Application Workflow
This section describes the application workflow.
Setting Up Pre-Pack Configuration Runs
Pre-pack configurations are expected to be run based on user-initiated runs using the Pack Configuration Create Run task.
Figure 14-3 Create Run Task
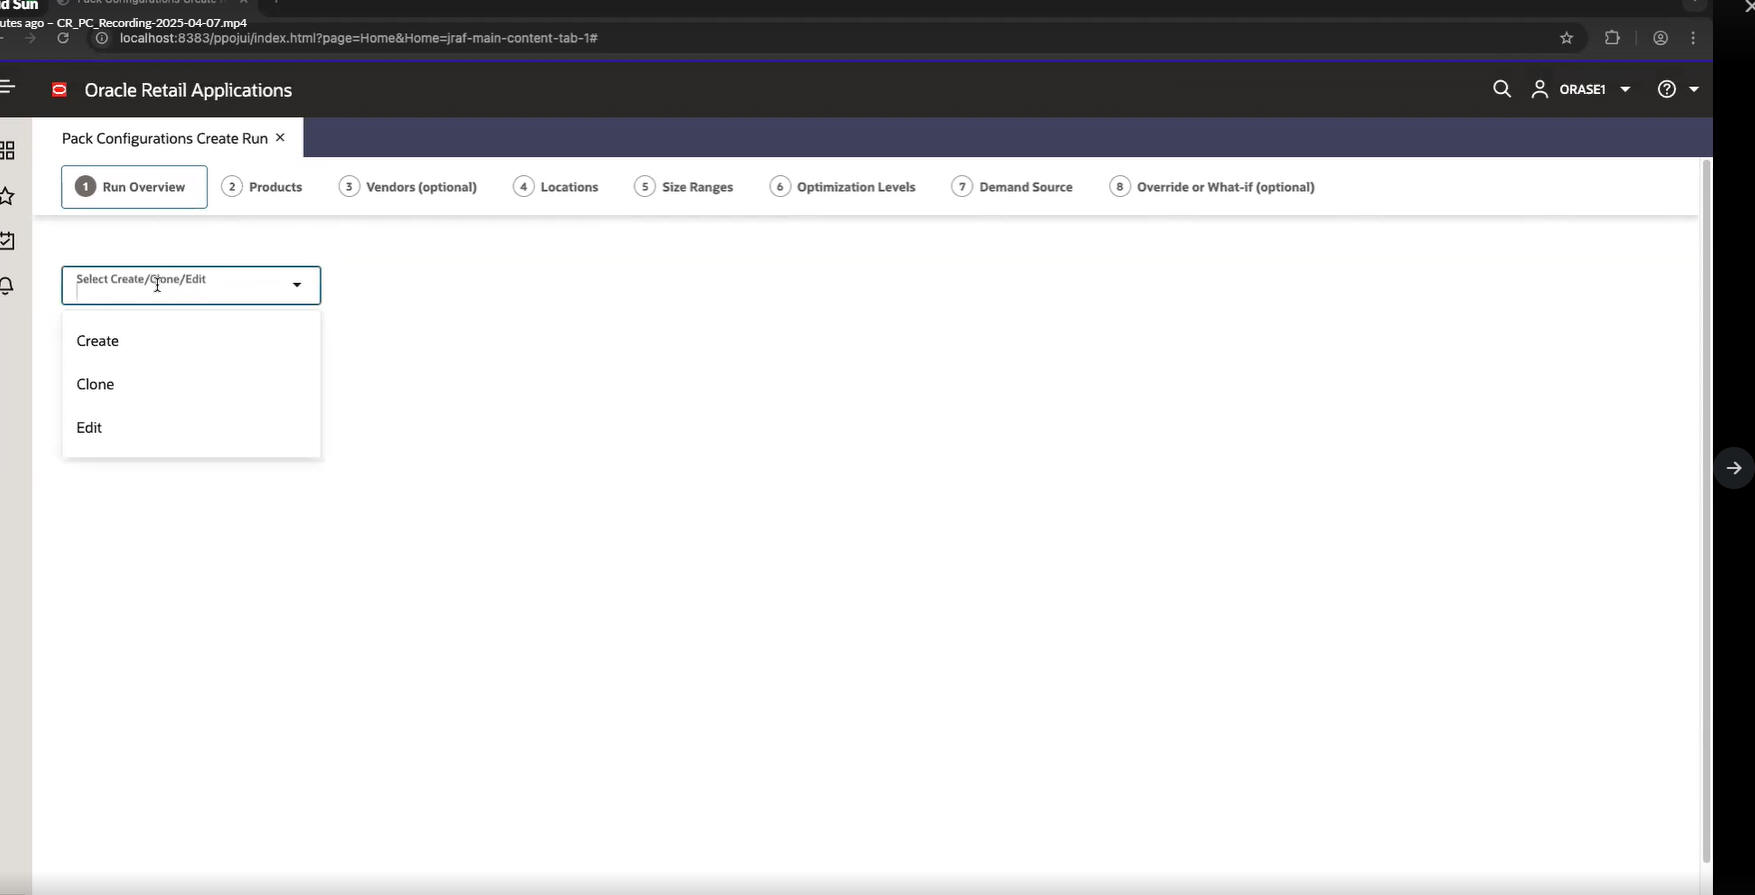
You can choose to create a new run or edit a draft run. As soon as a selection is made, the screen refreshes with the following options:
Figure 14-4 Create Run Options
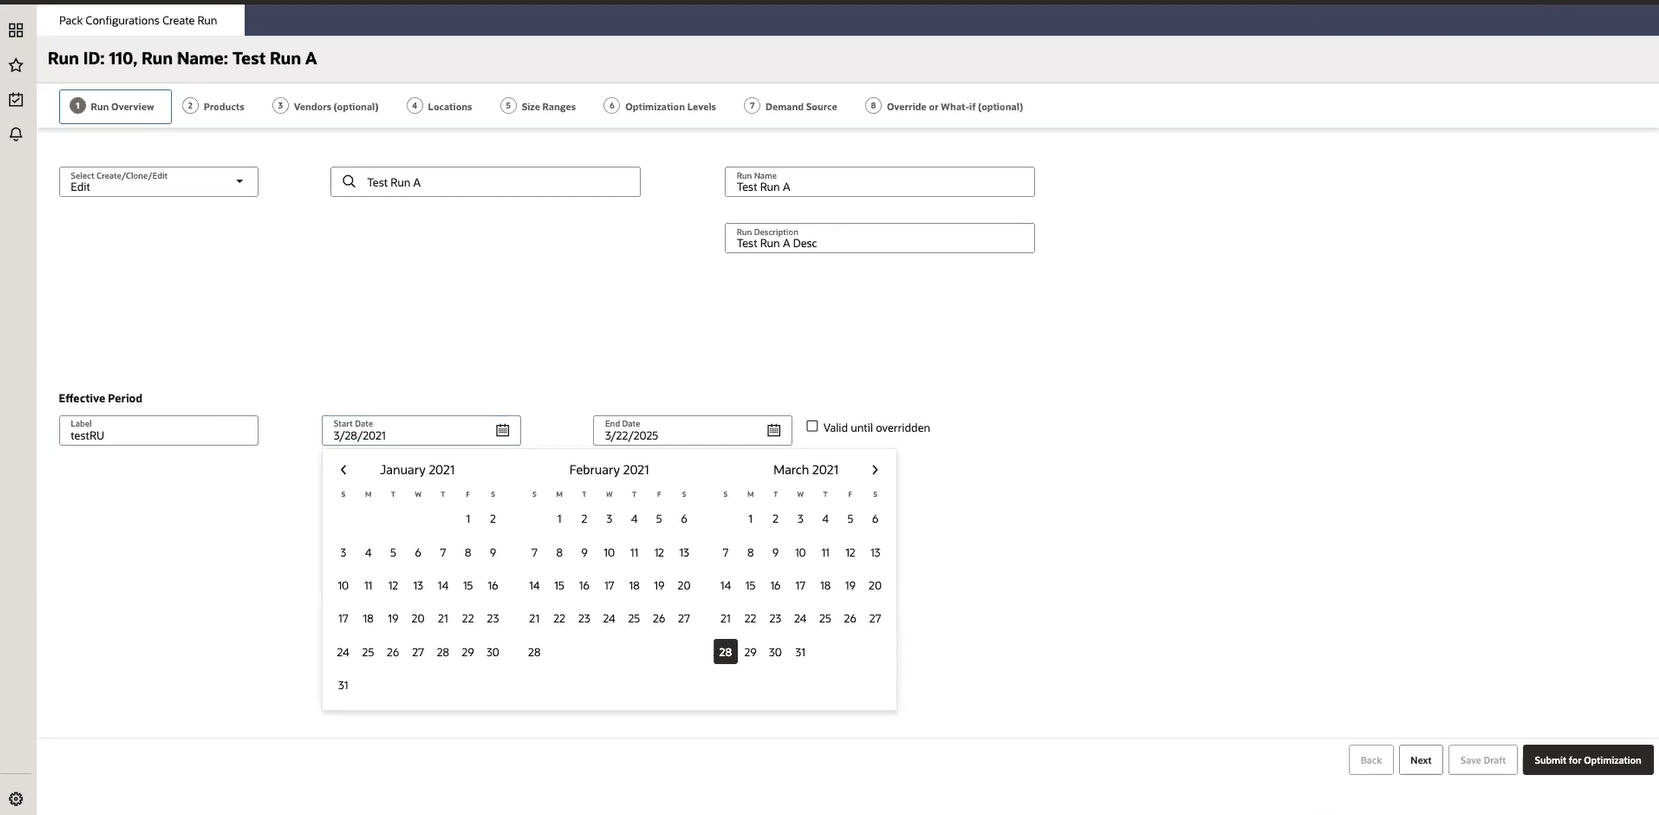
- Run Name is a user-entered label that is used throughout the application to reference a given run. The Run description allows you to provide some additional description about the run.
-
The Effective Period Label gives you a way to track the period for which these pack configurations are effective, which could be the Season such as “Fall 2028” as an example. Selected Start and End dates denote the effective time periods. The option for Valid Until Overridden when checked indicates that the Pack Configuration is effective until superseded by another Approved Pack Configuration (from a different Run or a scenario).
The effective periods are used in the following places:
-
When Creating a Run (in the optional override/what-if tab), other available pack configurations are displayed based on the effective product/location/vendor/size range and effective period.
-
When Approving Runs, you can choose to filter Pack Configuration runs based on the time period they are effective for.
-
- System auto-saves any WIP/ Draft Runs that did not get submitted when you exit the screen. All Draft runs can be found in the Run Queue screen.
Select Products
Figure 14-5 Select Products
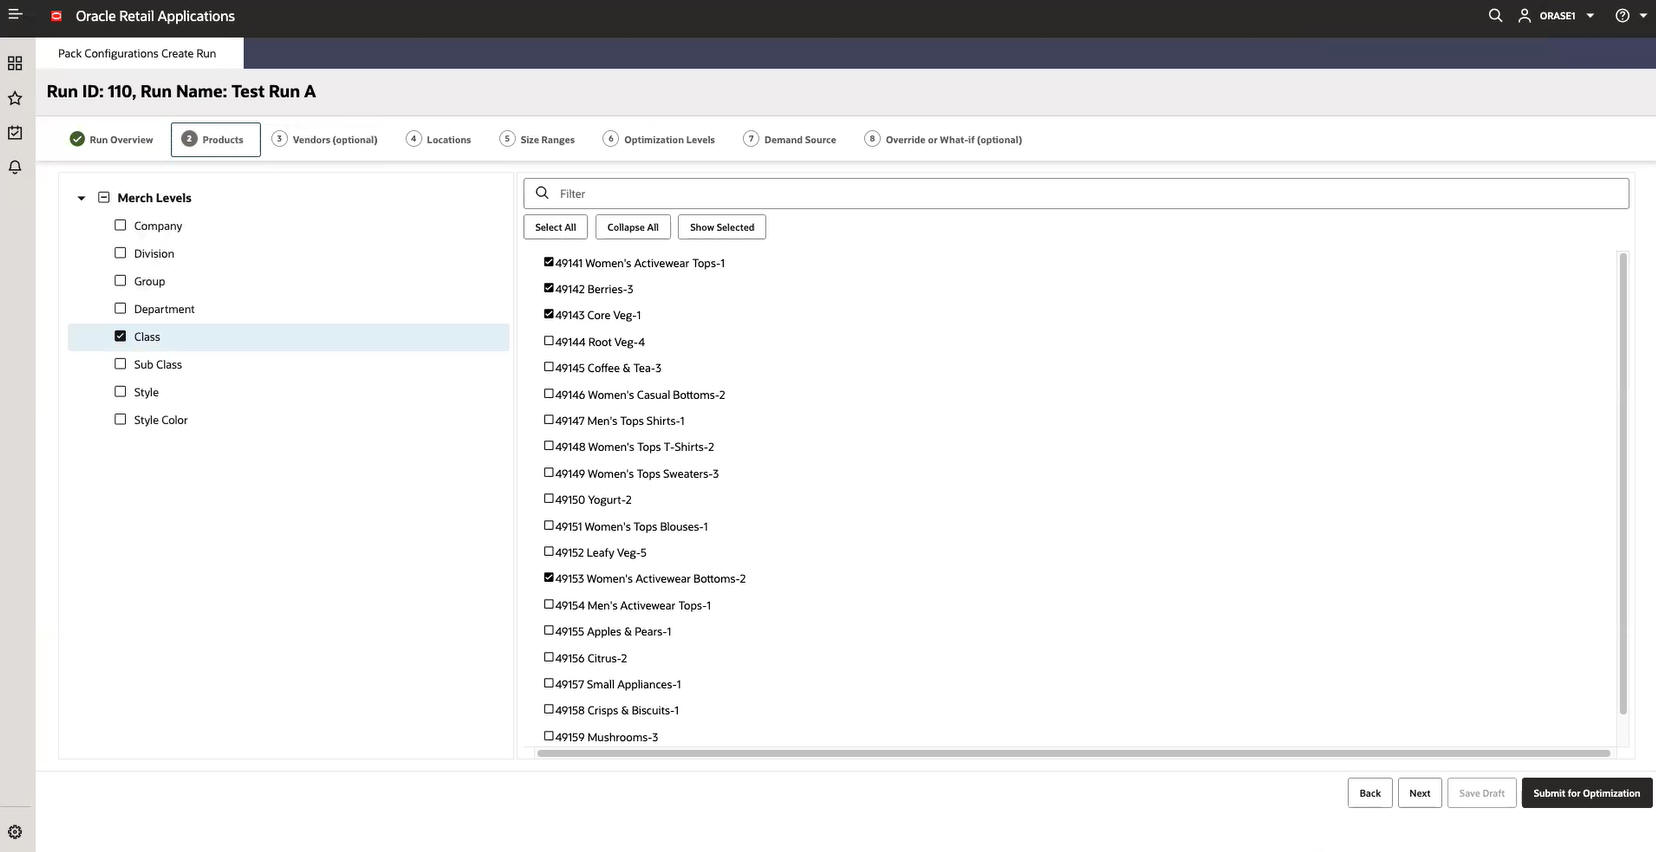
Products can be selected from any level. Lowest level is Style Color. Typical expected usage is Selection at the Department or Class level.
The selected products' (further filtered by vendors, locations, and size ranges) demand source will be included when generating pre-pack configurations.
Note:
Demand Source is explained below. Note also the selected Products, Locations, Vendors, and Size Ranges define the Scope of a run and when combined with the Optimization Level, determine how many pre-pack configuration sets are generated.Select Vendors
Figure 14-6 Select Vendors
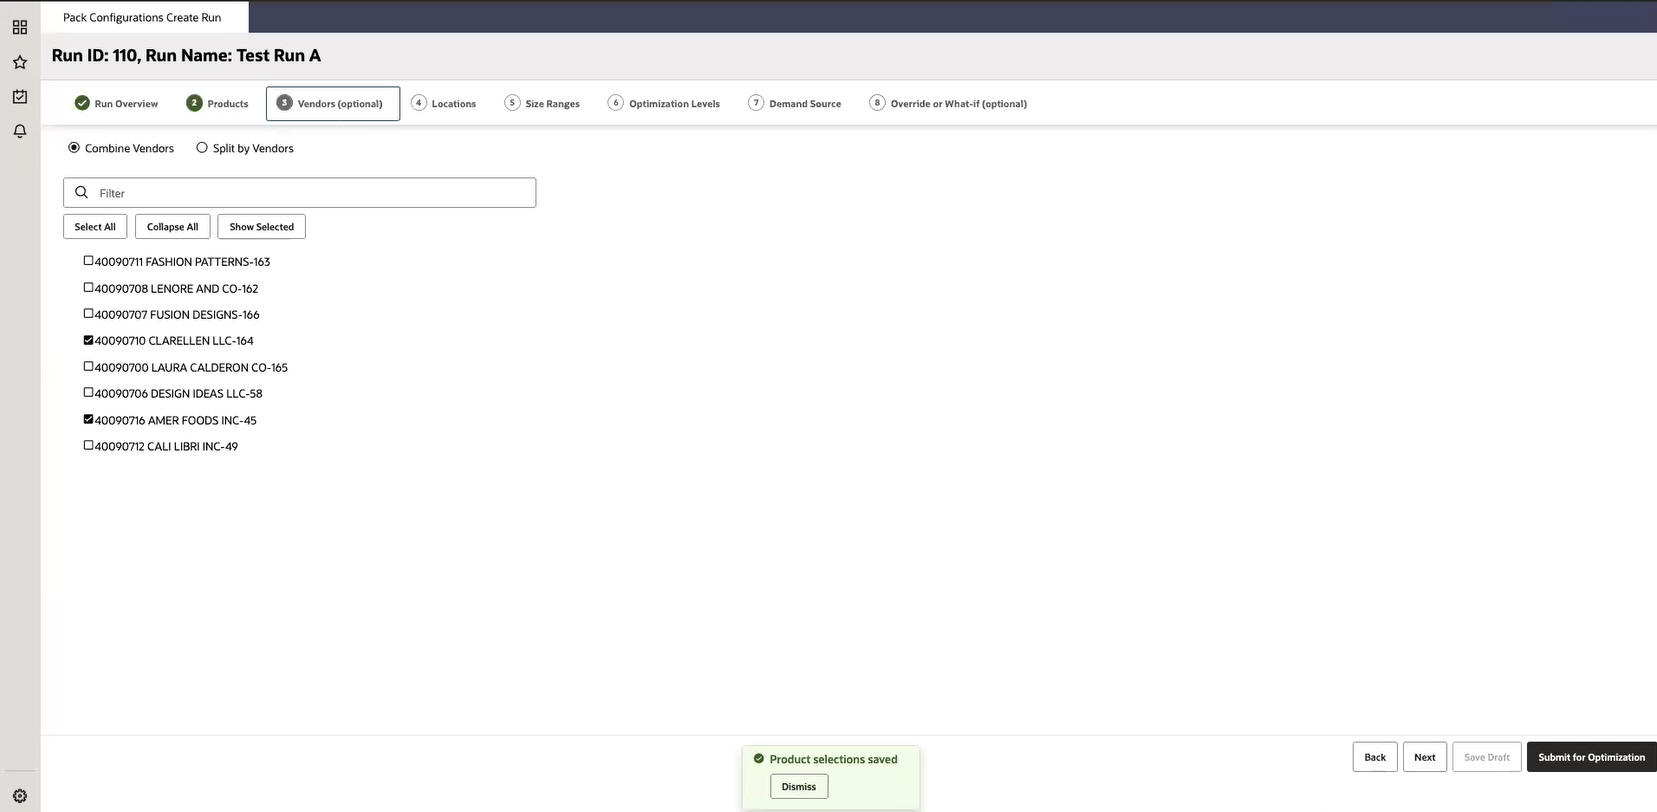
This is an optional step and the choices presented are pre-filtered based on selected Products. You can make the following choices:
-
Select vendors.
-
Toggle between Combine Vendors and Split by Vendor:
-
Select all and Combine Vendors means the system will generate non-vendor specific pre-packs.
-
If some vendors are selected and Combine Vendors is checked, the system will generate a single set of pack configuration sets for all selected vendors combined. For example, if only Vendor A and Vendor B are selected out of the choices for Vendor A,B,C, Pack Configuration Sets are generated for Vendor A and B combined. An example usage for this could be when multiple alternate vendors exist for a product area, but it is required to have common packs for them all because the demand characteristics of the products are consistent across vendors.
-
Split by Vendor means pre-packs will be generated specific by Vendor for all selected vendors.
-
Select Locations
Figure 14-7 Select Locations
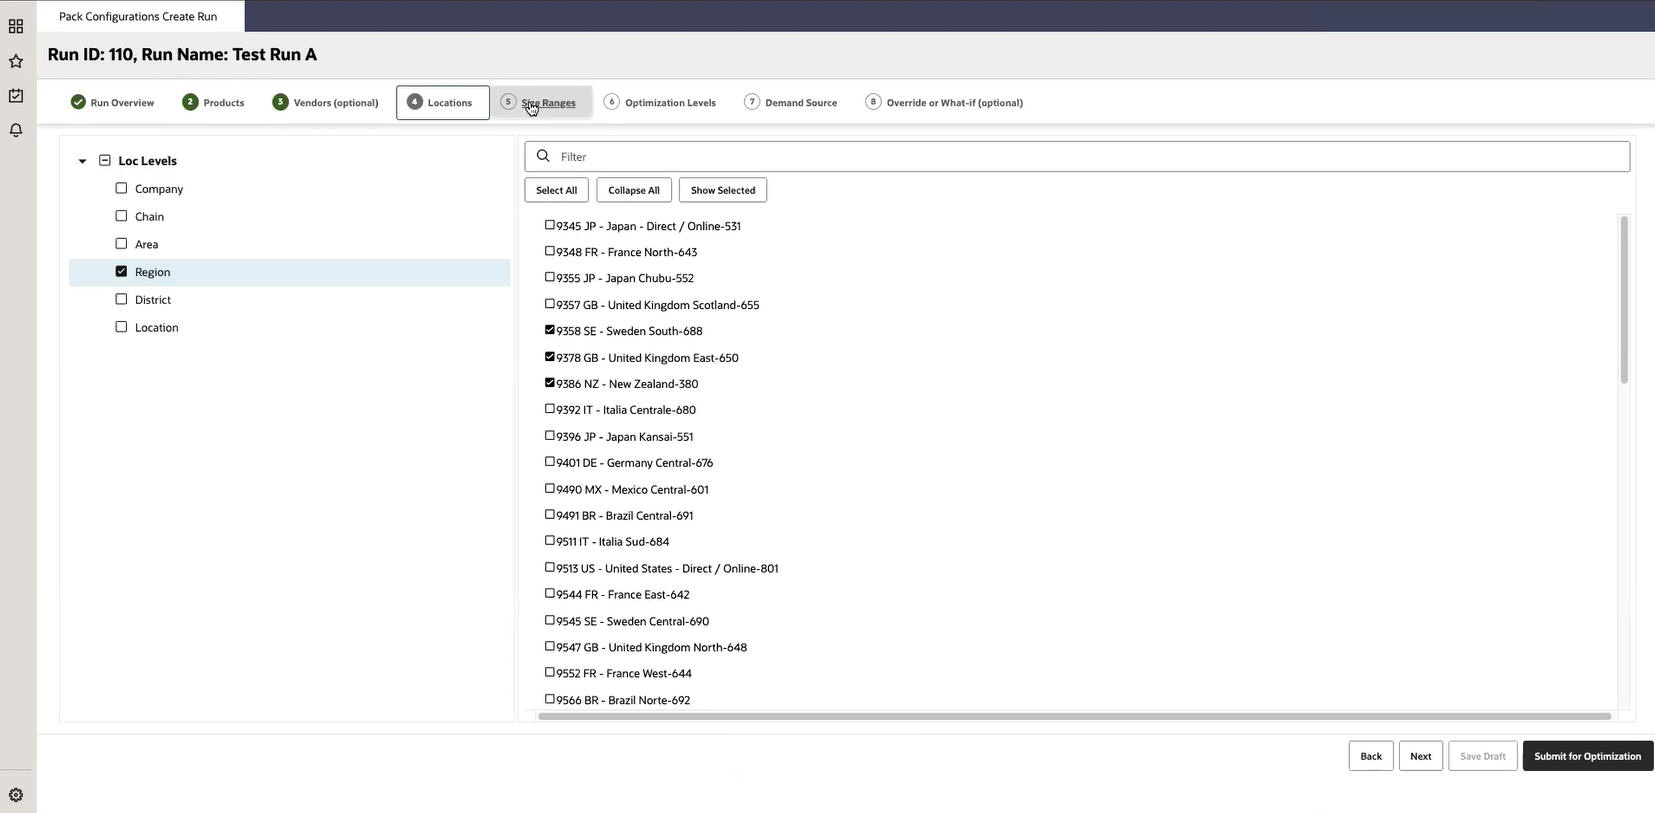
Locations selected are included for the Pack Configuration Optimization.
The selected locations' (further filtered by selected products, size ranges, and vendors) demand source will be included when generating pre-pack configurations.
Note:
Demand Source is explained below. Note also the selected Products, Locations, Vendors, and Size Ranges define the Scope of a run and, when combined with Optimization Level, determine how many pre-pack configuration sets are generated.Select Size Ranges
Figure 14-8 Select Size Ranges
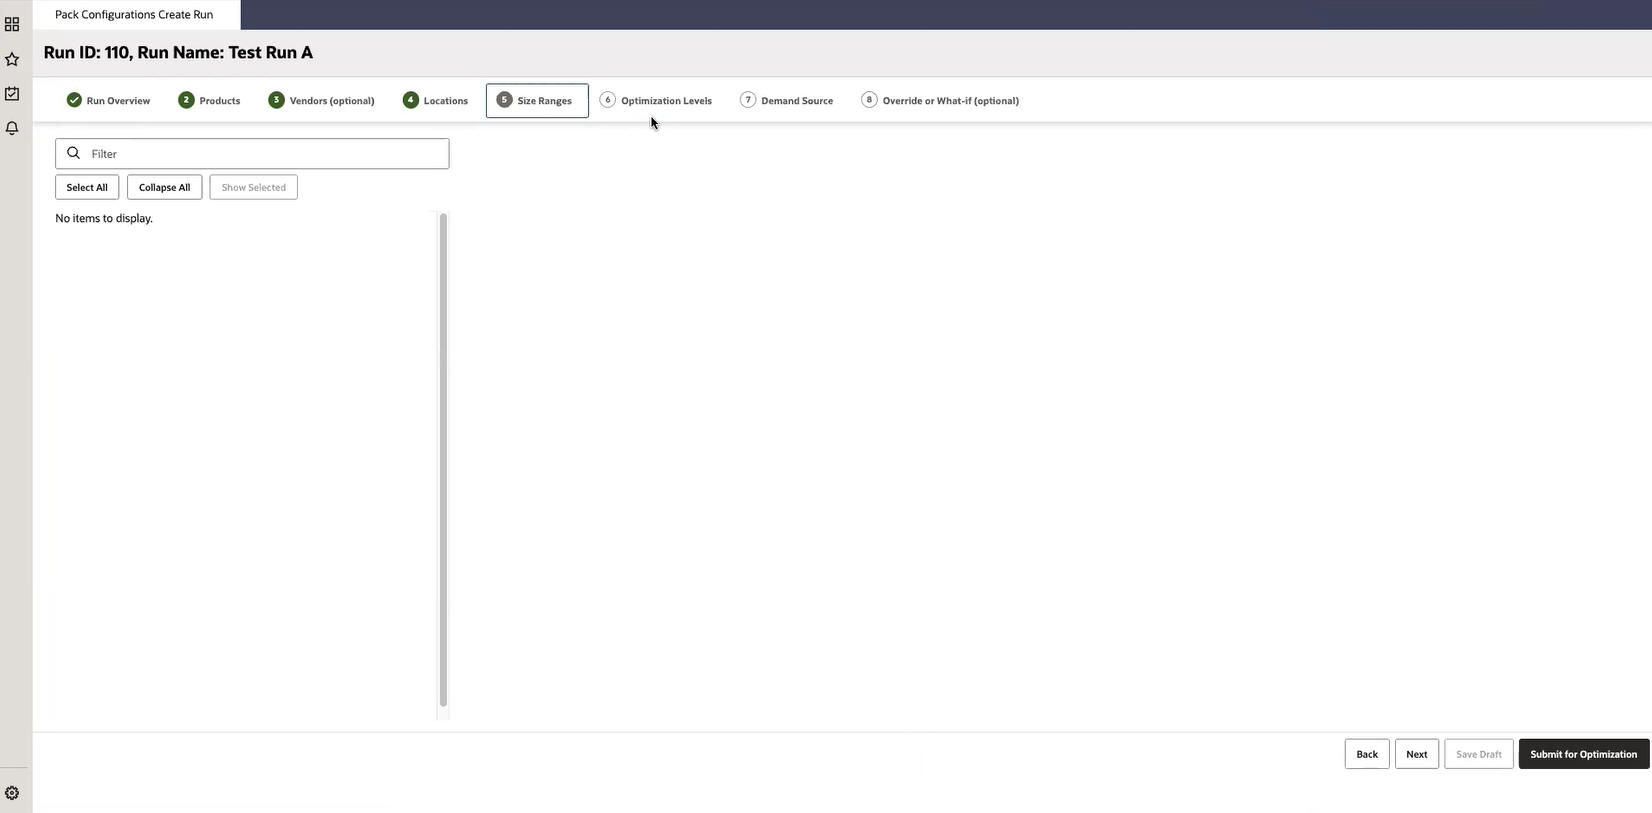
Size Ranges provided are pre-filtered based on selected Products and Locations.
Select Optimization Level
Figure 14-9 Select Optimization Level
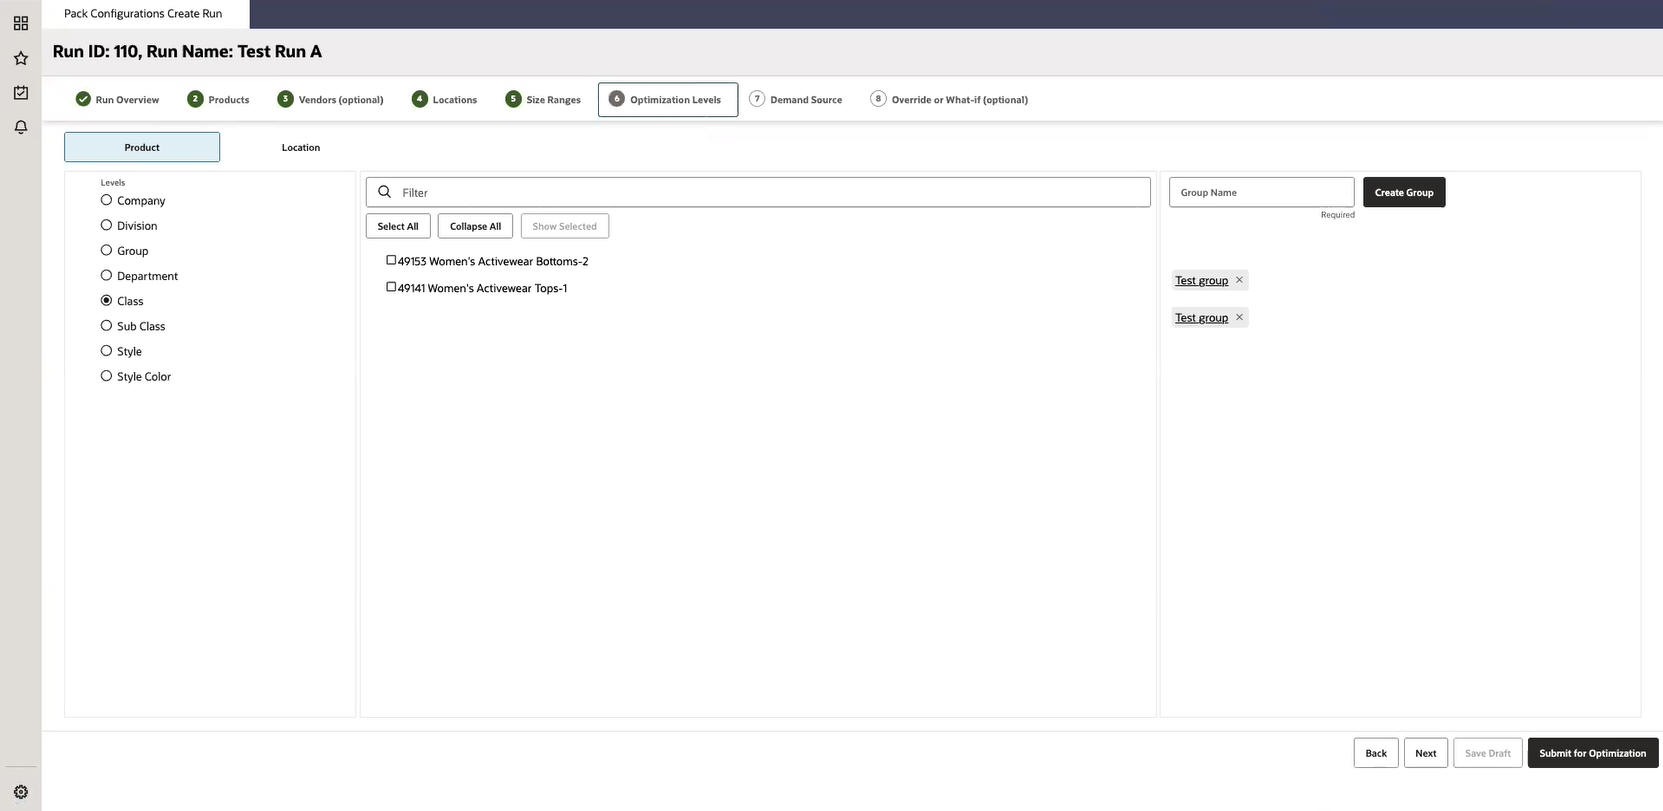
The Optimization level drives the level at which Pack Configuration sets are generated. All selected Products and Locations are then grouped by or aggregated to the selected optimization level.
For example, if Dept A (Product) and Chain (Location) are selected in the Select Product and Select Location steps and the optimization level is specified as Class/Chain level, pack configurations are generated by Class for all Products in Dept A.
For example, if Styles 1,2, and 3 and Chain (Location) are selected in Select Product step and Select Location steps and the optimization level is specified as Class/Chain level, pack configurations are generated by Class but only including demand data from Styles 1, 2, and 3.
Select Demand Source
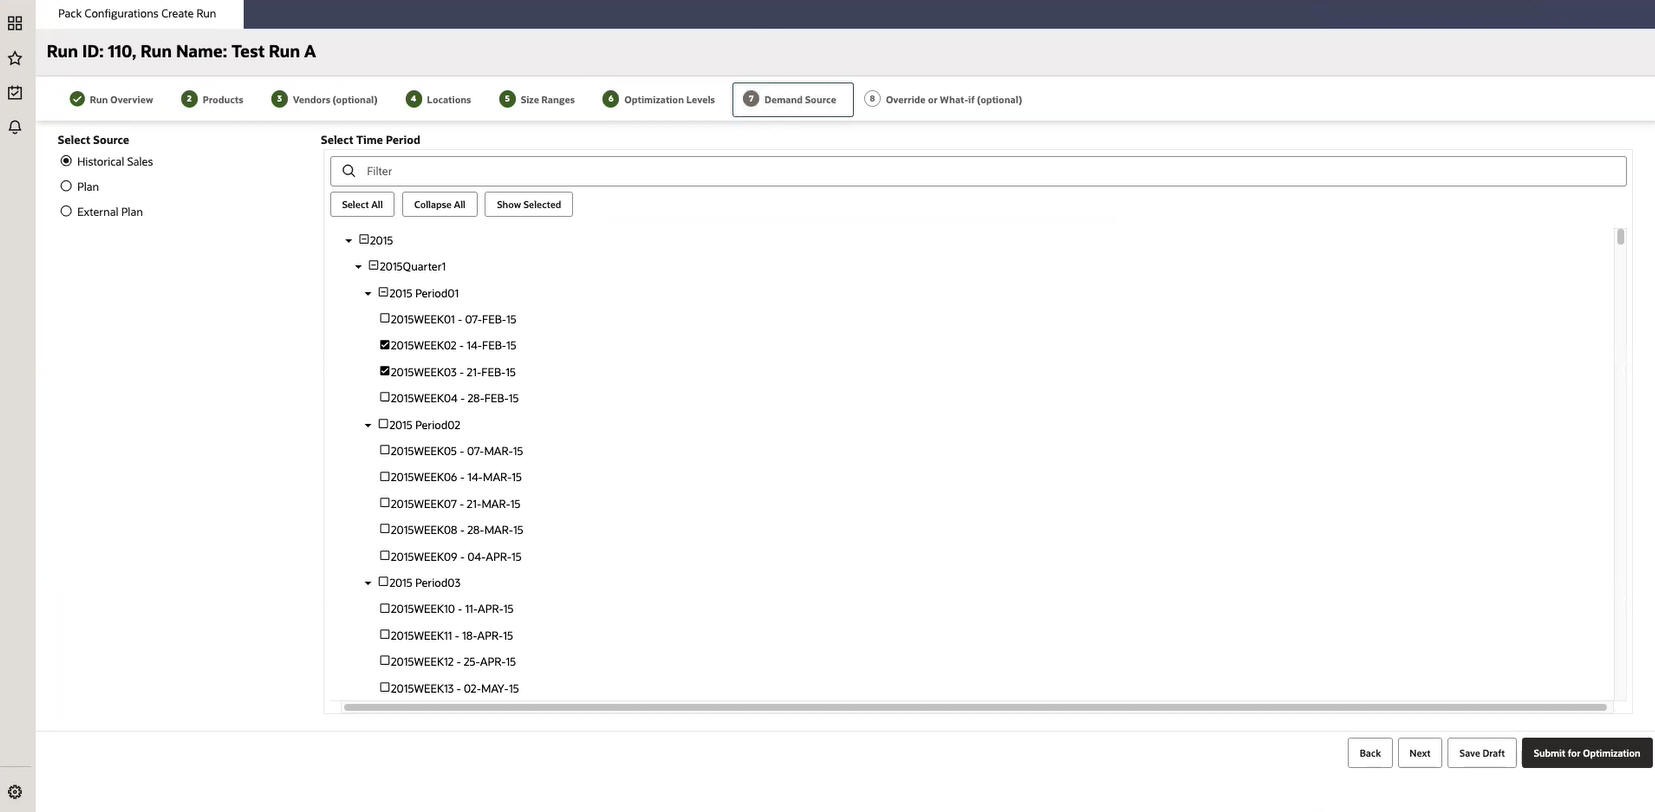
Demand Source can be selected to be either Historical Sales or External Plan. Once the demand source is selected, you can select the time periods to include.
These selections form the basis for generating pre-pack configurations recommendations. For example, when generating pack configurations for Women's Activewear for the next Fall season, it is expected that you select the relevant time periods from Historical Sales or External Plan. It is possible to select multiple weeks from the same selling period, for example, all fall weeks across multiple years.
Override and Clone (Optional)
This screen might take a minute or so to load, depending on number of prod/locs selected. The spinner displays the completion percentage.
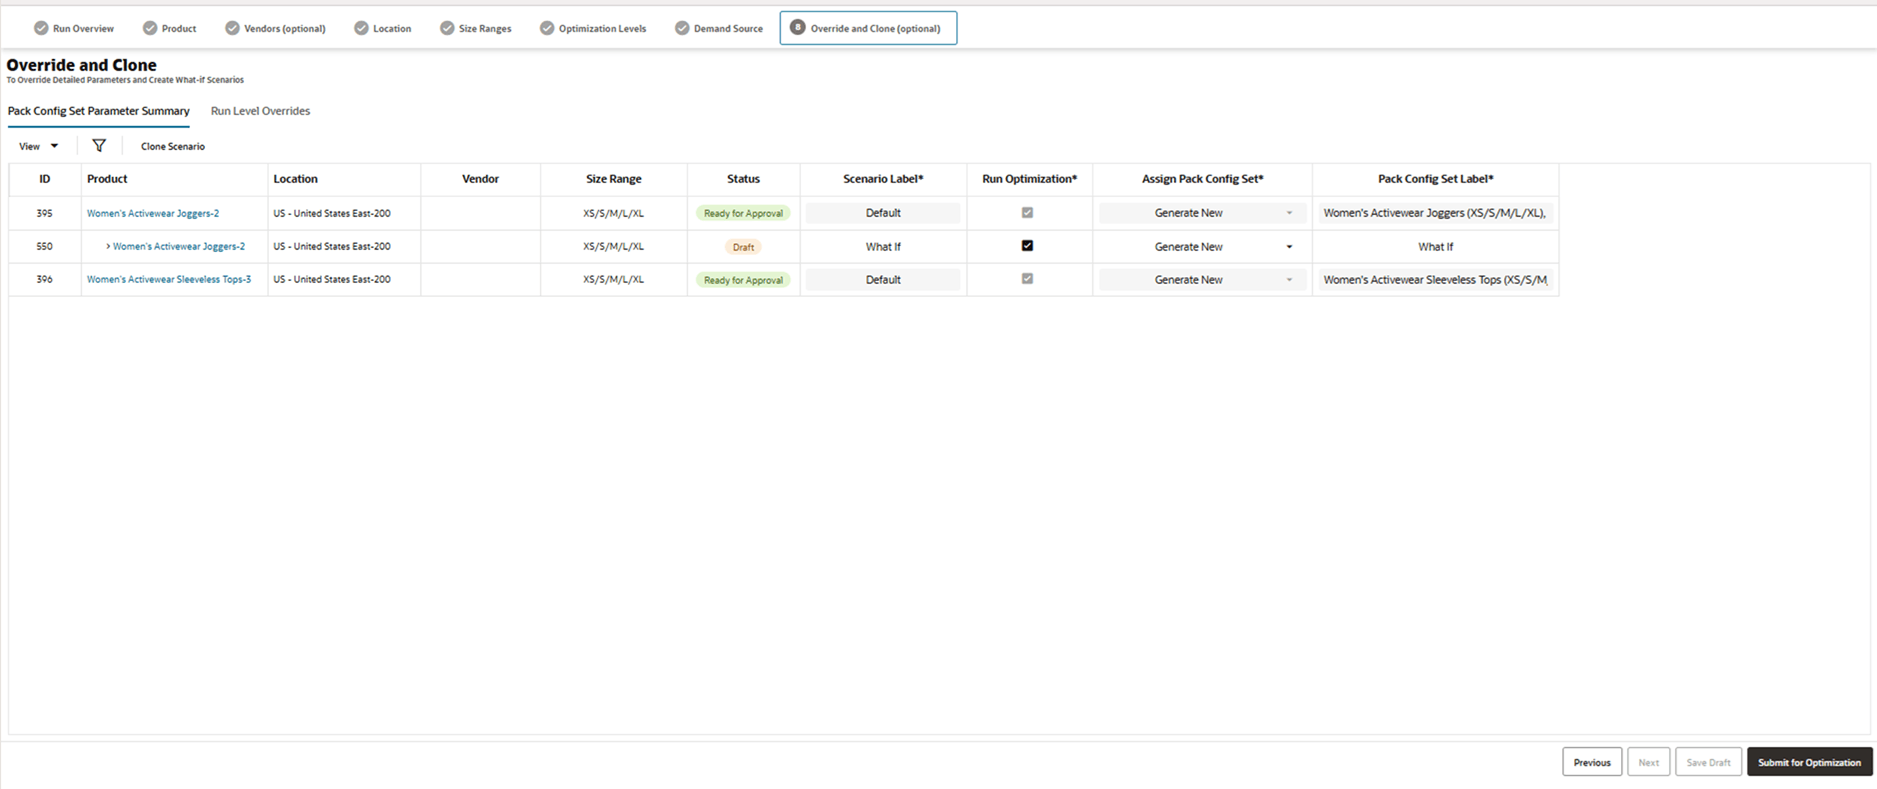
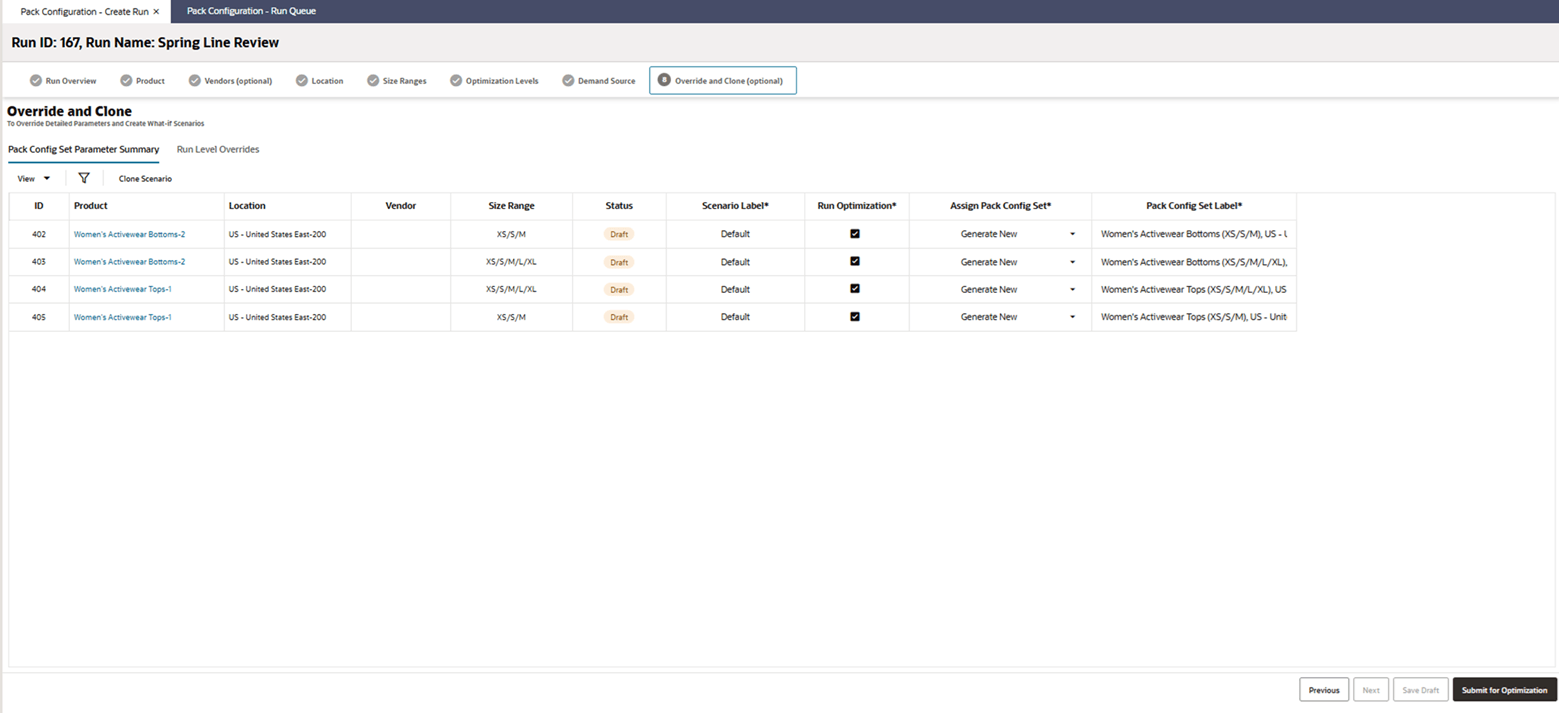
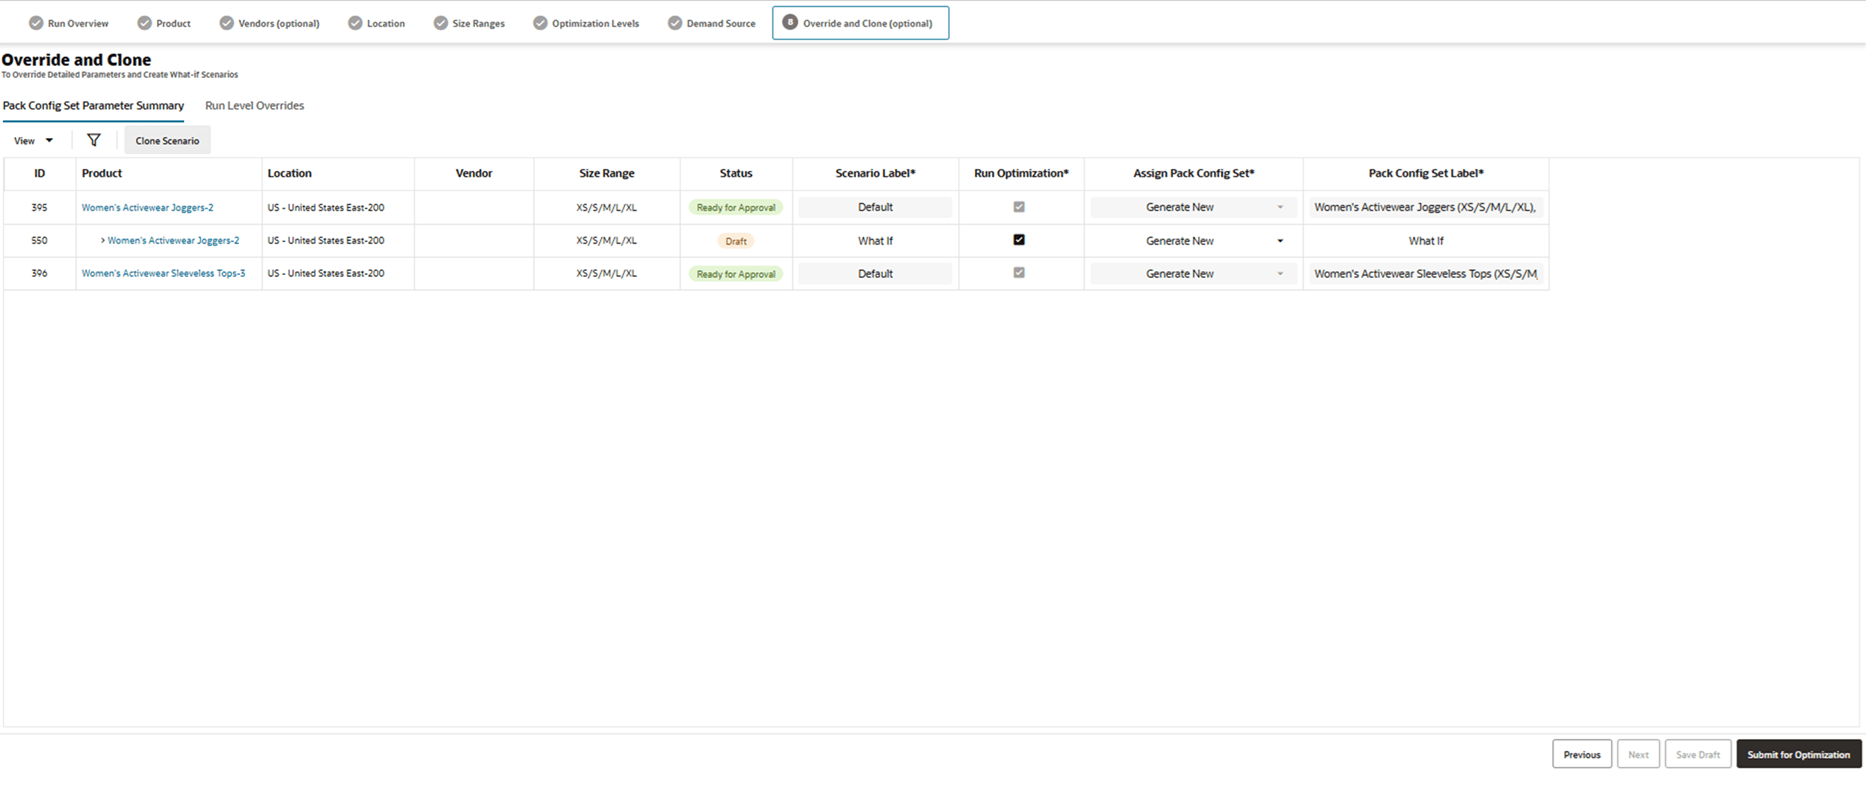
Once the screen loads, you can see a table filled with Pack Configuration Sets to be generated in this run. The table is generated based on the selections from the previous step, as explained in the preceding text. A single scenario is created for each Unit of Work or desired Pack Configuration Set with the scenario label defaulted. You have the option to relabel the scenario.
Each row corresponds to a desired Pack Configuration Set, when the table is initially created. You have the option to create additional rows in the table by cloning existing scenarios.
The Product Level and Location Level are dynamically determined based on the selections for Optimization Level. These are the first two column names in the table.
Labels with an asterisk indicate user-editable fields.
Pack Config Set Label is auto-generated based on the combination of Product/Location/Size Range/Vendor values. You have the option to override them. The label can then be used when reviewing and approving Pack Configurations in the Review and Approve flow.
Assign Pack Config Set defaults to Generate New.
Figure 14-10 Override and Close
Overriding Parameters at the Run level
Figure 14-11 Override at the Run Level
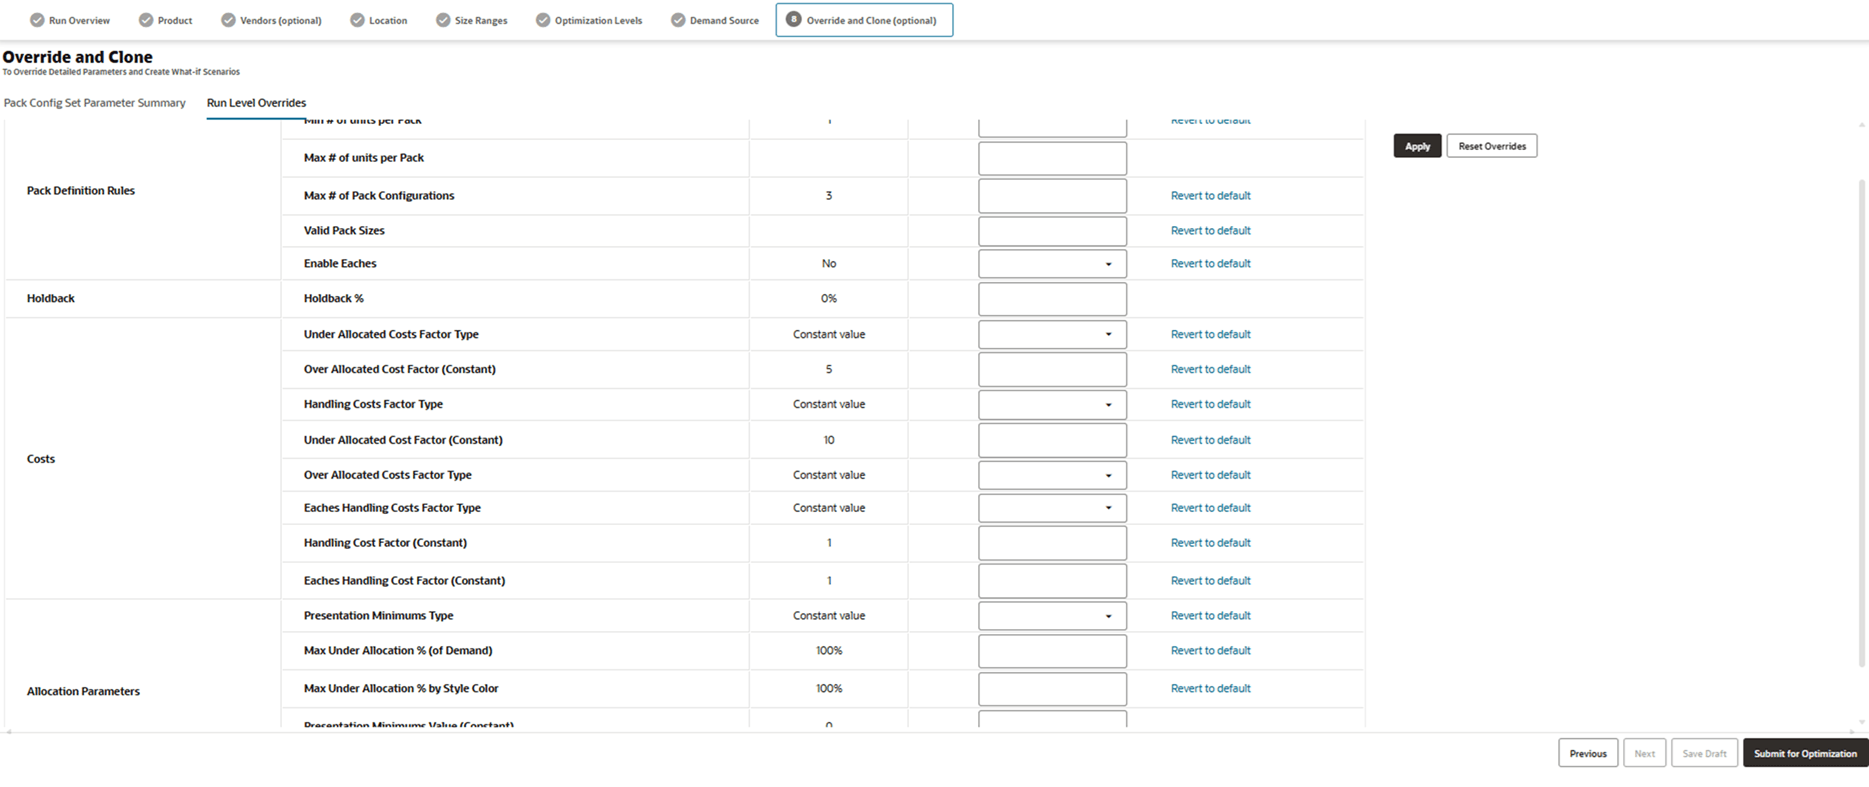
Four sets of Run level override parameters are available: Pack Definition Rules, Holdback, Costs, and Allocation Parameters.
Pack Definition Rules
These rules represent business constraints that need to be honored around how packs are recommended. These constraints could be due to constraints from the vendor or supply chain constraints around the ability to handle certain sizes of packs.
Max number of Pack Configurations: This value is set to indicate to the system not to try more pack configurations than this during optimization. This is helpful to ensure the optimization runs within acceptable and realistic search space and therefore does not unnecessarily process unrealistic scenarios. Within this, the optimizer will recommend the optimal number of Pack Configurations.
Minimum total units per pack: This is to be set based on vendor and supply chain constraints.
Maximum total units per pack: This is to be set based on vendor and supply chain constraints.
Valid Pack Sizes ladder: This allows you to enter a list of acceptable values such as 4,6,8,10,13,14.
Enable Eaches: If this is set, the optimization will fill the remaining demand outstanding after allocating packs with Eaches.
Holdback
This allows you to simulate situations where it is best practice to holdback a % of the demand at the Warehouse to replenish in eaches to stores, based on in-season sales. It is possible for you to simulate different holdback scenarios to see the difference in recommended pack configurations.
Holdback%: A % value of demand to be used as held back demand. For example, if this value is set to 30%, then 70% of the total demand (from the user selections of time period for the optimization level) are used for Pack Optimization. The remaining demand is assumed to be fulfilled in Eaches.
Allocation Constraints:
These allow you to impose constraints for the mock allocation to ensure presentation minimums are met and style colors and stores do not get under allocated below an acceptable threshold even if it may be sub-optimal to do so at an aggregate level.
Max Under Allocation % by Style Color: When the system performs the mock allocation, it computes the misallocation at each SKU and Store level. Misallocation is percent of demand that was either over or under allocated relative to the SKU/Store demand. This misallocation% is recomputed at the Style Color level by computing the total misallocation across all SKU/Stores in the Style Color and comparing it to the demand at the Style Color. This parameter value imposes a maximum acceptable threshold on this. This can be used a guard rail to ensure no Style Colors are excessively used.
Max Under Allocation % : This parameter value imposes a maximum acceptable threshold on the percent of misallocation computed as the total misallocation across all stores aggregated up relative to the total demand. This can be used as a guard rail to ensure overall misallocation stays within a threshold even when it may be more efficient to misallocate demand rather than incur additional distribution costs.
Presentation Minimum: If it is required that a minimum quantity of each SKU is sent to each store, this value can be set. For example, this would be useful to maintain presentation standards at the launch of an assortment at the beginning of the season. Note that this parameter can be overridden at the Size level, for example, it is possible to specify this for only some core sizes rather than all SKUs. In that case, this will be indicated by a pre-populated value. If any changes are made in this screen tab, any size level overrides will get overridden.
Costs
These are cost factors that the optimizer considers when balancing tradeoffs.
Under Allocated Costs Factor Type: This currently defaults to Constant.
Under Allocated Costs Factor: Specifies the factor by which every under allocated unit gets multiplied by, when the optimizer computes the over allocation cost for any scenario it evaluates. Recall that the optimizer tries to minimize the net objective cost and it is computed as the sum of Over Allocation Cost, Under Allocation Cost, and Handling Cost.
Over Allocated Costs Factor Type: This currently defaults to Constant.
Over Allocated Costs Factor: Specifies the factor by which every over allocated unit gets multiplied by, when the optimizer computes the over allocation cost for any scenario it evaluates. Recall that the optimizer tries to minimize the net objective cost and it is computed as the sum of Over Allocation Cost, Under Allocation Cost, and Handling Cost.
It may be considered that the cost of over allocating is different from cost (increased markdowns) of under allocating (lost revenue). Hence this level of flexibility is provided.
Handling Costs Factor Type: This currently defaults to Constant.
Handling Costs Factor: Specifies the factor by which every pre pack gets multiplied by, when the optimizer computes the handling cost for any scenario it evaluates. Recall that the optimizer tries to minimize the net objective cost and it is computed as the sum of Over Allocation Cost, Under Allocation Cost, and Handling Cost.
Eaches Handling Cost Factor: Specifies the factor by which every single item (also called Eaches) gets multiplied by, when the optimizer computes the handling cost for any scenario it evaluates. It is possible that it may be less or more laborious to handle eaches compared to handling pre-packs, hence this level of flexibility is provided. Recall that the optimizer tries to minimize the net objective cost and it is computed as the sum of Over Allocation Cost, Under Allocation Cost, and Handling Cost.
Saving overrides at the run level: Once you click Apply, this spreads the override values to all scenarios. Note that any previous scenario level overrides will then get overridden. Hence it is important that you set parameters at the Run level first and then perform any scenario specific overrides.
The Reset Overrides automatically overrides any user-entered values with Default values. This is an easy way to undo any work in progress edits and start over.
Overriding Parameters at the Scenario level:
Figure 14-12 Pack Configuration Set and Size Level Overrides

Pack Configuration Set level Overrides: Parameters provided are similar to the Run level overrides. For details, see above.
Figure 14-13 Pack Configuration Set and Size Level Overrides
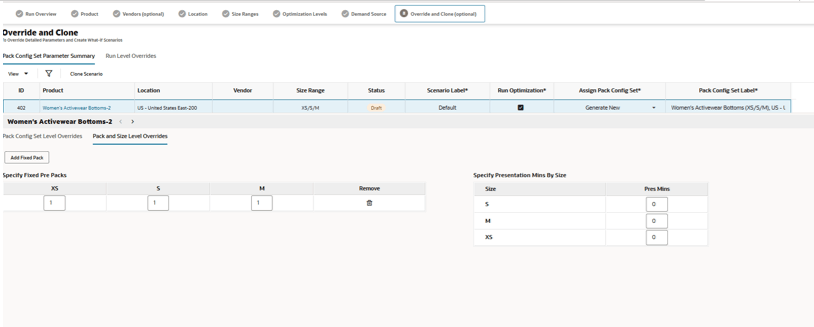
Fixed Pre-Packs
These pre-packs, if specified, are used by the optimizer as given. The user has the option to create additional rows to specify fixed pre-pack configurations by clicking the Add Fixed Pack button.
Presentation Minimums by Size
See above for details on Presentation Minimums. It is possible to override or specify these at the size level here.
Note that parameters are saved for approved scenarios and used for subsequent runs.
Creating Additional Clone Scenarios
After selecting a scenario or Unit of Work in the table, the Clone Scenario button is enabled. Clicking it prompts you to enter a Scenario Label and once you click OK, it creates a new row in the table with all the same values as the parent scenario other than the Scenario label. You can then go to the override drawer to make scenario specific overrides.
Figure 14-14 Override and Clone
Run Queue
Once a run is submitted for Optimization, it gets queued for batch execution. It is possible to view the status of the run from the Run Queue which has the following valid statuses:
- Draft (when a run is being defined but not yet submitted)
- Preparing (where the data is being prepared for the Override/What if screen - Run is not clickable in this state)
-
Ready (Ready for user review and optional additional scenarios)
When a Run is Draft or Ready status, it is possible to click the Run to see Scenario level details. Scenarios have the following statuses:
- Draft (when a scenario being defined but not yet submitted)
- Validation error (one or more conflicts in the specified override values)
- Preparing (where the data is being prepared)
- Queued for Execution
- Run in progress
- Ready for Approval
- Ready for Approval with Errors (Completed and some not all Desired Pack Configuration Sets had errors)
- Errored
Figure 14-15 Pack Configuration
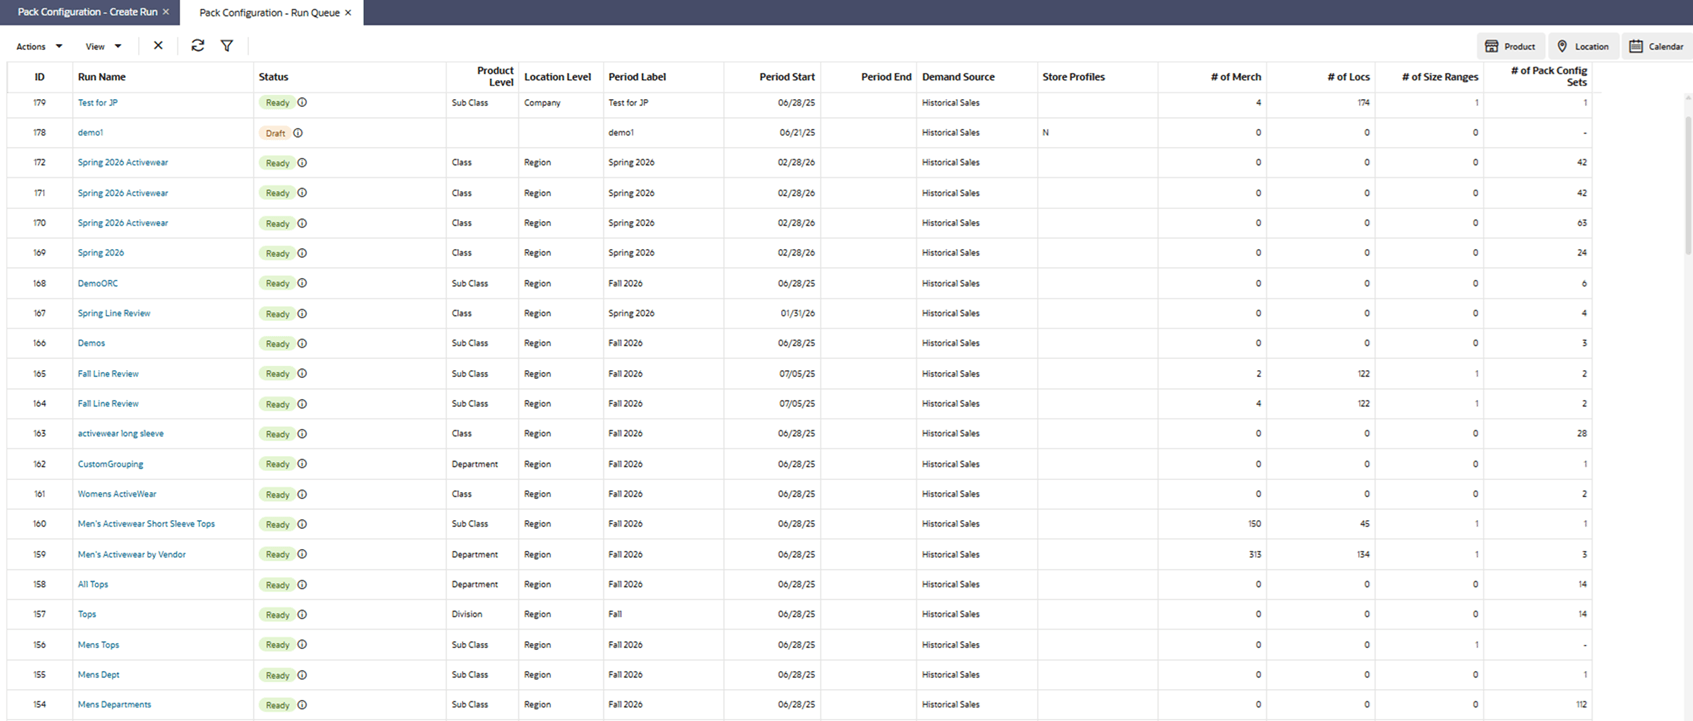
By clicking a run, user can launch into details of the run that includes the scenarios in the run, their statuses, and so on. It is possible for the user to create additional scenarios and submit for optimization if they so desire.
Figure 14-16 Override and Clone
