Assigning User Labels and Reviewing Machine Labels
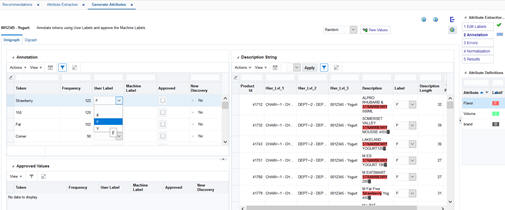
On the top left of Unigraph screen, you see the Annotation section that contains a table listing all tokens along with the following fields:
Table 6-1 Annotation Fields
| Field | Description |
|---|---|
|
Frequency |
The number of times the token appears across all product description strings |
|
User Label |
The label you have assigned to the token |
|
Machine Label |
The label recommended by the machine learning algorithm |
|
Approved |
A check box used to approve and apply the machine label to the token |
|
New Discovery |
A Yes/No flag that indicates whether or not the machine-recommended label is a new discovery from the most recent run |
In the Annotation section, shown in Figure 6-4, you can perform one of the following tasks for each token:
Table 6-2 Annotation Section Tasks
| Task | Description |
|---|---|
|
Change/assign the user label |
Select a value from the drop-down menu to change the label or assign a label to a token. (Values in the drop-down menu are the attribute labels that you defined in the Edit Labels tab.) The user label is applied to all instances of the token across all product description strings. |
|
Approve a machine label |
Check the Approve check box to assign the machine-recommended value to a token. Once you check the box, the token with the approved machine label is moved from the top tables to the bottom table (the Approved Values section). |
Figure 6-4 Annotation Tab with Label Tokens in Unigraph Screen

Description of "Figure 6-4 Annotation Tab with Label Tokens in Unigraph Screen"
The Approved Values section on the bottom left displays the tokens that you have approved so far. You can uncheck the Approve check box in this section to remove the approved machine label and move the token back to the top table.
The Description String section on the right side of the Unigraph screen displays all description strings that contain a token selected on the left, along with the length of the strings and position of the selected token in the string, as well as the product hierarchy. The Label column is populated based on the user label or approved machine label for the token. All labeled tokens are colored based on the colors you assigned in the Edit Labels tab. The token selected on the left (in the Annotation section) is shown using a bold font.
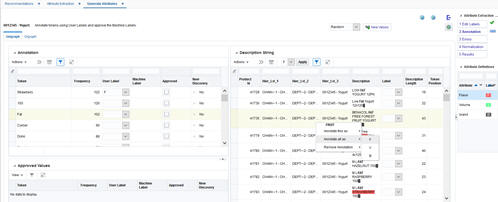
You can perform one of the following tasks in the Description Strings section:
Table 6-3 Description Strings Section Tasks
| Task | Description |
|---|---|
|
Change or remove the label for one instance of the selected token |
Use the inline drop-down menu in the label column to change or remove the label of the token in a particular description string. Alternatively, right click on any token and use the first option in the menu (Annotate this as) to assign a label to a particular instance. Use the third option in the menu (Remove Annotation -> Remove this label) to remove the label for a particular instance |
|
Change or remove the label for multiple instances of any of the tokens |
Select multiple rows using the Ctrl or Shift keys. Then, change the label using the drop-down list at the top of the table and click Apply. To remove the label for multiple rows, change the label to NULL by selecting the first option in the drop-down list at the top of the table. Alternatively, to change or remove the label for ALL instances of a token, right click on any token and use the second option in the menu (Annotate all as) to assign a label to all instances, or use the third option in the menu (Remove Annotation -> Remove all labels) to remove the label for all instances. Example: if you wish to change the label of a token for all products that belong to a certain department, you can first filter the hierarchy columns based on department. Then, select all of the rows using the Shift key and change the label for all selected rows using the drop-down list at the top of table and click Apply. |
