Assigning User Labels to Digraphs
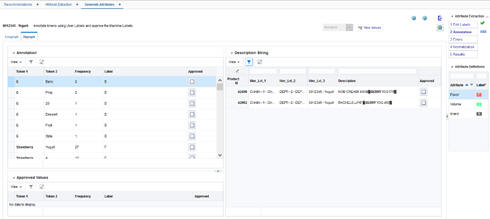
On the top left of Digraph screen, you see the Annotation section that contains a table listing all combinations of adjacent tokens (labeled as "token1" and "token2") where exactly one of the two tokens has been labeled and the other token has no label assigned or approved. The token that already has a label is shown using a bold font.
Other fields in this section are as follows:
Table 6-5 Diagraph Fields
| Field | Description |
|---|---|
|
Frequency |
The number of times that the two tokens are adjacent to one another across all product description strings. |
|
Label |
The label you have assigned to or approved for one of the tokens. (The token that is shown in bold font already has this label.) |
|
Approved |
A check box used to approve and apply the label of labeled token to the unlabeled token. |
If you think the two tokens are of the same attribute type indicated by the label, check the Approved check box to apply the label to both tokens. Once you check the box, the approved row is moved from the top table to the bottom table (the Approved Values section).
The Approved Values section on the bottom left displays the adjacent tokens that you have approved so far. You can uncheck the approve check box in this section to remove the approved row and return it to the top table.
The Description String section on the right side of the Digraph screen displays all description strings that contain the adjacent tokens selected on the left, as well as the product hierarchy. All labeled tokens are colored based on the colors you assigned in the Edit Labels tab. The two tokens selected on the left (in the Annotation section) are shown using a bold font.
You can do one of the following in the Description Strings section:
Table 6-6 Description Strings Section Tasks
| Task | Description |
|---|---|
|
Remove the label of the originally unlabeled token for one instance |
If you believe the combination of two tokens must not be labeled the same in one or few description strings, un-check the Approved check box to remove the label for the token that was not originally labeled. Note that the token that was originally labeled (i.e., the token displayed in bold font in the Annotation section on the left) remains as labeled and is not affected. |
|
Change or remove the label for one or all instances of any of the tokens |
As with the Unigraph screen, you can use the right click menu on any token and use the Annotate this as option to assign a label to a particular instance or use the Annotate all as option to assign a label to all instances of the token. To remove the label for a particular instance or all instances of the token, use Remove annotation -> Remove this label and Remove annotation -> Remove all labels. |
