4 Access Setup for the Credential Exchange Service
Before you can use the Credential Exchange Service, you must obtain OAuth 2.0 credentials that authorize access to it. These access credentials are distinct from the schema or wallet credentials returned by the service itself.
There are two parts to using OAuth 2.0 with the service:
- Creating an OAuth2 Client
A one-time setup step where a client is registered with the authorization server and issued credentials (that is, a client ID and client secret). See Creating an OAuth 2.0 Client.
- Obtaining and Using Access Tokens
A runtime step. Each time you call the service, you must include a valid, unexpired token in the request header. See Generating an Access Token.
Setting Up Administrator Privileges to Oracle
If you do not have administrator privileges to Oracle Retail Home, you need to obtain them before setting up access. In order to obtain the privileges, you need to have permission to manage IAM users and groups in the OCI tenancy.
There are two sets of groups that control administrative access:
-
Production environments
RETAIL HOME ADMIN, PLATFORM SERVICES ADMINISTRATOR, PLATFORM_SERVICES_ADMINISTRATOR_ABSTRACT -
Non-production environments (STG or UAT)
RETAIL HOME ADMIN PREPROD, PLATFORM SERVICES ADMINISTRATOR PREPROD, PLATFORM_SERVICES_ADMINISTRATOR_ABSTRACT_PREPROD
Note:
These groups are pre-created by Oracle.Steps to Assign a User to an Admin Group
The following steps assume you are using the Redwood UI rather than the Classic UI.
- Sign in to the OCI Console for your tenancy. Use the identity domain where AI Foundation Cloud Service is deployed.
- From the left navigation menu, select Identity & Security > Domains.
- Click the domain where your AI Foundation Cloud Service is deployed. If you are unsure which one to use, ask your tenancy administrator.
- Click the User Management menu item. Groups are found at the bottom of the page.
- Search for and select the groups to which you want to assign the user:
- Production
- Non-production
- Both
- In the group details, click the Users menu item.
- Search for users by name or email. Select the appropriate user by checking the box next to their name, then click Assign user to group.
- Repeat for additional users and groups as needed.
Note:
It can take some time for group settings to propagate. It is not instantaneous. You need to log out of Oracle Retail Home and log in again before the group setting will take effect.Creating an OAuth 2.0 Client
OAuth2 clients are registered with an Oracle Identity Cloud Service (IDCS) server, not with individual AIFCS environments. This is a key architectural point: the client is associated with the IDCS server, and the server governs access to all environments under its domain (such as PROD, STG, and UAT). You may have two IDCS servers, one for production and one for non-production environments. The distinction matters.
As a result:
- A single OAuth2 client can be used to obtain access tokens that are valid for any environment managed by the same IDCS server. It does not matter which Oracle Retail Home environment you use to create the client so long as the environment is secured by the correct IDCS server.
- Any valid token issued by the IDCS server is accepted by the Credential Exchange Service across all of its environments secured by that server.
Note:
Only one OAuth2 client is required per IDCS server. There is no need to create separate clients for each environment.
This approach simplifies configuration and reduces operational overhead.
Steps for Creating a Client
In a supported browser, navigate to Oracle Retail Home for one of your environments (that is, PROD, STG, or UAT).
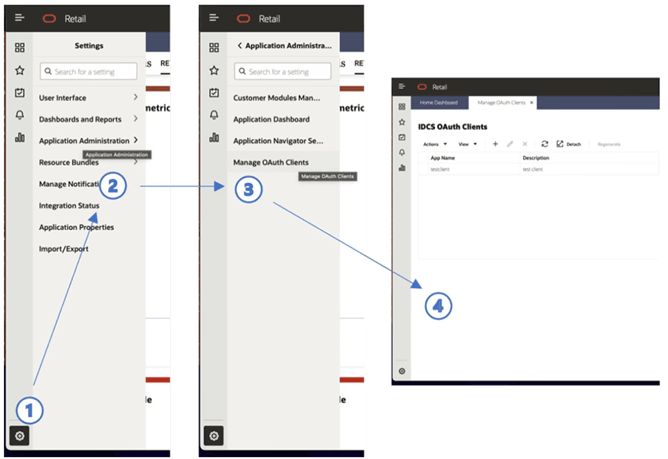
Figure 4-1 shows the first four steps for creating a client.
Figure 4-1 OAuth 2.0 Client Creation Flow Diagram

- Click the settings icon
 in the lower left corner of the Oracle Retail Home screen. If you do not see the settings icon, you may be experiencing one of several problems:
- You do not have administrator privileges.
- Groups have not propagated yet.
- You need to log out and log in to refresh your group associations.
- Click Application Administration.
- Click Manage OAUTH Clients.
-
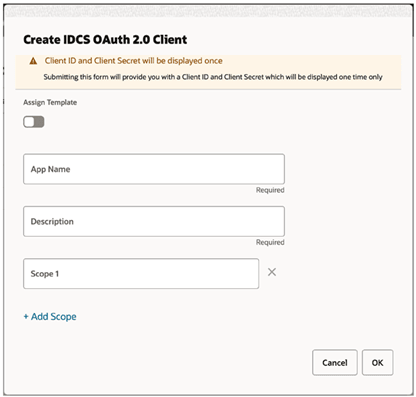
On the Manage OAUTH Clients page, click + to add a client. The Create IDCS OAuth 2.0 Client dialog opens.
Figure 4-2 Create IDCS OAuth 2.0 Client

- Provide the App Name and Description. Leave Scope blank.
-
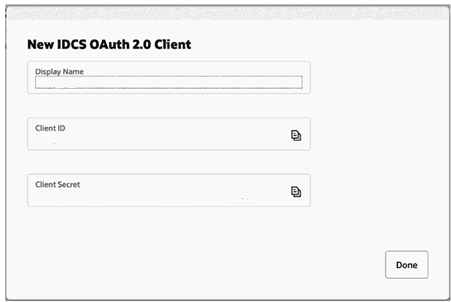
Click OK. The New IDCS OAuth 2.0 Client dialog opens. It shows the Display Name, Client ID, and Client Secret.
Figure 4-3 New IDCS OAuth 2.0 Client

-
It is important to retain this information. It will not be displayed again. When the information has been copied, click Done.
Consult the Oracle Retail Home Administration Guide for additional details on managing OAUTH clients.
Remember that the OCI IAM service is rate-limited (see API Rate Limits). Best practice is to reuse tokens until they expire (one hour). If you encounter a 429 error when requesting a token or authenticating, you have hit the rate limit. When you encounter a rate limit, back off for one minute to reset the rate limiter.
Before proceeding:
- Verify that a client ID and secret can be created in Retail Home.
- Retain the client ID and secret for future use.
Remember, there is no need to create multiple OAuth clients for each OCI IAM service. A single OAuth client can be used across all environments secured by a given IDCS.
Generating an Access Token
You need an IDCS Authorization Server endpoint URL, and an OAuth 2.0 client ID and client secret to perform the steps described below. There are multiple techniques for generating an access token. The example below employs cURL and assumes Oracle Linux 8.
The cURL command for generating an access token has five components:
- The IDCS Authorization Server endpoint URL
- A content type
- A client ID and client secret
- A grant type
- A scope
Only the IDCS Authorization Server endpoint URL, client ID, and client secret are customer specific. Content type, grant type, and scope are the same for all customers.
IDCS Service Host
The IDCS endpoint URL has the following format:
https://<idcs authorization server host>/oauth2/v1/token
To obtain your IDCS service host, navigate to Retail Home. When you navigate to Retail Home, you are redirected to an IDCS authorization server URL. The host of that URL is the IDCS authorization server that you use to obtain your access token. If you are already logged in to Oracle Home, log out and log back in. Once you log back in, you will be redirected to an IDCS authorization server.
Basic Auth Encoding
To fetch a token, you need to use Basic Auth and Base 64 to encode the credentials. For example, you could use the following script to encode the Basic Auth credentials:
CLIENT_ID=”your_client_id”
CLIENT_SECRET=”your_client_secret”
Combine the client ID and secret, then encode in Base64.
ENCODED_CREDS=$(echo -n “${CLIENT_ID}:${CLIENT_SECRET}” | base64 -w 0)Output the result.
Echo “Encoded Base64 credentials: $ENCODED_CREDS”Replace your_client_id and your_client_secret with the credentials obtained when creating your OAuth 2.0 client.
Using the cURL Command
You can use cURL to generate a token using the following shell script:
RESPONSE=$(curl --location --request \
POST "https://<idcs authorization server host>/oauth2/v1/token" \
--header "Content-Type: application/x-www-form-urlencoded" \
--header "Authorization: Basic ${ENCODED_CREDS}" \
--data-urlencode "grant_type=client_credentials" \
--data-urlencode "scope=urn:opc:idm: myscopes ")

ACCESS_TOKEN=$(echo ${RESPONSE} | jq -r .access_token) echo ${ACCESS_TOKEN}