11 Create Location Plan Task
The Location Planner role is usually the same person that generates merch plans in the merchandise planning organization.
The Planner will start the Create Location Plan task after location targets are published. Location Planning is the process in which planners create the location plans at the store level. These plans are then ultimately compared to and reconciled against the Merch Plan.
In Modular MFP, pre-season and in-season planning are handled as separate workspaces and task flows. This chapter is therefore organized in two parts: the pre-season workspace, where the initial working plan is created and approved, and the in-season workspace, where the plan is reviewed, reforecast, and re-approved as needed.
Create Location Plan Pre-Season Task
The Create Location Plan Pre-season task is used to build the initial location-level working plan after location targets are published. In this task, the planner seeds the plan, develops sales, markdown, receipts, inventory, and gross margin, then reconciles the location plan back to the merch plan. Once reviewed and aligned, the plan is approved for use as the pre-season location plan baseline.
This task includes the following steps:
- Create Plans
- Review & Approve Plans
Create Plan Step
Location Plan creation is important for ensuring that each location's receipts are in-line so that the organization can achieve the plans and targets set forth. Location planning requires a balance and understanding of the store's promotional-nature, seasonality/climate, size, and so on. On top of that, consideration of the events of last year that impact that particular location's sales history become crucial. Examples of significant events that impact the Ly sales history:
-
Hurricane or other natural disasters that close the store
-
Competition: competitor opened or closed a store
-
A remodel or reformat
Tabs and Views in this step:
- Seed Plan Tab
- Seed Plan View
- Set Local Currency View
- Set Alert Threshold View
- Create Plan Tab
- Sales & Markdowns View
- Inventory & Receipt View
- Gross Margin View
Application Action:
Seed Plan: Use this action to seed the plan
Clear Plan: Clear the seeded plan
Seed Plan Tab
The first action that the Merch Plan users complete when creating a new plan is to seed the plan with the Seed Plan view.
Application Action
- Seed: Seed the plan; this copies the seed source into the Wp version.
- Clear Plan: Clear the seeded data from the Wp plan.
- Receive Portfolio Opt: To retrieve the Portfolio Optimization results for the selected product.
Seed Plan View
With this view, you can choose to seed your plan Last Year (Ly), Forecast (Fcst), or Targets (Tgt) data to create a demand curve on which to initially spread the new plan. Or, you can instead choose to not seed the plan, which allows you to create a plan that is not influenced by last year's performance or forecast (plus last year's performance).
Seeding gives the planner a starting curve so that the plan does not have to be built manually from a blank grid unless the planner intentionally chooses that approach.
Table 11-1 Create Plan - Seed Plan Initialize Measures
| Measure | Description |
|---|---|
|
Wp Seed Source |
The seed source used to seed the working plan. Use this option to seed or not seed the working plan. You can seed with Last Year's (Ly) or Forecast (Fcst) data. Alternatively, choose the Blank option if you do not want to seed the working plan. |
|
Wp Seed Info |
Includes a few pertinent facts about the last time that the Seed custom menu was executed: last seed source concatenated with last seeded date and the last user to seed. If blank, then the given intersection has never been seeded. |
The following table shows a list of measures that are seeded for different seeding options.
Table 11-2 Seeded Measures
| Seeded Measure | Seed with Version |
|---|---|
|
Wp Sales R |
Ly/Fcst/Tgt Note: Only Target measures corresponding Variance to Ly (var Ly) measures will be seeded. |
|
Wp Sales U |
Ly/Fcst/Tgt Note: Only Target measures corresponding Variance to Ly (var Ly) measures will be seeded. |
|
Wp Markdown POS R % |
Ly/Tgt |
|
Wp Returns R % |
Ly/Tgt |
|
Wp Returns AUR |
Ly/Tgt |
|
Wp Receipts R |
Ly |
|
Wp Receipts U |
Ly |
|
Wp Receipts MU % |
Ly |
|
Wp Shrink R % |
Ly |
|
Wp Shrink AUR |
Ly |
|
Wp Shrink MU % |
Ly |
|
Wp Transfers In/Out R |
Ly |
|
Wp Transfers In/Out U |
Ly |
|
Wp W/F Owned by Retailer R % |
Ly |
|
Wp W/F Markup R % |
Ly |
|
Wp W/F Markdown R % |
Ly |
Note:
To clear the seeded data, use the Clear Plan custom menu option.
Select Local Currency View
The local currency chosen will be applied to the views of local currency found throughout the Create Location Plan task.
After selecting a currency, you can click Calculate to apply the rate. If you have not yet performed a seeding action, the rate will be applied at the time of seeding.
Set Alert Thresholds View
In this view, you set the threshold minimums (mins) and maximums (maxs) that will trigger alert formatting and alerts in the LP: Exceptions dashboard. The following table lists the conditions under which an alert is triggered. Thresholds must be non-zero to trigger alerts.
| Threshold | Condition |
|---|---|
|
Wp GM R % Max Threshold |
Alert is green when Wp GM R % is greater than the threshold |
|
Wp GM R % Min Threshold |
Alert is red when Wp GM R % is less than the threshold |
|
Wp Markdown POS R % Max Threshold |
Alert is red when Markdown POS R % is greater than the threshold |
|
Wp Markdown POS R % Min Threshold |
Alert is green when Markdown POS R % is less than the threshold |
|
Wp Net Sales R Max Threshold |
Alert is green when Net Sales R is greater than the threshold |
|
Wp Net Sales R Min Threshold |
Alert is red when Net Sales R is less than the threshold |
|
Wp Returns R % Max Threshold |
Alert is red when Returns R % is greater than the threshold |
|
Wp Returns R % Min Threshold |
Alert is green when Returns R % is less than the threshold |
|
Wp Sell Thru R % Max Threshold |
Alert is green when higher than the threshold |
|
Wp Sell Thru R % Min Threshold |
Alert is yellow when less than the threshold |
|
Wp Do Not Alert |
Prevents alerting of the department/locations that are checked |
Create Plan Tab
After seeding, use this tab to develop the location-level sales, markdown, receipt, inventory, and gross margin plan together so each location has a balanced commercial and inventory outlook. Review the seeded values, adjust the plan as needed, and confirm that inventory flow and margin support the planned sales.
Sales & Markdowns View
You can verify the seeded sales and markdown data in this view. After you have seeded, develop the sales, and markdown location plan for those departments. Module reference: Location Plan Sales & Return, Location Plan Sales & Return Units. For more details on modules, refer to the Oracle Merchandise Financial Planning Cloud Service Starter Kit Guide.
There are several measure profiles available to logically guide you through the plan variables. A measure profile is selected by clicking the Edit View button next to the Measure tile.
Figure 11-1 Plan Sales/Gross Margin % View
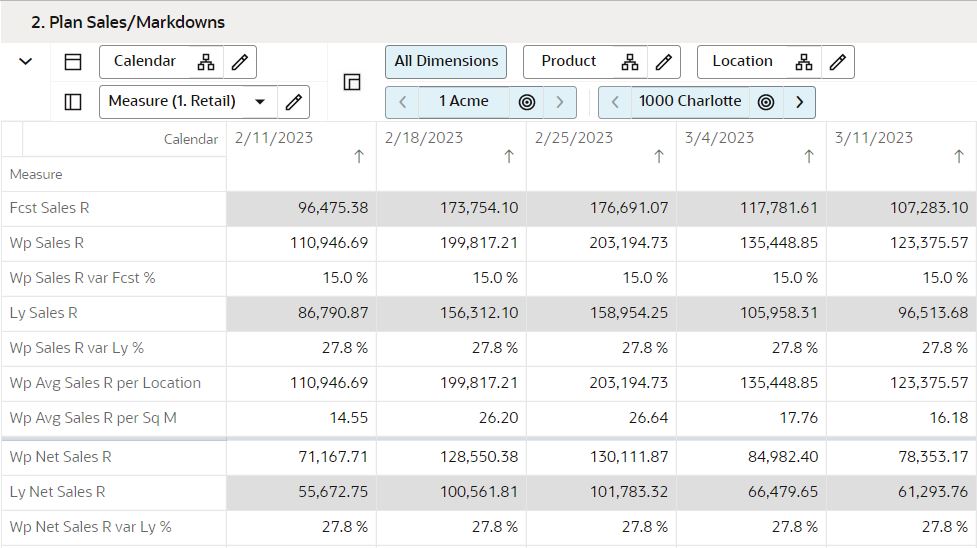
The following measure profiles are available:
-
Retail
The sales (default) measure profile shows the key sales planning metrics including sales, net sales, and returns.
To use the Average Sales/Net Sales/Returns Per Location measures to see averages, you must rollup the Location Dimension to a level above Location. The average calculated is limited to the average of the active locations of the workspace segment. A segment with one location will have an average equal to the Wp. In the same way, a dimension with only a single location which rolls up to it will also have an average equal to the Wp.
-
Units
The sales measure profile shows the key sales units planning metrics including sales, net sales, and returns.
To use the Average Sales/Net Sales/Returns Per Location measures to see averages, you must rollup the Location Dimension to a level above Location. The average calculated is limited to the average of the active locations of the workspace segment. A segment with one location will have an average equal to the Wp. In the same way, a dimension with only a single location which rolls up to it will also have an average equal to the Wp.
Inventory & Receipt View
After you have developed the sales and markdown plan, develop a receipts and inventory plan that can support the sales and markdown plan. The purpose of this step is to ensure that you have a receipt and inventory plan that supports the sales that you are projecting. Like the Plan Sales and Markdowns view, the Plan Receipts/Inventory view contains several Ly metrics that you can reference when setting your targets. Additional measures can be used to adjust your inventory targets. Module reference: Location Plan Inventory & Receipt, Location Plan Inventory & Receipt Units. For more details on modules, refer to the Oracle Merchandise Financial Planning Cloud Service Starter Kit Guide.
Gross Margin View
Use the Gross Margin view to evaluate the gross margin created from your sales and markdown plan and receipts and inventory plan. Determine whether the planned gross margin meets your gross margin goal. If it does not, return to the Plan Sales and Markdown Plan and Plan Inventory and Receipt Plan steps to adjust your receipt markups and receipt flow. When you return to the Plan Sales and Markdowns view, adjust the markdown plans, but do not change the sales. Continue this process until you are satisfied with the gross margin. Module reference: Location Plan Gross Margin. For more details on modules, refer to the Oracle Merchandise Financial Planning Cloud Service Starter Kit Guide.
Review and Approve Plan Step
In this step, review and compare your plan to ensure the goals set forth in the Merch plan are being met. Then you can continue to approve your location plan.
Views in this Step:
- Reconcile to Merch Plan View
- Review Plan View
- Approve Plan View
- Review Approved Plan View
Application Action:
Approve Plan: Approve the plan and copy Wp Values to Cp and Op.
Reconcile to Merch Plan View
Use the MFP OP and the MFP CP measure profiles to reconcile your location plan to the merch plan.
Review Plan View
In this step, review the location plan you created. The purpose of reviewing the plan is so that you can understand the goals that your plan should meet.
Create Location Plan In-Season Task
The In-season workspace is used to review the approved location plan against current business performance and update open periods when conditions change. Planners can reforecast sales, inventory, and margin, then reconcile and re-approve the plan as needed.
The task has following steps:
- Update Plans
- Review & Submit Plan
Update Plans Step
The Planner can update the plan during in-season. This has similar views and measures as Pre-season steps.
Tabs and Views in this Step:
- Sales & Inventory
- Open to Buy Projection
- Sales & Markdown
- Gross Margin
- Receipt & Inventory
- Review & Approve Plan
- Reconcile to Merch Plans
- Review Plans
- Approve Plans
Sales and Inventory Tab
After pre-season plan, review & plan Open to Buy, Sales, Inventory & Receipt during in-season. You can review the On Order and Open To Buy during in-season and adjust planned inventory data as needed and re-approve the CP Plan. Module reference: Location Plan Sales & Return, Location Plan Sales & Return Units, Location Plan Inventory & Receipt, Location Plan Inventory & Receipt Units, Location Plan Gross Margin. For more details on modules, refer to the Oracle Merchandise Financial Planning Cloud Service Starter Kit Guide.
Application Actions
- Seed Plan: Use this action to seed the plan which copies Ly and/or Fcst values into Wp.
- Clear Plan: Clear the Wp seeded plan.
Review and Submit Plan Tab
In this step, review and compare your plan to ensure the goals set forth in the Merch Plan are being met. Once plans are re-projected, approved them.
Application Action
- Approve Plan: Copy Wp value into Op/Cp version.
Reconcile to MFP View
Use the MFP OP and the MFP CP measure profiles to reconcile your location plan to the Merch Plan.