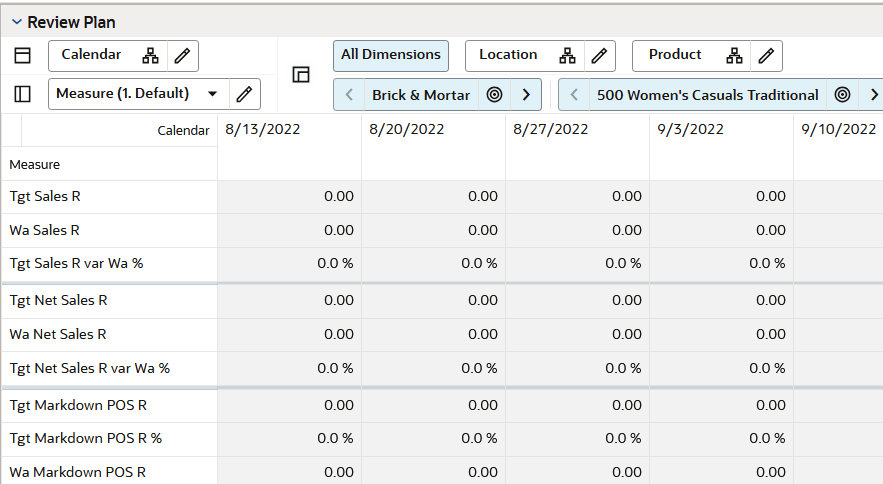
8 Create Merch Plan Targets Task
The Planning Manager owns the target-setting process for the merchandise planning organization. This role is typically aligned with senior or mid-level planning leadership and is responsible for defining the financial direction that planners will use as the basis for their merchandise plans.
The Planning Manager creates merchandise plan targets before the planning period begins. This pre-season activity usually starts two to six months ahead of the season, half, or year being planned. During this time, the Planning Manager establishes high-level financial targets across the relevant merchandise and location scope, giving planners a clear target framework for sales, markdowns, receipts, inventory, and margin planning.
In Modular MFP, pre-season and in-season target activities are organized into separate tasks. The planning manager is presented with the activity Create Merch Target and it consists of two tasks: Create Merch Plan Target Pre-season and Create Merch Plan Target In-season.
Create Merch Targets Pre-Season Task
The pre-season areas are used to create targets and publish them to Merch Planners before the season begins. The in-season area is used after actuals are available and the Planning Manager needs to review performance, update targets, republish revised targets.
The Planning Manager must complete the pre-season target creation and publishing activities before Merch Planners can retrieve the targets and build their plans.
The pre-season task includes the following steps:
Create Targets Step
The Create Targets step is where the Planning Manager builds the Working Plan target before publishing it as the official Target version
Complete the following steps:
- Seed the plan using Last Year (Ly), Forecast (Fcst), or Portfolio Optimization data.
- Review the Portfolio Optimization data and choose to plan with Portfolio Optimization results.
- Select local currency settings, when local currency planning is provisioned. (Ref: Merch Target Sales & Return Local Currency Module).
- Set alert thresholds for exception reporting.
- Plan sales, markdowns, and returns.
- Plan inventory and receipts to support the sales and markdown target.
- Review gross margin and adjust the plan until the target supports the intended business outcome.
- Seed Plan Tab:
- Seed Plan view
- Review Portfolio Optimization view
- Set Local Currency view
- Set Alert Threshold view
- Sales & Inventory Tab:
- Sales and Markdowns view
- Local - Sales and Markdowns view
- Receipts and Inventory view
- Move to Clearance view
- Gross Margin view
Tip:
As you build your plan, click Commit when you are satisfied with the intermediate state. This creates a permanent snapshot of the as-is state. This creates a restore point you can revert to if you go down a path that is unsatisfactory.
Seed Plan Tab
The first action in target creation is to seed the plan in the Initialize view. Seeding creates a starting point for the Working Plan target by spreading a selected source across the workspace positions. Before seeding, review the Last Year and Forecast values in the sales and markdown views. If Portfolio Optimization is available, review the Portfolio Optimization output before selecting the seed source.
Seeding is optional. If you do not want the target to be influenced by Last Year, Forecast, or Portfolio Optimization data, you can create the target without seeding and enter the plan manually.
Application Actions
- Seed: Seed the plan. This copies the seed source into the Wp version.
- Clear Plan: Clear the seeded data from the Wp version.
- Receive Portfolio Opt: To retrieve the Portfolio Optimization results for the selected product.
Seed Plan View
With this view, you can choose to seed your plan with Last Year (LY), Forecast (Fcst), or Portfolio Optimization data to create a demand curve on which to spread the new plans initial targets. Or you can instead choose to not seed the plan, which allows you to create a plan that is not influenced by Last Year (LY) performance, the forecast (plus last years performance) result, or Portfolio Optimization results. When seeding the plan, you can choose which information is seeded. For instance, you can seed just one half or all halves in the workspace. You can also choose what locations and products to seed.
Table 8-1 Seed Plan View Measures
| Measure | Description |
|---|---|
|
Seed Source |
The seed source used to seed the working plan. Use this option to seed or not seed the working plan. You can seed with Last Year (LY), Forecast (Fcst), or Portfolio Optimization data output. Or, you can choose the blank option if you do not want to seed the working plan. |
|
Seed Info |
Includes a few pertinent facts about the last time that the Seed custom menu was executed: last seed source concatenated with last seeded date and the last user to seed. If blank, then the given intersection has never been seeded. |
|
Seed Returns Setup |
Use this option to seed the working plan returns. You can seed the returns values with Last Year (LY) or Forecast (Fcst) data. You can also choose the blank option if you do not want to seed the working plan returns. |
Seeding One Level at a Time
To seed a target, set the seed source for the current product, location, and calendar intersection. Then move through the remaining positions and repeat the selection:
- Select the Product and calendar Dimension level you want to seed.
-
Select the Wp Seed Source from the picklist of Last Year (LY), Forecast (Fcst), or Portfolio Optimization data.
Note:
Before seeding with Portfolio Optimization data, you need to retrieve results from Portfolio Optimization using the Review Portfolio Optimization view.
-
Select Wp Seed Returns Setup to populate returns values. (This is optional Step.)
-
Click Seed from the actions.
-
Review the confirmation message, stating that the data has been successfully seeded. Click OK.
After you have seeded, the view refreshes and the Last Seed Source and Last Seed Date measures contain the source and date of the last seed.
Review Portfolio Optimization View
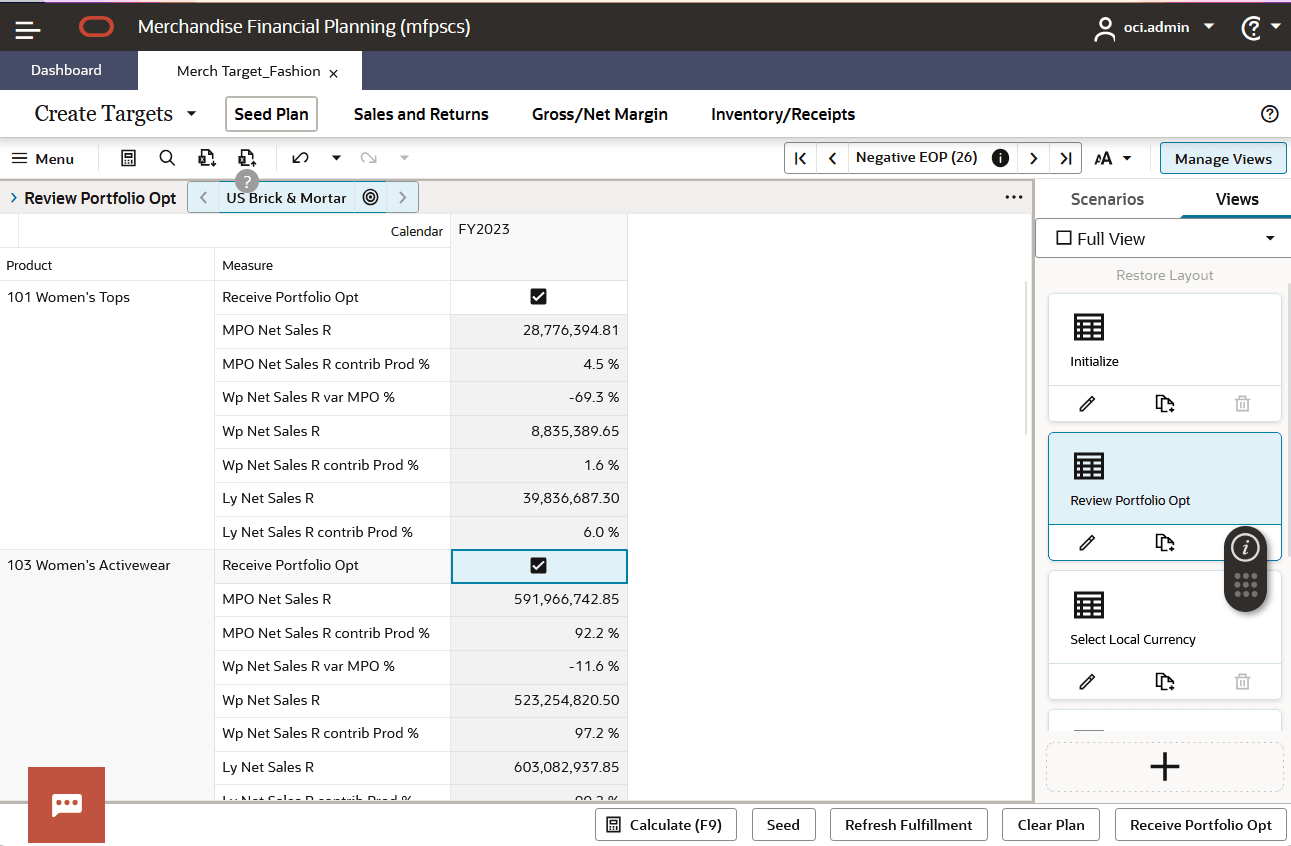
Use the Review Portfolio Optimization view to review Portfolio Optimization output before using it as a seed source. Select the Boolean for dimension scope and click the custom menu action, Receive Portfolio Opt. After the results are populated against the MPO (Portfolio Optimization) measures, you can proceed with seeding the plan from the Initialize view.
By default, MFP GA receives Net Sales R as output from Portfolio Optimization and it populates MPO Net Sales R in the view. The portfolio optimization results are retrieved at the year level which are then split into weeks using the LY data reference while seeding. You can choose to configure it for Gross Sales Portfolio Optimization output. Module Reference: Merch Target Portfolio Optimization. For more details on modules, refer to the Oracle Merchandise Financial Planning Cloud Service Starter Kit Guide.
Note:
When creating the Merch Target workbook, the scope of the workbook should be at the same level of the scope of the Portfolio Optimization run.
Figure 8-1 Review Portfolio Optimization View
Select Local Currency View
Use the Select Local Currency view when local currency planning is provisioned. The selected currency is applied to the local currency views used in the Create Merch Targets task.
After selecting a currency, click Calculate to apply the rate. If you have not yet performed a seeding action, the rate will be applied at the time of seeding.
Reference Module: Merch Target Sales & Returns Local Currency
Set Alert Thresholds View
In this view, you set the threshold minimums (mins) and maximums (maxs) that will trigger alert formatting and alerts in the MT: Exceptions dashboard. The following table lists the conditions under which an alert is triggered. Thresholds must be non-zero to trigger alerts.
| Threshold | Condition |
|---|---|
|
Wp GM R % Max Threshold |
Alert is green when Wp GM R % is greater than the threshold |
|
Wp GM R % Min Threshold |
Alert is red when Wp GM R % is less than the threshold |
|
Wp Markdown POS R % Max Threshold |
Alert is red when Markdown POS R % is greater than the threshold |
|
Wp Markdown POS R % Min Threshold |
Alert is green when Markdown POS R % is less than the threshold |
|
Wp Net Sales R Max Threshold |
Alert is green when Net Sales R is greater than the threshold |
|
Wp Net Sales R Min Threshold |
Alert is red when Net Sales R is less than the threshold |
|
Wp Returns R % Max Threshold |
Alert is red when Returns R % is greater than the threshold |
|
Wp Returns R % Min Threshold |
Alert is green when Returns R % is less than the threshold |
|
Wp Sell Thru R % Max Threshold |
Alert is green when higher than the threshold |
|
Wp Sell Thru R % Min Threshold |
Alert is yellow when less than the threshold |
|
Wp Do Not Alert |
Prevents alerting of the department/channels that are checked |
Sales & Inventory Tab
The Sales & Markdown sub-step is where the Planning Manager develops and reviews the core target assumptions for sales, markdowns, returns, inventory, clearance movement, and gross margin. Use Forecast and Last Year data as reference points, then adjust the Working Plan to reflect the strategic target for the season.
This tab helps confirm that the sales and markdown target is supported by the right inventory and receipt plan, and that the resulting gross margin meets the intended profitability objective before the target is published.
This tab includes the Sales & Markdown view, Inventory & receipt view, Gross Margin view, and Move to Clearance view. Together, these views help the Planning Manager build a balanced target by aligning sales and markdown expectations with the inventory, return, clearance, and margin outcomes needed to support the plan.
Sales and Markdowns View
In the Sales and Markdowns view, you plan net sales, promotions, and markdowns. Sales are the revenue generated by selling goods or services. Regular priced sales yield the greatest margin, however successful promotions drive more traffic and completion of sales. Though the promotional sale likely includes markdown, the overall increase in sales should outweigh the markdown and drive at good margins. Module Reference: Merch Target Sales & Return & Merch Targe Sales & Returns Unit. For more details on modules, refer to the Oracle Merchandise Financial Planning Cloud Service Starter Kit Guide.
A measure profile is selected by clicking on the Edit View button next to the Measure tile.
The following measure profiles are available:
-
Sales and Markdowns (Default)
The measures in this profile represent totals which are not broken down by type of sale such as Promo, clearance, and so on. This view also incorporates the forecast for viewing on top of all Ly actuals.
-
Sales by Type
The measures in this profile display and capture sales and returns figures by type of sale: Regular + Promotional, and Clearance. Regular + Promo, and Clearance added together equate to the total sale or total return.
Start by planning the regular sales. Then, using your marketing calendar as a guide, align the promotional sales to the calendar. Refer to the calendar again for the exit weeks for the products, and plan the clearance sales for those weeks.
The planned figures for these sales types populates the Wp Sales R measure.
-
Markdowns by Type
Markdown is the difference between the original retail price and the actual selling price. The measures in this profile display and capture markdown figures as a total as well as by sales type: Regular + Promotional, and Clearance. The markdown types added together equate to the markdown (Wp Markdown POS R).
-
Units
Some lines of businesses may prefer to build the plan, or at least closely couple the financial plan, by sales in terms of units. You also use this view to review the Average Unit Retail (AUR) to ensure it aligns with your strategic plans for the department.
Follow these steps to basic sales and markdown generation:
-
Using the default measure profile, which is Sales and Markdowns, review and compare the total sales to the forecast and last year.
-
Change the measure profile to Sales by Type.
-
In the Sales by Type measure profile, plan your sales by type. The sales types are Total Sales, Regular + Promo Sales, and Clearance Sales.
Start by planning the regular sales. Then, using your marketing calendar as a guide, align the promotional sales to the calendar. Refer to the calendar again for the exit weeks for the products, and plan the clearance sales for those weeks.
The planned figures for these sales types populates the Wp Sales R measure.
-
Return to the Sales and Markdowns measure and adjust the total Working Plan sales target as needed.
-
Change the measure profile to Markdown by Type And adjust the markdown rates or amounts.
- Review returns where applicable and confirm that the net sales still align to the required target.
- Use the Units profile, when provisioned, to validate the unit sales and AUR.
Note:
Since sales and markdowns are both planned at the type level, you must first complete the sales by type planning before you can plan the markdowns by type.
Local - Sales and Markdowns View
If the Local Currency option is provisioned, you use this view. The key planning KPIs are available in local currency for cross-referencing and high-level planning. Module reference: Merch Target Sales & Return Local Currency. For more details on modules, refer to the Oracle Merchandise Financial Planning Cloud Service Starter Kit Guide.
Receipts and Inventory View
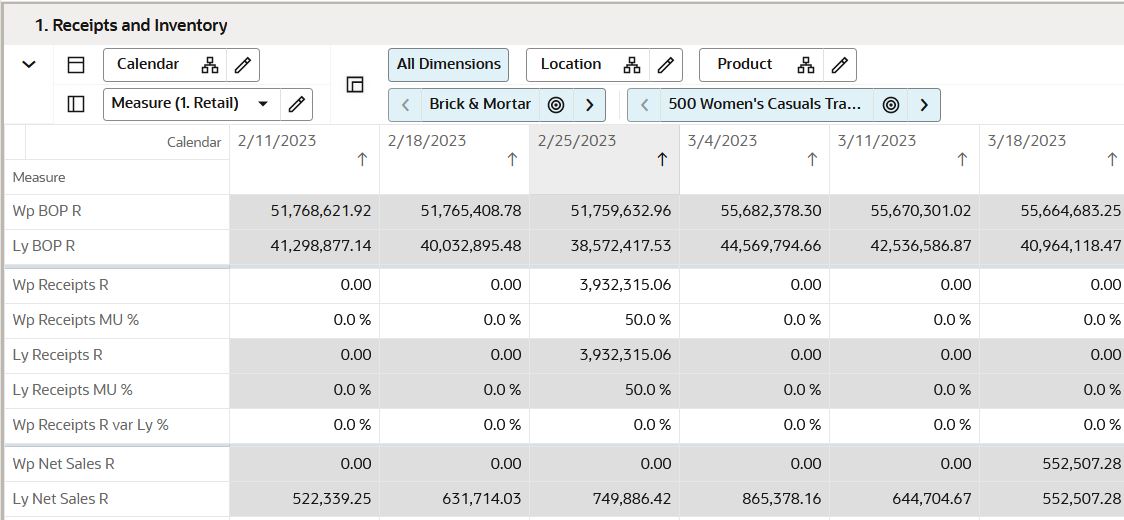
Receipts and Inventory is where you will plan Beginning-of-period (BOP)/End-of-period (EOP) inventory, receipts, turn, and so on. This view is frequently planned at a month level. At a month level, EOP is usually targeted to be about the same as BOP and then ramp up for holiday gift giving is factored in. After planning the month, it is wise to review the results at a week level to ensure there are no undesirable anomalies.
Inventory turn is an important indicator of the effectiveness of the planned inventory. It tells you how many times stock is being sold and repurchased over a given period of time. The goal is to increase your turn as much as possible, without having to take markdowns. Turn (Wp CUM Turn R) is reviewed in this workspace view.
Another important indicator is Stock to Sales Ratio. The stock to sales ratio is the proportion of inventory on hand at the beginning of a period (such as a week or month) that will support the planned sales in that period.
If the Stock to Sales Ratio rises, (due to an increase in inventory without an accompanying rise in sales), then you are adding more stock without increasing sales. Unless you are intentionally ramping up stock for holiday, promo, and so on, then it is time to hold off on receipts and work on selling down the quantity on that item. The ultimate goal is to reduce your Stock to Sales Ratio as low as possible, without losing sales. Module Reference: Merch Target Inventory & Receipt; Inventory & Receipt Units. For more details on modules, refer to the Oracle Merchandise Financial Planning Cloud Service Starter Kit Guide.
Note:
The adjustments you made to the Sales and Markdowns view are visible in this view after you have clicked Calculate.
Measure profiles help the Planning Manager evaluate inventory from different perspectives. The following measure profiles are available:
-
Retail (Default)
The Retail profile is the default profile. The planning is focused on total retail rather than units, and sale type. This profile is the most comprehensive view of variables impacting inventory.
-
Inventory by Type
In this profile, you can review and maintain a breakdown of inventory by sales type, Regular + Promo, and Clearance.
-
Units
In this view, you can directly maintain EOP inventory, Mark Out of Stock (MOS), and Move to Clearance in terms of units.
Use the following best practices to plan the receipts and inventory:
-
Plan the receipt flow and then evaluate the average inventory and turn.
-
Review the Receipts Markup (MU) for accuracy. Often this will follow the keystone 50%, but many variables can impact the decision on markup-from competitor pricing to freight costs, and overhead operating expense.
-
Review the Wp CMU % measure. Cumulative markup rate (CMU %) is a blend of the beginning of period (BOP) inventory retail and cost with the future receipt retail and receipt cost. The Wp CMU % directly affects the cost of goods sold (COGS), which then affects the gross margin.
-
Review the Wp Stock to Sales R ratio. Make adjustments to Sales and other inventory measures (Receipts, Move out of Stock, Move to Clr, and so on) to achieve the desired stock to sales ratio.
Figure 8-2 Receipts and Inventory View
Move To Clearance View
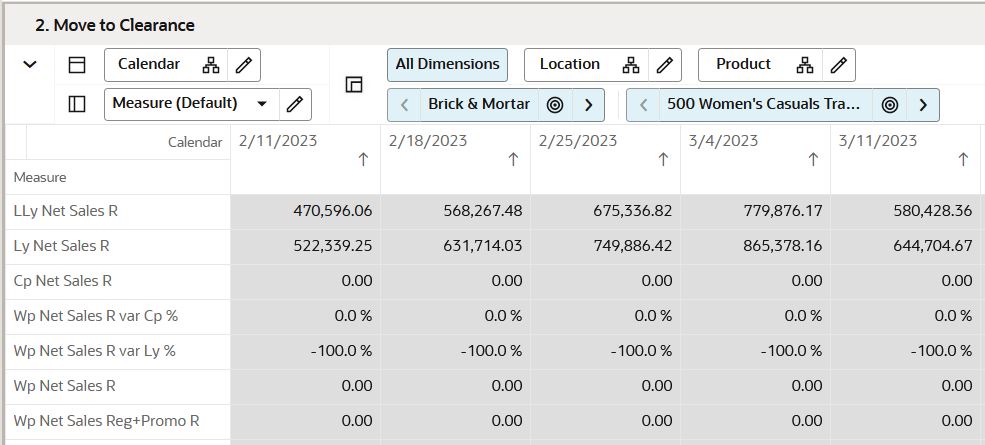
Use the Move to Clearance view to plan inventory that should transition into clearance. This is an important step in maintaining the balance between Regular + Promotional inventory and Clearance inventory.
Figure 8-3 Move to Clearance View
Gross Margin View
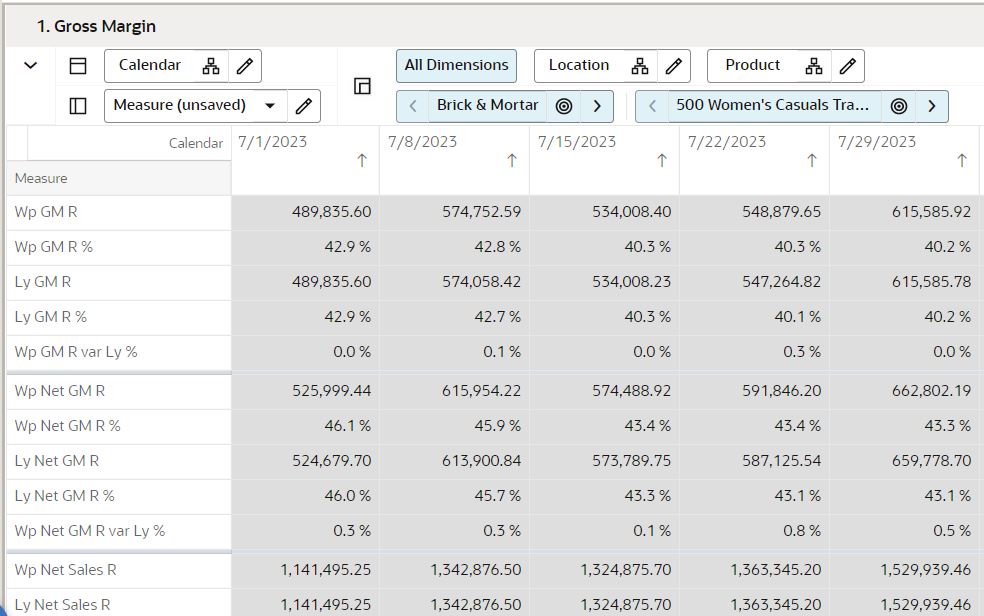
Use the Gross Margin view to evaluate the gross margin created from your sales and markdown plan and receipts and inventory plan. Determine whether the planned gross margin meets your gross margin goal. If it does not, return to the Develop Sales and Markdown Plan and Develop Inventory and Receipt Plan steps to adjust your receipt markups and receipt flow.
Finally, return to the Gross Margin view to adjust additional contributors to net gross margin such as vendor funds and royalties. Module Reference: Merch Target Gross Margin. For more details on modules, refer to the Oracle Merchandise Financial Planning Cloud Service Starter Kit Guide.
Figure 8-4 Gross Margin View
Review and Publish Targets Step
The Review and Publish Targets step is performed after you have completed creation or revision of targets in the Create Targets step. You can choose to review and publish many targets at once or one at a time as you complete building the targets of each Dept/Channel/Half.
The key action in this task is publishing the targets so that your planners can view them and begin to build their plans. To learn about the Planner's role, see Create Merch Plan Targets Task.
If you need to revise your targets at any time during the pre-season, you can follow the same procedures described in this chapter. Since you have already created a working plan, there is no need to seed the task again, unless you want to start over with Ly (Last Year) or Fcst (Forecast) data.
Tabs and Views in this Step:
- Review & Publish Targets Tab:
- Review Targets View
- Publish Targets View
- Published Targets View
Review & Publish Targets Tab
In this tab, review and publish the targets you created in the previous step Publishing a target copies the targets you built in the Wp measures to the target (Tgt) measures, and then commits them to the database. Once committed, Planners can retrieve those targets and take action planning to them.
Application Action
Publish Targets
Moves the Working Plan (Wp) version of the planning data to Target (TG) version for the use in Merch Plan Task.
Review Targets View
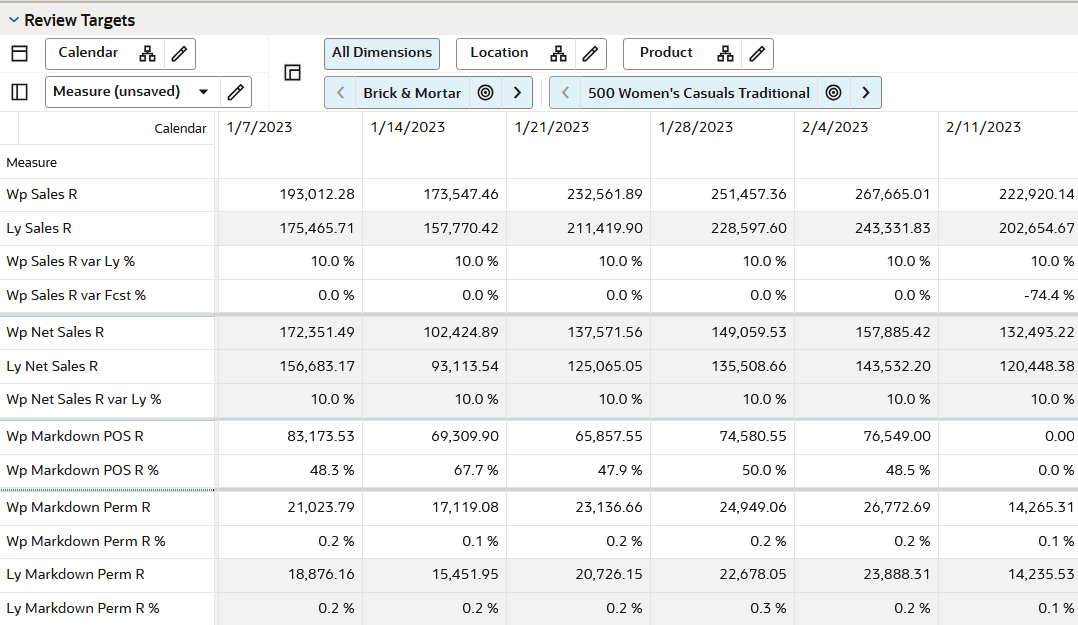
Use this view to review the targets created in previous step. If the target needs to be changed, return to the Create Targets step, make the required edits, and then review again.
There are several measure profiles in this view to quickly guide you to the plans you wish to review:
-
Default
This measure profile shows the main Working Plan metrics for comparison with last year metrics. This is the profile you will use after initially performing the Create Targets step.
-
Tgt with Cp
This measure profile shows the main Working Plan metrics for comparison with Current Plan metrics. Current Plan is a version of the plan that is approved in-season (and is actualized for elapsed/historical periods).
-
Tgt with Op
This measure profile shows the main Working Plan metrics for comparison with Original Plan metrics. Original Plan is the plan as it was initially approved-typically it got approved pre-season and stays fixed when the period becomes in-season.
Figure 8-5 Review Targets View
Publish Targets View
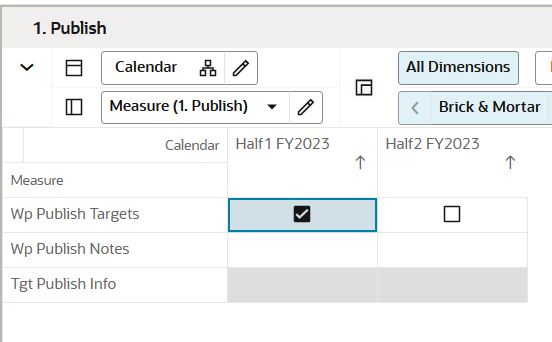
Publish your targets in this view. The Target measures in the Publish Targets view are initially blank or populated with prior published target values. After the publish action completes, the Target measures are updated with the newly published target values.
To publish the targets, complete the following steps.
-
Select the halves in the Wp Publish Targets measure that you want to publish.
-
Enter notes in Wp Publish Notes, if notes are needed.
-
Repeat Steps 1 and 2 for other channels and departments as desired.
-
Click Publish Targets from the actions.
-
A success message is displayed. Click Dismiss to close it.
The view refreshes and clears the data in Wp Publish Targets and Wp Publish Notes measures. It populates the data for Tgt Publish Info measure as name:date:notes.
Figure 8-6 Publish Targets
Review Approved Plan Step
The Review and Approve Plan step is performed after the Planner has built a merch plan that aligns with the Targets you previously created and published. In the Create Merch Plan Task, the planner approves their plan and the same plan is reviewed here.
MFP Modular is set for the Self Approval process, a Merch Planner can approve the plans independently and the manager receives the approved plan for reference.
Tabs and Views in this Step:
- Review Approved Plan Tab:
- Review Approved Plans
Create Merch Targets In-Season Task
The planning manager uses Create Merch Plan Target In-season Task during in-season to review and compare the plans to season actuals. The Planning Manager reviews current performance, compares targets to approved plans and actual results, re-projects targets where necessary, republishes revised targets, and reviews updated plans created by Merch Planners. In-season target management focuses on keeping the plan aligned with current business performance.
One of the key steps of in-season management is reviewing Open to Buy (OTB). OTB is the amount of money budgeted during the in-season to purchase goods that have not yet been received or ordered. The Planner decides in-season how to spend this money to reach strategic targets.
The in-season task includes the following step:
- Update Target Steps
Update Target Steps
Use this step to update the Open to Buy plan and review weekly projections. Planning Manager compare planned and projected inventory levels, evaluate available OTB, and determine whether future receipts should be purchased, reduced, or canceled based on projected sales, markdowns, receipts, and inventory.
Tabs and Views in this Step:
- Open to Buy tab:
- Open to Buy view
- Projections tab:
- Weekly In-Season Projections view
Open to Buy Tab
This tab has one view.
Open to Buy View
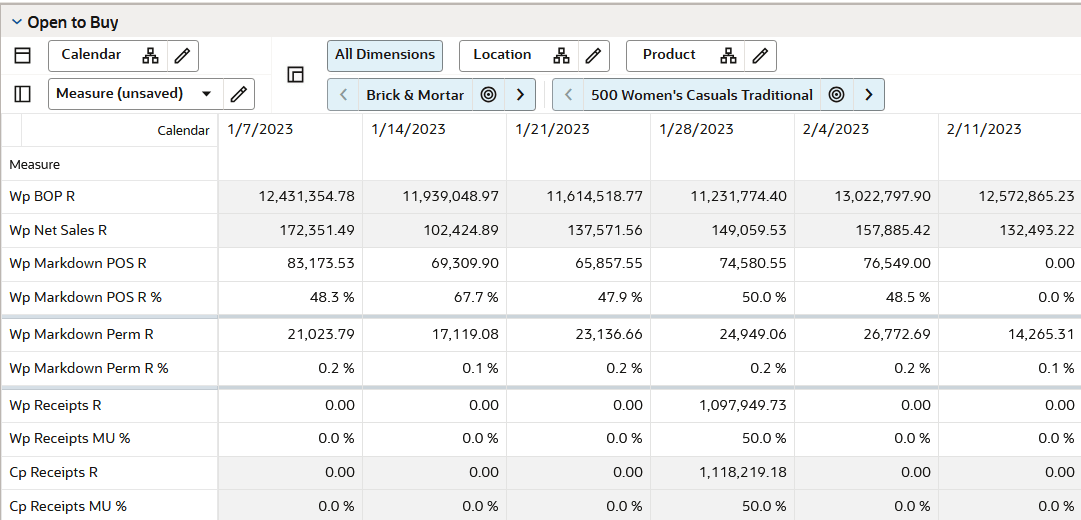
Use Open to Buy (OTB) to understand the variance between the planned and projected inventory levels. This variance is shown in the Wp OTB R measure. OTB indicate how many additional receipts can be purchased (or canceled) after projected sales and markdowns. Module Reference: Merch Target Inventory & Receipt; Merch Target Inventory & Receipt Units. For more details on modules, refer to the Oracle Merchandise Financial Planning Cloud Service Starter Kit Guide.
Users should understand if their planned receipts keep them on the overall Cp EOP inventory plan. To understand the variance between the Cp EOP inventory plan and the Wp EOP inventory plan, reference the measure Wp EOP R var Cp%.
Use this view to validate what OTB you have available and then start adjusting your plan. Then, confirm that your updates can be obtained given the OTB constraints you may have. Use the following best practices to adjust OTB:
-
To understand the difference between the current approved receipts and the net on order, compare Cp Receipts R to Wp Net On Order R.
-
If receipts are booked for upcoming (non-elapsed) periods, you can enter the Wp Receipt R data into the Wp On Order Adj R to capture the Wp OTB R measure. For example, this may occur if receipts book daily for the retailer, and OTB is completed on a Tuesday. By using the Wp On Order Adj measures, you can capture all receipts for comparing the Net On Order to the Cp receipt plan.
This view has two measure profiles:
-
Default
This measure profile focuses on key metrics of total sales, markdowns, receipts, and on order to summarize open to buy.
-
Units
This measure profile focuses on unit and average unit cost key metrics for sales, receipt, and on order.
Figure 8-7 Open to Buy View
Projection Tab
This tab has one view.
Weekly In-Season Projections
Use this view to review the in-season projection after target and plan updates. Projection measures help the Planning Manager understand how sales, markdown, receipt, and inventory updates affect the expected outcome for the season.
The Projection view has the following measure profile available:
-
Default
This measure profile displays Reg+Promo, Clearance, and Net Sales and Markdowns and the corresponding inventory.
In-Season Review & Re-Project Targets Step
Use the Review & Re-Project step to compare and update Working Plan targets against Current Plan, Original Plan, and Last Year. This review helps the Planning Manager decide whether the target should remain unchanged or be revised for the current in-season outlook. Planning Manager can publish the adjusted targets.
Tabs & Views in this Step:
- Review & Re-project Target Tab:
- Review Targets View
- Publish Targets Tab:
- Publish View
- Published Targets View
Review & Re-Project Tab
Use the Review & Re-Project sub-step to compare and update Working Plan targets against Current Plan, Original Plan, and Last Year. This review helps the Planning Manager decide whether the target should remain unchanged or be revised for the current in-season outlook.
Application Action
Publish Targets
Moves the Working Plan (Wp) version of the planning data to Target (TG) version for the use in Merch Plan Task.
This tab has only one view.
Publish Targets Tab
Perform this tab when you are ready to publish the in-season adjusted targets you created. Publishing a target copies your Wp measure information to the Tgt measures and then it commits those target measures to the database so that Planners can retrieve those targets.
Publish View
To publish the targets, complete the following steps:
-
Place a check mark in the Wp Publish Targets measure to select the halves the that you want to publish.
-
If necessary, enter relevant information in the Wp Publish Notes measure. This is optional.
-
Repeat the steps for other locations and products if necessary.
-
Click Publish Targets.
-
A success message is displayed. Click Dismiss to close it.
After publishing, the view refreshes. Wp Publish Targets and Wp Publish Notes are cleared, Tgt Publish Info is populated, and the Target measures reflect the newly published target values.