4 Managing Batches
The Process Orchestration and Monitoring (POM) application is a user interface for scheduling, tracking, and managing batch jobs. As an application administrator, you will be expected to monitor the various batches running in POM and potentially take corrective actions if a batch is in a failed or long-running state. This chapter summarizes the most common activities associated with POM and batch execution and provides references to additional details where available.
Batch Administration Duties
Throughout the project and after you are in a Production environment, the responsibility of monitoring and maintaining batch schedules and processes is divided across multiple groups. Review the information below for a typical breakdown of batch responsibilities.
Initial Configuration: Oracle Cloud Operations deploys batch schedules according to your subscriptions, which come pre-installed with certain basic configurations and enabled or disabled batch programs.
Final Configuration: Customer/Solution Implementation Partner (SI) is responsible for modifying the batch schedules during the project and after go-live in Production, based on their current implementation needs.
Scheduling: Customer/Solution Implementation Partner (SI) uses the POM scheduler to schedule nightly, cyclical, and ad hoc jobs. Oracle is not typically responsible for changing schedule start times after go-live, as it can be done in POM.
Notifications: Customer/Solution Implementation Partner (SI) is responsible for setting up batch notifications using Retail Home and POM. Oracle will not typically alter batch notifications on customer environments (unless needed to change internal notifications of batch status).
Error Resolution: Customer/Solution Implementation Partner (SI) is responsible for resolving issues in non-production environments and restarting batch processes from POM after the errors are resolved. In Production environments, the Customer is responsible for monitoring the batch and resolving errors, if possible (for example, if files are not uploaded on time or uploaded with bad data). In both cases, Service Requests can be raised with Oracle for support.
File Retention: Customer is responsible for retaining backups and archives of any file-based data sent as input to Oracle systems according to their business’s data retention policies. Oracle’s file retention policy for RAP solutions is between 7 and 30 days depending on the OCI region, after which time any incoming or outgoing files may be purged without notice.
Review the table below for a summary of duties broken down by environment type:
| Environments | Activities | Responsibility | Support Mechanism |
|---|---|---|---|
|
Non-Prod (Dev, Breakfix, Stage) |
Batch Monitoring Troubleshooting Data Correction Data File Retention |
Customer/SI partner |
Service Request |
|
Production |
Batch Monitoring Troubleshooting Data Correction |
Customer/Oracle |
Service Request/ Email groups |
|
Production |
Data File Retention |
Customer |
Service Request |
Batch Email Notifications
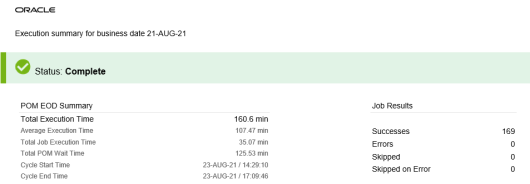
The primary source of information about the batch status on a daily basis will be the email notifications sent from POM for every batch execution. These emails will contain a summary of the batch status, the longest-running jobs, the total batch duration, and other useful details to help you assess the state of the current batch cycle. To keep the business up-to-date on batch execution status and take action in the case of batch failures, the designated administrators for the Retail Analytics and Planning applications will be expected to receive and review these emails regularly after going live in a production environment.
Figure 4-1 POM Sample Batch Notification
Each batch schedule in POM issues its email notifications. Additionally, POM supports numerous notification types for specific use cases, such as individual job failures and long-running processes. Customers are expected to set up local mailing lists which can receive automated messages from Oracle Cloud applications. To change the recipients on an email notification, access the Notifications interface in Retail Home. Follow these steps to add or update a notification:
-
Log in to Retail Home with a user having Retail Home Administrator privileges (see the section on Application Security Policies for role details if needed).
-
Open the Settings panel and access the Manage Notifications screen.
-
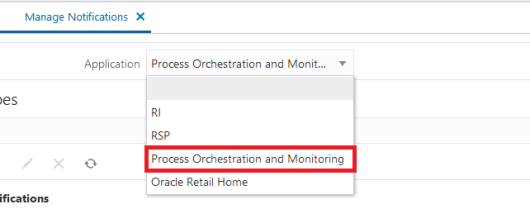
Select Process Orchestration and Monitoring from the dropdown.
-
A pre-populated list of supported notifications appears in the table below the dropdown. POM supports many different notification types. For example, the code for batch summary emails is
NightlySummaryReportExternal. You can type codes into the Filter box to find specific entries.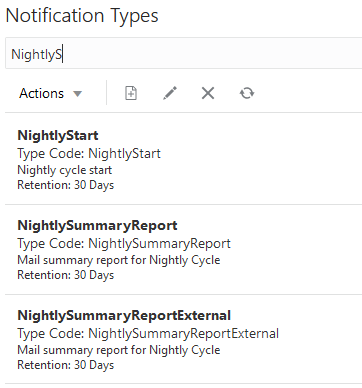
-
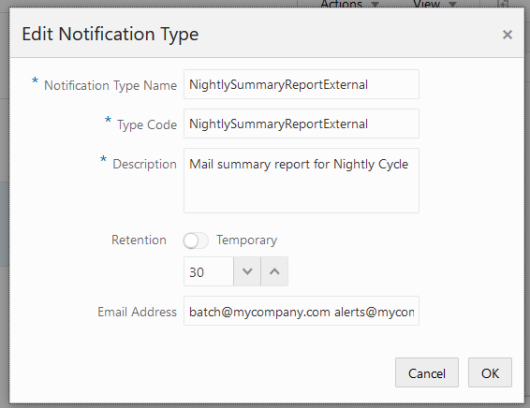
To add email addresses to a notification type, select a row and click the Edit icon. Enter one or more email addresses in the popup menu, separated by spaces. Do not edit the notification type code or name.
-
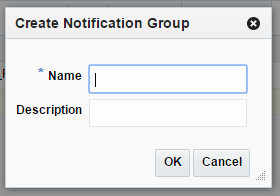
Once a Notification Type has been selected in the previous step, the Notification Groups table refreshes on the right side of the screen. You can add groups to the notification, and all users in these groups will see notifications in their Task panel from POM. Click Create in the Notification Groups table. Enter a name and description for the group of users or roles that you plan to send this notification to.
-
Click Add Job Role in the Notification Groups table to add valid roles to the new notification group. Notifications of this type will show up for users with these roles within the Notification Panels throughout Oracle Retail applications.
-
Enter a valid role name (for example,
BUYER_JOB) to issue the notifications to all users having that role.
Repeat these steps for as many POM notification types as you wish to receive.
Note:
It is not recommended to set up these emails until the implementation is nearing completion, as it could result in spamming email inboxes with many unwanted messages from non-production environmentsBatch Monitoring in POM
The POM application provides a Batch Monitoring screen for viewing detailed information about batch schedules, including
the current run status of each job in a schedule, and the runtime of completed jobs. Accessing the Batch Monitoring screen
requires you to have at least the OCI IAM user group BATCH_VIEWER_JOB. Once you have the necessary user permissions,
follow these general steps to monitor the batch:
-
Navigate to POM using the application link provided in Retail Home, or navigate directly to the POM URL, if known.
-
Click the Batch Monitoring link from the navigator menu.
-
Change the business date if you are looking to see batch information for prior runs; otherwise, select an application tile to open the batch details.
-
Select the batch cycle type (nightly / recurring / standalone).
-
Review the information shown on-screen or click Download Cycle Summary to save the information to review offline.
For additional information about this screen, refer to the POM User Guide section on “Batch Monitoring”.
Change Batch Start Time
Another maintenance task that the application administrator may be required to do periodically is to change the start time
for a batch cycle. This activity requires you to have the BATCH_SCHEDULE_ADMINISTRATOR_JOB in OCI IAM. The
POM application provides a way to configure each batch with a start time following the general steps below:
-
Navigate to POM using the application link provided in Retail Home, or navigate directly to the POM URL, if known.
-
Click the Scheduler Administration link from the navigator menu.
-
Select a schedule tile and frequency that you wish to edit.
-
Select the row displayed in the table and click the Edit action to modify the start time of the batch cycle.
-
The batch schedule change will only take effect from the next scheduler day onwards. If it needs to take effect immediately, click Restart Schedule on the Batch Monitoring screen.
For additional information about this screen, refer to the POM User Guide section on “Scheduler Administration”.
Batch Error Details
When a batch process fails in POM, an email notification should be issued, stating the exact point of failure (assuming notifications are configured). You can also access the Batch Monitoring screen in the POM user interface to view the failed job and download the log information. The steps to download job logs are below:
-
Navigate to POM using the application link provided in Retail Home, or navigate directly to the POM URL, if known.
-
Click the Batch Monitoring link from the navigator menu.
-
Select your schedule and cycle from the available batches.
-
Click the name of a job with an incomplete status. Under the Batch Details screen, locate the table for Executions and click the download link in the Log column.
Review the error log details for the cause of failure. If the error message does not indicate a problem that can be fixed internally (for example, invalid data files, duplicate data rows, or data that violates a key constraint on the interface) then raise an Oracle Service Request for assistance. After batch issues have been resolved, you may restart the batch processing from the point of failure using the POM user interface.
Reprocessing Bad Data Files
It is the customer’s responsibility to resolve issues with data files and re-upload files that need to be corrected to complete the nightly batch. For example, it is possible for a data file to have formatting issues that prevent it from loading into the Oracle database in RAP, and the file must be corrected from the source system before the RAP nightly batches can proceed. Follow the steps below to reprocess invalid files that are blocking a batch process:
-
Correct the files that have issues (coordinating with Oracle Support if POM does not help you determine which files need to be re-sent) and bundle them into a ZIP file named
RI_REPROCESS_DATA.zip. The zip file name is case sensitive and must be exactly this name, or it will not be detected. -
Using Postman or other tools, run the ad hoc process
REPROCESS_ZIP_FILE_PROCESS_ADHOCto import the ZIP file and unpack it. This process will overwrite any existing files with the new files you bring in, while keeping the other batch files unchanged. -
If your file failed to stage into the database at all, such as when it has an improper format or line-ending character, then you may rerun the failed job from POM at this time. If the batch failed further along in the process, after files are staged, then continue with the next steps.
-
Run the
C_LOAD_DATES_CLEANUP_ADHOCprocess to clear failed run statuses from the backend before loading new data. -
Use the
ADHOCprocesses associated with your failed data files to get them loaded up to the point of batch failure. For example, if the filePRODUCT.csvloaded into the database but then failed on theW_PRODUCT_DSload step, useLOAD_DIM_INITIAL_CSV_ADHOCjobs to stage the file again, then resume the batch. If it failed during theDIM_PROD_VALIDATOR_JOBstep, also use theLOAD_EXT_DIM_INITIAL_SI_ADHOCjobs to load it into the target tables, and then restart the failed batch job.
Recovering from Job Timeouts
It is possible for a job to take more than 4 hours to complete due to extremely high data volumes or very intensive calculations planned for a given date. The job in POM may time out after 4 hours of inactivity (meaning a lack of response from the database or backend process). The backend process may still be running in the database and should be allowed to complete, even though the POM job has failed. If you encounter any situation where a POM job in your batch has failed after exactly 4 hours, you may raise a Service Request asking for assistance checking for any jobs in the database that could still be running relating to the failed process.
Restarting the Job
Support may ask you to restart the failed job after they check the backend status. You may also be asked by Oracle Support
to clear entries from a table named C_LOAD_DATES, which tracks the status of many batch jobs connected to
RI and RAP foundation processes. Records in this table must be deleted to allow a failed job to be restarted if it needs to
run from the beginning. Follow the steps below to complete this activity:
-
Access the Manage System Configurations screen inside the Control & Tactical Center in AI Foundation.
-
Select the
C_LOAD_DATEStable from the dropdown menu. -
Locate the rows relating to your failed job (Oracle Support should provide some indication of which rows they are, such as any rows where
TARGET_TABLE_NAME=W_RTL_ITEM_GRP1_DS). -
Select each row and click the Delete icon to remove the record from the database.
-
Now navigate to the POM UI Batch Monitoring screen, locate/select the failed batch job, and click Rerun.
With the entry removed from C_LOAD_DATES, the job will start from the beginning and attempt to repeat
all steps in the process. Once the job completes successfully, the rest of the batch cycle will resume automatically.
Skipping the Job
Oracle Support may determine that the failed job has completed successfully in the database and you are safe to resume the batch from after the failed job. Follow the steps below to complete this activity.
-
Open the POM UI and go to the Batch Monitoring screen.
-
Locate the failed job and click the Skip button. Enter a reason for the action such as “confirmed with Oracle Support to skip the job”.
-
The job should change from Failed to Skipped status and the next job in the batch cycle will have started automatically.
Planning Batches in OAT
If you are using any Planning solution, then POM will not be the only source of batch information that you will be required to access. Planning applications like Merchandise Financial Planning schedule jobs through POM and run ad hoc tasks within the application through Online Administration Tools (OAT). Please refer to the RPASCE Administration Guide and the Administration Guide(s) for your Planning-specific application for more details on managing tasks using OAT.