2 Installing on a Windows Environment
This chapter describes how to install the AP Cloud Service Starter Kit on a Windows environment.
AP Cloud Service Starter Kit Overview
RPAS Cloud Service is comprised of many components. In addition, there are solutions that have been developed using the RPAS Cloud Service foundation. Examples of these solutions include Oracle Retail Merchandise Financial Planning (MFP) and Oracle Retail Demand Forecasting (RDF). Each application supported by the RPAS Cloud Service Platform has a dedicated Starter Kit.
The components of the Starter Kit software include the following:
-
RPAS Configuration Tools
-
RPAS Server libraries used by the Configuration Tools
-
Documentation
Note:
The Starter Kit distribution does not contain a full Retail Home instance. As a result, Retail Home and its features are not supported in Starter Kit environments.
Starter Kit Installation on Windows
For the purposes of this section, a slash “/" is used to delineate directories and files in paths. Users in a Windows Command Prompt environment need to either use a backslash “\" as the delineation character or use double quotes around paths.
This section contains the following topics:
Starting the Cygwin Shell and Setting up the Environment
Perform the following procedures to start the Cygwin shell and set up the environment.
Download and Install Java JDK
This version of ConfigTools support 64 bit Java JDK version. Java needs to be installed under the directory which does not have spaces in it.
C:\Java
Setup JAVA_HOME
After installing JDK inside Cygwin, setup the JAVA_HOME as described in Creating the Required Environment Variables.
RPAS Package Location
The RPAS package can be found on My Oracle Support.
-
Access My Oracle Support using this URL:
https://support.oracle.com -
From the My Oracle Support dashboard, click on the Patches & Updates tab.
-
From the Patches & Updates tab, select the Product or Family (Advanced Search) that is located in the Patch Search panel.
-
In the Product search box, enter Oracle Retail Assortment Planning Cloud Service .
-
Click the arrow on the Release list to view all of the available releases for your product. Select the release that you wish to access and then click Search.
Figure 2-1 Patch Search

-
From the Patch Advanced Search Results, click the patch link located in the Patch Name column.
-
Verify that this is your desired patch and then click Download.
Note:
Some customers may not be able to download the Starter Kit package, due to a limitation in My Oracle Support portal's structure. If you run into a problem trying to download, then log an SR through which Oracle will provide you a link to access the Starter Kit package.
Installing the Starter Kit
The following procedures provide information about creating the necessary folders on your Windows PC and copying the Configuration Tools components to them.
-
Using Windows Explorer, navigate to your C drive, create a folder named Oracle.
-
Open the Oracle folder.
-
Unzip the downloaded file with a name similar to
p33174696_19000_MSWIN-x86-64.zipinto the newly created Oracle directory on the Windows machine. Once extracted, the following directories appear:Directory Description ConfigTools
This directory contains the components required to run the RPAS Configuration Tools.
In this example, the path
C:\Oracle\AP_Starter_Kit\ConfigToolsis both the RPAS_HOME and RIDE_HOME. Environment variables are defined on your Windows PC to point to this location so that RPAS will function correctly. Refer to "Creating the Required Environment Variables" for information on creating the necessary RPAS variables.
Creating the Required Environment Variables
The following steps outline the process to follow and environment variables required to support the RPAS installation and application install.
Steps to Access the Environment Variables Window
Perform the following steps to access the Environment Variables window.
-
Press Windows key and R, the Run box opens.
-
Type
sysdm.cpland press Enter. -
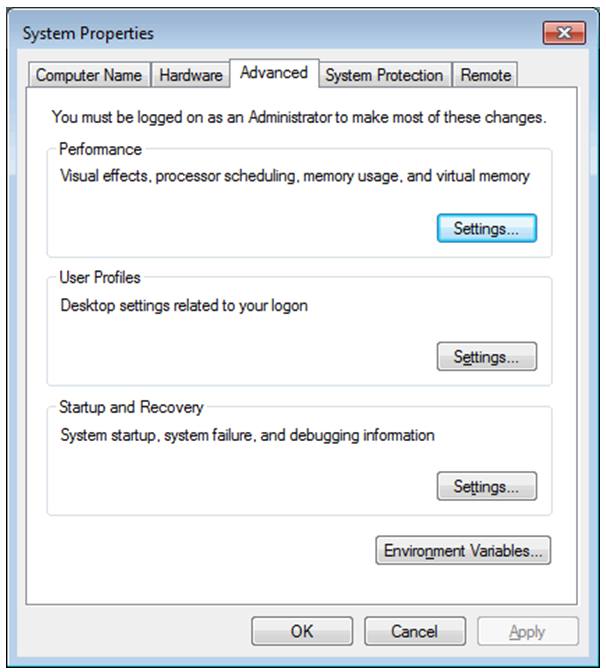
Select the Advanced tab.
-
At the bottom of the window, click Environment Variables.
Figure 2-2 System Properties - Advanced Tab

-
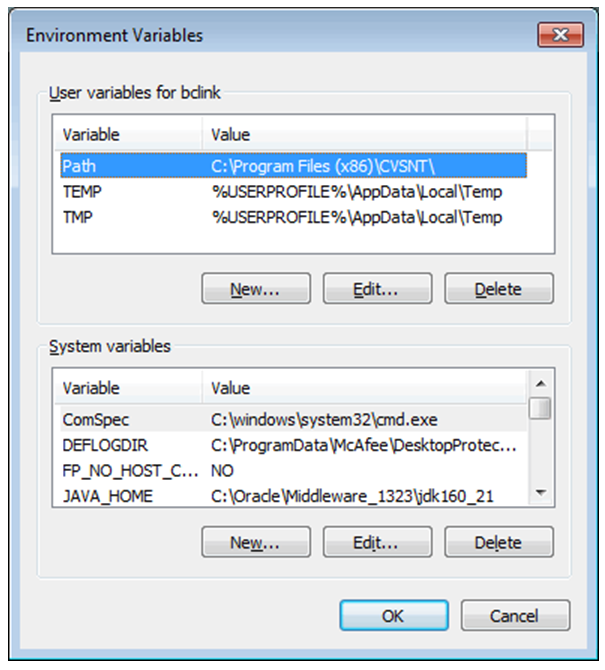
The Figure 2-3 window opens.
Figure 2-3 Environment Variables Window

Create the RPAS_HOME Environment Variable
-
Under the System variables box, click New. The New System Variable dialog box opens.
-
Enter RPAS_HOME in the Variable name field.
-
Enter the path of the RPAS Server folder in the Variable value field. In our Figure 2-4 example, this is:
/cygdrive/c/Oracle/AP_Starter_Kit/ConfigToolsFigure 2-4 Example of RPAS_HOME Variable

-
Click OK. RPAS_HOME now appears in the Variable name box.
Create the RIDE_HOME Environment Variable
-
Under the System variables box, click New. The New System Variable dialog box opens.
-
Enter RIDE_HOME in the Variable name field.
-
Enter the path of the ConfigTools folder in the Variable value field. In our Figure 2-5 example, this is:
/cygdrive/c/Oracle/AP_Starter_Kit/ConfigTools -
Click OK.
Figure 2-5 Example of RIDE_HOME Variable

Update or Create the JAVA_HOME Environment Variable
-
Under the System variables box, select the JAVA_HOME environment variable and update it
-
Enter the path of the java folder in the Variable value field. In Figure 2-6, this is:
/cygdrive/c/Java/jdk1.8.0_231Figure 2-6 JAVA_HOME Variable

-
Create the ORACLE_HOME environment variable.
-
Ensure that the Oracle Database 19c Client is installed locally on your Windows machine. If not installed, you can download a copy from:
https://www.oracle.com/database/technologies/oracle19c-windows-downloads.htmlFor example, download the
WINDOWS.X64_193000_client_home.zipfile and then unzip it into your Download directory. -
Beneath the System variables box, click New. The New System Variable dialog box opens.
-
In the Variable name field, enter ORACLE_HOME
-
In the Variable value field, enter the path of the Oracle database 19c client folder. In Figure 2-7, this is:
c:/Users/xxx/Downloads/WINDOWS.X64_193000_client_homeFigure 2-7 Example of ORACLE_HOME Variable

-
Update the PATH Variable
-
Under the System variables section, select the PATH environment variable and click Edit.
-
Insert the complete paths for RPAS_HOME, RIDE_HOME, and JAVA_HOME as shown:
%RPAS_HOME%\bin;%RPAS_HOME%\applib;%RPAS_HOME%\lib;%JAVA_HOME%\bin;%JAVA_HOME%\lib;%JAVA_HOME%\jre\bin\server;%ORACLE_HOME%\bin;%ORACLE_HOME%\lib;Note:
Remember to separate all path statements with semicolons (;).
-
Select OK to save your changes.
Update the RPAS_JAVA_CLASSPATH Variable
The RPAS_JAVA_CLASSPATH is used to enable the AP solution to execute extensions to RPAS written within the AAI framework. In order for the Configuration Tools to support these extensions, it is necessary to set the RPAS_JAVA_CLASSPATH environment variable so that the Configuration Tools can locate the libraries.
The value of the RPAS_JAVA_CLASSPATH variable should be the locations of the aaijni.jar located in the applib subdirectory of the Starter Kit installation and the oracleRpasUtils.jar located in the lib subdirectory of the Starter Kit installation. Assuming the default location for Starter Kit installation, RPAS_JAVA_CLASSPATH should be set to:
C:/Oracle/ConfigTools/AP_Cloud_Starter_Kit/lib/oracleRpasUtils.jar;C:/Oracle/ConfigTools/AP_Starter_Kit/applib/aaijni.jar
Figure 2-8 Example of RPAS_JAVA_CLASSPATH Variable

The RIDE_OPTIONS Variable
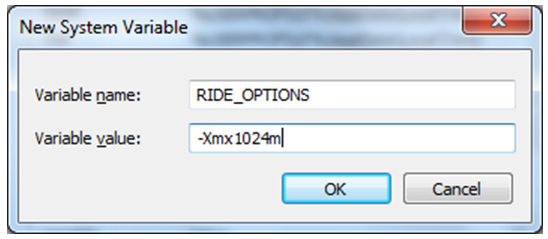
The RIDE_OPTIONS environmental variable can be used to pass information into the ConfigTools.
By default, the Java Virtual Machine requests on the order of 268 MB of RAM from the OS to allocate for its heap. This is even more of an issue when multiple configurations are open in the Configuration Tools and must be held in memory simultaneously.
By using the -Xmx option, you can instruct the
Java Virtual Machine to request more memory from the OS to prevent
situations when all allocated memory is exhausted. The syntax of the
property is:
-Xmx###m, where ### is the amount, in megabytes,
of memory the JVM is to request. Common values for this argument are -Xmx512m or -Xmx1024m.
Figure 2-9 Example of RIDE_OPTIONS Variable

Launching RPAS Cloud Edition Configuration Tools
Perform the following steps to launch RPAS Cloud Edition Configuration Tools.
-
Start Cygwin terminal and run the following commands:
>cd $RIDE_HOME/binthen
>ConfigTools
Application Building
This section describes building applications on Oracle cloud using the configuration from the Starter Kit.
Object Store Locations
For the purposes of building the application, following subpaths in the object store are used:
Note:
If you are using the VM it still uses the incoming FTP location; which is a folder shared with the host machine instead of the object store.
config
For uploading the application configuration into the cloud environment, create an archive containing the config directory and all of its contents. This archive file must be named as <config_name>_config.zip. This archive file must be uploaded to the in Object Store under planning/incoming/config location.
json
Dashboards uses dashboardSettings.json and this file is used by the RPASCE client for displaying the dashboard. This file is optional. If present it should be uploaded to the Object Store under planning/incoming/json location.
batch_control
The set of batch process control files is optional. If present they must be uploaded to the Object Store under planning/incoming/batch_control location.
integration
The batch process also needs interface.cfg file which is a configuration file to get data from RAP Integration. Refer to the Oracle Retail Predictive Application Server Cloud Edition Implementation Guide for more details about configuring the interface.cfg file. This file is needed only if some interfaces are configured to get the data. This file if present should be uploaded to the Object Store under planning/incoming/config location.
input
The hierarchy data files and measure input files must be uploaded to the object store under planning/incoming/input as individual files or as an archive in the .zip format. If uploading data files as an archive, the name of the archive file should be same as the one used in batch control files for the compressed files. Remember not to include any directory structure in the archive file. In addition to the application build and patch processes, batch framework tasks like measload, hierload, unpack, and waittrigger will check for incoming files in this same object store input location.
Updating the Starter Kit Installation
Each release of Cloud Service will have a version-specific Starter Kit. As the product is enhanced in future versions, it will be necessary to update the Starter Kit to incorporate these enhancements. The following steps outline the process of updating the Starter Kit installation:
-
Download the new version of the AP Cloud Service Starter Kit.
-
Delete the contents of the
C:/Oracle/AP_Starter_Kitdirectory.WARNING:
It is highly recommended to save custom configurations outside of the AP_Starter_Kit directory so that they are not accidentally deleted when updating the Starter Kit.
-
Follow the installation instructions for the new version of the Starter Kit.
-
Run plug-in automation (if available) on the existing configuration to create a version of the configuration for the selection configuration options. Follow the instructions in the Oracle Retail Demand Forecasting Cloud Service Implementation Guide.
-
Apply the changes in the newly generated configuration to the AP Cloud Service application.
Note:
For more information on using the RPAS Configuration Manager, refer to the Oracle Retail Predictive Application Server Configuration Tools User Guide.