11 Glossary Administration
The chapter deals with the administration of glossaries used within the system. The following topics are covered in this chapter:
Bulk Glossary Export
Retailer users with the Glossary Administrator authority profile have access to the Import/Export option within the Admin menu.
To export all glossaries:
-
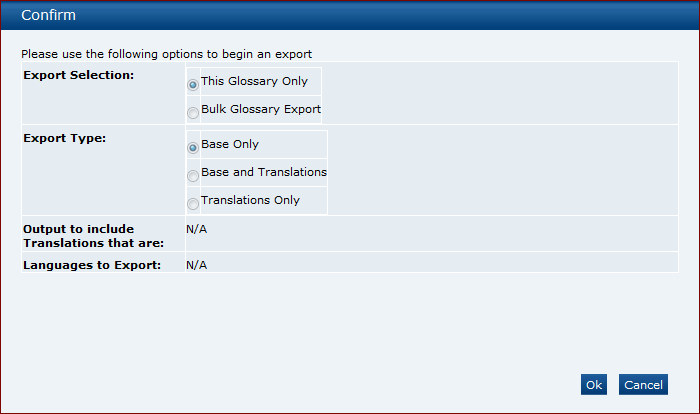
Select any glossary and then select the Export action from the actions menu. The Glossary Export dialog box opens.
Figure 11-1 Glossary Export Dialog Box

-
Set the Export Selection option to Bulk Glossary Export.
-
Set the following filters as required:
-
Using the Export Type filter:
This defaults to Base Only which means that all base files will be exported, and the following filters are set and locked to N/A:
-
Output to include Translations that are
-
Limit Languages to Export
If set to Translations Only, this will export all translations files for any of the selected languages.
-
-
Using the Output to include Translations that are filter:
This defaults to Populated and Blank, which exports all glossaries that have a value for any of the selected languages.
If set to Populated, the system will export all glossaries that have a value for any of the selected languages.
If set to Blank, the system will export all glossaries that have no value for any of the selected languages.
-
Using the Languages to Export filter:
This always begins with no languages shown as it is assumed the export will be for all languages.
Selecting one or more languages will limit the export to only those languages.
Note:
Selecting more than five languages will result in an error.
-
-
Click Submit or Submit Go to Manage Batch Jobs. A batch job is submitted to export glossaries using the filters set. All the relevant glossaries will be exported as XLS files which are compressed into a ZIP file and stored as an attachment on the job.
Single Glossary Export
To export a single glossary:
-
Select the required glossary and then select the Export action from the actions menu. The Glossary Export dialog box opens.
Figure 11-2 Glossary Export Dialog Box

-
Set the following filters as required:
-
Using the Export Type filter:
This defaults to Base Only which means that all base files will be exported, and the following filters are set and locked to N/A:
-
Output to include Translations that are
-
Limit Languages to Export
If set to Base and Translations, this will export all base and translations files for any of the selected languages.
If set to Translations Only, this will export all translations files for any of the selected languages.
-
-
Using the Output to include Translations that are filter:
This defaults to Populated and Blank, which exports all glossaries that have a value for any of the selected languages.
If set to Populated, the system will export all glossaries that have a value for any of the selected languages.
If set to Blank, the system will export all glossaries that have no value for any of the selected languages.
-
Using the Languages to Export filter:
This always begins with no languages shown as it is assumed the export will be for all languages.
Selecting one or more languages will limit the export to only those languages.
Note:
Selecting more than five languages will result in an error.
-
-
Click Ok. This will initiate the download of a ZIP file containing files according to the filters set.
Bulk Glossary Import
Retailer users with the Glossary Administrator authority profile have access to the Import/Export option within the Admin menu.
To import glossaries:
-
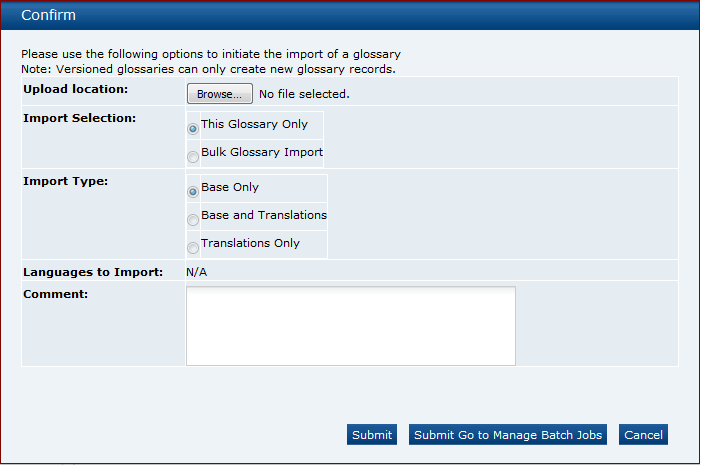
Select any glossary and then select the Import action from the actions menu. The Glossary Import dialog box opens.
Figure 11-3 Glossary Import Dialog Box

Note:
As the upload of files is limited to 10 MB, this may not be sufficient if you are attempting to upload all the glossaries for the system. An Administrator may therefore need to temporarily increase the File attachment size limit parameter.
-
Click Browse to locate and attached the file containing the glossary files.
Note:
The file being imported may be a single base file or a ZIP file containing one or more base and translation files. The system accepts CSV, XLS, or XLXS file formats.
-
Set the Import Selection option to Bulk Glossary Import.
-
Set the following filters as required:
-
Using the Import Type filter:
This defaults to Base Only which means that all base files will be imported, and the following filter will be set and locked to N/A:
-
Limit Languages to Import
If set to Base and Translations, this will import all base and translation files for any of the selected languages.
If set to Translations Only, this will import all translations files for any of the selected languages.
-
-
Using the Languages to Import filter:
This always begins with no languages shown as it is assumed the import will be for all languages.
Selecting one or more languages will limit the import to only those languages.
-
-
Enter a suitable comment into the comment field.
-
Click Submit or Submit Go to Manage Batch Jobs. A batch job is submitted to import glossaries using the filters set. All the relevant glossaries will be imported which will be stored within a ZIP file and as an attachment on the job.
Note:
If using the Glossary Import facility to load large numbers of additional ingredients to an Ingredients glossary that is already populated, the processing time may be significant due to the validation checks that are applied.
For example, uploading 4,000 additional ingredients could feasibly take around 2 hours to complete the processing.
In such a scenario, it may be desirable to split the uploads over multiple smaller batches.
Single Glossary Import
Retailer users with the Glossary Administrator authority profile have access to the Import option within the actions menu of any glossary list view.
To import a single glossary:
-
Select the glossary in the Admin area and then select the Import action from the actions menu. The Glossary Import dialog box opens.
Figure 11-4 Glossary Import Dialog Box

-
Click Browse to locate and attached the file containing the glossary files.
Note:
The file being imported may be a single base file or a ZIP file containing one or more base and translation files. The system accepts CSV, XLS, or XLXS file formats.
-
Set the Import Selection option to This Glossary Only.
-
Set the following filters as required:
-
Using the Import Type filter:
This defaults to Base Only which means that only the base file will be imported, and the following filter will be set and locked to N/A:
-
Limit Languages to Import
If set to Base and Translations, this will import a base file and translation files for any of the selected languages.
If set to Translations Only, this will import all translations files for any of the selected languages.
-
-
Using the Languages to Import filter:
This always begins with no languages shown as it is assumed the import will be for all languages.
Selecting one or more languages will limit the import to only those languages.
-
-
Enter a suitable comment into the comment field.
-
Click Submit or Submit Go to Manage Batch Jobs. A batch job is submitted to import a glossary using the filters set. All the relevant files will be imported which will be stored within a ZIP file and as an attachment on the job.
Note:
If using the Glossary Import facility to load large numbers of additional ingredients to an Ingredients glossary that is already populated, the processing time may be significant due to the validation checks that are applied.
For example, uploading 4,000 additional ingredients could feasibly take around 2 hours to complete the processing.
In such a scenario, it may be desirable to split the uploads over multiple smaller batches.
Using Glossary Import/Export to Populate a Clean System
The bulk import/export facility can be used to populate a new system with the glossary entries and their translations from another system, for example to load a UAT test system with data from the Live system.
Note:
Remember to set system parameters as required prior to loading glossaries into a new system.
Single Language Glossaries
The following steps and typical timings are for exporting, amending, and importing a single language glossary:
-
Log in as a user that has the Oracle Authorized User authority profile.
-
Open the glossary list view.
-
Select the Export action.
Set the selection as Bulk Glossary Export and Base Only.
-
Click Submit.
-
Go to Batch Jobs / Manage Batch Jobs to check for completion of the export.
The export should complete within a few minutes.
-
Save the ZIP file to your local drive and extract the glossary CSV file.
-
Make any updates, additions, or deletions to the glossary contents within the CSV file, then save, and optionally compress to a ZIP file.
-
Select the Import action within the glossary's list view.
-
Click Browse... and select the CSV or ZIP file to import.
Set the selection as Bulk Glossary Import and Base Only.
-
Click Submit.
-
Go to Batch Jobs / Manage Batch Jobs to check for completion of the import.
The job may take around 10 to 20 minutes, depending on volume of glossary data.
Fix any errors and resubmit before moving on to import translations.
-
Refresh the glossary list view to see the new entries listed.
Multi-Language Glossaries
The following steps and typical timings are for exporting, amending, and importing a multi-language glossary:
-
Log in as a user that has the Oracle Authorized User authority profile.
-
Open the glossary list view.
-
Select the Export action.
Set the selection as Bulk Glossary Export, Translations Only, and Populated.
Select the desired languages. A maximum of five languages can be selected for each Export. If more than five are required, run the export again to export the languages in batches of five.
-
Click Submit.
-
Go to Batch Jobs / Manage Batch Jobs to check for completion of the export.
The job may take around 10 to 20 minutes, depending on volume of glossary data.
-
Save the ZIP file to your local drive and extract the glossary CSV file.
-
For the Ingredients glossary, remove unwanted translation files for the bwsIngredient, ingredient, fnfIngredient, and produceIngredient files. These glossaries contain a large amount of data and applying translations can be a lengthy process. Save and optionally compress to a ZIP file.
-
Select the Import action within the glossary's list view.
-
Click Browse... and select the CSV or ZIP file to import.
Set the selection as Bulk Glossary Import and Base Only.
-
Click Submit.
-
Go to Batch Jobs / Manage Batch Jobs to check for completion of the import.
The job may take around 10 to 20 minutes, depending on volume of glossary data.
Fix any errors and resubmit before moving on to import translations.
-
Repeat the process to import the translations by setting the selection as Translations Only.
Each set of five language translations should import in around 10 to 30 minutes depending on the volume of glossary data.