7 Supplier Administration
The following topics are covered in this chapter:
Alerts
Select the Alerts option from the Admin drop-down list. The following options are available in the left pane:
Mailing Lists
Mailing lists can be used to create a predefined list of recipients to receive alerts.
To create a mailing list:
-
Select the New Mailing List action. The New Mailing List tab opens.
-
Enter the name of the mailing list. This field is mandatory.
-
Select the list of users from which you can choose the recipients in this mailing list. You can select Sites, Suppliers, or Sites & Suppliers. Open the Recipients tab to select from the list of available users.
-
Select the Save action.
Manage Alert Status
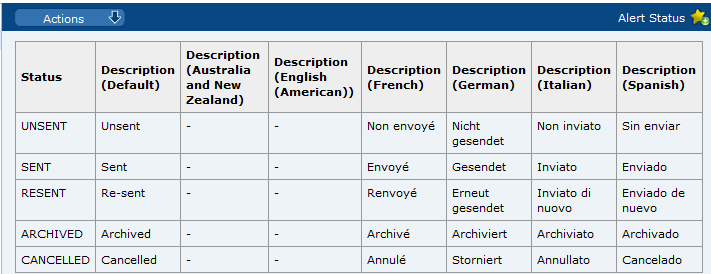
This option enables you to view the alert status codes and descriptions defined for each. To edit the list, select the Edit action. You can change the descriptions and add new status codes.
Figure 7-1 Alert Status Page
Manage Alert Response Status
This option enables you to view the alert status response codes and the descriptions defined for each. To edit the list, select the Edit action. You can change the descriptions and add new status response codes. The Alert Response Status page has the same format as the Alert Status page shown in Figure 7-1.
Suppliers & Sites
Billing Codes
This option is used to define the billing codes used when creating a new supplier. The billing code determines how costs are calculated during the registration process. Billing codes are optional. If billing is not applicable or a portal, a code could be defined with a zero charge.
During the registration of a new supplier in the Supplier module, the values in this table are used to determine the cost charged for the registration:
Registration Cost equals Fixed Price plus (Charge Per Site multiplied by the number of sites registered)
For more information, see the Oracle Retail Brand Compliance Management Cloud Service Supplier User Guide.
Figure 7-2 Billing Codes Page

To edit the list of billing codes, select the Edit action. The table opens in edit mode. The code and any existing descriptions cannot be edited.
To add a new billing code, click Add. A new row is added to the table. Enter the code, charge per site, fixed price, description in the default language. Enter any translations. Select the Save action.
Order Requests
This option is used to manage registration order requests.
To work with orders:
-
Select Order Requests. The list of orders appears. It is sorted into processed and unprocessed orders.
Figure 7-3 Orders Page

-
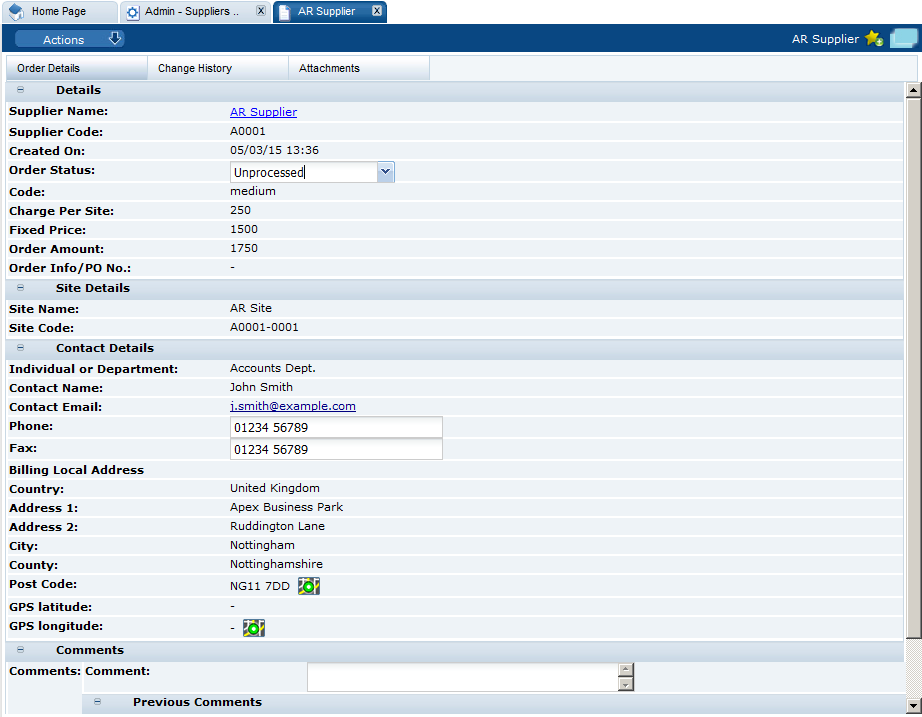
To see the details for an order, select the order and then select the View action. A new tab opens with the order details in read-only mode. For an example of the content, see Figure 7-4.
-
To edit an order, select the order an then select the Edit actions. A new tab opens with the order record in edit mode.
Figure 7-4 Order Details Page
-
Order status: Choose the status from the drop-down list. The status can be updated to Processed once the supplier has been billed.
-
Contact Details: The Phone and Fax fields can be updated.
-
Comments: Enter any comments.
-
Supplier Statuses
This option is used to define the statuses that can be associated with the registration of a supplier. The codes are defined by the system; new codes cannot be added. To edit the existing codes, select the Edit action. The table opens in edit mode. Any translations that do not already exist can be added. No other changes can be made.
Figure 7-5 Supplier Statuses Page

Site Statuses
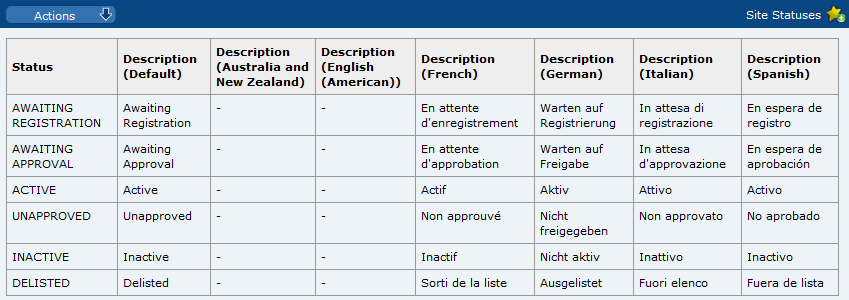
This option is used to define the statuses that can be associated with a site. The statuses are defined by the system; new statuses cannot be added. To edit the existing statuses, select the Edit action. The table opens in edit mode. Any translations that do not already exist can be added. No other changes can be made.
Figure 7-6 Site Statuses Page
Business Categories
Select the Business Categories option in the left pane. The list of defined business categories appears in the right pane. Each top-level category can be expanded to show its child categories.
Figure 7-7 Business Categories Page

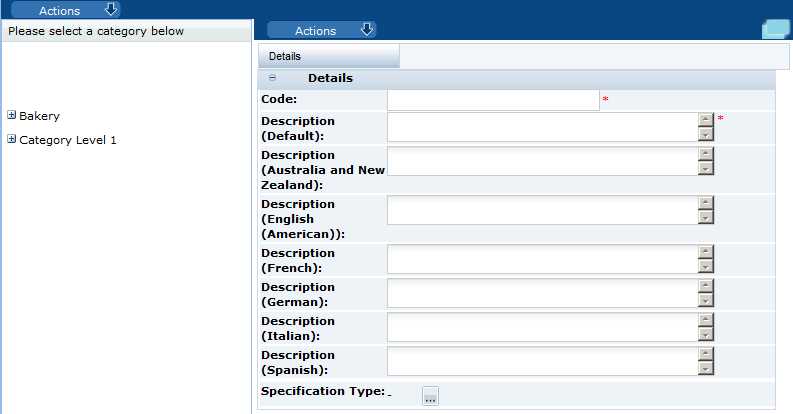
To edit a category entry, select the entry in the left pane and then select the Edit action in the right pane. The category opens in edit mode. The descriptions and specification types can be edited. For an example of the content of this page, see Figure 7-8.
To create a new top-level category:
-
Click Create new top-level category. The Business Category Details page opens.
Figure 7-8 Add Business Category Details Page
-
Enter the details for the new category:
-
Enter the code. This is a mandatory field.
-
Enter the description for the default language. This is a mandatory field. Enter any translations.
-
To select the specification types for this level, click the icon. The Select Specification Types dialog box appears. Select the specifications for this level and click Ok.
-
-
Select the Save action. The business category is added to the list of categories.
-
To add child categories, select the top-level category and then select the Add Child Category action.
-
Enter the details for the child level and select the Save action.
Supplier Types
This option is used to define the types of suppliers that can be created.
Figure 7-9 Supplier Types Page

To edit the list of supplier types, select the Edit action. The table opens in edit mode. For existing supplier types, only the translated descriptions that do not already exist can be edited. To add a supplier type, click Add. A new row is added to the table. Enter the new supplier type and description in the default language. Enter any translations. Select the Save action.
Site Types
This option is used to define the types of sites that can be created.
To edit the list of site types:
-
Select the Edit action. The table opens in edit mode. For existing site types, only the translated descriptions that do not already exist can be edited.
-
To add a site type:
-
Click Add. A new row is added to the table.
-
Enter the new site type and description in the default language. Enter any translations.
-
To select the specification types enabled for this site, click the icon and select the specifications in the dialog box. Click Ok.
-
-
Select the Save action.
Maintenance Audit Reasons
This option is used to define the reasons why a maintenance audit needs to take place. The Maintenance Audit Reasons page has the same format as the Supplier Statuses page shown in Figure 7-5.
To edit the list of reasons, select the Edit action. The table opens in edit mode. For existing reasons, only the translated descriptions that do not already exist can be edited. To add a maintenance audit reason, click Add. A new row is added to the table. Enter the new reason code and description in the default language. Enter any translations. Select the Save action.
Invoicing Systems
Invoicing systems are used in the Billing Details area of the Supplier and Site records to assign alternative account codes, such as the supplier's account number in the retailer's corporate purchasing system. This option is used to define the available invoicing systems. The Invoicing Systems page has the same format as the Supplier Statuses page shown in Figure 7-5.
To edit the list of invoicing systems, select the Edit action. The table opens in edit mode. For existing invoicing systems, only the translated descriptions that do not already exist can be edited. To add an invoicing system, click Add. A new row is added to the table. Enter the new invoicing system code and description in the default language. Enter any translations. Select the Save action.
Supplier Top Grades
This option is used to define the grades that can be associated with a supplier for an audit/visit, for example, A, B, and C. The Supplier Top Grades page has the same format as the Supplier Statuses page shown in Figure 7-5.
To edit the list of grades, select the Edit action. The table opens in edit mode. For existing grades, only the translated descriptions that do not already exist can be edited. To add a new grade, click Add. A new row is added to the table. Enter the new grade code and description in the default language. Enter any translations. Select the Save action.
Site Top Grades
This option is used to define the grades that can be associated with a site for an audit/visit, for example, A, B, and C. The Site Top Grades page has the same format as the Supplier Statuses page shown in Figure 7-5.
To edit the list of grades, select the Edit action. The table opens in edit mode. For existing grades, only the translated descriptions that do not already exist can be edited. To add a new grade, click Add. A new row is added to the table. Enter the new grade code and description in the default language. Enter any translations. Select the Save action.
Reference Statuses
This option is used to define the reference codes that can be associated with a supplier site, for example, the health mark codes used in the UK or the FDA registration numbers used in the US. The Reference Status page has the same format as the Supplier Statuses page shown in Figure 7-5.
To edit the list of statuses, select the Edit action. The table opens in edit mode. For existing statuses, only the translated descriptions that do not already exist can be edited. To add a new status, click Add. A new row is added to the table. Enter the new code and description in the default language. Enter any translations. Select the Save action.
Reference Types
This option is used to define the reference types, or certificate types, that can be associated with a supplier.
Figure 7-10 Reference Types Page
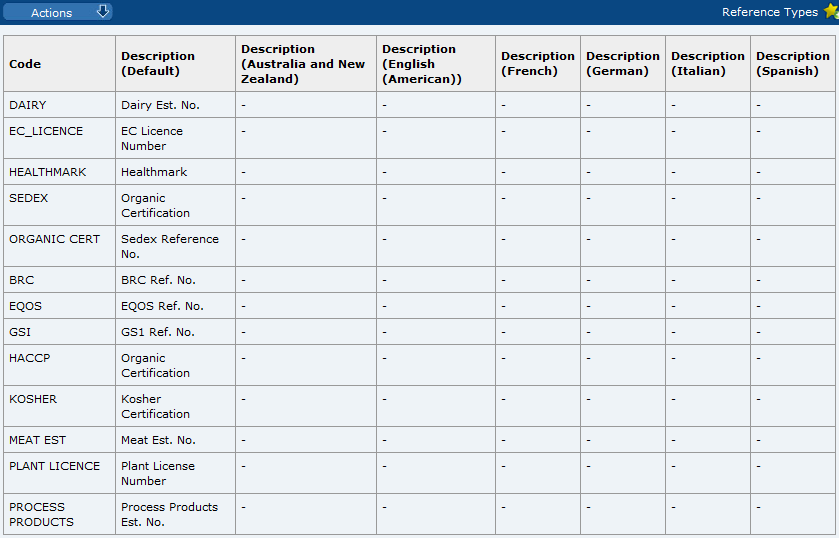
To edit the list of reference types, select the Edit action. The table opens in edit mode. For existing types, only the translated descriptions that do not already exist can be edited. To add a new type, click Add. A new row is added to the table. Enter the new type code and description in the default language. Enter any translations. Select the Save action.
Business Units
This option is used to define the classifications of suppliers and sites.
Figure 7-11 Business Units Page

To edit the list of business units, select the Edit action. The table opens in edit mode. For existing business units, only the translated descriptions that do not already exist can be edited. To add a new business unit, click Add. A new row is added to the table. Enter the new business code and description in the default language. Enter any translations. Select the Save action.
Currencies
This option is used to define the supported currencies, for example, Sterling and Dollars. The Currencies page has the same format as the Supplier Statuses page shown in Figure 7-5.
To edit the list of currencies, select the Edit action. The table opens in edit mode. For existing currencies, only the translated descriptions that do not already exist can be edited. To add a new currency, click Add. A new row is added to the table. Enter the new currency code and description in the default language. Enter any translations. Select the Save action.
Countries
This option is used to define the list of countries used throughout the system (in addresses, countries of origin, countries of manufacture, and so on).
The maintenance of Countries also incorporates Areas and Regions. Areas are geographical areas that are not countries, but may be referenced in a similar way within the system. For example, the country of origin of a product may be a country or may be an area, such as the Atlantic Ocean.
When the user selects from the pick-list of countries, it either contains a list of just Countries (for example, where completing an address), or Countries and Areas (for example, where selecting a country of origin).
A list of Regions can be maintained against a Country to provide, for example, the states or countries of that country. The list can be used to provide a pick-list of the states/counties for use when entering the address for that country.
Figure 7-12 Countries Page
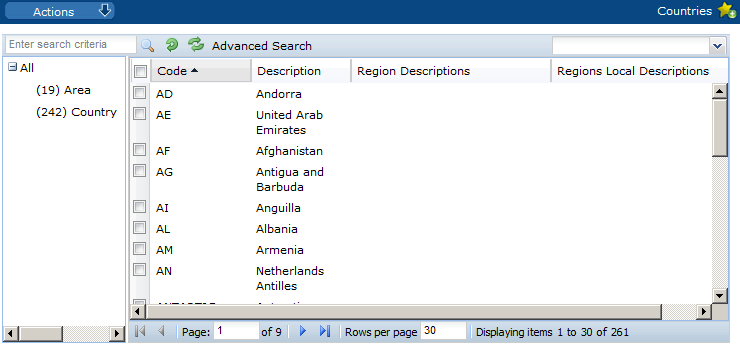
To edit a country entry, select the entry in the list and then select the Edit action. A tab opens in edit mode. Translated descriptions that do not already exist and additional regions can be added. For an example of the content of this page, see Figure 7-13.
To add a new country:
-
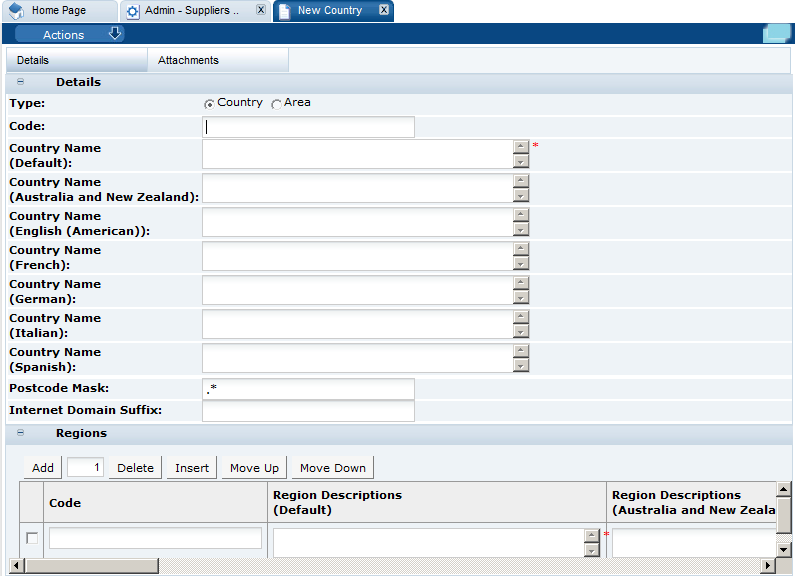
Select the New Country action. The New Country tab opens.
Figure 7-13 New Country Page
-
In the Details section:
-
Type: Select whether this is a country or area.
-
Code: Enter a code for the country.
-
Country Name: Enter the country name in the default language. This field is mandatory. Enter any translations.
-
Postcode Mask: The Postcode Mark is used to define the format of the postal or zip code for the country. Enter a post code mask to be used for this country.
-
Internet Domain Suffix: Enter the Internet domain suffix used for this country.
-
-
In the Regions section, enter any regions for this country or area. To add a region, click Add. A row is added to the table. Enter the code for the region. Enter a description in the default language. The description is a mandatory field. Enter any translations.
-
Select the Save action.
Other Production Details
This option is used to define the list of production details that can be assigned to a site. The Other Production Details page has the same format as the Supplier Statuses page shown in Figure 7-5.
To edit the list of production details, select the Edit action. The table opens in edit mode. For existing details, only the translated descriptions that do not already exist can be edited. To add a new production detail, click Add. A new row is added to the table. Enter the new detail code and description in the default language. Enter any translations. Select the Save action.
Area
This option is used to define the supported areas. The Areas page has the same format as the Supplier Statuses page shown in Figure 7-5.
To edit the list of areas, select the Edit action. The table opens in edit mode. For existing areas, only the translated descriptions that do not already exist can be edited. To add a new area, click Add. A new row is added to the table. Enter the new area code and description in the default language. Enter any translations. Select the Save action.
Delete Supplier
This option is used to delete suppliers. In order for a supplier to be deleted, the following criteria must be met:
-
The supplier has not gone through the registration process, that is, only a supplier with sites at a status of AWAITING REGISTRATION can be deleted.
-
There is no Alert Response record beyond the status of OUTSTANDING for the supplier being deleted.
-
There are no Scorecards beyond the status of FUTURE for any of the sites of a supplier being deleted.
To delete a supplier:
-
Select the Delete Supplier option from the Admin drop-down list. The Select Suppliers page appears.
-
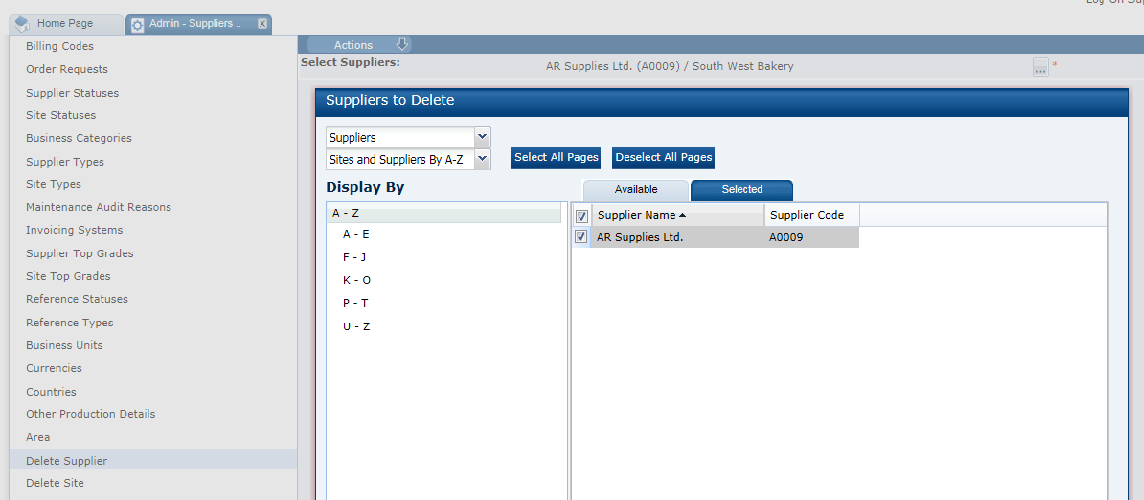
To display the list of suppliers, select the icon. The Suppliers to Delete page appears.
Figure 7-14 Suppliers to Delete Page
-
Select the suppliers to be deleted and click Ok. The selections are shown in the right pane.
-
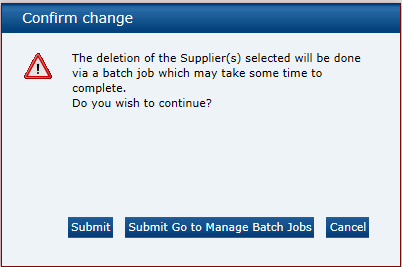
To delete the suppliers, select the Submit action. A dialog box appears to enable you to confirm the deletion. To confirm the deletion, click OK. A batch job is submitted to perform the deletion.
Figure 7-15 Delete Suppliers Confirm Change Dialog Box
Delete Site
This option is used to delete sites. In order for a site to be deleted, the following criteria must be met:
-
The site has not gone through the registration process, that is, only sites at a status of AWAITING REGISTRATION can be deleted.
-
There is no Alert Response record beyond the status of OUTSTANDING for the site being deleted.
-
There are no Scorecards beyond the status of FUTURE for the site being deleted.
To delete a site:
-
Select the Delete Site option from the Admin drop-down list. The Select Sites page appears.
-
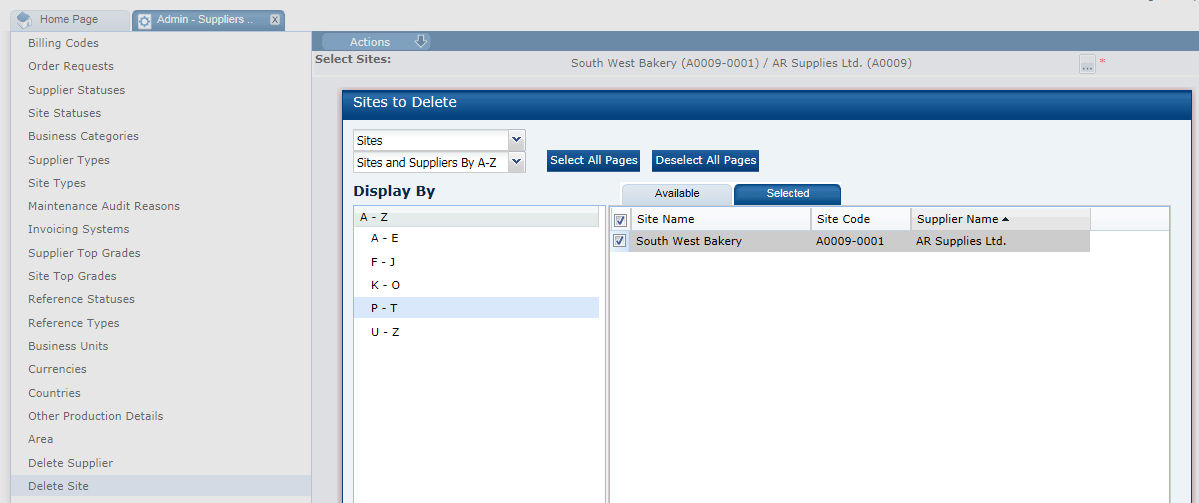
To display the list of sites, select the icon. The Sites to Delete page appears.
Figure 7-16 Sites to Delete Page
-
Select the sites to be deleted and click Ok. The selections are shown in the right pane.
-
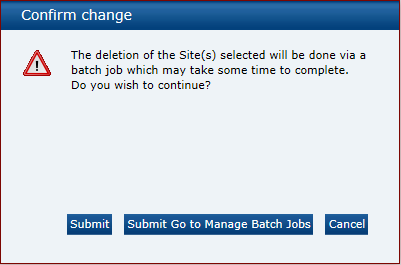
To delete the sites, select the Submit action. A dialog box appears to enable you to confirm the deletion. To confirm the deletion, click OK. A batch job is submitted to perform the deletion.
Figure 7-17 Delete Sites Confirm Change Dialog Box
Upload Supplier and Site Data
Retailer users with the Upload Administrator authority profile have access to the Upload Data option within the Admin menu for the upload of suppliers and sites.
To upload new suppliers and sites:
-
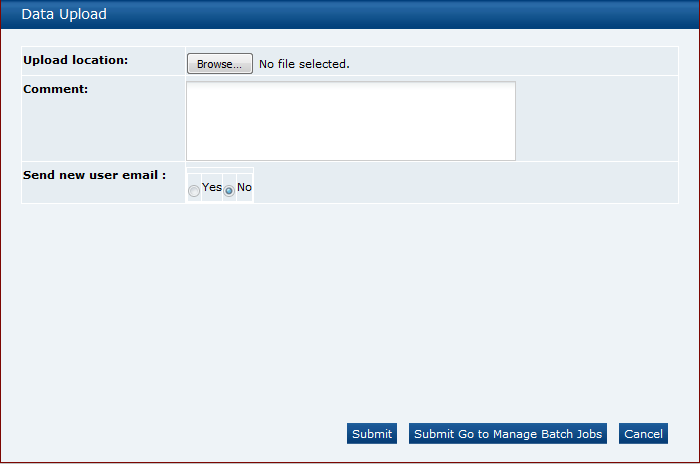
Select the Import action from the Suppliers List View actions menu. The Data Upload dialog box opens.
Figure 7-18 Data Upload Dialog Box
-
Click Browse to search for the upload file.
-
Enter any comments to describe the reason for the upload.
-
Select whether the system is to automatically send email to the primary contact user of each newly created supplier/site on successful completion of the upload. The email will invite the user to register on the portal. The default is No, which will not send an email.
-
To upload the file, select either the Submit or Submit Go to Manage Batch Jobs action. At this point, the system will create a background job to process the spreadsheet. The spreadsheet used to upload the data will be stored within the Attachments tab of the batch job.
Note:
An email will be sent to the job submitter if the date within the upload file fails validation.
Download Supplier and Site Upload Spreadsheet
Retailer users with the Upload Administrator authority profile also have access to the option to download a blank spreadsheet.
To download the latest version of the upload spreadsheet:
-
Select the Download Blank Spreadsheet action from the Suppliers List View actions menu. An operating system specific dialog box opens with the option to either open or save the file.
-
Select the save option to download the ZIP file to your desktop.
Note:
The ZIP file contains a spreadsheet workbook with the first tab used to upload the data. The second tab contains guidance notes and the remaining tabs contain the valid glossary values.
The column heading text shown on the first tab is in the user's language. If translations are not present for the user's language, the system the portal's default language is substituted. An asterisk (*) is shown in a column heading if an entry is mandatory.
Scorecards
Select the Scorecards option from the Admin drop-down list. The following options are available in the left pane:
Scorecard Questions
Each scorecard template is comprised of a series of questions which may be selected from this glossary.
Figure 7-19 Glossary Scorecard Question Page
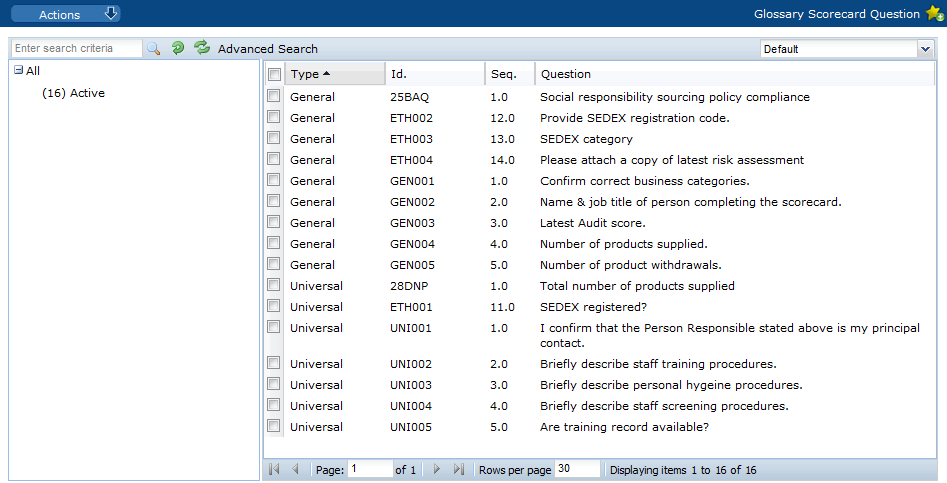
To edit a question, select the question and then select the Edit action. A tab opens with the record in edit mode.
To create a new scorecard question:
-
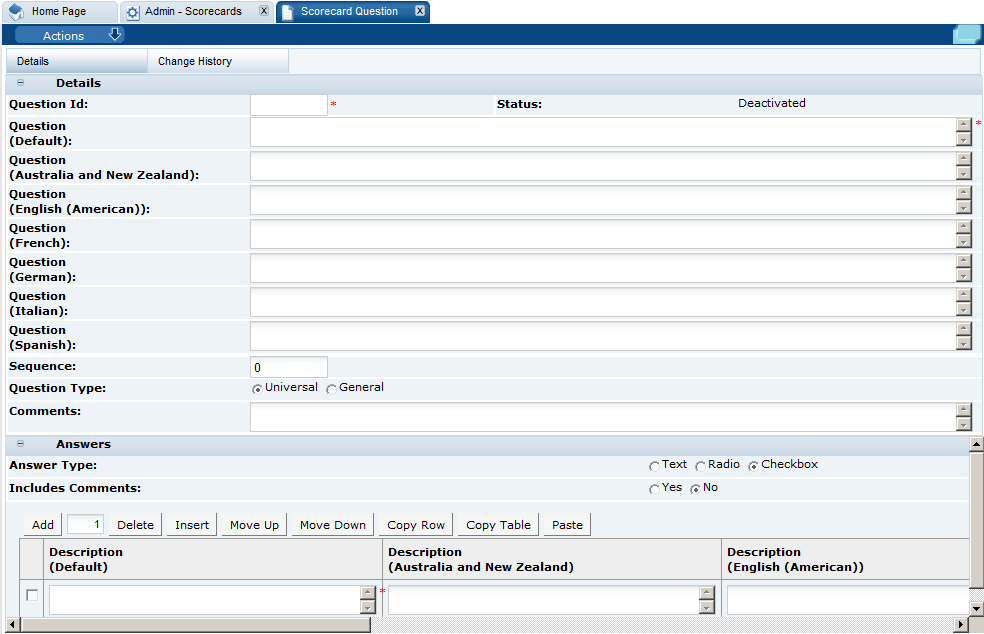
Select the New Question action. The Scorecard Question tab opens.
Figure 7-20 New Scorecard Question Page
-
In the Details section:
-
Question Id: Enter the ID for this question. The ID must be between 3 and 10 characters and unique. The value cannot be changed once the question has been created. This field is mandatory.
-
Status: The status is set to Deactivated.
-
Question: Enter the question in the default language. This field is mandatory.
-
Sequence: Enter the sequence number for this question. The sequence number is used to set the default order of questions within the scorecard template.
-
Question Type: Select the type of question:
-
Universal questions are automatically added to a scorecard template. These questions may be removed and individually re-added as required (if configured in System Parameters to allow removal).
-
General questions are manually added to a scorecard template from the questions glossary.
-
-
Comments: Enter any comments. This field is not mandatory.
-
-
In the Answers section:
-
Answer Type: Select the type of answers allowed for this question.
-
Includes Comments: If set to Yes, a text field is included in the questionnaire to enable the user to enter any comments.
-
To add an answer choice, click Add. Enter the answer in the default language. This is a mandatory field. Enter any translations.
-
-
Select the Save action.
Scorecard Templates
Scorecards provide a means for the retailer to assess their suppliers on an on-going (or ad hoc) basis against a set of predefined criteria. Scorecards are made up of a series of questions which may be answered by the suppler as a self-assessment or completed by the retailer.
Any number of types of scorecard can be configured, with the option to use weighted scoring for the overall grading of suppliers' responses. On completion of a scorecard, the next one can be automatically scheduled based on a predefined periodic or quarterly frequency.
Scorecard templates define the rules that control the behavior of the different types of scorecards. Every scorecard is created from a template which defines the rules for how it behaves within the system, that is, the set of questions and permitted answers, the setting of basic default values, and whether certain fields are used or hidden.
Figure 7-21 Glossary Scorecard Templates Page

To edit a template, select the entry and then select the Edit action. A tab opens in edit mode to enable you to edit the template. For an example of the content, see Figure 7-22.
To create a new template:
-
Select the New Scorecard Template action. The New Scorecard Template tab opens.
Figure 7-22 New Scorecard Template Page
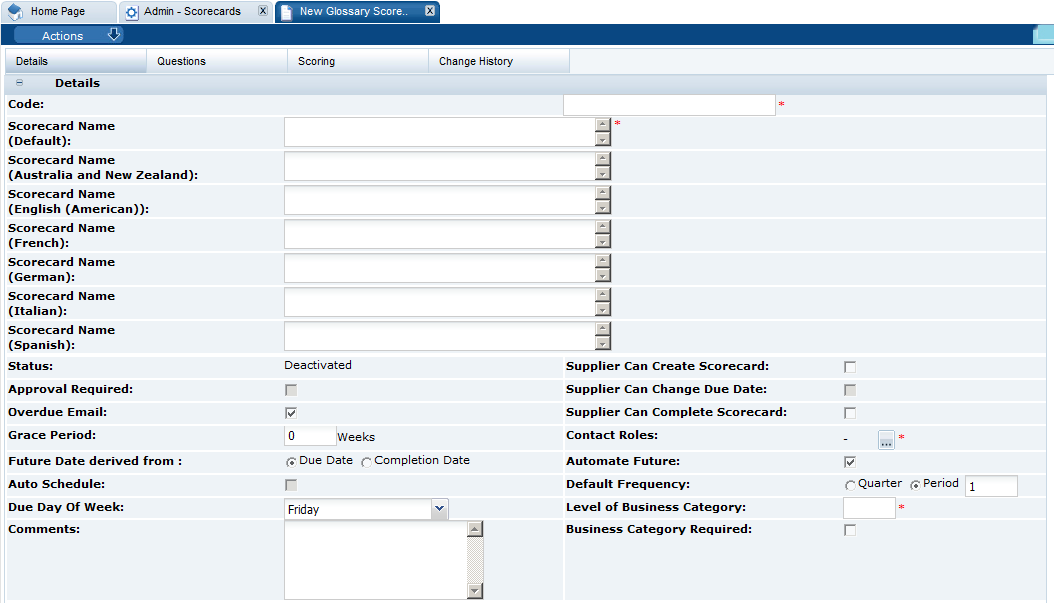
Table 7-1 describes the fields in the Details section.
Table 7-1 New Scorecard Template Fields
Field Description Code
Enter a unique code for this template. This field is mandatory.
Scorecard Name
Enter the name for the template in the default language. This field is mandatory. Enter the translations.
Status
The status is set to Deactivated.
Supplier Can Create Scorecard
If checked, the supplier user can choose to create this type of scorecard. The default is unchecked.
Supplier Can Change Due Date
If the supplier can create this type of scorecard and this field is checked, the supplier user may also change the due date of this type of scorecard. The default is unchecked.
Supplier Can Complete Scorecard
If checked, the supplier user may choose to complete this type of scorecard. The default is unchecked.
Approval Required
If the supplier can complete this type of scorecard and if this field is checked, the retailer user is required to approve this scorecard before the supplier can complete it. The default is unchecked.
Grace Period
Enter the number of days or weeks after the scorecard's due date when it becomes overdue.
Overdue Email
If checked, an email is automatically generated to the supplier if the supplier has not completed the scorecard by the time it becomes overdue.
Contact Roles
Select the roles for which supplier users receive the notifications if the scorecard becomes overdue. The field is mandatory.
Future Date Derived From
These fields are used to control the rules for automatically scheduling subsequent scorecards of this type, and when a scorecard becomes overdue.
Automate Future versus Auto Schedule
If a scorecard’s template is set to Automate Future the system will automatically create the next future scorecard of this type for active sites that have previously had this type of scorecard and do not already have one currently scheduled, or do have one scheduled but its due date has been reached. This ensures all sites that have this type of scorecard always have one scheduled.
If a scorecard’s template is set to Auto Schedule, the system prompts the user with the option to auto-schedule the next future scorecard of this type for the site when the existing scorecard is completed.
Automate Future
Auto Schedule
Default Frequency
Due Day Of Week
Level of Business Category
Enter the number of levels of business category to be recorded for this type of scorecard. Set to zero if none are required. This is a mandatory field.
Business Category Required
If checked, the business category becomes mandatory when the scorecard is completed.
Comments
Enter a comment regarding this template.
-
Set the questions for this type of scorecard in the Questions tab using the tables of questions for Universal, General, and Ad Hoc Questions:
-
Universal questions are automatically added.
-
General Questions are selected from the glossary of Scorecard Questions.
-
Ad Hoc questions can be entered specifically for this type of scorecard.
Once the questions have been added, the Refresh Preview action can be used to show the scorecard as it will be presented to the supplier.
-
-
Select any scoring rules for this type of scorecard in the Scoring subtab.
-
Select the Save action.
Scorecard Status
This option enables you to view the scorecard status codes and descriptions defined for each. To edit the list, select the Edit action. You can change the descriptions and add new status codes. The Scorecard Status page has the same format as the Alert Status page shown in Figure 7-1.
Audits & Visits
Select the Audit & Visits option from the Admin drop-down list. The following options are available in the left pane:
Certification Bodies
Certification bodies are assigned to audits/visits that are carried out by a third-party organization. A certification body defines the details of an organization that carries out an audits. On the Certification Bodies page, the name and contact details of existing auditors and certification bodies are shown.
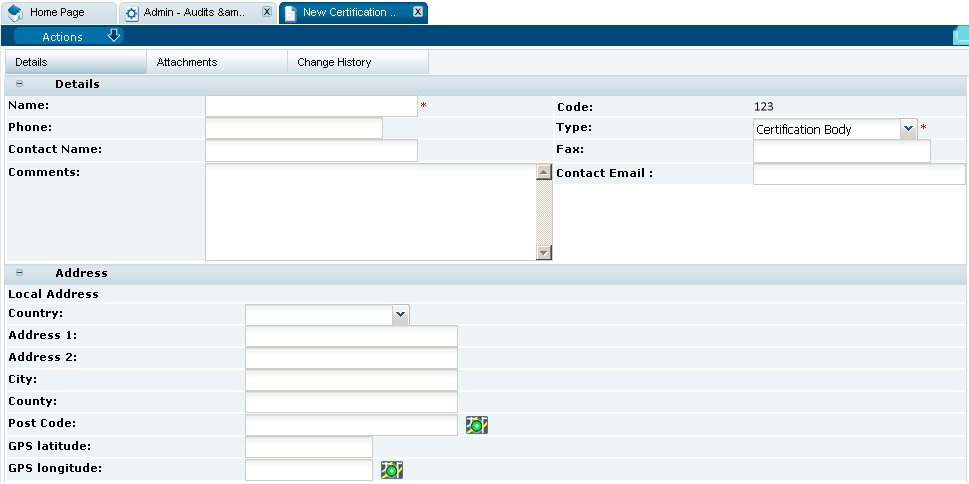
To edit the details for a certification body, select the entry and then select the Edit action. A page opens in edit mode with the details of the certification body. For an example of the content, see Figure 7-23.
To add a new certification body, select the New Certification Body action. The New Certification Body tab opens. The Name and Type fields are mandatory. The contact details and address may also be entered.
Figure 7-23 New Certification Body Page
Audit/Visit Templates
Audit/visit templates define the rules that control the behavior of the different types of audits and visits. Every audit or visit is created from a template which defines the rules for how it behaves within the system, that is, the setting of basic default values and whether certain fields are used or hidden.
Figure 7-24 Audit/Visit Templates Page
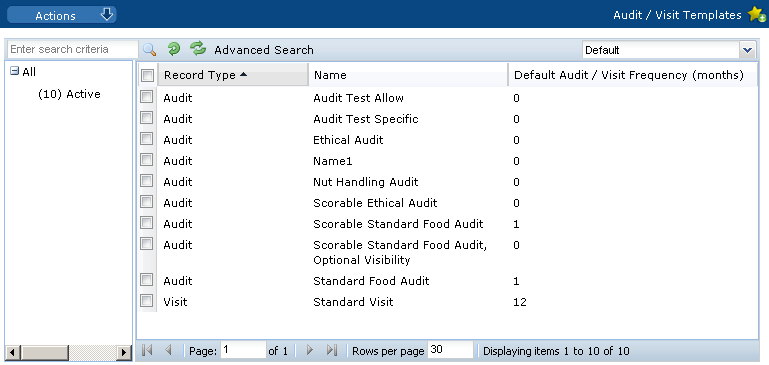
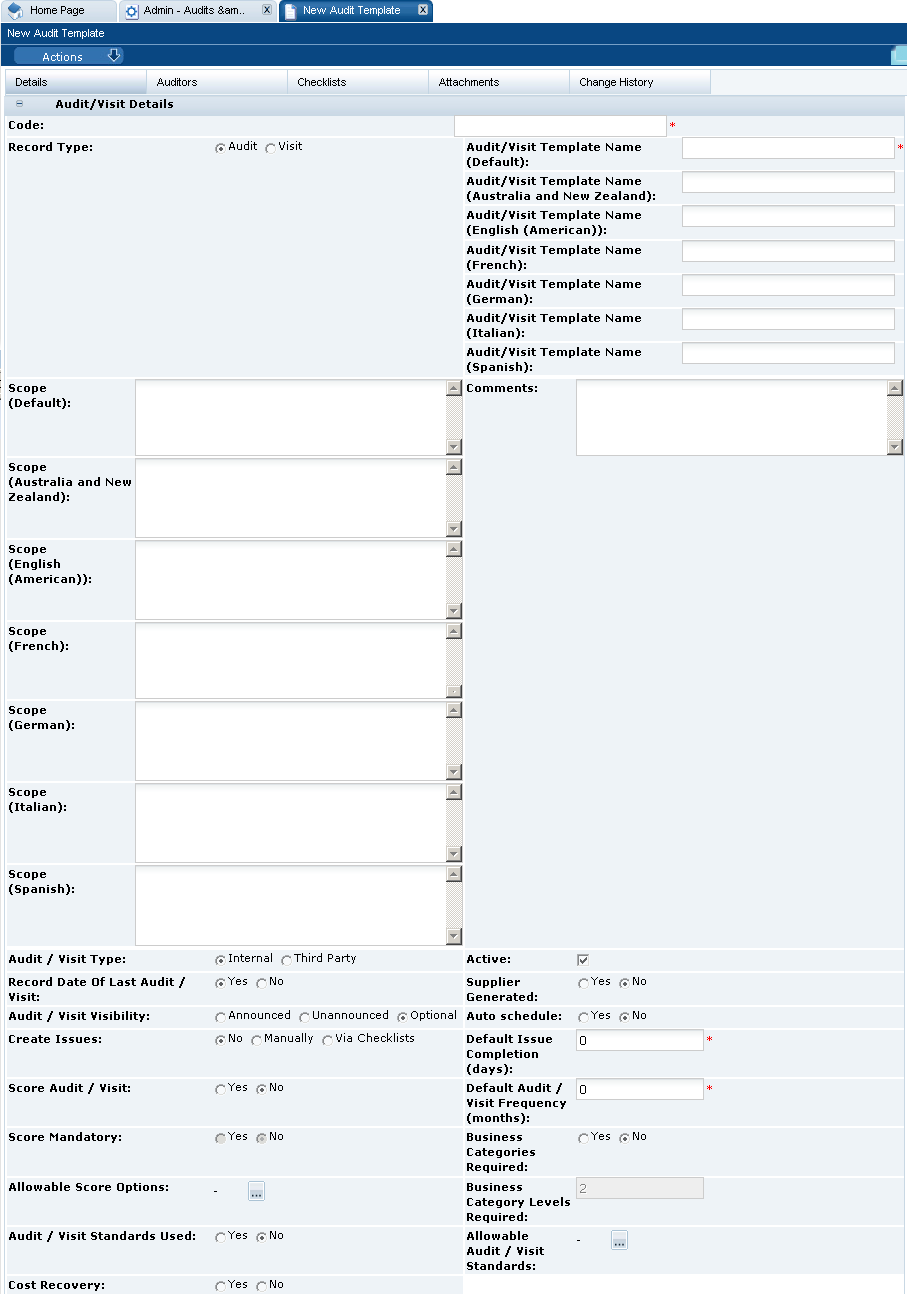
To edit a template, select the entry and then select the Edit action. A tab opens in edit mode to enable you to edit the template. For an example of the content, see Figure 7-25.
To create a new template:
-
Select the New Audit/Visit Template action. The New Audit/Visit Template tab opens.
Figure 7-25 New Audit Template Page
-
Table 7-2 describes the fields in the Audit/Visit Details section.
Table 7-2 Audit/Visit Template Fields
Field Description Active
Check the box if this template is set active when created.
Allowable Audit/Visit Standards
Click the icon to select the standards for this audit/visit.
Allowable Score Options
If scoring is used, click the icon to select the scoring options to use.
Audit/Visit Standards Used
If set to Yes, this type of audit is aligned with a particular standard.
Audit/Visit Template Name
Enter the name for the template in the default language. This field is mandatory. Enter the translations.
Audit/Visit Type
-
Select Internal if the audit/visit is carried out by the retailer.
-
Select Third Party if a third-party auditor or certification body carries out the audit/visit.
Audit/Visit Visibility
This field determines whether the supplier knows in advance of an audit/visit. If Unannounced, the supplier is not notified until it is time for them to collaborate.
Auto Schedule
If set to Yes, a new future audit/visit is automatically scheduled on completion of the current audit/visit.
Business Category Levels Required
If the Business Categories Required field is set to Yes, enter the number of levels of business category to use on the audit/visit record.
Business Categories Required
If set to Yes, a business category is required for this type of audit/visit.
Code
Enter a unique code for this template. This field is mandatory.
Comments
Enter a comment regarding this template.
Cost Recovery
If set to Yes, the all or part of the cost of the audit/visit is recharged to the supplier.
Cost Recovery Comments
If the Cost Recovery field is set to Yes, the amount to be recharged can be entered as a comment.
Create Issues
If set to Yes, issues can be raised against audits/visits of this type regardless of whether the issue is created by the supplier or retailer.
Default Audit/Visit Frequency (months)
Enter the frequency of the audit/visit in months. This is used when auto-scheduling the next audit/visit.
Default Issue Completion (days)
Enter the number of days an outstanding issue must be completed by before being flagged as urgent.
Record Date of Last Audit/Visit
If set to Yes, the site record is updated with the date when the latest audit is completed.
Record Type
Select whether this template is for an audit or a visit.
Scope
This is the summary of the purpose of the audit/visit. This is the default text for the Scope field in the audit/visit.
Score Audit/Visit
If set to Yes, an overall score/grade is required.
Score Mandatory
If set to Yes, scoring is mandatory when scoring is being used.
Supplier Generated
If set to Yes, the supplier can create new audits/visits of this type.
-
-
In the Auditors subtab, select the certification bodies and internal auditors who are allowed to perform the audit:
-
If All is selected, all defined certification bodies or internal auditors are allowed to perform the audit.
-
If Only Allowable is selected, the list of certification bodies or internal auditors is chosen. Click the icon and select the certification bodies or internal auditors.
Figure 7-26 New Audit Template Auditors Subtab

-
-
Select the Checklists subtab. Add any checklists to be used for the audit. When an audit/visit is created, if its template has checklists assigned, the checklists are automatically created as Audit/Visit Checklist records for completion during the audit/visit.
-
In the Attachments subtab, attach any documents to the audit.
-
Select the Save action.
Audit/Visit Issue Types
Audit/visit issue types define the types or levels of non-conformance that can be raised against an audit. An audit/visit template may not be edited once it has been made active; to make any changes it must first be deactivated. The Audit/Visit Issue Types page has the following columns:
-
Set to Yes if the issue type is active.
-
Code for the issue type.
-
Description for the issue type in the default language.
-
Descriptions for each supported language.
Figure 7-27 Audit/Visit Issue Types Page

To edit the list of issue types, select the Edit action. The table opens in edit mode. Only the translated descriptions can be edited.
To add a new issue type, click Add. If the issue type should be set active, check the box in the Active column. The code and description in the default language are mandatory fields.
Auditor Types
Audit types are used to differentiate between individuals (Auditors) and organizations (Certification Bodies). The Auditor Types page has the same format as the Audit/Visit Issue Types page shown in Figure 7-27.
To edit the list of auditor types, select the Edit action. The table opens in edit mode. Only the translated descriptions can be edited.
To add a new auditor type, click Add. If the auditor type should be set active, check the box in the Active column. The code and description in the default language are mandatory fields.
Audit/Visit Risk Levels
Where used, the levels of risk may be assigned to a site based on the type of product the site produces, for example, High Risk and Low Risk. The levels can be used, based on risk level, to vary the frequency of an audit/visit type per site. The Audit/Visit Risk Levels page has the same format as the Audit/Visit Issue Types page shown in Figure 7-27.
To edit the list of risk levels, select the Edit action. The table opens in edit mode. Only the translated descriptions can be edited.
To add a new risk level, click Add. If the risk level type should be set active, check the box in the Active column. The code and description in the default language are mandatory fields.
Audit/Visit Scores
Audit/visit scores provide the scoring or grading options for audits, for example, Red and Green. The Audit/Visit Scores page has the same format as the Audit/Visit Issue Types page shown in Figure 7-27.
To edit the list of scores, select the Edit action. The table opens in edit mode. Only the translated descriptions can be edited.
To add a new score, click Add. If the score should be set active, check the box in the Active column. The code and description in the default language are mandatory fields.
Audit/Visit Standards
Each type of audit can be aligned with a specific standard. The Audit/Visit Standards page has the same format as the Audit/Visit Issue Types page shown in Figure 7-27.
To edit the list of standards, select the Edit action. The table opens in edit mode. Only the translated descriptions can be edited.
To add a new standard, click Add. If the standard should be set active, check the box in the Active column. The code and description in the default language are mandatory fields.
Audit/Visit Statuses
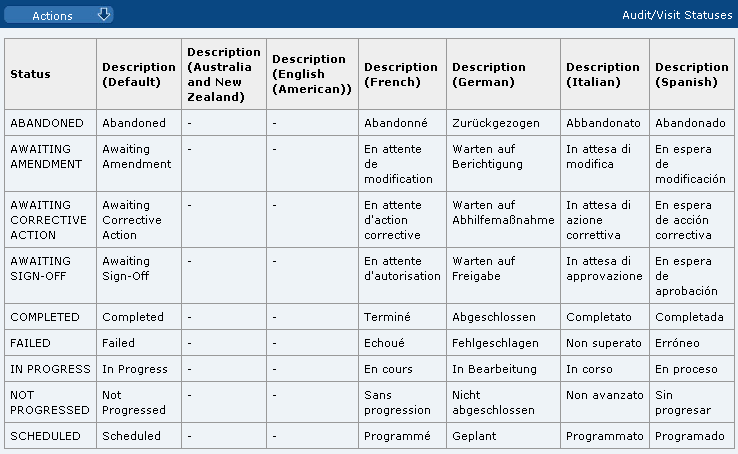
Statuses define the names of the stages of the Audit/Visit workflow.
To edit the list of statuses, select the Edit action. The table opens in edit mode. Only the translated descriptions can be edited.
Figure 7-28 Audit/Visit Statuses Page
Issue Statuses
Issue statuses define the names of the stages of the Issues (non-conformances) workflow. The Issue Statuses page has the same format as the Audit/Visit Statuses page shown in Figure 7-28.
To edit the list of statuses, select the Edit action. The table opens in edit mode. Only the translated descriptions can be edited.
Visit Locations
Only used in visits, the locations are a predefined list of options for specifying where the visit takes place, for example, Head Office or Conference Room. The Visit Locations page has the same format as the Audit/Visit Issue Types page shown in Figure 7-27.
To edit the list of locations, select the Edit action. The table opens in edit mode. Only the translated descriptions can be edited.
To add a new location, click Add. If the location should be set active, check the box in the Active column. The code and description in the default language are mandatory fields.
Visit Reasons
Only used in visits, the reasons are a predefined list of options for why the visit takes place, for example, Audit Follow-up or Complaint Investigation. The Visit Reasons page has the same format as the Audit/Visit Issue Types page shown in Figure 7-27.
To edit the list of reasons, select the Edit action. The table opens in edit mode. Only the translated descriptions can be edited.
To add a new reason, click Add. If the reason should be set active, check the box in the Active column. The code and description in the default language are mandatory fields.
Checklist Templates
A checklist is the breakdown of items to be assessed as part of an audit or visit. The items may correspond to individual clauses in corporate standards or policy documents. A checklist template is the grouping together of checklist questions and their permissible answers to form reusable common questionnaires for completion during an audit.
Figure 7-29 Checklist Templates Page
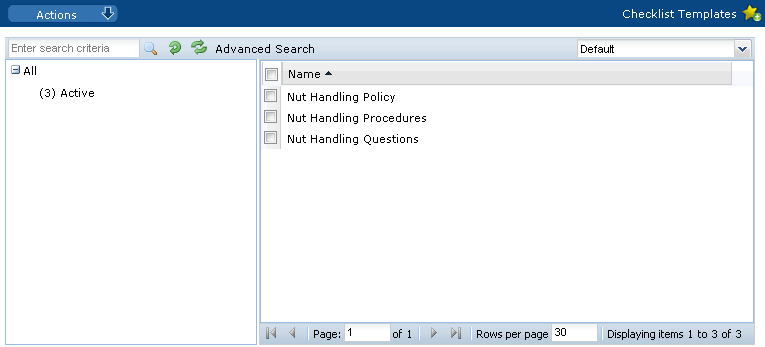
To edit a template, select the Edit action. The template record opens in edit mode.
To add a new checklist:
-
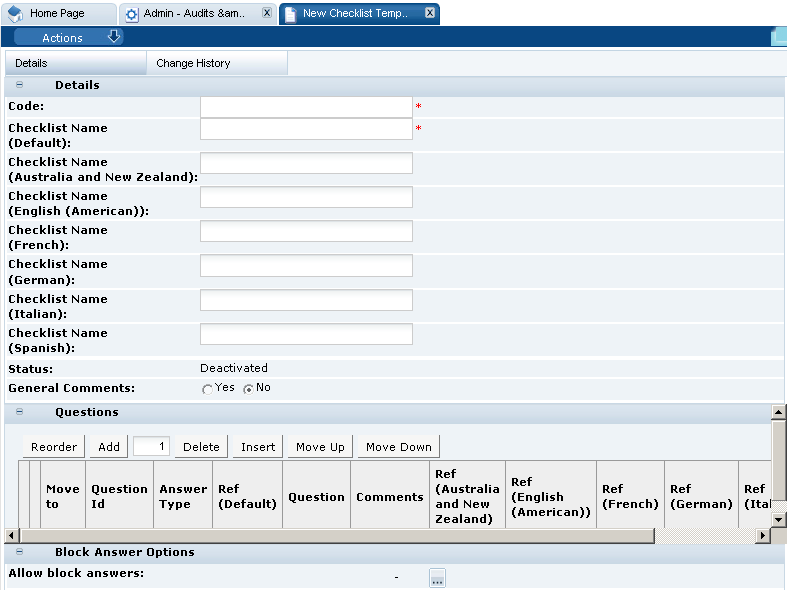
Select the New Checklist Template action. The New Checklist Template tab opens.
Figure 7-30 New Checklist Template Page
-
In the Details section:
-
Code: A unique Code must be entered when the template is created, after which it is read-only. This field is mandatory.
-
Checklist Name: Enter the name that appear in the audit/visits. The name must be unique. The name is editable after the record has been created. Enter any translations. This field is mandatory.
-
Status: The status is set to Deactivated.
-
General Comments: If set to Yes, a general comments field is included in the checklist.
-
-
In the Questions section: To add questions, click Add. The Select Glossary Questions dialog box appears with the list of available questions. Select questions and then click Ok.
-
In the Block Answer Options section: Allow block answers adds an option to the checklist to allow the user to block answer all the questions with the answers specified here, where it is one of the permissible answers for the question. For example, if block answering is set to Not Assessed, all questions in the checklist that have Not Assessed as one of the answer options are answered in that way. The contents of the Allow Block Answer pick-list are dynamically built based on the set of answers associated to the questions present in this checklist. Any duplicates are excluded.
-
Select the Save action.
Checklist Answers
The sets of available checklist answers are managed using this option.
Figure 7-31 Checklist Answers
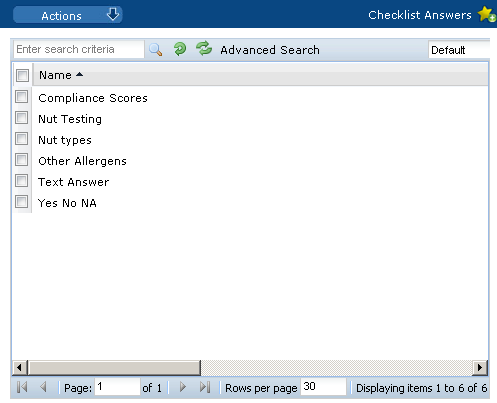
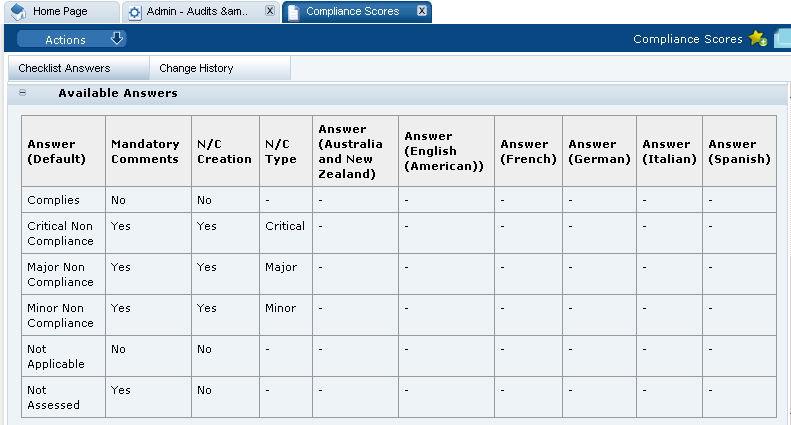
Figure 7-32 shows an example of checklist answers.
Figure 7-32 Checklist Answers Example
To edit a set of checklist answers, select the entry and then select the Edit action. The template record opens in edit mode.
To add a new set of checklist answers:
-
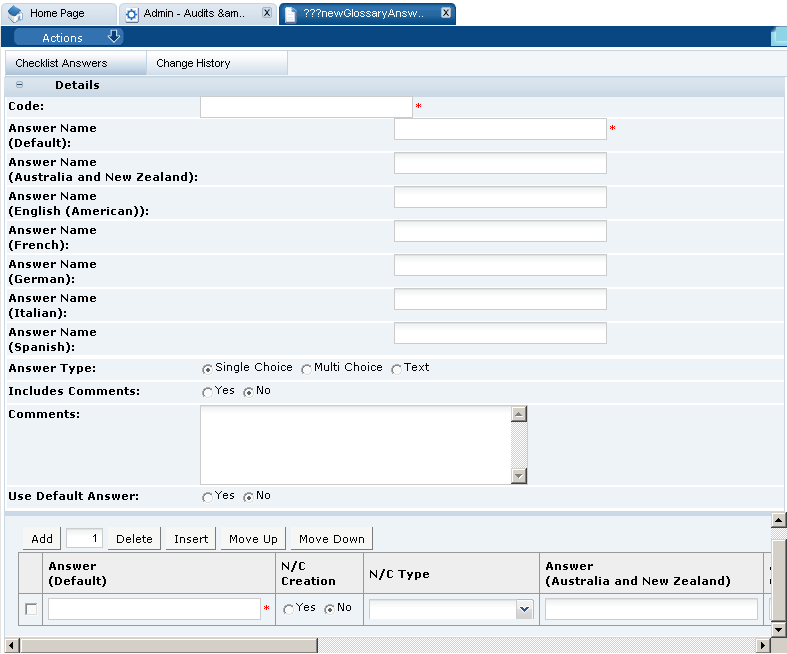
Select the New Checklist Answer option. The New Glossary/Answers page opens.
Figure 7-33 New Checklist Answer Page
-
In the Details section:
-
Code: Enter a unique code for this answer set. This field is mandatory.
-
Answer Name: Enter a unique identifier of this answer set in the default language. This field is mandatory. Enter any translations.
-
Answer Type: Select the type of answer presented to the user:
-
Single Choice presents a pick-list.
-
Multi Choice presents a multi-select pick-list.
-
Text presents an auto-expanding text area.
-
-
Include Comments: This field determines a comment is required. If the selected answer type is Text, this field is set to No and cannot be changed.
-
Comments: Use this field to enter a comment regarding this checklist answer glossary.
-
Use Default Answer: If the answer type is Single Choice or Multi Choice, the Use Default Answer option is used to control whether a default value is to be set for this answer when presented in a checklist. If Yes is selected, the Default Answers field presents a checklist of the answers that have been added to the Answers table for one to be selected. If No is selected the selector is hidden.
-
-
The table of answers defines the answer choices and is only presented if the answer type is Single Choice or Multi Choice. To add answer, click Add to add a row to the table:
-
Enter the answer in the default language. This field is mandatory.
-
The N/C Creation field determines whether, when the chosen answer is given to this question, the system should generate an issue for the question.
-
The N/C Type field determines for what issue type an issue is automatically generated. The selection is made from the Issue Types glossary, for example, Critical, Major, Minor, or Recommendation.
-
Enter the descriptions in the supported languages.
-
-
Select the Save action.
Checklist Questions
The sets of available checklist questions are managed using this option.
Figure 7-34 Checklist Questions
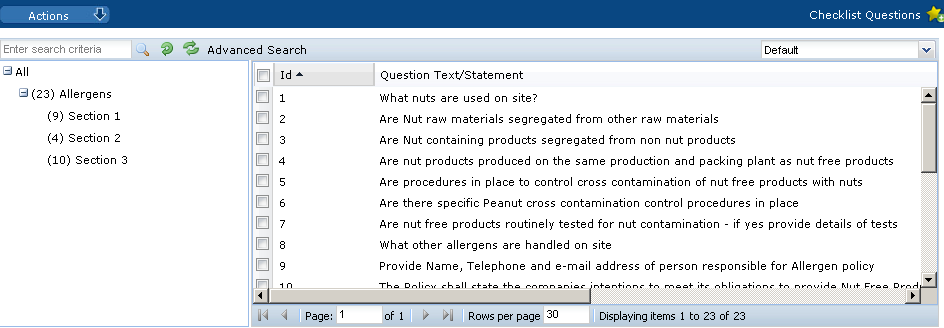
To edit a checklist question, select the entry and then select the Edit action. The question record opens in edit mode.
To add a checklist question:
-
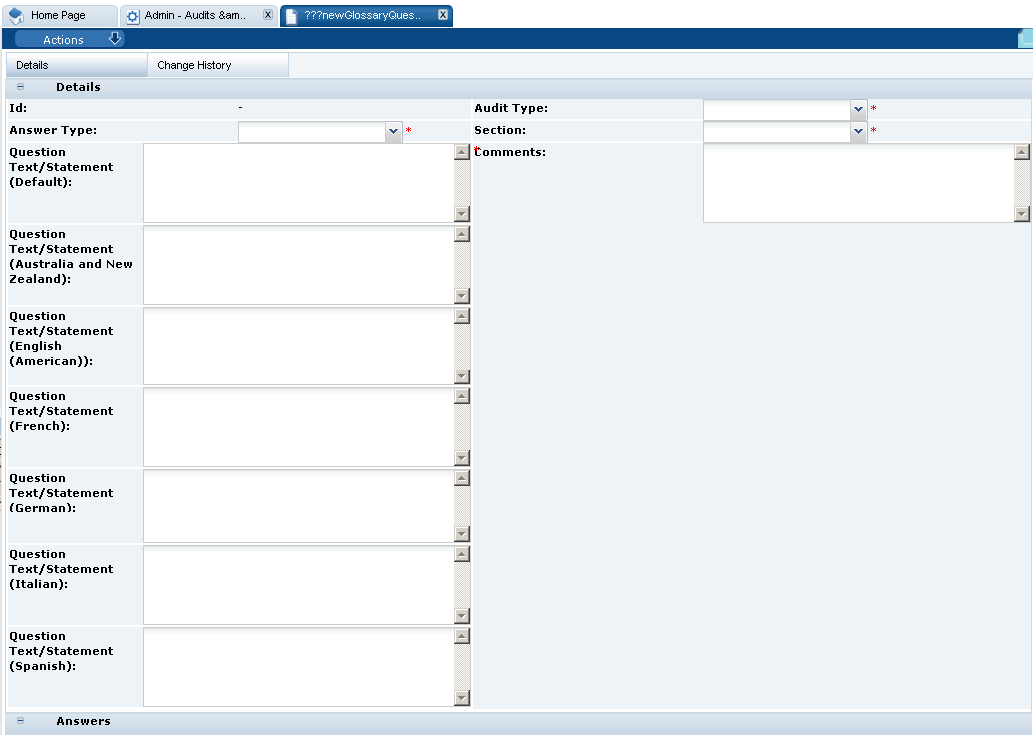
Select the New Checklist Question action. The New Glossary/Question tab opens.
Figure 7-35 New Checklist Question Page
-
In the Details section:
-
Id: This is a unique identifier of each question. It is automatically assigned as an incrementing sequence number.
-
Audit Type: Select the type of audit associated with this question from the drop-down list. This field is mandatory.
-
Answer Type: Select the type of answer associated with this question from the drop-down list. This field is mandatory.
-
Section: Select the section of the questionnaire from the drop-down list. This field is mandatory.
-
Question/Text Statement: Enter the question in the default language. This field is mandatory. Enter any translations.
-
Comments: Use this field to enter a comment regarding this checklist question glossary entry.
-
-
In the Answers section: The table of Answers is automatically built based on the selected answer type. The table is only applicable for Single Choice and Multi Choice answer types. For more information, see Checklist Answers
-
Select the Save action.
Checklist Question Colour Management
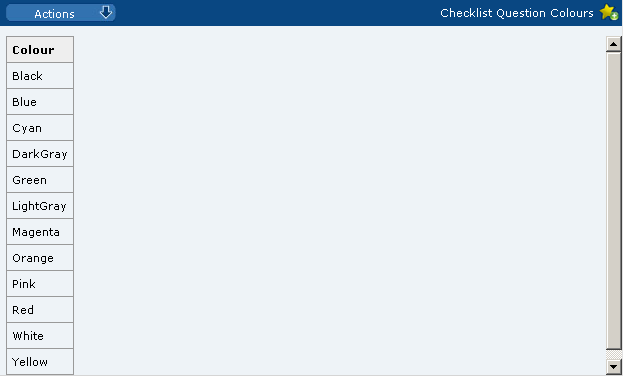
This option is used to define the rules for color-coding within checklists. The system uses this table to apply to present the text in the specific color if it encountered as part of a checklist question.
To edit the list of colors, select the Edit action. The table opens in edit mode. The color and descriptions can be edited.
To add a new color, click Add. A row is added to the table. Enter the code, color, and description in the default language. Enter any translations.
Figure 7-36 Checklist Question Colour Management

Roles and Permissions
Select the Contact Roles option in the left pane. The Contact Roles page opens.
Figure 7-38 Contact Roles Page
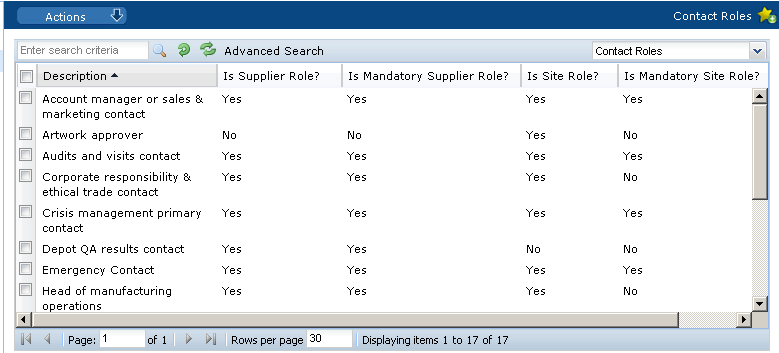
The set of contact roles is configurable. Each portal can build their own set of roles that contacts are to be recorded for at the supplier and site levels. The roles may be set as mandatory, in which case, a contact must be assigned to that role for the supplier/site account to be approved.
Some roles are mandatory because they are used by the system to automatically notify the relevant users as part of the system's workflow, for example, an Audits &Visits Main Contact would be notified when an audit requires action.
Where there are mandatory roles that have not been assigned a contact, the supplier/site administrator is alerted through the Urgent Item Manager (UIM) app.
For more information on adding and editing contact roles, see Managing Contact Roles.
System Parameters
To maintain the parameters used to support Supplier, select the System Control option and then System Parameters.
Table 7-3 shows the specific system parameters, by subtab on the System Parameters page, used to support Supplier.
Table 7-3 System Parameters to Support Supplier
| Subtab | Parameter | Description | ||||||||||||||||
|---|---|---|---|---|---|---|---|---|---|---|---|---|---|---|---|---|---|---|
|
Audits & Visits |
Allow creation of Audits from Audits List |
If set to Yes, users may create new audits/visits from within the Audits & Visits area (in which case, they select the supplier and site) as well as through the Site record. If set to No, new audits/visits are created through the Site record (in which case there is no need to select the supplier and site). Default is No. |
||||||||||||||||
|
Audits & Visits |
Max Time Spent (hours) |
Sets the maximum value a user may record as the time spent on an audit/visit. This prevents excessive time being accidentally entered. Default is 20. |
||||||||||||||||
|
Audits & Visits |
Use Risk Levels |
Determines whether levels of risk are being assigned to Sites (based on the type of product produced). If set to Yes, a Risk Level classification can be set on the Site record, and the frequency of an audit/visit may be set differently per risk level; thus allowing an audit/visit to be scheduled more (or less) frequently for sites that supply particular types of products. Default is No. |
||||||||||||||||
|
Audits & Visits |
Days to show Scheduled in Tasks App |
Used to control when Scheduled audits/visits appear in the user's Task App in order to limit the list of audit/visits to just those that will become due in the next 28 days, for example, thereby excluding those that are currently scheduled but not due for a number of months. Default is 28. |
||||||||||||||||
|
Audits & Visits |
Edit Score on Completion |
If set to Yes, where an audit/visit is scored, the score can be assigned or changed when the audit/visit is completed (through the completion confirmation dialog box). If set to No, any scoring has to be assigned directly within the Audit/Visit record. Default is No. |
||||||||||||||||
|
Log On |
Site Details Update Reminder |
Number of working days between a reminder being shown in a user's UIM when a user has logged in. It is used to ensure that Mandatory Contact details are kept up to date on both the supplier and sites. Default is 90 days. When the first supplier user logs in, they see an entry in the UIM drawing their attention to this. If they use the Confirm Details action, this stamps the date onto the record so that the next time a user logs in, the system checks if the current date is greater than the stamped date. |
||||||||||||||||
|
Registration |
Notify Lead Technologist |
If set to Yes, the Product Technologist is notified by email when a supplier completes the registration for a site for which they are the Lead Technologist. Default is No. |
||||||||||||||||
|
Registration |
Notify Others |
User roles, with Role Type equal to Retailer, for which users should be copied on the email sent to a Technologist when a supplier completes registration. For example, it is used to notify Auditors when sites are ready to be audited. Parameter is linked to the user roles. |
||||||||||||||||
|
Registration |
Create Initial Audit |
If set to Yes, additional fields are made available to allow the user to create the initial audit when a site is approved. Default is No. |
||||||||||||||||
|
Registration |
Notify Accounts |
If set to Yes, the Account Administrator is automatically notified by email (REG3) that an order has been created when the supplier has completed their part of the registration process (for a standard supplier registration). Default is Yes. |
||||||||||||||||
|
Registration |
Create initial scorecard |
If set to Yes, additional fields are made available to allow the user to create the initial scorecard when a site is approved. Default is No. |
||||||||||||||||
|
Registration |
Registration Ts & Cs Active |
If set to Yes, suppliers are required to accept the portal's terms and conditions during the supplier registration process. Default is Yes. This parameter can only be seen and maintained by users with the Oracle Authorized Administrator authority profile. |
||||||||||||||||
|
Registration |
Supplier Code Allocation |
If Auto, the system will automatically assign supplier codes to new Suppliers. If Auto/Edit, the system will automatically assign supplier codes, however the auto-allocated code may be manually changed to a unique alternative during the creation process. If Manual, the retailer user must assign a unique supplier code during the creation process. Default is Auto. Note: This parameter can only be seen and maintained by a user with the Oracle Authorized Administrator authority profile. |
||||||||||||||||
|
Registration |
Supplier Code Editable |
If checked, the supplier code may be edited in the Supplier record after the account has been created. If Supplier Code Allocation is set to Auto, this parameter is set as unchecked and cannot be changed. Default is unchecked. Note: This parameter can only be seen and maintained by a user with the Oracle Authorized Administrator authority profile. |
||||||||||||||||
|
Registration |
Site Code Allocation |
If Auto, the system will automatically assign site codes to new Supplier sites. If Auto/Edit, the system will automatically assign site codes, however the auto-allocated code may be manually changed to a unique alternative during the creation process. If Manual, the retailer user must assign a unique site code during the creation process. Default is Auto. Note: This parameter can only be seen and maintained by a user with the Oracle Authorized Administrator authority profile. |
||||||||||||||||
|
Registration |
Site Code Editable |
If checked, the site code may be edited in the Site record after the account has been created. If Site Code Allocation is set to Auto, this parameter is set as unchecked and cannot be changed. Default is unchecked. Note: This parameter can only be seen and maintained by a user with the Oracle Authorized Administrator authority profile. |
||||||||||||||||
|
Registration |
Site Code Format |
If Numeric, the site coding will follow an incrementing number sequence, starting at 1 for each supplier (with leading zeroes), such as, 0001 > 0002 … 9999 > 10000 … If Alpha, the site coding will follow an incrementing alpha code sequence, starting at AAAA for each supplier, such as, AAAA > AAAB … AAAZ > AABA … AZZZ > BAAA … This parameter cannot be changed once the first site has been created. Default is Numeric. Note: This parameter can only be seen and maintained by a user with the Oracle Authorized Administrator authority profile. |
||||||||||||||||
|
Registration |
Prefix Site Code with Supplier Code |
If checked, the supplier code is automatically prepended to the site code when creating a Site account, with a hyphen, such as A0001-AABD. This parameter cannot be changed once the first site has been created. Default is checked. Note: This parameter can only be seen and maintained by a user with the Oracle Authorized Administrator authority profile. |
||||||||||||||||
|
Registration |
Site Code Unique Across Portal |
If checked, the system will continue incrementing the site code across the entire portal rather than just within the supplier, to ensure the uniqueness across the portal. For example: If site codes are not required to be unique across the portal,
the coding may be:
If site codes are required to be unique across
the portal, the coding would be:
This parameter cannot be changed once the first site has been created. Default is unchecked. Note: This parameter can only be seen and maintained by a user with the Oracle Authorized Administrator authority profile. |
||||||||||||||||
|
Registration |
Minimum Site Code Length |
The minimum number of digits or characters in the site code. This parameter cannot be changed once the first site has been created. Default is 5. Note: This parameter can only be seen and maintained by a user with the Oracle Authorized Administrator authority profile. |
||||||||||||||||
|
Registration |
Registered Company Number Mandatory at Registration |
Use this to control whether the Registered Company Number is mandatory or optional when the supplier completes the Registration wizard. Default is checked/Yes (mandatory). |
||||||||||||||||
|
Scorecards |
Allow creation of Scorecards from Scorecards list |
If checked, scorecards can be created from the scorecards list views. If not checked, scorecards can only be created directly from within a Site record. |
||||||||||||||||
|
Scorecards |
Grace period |
Select if the scorecard completion overdue grace period is in days or weeks. |
||||||||||||||||
|
Scorecards |
Email Agent run on |
Controls which days of the week reminder emails are generated for overdue scorecards. Specific days can be selected. Buttons are available to select or clear all days. |
||||||||||||||||
|
Scorecards |
Allow ad hoc (non glossary) questions |
If checked, scorecard templates have the option to have questions added that do not appear in the questions glossary. |
||||||||||||||||
|
Scorecards |
Allow removal of universal questions |
If checked, whether universal questions may be removed from a scorecard template (if not, all universal questions will appear on every scorecard type |
||||||||||||||||
|
Urgent Items |
Show Alert Items |
If set to Yes, Alert KPIs are shown in the UIM. Default is Yes. |
||||||||||||||||
|
Urgent Items |
No. Days Before Alert Response is overdue |
Number of days before this KPI is shown. Default is two days. |
||||||||||||||||
|
Urgent Items |
Show scorecards |
If set to Yes, scorecards are shown in the UIM. Default is Yes. |
||||||||||||||||
|
Urgent Items |
Scorecard Overdue Off-set days |
Number of days before an overdue scorecard is shown. Default is two days. |
