7 Library
To access Library, select Library on the main navigation bar. The list of published documents that can be accessed by the user is shown. Figure 7-1 shows an example of this page.
Figure 7-1 Library Tab
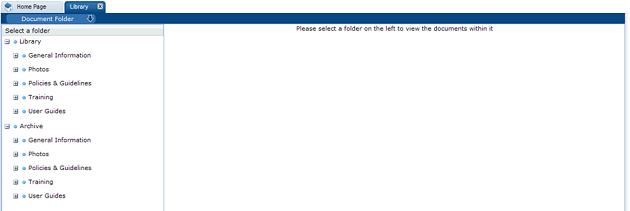
Document Folder Pane
The contents of the document library are presented as a structured hierarchy where documents are organized within a tree of libraries that contain any number of folders and sub-folders.
A user only sees the folders and sub-folders that contain documents to which the user has access. Clicking a folder or sub-folder name displays the list of all documents in the folder or sub-folder and all its sub-folders.
When a user puts focus on the lowest level folder, the number of documents is shown in brackets:

Archive shows the folder and sub-folder structure of archived documents. It is only available to users with the Library Administrator authority profile.
Permissions
Permissions control whether a user has access to the document library. Generally, all users are granted access. Access to individual documents can be granted or refused on a user basis. The Library Reader authority profile provides reader access to the library.
Locating a Document
To display all the documents within and beneath a folder, click the folder name in the Document Folder pane area. Only those documents to which the user has access are shown.
Figure 7-2 Folder Content Display
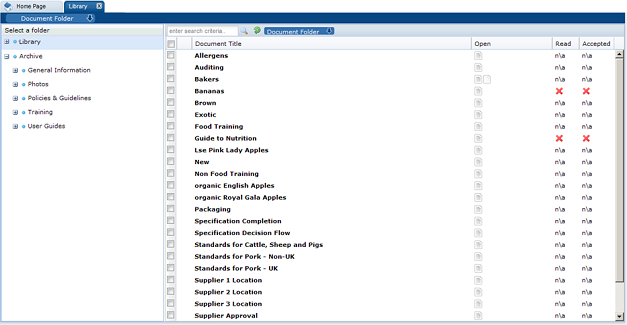
Table 7-1 describes the columns displayed for the selected folder.
Table 7-1 Columns Displayed for a Selected Folder
| Column | Icons | Description |
|---|---|---|
|
First |
Shows the status of the document. |
|
|
|
This document is only visible to internal users, that is, the retailer's users. The document title in the next column is shown in red. |
|
|
|
This document is mandatory. This icon is only shown for supplier users. |
|
|
|
This document has not been published and is therefore only visible to users with the Library Administrator authority profile. |
|
|
Document Title |
The list of document titles is sorted by the icon in the first column. Clicking a document title opens the summary document as a new tab. |
|
|
Open |
Indicates the type of attachments to the document, if any. If there are more than three attachments, an ellipsis is appended to the icon for the third attachment. |
|
|
|
Microsoft Excel spreadsheet |
|
|
|
Microsoft Word document |
|
|
|
Portable Document Format (PDF) file |
|
|
|
Text Document |
|
|
Read |
Indicates if this document has been read by the user. |
|
|
|
User has not read the document. |
|
|
n\a |
Indicates the document has Log Readership set to NO. |
|
|
|
User has marked the document as read. |
|
|
Accepted |
Indicates the acceptance of the document by the user. |
|
|
|
User has not accepted the document. |
|
|
n\a |
Indicates the document has Log Readership set to NO. |
|
|
|
User has accepted the document. |
|
The following actions are available in this pane:
-
Mark as read
-
Mark as accepted
Reading a Document
To read a document:
-
Click a document folder. The list of available documents in the folder appears. See Figure 7-2.
-
To read a document, click the document title. A new tab opens for the document.
-
If there are any attachments available, an icon is shown in the Open column. Click the icon to open the attachment.
-
If you are required to mark the document as read when you complete reading it, select the Mark as Read action. If you are required to mark the document as accepted when you complete reading it, select the Mark as Accepted action.
Marking a Document
The Library Administrator can require that a user confirm that a document has been read and approved.
Marking a Document as Read
The read confirmation action is only applicable for mandatory' documents It can only be selected if the user has at some point opened the document or one of its attachments.
To mark a document as read, do one of the following:
-
Select the document in the left-hand pane and select the Mark as Read action from the Actions menu in the right-hand pane.
-
Select the document in the left-hand column. Right-click and select the Mark as Read action.
-
Open the Summary document and select the Mark as Read action.
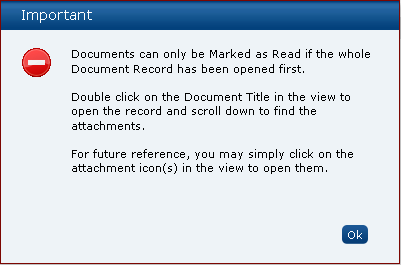
If the Mark as Read action is selected, but the document has not been opened the following error dialog box appears.
Figure 7-3 Mark as Read Error Dialog for Document Not Opened
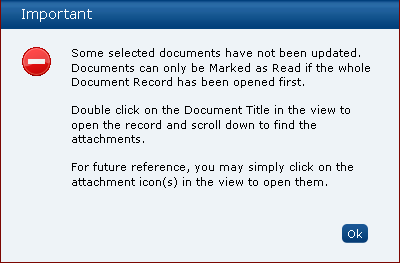
If the Mark as Read action is selected, but the document has not been opened within a multiple selection of documents, the following error dialog box appears. Some documents are marked as read, but the rest of the documents are not marked.
Figure 7-4 Mark as Read Error Dialog for Not All Documents Marked
Marking a Document as Accepted
The accept confirmation action is only applicable for mandatory documents It can only be selected if the user has at some point opened the document or one of its attachments.
To mark a document as accepted, do one of the following:
-
Select the document in the left-hand column and select the Mark as Accepted action from the Actions menu in the right-hand pane.
-
Select the document in the left-hand column. Right-click and select the Mark as Accepted action.
-
Open the Summary document and select the Mark as Accepted action.
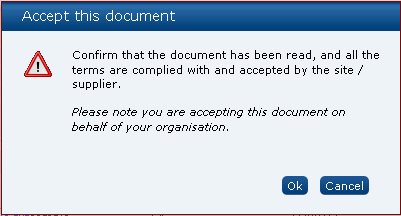
A dialog box appears to enable the user to confirm the acceptance. Select Ok.
Figure 7-5 Accept this Document Dialog Box
If the Mark as Accept action is selected, but the document has not been opened the following error dialog box appears.
Figure 7-6 Mark as Accept Error Dialog for Document Not Opened

If the Mark as Accept action is selected, but the document has not been opened within a multiple selection of documents, the following error dialog box appears. Some documents are marked as accepted, but the rest of the documents are not marked.
Figure 7-7 Mark as Accept Error Dialog for Not All Documents Marked

Viewing the Reader Log
The Reader Log page enables users to see who has read the document.
Figure 7-8 Reader Log Page
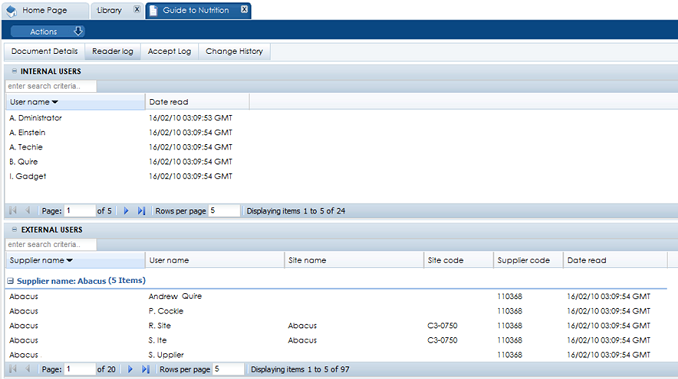
The list of internal users is sorted by the user name in ascending order. The list of external users is sorted by the supplier name and then user name, both in ascending order.
Supplier users have visibility to mandatory documents so they can see who else within their organization has read the document (restricted to only being able to see information relating to their organization). They are not able to see the Internal Users field set.
Users are able to perform a Quick Search on the full contents of the log and export the log to Microsoft Excel.
Note:
The Site code and Site Name columns are populated if the user is assigned to one or more individual sites. If the user is an All Sites user or is a Supplier user, they will not appear in the Read and Accept logs.
Viewing the Accept Log
The Accept Log page enables users to see who has accepted the document.
Figure 7-9 Accept Log Page
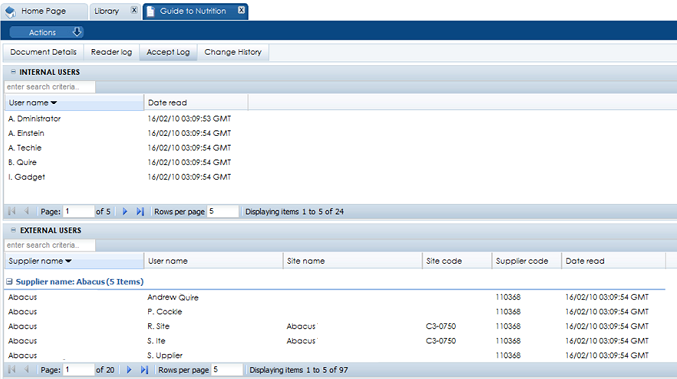
The list of internal users is sorted by the user name in ascending order. The list of external users is sorted by the supplier name and then user name, both in ascending order.
Supplier users have visibility to mandatory documents so they can see who else within their organization has accepted the document (restricted to only being able to see information relating to their organization). They are not able to see the Internal Users field set.
Users are able to perform a Quick Search on the full contents of the log and export the log to Microsoft Excel.
Note:
The Site code and Site Name columns are populated if the user is assigned to one or more individual sites. If the user is an All Sites user or is a Supplier user, they will not appear in the Read and Accept logs.