13 Administration
Associate Role Definition
Associate Roles are used to assign Associates to Customers. Only one Associate can be assigned to a Customer for each Associate Role, so the number of Associate Roles determines the number of Associates that can be assigned to a Customer.
Figure 13-1 Associate Role Definition

To access the Association Role Definition window:
-
Click the Tasks icon.
-
Click the Admin Task.
-
Click the Associate Role Definition Task.
The following information is displayed for each role:
-
Role ID – Unique ID for the Associate Role.
-
Role Name – Name of the Associate Role.
-
Description – Description of the Associate Role.
-
Active – Indicates whether the Associate Role is active.
-
Primary – Indicates whether the Associate Role is the primary role.
Sorting Associate Role Definitions
The user can sort the list to refine the results. The following sorting options include:
Figure 13-2 Sorting Options
The following fields can be sorted Ascending or Descending:
-
Active – Indicates whether the Associate Role is active.
-
Description – Description of the Associate Role.
-
Primary – Indicates whether the Associate Role is the primary role.
-
Role ID – Unique ID for the Associate Role.
-
Role Name – Name of the Associate Role.
Adding an Associate Role
To add an Associate Role, do the following:
-
Click the Add (+) icon, or choose Add from the Actions menu. This displays a Create Associate Role window where you can enter the following information:
-
Role Name - This field configures the name of the Associate Role.
-
Description - This field configures a description of the Associate Role. This is a required field.
-
Active - This check box determines whether the Associate Role is active. As a default, the check box is selected.
-
Primary - This check box determines whether the Associate Role is the primary role.
Note:
Customer Engagement only allows one Associate Role to be primary.
-
-
To add the new Associate Role to the list of definitions, click OK. To return to the original window without saving, click Cancel.
Editing an Associate Role
To edit an Associate Role, do the following:
-
Highlight the desired Associate Role (Only one record can be selected at a time for editing).
-
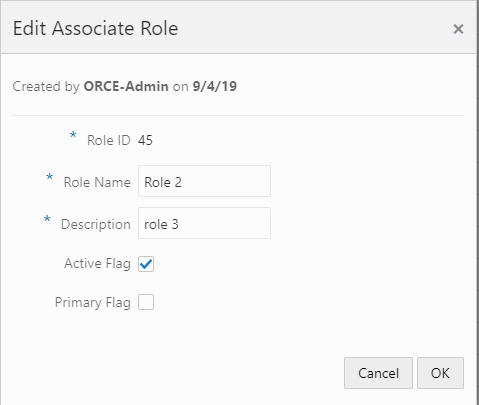
Click the Edit icon, or choose Edit from the Actions menu. This displays an Edit Associate Role window: This displays a window with details of the role:
Figure 13-3 Edit Associate Role
-
Make any necessary change to the fields.
-
Click OK to accept the changes. The Associate Role is displayed with the new information. Click Cancel to return to the original window without saving.
Attribute Management
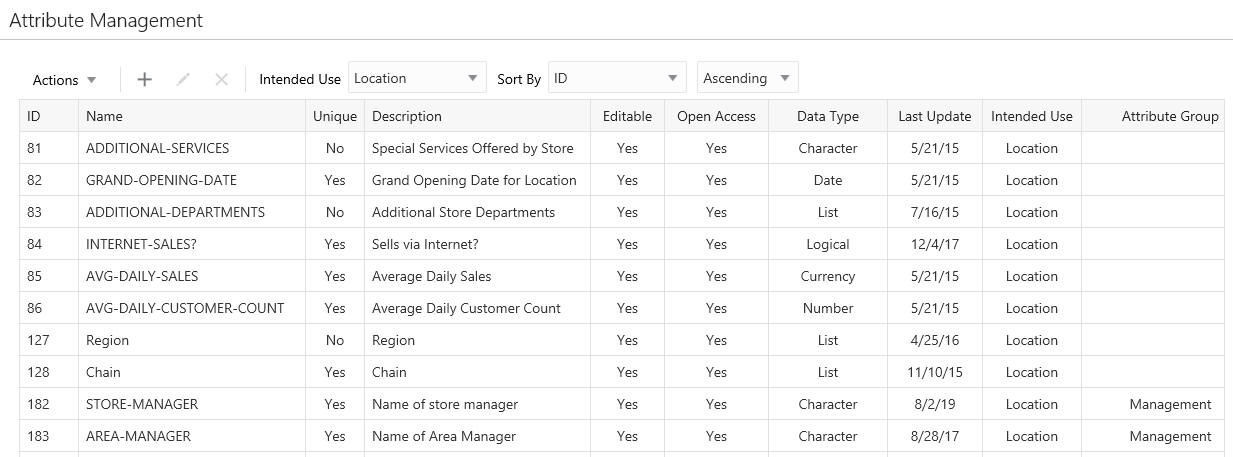
Use the Attribute Management window to create, edit, or delete attributes.
Figure 13-4 Attribute Management
To access the Attribution Management window:
-
Click the Tasks icon.
-
Click the Admin Task.
-
Click the Attribute Management Task.
The following information is displayed for each attribute:
-
ID – The ID for the attribute.
-
Name – The name of the attribute.
-
Unique – Only one value can be added to the attribute when it is identified as unique.
-
Description – Description of the information provided by the attribute.
-
Editable – Identifies whether the associate is allowed to edit the value for the attribute once it is added.
-
Open Access – Indicates whether there is open access to this attribute.
-
Data Type – The type of data contained in the attribute value. Possible values include: Character, Number, Currency, Date, Logical, and List.
-
Last Update – The date last updated in the system.
-
Intended Use – The Customer Engagement element the attribute was created for. Possible uses include: Card, Card Series, Card Type, Customer, Gift Registry, Item Location, Offer, Promo Offer, Promotion, Segment, and Wish List.
-
Attribute Group – The group associated with the attribute.
Filtering and Sorting Attributes
The user can narrow down the list by selecting any of the Intended Use filters. The list can then be sorted by the fields as shown in Figure 13-5.
Figure 13-5 Filtering and Sorting Options
Intended Use filters include:
-
All (Default)
-
Card
-
Card Series
-
Card Type
-
Customer
-
Gift Registry
-
Item Location
-
Offer
-
Promo Offer
-
Promotion
-
Segment
-
Wish List
The following fields can be sorted Ascending or Descending:
-
Attribute Group
-
Data Type
-
Description
-
ID
-
Intended Use
-
Last Update
-
Name
Creating an Attribute
To create an Attribute, do the following:
-
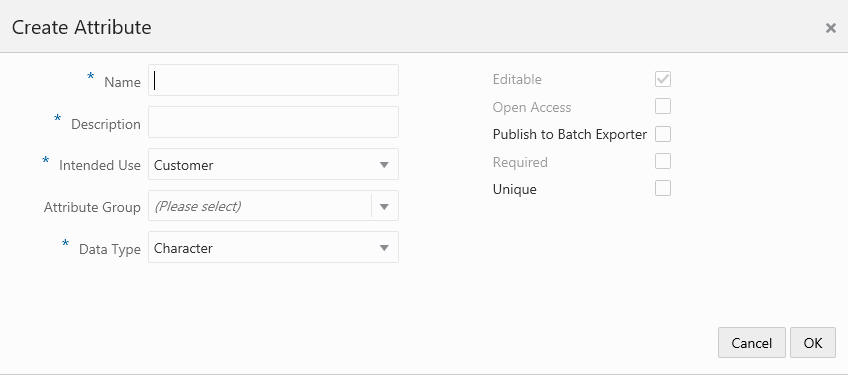
Click the Add (+) icon, or choose Add from the Actions menu. This displays a Create Attribute dialog, where you can enter the following information:
Figure 13-6 Create Attribute
-
Attribute
Name – Name of the attribute (required field).
-
Description – Description of the attribute (required field).
-
Intended Use – The Customer Engagement element the attribute was created for (required field).
-
Attribute Group – The group associated with the attribute. Required for Gift Registry Intended Use, otherwise, optional.
-
Data Type – The type of data contained in the attribute value. Possible values include:
-
Character
-
Number
-
Currency
-
Date
-
Logical
-
List (required field
-
-
-
Depending on your previous selections the following fields are dynamic:
-
Editable – Indicate whether the attribute isis editable.
-
Open Access – Indicate whether the attribute has open access.
-
Publish to Batch Exporter – A flag to indicate export to a marketing system.
-
Required – Adds a flag to make the attribute required
-
Unique – Indicates whether the attribute can be assigned to an element more than once.
-
-
Click OK. This adds the new attribute to the list of attributes. Click Cancel to return to the original window without saving.
Editing an Attribute
To edit an Attribute, do the following:
-
Highlight the row of the desired attribute.
-
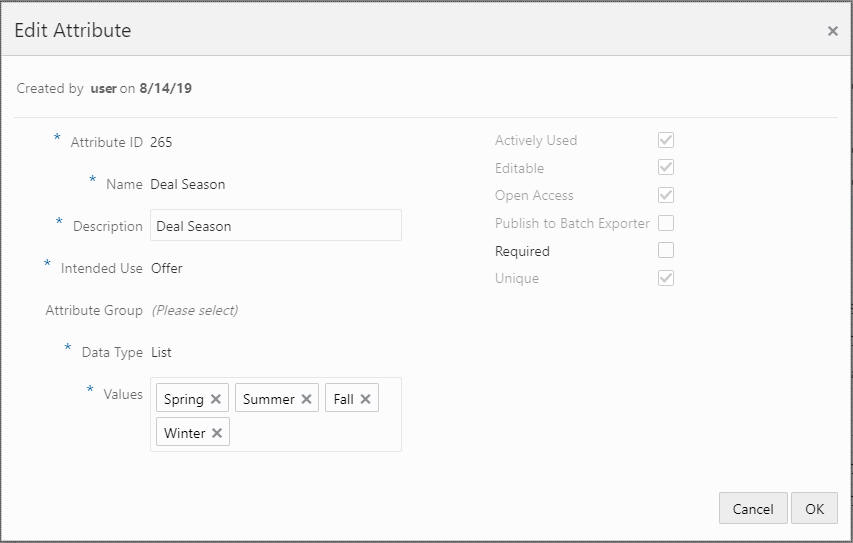
Click the Edit icon, or choose Edit from the Actions menu. This displays an Edit Attribute dialog that displays a window with details of the attribute:
Figure 13-7 Edit Attribute
Note:
Attributes that are actively used (already associated to an element in Customer Engagement) are limited to what fields may be changed, such as Description.
-
Make any necessary changes to the fields.
-
Click OK to accept the changes. The attribute is displayed with the new information. Click Cancel to return to the original window without saving.
Deleting an Attribute
Use the following steps to delete an Attribute:
-
Highlight the row of the Attribute.
Note:
Actively used attributes cannot be deleted, so highlighting such a row will not enable the delete action or the delete icon.
-
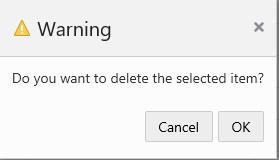
Click Delete from the Actions menu or the Delete icon. This opens the delete confirmation window.
Figure 13-8 Warning
-
Click OK to delete the attribute or Cancel to close the window without deleting the row.
Figure 13-9 Confirmation Notification

Note:
A confirmation notification appears to confirm the attribute has been deleted.
Batch Import Review
You will have the ability to search, sort and view the details of the batch import file. Additionally, files currently being processed can also be viewed.
Searching for Batch Imports
-
Click Tasks.
-
Click Admin.
-
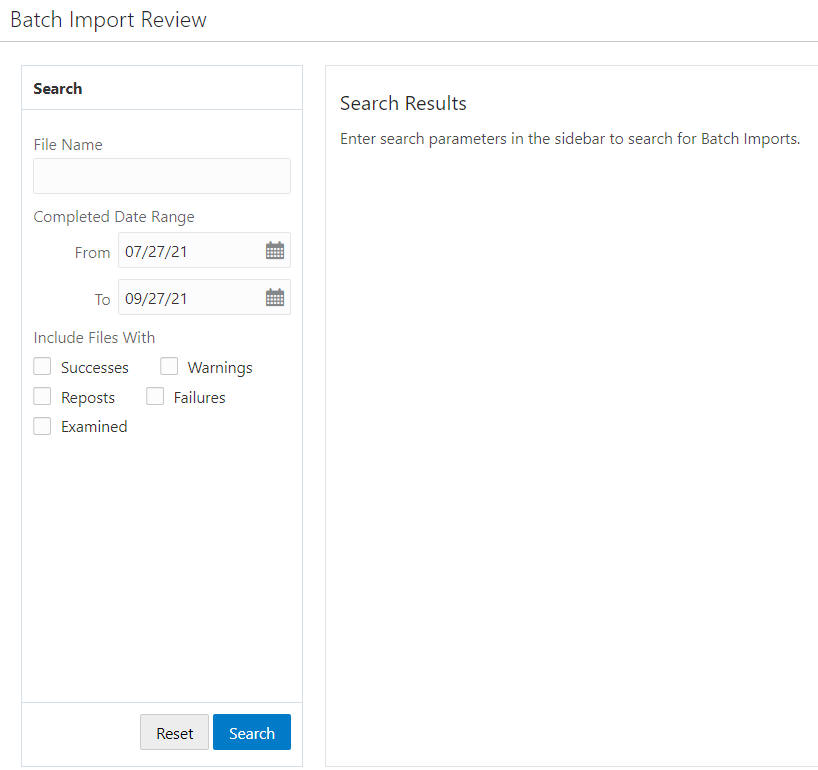
Click Batch Import Review. The Batch Import Review window opens.
Figure 13-10 Batch Import Review - Search
-
Enter the following search parameters to search for Batch Imports.
-
Enter any or all of a File Name.
-
Enter the From and To Completed Date Ranges.
-
Select from the following Includes Files With Options:
-
Successes
-
Reposts
-
Examined
-
Warnings
-
Failures
-
-
-
Click Search to find the results, or click Reset the search parameters.
Figure 13-11 Search Results
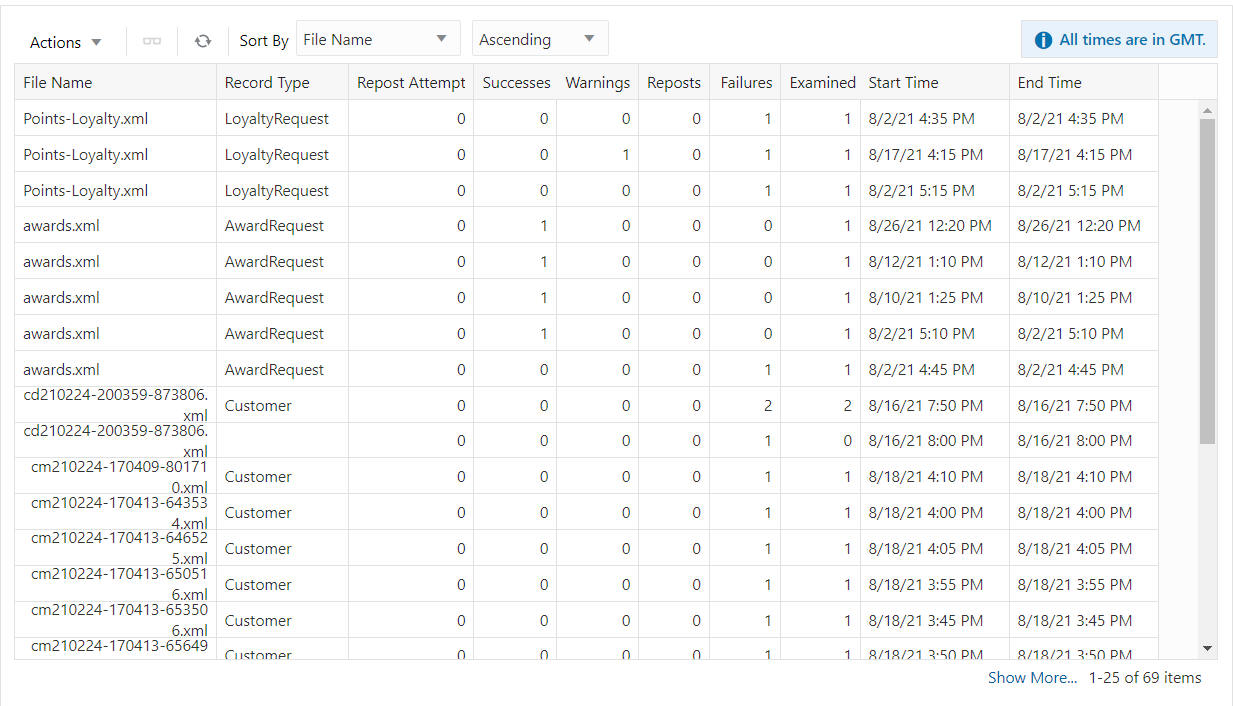
Note:
The results display in batches of 25 records. When more than 25 records are available, click Show More... to view more results.
You can refresh the Search Results by clicking the Refresh icon or picking the Refresh option from the Actions menu.
Sorting Batch imports
You can sort by:
-
End Time
-
Examined
-
Failures
-
File Name (default)
-
Record Type
-
Repost Attempt
-
Reposts
-
Start Time
-
Successes
-
Warnings
Preference types can be sorted ascending or descending from the list.
Viewing a Batch Import
To view a Batch Import, do the following:
-
Highlight the row of the Batch Import you want to view.
-
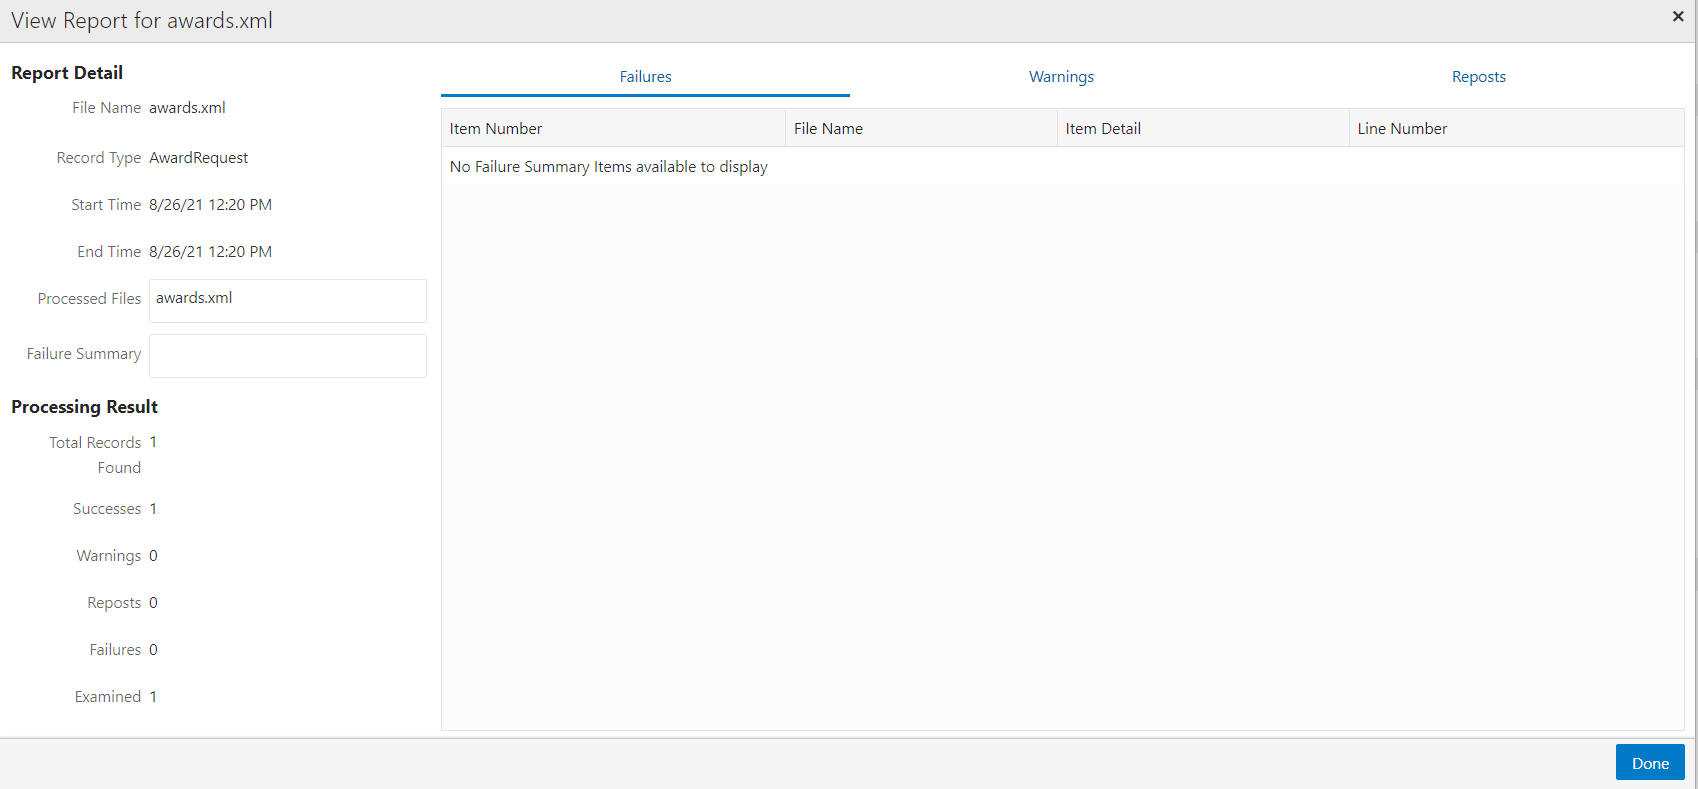
Click the Actions menu or the View icon to open the View Report for window.
Figure 13-12 View Report For File Name Selected
-
View the details of the Report and click Done to close the window.
Batch Process Tracking
You have the ability to view statistics for successes, warnings, and failures by batch type on a daily, weekly, and monthly basis, so that you can monitor problems with batch jobs.
To track batch processes do the following:
-
Click Menu.
-
Click the Admin task.
-
Click the Batch Process Tracking task. The Batch Process Tracking window displays.
Figure 13-14 Batch Process Tracking
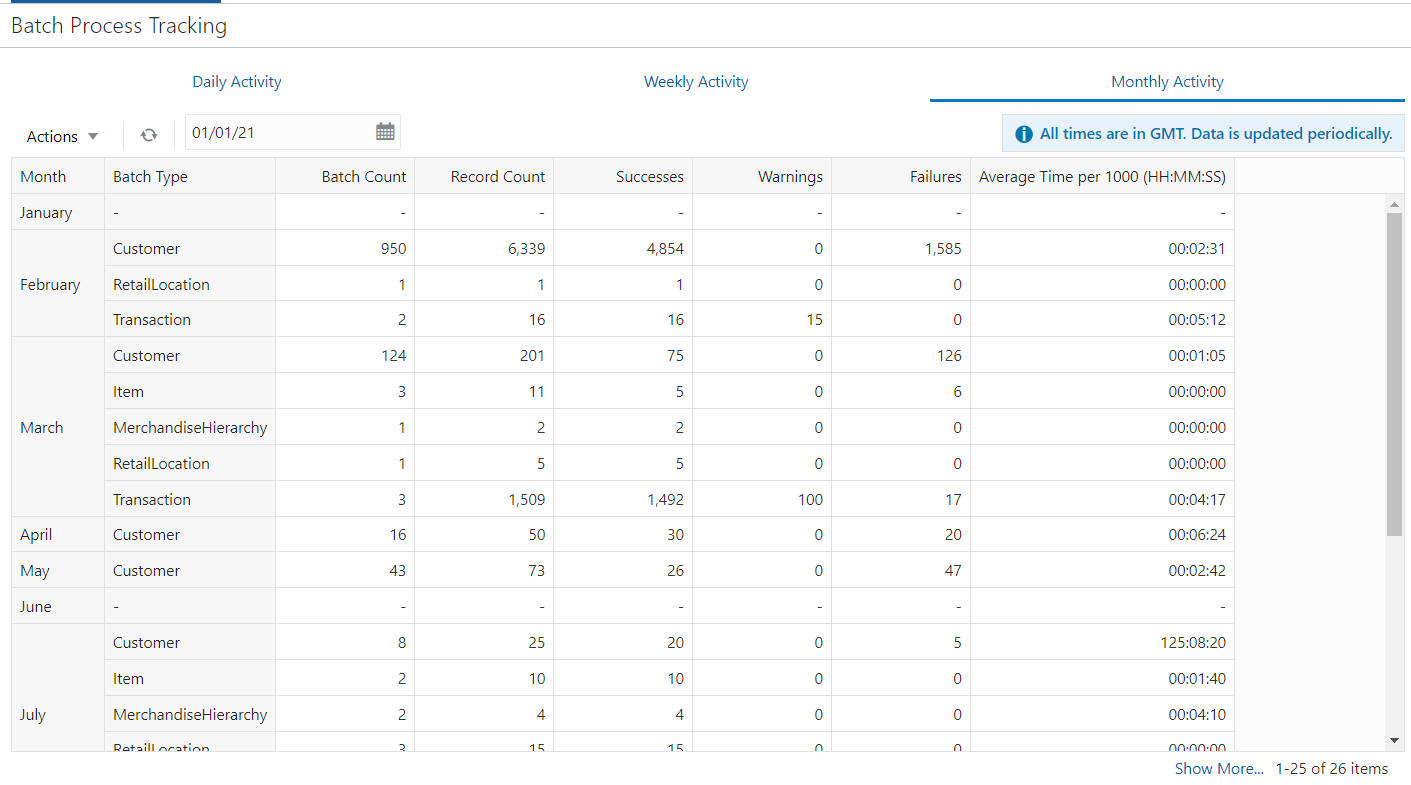
Note:
The results display in batches of 25 records. When more than 25 records are available, click Show More... to view more results.
You can refresh the list by clicking the Refresh icon or picking the Refresh option from the Actions menu.
-
View the Results by clicking one of the following options:
-
Daily Activity
-
Weekly Activity
-
Monthly Activity
-
-
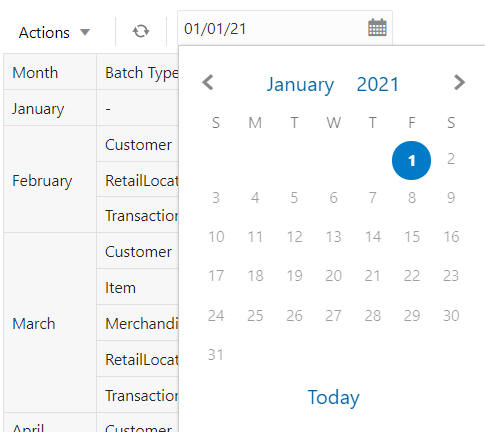
To change the date range enter a date into the calendar field.
Figure 13-15 Date Selector
Exchange Rate
You can use the Exchange Rate feature to review the most current exchange rates that have been set up for currency conversions for PosLog transactions. You can also review previous Exchange Rates, as well as create new Exchange Rates.
Note:
This option is available only if the user has been assigned the SystemAdmin role. See the Oracle Retail Customer Engagement Cloud Service Implementation Guide for more information on assigning User Roles.
Accessing the Exchange Rate Feature
To access the Exchange Rate feature do the following:
-
Click Menu.
-
Click the Admin task.
-
Click the Exchange Rate task. The Exchange Rate window displays.
Figure 13-16 Exchange Rate Window
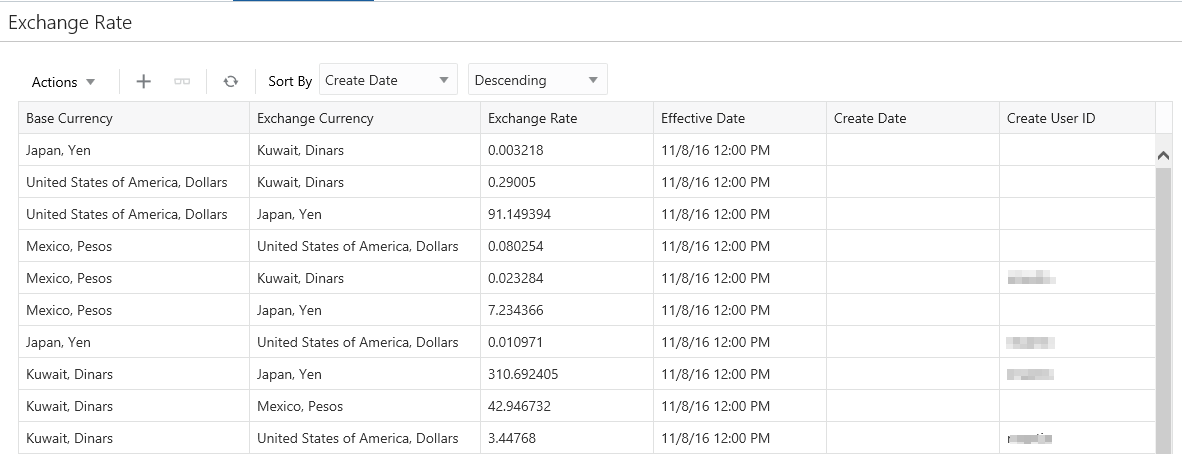
The Exchange Rate List displays the following information for each currency conversion that has a current Exchange Rate:
-
Base Currency - The name of the currency that is being converted (the from currency).
-
Exchange Currency - The name of the currency that is being converted to (the to currency).
-
Exchange Rate - The most current Exchange Rate that has been defined for the currency conversion. Up to 6 decimal positions. Any future Exchange Rates are not displayed.
-
Effective Date - The most current Exchange Rate that has been defined for the currency conversion, with the rate displaying up to 6 decimal positions. Any Exchange Rates with a future Effective Date are not displayed.
-
Create Date - The date and time when the Exchange Rate was created.
-
Create User Id - The user ID of the person who created the Exchange Rate.
Working with Exchange Rates
Sorting Results
Figure 13-17 Sort By Options

In the Exchange Rates window, the user can sort the list to refine the results. Results can be sorted Ascending or Descending using the following sorting options:
-
Base Currency
-
Create Date (Default)
-
Create User ID
-
Effective Date
-
Exchange Currency
-
Exchange Rate
Viewing Exchange Rate History
To view an Exchange Rate History do the following:
-
Highlight an Exchange Rate from the list of results.
-
Click the Actions Menu, and then click View, or click the View icon. The Exchange Rate History window displays the history of that Exchange Rate in descending date order.
Figure 13-18 Exchange Rate History
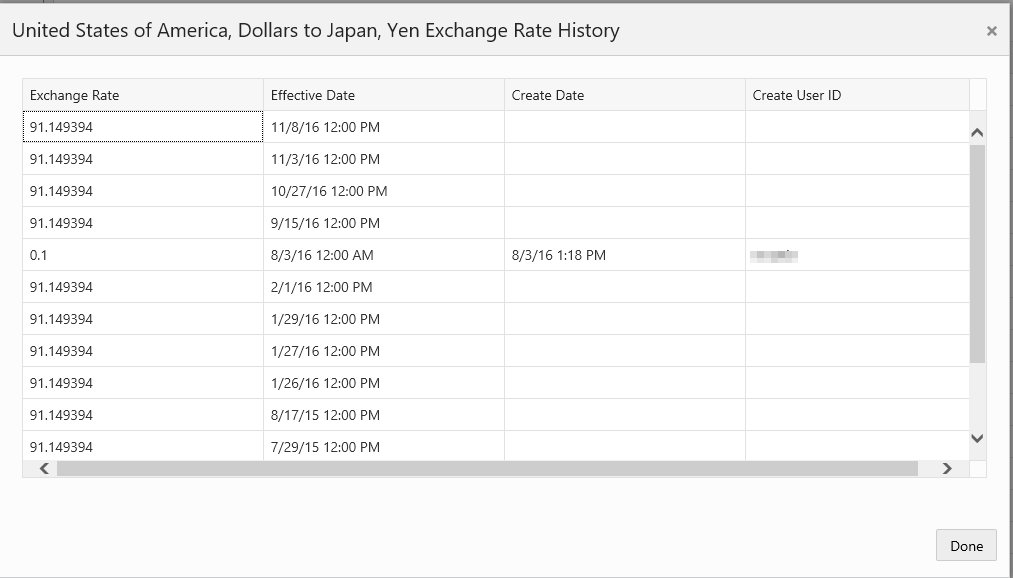
-
Exchange Rate - The Exchange Rates defined for the conversion of the Base Currency to the Exchange Currency.
-
Exchange Rate Date - The date and time when the Exchange Rate becomes effective.
-
Create Date - The date and time when the Exchange Rate was created.
-
Create User Id - The user ID of the person who created the Exchange Rate.
-
-
Click Done to close the window and return to the Exchange Rate Window.
Creating a New Exchange Rate
To create a new Exchange Rate for a currency conversion do the following:
-
Click the Actions Menu, and then click Add, or Click the Add (+) icon. The Create Exchange Rate window displays.
Figure 13-19 Create Exchange Rate
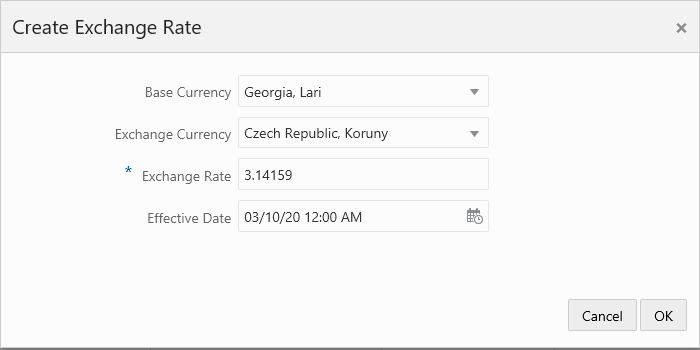
-
Enter the following information:
-
Base Currency - Select the basic currency from the list.
-
Exchange Currency - Select the Exchange Currency from the list.
-
Exchange Rate - Enter the Exchange Rate to use when converting the Base Currency to the Exchange Currency. The value entered can include up to 11 positions before the decimal and up to 6 after.
-
Effective Date and Time - Use the Calendar picker to select the date and time which the rate is effective. The date/time can be in the past or in the future. If an existing Exchange Rate for the specified date and time currently exists, the page displays an error.
-
-
Click OK to accept the changes or Cancel to close the task without saving. If you select OK, you will receive a confirmation at the bottom of the window confirming the new exchange rate was successfully added. You are returned to the Exchange Rate window where the new exchange rate you just created now displays at the top of the list.
-
You can refresh the Exchange Rate list by clicking the Refresh icon or picking the Refresh option from the Actions menu.
File Review
As an Administrator, I want the ability to view files, so that I can manage downloading and transferring of files.
-
Click the Tasks icon.
-
Click Admin.
-
Click File Review.
-
Select either Available Files or Transfer Activity.
Searching for Available Files
In the File Review window select Available Files.
-
Enter the following search parameters to search for Available Files.
-
Select a File Type.
-
Enter any or all of a File Name.
-
Enter the From and To Date Ranges.
-
Select whether or not to Exclude Zero Length Files.
-
Click Search.
Note:
The results display in batches of 25 records. When more than 25 records are available, click Show More... to view more results.
You can refresh the Search Results by clicking the Refresh icon or picking the Refresh option from the Actions menu.
Sorting Available Files
The following fields can be sorted Ascending or Descending:
-
Create Date
-
File Length
-
File Name
-
File Type
-
Job Run ID
-
Record ID (default)
Viewing a FIle
To view a File, do the following:
-
Highlight the row of the File you want to view.
-
Click the Actions menu or the View icon to open the View File Details window.
Figure 13-20 View File Details
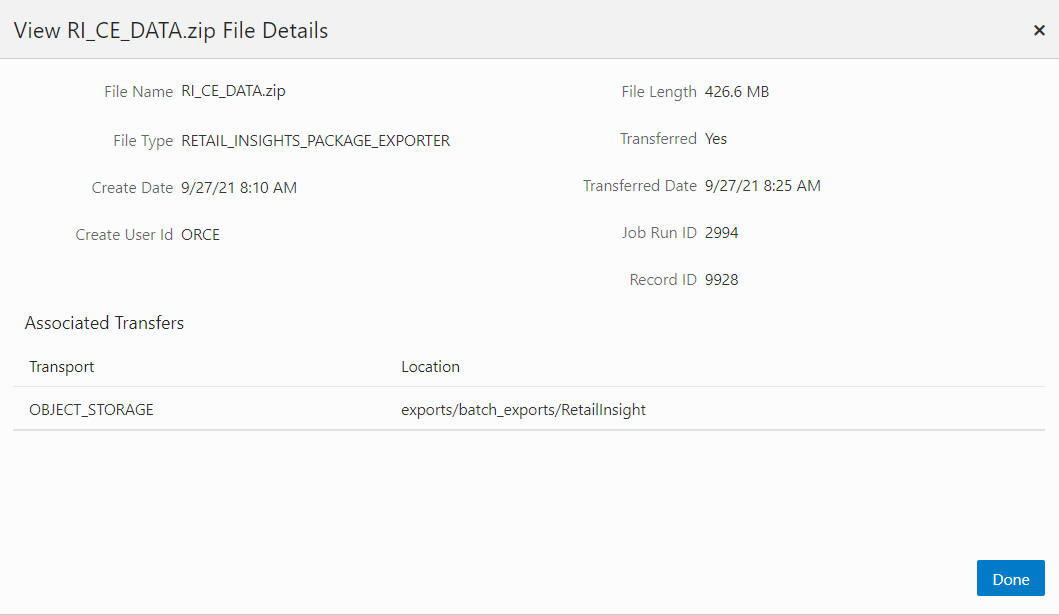
-
View the details of the file and click Done to close the window.
Downloading Files
To download a file do the following:
-
Highlight the row of the File you want to download.
-
Click the Actions menu and select Download, or click the Download icon to download the file. The file is downloaded to a location based on your settings.
Transfer to Server
To transfer a file to the server do the following:
-
Highlight the row of the File you want to transfer to server.
-
Click the Actions menu and select Transfer to Server. A notification appears to indicate the transfer is a success.
Figure 13-21 Notification

Searching for Transfer Activity
In the File Review window select Transfer Activity.
-
Enter the following search parameters to search for Transfer Activity.
-
Select a Transfer Type.
-
Enter any or all of a File Name.
-
Select a Status. Options include:
-
All (default)
-
New Entry
-
Waiting
-
Transfer Started
-
Transfer Retry
-
Transfer Failed
-
Completed
-
Historical
-
Discard
-
-
Select a Transport option.
-
Click Search.
Note:
The results display in batches of 25 records. When more than 25 records are available, click Show More... to view more results.
You can refresh the Search Results by clicking the Refresh icon or picking the Refresh option from the Actions menu.
Sorting Transfer Activity
The following fields can be sorted Ascending or Descending:
-
Attempt
-
File Name
-
Last Updated (default)
-
Message
-
Retry
-
Status
-
Transfer Type
-
Transport
Franchisees
You have the ability to view, add, edit, and delete a franchisee to be used within the system. Additionally, users and locations can be added and deleted on a franchisee as well as viewing a list of customers that are currently assigned to a franchisee. A list of Franchisees can also be imported.
-
Click the Tasks icon.
-
Click Admin.
-
Click Franchisees.
Searching for Franchisees
Enter the following search parameters to search for Franchisees.
-
-
Enter all or part of a Franchisee ID.
-
Enter all or part of a Name.
-
Enter all or part of a Description.
-
Enter all or part of a City.
-
Enter all or part of a State.
-
Click Search.
Note:
The results display in batches of 25 records. When more than 25 records are available, click Show More... to view more results.
You can refresh the Search Results by clicking the Refresh icon or picking the Refresh option from the Actions menu.
Sorting Available Franchisees
The following fields can be sorted Ascending or Descending:
-
City
-
Description
-
Franchisee ID (default)
-
Name
-
State
Viewing a Franchisee
To view a Franchisee, do the following:
-
Highlight the row of the Franchisee you want to view.
-
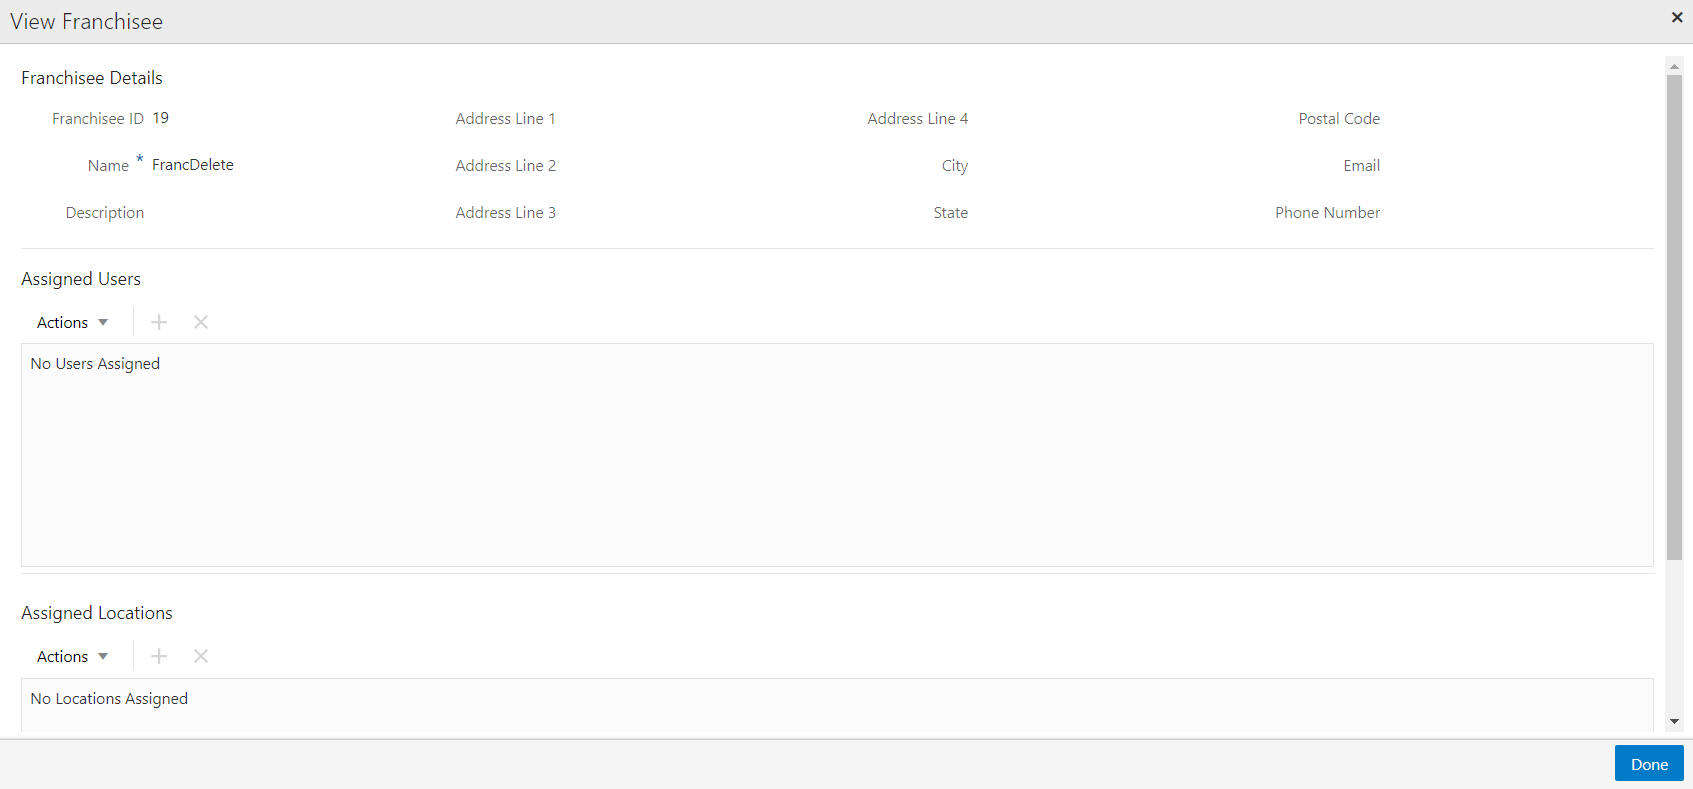
Click the Actions menu or the View icon to open the View Franchisee window.
Figure 13-23 View Franchisee
-
View the details of the Franchisee and click Done to close the window.
Adding Franchisees
Do the following to add a new Franchisee.
-
Click the Actions menu and select Add, or click the Add icon (+).
-
Enter the following information:
-
Franchisee ID (automatically assigned after save)
-
Name
-
Description
-
Address Line 1
-
Address Line 2
-
Address Line 3
-
Address Line 4
-
City
-
State
-
Postal Code
-
Email
-
Phone Number
-
-
Select OK to save or Cancel to exit. You do not at this time have to add users. If you wish to associate users to the new Franchisee at this time, then proceed to the Assign Users section.
Assign Users
-
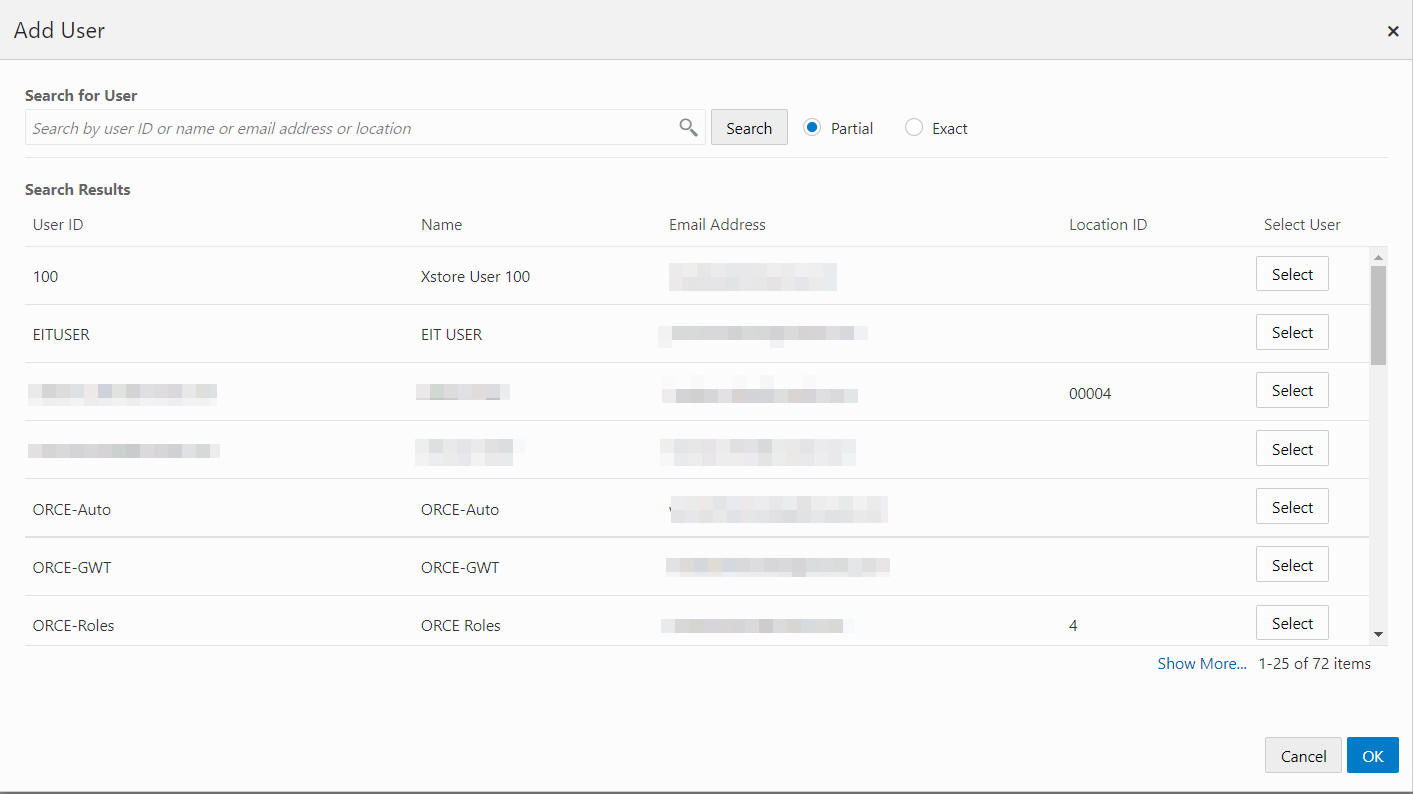
In the Assign Users section of the Create Franchisee window, click the Actions Menu, and then click Add, or click the Add (+) icon. The Add Users window displays.
Figure 13-24 Add Users

-
In the Search for User field, enter the User ID, Name, Email Address, or Location of the user you want to search for.
-
Select Partial, if you want to results that match part of what you enter, or select Exact if you only want results that are an exact match.
-
Click Search. A list of users matching the search text is displayed in the Search Results grid.
Figure 13-25 Search Results Grid
-
For each user you wish to assign, click Select.
-
For each user you wish to unassign, click Unselect.
-
Click OK to accept the changes, or Cancel to close the window without saving.
-
Select OK to save or Cancel to exit. You do not at this time have to add locations. If you wish to associate locations to the new franchisee at this time, then proceed to the Assign Locations section.
Assign Locations
-
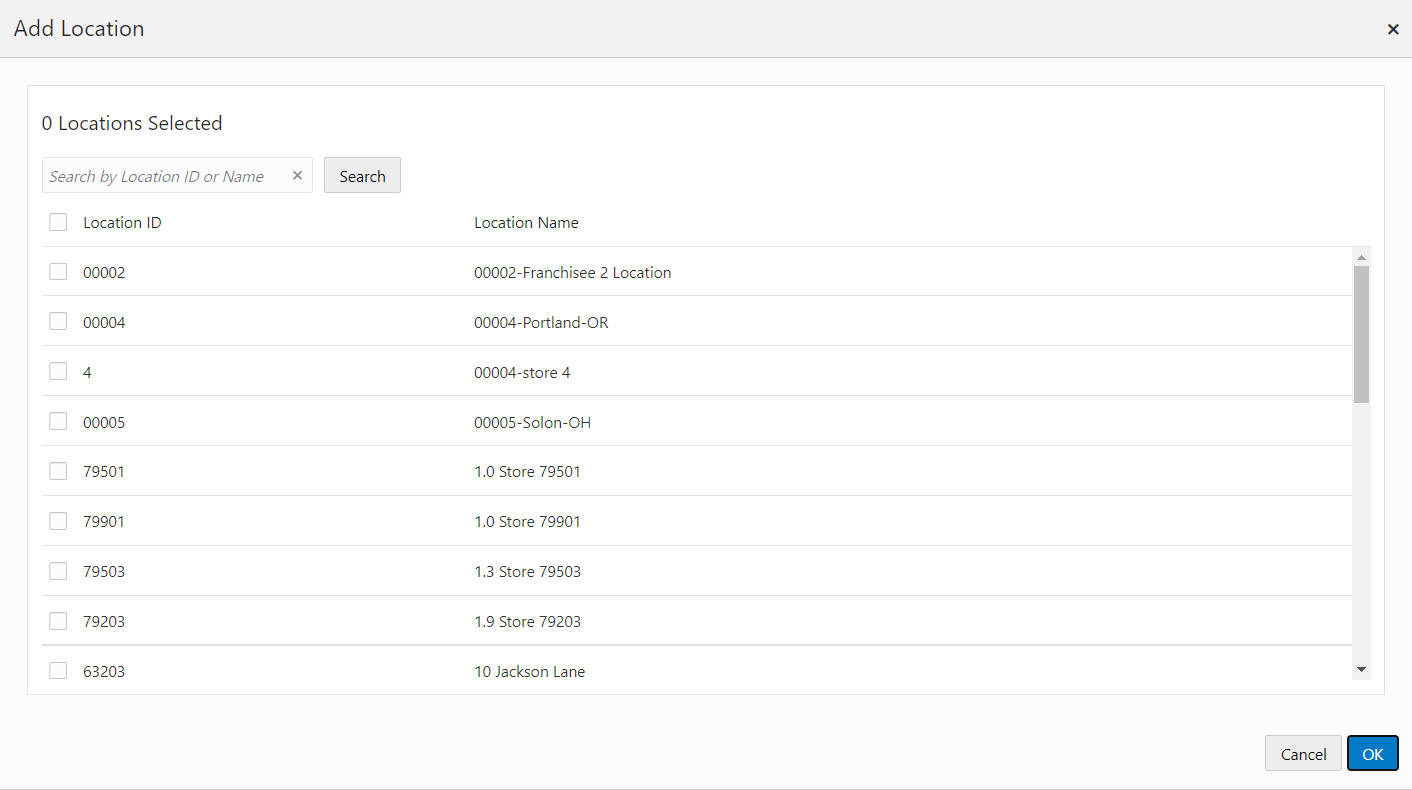
In the Assign Locations section of the Create Franchisee window, click the Actions Menu, and then click Add, or click the Add (+) icon. The Add Location window displays.
Figure 13-26 Add Location
-
Enter all or part of a Location ID or Name.
-
Click Search.
-
Select the top Location ID check box to add all locations, or select each individual Location ID check box for each location to assign to the Franchisee.
-
Click OK to accept the changes, or Cancel to close the window without saving.
-
Click OK to create the new franchisee, or click Cancel to close without saving.
A notification appears to indicate the successful creation of a Franchisee.
Figure 13-27 Notification

Editing Franchisees
To edit a Franchisee do the following:
-
Highlight the row of the Franchisee.
-
Click the Actions menu and select Edit, or click the Edit (Pencil) icon.
-
Edit the Franchisee. See Adding Franchisees for more information.
Deleting a Franchisee
To delete a Franchisee do the following:
-
Highlight the row of the Franchisee.
-
Click the Actions menu and select Delete, or click the Delete (X) icon.
A notification appears confirming the successful deletion of the Franchisee.
Figure 13-28 Notification

Note:
The delete function will not process if the Franchisee is associated with one or more customers. A notification appears to indicate the process did not complete.
Viewing Assigned Customers to a Franchisee
To view the assigned customers to a franchisee do the following:
-
Highlight the row of the Franchisee.
-
Click the Actions menu and select View Customers, or click the View Customers icon.
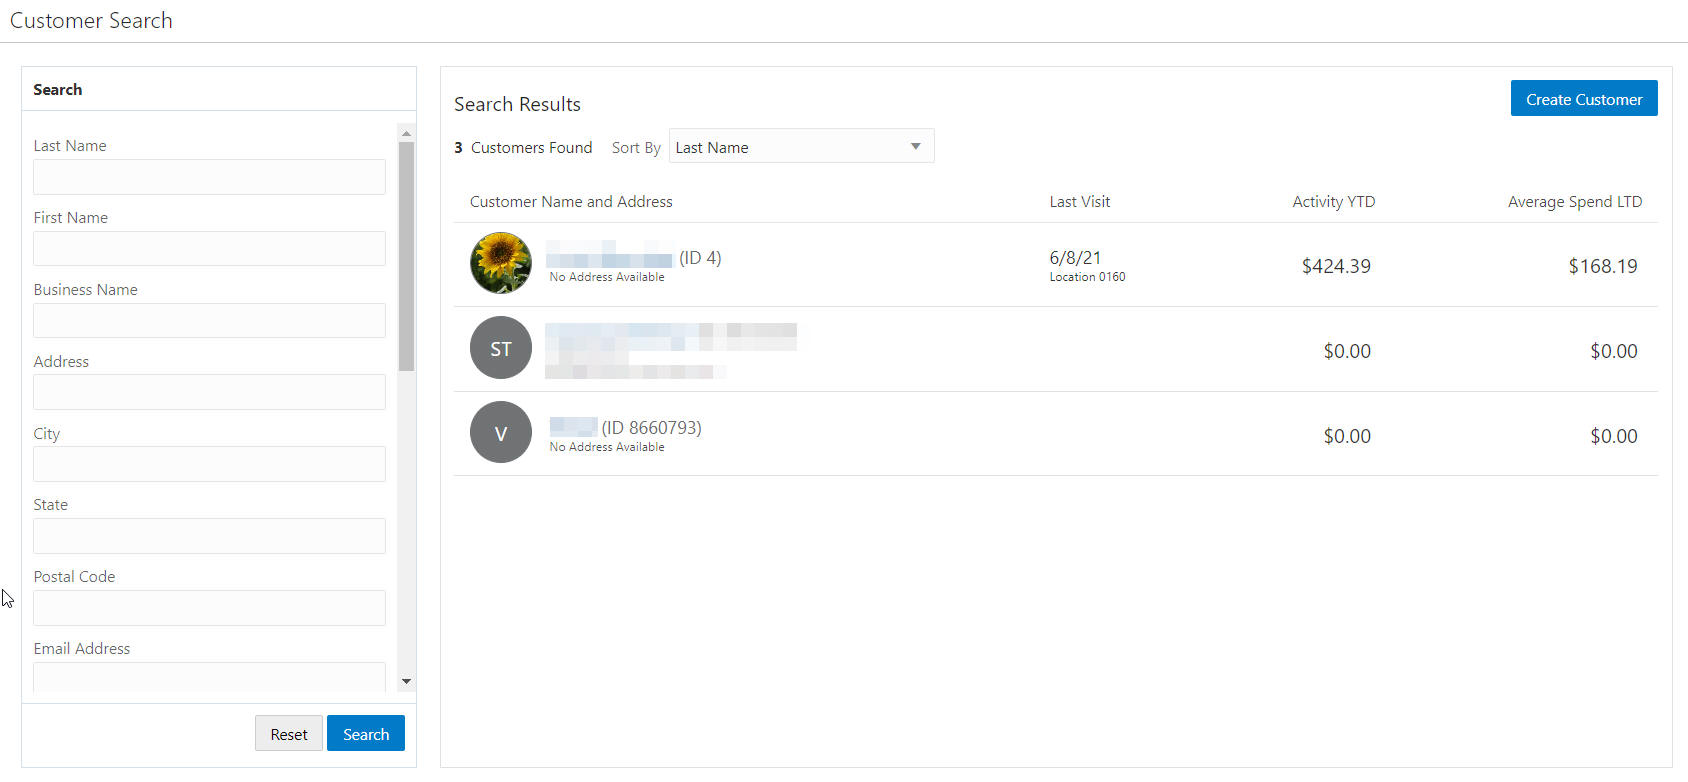
The Customer Search window opens. The Search Results section lists the customers assigned to the franchisee.
Figure 13-29 Customer Search Results
-
Close the Customer Search tab to return to the Franchisees.
Import Franchisees using CSV File
You have the ability to import a csv file containing the franchisees for a client, so that they can be brought into Customer Engagement without creating them all manually.
To import by CSV do the following:
-
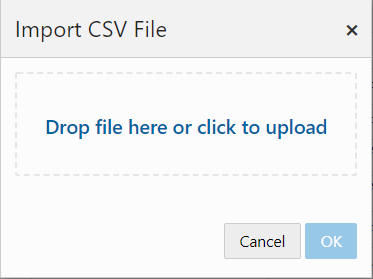
Click the Actions menu and select Import CSV file.
Figure 13-30 Import CSV File
-
To add a file either:
-
Drag and Drop a new file as shown in
-
Click anywhere in the Drop file here or click to upload box.
-
-
After uploading the CSV file, it will scan for viruses and validate the uploaded file's name, size, and extension. After passing the validations, the name of the file will appear on the popup and the OK button is enabled
-
Click OK to import the file or click Cancel the close the window without saving.
Note:
The Franchisees from the CSV file will be read, validated, and saved into the database and the appropriate response message will be displayed. Failure response will also be shown on the click of OK, in case of invalid CSV file. Click Done to close the window and refresh the base Franchisees screen.
Location Management
Use the Location Management window to add or edit a location.
-
Click the Tasks icon.
-
Click the Admin Task.
-
Click the Location Management Task.
The following information is displayed for each location:
-
Location ID – Unique ID of the Location.
-
Location Name – Name of the Location.
-
Address –Address 1 of the Location.
-
Franchisee Location – Indicates whether the Location is a Franchisee.
-
Active – Indicates whether the Location is currently active.
The Location Management window shows the first 25 locations, displayed in Location ID ascending order. You can click the Show More… link to show the next 25 locations or filter the results by completing the following steps:
Filtering the Results
-
Enter the information in any available following fields:
Figure 13-31 Filter Options

-
Attribute – Additional, descriptive information about a Customer Engagement element.
-
Attribute Value – This is a dynamic field based on the attribute previously selected.
-
Location ID – Unique ID for the Location.
-
Location Name – Name of the Location.
-
Address – Address 1 of the Location.
-
City – City of the Location.
-
State – State or Province of the Location.
-
Postal Code – Postal Code or Zip Code of the Location.
-
-
Click Apply to filter the results, or click Reset to clear the fields.
Note:
The results remain the same even if you click Reset. Reset only clears the previously entered filter criteria. The results will only refresh when another filter is configured.
Adding a Location
Use the following steps to add a location:
Location Information
-
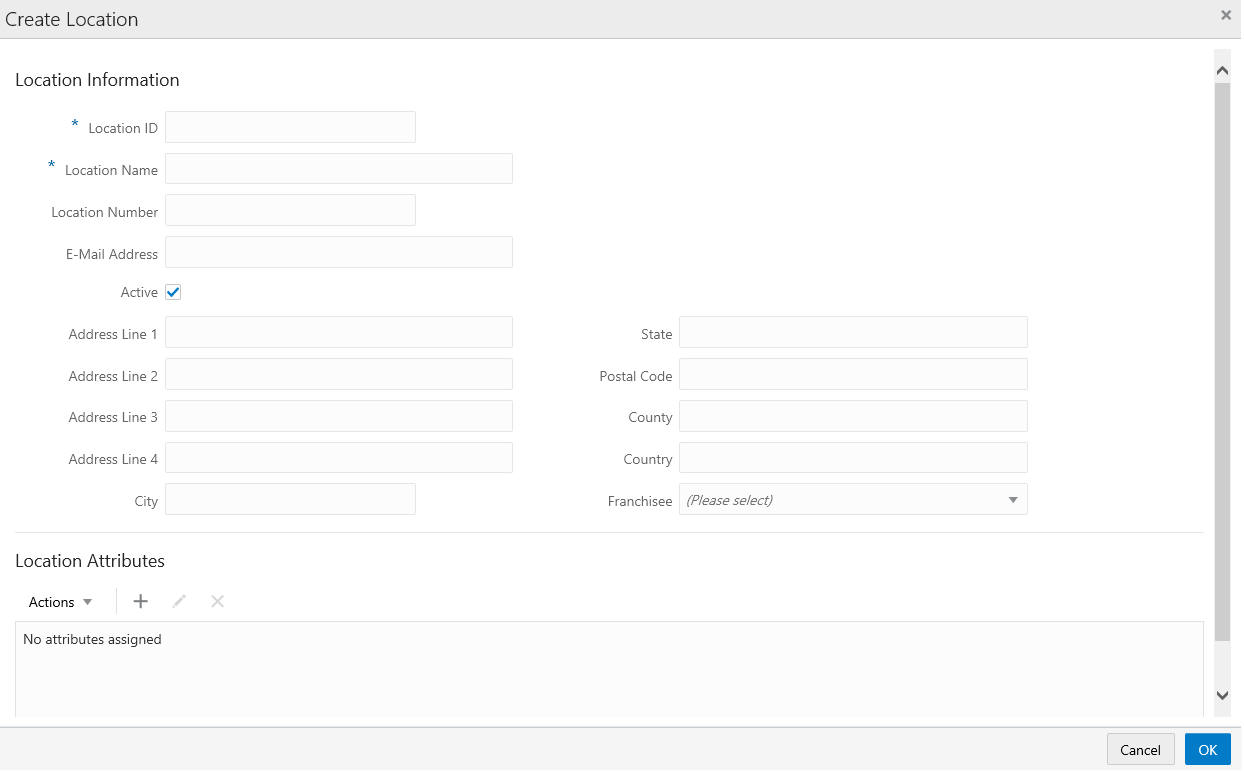
Click the Add (+) icon, or choose Add from the Action menu. This displays a Create Location window where you can enter the following information:
Figure 13-32 Create Location
-
Enter the values for the following fields:
-
Location ID - Unique ID of the Location (Required field).
-
Location Name - Name of the Location (Required field).
-
Active - Indicates whether the Location is currently active. The default is checked.
-
Location Number - Location Number of the Location.
-
Email Address - Email address for the Location.
-
Address Line 1 - Line 1 of the Location's address.
-
Address Line 2 - Line 2 of the Location's address.
-
Address Line 3 - Line 3 of the Location's address.
-
Address Line 4 - Line 4 of the Location's address.
-
City - City of the Location.
-
State - State or Province of the Location.
-
Postal Code - Postal Code or ZIP Code of the Location.
-
County - County of the Location.
-
Country - Country of the Location.
-
Franchisee - Name of the Franchisee to which the Location is assigned (optional).
-
-
Either continue to the Location Attributes section or, if no Location Attribute additions are required, Click OK to create the Location. Click Cancel to close the window without saving.
Location Attributes
If configured, the user can Add, Edit, or Delete Location Attributes.
Adding a Location Attribute
-
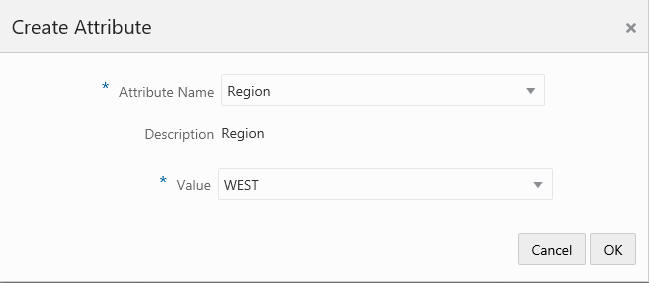
To add a Location attribute, click the Action Menu and click Add or click the Add (+) icon. This displays a Create Attribute window where you can enter the following information:
Figure 13-33 Create Location Attribute
-
Click the Attribute Name list.
-
The Value field is dynamic and is based off of the data type of the attribute. The user either enters a value or selects a value from the list.
-
-
Click OK. This adds the new Location Attribute. Or select Cancel to close the window without adding the location attribute.
Editing a Location Attribute
-
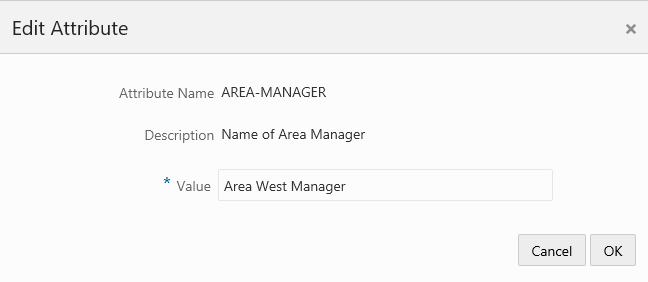
To edit a Location attribute, highlight the Location Attribute and click the Action Menu, then click Edit, or click the Edit icon.
Figure 13-34 Edit Attribute
-
Edit the location attribute value.
-
Click Ok to accept the change or Cancel to close without saving.
Deleting a Location Attribute
-
To delete a Location Attribute, highlight the row of the location attribute and from the Action menu, click Delete, or click the Delete X icon.
Figure 13-35 Warning

-
Click OK to delete the Location Attribute, or Cancel to return to the list of Location Attributes.
-
Once all Location Attributes are determined, click OK to create the location, or Cancel to close the window without saving.
Editing a Location
To edit the information in the Location Information, and/or Location Attribute sections for the Location, select the location from the Location Management window.
-
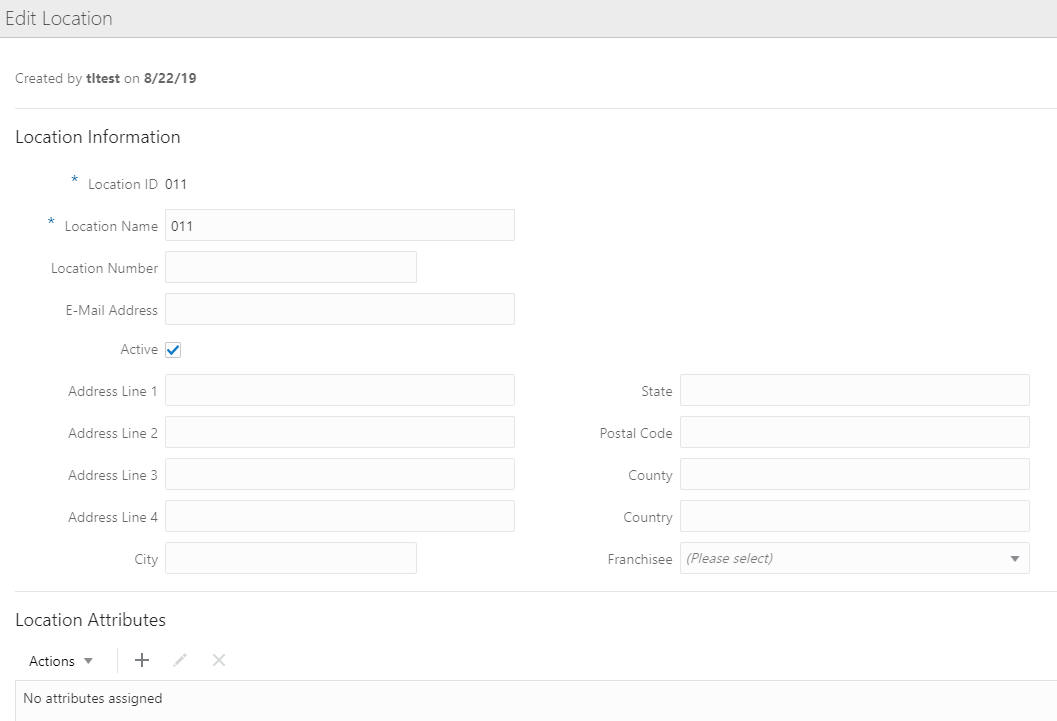
Click the Edit icon, or choose Edit from the Actions menu. This displays an Edit Location window which displays a window with details of the location:
Figure 13-36 Edit Location
-
Make any necessary change to the Location Information fields, and/or the Location Attributes values.
-
Click OK to accept the changes. The location is displayed with the new information. Click Cancel to close without saving.
Managing External Application Access
As a retailer with external applications, I want a consistent view of the product integration with various application clients from Customer Engagement, so that my experience is the same regardless of the application I am in.
To view the list of application clients do the following:
-
Click Tasks.
-
Click Admin.
-
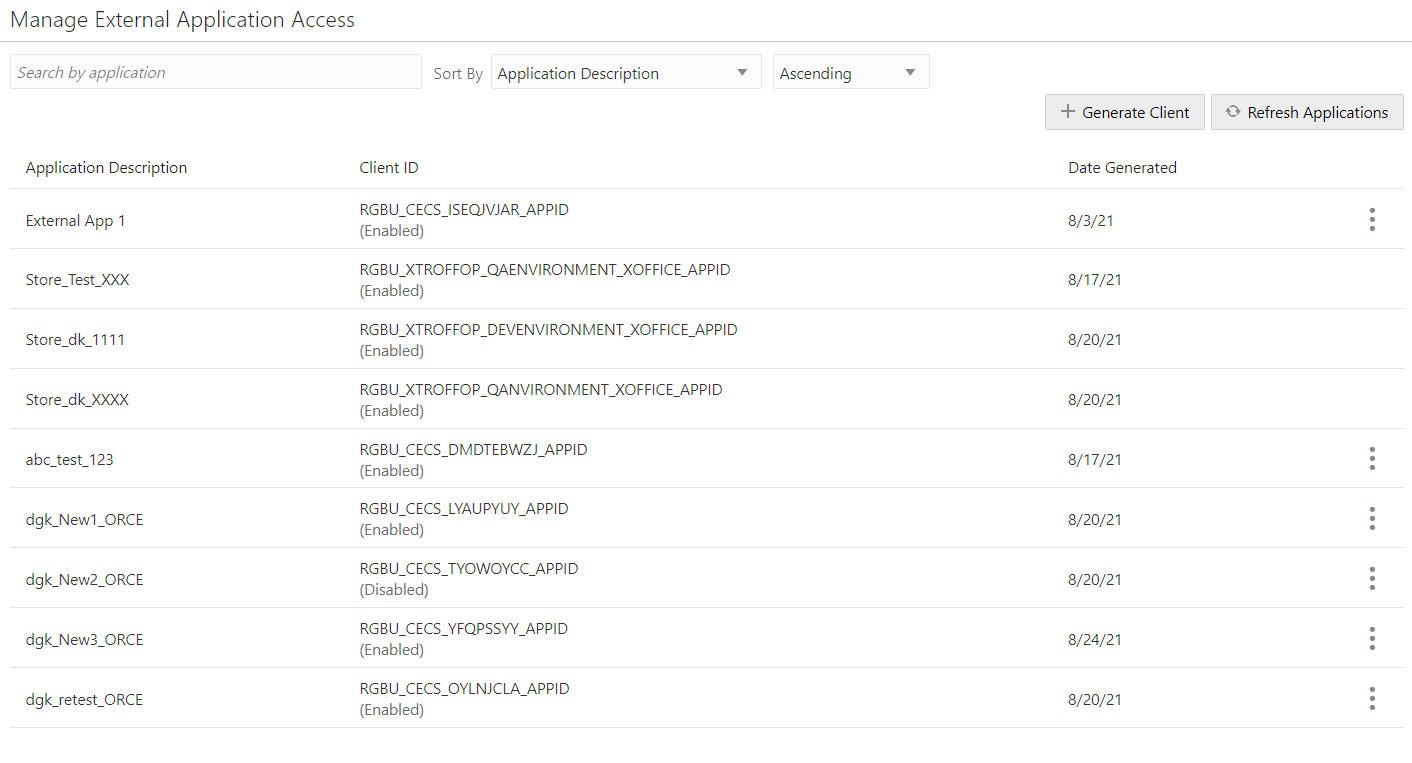
Click Manage External Application Access. The Manage External Application window displays.
Figure 13-37 Manage External Application Access
Sorting Application Clients
You can Sort By the following options:
-
Application Description (default)
-
Client ID
-
Date Generated
Applications can be sorted ascending or descending from the list.
Delete an Application Client
To delete an Application, do the following:
-
Click the Action menu of the Application you want to delete.
-
Click Delete which opens the delete confirmation window.
-
Click OK to delete the Application or Cancel to close the window without deleting the application.
Note:
A confirmation notification appears to confirm the Application is deleted.
Disable an Application Client
To disable an Application, do the following:
-
Click the Action menu of the Application you want to disable.
-
Click Disable which opens the disable confirmation window.
-
Click OK to disable the Application or Cancel to close the window without disabling the application.
Note:
A confirmation notification appears to confirm the Application is disabled.
Regenerate Secret
To regenerate secret, do the following:
-
Click the Action menu of the Application you want to regenerate secret.
-
Click the Regenerate Secret which opens the confirmation window.
-
Click OK to continue the process, or Cancel to close the window without regenerating secret. The Regenerate Application Client Secret window opens.
-
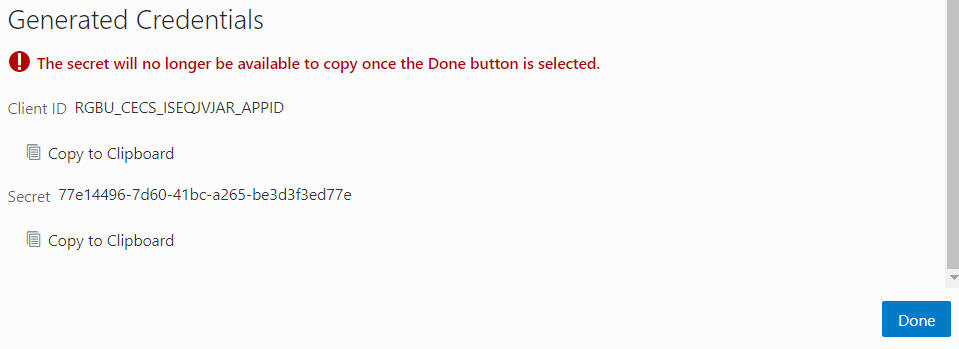
The window confirms a new secret will be generated. The Application Details display. Click Regenerate to regenerate secret or Cancel to close the window without saving. The Generated Credentials appear.
Figure 13-38 Generated Credentials
-
Click Copy to Clipboard to copy the Client ID.
-
Click Copy to Clipboard to copy the Secret.
-
Click Done to close the window.
Note:
The secret will no longer be available to copy once the Done button is selected.
Generate Client
You have the ability to generate an application client for IDCS or OCI-IAM from Customer Engagement, so that my experience is the same regardless of the application I am in. To generate a client do the following:
-
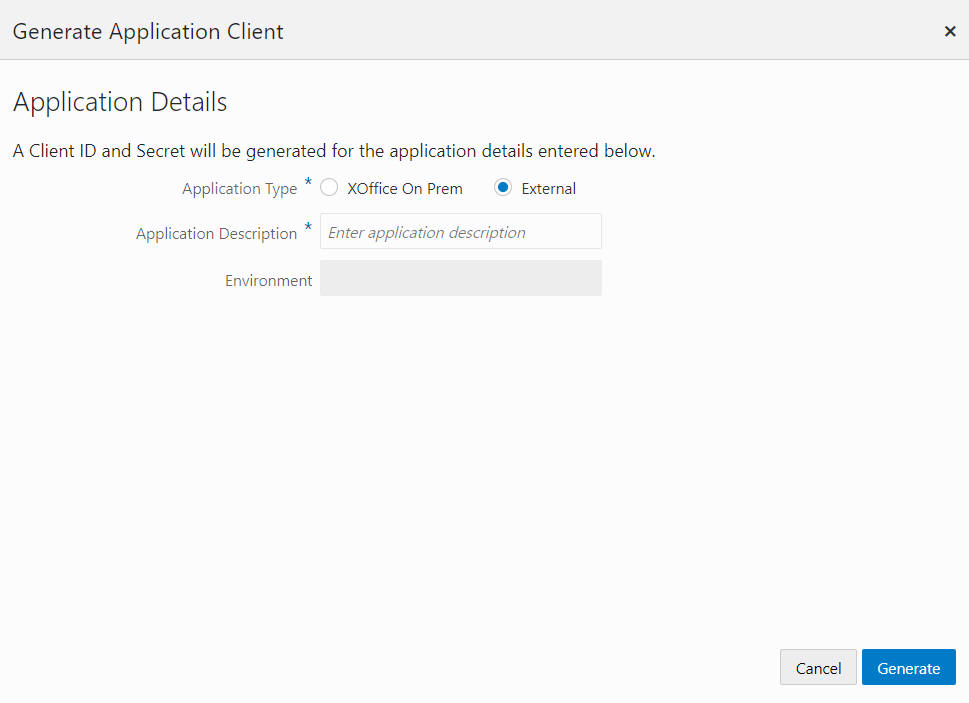
Click + Generate Client. The Generate Application Client window opens.
Figure 13-39 Generate Application Client
-
Select an Application Type.
-
XOffice On Prem
-
External
-
-
Enter the Application Description.
-
Enter the Environment. (only available for XOffice On Prem)
-
Click Generate. The Generated Credentials appear.
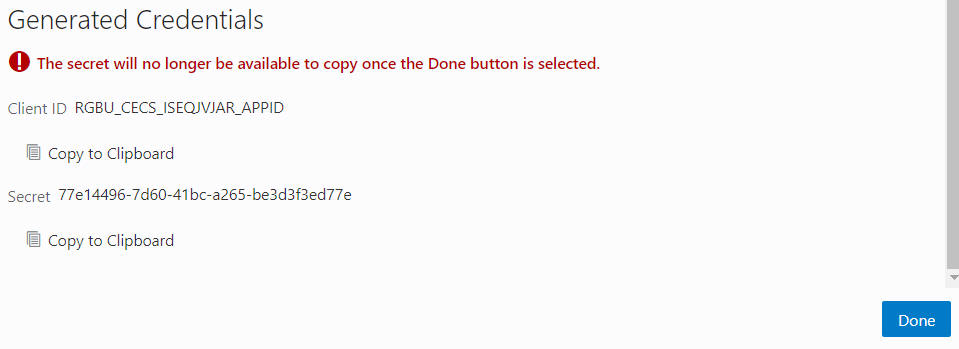
Figure 13-40 Generated Credentials
-
Click Copy to Clipboard to copy the Client ID and Secret in order to paste into the configuration for linking applications. You will receive a notification: "Copied" for the Client ID. For Secret, a confirmation window appears if you have the Client ID still in memory. Click OK to copy the Client Secret or Cancel to close that confirmation without copying.
Note:
You may also manually highlight the Client ID and Secret and use Copy/Paste.
Preference Types
Preference Types are methods in which a customer can receive promotional information from the retailer. In this section, you can sort, add, edit, view, and delete preference types, so that you can setup unlimited preference types to use with the Customer Preference Center. To access Preference Types:
-
Click the Tasks icon.
-
Click the Admin Task.
-
Click the Preference Types Task.
Figure 13-41 Preference Types

Sorting Preference Types
You can sort by:
-
Default Frequency
-
Preference Type ID
-
Preference Type Name
Preference types can be sorted ascending or descending from the list.
Adding a Preference Type
To add a Preference Type do the following:
-
To add a Preference Type, click the Action Menu and click Add, or click the Add (+) icon. This displays the Create Preference Type window where you can enter the following information:
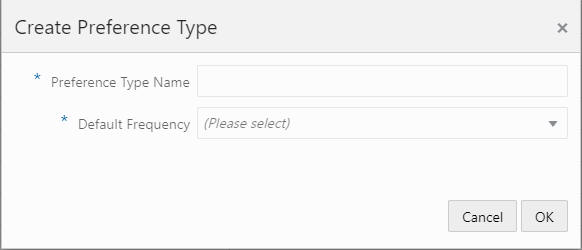
Figure 13-42 Create Preference Type
-
Type a Preference Type Name and choose one of the following default frequencies – both fields are required (these frequencies are configurable).
-
Anytime
-
Weekly
-
Monthly
-
Yearly
-
Daily
-
Quarterly
-
-
Click OK to add the new Preference Type. Click Cancel to close the window.
Editing a Preference Type
To edit a Preference Type, do the following:
-
Highlight the row of the Preference Type you want to edit and click the Actions menu or the Edit icon to open the Edit Preference Type window.
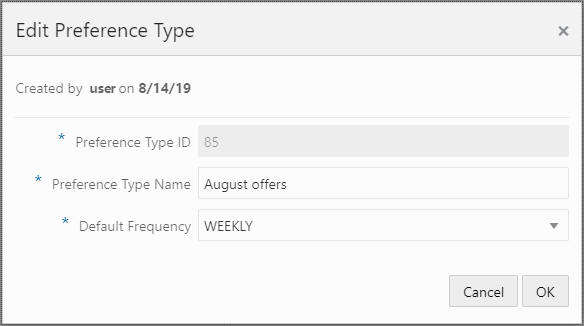
Figure 13-43 Edit Preference Type
-
Edit the Preference Type Name or select a different Default Frequency and click OK. Click Cancel to close the window and discard any changes.
Viewing a Preference Type
To view a Preference Type, do the following:
-
Highlight the row of the Preference Type you want to view.
-
Click the Actions menu or the View icon to open the View Preference Type window.
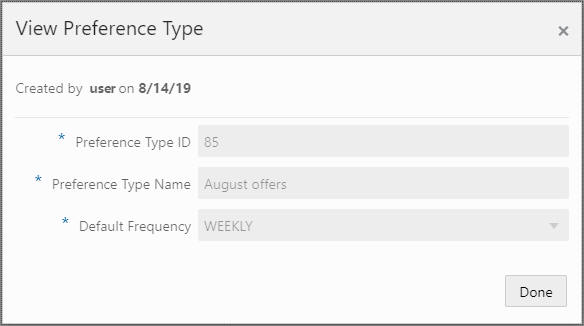
Figure 13-44 View Preference Type
-
View the details of the Preference Type and click Done to close the window.
Delete a Preference Type
To delete a Preference Type, do the following:
-
Highlight the row of the Preference Type you want to delete.
-
Click the Actions menu Delete option, or the Delete icon which opens the delete confirmation window.
-
Click OK to delete the Preference Type or Cancel to close the window without deleting the row.
Note:
A confirmation notification appears to confirm the Preference Type has been deleted.
Role Groups
You have the ability to view, add, edit, and delete role groups, so that you can define which permissions should be granted to a role group. To access Role Groups do the following:
-
Click Menu.
-
Click the Admin task.
-
Click Role Groups. The Role Groups window displays.
Sorting Role Groups
Roles Groups can be sorted ascending or descending using the following Sort By options:
Figure 13-45 Sorting Role Groups
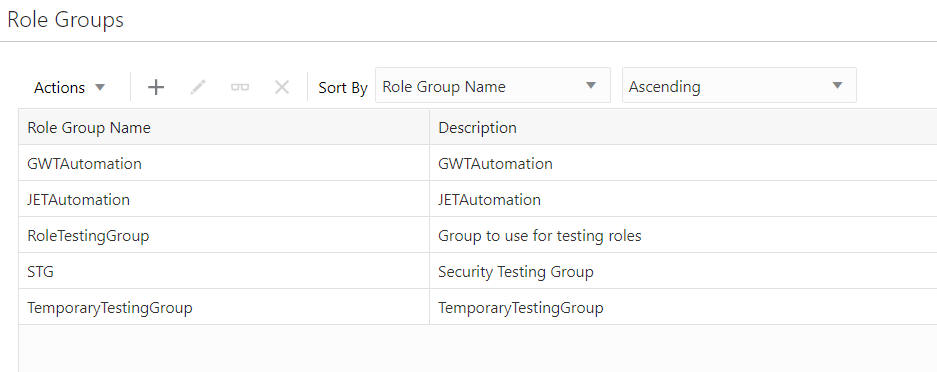
-
Role Group Name (default)
-
Description
Adding Role Groups
To add a Role Group do the following:
-
Click the Actions menu Add option, or the + icon which opens the Add Role Group window.
-
Enter a Role Group Name.
-
Enter a Description.
-
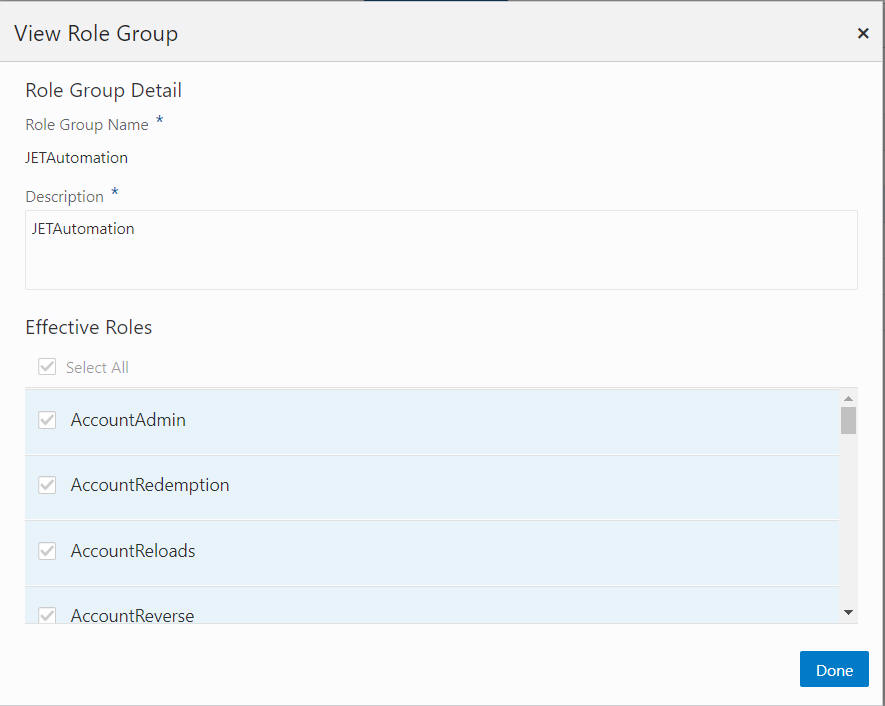
Use the Select All check box to select all Effective Roles or select individual Effective Roles using the check box next to the role.
-
Click OK to add the role group, or click Cancel to close the window without saving.
Editing Role Groups
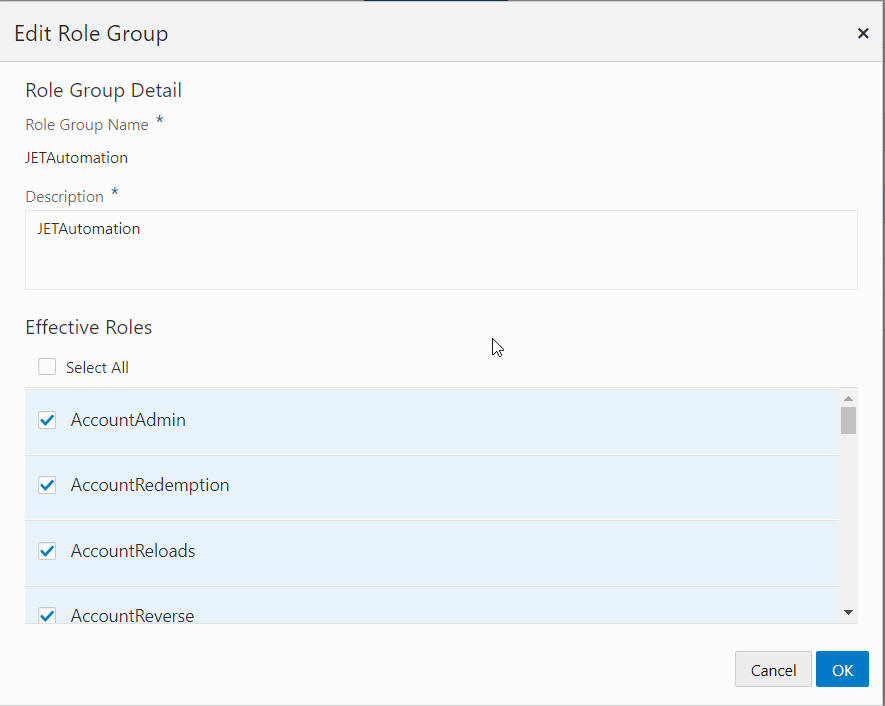
To edit a Role Group do the following:
-
Highlight a Role Group.
-
Click the Actions menu Edit option, or the Pencil icon which opens the Edit Role Group window.
Figure 13-46 Edit Role Group
-
Edit the Description.
-
Edit the Effective Roles.
-
Click OK to save the changes, or click Cancel to close the window without saving.
Security Groups
Security Groups determine whether Users can access and/or modify Customer information in that Security Group. Each Security Group is assigned a certain permission level for the Customers in that group. Each User assigned to a Security Group is assigned the permissions for that Security Group.
Note:
This option is available only if the user has been assigned the SystemAdmin role. See the Oracle Retail Customer Engagement Cloud Service Implementation Guide for more information on assigning User Roles.
Accessing Security Groups
To access the Security Groups do the following:
-
Click Menu.
-
Click the Admin task.
-
Click the Security Groups task. The Security Groups window displays.
Figure 13-48 Security Groups

The following fields are displayed:
-
The following fields are displayed:
Group ID – ID of the Security Group.
-
Group Name – Name of the Security Group.
-
Default Privilege – The access privileges given to Users in the Security Group. These access privileges are specific to the Customer. For a description of the Default Privilege Types, see , Default Privilege.
-
Active – Indicates whether the Security Group is Active or not.
Sorting Results
In the Security Groups window, the user can sort the list to refine the results (see Figure 13-48). Results can be sorted Ascending or Descending using the following sorting options:
-
Active
-
Default Privilege
-
-
Read/Write
-
Read Only
-
Limited Read
-
No Access
-
-
Group ID (Default)
-
Group Name
Working with the Security Groups
Creating a New Security Group
To create a new Security Group do the following:
-
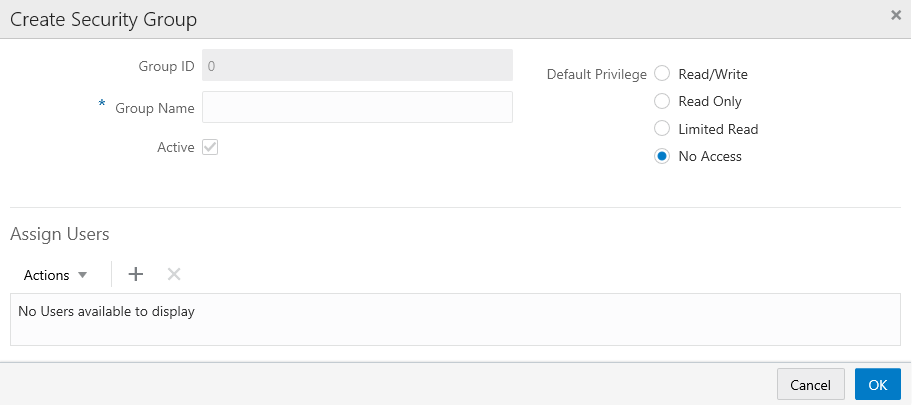
Click the Actions Menu, and then click Add, or Click the Add (+) icon. The Create Security Group window displays.
Figure 13-49 Create Security Group
-
Enter the following information:
-
Group ID – (Read Only) Automatically assigned ID of the Security Group.
-
Group Name – (Required) The name you want to give to the Security Group.
-
Active – Indicates whether the Security Group is Active or not.
-
Default Privilege – Security Groups have the following privilege types available, listed in order from most permissible to least.
-
Read/Write - Users in the Security Group can read and update all data for Customers who have had the Security Group applied.
-
Read Only - Users in the Security Group can read all data for Customers who have had the Security Group applied, but cannot make updates.
-
Limited Read - Users in the Security Group can read some data for Customers who have had the Security Group applied, but cannot read sensitive Customer information (such as Address, Telephone Numbers, and Email Addresses) and cannot make updates.
-
No Access - A User in the Security Group will not even see that the Customer exists in the system.
-
-
-
Select OK to save or Cancel to exit. You do not at this time have to add users. If you wish to associate users to the new group at this time, then proceed to the Assign Users section.
Assign Users
-
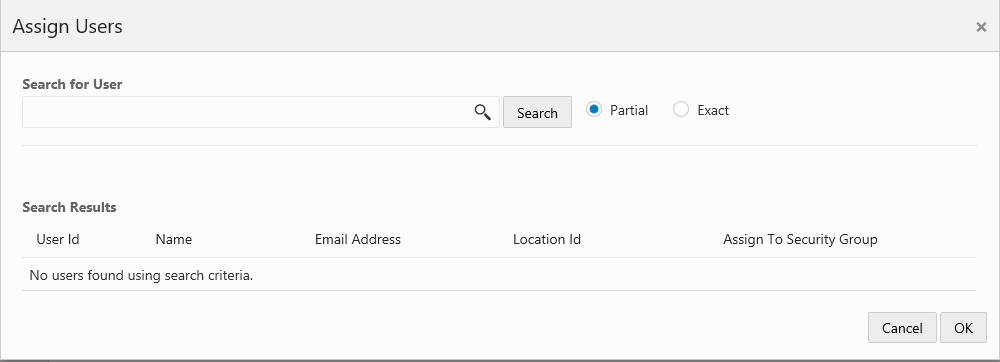
In the Assign Users section of the Create Security Group window, click the Actions Menu, and then click Add, or Click the Add (+) icon. The Assign Users window displays.
Figure 13-50 Assign Users
-
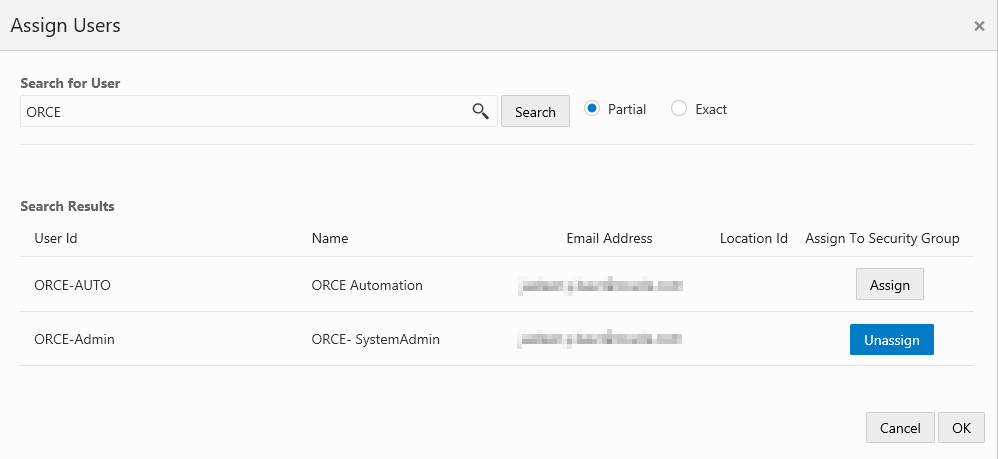
In the Search for User field, enter the User ID, Name, Email Address, or Location of the user you want to search for.
-
Select Partial, if you want to results that match part of what you enter, or select Exact if you only want results that are an exact match.
-
Click Search. A list of users matching the search text is displayed in the Search Results grid.
Figure 13-51 Search Results Grid
-
For each user you wish to assign, click Assign.
-
For each user you wish to unassign, click Unassign.
-
Click OK to accept the changes, or Cancel to close the window without saving.
-
Click OK to save the new Security Group, or Cancel to close the window without saving.
-
Click the Refresh icon to update the Security Groups results.
Viewing Security Group Details
To view Security Group Details do the following:
-
Highlight a Security Group from the list of results.
-
Click the Actions Menu, and then click View, or click the View icon. The View Security Group window displays.
Figure 13-52 View Security Group
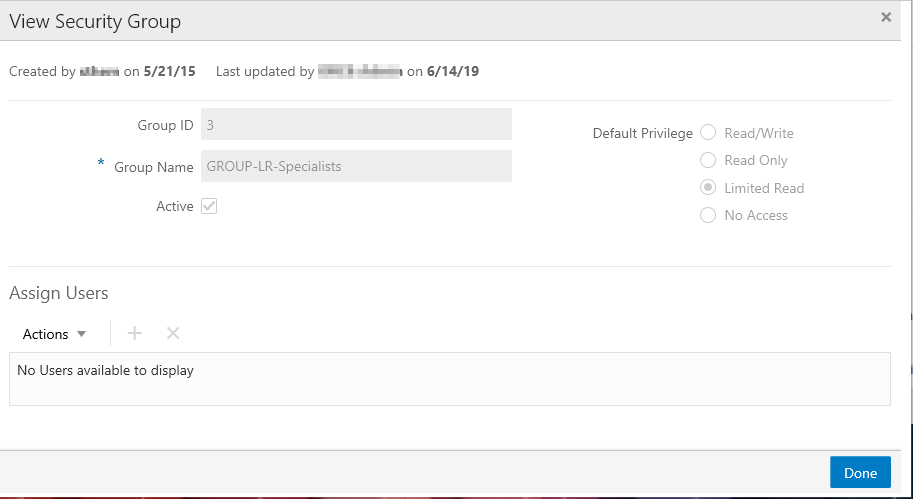
The following information is displayed:
-
Group ID - ID of the Security Group.
-
Group Name - Name of the Security Group.
-
Active - Indicates whether the Security Group Privilege is active or not.
-
Privilege Type - Determine the access privileges given to Users in the Security Group.
-
-
Click Done to close the window and return to the Security Group window.
Edit an Existing Security Group
To edit the Security Group Details do the following:
-
In the Security Group window, highlight a Security Group you wish to edit.
-
Click the Actions Menu, and then click Edit, or click the Edit icon. The Edit Security Group window displays.
Figure 13-53 Edit Security Group
-
The following fields are editable:
-
Group Name
-
Active
-
Default Privilege
-
-
You may edit the assigned users section to Add new, or Remove, any existing users.
-
Select OK to save or Cancel to exit.
System Configuration
You have the ability to view and edit system configurations, so that the system can be configured to work in the way the business operates.
Accessing System Configuration
To access System Configuration do the following:
-
Click Menu.
-
Click the Admin task.
-
Click the System Configuration task. The System Configuration window displays.
Figure 13-54 System Configuration
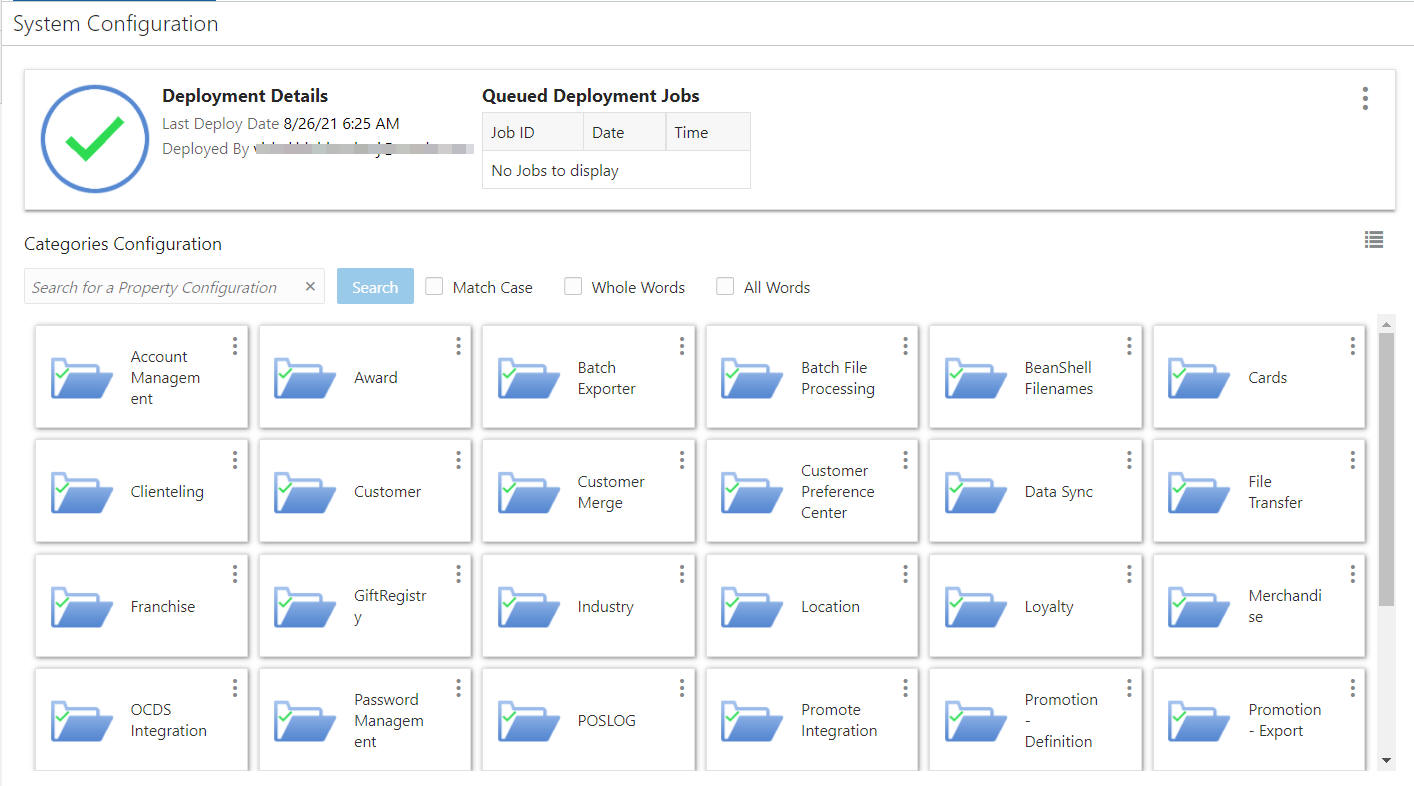
The System Configuration window consists of the following areas:
-
Deployment Details
-
Queued Deployment Jobs
-
Categories Configuration
-
-
To refresh the results at any time click the System Configuration Action menu and click Refresh.
Categories Configuration
The Categories Configuration displays the Property Configurations.
Figure 13-55 Categories Configuration

Searching for Property Configurations
To search for a Property Configuration do the following:
-
Enter any or all of a Property Configuration name.
-
You may use search options that include:
-
Match Case
-
Whole Words
-
All Words
-
-
Click Search.
-
To reset the search click the System Configurations Action menu and then click Return to Categories.
Categories Configuration Views
Click the Switch to List view icon to see the configurations in list form.
Figure 13-56 Switch to List

Click the Switch to Card view icon to see the configurations in list form.
Figure 13-57 Switch to Card

Viewing Property Configurations
To view a Property Configuration do the following:
-
Click a Category Configuration tile or click the Action menu for that tile and click Edit. The Property Configurations for that Category Configuration display.
Figure 13-58 Property Configuration

-
To Edit the Property Configuration click the tile or click the Action menu and click Edit.
-
Make any Value changes deemed necessary.
-
Enter a Justification.
-
Click OK to save the changes, or click Cancel to close the window without saving.
Note:
Saved property configurations need to be deployed. See Deploy for more information.
-
At any time you can refresh the results by clicking the System Configurations Action menu and then click Refresh.
-
To return to the Categories Configuration click the System Configurations Action menu and then click Return to Categories.
Working with System Configurations
The following Action Menu options include:
-
Audit Log
-
Cancel Deploy
-
Deploy
-
Export File
-
Import File
-
Refresh
-
Rollback
-
Upload File
Audit Log
To access the Audit Log do the following:
-
Click the Action menu.
-
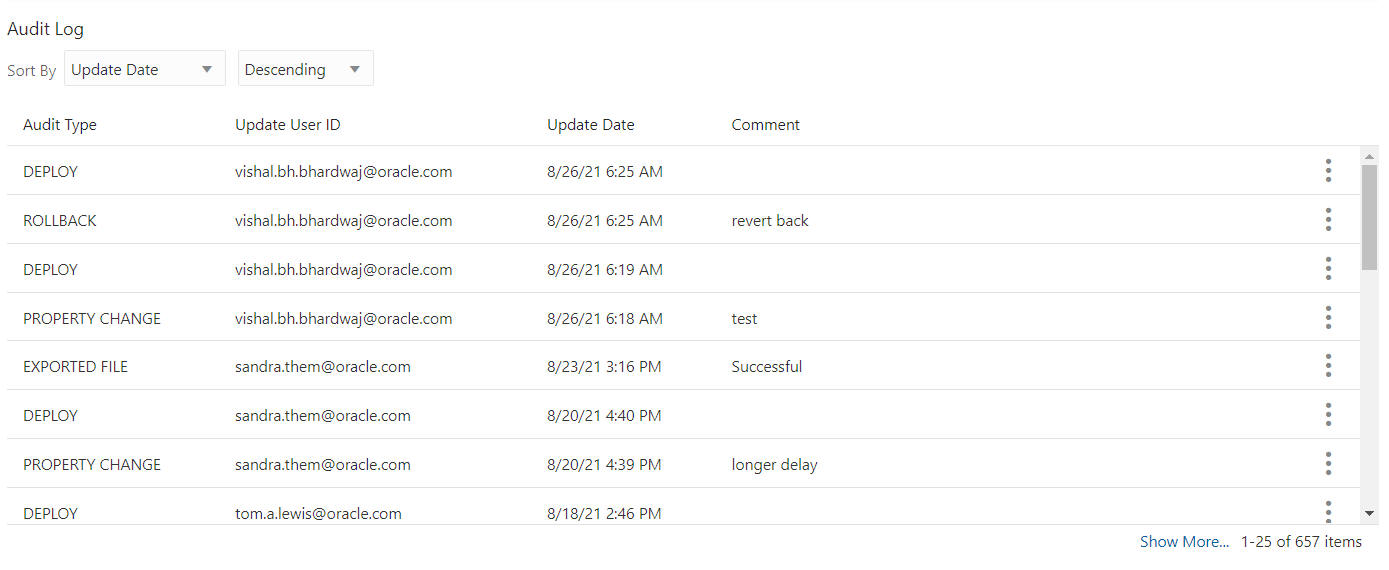
Click Audit Log. The Audit Log window displays.
Figure 13-59 Audit Log
-
The Audit Log is sorted ascending or descending using the following Sort By options:
-
Audit Type
-
Update Date (default)
-
Update User ID
-
-
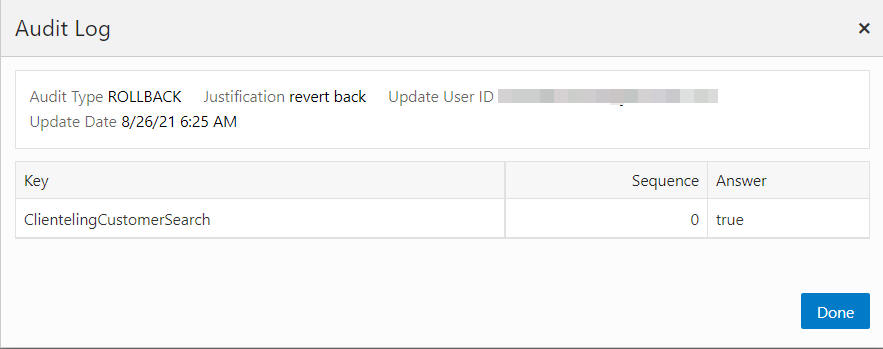
To view the Audit Log details, click the Action menu for the desired Audit Log and click View. The Audit Log appears.
Figure 13-60 Audit Log
-
Click Done to close the window.
-
At any time you can refresh the results by clicking the System Configurations Action menu and then click Refresh.
-
To close the Audit Log click the System Configurations Action menu and then click Return to Categories.
Cancel Deploy
You have the ability to cancel deploy configuration changes, so that you can control how changes are made to the system. To Cancel Deploy a job do the following:
-
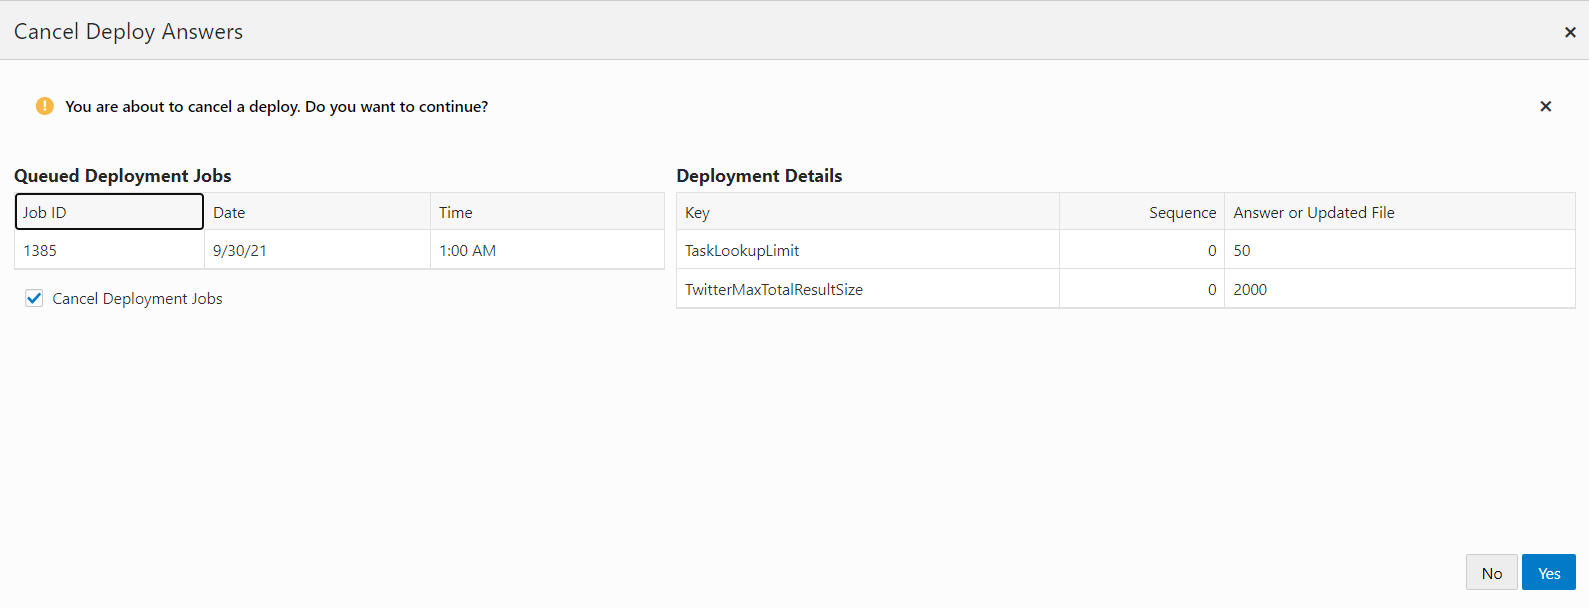
Click the System Configuration Action menu and click Cancel Deploy. The Cancel Deploy Answers window displays.
Figure 13-61 Cancel Deploy Answers
-
Click Yes to Cancel the job or No to close the window without saving. A notification appears indicating a successful cancel deployment is scheduled.
Figure 13-62 Notification

Deploy
You have the ability to deploy configuration changes, so that you can control how changes are made to the system. To Deploy a job do the following:
-
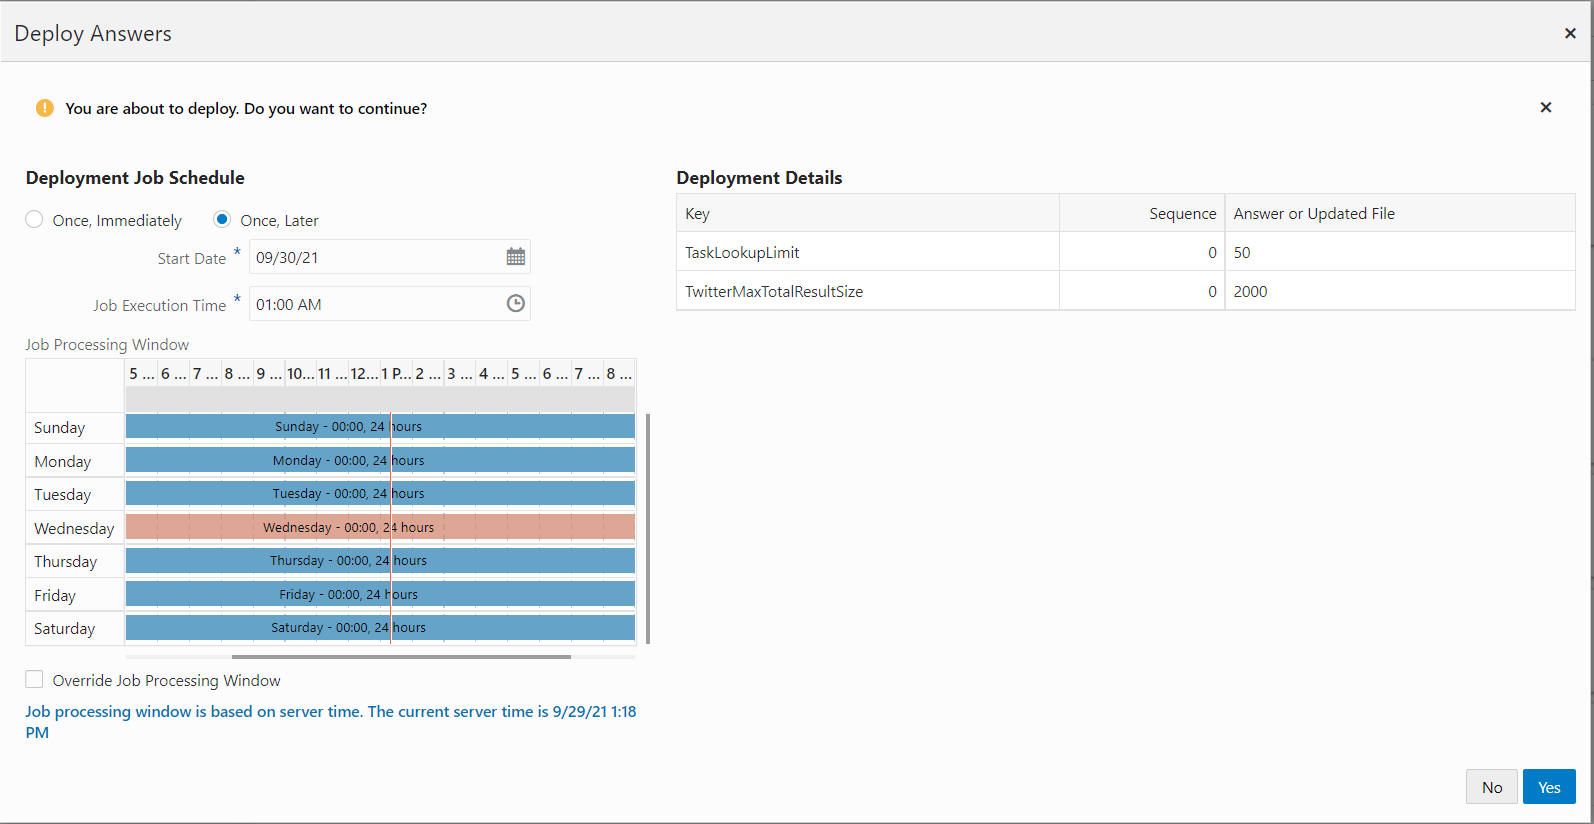
Click the System Configuration Action menu and click Deploy. The Deploy Answers window displays.
Figure 13-63 Deploy Answers
-
Enter the Deployment Job Schedule, options include:
-
Once, Immediately
-
Once, Later
-
-
View the Job Processing Window to see when Jobs are processed. Then decide if you need to select the Override Job Processing Window check box.
-
Click Yes to Deploy the job or No to close the window without saving. A notification appears indicating a successful deployment is scheduled.
Figure 13-64 Notification

Export File
To Export a configuration file do the following:
-
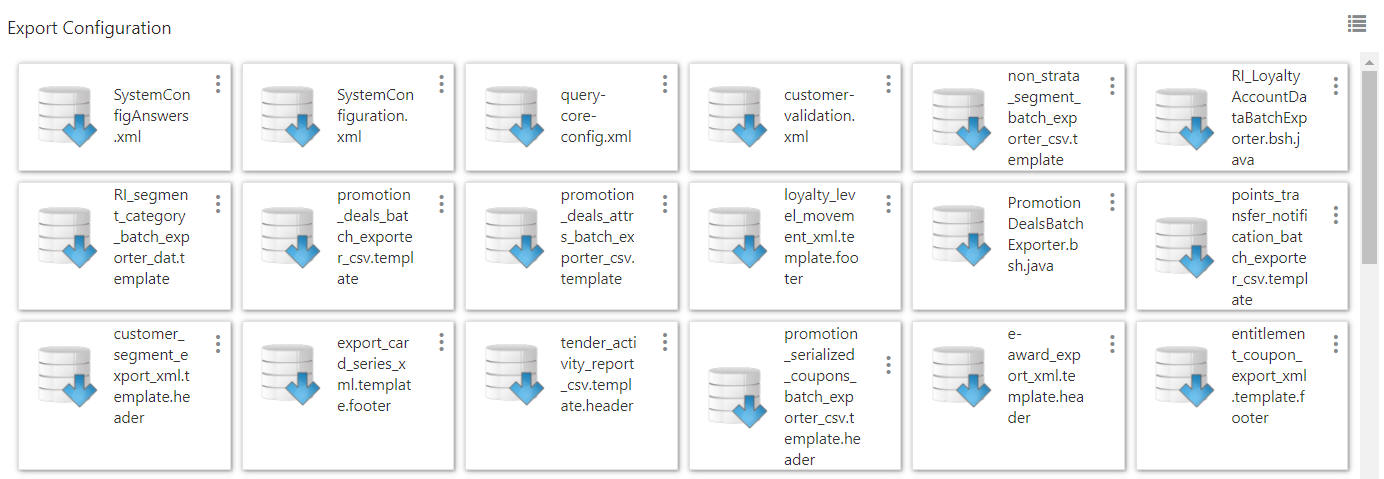
Click the System Configurations Action menu and then click Export File. The Export Configurations display.
Figure 13-65 Export Configuration
-
Click the tile to Export, or use the Action menu for that tile and click Export. A notification appears indicating the successful export.
Figure 13-66 Notification

-
At any time you can refresh the results by clicking the System Configurations Action menu and then click Refresh.
-
To close the Export Configuration click the System Configurations Action menu and then click Return to Categories.
Import File
To Import a configuration file do the following:
-
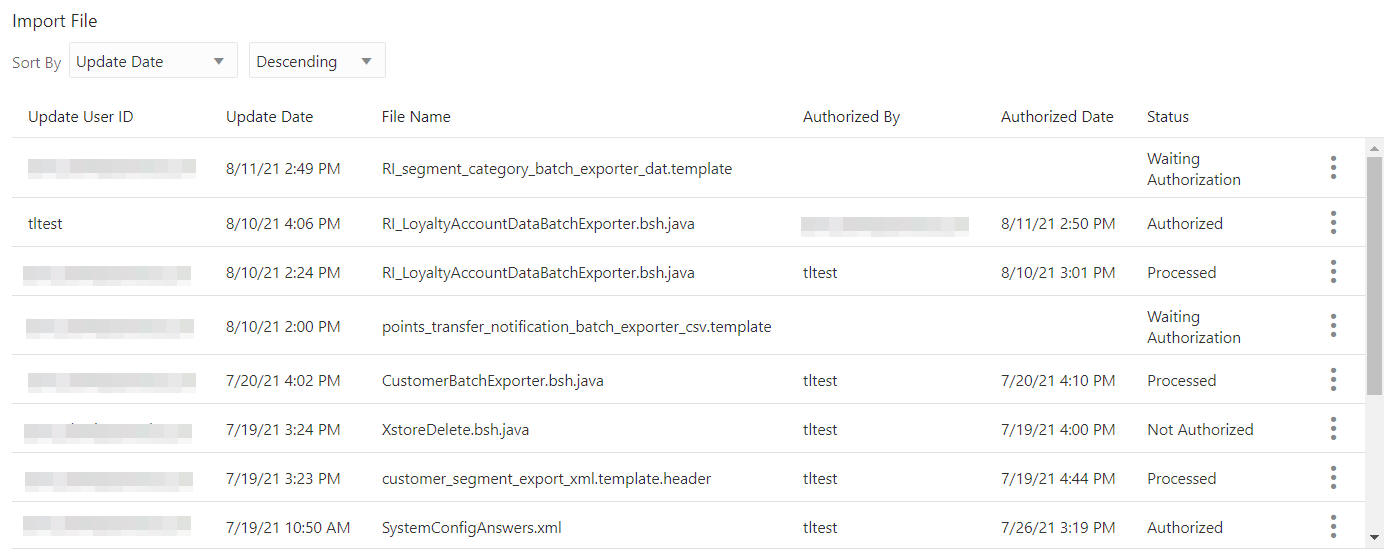
Click the System Configurations Action menu and then click Import File. The Import File list displays.
Figure 13-67 Import File
-
The Import File list is sorted ascending or descending using the following Sort By options:
-
Authorized By
-
Authorized Date
-
File Name
-
Status
-
Update Date (default)
-
Update User ID
-
-
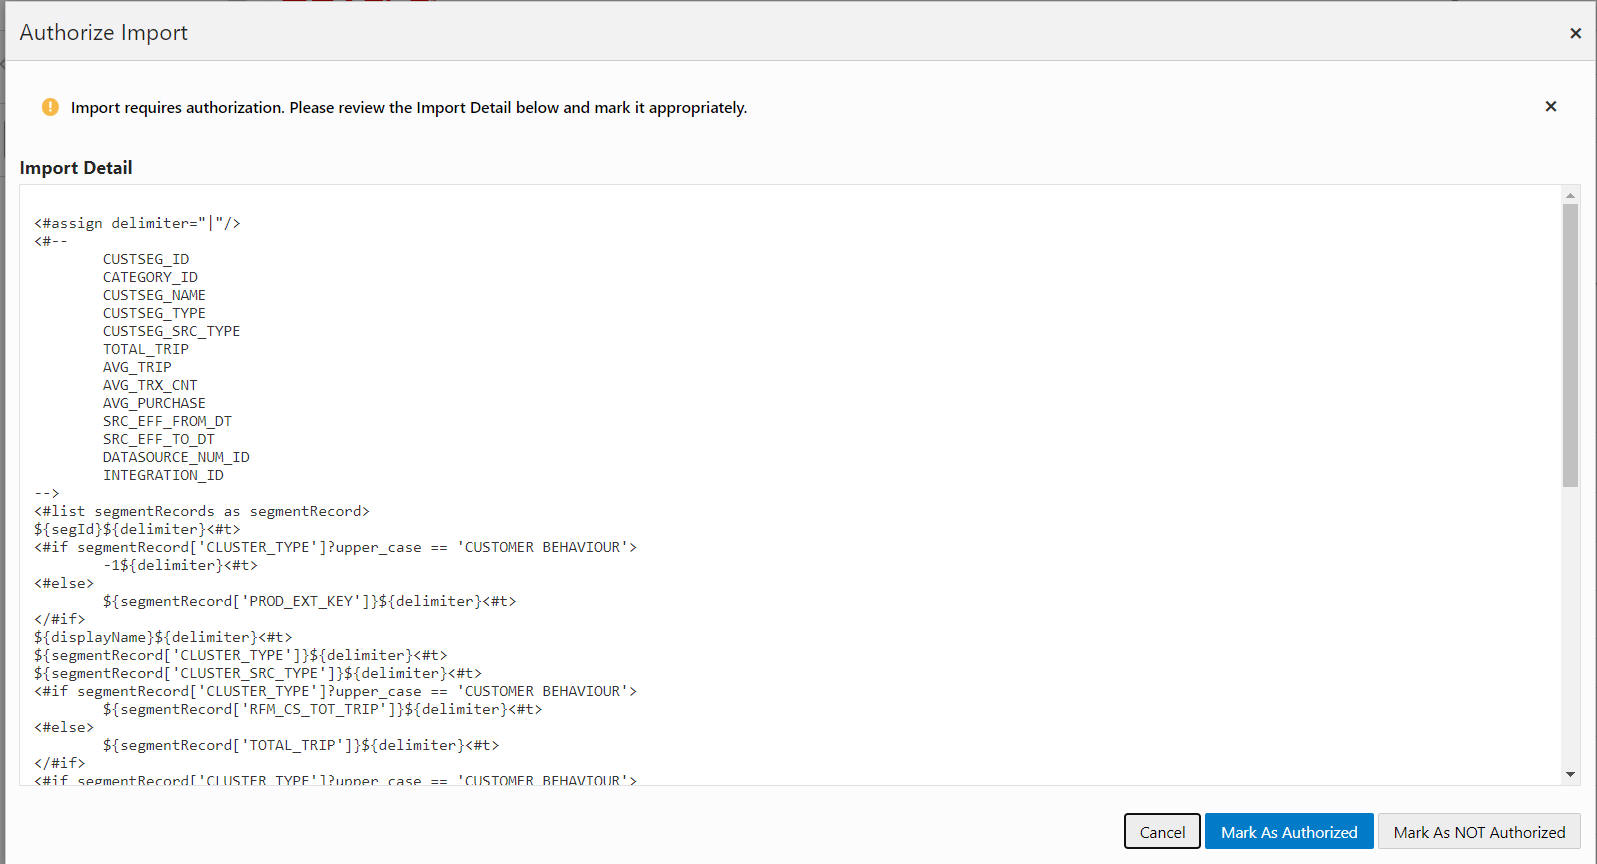
Only files with the status of Waiting Authorization can be authorized. Click the Action menu for the file and click Authorize. The Authorize Import window displays.
Figure 13-68 Authorize Import
-
After reviewing the Import Details, either click:
-
Mark As Authorized to authorize the file, a notification appears.
Figure 13-69 Notification

-
Mark as NOT Authorized to indicate the file is not authorized for import.
-
Cancel to close the window and mark the status as Waiting Authorization.
Note:
Using the Authorize action on any other file status will open the Import Details for viewing. Click Cancel to close the window.
-
-
At any time you can refresh the results by clicking the System Configurations Action menu and then click Refresh.
-
To close Import File click the System Configurations Action menu and then click Return to Categories.
Rollback
To Rollback a configuration do the following:
-
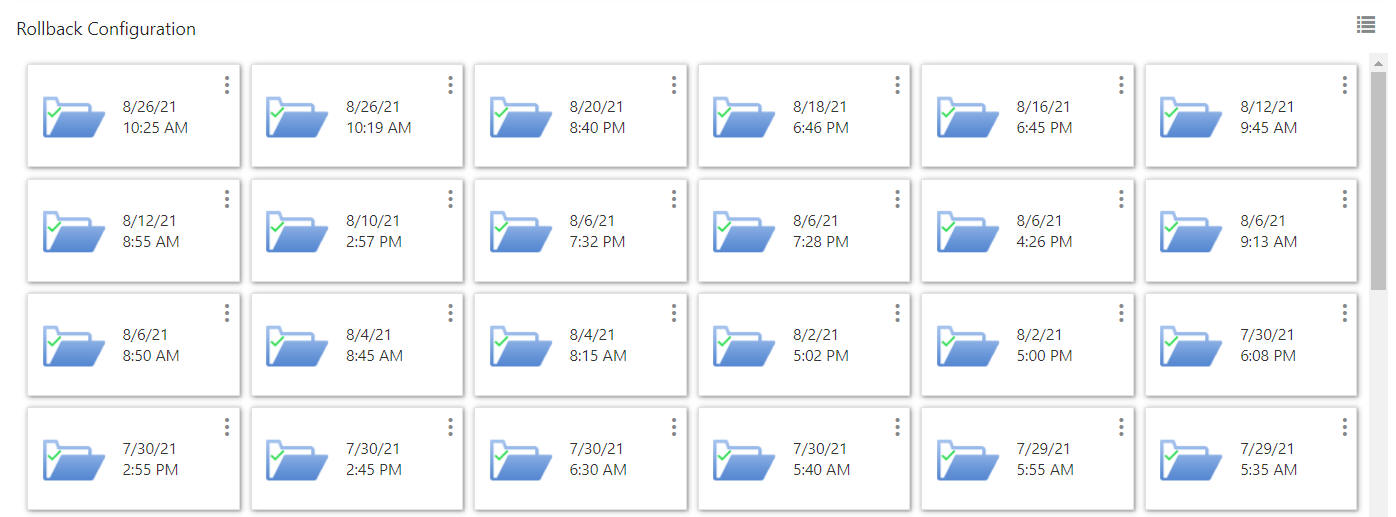
Click the System Configurations Action menu and then click Rollback. The Rollback Configurations display.
Figure 13-70 Rollback Configuration
-
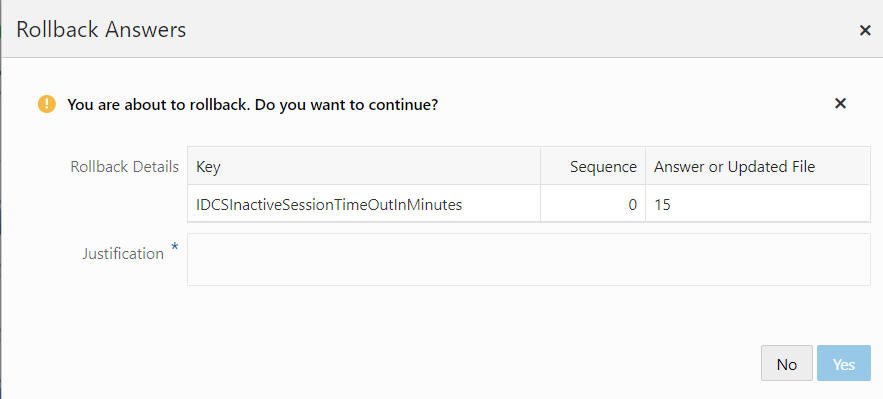
Click the tile to Rollback, or use the Action menu for that tile and click Rollback. The Rollback Answers window displays.
Figure 13-71 Rollback Answers
-
Enter a Justification.
-
Click Yes to Rollback, or No to close the window without saving.
Figure 13-72 Notification

-
At any time you can refresh the results by clicking the System Configurations Action menu and then click Refresh.
-
To close the Rollback Configuration click the System Configurations Action menu and then click Return to Categories.
Upload File
To upload a file configuration do the following:
-
Click the System Configurations Action menu and then click Upload File. The Upload Configurations display.
Figure 13-73 Upload Configuration

-
Click the tile to Upload, or use the Action menu for that tile and click Upload. The Upload Configuration window displays.
Figure 13-74 Upload Configuration

-
To add a file to upload, either:
-
Drag and Drop a file as shown in Figure 13-74.
-
Click anywhere in the Drop a file here or click to upload box.
-
-
Click Upload File to upload the file, or Cancel to close the window without saving.
-
At any time you can refresh the results by clicking the System Configurations Action menu and then click Refresh.
-
To close the Upload Configuration click the System Configurations Action menu and then click Return to Categories.
System Logs
Users who have the System admin role can view the log events. Log events include:
-
Access
-
Data Privacy Audit
-
Duplicate Customer Merge
-
File Reader
-
File Transfer
-
Loyalty Points
-
Promote
-
Promotions
-
Quartz
-
Services
-
User Roles
-
Web Services
Viewing System Logs
To access the System Logs do the following:
-
Click Menu.
-
Click the Admin task.
-
Click the System Logs task. The System Logs window displays.
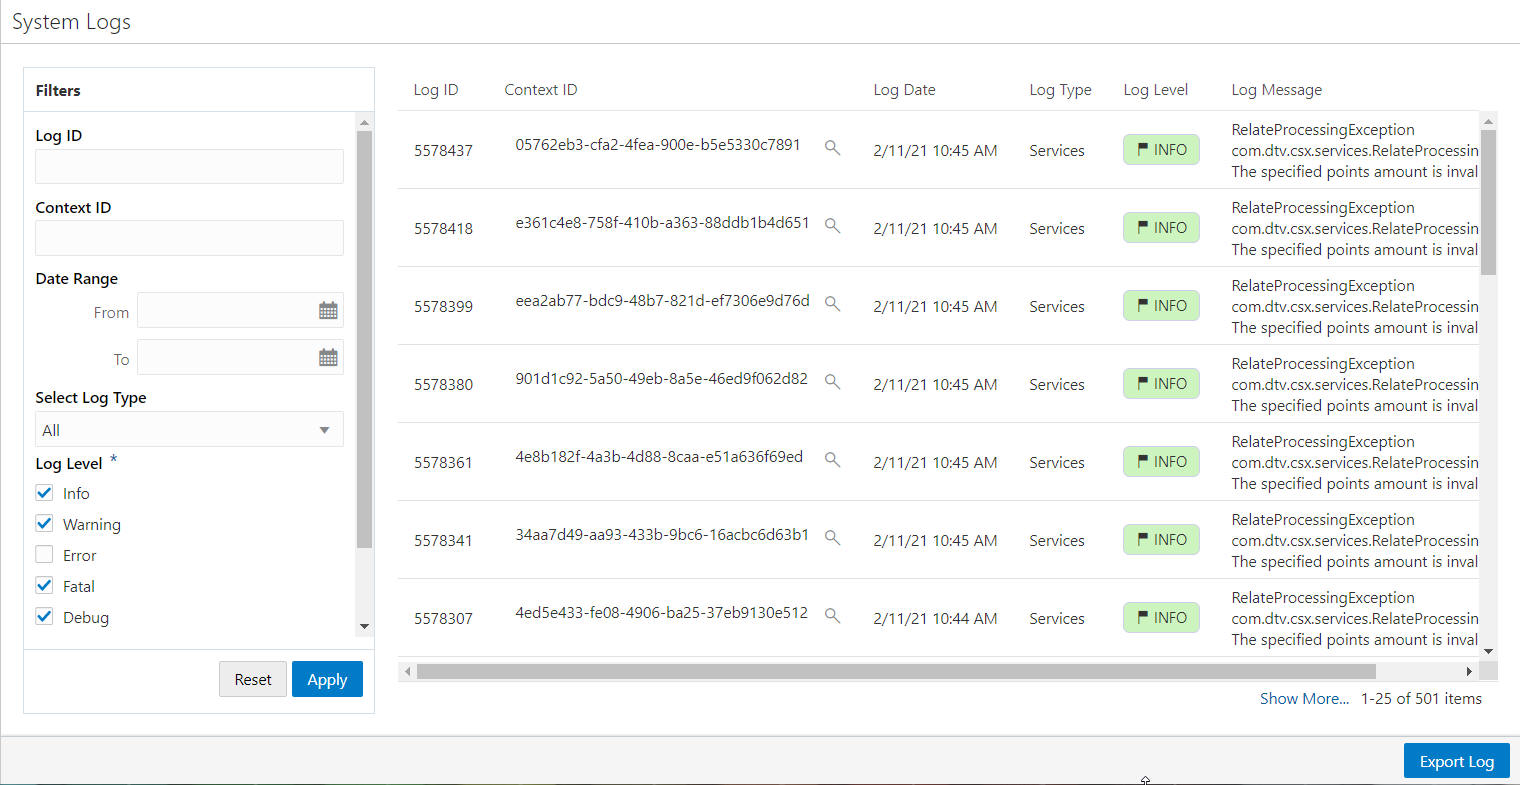
The following fields are displayed:
-
Log ID – ID of the log.
-
Context ID – Diagnostic context information to correlate messages coming from a specific request or application.
-
Log Date – The date and time the log event was generated.
-
Log Type – The particular log containing the log event.
-
Log Level – The level of the log event recorded.
Colors as well as text are used to indicate the severity. They include:
-
Info - Pale Green
-
Warning - Pale Yellow
-
Error - Pale Red
-
Fatal - Red
-
Debug - Cyan
-
Trace - Grey
-
-
Log Message – The error message and first line of the recorded log event.
Figure 13-75 System Logs
Note:
The log events display in batches of 25 records. When more than 25 records are available, click Show More... to view more events up to a maximum of 500 records.
-
-
The Filters panel enables you to enter criteria to filter for a specific system log. Enter the desired filter criteria which includes the following fields:
-
Log ID – The log event sequence number.
-
Context ID – Diagnostic context information to correlate messages coming from a specific request or application.
-
Date Range From and To – The date range covering the log event.
-
Select Log Type – The particular log containing the log event. Default is All.
-
Access
-
Data Privacy Audit
-
Duplicate Customer Merge
-
File Reader
-
File Transfer
-
Loyalty Points
-
Promote
-
Promotions
-
Quartz
-
Services
-
User Roles
-
Web Services
-
-
Log Level – The level of the log event recorded. Default is to show all.
Log levels include:
-
INFO
-
WARNING
-
ERROR
-
FATAL
-
DEBUG
-
TRACE
-
-
Show Exceptions Only – Whether to show log events where an exception has been recorded or to show all log events. Default is Exception Only.
-
-
Click Apply to apply the filter criteria or, click Reset to clear any criteria changes back to the default filter criteria settings.
Exporting System Logs
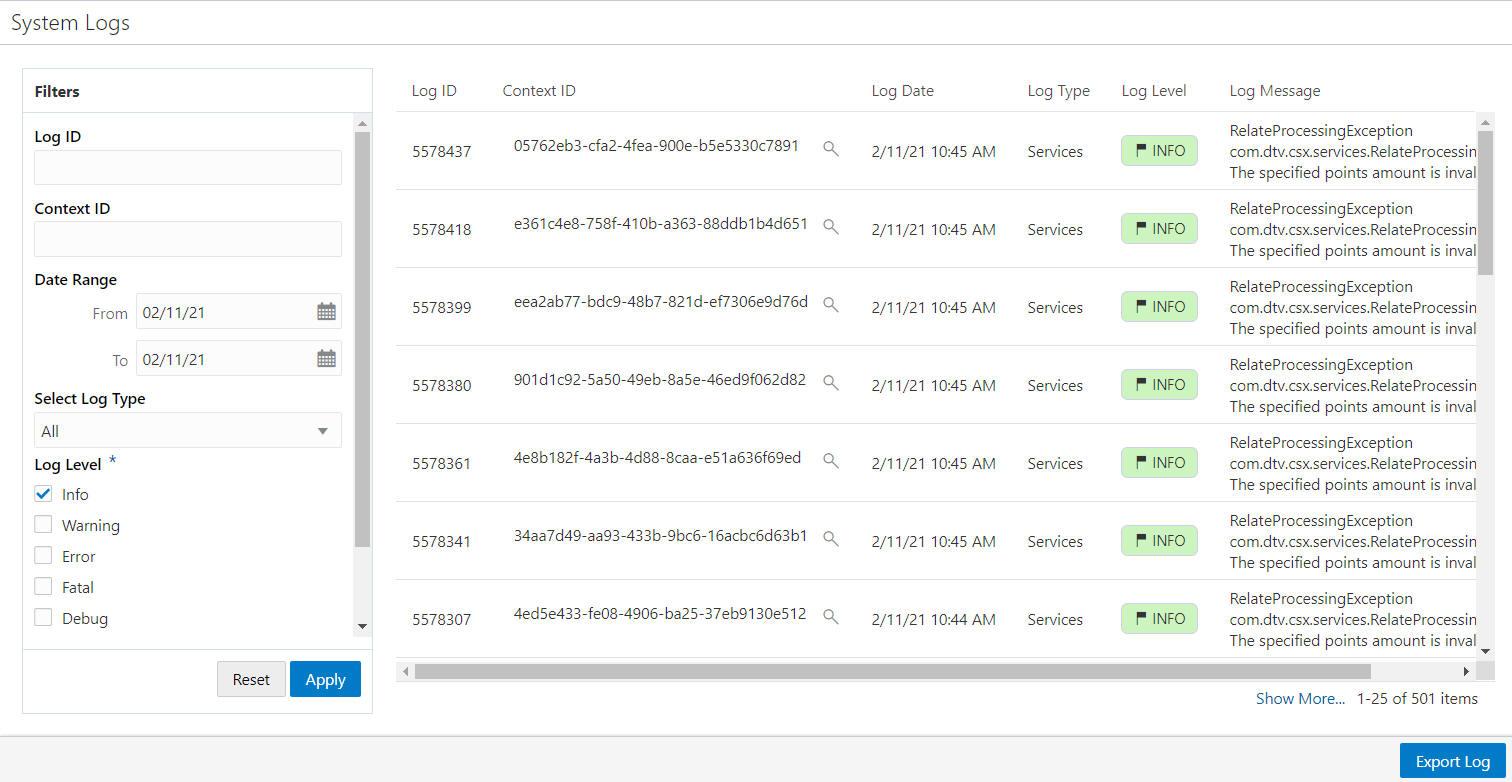
Using the Export Log button creates an immediate job to export the log events to a downloadable file based on the filter criteria.
To export a system log perform the following actions:
-
Navigate to the System Logs window.
-
Enter the desired filter criteria for a specific system log or logs.
-
Click Apply to apply the filter criteria or, click Reset to clear any criteria changes back to the default filter criteria settings.
-
Click Export Log.
Figure 13-76 Exporting Logs
Note:
A message appears indicating success or failure.
Figure 13-77 Success Notification

The download link will be attached to the “Export System Logs" job in the task information panel found in the Job Management process queue.
The exported file will contain a file header:
>>>> Report Based On Criteria - , Log ID: Not specified From Date: Not specified, To Date: Not specified, Log Levels: [INFO, WARN, ERROR, FATAL, DEBUG, TRACE], Log Type: ALL, Context ID: Not specified <<<<
The header details the selection criteria used to generate the report.
The report detail contains the same information as displayed in the UI.
Task Management
Use the Task Management window to search for tasks, as well as to add, edit, and assign tasks. To access the Task Management window:
-
Click Menu.
-
Click the Admin task.
-
Click the Task Management task. The Task Management window displays.
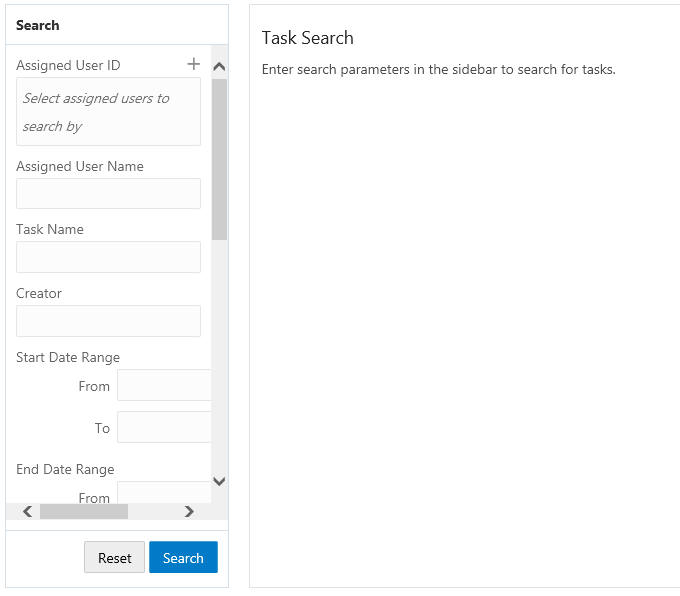
Figure 13-78 Search Panel Options
-
The Search panel enables you to enter criteria to search for a specific task. Enter the desired search criteria which includes the following fields:
-
Assigned User ID – ID of the assigned user
-
Assigned User Name – Name of the assigned user
-
Task Name – Name of the Task
-
Creator – ID of the user who created the Task
-
Start Date Range From and To – Dates on which the Range starts
-
End Date Range From and To – Dates on which the Range ends
-
Task ID – ID of the Task
-
Task Type – Type of Task
-
Status – Status of the task
-
Priority – The priority assigned to the task
-
Location – Location of the task
-
Event – The promotion assigned to the task
-
Assigned Customer ID – ID of the assigned customer
-
First Name – First name of the customer
-
Last Name – Last name of the customer
-
-
Click Search to see the results.
Note:
The results will remain the same if the Reset button is clicked. The Reset button only clears the previously entered search criteria. The results will only refresh when another search is completed.
Figure 13-79 Results Pane

Figure 13-80 Show More... Link
The following information is displayed for each task:
-
Task ID – The ID of the task.
-
Task Name – The name of the task.
-
Start Date – The date the task starts.
-
End Date – The date the task ends.
-
Task Type – The type of task.
-
Creator – User who created the task.
-
Status – The status of the task.
-
Assigned To – The associate to whom the task is assigned.
-
Customer – Name of the customer.
Sorting Results
Once the results appear the user can sort the list to refine the results. The following sorting options include:
Figure 13-81 Sort By Options

The following fields are sorted Ascending or Descending:
-
Assigned To – The associate to whom the task is assigned.
-
Creator – User who created the task.
-
Customer – Name of the customer.
-
End Date – The date the task ends.
-
Start Date – The date the task starts.
-
Status – The status of the task.
-
Task ID – The ID of the task.
-
Task Name – The name of the task.
-
Task Type – The type of task.
Creating a Task
Users with the appropriate access level can add a task. To Create a Task:
-
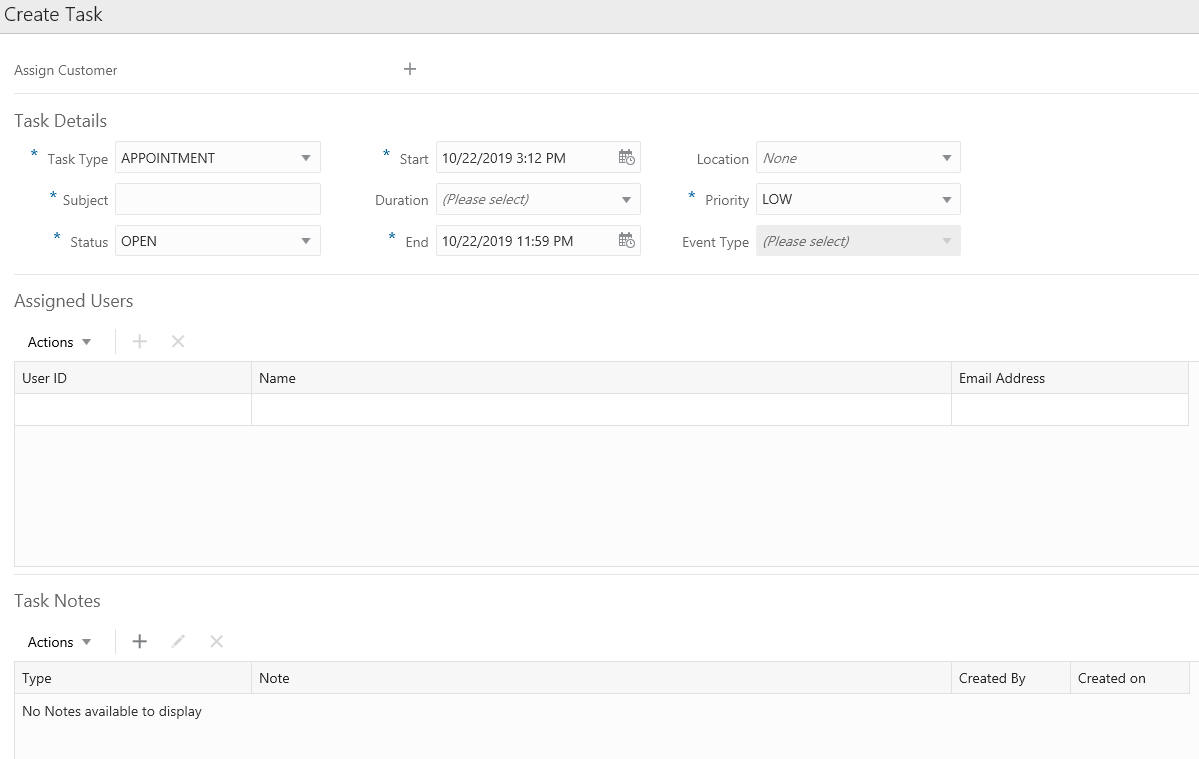
Click the Add (+) icon, or choose Add from the Actions menu. This displays a Create Task window.
Figure 13-82 Create Task
Assigning Customers
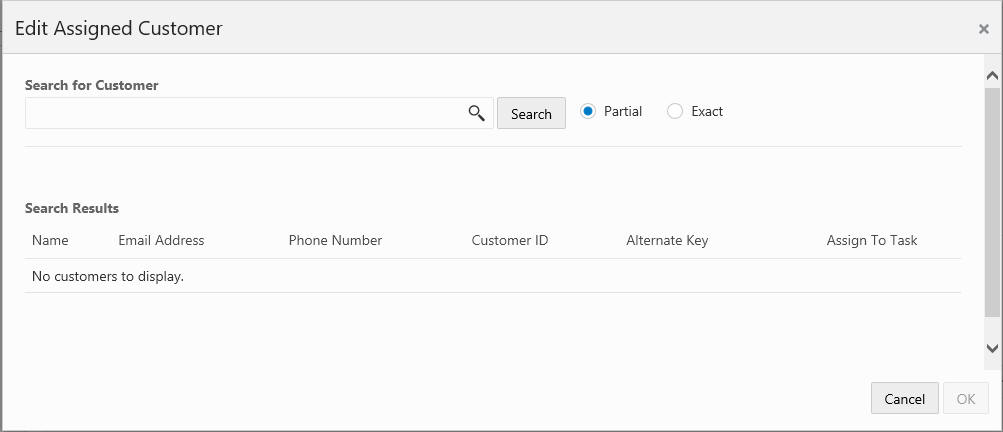
To assign Customers, do the following:
-
Click the Assign Customer + icon to assign a customer to the Task (optional).
Figure 13-83 Edit Assigned Customer
-
Enter some or all of a customer's name in the Search for Customer field. The user can search by any of the criteria shown in the search results including:
-
Name
-
Email Address
-
Phone Number
-
Customer ID
-
Alternate Key
-
-
Select Partial, if you want to results that match part of what you enter, or select Exact if you only want results that are an exact match.
-
Click Search.
-
Click Assign to assign the customer to the task.
-
Click OK to save the assignment or Cancel to return to the Task Details without saving any customer assignments.
Task Details
Enter the Task Details which include the following fields:
Figure 13-84 Task Details

-
Task Type – Type of task (required field)
-
Subject – The subject of the task (required field)
-
Status – The status of the task (required field)
-
Start – The date and time the task starts (required field)
-
Duration – The duration of the task
-
End – The date and time the task ends (required field)
-
Location – The location of the task
-
Priority – The priority assigned to the task (required field)
-
Event Type – Type of event (only used for Event Type tasks)
Assigning Users
To Assign Users, do the following:
-
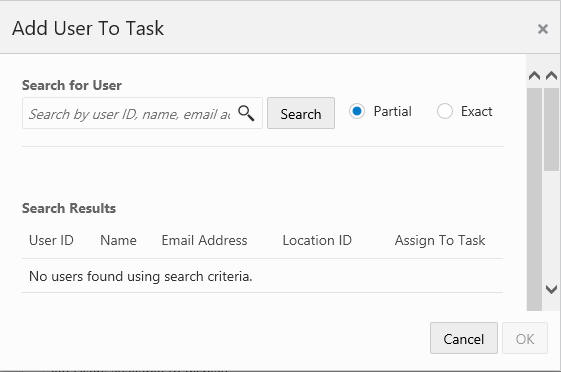
Click the Actions menu and click Add or click the Add (+) icon.
Figure 13-85 Add User to Task
-
Enter some or all of a user's name in the Search for User field. The user can search by any of the criteria shown in the search results including:
-
User ID
-
Name
-
Email Address
-
Location ID
-
-
Select Partial, if you want to results that match part of what you enter, or select Exact if you only want results that are an exact match.
-
Click Search.
-
Click Assign to assign the user to the task.
-
Click OK to save the assignment or Cancel to return to the Task Details without saving any user assignments.
Deleting Users
To delete users, do the following:
-
Highlight a user from the Assigned Users section.
-
Click Remove from the Actions Menu or click the X icon.
Note:
To immediately remove the user, click X.
Task Notes
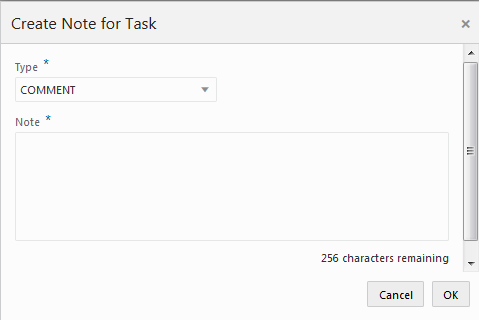
To add a Task Note, do the following:
-
Click Add from the Actions Menu or click the + icon.
Figure 13-86 Create Note for Task
-
Select a note Type (required field).
-
Enter information in the Note field (required field)
-
Click OK.
-
To edit a note, highlight a note in Task Notes section and click Edit from the Actions Menu or click the Edit icon.
-
Edit the note.
-
Click OK to accept the changes or Cancel to close without saving.
-
To delete a note, highlight a note in Tasks Notes section and click Delete from the Actions Menu or click the X icon.
Note:
To immediately remove the user, click X.
Task Confirmation
-
Click OK to create a task or Cancel to close the Create Task window without saving any changes.
Editing a Task
To edit a task use the following steps:
-
Highlight a Task row.
-
Click the Action Menu, and then click Edit, or click the Edit icon.
-
Edit the Task.
-
Click OK to accept the changes or Cancel to close the task without saving.
Viewing a Task
To view a task use the following steps:
-
Highlight a Task row.
-
Click the Action Menu, and then click View, or click the Eyeglasses icon.
-
Click Done to close the window.
Re-Assigning a Task
Users with the appropriate permissions can reassign a task. To reassign a task:
-
Click Menu.
-
Click the Admin Task.
-
Click the Task Management task. The Task Management window displays.
Figure 13-87 Task Management Window

-
Highlight a task you wish to reassign.
-
Click the Actions menu and choose Re-Assign, or select the Person icon from the menu row tool bar. This opens the Re-AssignTask dialog window.
Figure 13-88 Re-Assign Task Window

-
Expand the list of users and from the list of available users, and click Assign to reassign the task.
-
Click OK to assign the task. A Warning window displays notifying that a different user is assigned the task.
-
Click OK to accept ownership of the task. The task is reassigned to another user.
Web Service Tracking
You have the ability to view web service call activity statistics hourly, daily and monthly, so that you can monitor successful and failed messages. Additional operation details for the service will also be available to allow the Associate to troubleshoot problems.
-
Click the Tasks icon.
-
Click Admin.
-
Click Web Services Tracking.
Activity Views
You can view the activities by Hourly, Daily, or Monthly. Select the header for each view to view by that time period.
Figure 13-89 Hourly Activity

Figure 13-90 Daily Activity

Figure 13-91 Monthly Activity

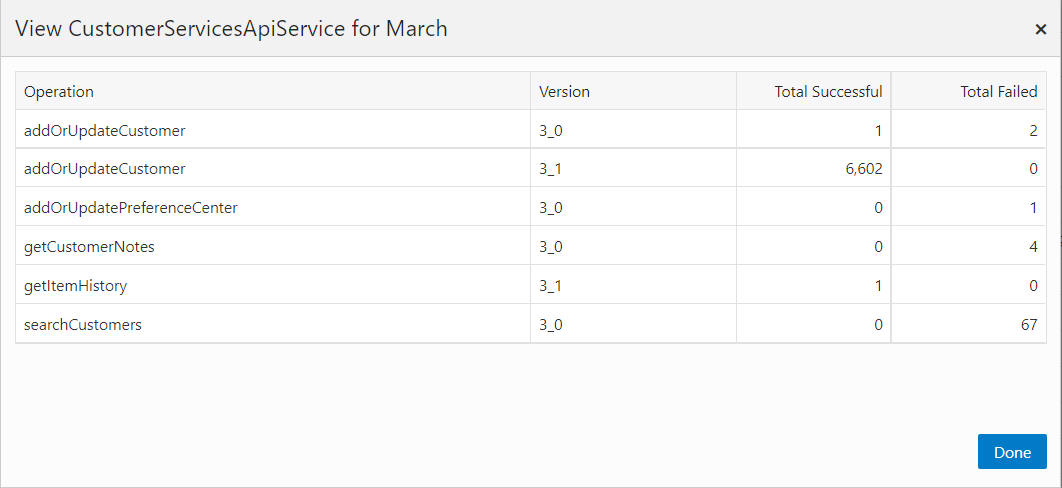
Viewing Operation Details
You have the ability to view operation details for a service to allow you to troubleshoot problems. To view operational details:
-
Use the Date Picker to enter a date.
-
Select a specific time period with a value greater than zero within one of the Activity Views.
Note:
The View Action Menu item is only available for specific time periods. The Total and Average section details of each view are unable to be viewed at that level.
-
Click the Actions menu View option, or the Eyeglasses icon. The service details displays.
Figure 13-92 Service Details
-
After viewing the details click Done to close the window.
-
You can refresh the list by clicking the Refresh icon or picking the Refresh option from the Actions menu.
Users
You have the ability to view, search and edit a list of users, so that you can update user details.
Searching for Users
To search for a user do the following:
-
Click Tasks.
-
Click Admin
-
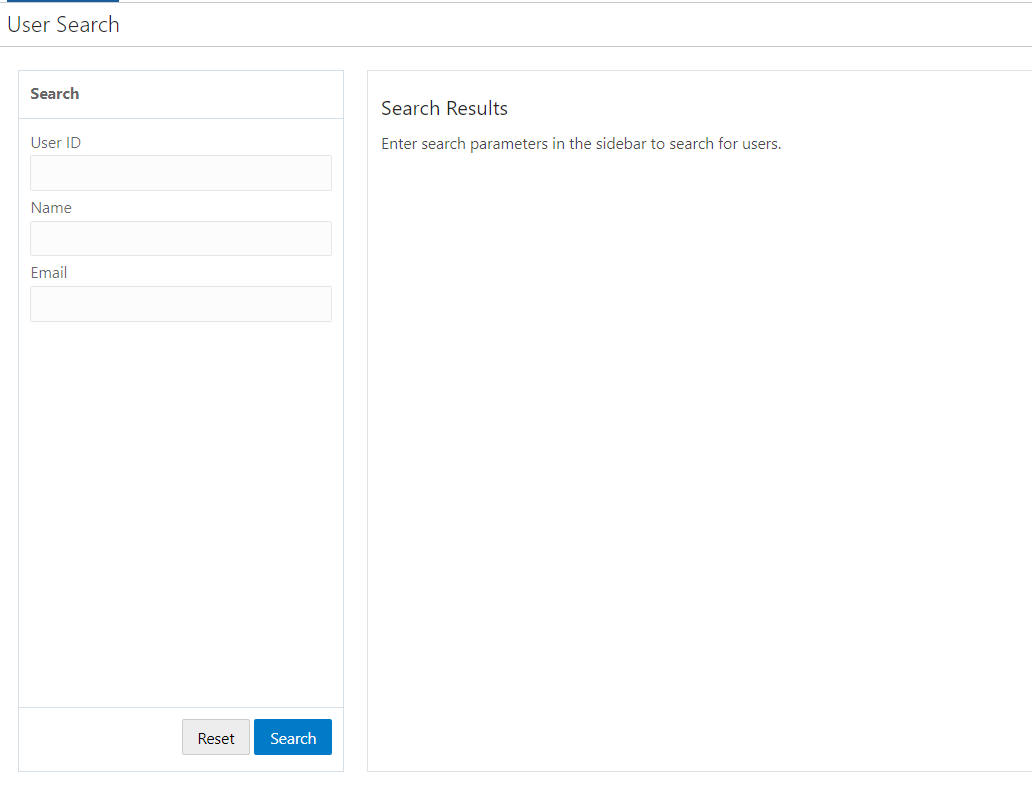
Click User. The User Search window displays.
Figure 13-93 User Search
-
Enter the USER ID, Name, or Email of the user.
-
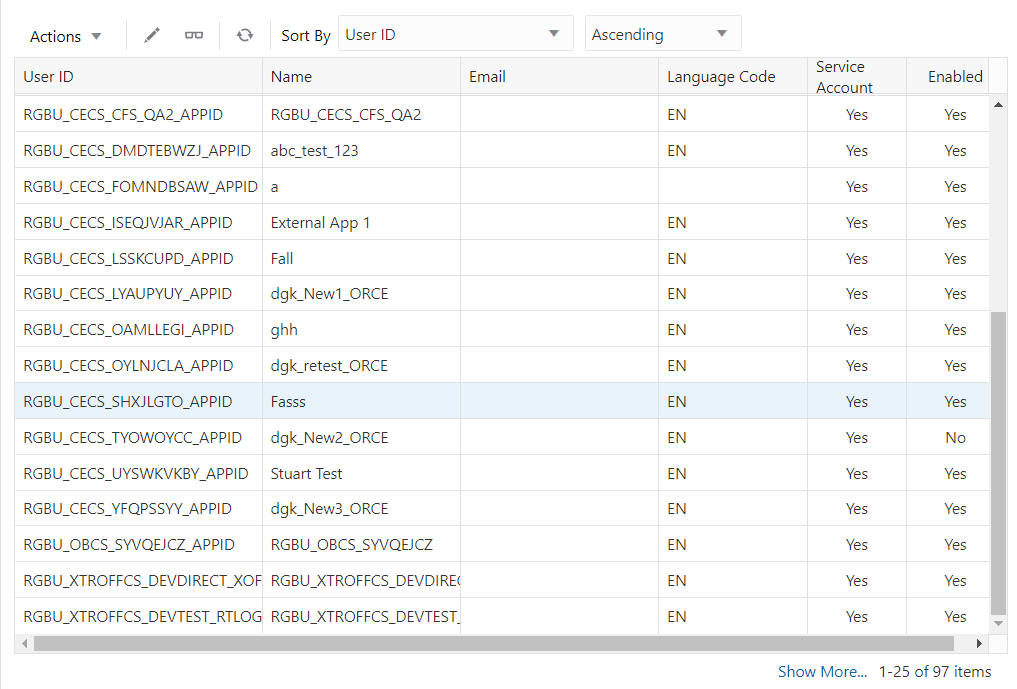
Click Search. The list of users matching the search criteria displays.
Figure 13-94 Search Results
Viewing a User
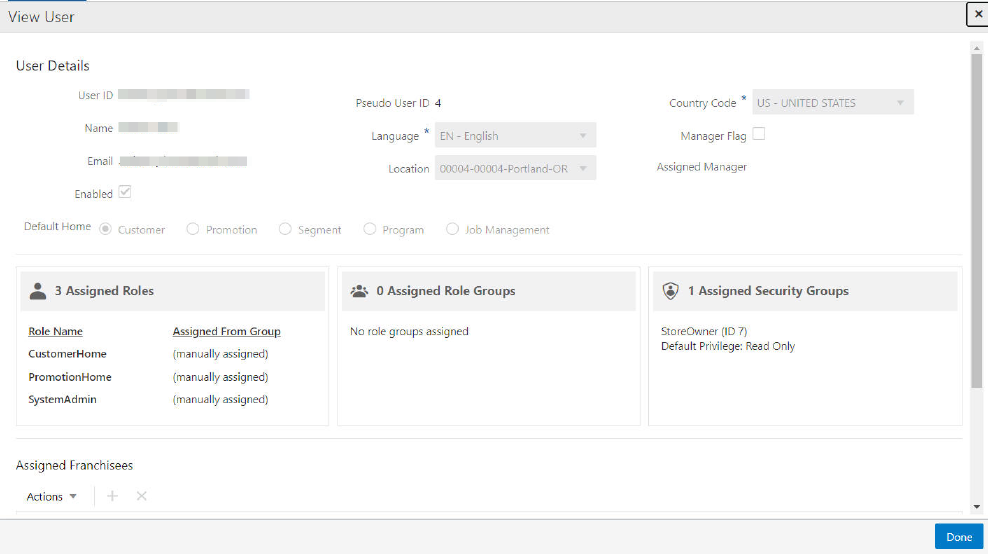
To view a User, do the following:
-
Highlight the row of the User you want to view.
-
Click the Actions menu or the View icon to open the View Franchisee window.
Figure 13-95 View User
-
View the details of the User and click Done to close the window.
Editing Users
To edit a User do the following:
-
Highlight the row of the User.
-
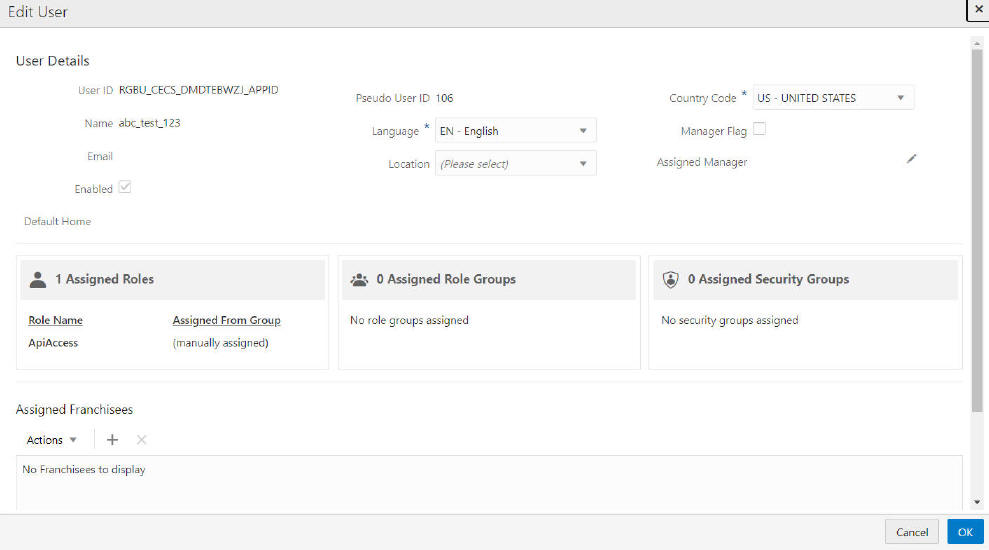
Click the Actions menu and select Edit, or click the Edit (Pencil) icon. The Edit User window displays.
Figure 13-96 Edit User
-
The User Details editable regions for each user will vary based on privileges. Typically you can edit the Language, Country Code, Assigned Manager, and Default Home Page.
Assign a Manager
-
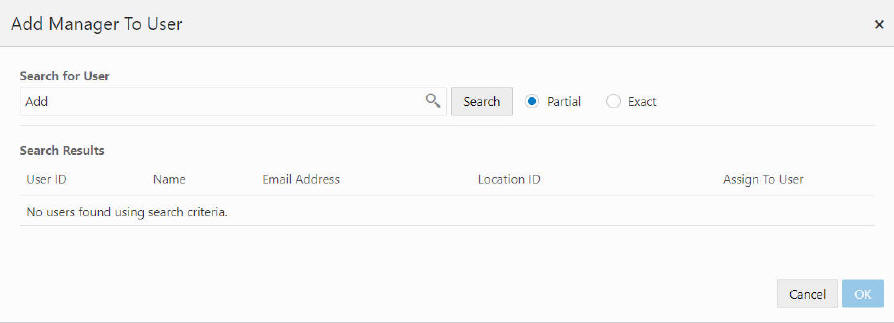
Click the Assigned Manager Pencil icon. The Add Manager to User window displays.
Figure 13-97 Add Manager To User
-
In the Search for User field, enter the User ID, Name, or Email Address of the user you want to search for.
-
Select Partial, if you want to results that match part of what you enter, or select Exact if you only want results that are an exact match.
-
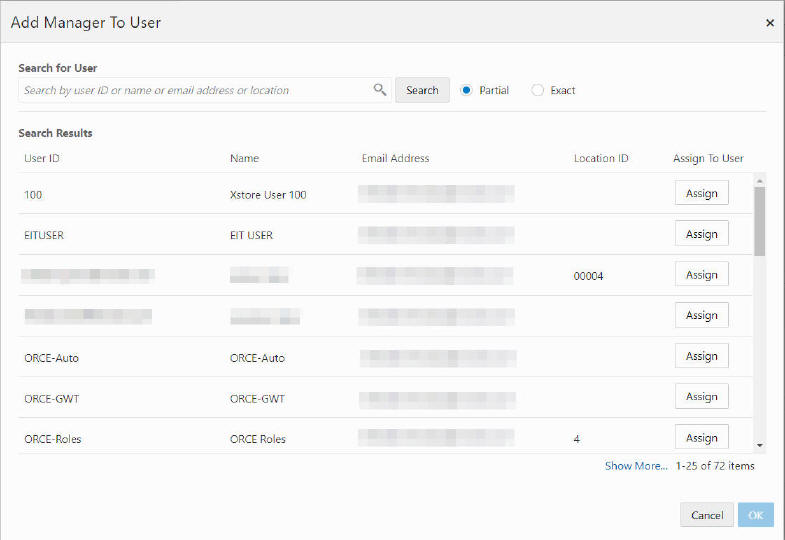
Click Search. A list of users matching the search text is displayed in the Search Results grid.
Figure 13-98 Search Results Grid
Note:
The results display in batches of 25 records. When more than 25 records are available, click Show More... to view more results.
-
For each user you wish to assign, click Assign.
-
For each user you wish to unassign, click Unassign.
-
Click OK to accept the changes, or Cancel to close the window without saving.
Assigned Franchisees
-
You can assign Franchisees to the User.
Click the Add (+) icon, or choose Add from the Actions menu. The Assigned Franchisees window displays.
Figure 13-99 Assigned Franchisees

-
Enter any or part of a Franchisee ID, Name, or Description.
-
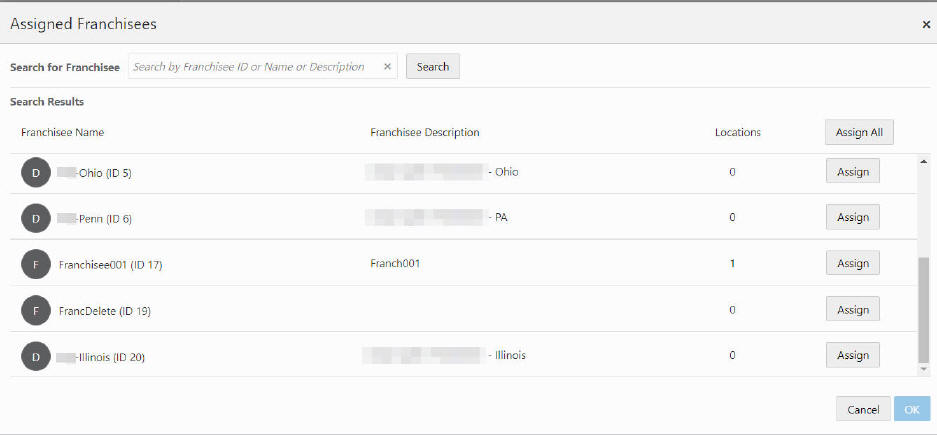
Click Search. The Search Results list appears.
Figure 13-100 Search Results
-
For each Franchisee you wish to assign, click Assign.
-
For each user you wish to unassign, click Unassign.
-
Click Assign All to assign all of the Franchisees that appear in the search results.
-
Click OK to accept the changes, or Cancel to close the window without saving.
-
To delete a previously assigned Franchisee, highlight the row of the Franchisee and click the X icon, or click the Action menu and click Delete.
-
After all edits are finished click OK save the changes, or click Cancel to close the window without saving.
