9 Registries
Overview
The Customer Item Registry allows you to set up two different types of registries:
-
Gift Registry: Select the items that the recipient would like to receive - usually for a special event such as a wedding or baby shower.
-
Wish List: Select items that the recipient would like to receive, without identifying a special event as with a Gift Registry
About this Chapter
This chapter contains the following information:
-
Looking Up an Item Registry – Describes how to navigate to the Registries page and look up registries.
-
Creating a Registry – Explains each of the five steps for creating a registry in the Registry Wizard:
-
Step 1: Information – Add the basic registry details, such as owner and type.
-
Step 2: Items – Add the items to the list for the Gift Registry or Wish List.
-
Step 3: Attributes – Add the registry attributes, if any.
-
Step 4: Addresses – Add event addresses. This only applies to Gift Registries.
-
Step 5: Review – Review the information that has been entered, make revisions if necessary, and save the registry.
-
-
Viewing a Registry – Explains how to view a registry in read-only mode
-
Downloading a Registry Report – Explains how you can download a report containing a registry's information in PDF format
-
Editing a Registry – Explain the different ways to navigate to the Edit Registry page and how to edit the registry.
-
Deleting a Registry – Explains how to delete a registry
Looking Up an Item Registry
There are two ways to look up an item registry. You can search all registries using the Registries icon on the main toolbar, or you can look up just the registries for a specific customer using Registries option on the Actions menu in the Customer Dashboard.
To look up a registry from the Customer Dashboard:
-
From the Actions menu in the Customer Dashboard, choose the Registries option. This displays the list of Registries Found for the customer. See Figure 9-2.
To look up a registry from the main toolbar:
-
Click the Tasks icon.
-
Click Customer.
-
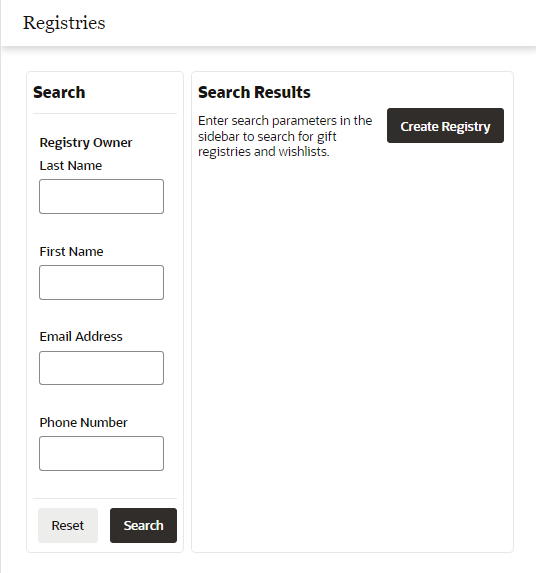
Click Registries. This displays the Registries page.
Figure 9-1 Registries Page
-
Enter search criteria in one or more of the following fields in the Search panel:
Note:
To retrieve all the active Item Registries in the system, click Search without entering any search criteria.
To clear the search fields and restore default selections in the search page, click Reset.
Registry Owner
-
Last Name - Last name of the registry owner.
-
First Name – First name of the registry owner.
-
Email Address – Registry owner's email address.
-
Phone Number – Registry owner's phone number.
-
Customer ID – ID of the customer who owns the registry.
-
Card Number – Number for a Card associated with the customer.
Registry
-
Registry Type – Select All, Gift Registry, or Wish List from the list.
-
Registry Name – Name of the registry.
-
Event Type – Type of event for which the registry was created (wedding shower, for example).
Note:
You should not select an Event Type when searching for a Wish List, because a Wish List is not associated with an event.
-
Event Date – Use the calendar to select the date on which the event occurs.
-
Registry ID – The ID of the registry.
-
-
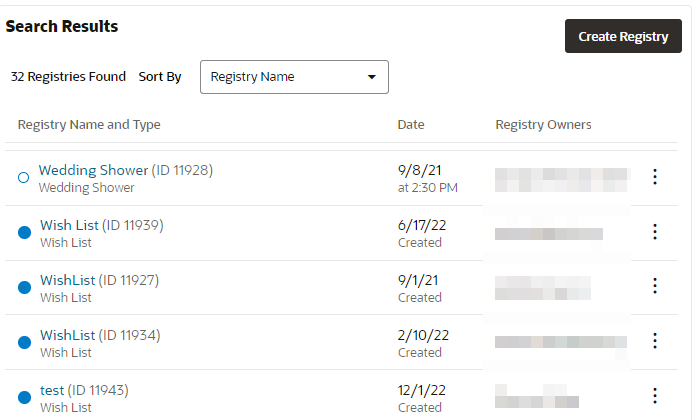
Click Search. This displays a list of registries that match the entered criteria. If you searched for the registries for one specific customer for example, by entering a complete Customer ID, you will see just that customer's registries. If you chose Registries from the Actions menu in the Customer's Dashboard, the registries for just that customer are displayed, as in the example following:
Figure 9-2 Registries Found List
-
The number of registries that match the search criteria is shown to the left of the Sort By field.
-
You can sort the registries displayed in the grid by the following options on the list:
-
Registry Name – Ascending order
-
Date Created- Descending order. This field sorts only for Wish Lists.
-
Registry Owner – Ascending order, by Last Name
-
Number of Items – Highest to lowest
-
-
Create Registry – Displays a Create Registry window See Creating a Registry for more information.
-
The registry grid displays the following information for each registry:
-
Blue dot at the left of the Wish List or Registry Name. If filled, indicates that the wish list or registry is active. If unfilled, it is inactive. Values are
Active – displays from the time the registry is activated to the date and time of the event.
Past – displays any time after the date and time of the event.
-
Registry Information – Shows the Registry Name and Registry Type
-
Date – The Event Date for a Registry or the Create Date for a Wish List
-
Registry Owners – The name of the Primary customer who owns the registry first, with any other owners subsequently.
-
-
An action menu icon is displayed at the end of each row. It has these options:
-
Delete – Select to delete the registry. See Deleting a Registry.
-
Download Report – Select to download a report with information about the registry. See Downloading a Registry Report.
-
Edit – Select to edit the registry. See Editing a Registry.
-
-
You can view registry details by clicking the name of the registry in the grid.
-
Creating a Registry
Step 1: Information
-
From the Actions menu on a Customer's Dashboard, choose Registries, or click the Registries icon to display the Registries window, and click Create Registry. Either action displays the Create Registry Wizard.
Figure 9-3 Create Registry Wizard
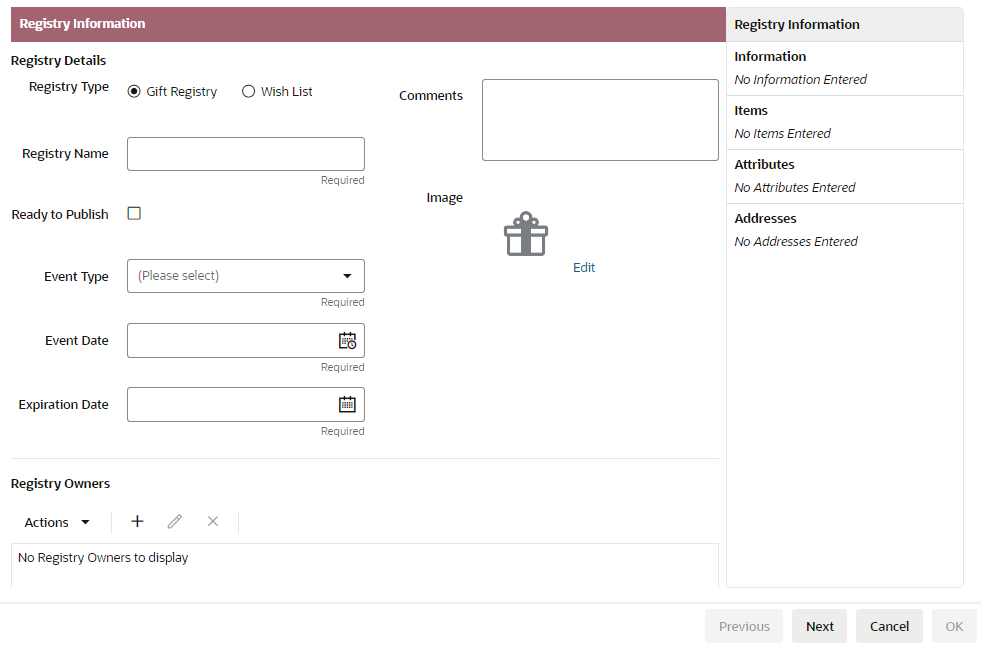
The progress bar at the top indicates that you are located at step 1, Information. As you progress, the Create Registry Wizard moves you through each of the five steps.
-
Under Registry Details, Select the Registry Type. A Gift Registry is tied to an event, while a Wish List is open-ended. This is mandatory.
-
Enter a name for the registry in the Registry Name field. This is mandatory.
-
If the Ready to Publish check box is selected, it indicates that the registry is available for export to a third party when the registry is saved
-
If the Registry Type is Wish List, there are no other mandatory fields under Registry Details. If the Registry Type is Gift Registry, also make selections for these mandatory fields:
Event Type – Select an Event Type from the list.
Event Date – Select the date and time of the event from the calendar.
Expiration Date – Select the date that the registry expires, from the calendar.
-
Optionally, you can enter comments about the registry in the Comments field.
-
Optionally, you can add an image that represents the Gift Registry. Click Edit next to the logo in the Image field to display an Edit Registry Image prompt that lets you drop or upload a new image. This is only available for Gift Registries.
-
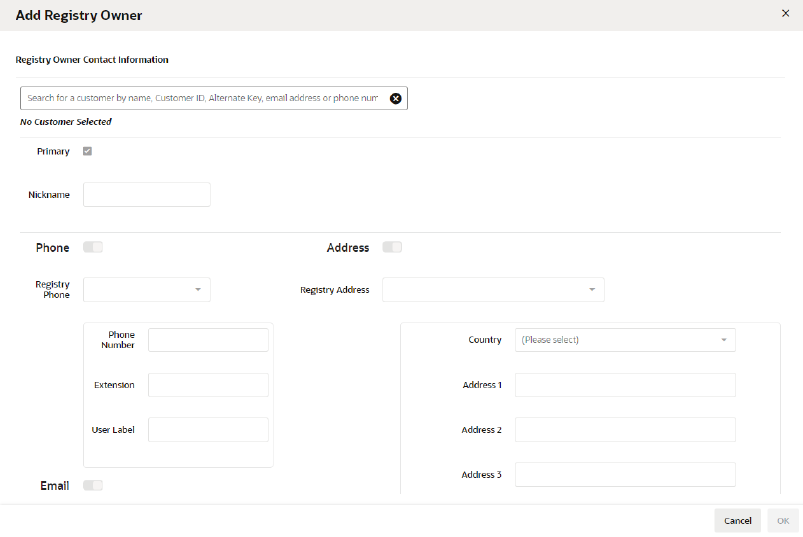
Under Registry Owners, choose Add from the Actions Menu, or click the Add Icon. Either action displays the Add Registry Owner window:
Figure 9-4 Add Registry Owner
-
In the search field at the top of the window, enter search criteria such as customer name or ID. A list of customers matching the search criteria is displayed. Select the customer for whom you are creating the registry. This displays the Name, ID, Alternate Key, and primary contact information of the selected customer under the search field. When you select a customer, the window is populated with available information about the customer.
-
Add any details that are missing. The following information can be entered, with mandatory fields marked by asterisks (*):
-
Primary – Indicates whether this customer is the primary owner of the registry.
-
Nickname –Enter an optional nickname for the registry owner.
-
Phone – Information about the registry owner's phone number:
-
The Phone switch defaults to On. If this switch is set to Off, the following fields are not displayed.
-
Registry Phone – Select the type of phone number being used for the registry from the list, or select Create New to enter a new phone number.
-
Phone Number – The registry phone number. This field is mandatory.
-
Extension – the extension of the registry phone number, if applicable.
-
User Label – Enter an optional user label for the registry phone number
-
-
Email – Information about the registry owner's email address:
-
The Email switch defaults to On. If this switch is set to Off, the following fields are not displayed.
-
Registry Email – Select the type of email address being used for the registry from the list, or select Create New to enter a new email address.
-
Email – The registry email address. This field is mandatory.
-
User Label – Enter an optional user label for the registry email address
-
-
Address – Information about the registry owner's address:
-
The Address switch defaults to On. If this switch is set to Off, the following fields are not displayed.
-
Registry Address - Select the type of address being used for the registry from the list, or select Create New to enter a new address.
-
Country – Select the country of the registry form the list.
-
Address 1-4 –The street address of the registry. Address 1 is mandatory
-
Apartment – The apartment number of the registry, if applicable.
-
City – The city of the registry. This field is mandatory.
-
State – The state or province of the registry. This field is mandatory.
-
Postal Code – The postal code of the registry. This field is mandatory.
-
County – The County of the registry.
-
-
-
Click OK when you are finished entering the customer details. This returns you to the Create Registry window. The customer information is displayed in the Registry Owners list. If you are done entering registry information, click Next to go to Step 2: Items.
Step 2: Items
Figure 9-5 Create Registry Items
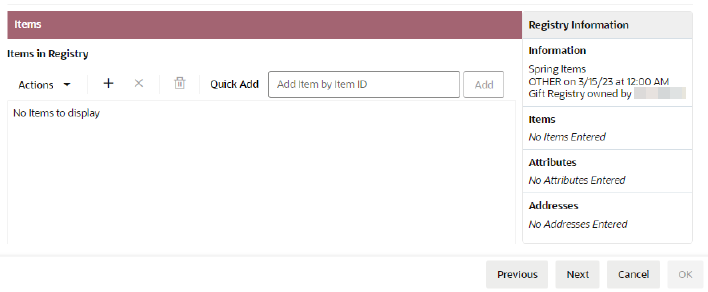
To add items to a Registry:
-
There are two methods for adding items to a registry, using the Add command to display the Add Items to Registry dialog, where you can search for items, or by entering the exact Item ID in the Quick Add field:
-
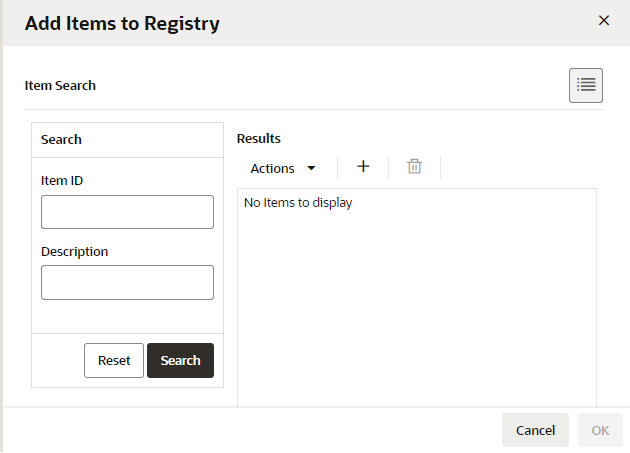
Under Items in Registry, choose Add from the Actions menu, or click the Add Icon. Either action displays the Add Items to Registry dialog:
Figure 9-6 Add Items to Registry
-
-
In the Search panel, enter an Item ID, Description, or both in the provided fields and click Search. This displays a list of items matching the search criteria in the Results panel. If you want to clear a search, click Reset. Use the Search panel to add more items.
-
The Results panel displays the Image, Item ID and Description of the items in the search results:
Figure 9-7 Search Results
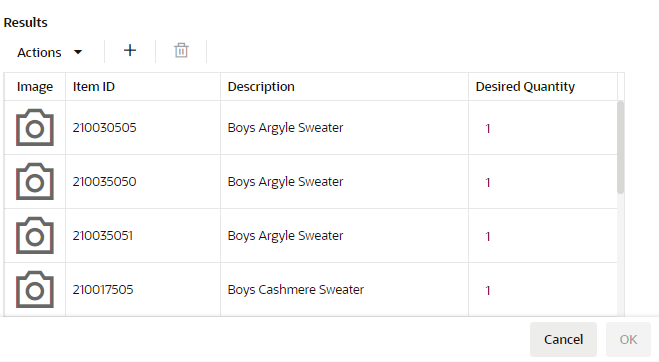
If you want to specify the desired quantity of this item, use the Increment and Decrement arrows to increase or decrease the quantity. The Desired Quantity value defaults to 1.
-
If you want to add an item from the Results panel to the Registry, select the item and choose Add from the Actions Menu, or click the Add (+) Icon. Items that you add are displayed in an Add Items to Registry panel on the right side of the page. To remove all items from the list, choose Remove All from the Actions menu or click the Remove All icon.
-
Click OK to add items. The selected items are added to the Items in Registry list on the Items tab.
Or use this alternate method:
-
In the Quick Add field (see Figure 9-5), enter the exact Item ID and click Add. If the exact match is found, the item is added to the Items in Registry table. If the item is not found, the message
Invalid itemdisplays. -
If the item is found, the Image, Item ID and Description of the item and a Desired Quantity field are displayed. The default quantity is 1. You can change the quantity using the Increment and Decrement arrows to increase or decrease the quantity.
-
-
When you are done adding items to the registry, click Next to go to Step 3: Attributes.
Step 3: Attributes
Figure 9-8 Registry Attributes
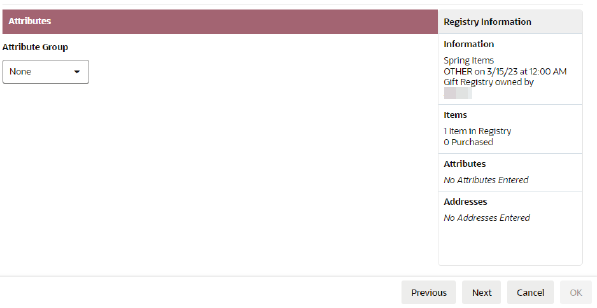
To add attributes to a registry:
-
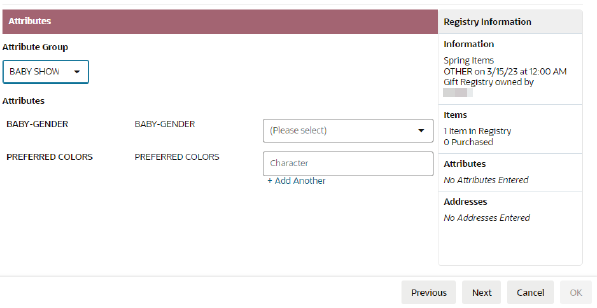
Select a group from the Attribute Group list. A list of attributes specific to the selected Attribute Group is displayed.
Note:
This step is optional unless specific attributes are included in a group and you want to select any of them.
Figure 9-9 Attributes List
-
If you selected an Attribute Group, the attributes belonging to that group are listed in the Attributes grid. Enter values for the attributes you want applied to the registry. You must enter a value for each required attribute (indicated by an asterisk*).
-
The grid displays the name, description and value entry field for each attribute.
-
Attributes are displayed by group, with mandatory attributes displayed first.
-
Attribute value entry fields will initially indicate the type of value to enter, for example, (Please select) for a list of items.
-
If there is more than one possible value for the attribute, there is a + Add Another link under the attribute value entry field. Click the + Add Another link if you have entered a value and need to add another. This displays a duplicate entry field for the attribute.
-
A value can only be removed if an X appears next to it. The X is only displayed if the value can be removed.
-
-
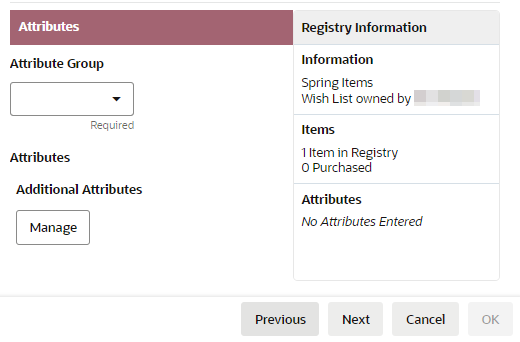
If you want to add attributes not assigned to the available Attribute Groups, click the Manage button under Additional Attributes.
Figure 9-10 Attributes: Wish List
Note:
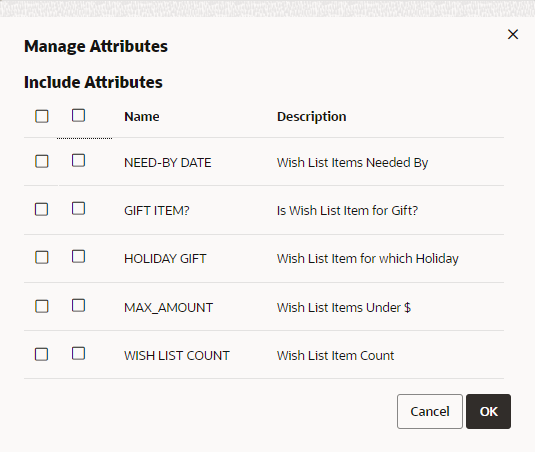
This is only available for Wish Lists. This displays a Manage Attributes window:
Figure 9-11 Manage Attributes
-
Click the check box next to the Name and Description header row to select all of the attributes, or select the check box next to each attribute that you want to include, and click OK. The selected attributes are display beneath Manage.
-
If you have added attributes using the Manage Attribute window, specify values for those attributes.
-
When you are done selecting attributes and entering values, click OK.
-
Click Next to go to Step 4: Addresses.
Step 4: Addresses
Figure 9-12 Addresses
Note:
This section only applies to Gift Registries.
To add Addresses:
-
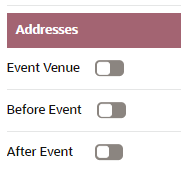
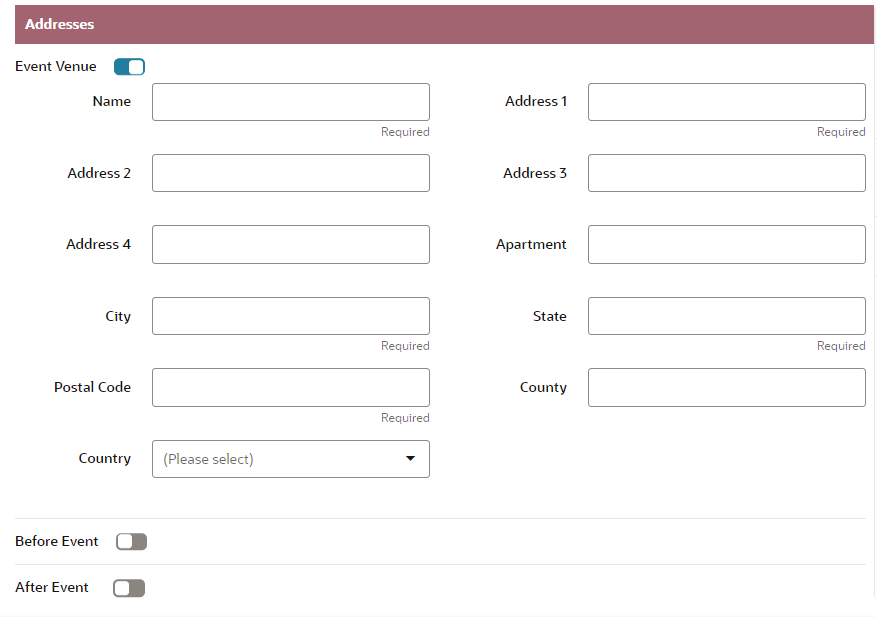
Click the switch next to an address type to On to display a list of fields associated with that address. To hide the fields, set the switch to Off. The following example shows the fields associated with the Event Venue address. Fields marked with an asterisk (*) are mandatory:
Figure 9-13 Event Venue Address
-
Enter information in the fields.
-
Name – The name of the event venue. This field is mandatory.
-
Address 1-4 – The street address of the venue. Address 1 is mandatory.
-
Apartment – The apartment number, if applicable.
-
City – The city of the venue. This field is mandatory.
-
State – The state or province of the venue. This field is mandatory.
-
Postal Code – The postal code of the venue. This field is mandatory.
-
County – The County of the venue.
-
Country - The country of the venue. Choose a country from the list
If there is a Use Address field for the event, as in the following example, select a name from the list. This will populate the remaining fields:
Figure 9-14 Address Fields

-
-
When you are done entering addresses, click OK.
-
Click Next to go to Step 5: Review. This displays a page where you can review all the information you have entered for the registry.
Step 5: Review
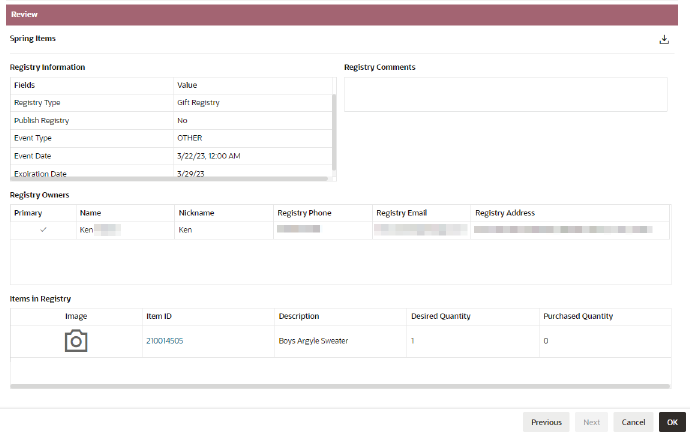
Figure 9-15 Review
To review the registry:
-
Look over the information in the review page. If there is anything you want to change, click the step located in the top bar where the information was first entered. For example, click Information to return to the Information window. To navigate to the previous step, click Previous.
-
Make the changes to the information. For example, if you want to publish the registry, go back to the Information window and select the Ready to Publish check box. This ensures that the registry is published the next time it is saved.
-
Click OK to save your changes in each window.
-
Click Review located in the top bar, and then click OK in the Review window when complete. This saves the registry, and it now appears in the list of registries for the customer.
Viewing a Registry
To View a Registry
-
In the Registries Found list (See Figure 9-2), click the name of the registry you want to view.
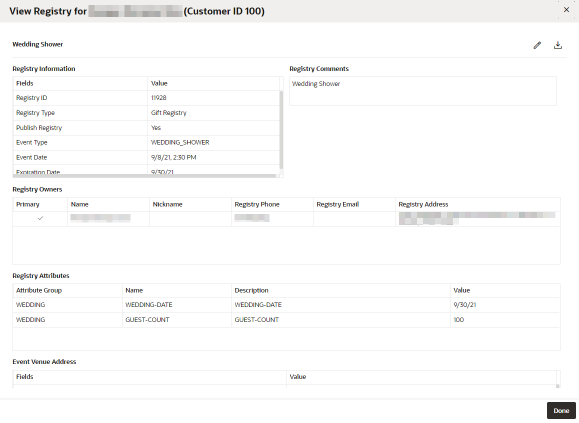
This displays the registry details in view-only mode:
Figure 9-16 View Registry
-
View the items in the registry. You can use the scroll bar to view hidden information.
The following information can be displayed, depending on what has been entered and saved for the registry:
-
Customer Bar
-
Title (View Registry for
-
Primary Owner Customer Name
-
Primary Owner Customer ID
-
-
Display Bar
-
The Registry Name
-
Icons for editing the registry and downloading the registry report
-
-
Registry Information – This table contains the following listed Fields and Values, if they have been entered
-
Registry ID
-
Registry Type
-
Publish Registry
-
Event Type – This is displayed for Gift Registries only
-
Event Date – This is displayed for Gift Registries only
-
Expiration Date – This is displayed for Gift Registries only
-
-
Comments – any comments entered about the registry
-
Registry Owners
-
Primary – The primary owners are displayed first, with any subsequent owners after.
-
Name
-
Nickname
-
Registry Phone
-
Registry Email
-
Registry Address – (also known as) Contact Address
-
-
Items in Registry – For each item in the registry, this information is displayed:
-
Image
-
Item ID - The item ID has a link, that when clicked, displays a window with detail information.
-
Description
-
Desired Quantity
-
Purchased Quantity
-
-
Attributes
-
Group
-
Name
-
Description
-
Value
-
-
Event Venue Address – Displayed for Gift Registries only.
-
Name
-
Address 1-4
-
Apartment
-
City
-
State
-
Postal Code
-
County
-
Country
-
-
Before Event Address – Displayed for Gift Registries only.
-
Name
-
Address 1-4
-
Apartment
-
City
-
State
-
Postal Code
-
County
-
Country
-
-
After Event Address – Displayed for Gift Registries only.
-
Name
-
Address 1-4
-
Apartment
-
City
-
State
-
Postal Code
-
County
-
Country
-
-
-
Click Done. This returns you to the Registries Found list.
Downloading a Registry Report
To download a registry report either:
-
In the Registries Found list (see Figure 9-2), click the Actions Menu in the row of the registry for which you want to download a report, and choose the Download Report option.
-
In the Edit Registry Review or View Registry page, click the Download Report icon.
Either action displays a prompt for saving or running the report with these options:
-
The steps in the prompt can vary based on the browser that is being used.
-
The report is available in PDF format
-
The steps in the prompt can vary based on the browser that is being used.
Registry Report Output
The following example shows the output of a downloaded registry report:
Figure 9-17 Registry Report
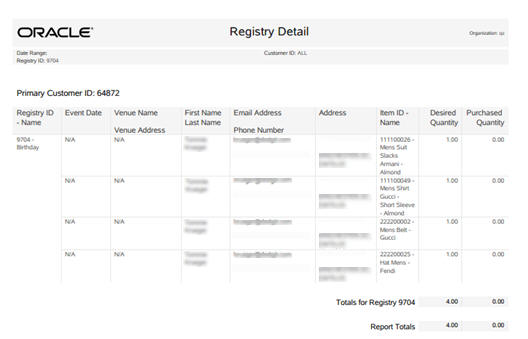
The Registry Report contains the following information:
Header Information
-
Organization - The code identifying your organization.
-
Date Range - The date range selected when generating the report.
-
Customer ID - The numeric ID for the Customers selected when generating the report. Displays ALL if there was no restriction when running the report.
-
Registry ID - The numeric ID for the Registries or Wish Lists selected when generating the report. Displays ALL if there was no restriction when running the report.
Detail Information
-
Primary Customer ID - The unique numeric identifier for a Customer.
-
Registry ID - Name - The unique numeric identifier for a Registry or Wish List, and the Name describing the Registry or Wish List.
-
Event Date - The date for an Item Registry. Set to N/A for a Wish List. Repeated for each Item for the Registry.
-
Venue Name and Venue Address - The Venue Name and Address for an Item Registry. Set to N/A for a Wish List. Repeated for each Item for the Registry.
-
First Name and Last Name - The primary Customer's first and last name. Repeated for each Item for the Registry or Wish List.
-
Email Address and Phone Number - The primary Customer's email address and phone number, as specified for the Registry or Wish List.
-
Address - The primary Customer's address, as specified for the Registry or Wish List.
-
Item ID - Name - The ID and Name of the Item on the Registry or Wish List.
-
Desired Quantity - The desired quantity of the Item.
-
Purchased Quantity - The purchased quantity of the Item.
-
Totals for Registry:
-
Desired Quantity - The total desired quantity of all Items on the Registry or Wish List that are included on the report.
-
Purchased Quantity - The total purchased quantity of all Items on the Registry or Wish List that are included on the report.
-
-
Report Totals:
-
Desired Quantity - The total desired quantity of all Items included on the report.
-
Purchased Quantity - The total purchased quantity of all Items included on the report.
-
Editing a Registry
If you need to edit a Registry, click the Edit Icon in the View Registry window (see Figure 9-14) or, in the Registries Found list, (see Figure 9-2), or click the Actions menu in the row of the registry you want to edit, and choose the Edit option from the menu. Each action displays the registry in an editable window:
Figure 9-18 Edit Registry
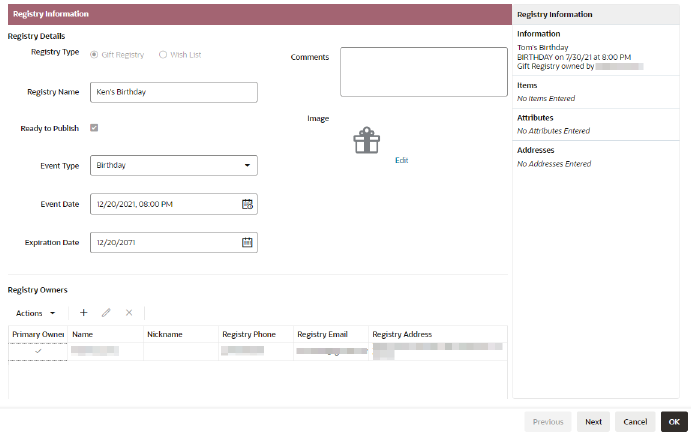
You can review registry details and edit fields that are editable. Click Next to progress through the Edit Registry windows, or click the Step Icons located in the top bar. Use Previous to return to the previous window.
The Edit Registry window displays the same information as that in the Create Registry window, although not all fields are editable. For more information about entering the fields in a registry, see Creating a Registry.
Information in the Edit Registry windows includes that displayed in the Create Registry windows with these variations:
Information
-
Title Bar
-
Title (Edit Registry for)
-
-
Registry Details
-
Registry Type – this is not editable
-
The rest of the fields are editable
-
-
Items
-
The Purchased Quantity for this registry is displayed on the right of the Desired Quantity field. This field is not editable
-
The rest of the fields are editable
-
-
Attributes
-
All fields are editable
-
-
Addresses
-
All fields are editable
-
Review
-
Header Information
-
Displays Edit Registry for Customer name (Customer ID)
-
The Create User ID, Create Date, Update User ID, and Update Date are displayed next to the Registry Name
-
When you are done editing the Registry, click OK to save the changes.
For more information about entering the fields in a registry, see Creating a Registry.
Deleting a Registry
To delete a registry:
-
In theFigure 9-2 , click the Actions Menu in the row of the registry you want to delete.
-
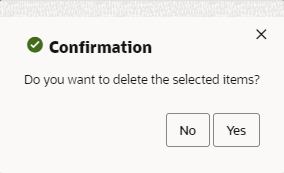
Choose Delete from the menu, this displays a Confirmation prompt:
Figure 9-19 Confirmation Prompt
-
Click Yes to delete the registry.