5 Customer Dashboard
Use the Customer Dashboard to look up the information available for a customer and to edit customer information.
The Customer Dashboard is displayed when you look up a customer. See Customer Search. You can also link from the customer name or image icon in the Customer List on the Home page.
Figure 5-1 Customer Dashboard
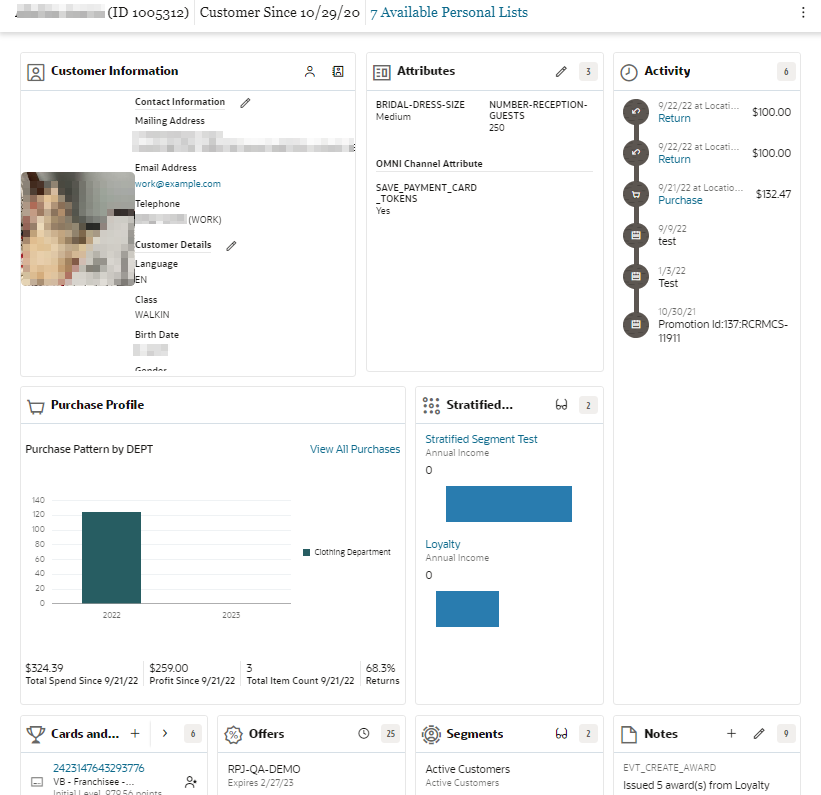
Information on the Customer Dashboard is divided into these sections:
-
The header bar displays the Customer Name and ID, Sign Up Date, Personal Lists, Number in Customer Household and Actions menu.
-
Customer Information - Basic information about the customer, such as mailing addresses, email addresses and phone numbers. See Customer Information.
-
Attributes - Information that helps to characterize the customer, such as birth month and marital status. See Attributes.
-
Activity - Shows current and upcoming customer tasks. See Activity.
-
Purchase Profile - Shows purchase pattern of the customer by revenue center over a year. See Purchase Profile.
-
Stratified Segments - Shows the stratified segments in which the customer is grouped. See Stratified Segments.
-
Cards and Programs - Includes information for each program where the customer has an account. See Cards and Programs.
-
Offers - Shows current offers for the customer. See Offers.
-
Segments - Segments define groups of customers. This section shows the segments to which the customer belongs. See Segments.
-
Notes - Provides information about all of the notes written about the Customer. See Notes.
Customer Household
The Customer Household includes members of a household that a customer is a part of, so that it is possible to direct marketing efforts to a household, rather than each individual member. Household members can be included in this list if they share the same last name and address, or if they only share the same address.
Viewing the Customer Household List
To display the Customer Household list:
-
Display the customer in the Customer Dashboard, for example by clicking on the customer name or image in the Customer List.
-
In the header of the Customer Dashboard, look for the (Number) in Household link. This link will only display if there is more than one household member.
-
Click the (Number) in Household link. This displays the Customer Household list:
Figure 5-2 Customer Household
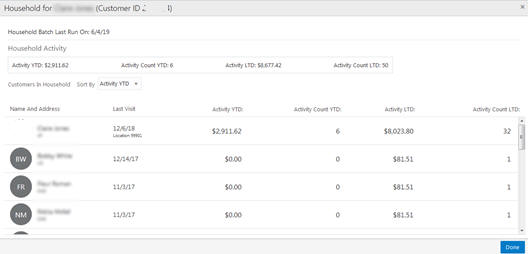
The Household list displays the following view-only information:
-
Household Activity - Summarizes the transaction activity of the household by these metrics:
-
Activity YTD – The amount of the total year-to-date transaction activity for the whole household.
-
Activity Count YTD – The number of transactions for the whole household for the year to date.
-
Activity LTD – The amount of the total life-to-date transaction activity for the whole household.
-
Activity Count LTD – The number of life-to-date transactions for the whole household.
-
-
You can sort by the above Household Activity metrics by selecting from these items on the Sort By drop-down list.
-
Activity YTD
-
Activity Count YTD
-
Activity LTD
-
Activity Count LTD
-
-
Name and Address – The name and address of the household member, and the customer image, if available.
-
Last Visit – The last date the customer made a purchase.
-
Activity YTD – The amount of the total year-to-date transaction activity for the household member.
-
Activity Count YTD – The household member's number of transactions for the year to date.
-
Activity Count LTD – The household member's number of life-to-date transactions.
-
-
Use the scroll bars to display hidden information. Click Done when you are done viewing the list. This returns you to the Customer Dashboard.
Personal Lists
The Personal List provides information about all the user-created personal lists (previously known as manual segments) to which the user can associate customers. The Personal Lists link at the top of the Customer Dashboard displays all the private lists created by the associate to which the customer may be assigned.
To Assign and Unassign Personal Lists:
-
Click the (#) Available Personal Lists link at the top of the Customer Dashboard. This displays the associate's available Personal Lists, with the ones that include the customer listed first.
Figure 5-3 Personal Lists for Customer
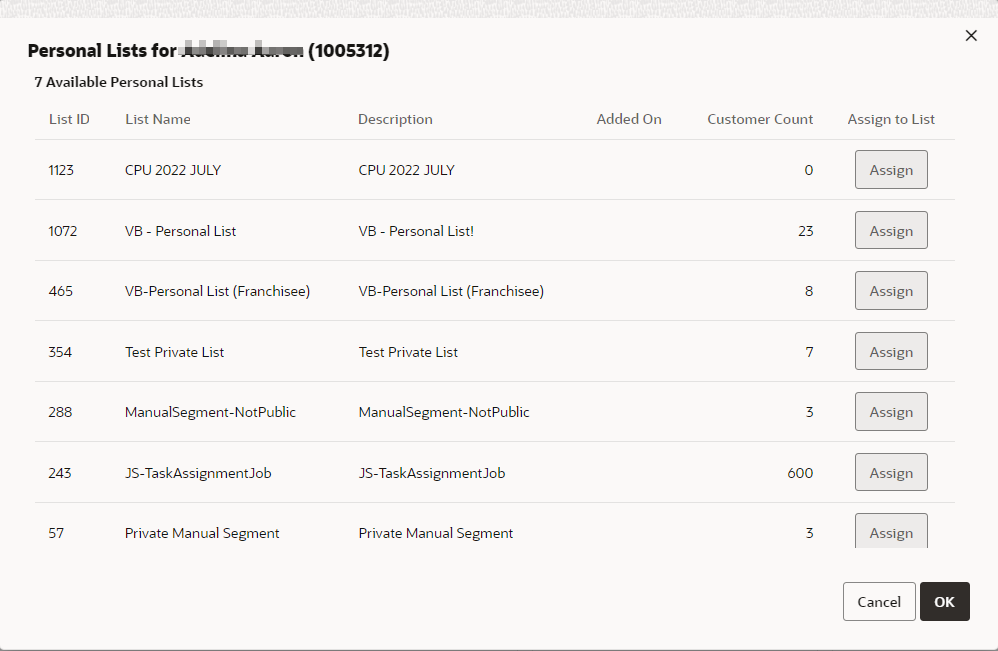
The Personal Lists for Customer pop-up window displays this information:
-
Sorted by Customer Added On date and then by List ID, in descending order
-
Customer Bar
-
The number of Available Personal Lists for the customer
-
Customer Name and ID
-
-
Available Personal Lists Grid
-
List ID – ID of the list
-
List Name – Name of the List
-
Description – Description of the list
-
Added On – The date on which the customer was added to the list
-
Customer Count – The number of customers on that list.
-
Assign to List – Buttons for assigning (Assign) and removing (Unassign)
-
-
Scroll bars are available if there are more lists than will fit on the window.
-
-
Add or remove the customer from a list:
-
Click Assign to assign a customer to a list
-
Click Unassign to remove a customer from a list.
-
-
Click OK when you are done. This returns you to the Customer Dashboard.
Actions Menu
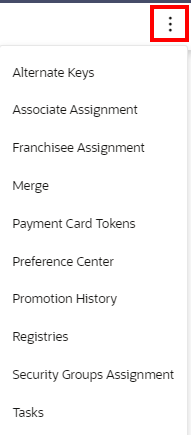
The actions menu at the top of the Customer Dashboard provides access to several tasks associated with customer management.
Figure 5-4 Actions Menu
-
Alternate Keys - Displays the Alternate Keys window for the customer displayed in the Customer Dashboard. See: Alternate Keys
-
Associate Assignment - Displays the Associate Assignment window for the customer displayed in the Customer Dashboard. See: Associate Assignment
-
Franchisee Assignment - Displays the Franchisee Assignment window for the customer displayed in the Customer Dashboard. This option is only displayed if the associate has access to at least one franchisee. See: Franchisee Assignment
-
Merge - Displays the Customer Merge window for the customer displayed in the Customer Dashboard. See: Merge
-
Payment Card Tokens - Displays the payment card tokens window for the customer displayed in the Customer Dashboard. See Payment Card Tokens.
-
Preference Center - Displays the Preference Center window for the customer displayed in the Customer Dashboard. See: Preference Center
-
Promotion History - Displays the Promotion History window for the customer displayed in the Customer Dashboard. See: Promotion History
-
Registries - Displays the Registries window for the customer displayed in the Customer Dashboard. See: Registries
-
Security Groups Assignment - Provides the ability to assign or unassign a Security Group to a customer, so that customer details will be protected based on the privileges for the assigned security group. See: Security Groups Assignment
-
Tasks - Displays the Customer Tasks window for the customer displayed in the Customer Dashboard. See: Tasks
Customer Information
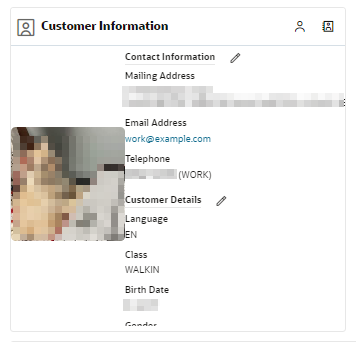
The Customer Information area of the Customer Dashboard includes contact information and other details about the customer.
Figure 5-5 Customer Information
-
Use the scroll bar or up and down arrow keys to move through the information.
-
If the user has read-only access, the View icon is displayed instead of the Edit icon.
Emailing a Customer
Click the Email Address link in the customer information panel to send a message to a customer. This link uses the client email server. After you send the message, you are returned to the Customer Information panel.
Editing Customer Details
To edit Customer Details, click the Edit icon at the top of the panel next to Customer Information, or next to Customer Details. This opens an editable Customer Details panel.
Figure 5-6 Customer Details Editing
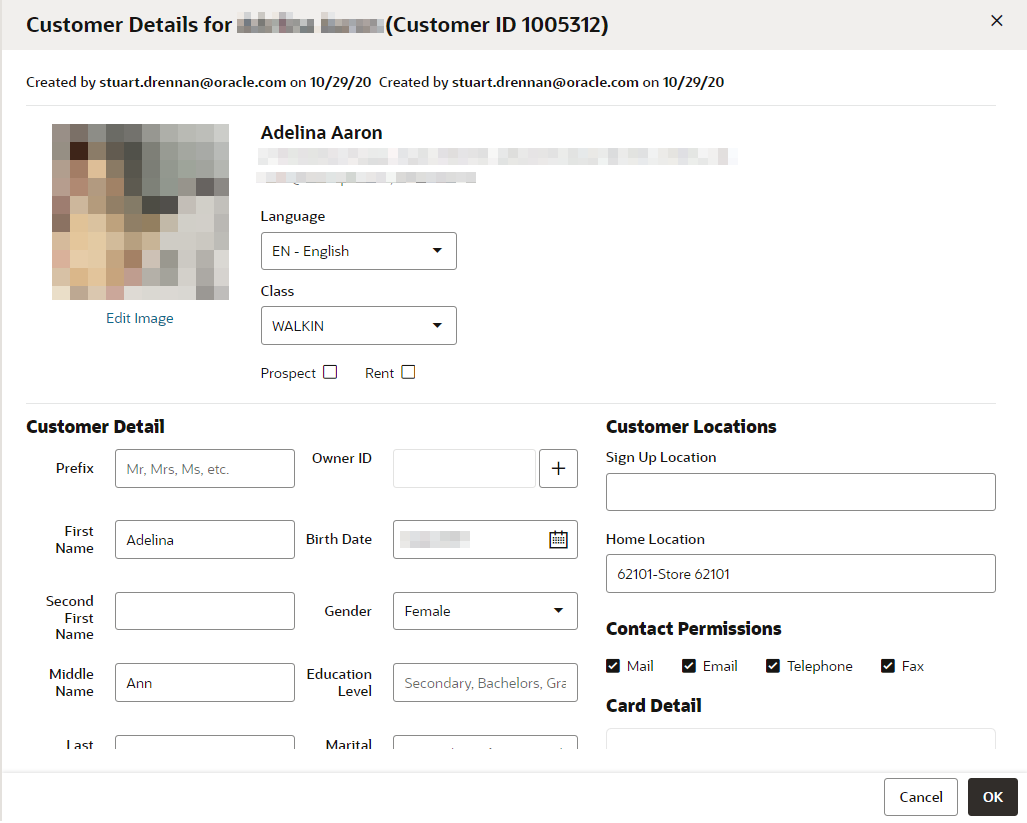
A customer image, if provided, is displayed in the top left of this panel.
To edit the customer image:
-
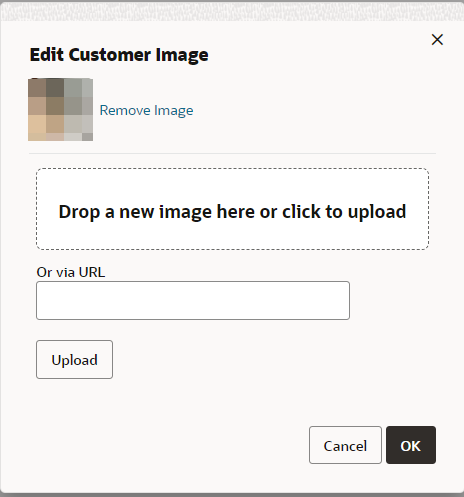
Under the customer image, click Edit Image. This displays a dialog for uploading an image.
Figure 5-7 Edit Customer Image
-
Select an image and drag it into the top box. Alternatively, you can enter a URL for the image file in the or via URL field, and click Upload.
-
When you have selected the new image file, click OK.
-
For all other items, enter the information in the fields that need updating and click OK.
Customer Detail information includes the following:
Customer Details
-
Language – The customer's preferred language (required).
-
Class – The class to which the customer belongs (required).
-
Prospect – Indicates whether the customer is a prospect.
-
Rent – Indicates whether the customer name can be rented to other companies for prospecting efforts.
-
Prefix – Prefix to the customer name.
-
First Name – First name for the customer.
-
Second First Name – A second first name for the customer, if provided.
-
Middle Name – Middle name or middle initial for the customer.
-
Last Name – Last name for the customer.
-
Second Last Name – A second last name for the customer, if provided.
-
Suffix – Suffix to the customer name.
-
Business Name – Name of the business associated with the customer.
-
Organization Name – Name of the organization associated with the customer.
-
Organization Type – Type of organization associated with the customer.
-
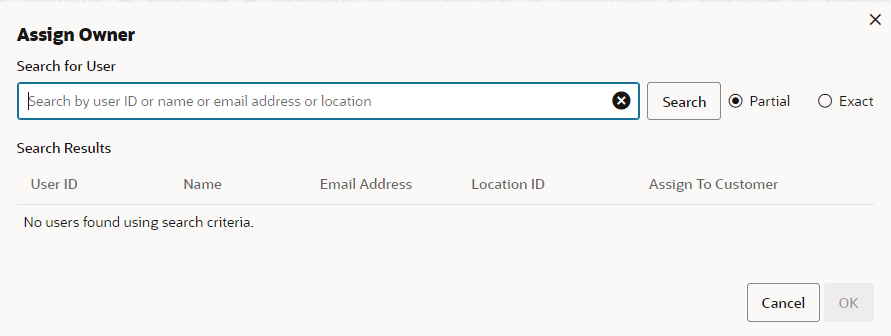
Owner ID - Used to control the associate able to assign one or more security groups to a customer. Do the following to add an Owner ID:
-
Click the Owner ID Assign Owner Add icon. Result: The Assign Owner window appears.
Figure 5-8 Assign Owner
-
In the Search for User field, enter the User ID, Name, Email Address, or Location of the user you want to search for. Click Partial to search for users that partially match the search text, or click Exact, to search for an exact match.
-
Click Assign for the user you wish to assign to the customer.
-
When you are finished assigning a user, you can either click OK to close the window and save the changes or click Cancel to close the window without saving the changes.
Note:
Click Unassign to remove an existing user assigned to a customer. This enables you to assign a new user. Each customer can only have one user assigned as an owner.
-
-
Birth Date – Date of birth of the customer.
-
Gender – Customer gender.
-
Education Level – Highest level of education completed by the customer.
-
Marital Status – Current marital status of the customer.
-
Anniversary – Customer anniversary date.
-
Ethnicity – Customer ethnicity.
-
Annual Income – Customer's annual income.
-
Net Worth – Net worth of the customer.
-
Signup Location – Location where the customer signed up.
-
Home Location – Home location for the customer.
-
Contact Permissions – The methods by which the customer has given permission to be contacted. Check the box next to each allowed method.
-
Card Detail – Details on card associated with the customer
Editing Customer Contact Information
To edit the customer's contact information, click the Edit icon next to Contact Information. This opens an editable Contact Information panel.
Figure 5-9 Edit Customer Contact Information
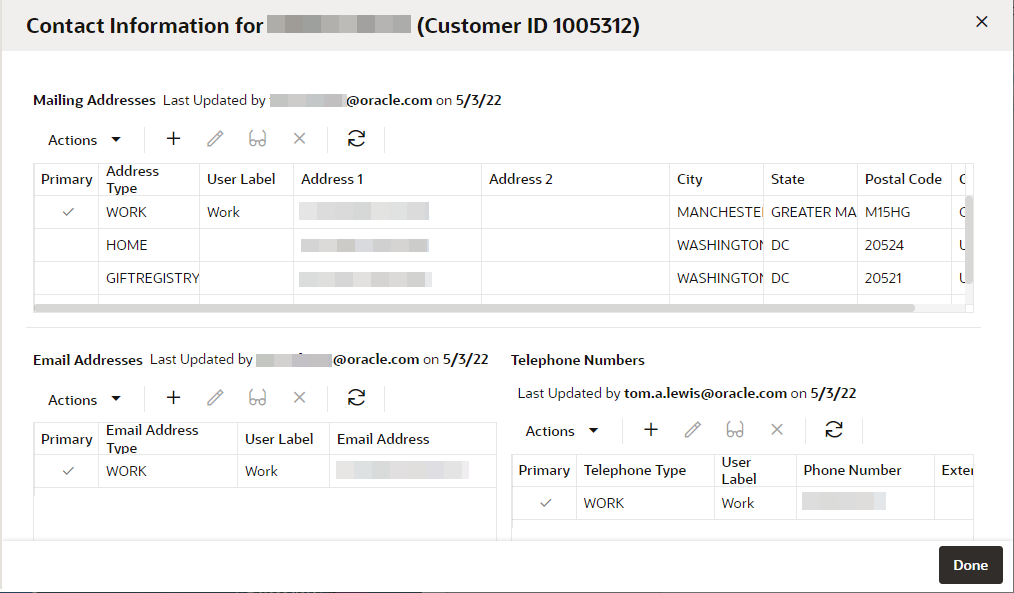
Customer Contact information includes the following:
-
Mailing Addresses - All mailing addresses of the customer.
-
Email Addresses - All email addresses of the customer.
-
Telephone Numbers - All telephone numbers of the customer.
Add, Edit, or Delete a Mailing Address:
To create a new mailing address:
-
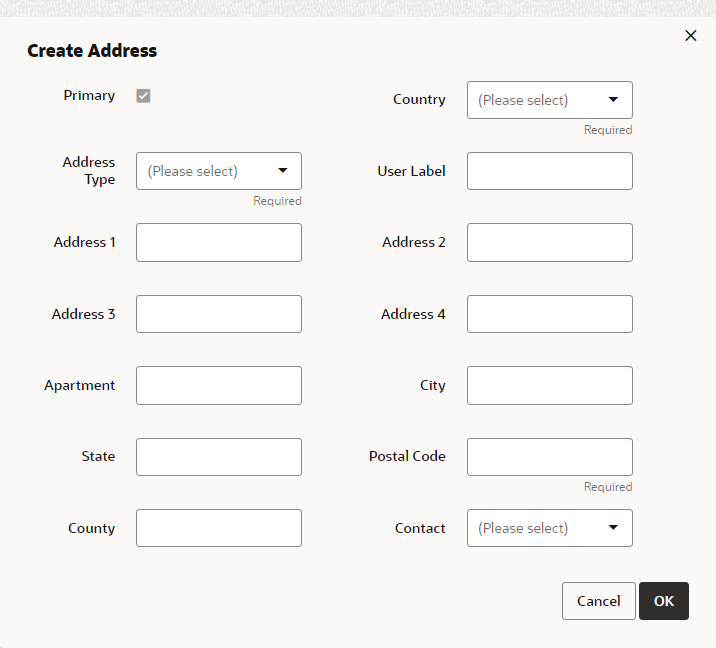
In the Contact Information editing panel under Mailing Addresses, choose Create Address from the Actions menu, or click the Add (+) icon. This opens a Create Address dialog.
Figure 5-10 Create Address Dialog
-
Enter the information for the new address (see Step 2 in Editing a Mailing Address) and click OK. The new address is displayed at the top of the Mailing Address list, because the Primary flag is automatically defaulted when adding a new mailing address.
The Primary field for any address that was previously the primary address is de-selected.
To delete a mailing address:
-
In the Contact Information editing panel under Mailing Addresses, select the address you want to delete.
-
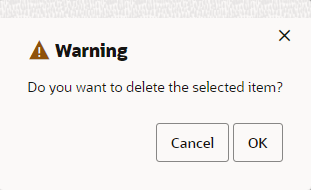
Choose Delete Address from the Actions menu, or click the Delete icon. This displays a Warning message:
Figure 5-11 Warning
-
In the Warning message, click OK. The address is deleted from the Mailing Addresses list.
To edit a mailing address:
-
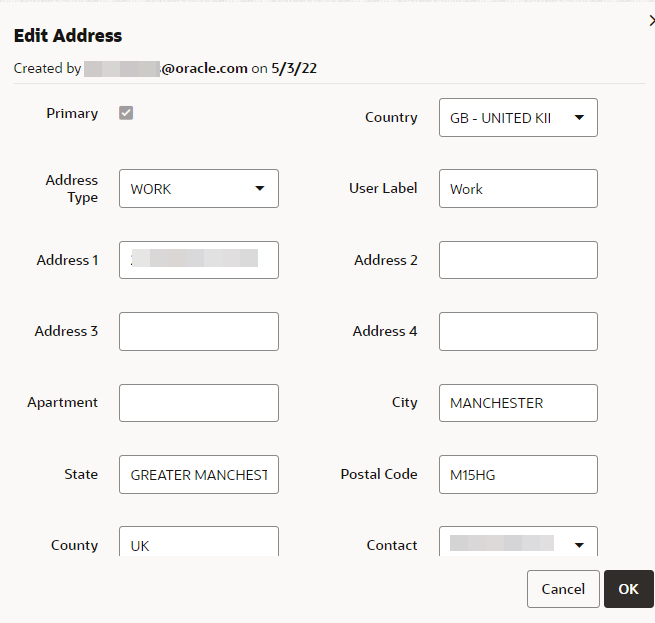
In the Contact Information editing panel under Mailing Addresses, choose Edit Address from the Actions menu, or click the Edit icon. This opens an Edit Address dialog:
Figure 5-12 Edit Address Dialog
-
Edit the information for the address (see Step 2 in Editing a Mailing Address) and click OK. The edited information is displayed in the Mailing Addresses list.
If the Primary check box for the address that you are editing was selected, the Primary check box is disabled in the Edit Address dialog. If the Primary check box for the address that you are editing was not selected, the Primary check box is enabled in the Edit Address dialog. To set an address as the new Primary address, select the Primary check box when editing.
The Create and Edit Mailing Address dialogs display the following information:
-
Primary – Indicates whether this is the primary address for the customer.
-
Country – The country for the customer address. Select a country from the drop-down list (required).
-
Address Type – Indicates the type of address, such as Home or Business. Select a type from the drop-down list (required).
-
User Label – User label for the address.
-
Address 1-4 – The street number in the address. You can enter up to four addresses, for example, suite or office number.
-
Apartment – The apartment number, if applicable.
-
City – The city for the customer address.
-
State – The state for the customer address.
-
Postal Code – The postal code for the customer address (required).
-
County – The County for the customer address.
-
Contact – The contact rule for the address. Select a contact preference from the drop-down list.
-
Add, Edit, or Delete an Email Address:
To create a new email address
-
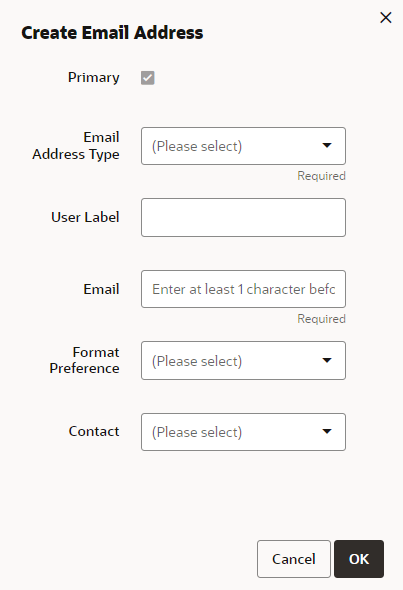
In the Contact Information editing panel under Email Addresses, choose Create Email Address from the Actions menu, or click the Add icon. This displays a Create Email Address dialog:
Figure 5-13 Create Email Address Dialog
-
Enter the information for the new email address (see Step 2 in Editing an Email Address) and click OK. The Primary flag is automatically defaulted when adding a new email address, so the new email is displayed at the top of the Email Addresses list.
The Primary field for any email that was previously the primary email is de-selected.
To delete an email address:
-
In the Contact Information editing panel under Email Addresses, select the email you want to delete.
-
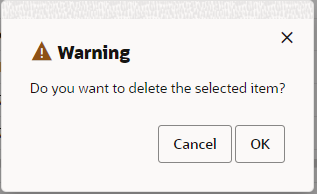
Choose Delete Email Address from the Actions menu, or click the Delete icon. This displays a Warning message:
Figure 5-14 Warning
-
In the Warning message, click OK. The email is deleted from the Email Addresses list.
To edit an email address:
-
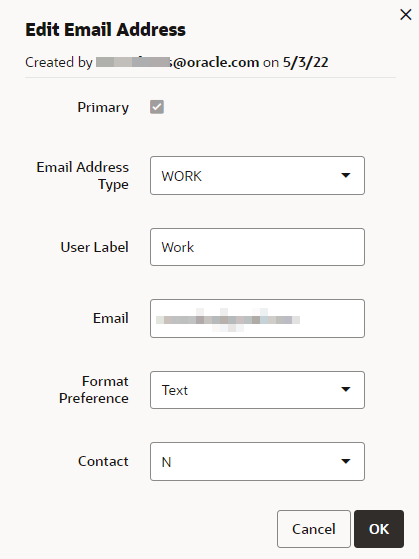
In the Contact Information editing panel under Email Addresses, select the email address you want to edit, and choose Edit Email Address from the Actions menu, or click the Edit icon. This opens an Edit Email dialog.
Figure 5-15 Edit Email Address Dialog
-
Edit the information for the email address (see Step 2 in Editing an Email Address)) and click OK. The edited information is displayed in the Email Addresses list.
If the Primary check box is selected for the email address being edited, the Primary check box is disabled in the Edit Email Address dialog. If the Primary check box is not selected for the email address being edited, the Primary check box is enabled in the Edit Email Address dialog. To set an email address as the new primary email address, select the Primary check box when editing.
The Create and Edit Email Address dialogs display the following information:
-
Primary – Indicates whether this is the primary email address for the customer.
-
Email Address Type – The type of email address, for example, Home or Business. Select a type from the drop-down list (required).
-
User Label – User label for the email address (required).
-
Email – The email address (required).
-
Format Preference – The preferred file format for receiving email messages. Select a format from the drop-down list.
-
Contact – The contact rule for the email address. Select a contact preference from the drop-down list.
Add, Edit, or Delete a Telephone Number
To create a new telephone number:
-
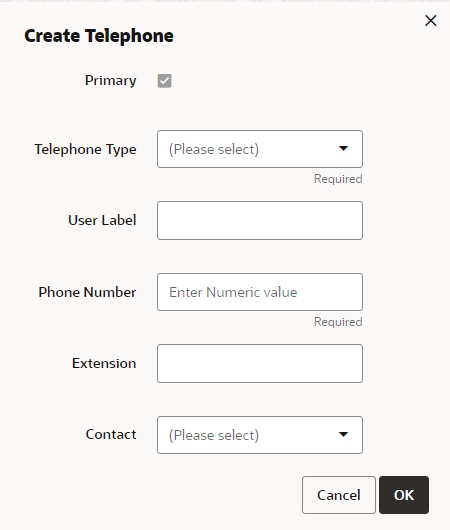
In the Contact Information editing panel under Telephone Numbers, choose Create Telephone from the Actions menu, or click the Add icon. This opens a Create Telephone dialog.
Figure 5-16 Create Telephone Dialog
-
Enter the information for the new number (see Step 2 in Editing a Telephone Number) and click OK. The Primary flag is automatically defaulted when adding a new telephone number, so the new number is displayed at the top of the Telephone Numbers list.
The Primary field for any number that was previously the primary number is de-selected.
To delete a telephone number:
-
In the Contact Information editing panel under Telephone Numbers, select the number you want to delete.
-
Choose Delete Telephone from the Actions menu, or click the Delete icon. This displays a Warning message.
Figure 5-17 Warning

-
In the Warning message, click OK. The number is deleted from the Telephone Numbers list.
To edit a telephone number:
-
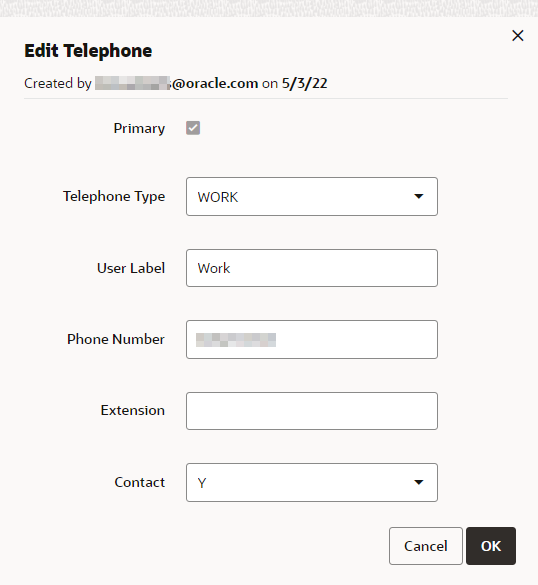
In the Contact Information editing panel under Telephone Number, select the telephone number you want to edit, and choose Edit Telephone from the Actions menu, or click the Edit icon. This opens an Edit Telephone dialog.
Figure 5-18 Edit Telephone Dialog
-
Edit the information for the number (see Step 2 in Editing a Telephone Number) and click OK. The edited information is displayed in the Telephone Numbers list.
If the Primary check box is selected for the telephone number being edited, the Primary check box is disabled in the Edit Telephone dialog. If the Primary check box is not selected for the telephone number being edited, the Primary check box is enabled in the Edit Telephone dialog. To set a telephone number as the new Primary telephone number, select the Primary check box when editing.
The Create and Edit Telephone dialogs display the following information:
-
Primary – Indicates whether this is the primary telephone number for the customer.
-
Telephone Type – The type of telephone number, for example, Home or Business. Select a type from the drop-down list (required).
-
User Label – User label for the telephone number.
-
Phone Number – The telephone number, including area code (required).
-
Extension – The telephone number extension, if applicable.
-
Contact – The contact rule for the telephone number. Select a contact preference from the drop-down list.
-
Viewing Customer Details and Contact Information
If you have read-only access, you will see the View icon in the Customer Information panel instead of the Edit icon.
-
To view both customer details and contact information, click the View icon at the top of the Customer Information panel.
-
To view just customer contact information, click the View icon at the top of the Contact Information section.
-
To view just customer details, click the View icon at the top of the Customer Details section.
See the previous sections for more information on the fields displayed in View mode.
Attributes
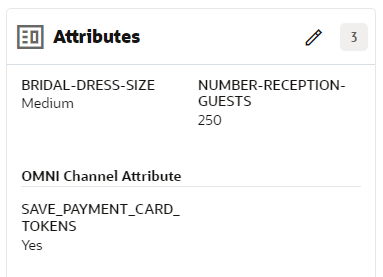
The Attributes panel of the Customer Dashboard displays all the attributes and attribute values associated with the customer:
Figure 5-19 Customer Attributes
-
A badge with the total number of attributes assigned to the customer is displayed on the right side of the title bar, as in **INTERNAL XREF ERROR**, above.
-
An Edit icon is displayed next to the badge as in as in **INTERNAL XREF ERROR**, above. This lets you access controls for editing, creating and deleting attributes.
-
The Customer Attribute section contains the following information for each customer attribute:
-
Group - The group associated with the attribute.
-
Name - The name of the attribute.
-
Value - The value set for the attribute.
-
Description - Description of the information provided by the attribute.
-
-
The name of the attribute appears above the attribute value.
-
If attributes are assigned to a group, those attributes are sorted by group, and the group name is displayed above the attributes.
-
Scroll bars are available if the number of attributes do not fit in the display area of the panel.
-
If there are no attributes assigned to the customer, a pop-up appears indicating
No Attributes assigned.
Creating an Attribute
-
Click the Edit icon at the top of the Attributes panel.
This displays a window with details of the customer's attributes:
Figure 5-20 Customer Attributes Details
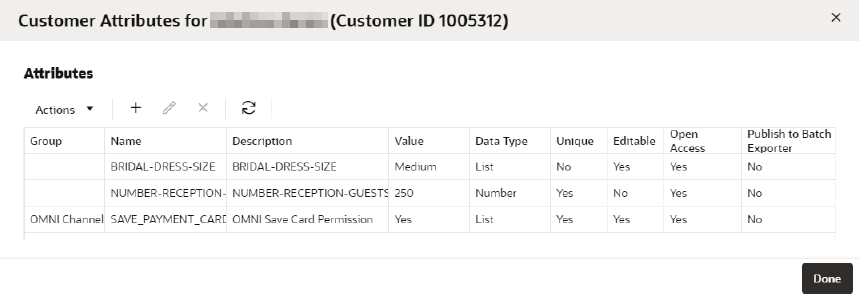
The following controls are available in the toolbar:
-
Actions menu – The Actions menu has options that correspond to the Add, Edit, and Delete icons.
-
Add icon - Displays a dialog that lets you create a new customer attribute
-
Edit icon - Displays a dialog that lets you edit a selected customer attribute.
-
Delete icon - Deletes a selected customer attribute.
The following information is displayed for each attribute:
-
Group – The group associated with the attribute.
-
Name – The name of the attribute.
-
Description – Description of the information provided by the attribute.
-
Value – The value set for the attribute.
-
Data Type – The type of data contained in the attribute value.
-
Unique - Only one value can be added to the attribute when it is identified as unique.
-
Editable - Identifies whether the associate is allowed to edit the value for the attribute once it is added.
-
Open Access – Indicates whether there is open access to this attribute.
-
Publish to Batch Folder – Indicates whether the attribute has been made available for export to a marketing system such as Responsys.
-
-
-
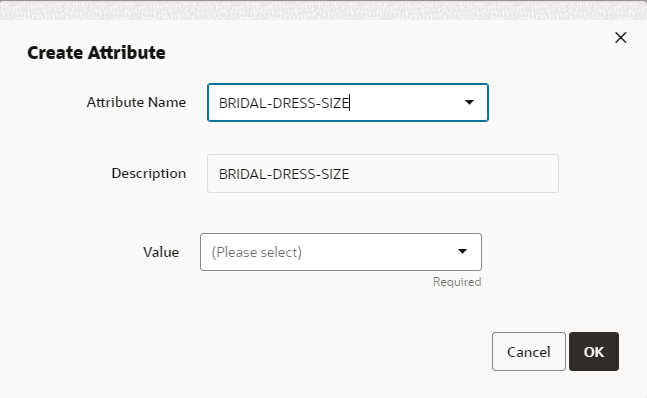
Click Add, or click the Actions Menu and select Add. This displays the Create Attribute dialog:
Figure 5-21 Create Attributes Dialog
-
Select a name from the Attribute Name list.
-
Select a value from the Value list.
-
Click OK. This adds the new attribute to the list of attributes for the customer
Editing an Attribute
-
Click Edit at the top of the Attributes panel.
-
Select the attribute that you want to edit.
-
Click Edit at the top of the detail window, or choose Edit from the Actions menu.
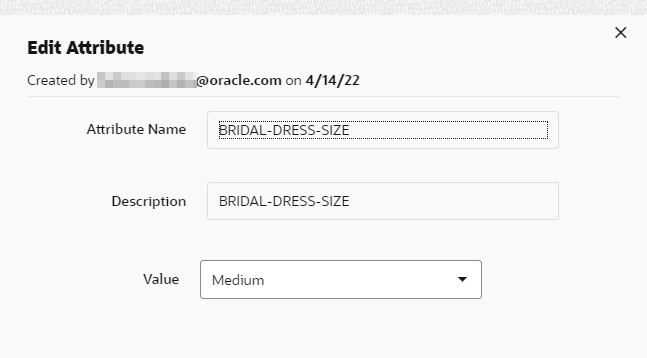
This displays an Edit Attribute dialog with details of that attribute:
Figure 5-22 Edit Attribute Dialog
-
Select a new Value for the Attribute form the list in the Value field.
-
Click OK to accept the value. The attribute is displayed with the new value.
Deleting an Attribute
-
Click Edit at the top of the Attributes panel.
This displays a window with details of the customer's attributes:
-
Select the attribute that you want to delete.
-
Click Delete, or click the Actions Menu and select Delete. This displays a Warning message:
Figure 5-23 Warning

-
Click OK to verify that you want to delete the message.
-
When you are finished adding, editing or deleting customer attributes, click Done, to return to the Customer Dashboard.
Activity
The Activity panel of the Customer Dashboard provides quick access to transactions and other activities pertaining to a customer.
-
This panel displays current and future tasks, and after those, the past 25 activities, which include tasks and retail transactions.
-
The user can view the tasks associated with the customer only if they have the appropriate user roles for task access.
-
The activity stream is sorted by the most recent first.
-
Scroll bars are available if the number of activities do not fit in the display area of the panel.
-
If there are no activities to show for the customer, an image with No Activity available to display displays.
Figure 5-24 Customer Activity
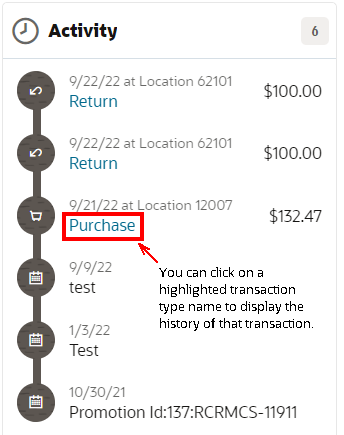
The Activity panel can display the following information, depending on the type of activity:
-
The date of the activity.
-
The name of the activity.
-
The location where the activity occurred, if available.
-
The total amount of a transaction, such as a purchase.
Item Purchase History
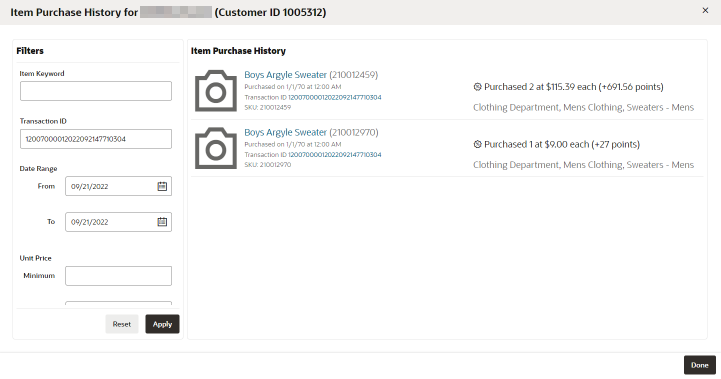
In the Activity panel as shown in Figure 5-24, if the activity is a transaction such as a purchase, return, or void, you can link to the item purchase history details by clicking the highlighted transaction type name.
Figure 5-25 Item Purchase History Details
Note:
You can also link to the Item Purchase History from the Purchase Profile by clicking a colored area in the bar chart, or by clicking the View All Purchases link. See Purchase Profile.
Filters
You can use the fields in the Filters panel to search for specific items by the following criteria:
-
Item Keyword – Enter a keyword in the item description to filter for items having that keyword.
-
Transaction ID – Enter an exact Transaction ID to filter for that transaction.
-
Date Range – Specify a date range using the calendars to search for items in that date range.
-
Unit Price – Use the up and down arrows to specify a minimum and maximum unit price to filter for items in that price range.
-
Department – The store department where the item was purchased. Select a department from the list to filter on items from that department.
Note:
This is a client-specific hierarchy field and the name (for example, Department) will depend on the client system configuration.
-
Reset – Click Reset to clear all filters. This displays all of the items purchased by the customer.
Apply – Click Apply to display items filtered by the specified criteria.
-
When there are more fields than can fit in the filter box, a scroll bar is provided to navigate to the hidden items.
The following information is displayed for each item in the list, if available:
-
Item name and number
-
Purchase date and time
-
Transaction ID
-
SKU
-
Quantity – the number of items purchased or returned
-
Price – the price paid for the item
-
Points –the loyalty points earned or reduced for the item purchased or returned
-
Item Hierarchies for the item
Item Details
When you click a specific item in the Item Purchase History panel, the Item Detail opens:
Figure 5-26 Item Detail
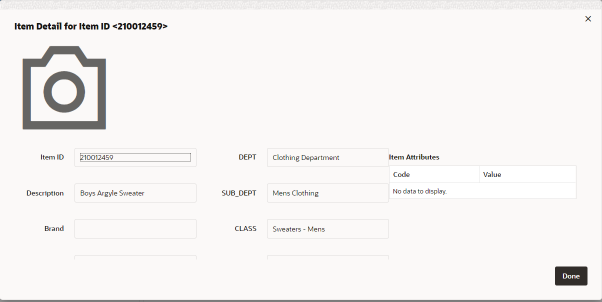
These details for the item are displayed, if available:
-
Item ID
-
Description
-
Brand
-
Season
-
Color
-
Hierarchy 1-5 - These vary according to the way the customer is configured, for example, Department, SUB_DEPT, CLASS, SUB_CLASS, STYLE_ID. Only configured levels are displayed.
-
Item Attributes:
-
Code
-
Value
-
If more attributes are available than can fit in the Item Attributes box, scroll bars are provided for navigation to hidden information.
-
Click Done to close the Item Detail.
Transaction Details
When clicking a specific transaction ID in the Item Purchase History panel, a Purchase Details window displays for that transaction ID.
-
The popup has three tabs.
-
The information is read-only.
-
It displays both purchases and returns, in all three tabs, based on the selected transaction.
-
All currency fields are populated based on the system base currency.
-
If there is more information than can fit in the tab, scroll bars are provided for navigation to hidden information.
Figure 5-27 Purchase Detail - Purchase Information
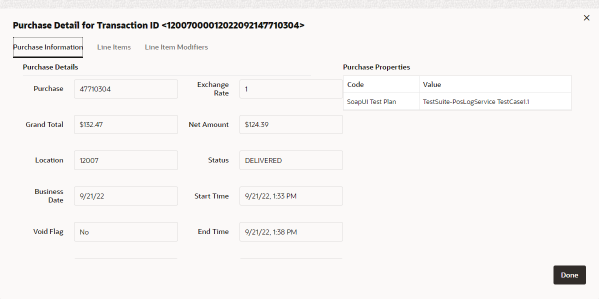
The first panel, Purchase Information, is displayed by default when you click the transaction ID, or when you click the Purchase Information tab. It displays the following details about the transaction, if available:
-
Purchase
-
Grand Total
-
Location
-
Business Date
-
Void Flag
-
Register
-
Cashier
-
Currency
-
Original Currency
-
Exchange Rate
-
Net Amount
-
Status
-
Start Time
-
End Time
-
Tax Amount
-
Points Earned
-
Linked Purchase
-
Code
-
Value
Figure 5-28 Purchase Details - Line Items
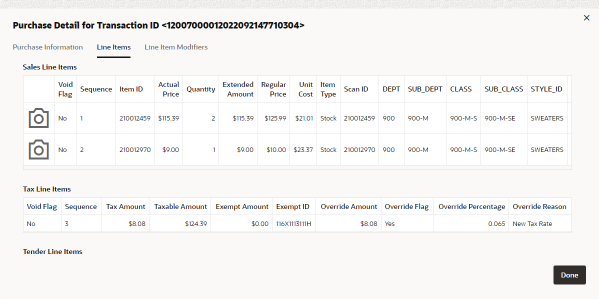
Line items are displayed when you click the Line Items tab. The following information is displayed, if available:
-
Sales Line Items
-
Void Flag
-
Sequence
-
Item ID
-
Actual Price
-
Quantity
-
Extended Amount
-
Regular Price
-
Unit Cost
-
Item Type
-
Scan ID
-
Department
-
Hierarchy 1-5 - These vary according to the way the customer is configured, for example, Department, SUB_DEPT, CLASS, SUB_CLASS, STYLE_ID. Only configured levels are displayed.
-
Points Earned
-
-
Tax Line Items
-
Void Flag
-
Sequence
-
Tax Amount
-
Taxable Amount
-
Exempt Amount
-
Exempt ID
-
Override Amount
-
Override Flag
-
Override Percentage
-
Override Reason
-
-
Tender Line Items
-
Void Flag
-
Sequence
-
Tender ID
-
Tender Amount
-
Authorization Code
-
Account Number
-
Activity
-
Adjudication Code
-
Expiration Date
-
Face Value
-
Issue Date
-
Issue Type
-
Serial Number
-
Remaining Amount
-
Figure 5-29 Purchase Detail - Line Item Modifiers
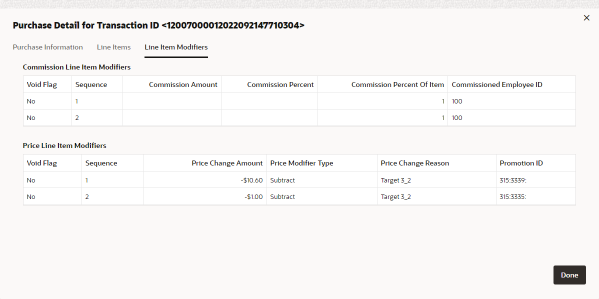
When clicking the Line Item Modifiers tab, the line item modifiers are displayed. The following information is displayed, if available:
-
Commission Line Item Modifiers:
-
Void Flag
-
Sequence
-
Commission Amount
-
Commission Percent
-
Commission Percent of Item
-
Commissioned Employee ID
-
-
Price Line Item Modifiers:
-
Void Flag
-
Sequence
-
Price Change Amount
-
Price Modifier Type
-
Price Change Reason
-
Promotion ID
-
Click Done when you are finished viewing the transaction details.
Purchase Profile
The Purchase Profile panel shows the purchase pattern of the customer. Each bar in the graph represents a year. The colored bands correspond to the revenue department* (*or other entity named by the client) in which the customer purchased products during that year, measured by the amount of spending. Each year in the graph displays the top five revenue departments (or other entities named by the client).
Figure 5-30 Customer Purchase Profile
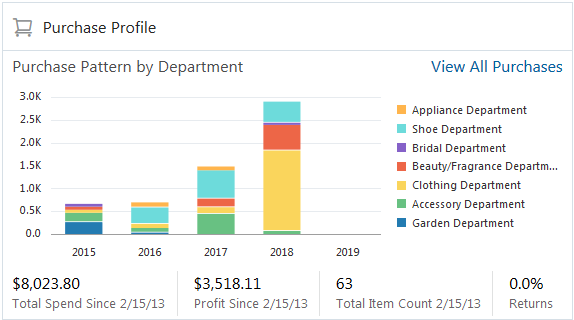
-
Other revenue metrics include:
-
Total Spend - Shows how much the customer has spent since their first purchase to date.
-
Profit Since - Shows the total profit the store or chain has made since the customer's first purchase to date.
-
Total Item Count - Shows the total transaction (purchases minus returns) count for the lifetime of the customer. This includes all transactions, not just the ones represented in the five departments and five years displayed in the graph.
-
Returns - Shows the percentage of the amount of Returns to the amount of Total Spending.
-
-
If there are no Purchase Profiles to show for the customer, an image with
No Purchase Activity available to displayappears:
Figure 5-31 No Purchase Activity Available Message
Viewing Purchase Pattern Details
Hover over a colored area in a graph to see detail information in a tool tip. This information includes:
-
Category – The category of the purchase, such as Clothing Department.
-
Category Spend – How much the customer spent on items in this category.
-
Classes – The name of the classes (or client-specific hierarchy level) within the selected category.
Viewing Purchase History
Click a colored area in a bar chart to go the Item Purchase History for all the items represented in that area.
You can also click the View All Purchases link to go to the Item Purchase History for all items.
See Item Purchase History for more information.
Stratified Segments
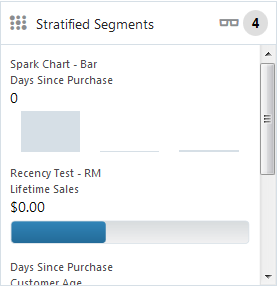
Stratified Segments define groups of Customers. The Customers within a Stratified Segment are divided into levels within the Segment. The stratified segments to which the customer belongs are shown in the Stratified Segments panel of the Customer Dashboard.
Figure 5-32 Stratified Segments Panel
-
Stratified segments classified as public are shown. If a stratified segment is classified as private, it will only be shown to the associate who created the stratified segment.
-
Three types of graphs are used to represent statistics:
-
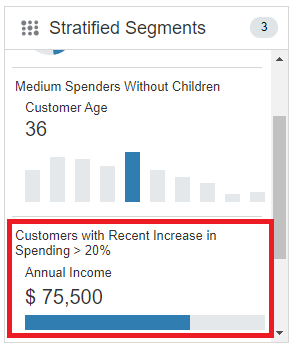
Status Meter Gauge – Horizontal, uses horizontal orientation to indicate thresholds at specific values:
Figure 5-33 Stratified Segments - Horizontal
-
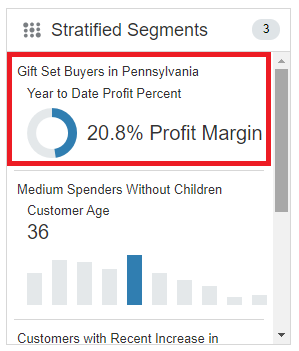
- Status Meter Gauge - Circular, uses circular orientation to indicate thresholds at specific values:
Figure 5-34 Stratified Segments - Circular
-
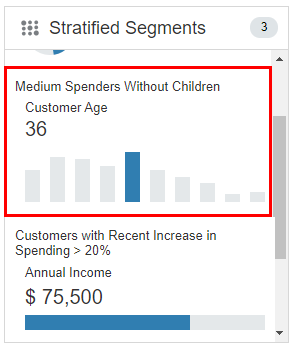
- Spark Chart - Bar, used to view trends over time and generally paired with additional context in a table:
Figure 5-35 Stratified Segments - Spark Chart (Bar)
-
-
A badge with the total number of stratified segments to which the customer belongs displays on the right side of the title bar.
-
An eyeglass icon lets you view details about all the Stratified Segments to which the customer belongs. See Viewing Customer Stratified Segments List.
-
Scroll bars are available if the number of stratified segments do not fit in the display area of the panel.
-
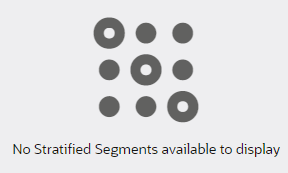
If there are no stratified segments assigned to the customer, the following image is displayed:
Figure 5-36 No Stratified Segments Assigned Message
Viewing Stratified Segment Details
If you hover over a segment name in the Stratified Segments panel a tool tip is displayed:
Figure 5-37 Stratified Segments Tool Tip
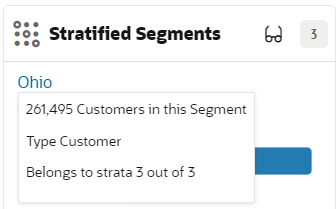
The following information is provided:
-
Segment Description.
-
Customer Count – Total number of customers in this segment.
-
Strata Type and Based on Value:
-
Strata Type values (Customer, Loyalty, Transaction).
-
Based on Value (Header, Detail, Customer, Loyalty Summary, Loyalty Detail).
-
Type = <strata type> based on <based on value>.
-
-
Customer Strata membership - The strata the customer falls into.
Viewing Customer Stratified Segments List
-
Click the eyeglass icon in the title bar. This displays the Stratified Segments for (Customer) window:
Figure 5-38 Stratified Segments for Customer

This window displays the following view-only information about the stratified segments associated with the customer:
-
The Customer Name and ID Number are displayed in the Segments for title bar. If there are no segments assigned, the table displays No Segments Assigned.
-
Assigned Stratified Segments Grid
-
Segment ID – ID of the segment
-
Segment Name – Name of the segment
-
Description – Description of the segment
-
Create User – the user who created the segment
-
Added On – the date on which the customer was added to the segment.
-
Customer Count – the number of customers in that segment.
-
Strata Type – (Customer, Loyalty, Transaction)
-
Strata Format – the format used to create the strata. Possible values are:
- Range Strata – Strata are determined by configured ranges
- Ntile Strata – Strata are formed by equally sized groups of customers
-
Based on Value – the basis used for determining the Strata field (Header, Detail, Customer, Loyalty Summary, Loyalty Detail)
-
Strata Field – the field used to create the Strata
-
Average Strata Value
-
Number of Strata – the number of strata in the segment
-
Customer Strata – the strata the customer falls into
-
Customer Value
-
-
-
Click Done. This returns you to the Customer Dashboard.
Cards and Programs
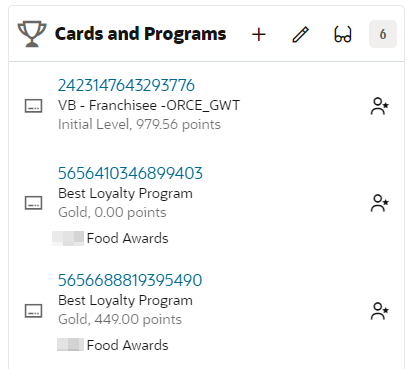
The Cards and Programs panel of the Customer Dashboard includes information about cards held by the customer and about the programs associated with each card. Programs include Tender, Award, and Loyalty. You can assign and generate cards for the customer in this panel.
Figure 5-39 Cards and Programs
-
The title bar icons let you perform the following actions:
-
Click the Add icon to assign a card or generate an electronic card
-
Click the Pencil icon to display the Cards and Programs window for the customer
-
-
Only active programs and cards are displayed.
-
If there are multiple cards associated with the customer, the programs are grouped together by card, and the card number is displayed next to the programs.
-
A badge with the total number of programs for which the customer has an account displays on the right side of the title bar.
-
Scroll bars are available if the number of programs do not fit in the display area of the panel.
-
If there are no programs assigned to the customer, the following image displays:
Figure 5-40 No Programs Assigned Message
Viewing Card Assignments
To view details about the cards and programs assigned to the customer:
-
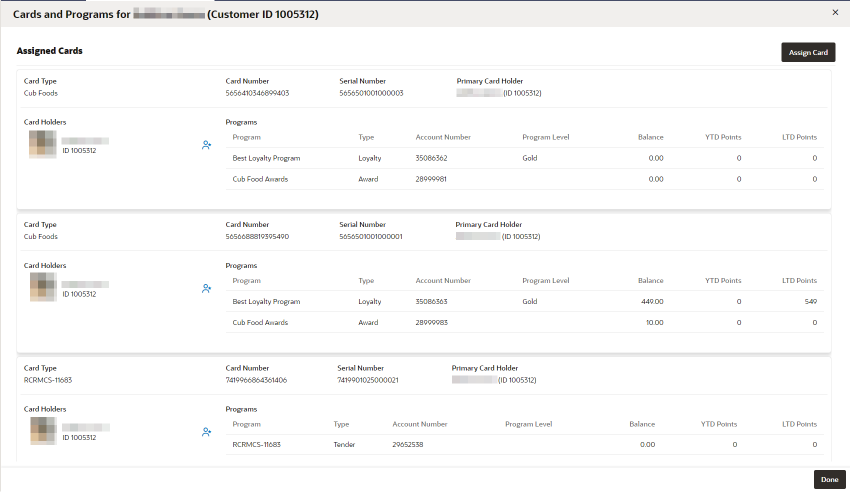
Click the Edit icon in the Cards and Programs title bar. This displays the Cards and Programs for (Customer) window:
Figure 5-41 Assigned Cards
-
The Customer Name and ID number are displayed in the title bar.
-
Assign Card allows access to the Assign Card to (Customer) dialog. See: Assigning a Card.
-
The following fields are displayed for a card:
-
Card Type
-
Card Number
-
Serial Number
-
Primary Card Holder (Customer Name and ID)
-
-
Card Holders
-
Customer Image, if available, or customer initials
-
Customer Name
-
Primary Card Holder Customer Name and ID
-
Primary Card Holder icon – displayed to the right of the card holder name and ID.
-
Secondary Card Holders Image, Name and ID – There can be multiple secondary card holders
-
-
The following fields are displayed for each program:
-
Program Name
-
Program Type – The type of program: Award, Tender, Loyalty
-
Account Number
-
Program Level – displayed for Loyalty programs only.
-
Balance
-
YTD Points – Year to Date points. This is displayed for Loyalty programs only
-
LTD Points – Lifetime to Date points. This is displayed for Loyalty programs only.
-
-
The list is sorted by card number, where the Customer is a primary cardholder first.
-
-
Click Done to return to the Customer Dashboard.
Assigning a Card
To assign a card:
-
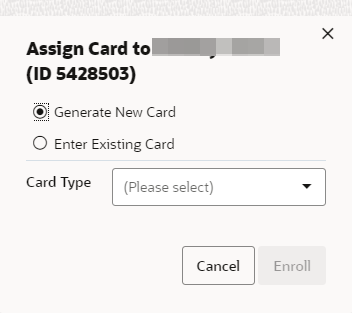
Click Assign in the Cards and Programs panel header or click Assign Card in the Cards and Programs for (Customer) detail window. Either action displays the Assign Card to (Customer) dialog:
Figure 5-42 Assign Card to (Customer)
-
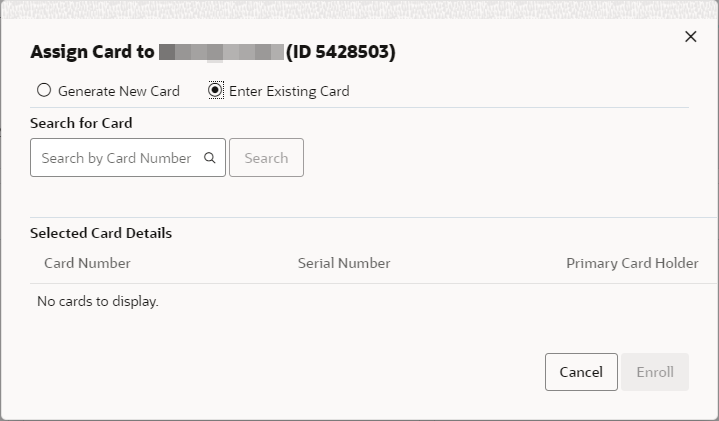
Select the Enter Existing Card option. This populates the dialog with Search for Card field:
Figure 5-43 Search for Card
-
In the Search for Card field, enter the full Card Number or Serial Number of the card you want to assign. Do not use spaces.
-
Click Search. This populates Selected Card Details with the Card Number, Serial Number, and Primary Card Holder of the card, if one exists.
-
Click Enroll to assign the card to the customer. This returns you to the previous window with the new card displayed for the customer.
Generating a Card
To generate a card:
-
Click Assign in the Cards and Programs panel header or click Assign Card in the Cards and Programs for (Customer) detail window. Either action displays the Assign Card to (Customer) dialog (see Figure 5-42).
-
By default, Generate New Card is selected. Keep this selection.
-
Select a Card Type from the list.
-
Click Enroll to generate a new electronic card for the customer. This returns you to the previous window with the new card displayed for the customer.
Note:
: If you select a valid card series where all cards have been assigned or generated already, clicking Enroll displays a message: No cards found for selected card type.
Offers
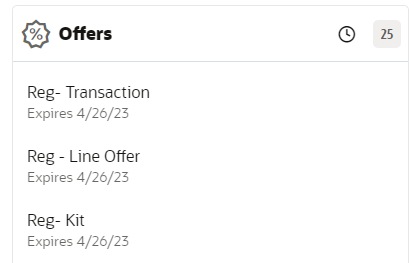
An offer is part of a campaign that is intended to provide some purchase incentive to customers. These offers may provide price incentives on a specific item, or provide coupons to be redeemed during a purchase, they may be messages notifying customers of special events or pricing, or they may provide tender certificates that a customer can use at a later date The Offers panel of the Customer Dashboard shows current offers for the customer.
Figure 5-44 Offers
-
A badge with the total number of offers the customer is qualified for displays on the right side of the title bar.
-
The following information is displayed for each offer:
-
Offer Name
-
Expiration date – the expiration date comes from the promotion of which the offer is a part, or from the coupon expiration date, if the offer has coupons.
-
-
The following offers are displayed:
-
Any offer within an ACTIVE, NOT EXPIRED promotion that is exclusively targeted to a segment the customer is a part of.
-
Any offer within an ACTIVE, NOT EXPIRED promotion that is NOT exclusively targeted.
-
Any offer within an ACTIVE, NOT EXPIRED promotion that is NOT targeted.
-
Any entitlement offer within an ACTIVE, NOT EXPIRED Award promotion, with an Award Program. Requires a card associated to the program for the customer.
-
-
A maximum of 25 offers are displayed.
-
The offers are sorted by expiration date in ascending order.
-
Scroll bars are available if the number of offers do not fit in the display area of the panel.
-
Exclusive offers are indicated with an icon next to the exclusive offer. When you hover over the icon, the text Exclusive Offer displays. Entitlements are exclusive offers. Promotional offers can be exclusive or general.
-
If there are no offers assigned to the customer, the system displays the following image:
Figure 5-45 No Offers Available Message
-
There is a View Promotion History link at the bottom of the Offers panel that provides access to the Promotion History window. See the following section, Promotion History for details.
Promotion History
When you click the View Promotion History link in the Offers panel or choose the Promotion History option from the Actions menu on the Customer's Dashboard, the Promotion History window is displayed.
Figure 5-46 Promotion History
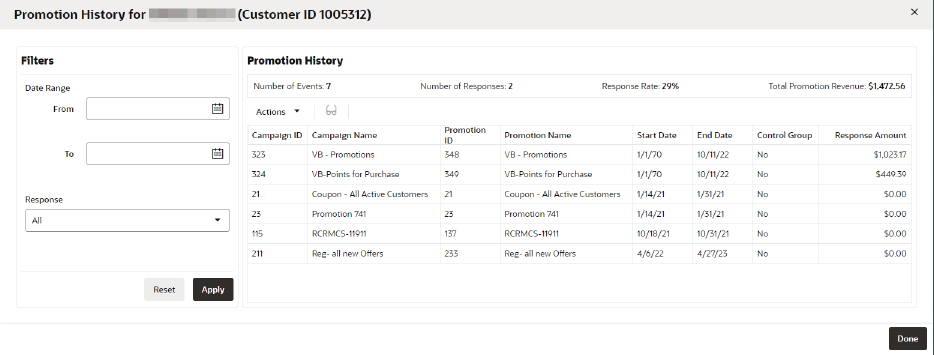
The Promotion History window displays metric summary information and detail information about specific promotion events for the selected customer. You can filter the list of events by date range and response type.
Filters Panel
You can filter the list of promotion events using these controls:
-
Date Range – Select a date range in the From and To calendar fields to filter on promotion events in only that date range
-
Response – Select a promotion response from the list to filter on one of the following response types:
-
All
-
None
-
Generated Revenue
-
Click Apply to apply the filter, or Reset to clear the filter.
Promotion History Panel
The Promotion History panel lists the filtered promotion events and summarized metrics for the set of events. The following information is provided:
-
Metrics:
-
Number of Events – The number of promotion events that have been available to the customer within the date range of the search.
-
Number of Responses – The number of promotions to which the customer has responded within the date range of the search.
-
Response Rate – The percentage of available promotions to which the customer has responded within the date range of the search.
-
Total Promotion Revenue – The total revenue received from customer responses to promotions within the date range of the search.
-
-
The following information is displayed in the Promotion History table for each event:
-
Campaign ID
-
Campaign Name
-
Promotion ID
-
Promotion Name
-
Start Date
-
End Date
-
Control Group
-
Response Amount
-
-
The Promotion History list is sorted by Response Amount in descending order (highest value first).
-
If there are no promotions for the customer, the message No Promotions Available to Display displays.
Viewing Promotion Event Detail
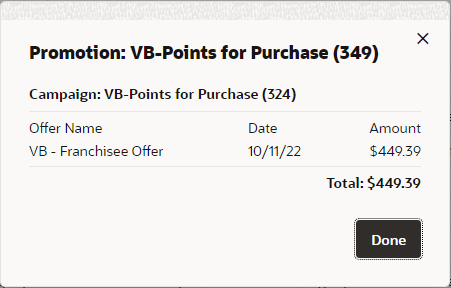
You can see more detail about an event in a view-only window following these steps:
-
Select the event in the grid that you want to view.
-
From the Actions menu, choose View, or click the View icon.
This displays the event in a view-only window:
Figure 5-47 Promotion Event Detail
-
Click Done. This returns you to the Promotion History window.
-
To return to the Customer Dashboard, click Done.
Segments
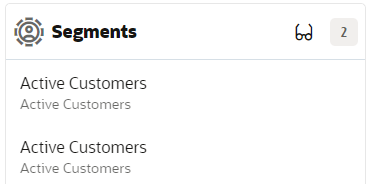
The Segments panel displays the unstratified segments to which the customer belongs.
Figure 5-48 Customer Segments
-
An eyeglass icon lets you view details about all the Segments to which the customer belongs. See Viewing Customer Segments
-
A badge with the total number of segments to which the customer belongs displays on the right side of the title bar.
-
The following information is displayed for each segment:
-
Segment Name
-
Segment Description
-
-
If a segment is designated as private, it is only displayed for the user who created it.
-
Scroll bars are available if the number of segments do not fit in the display area of the panel.
-
If there are no segments assigned to the customer, the following image is displayed:
Figure 5-49 No Segments Available Image
Viewing Customer Segments
-
Click the Eyeglass icon in the title bar. This displays the Segments for (Customer) window:
Figure 5-50 Segments for Customer
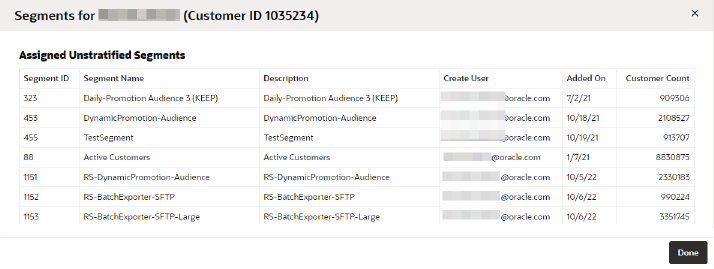
This window displays the following view-only information about the segments associated with the customer:
-
The Customer Name and ID Number are displayed in the Segments for title bar. If there are no segments assigned, the title displays No Segments Assigned.
-
Assigned Unstratified Segments Grid
-
Segment ID – ID of the segment.
-
Segment Name – Name of the segment.
-
Description – Description of the segment
-
Create User – the user who created the segment.
-
Added On – the date on which the customer was added to the segment.
-
Customer Count – The number of customers in that segment.
-
-
-
Click Done, to return to the Customer Dashboard.
Notes
The Notes panel of the Customer Dashboard provides information about the last 25 Notes written about the Customer.
Figure 5-51 Notes

-
A badge with the total number of notes for the customer displays on the right side of the title bar.
-
The following information is displayed for each note:
-
The note type.
-
The first three lines of the note.
-
The date the note was created.
-
The user name of the person who create the note.
-
-
If a note is marked as private, the details of the note are masked to all associates except for the note creator or an associate with the System Administrator role.
-
A maximum of 25 notes are displayed.
-
The notes are sorted by update date in descending order.
-
Scroll bars are available if the number of notes do not fit in the display area of the panel.
-
Notes created within a task do not appear on the list.
-
If there are no notes created for the customer, the following image is displayed:
Figure 5-52 No Notes Available Message
Create a Note
To add a note about the customer, use one of these methods to display the Create Note window:
-
Click the Add + icon in the top right corner of the Notes panel.
-
Click the Edit icon in the top right corner of the Notes panel to display the Notes for Customer list, and use either action:
-
Click the plus sign in the toolbar
-
From the Actions menu, choose Add.
-
Any of the following actions display the Create Note window:
Figure 5-53 Create Note
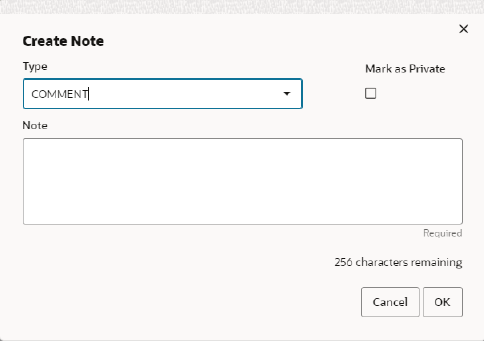
To create a note:
-
If you want the note to be private, select Mark as Private, otherwise, leave it de-selected.
-
Select a note type from the Type list.
-
Enter a note of up to 256 characters in the Note field.
-
Click OK when you are finished to save the note. Click Cancel if you do not want to add the note.
Edit a Note
You can edit notes that are listed in the Notes panel of the Customer Dashboard.
To edit a note:
-
Click the Edit icon at the top of the Notes panel. This displays a Notes for (Customer) window that lists the notes stored for the selected customer.
Figure 5-54 Notes for (Customer)
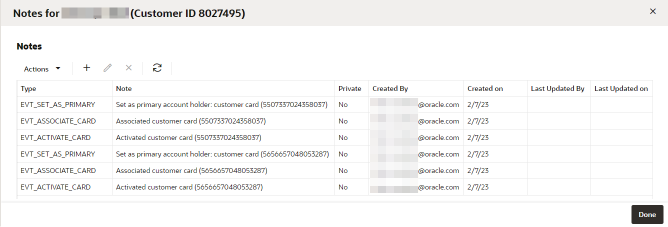
The Notes for (Customer) window provides the following information and features:
-
The title bar displays the Customer Name and ID
-
The user that last updated the notes and the date they were last updated is displayed beneath the title bar.
-
The toolbar and actions menu provide commands to Add, Edit, and Delete a note
-
The notes grid displays the following about each note:
-
Type – the type of note
-
Note – the text of the note
-
Private – indicates whether the note is private (can be seen only by the note's author or system administrators) Yes/No
-
Created By – the ID of the user who created the note
-
Last Updated By –the ID of the user who last updated the note
-
Last Updated On – the date the note was last update
-
-
The Note list is sorted by the Last Updated On date in descending order, by default. If there is no Last Updated On date, the Created On date is used.
-
If there is more information than can be displayed on the window, scroll bars are provided to navigate to hidden information.
-
-
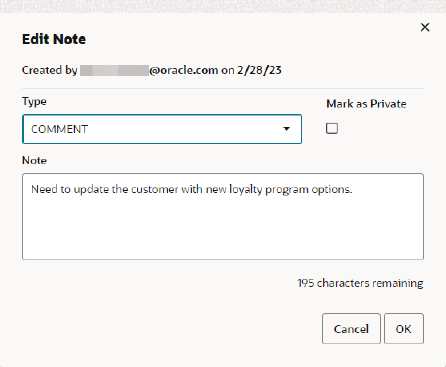
Select the note in the grid that you want to edit, and click the Edit icon, or choose Edit from the Actions menu. This displays the note in the Edit Note window:
Figure 5-55 Edit Note
-
You can change any of following:
Mark as Private – Select the check box to ensure that only the note's author and system administrators can see it, or de-select if you do not want to restrict access.
Type – Select a different type from the list.
Note – Edit the text of the note.
-
When you are finished editing the note, click OK to save the changes or click Cancel if you do not want to save the changes. Either action returns you to the Notes for (Customer) window.
Delete a Note
You can delete a note in the Notes for (Customer) window.
To delete a note:
-
Select the note in the grid that you want to delete, and click the Delete icon, or choose Delete from the Actions menu. This displays a Warning message:
Figure 5-56 Warning Message

-
Click OK to delete the note, or Cancel, if you do not want to delete the note.
-
Either action returns you to the Notes for (Customer) window. If you chose OK, to delete the note, it is no longer displayed in the grid and is removed from the database.
-
Click Done in the Notes for (Customer) window when you are finished. This returns you to the Customer Dashboard.
Alternate Keys
Alternate keys are used to link customer accounts with other systems. Choose the Alternate Keys option on the Actions menu in the Customer Dashboard for access to the Alternate Keys page:
Figure 5-57 Alternate Keys
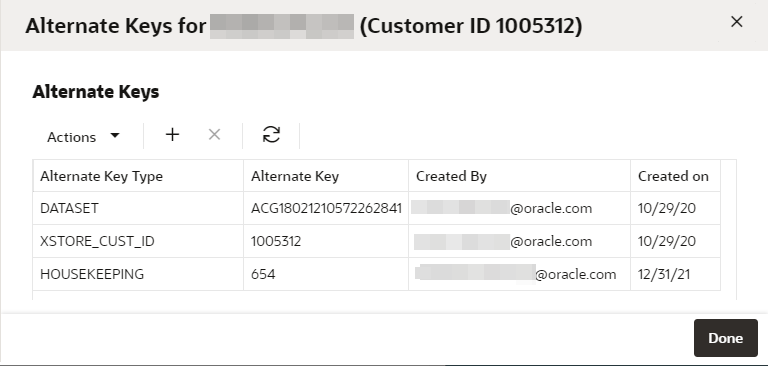
The Alternate Keys window offers the following information and features:
-
The customer name and ID
-
The user who last updated the window and the date it was last updated
-
The Actions menu and corresponding icons let you Add and Delete alternate keys.
-
Alternate Key Type –The type of the alternate key (these are defined by the customer)
-
Alternate Key – The value of the alternate key (the value format is defined by the customer)
-
Created By – The user who created the alternate key
-
Created On – The date the alternate key was created
Adding an Alternate Key
To add an Alternate Key:
-
Click the Actions menu in the Customer Dashboard and choose Alternate Keys. This displays an Alternate Keys window listing the customer's alternate keys.
-
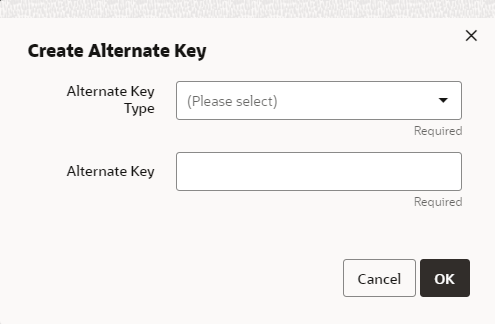
Click the Add+ icon, or choose Add from the Actions menu. This displays a Create Alternate Key window.
Figure 5-58 Create Alternate Key
-
Select an Alternate Key Type from the list.
-
Enter the value of the new alternate key in the Alternate Key field.
-
Click OK to save the new alternate key and return to the Alternate Keys window, click Cancel to return without saving the alternate key.
Deleting an Alternate Key
To delete an alternate key:
-
Select the alternate key that you want to delete.
-
Click the Delete icon, or chose Delete from the Actions menu.
This displays a Warning message asking you to confirm that you want to delete the alternate key.
Figure 5-59 Warning

-
Click OK to delete the alternate key, or Cancel, if you do not want to delete the alternate key.
-
Either action returns you to the Alternate Keys window. If you chose OK, to delete the alternate key, it is no longer displayed in the grid and is removed from the database.
-
Click Done in the Alternate Keys window when you are finished. This returns you to the Customer Dashboard.
Associate Assignment
The Associate Assignment page lets you add, update, or delete associates assigned to a role for a customer. Choose the Associate Assignment option on the Actions menu in the Customer Dashboard for access to the Associate Assignment page:
Figure 5-60 Associate Assignment
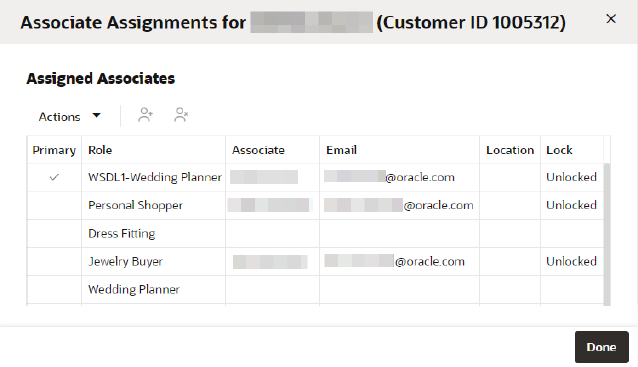
The Associate Assignment window offers the following information and features:
-
The customer name and ID
-
The user who last updated the window and the date it was last updated
-
The Actions menu and corresponding icons let you Assign and Unassign associates.
-
Primary – Indicates the pre-designated Primary role, which is set by the client.
-
Role – Associate Role. See the Oracle Retail Customer Engagement Cloud Service Implementation Guide for more information about Associate Roles
-
Associate – Name of the associate
-
Email – The email of the associate
-
Location – ID of the associate's location
-
Lock – Indicates whether the associate user assignment can be changed (Unlocked) or not changed (Locked).
-
If an associate is not assigned, this field is blank.
-
When the assignment is locked, the logged in user must be the same as the assigned user to edit or unlock the associate user assignment, with the exception of a system administrator. The system administrator can edit any assigned user.
-
If a user without the privileges to change the associate assignment attempts to do so, an error message displays: The assignment is locked, and can only be changed by the assigned user or a system administrator.
-
Assigning an Associate
To assign an associate to a role for a customer:
-
In the Associate Assignment grid, select the role to which you want to assign an associate.
-
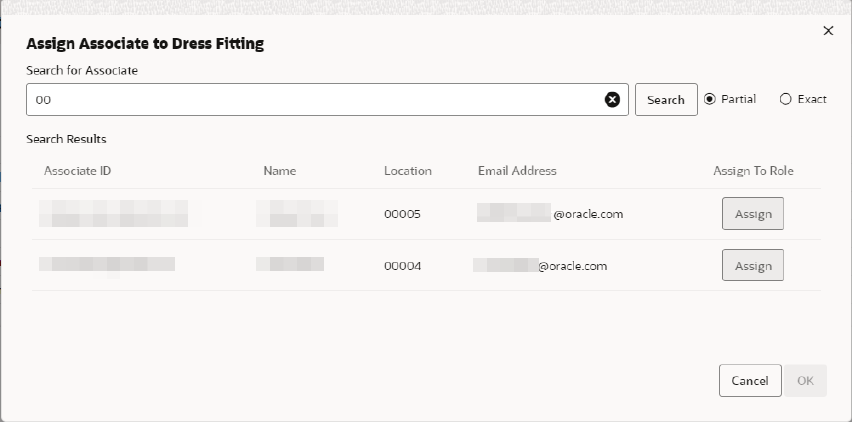
From the Action menu, choose Assign, or click the Assign icon. This displays the Assign Associate dialog:
Figure 5-61 Assign Associate
-
In the Search for Associate prompt, enter the ID, Name, Location or E-mail of the associate you want to assign to the role. Select Partial to search on a partial entry, or Exact, to search for only exact matches.
-
Click Search. This displays the associates matching the search criteria in the Search Results grid.
-
Click Assign in the row of the associate that you want to assign to the role. Assign changes to Unassign, and the Locked check box is displayed:
-
If you want to lock the assignment so that only you and system administrators can change it, select the Locked check box. If not, leave it clear.
-
Click OK. This returns you to the Associate Assignments page. The associate added to the role is displayed in the assignment row.
Unassigning an Associate
To un-assign an associate from a role for customer:
-
In the Associate Assignment grid, select the assignment from which you want to un-assign an associate. Only one assignment can be selected to un-assign at one time.
-
From the Action menu, choose Unassign, or click the Unassign icon. This removes the associate from the role, and their information is deleted from the assignment row.
-
Click Done when you are finished with associate assignments. This returns you to the Customer Dashboard
Franchisee Assignment
The Franchisee Assignments page displays information about the franchisees to which the customer has been assigned.
Note:
The Franchisee Assignment option is only displayed if the (Franchisee) user has access to more than one Franchisee.
For more information about how franchisees are initially set up and the configuration is enabled, see the Customer Engagement Cloud Services Implementation Guide
Choose the Franchisee Assignment option on the Actions menu in the Customer Dashboard for access to the Franchisee Assignment page:
Figure 5-62 Franchisee Assignment
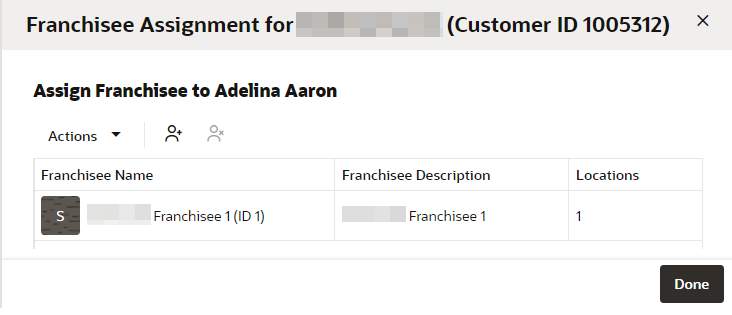
The Franchisee Assignment page offers the following information and features:
-
The customer name and ID
-
The user who last updated the window and the date it was last updated
-
The Actions menu and corresponding icons let you Assign and Un-assign franchisees.
-
Franchisee ID – ID number of the franchisee
-
Franchisee Name – Name of the franchisee
-
Franchisee Description – a description of the franchisee
Assigning a Franchisee
To assign a Franchisee to a customer:
-
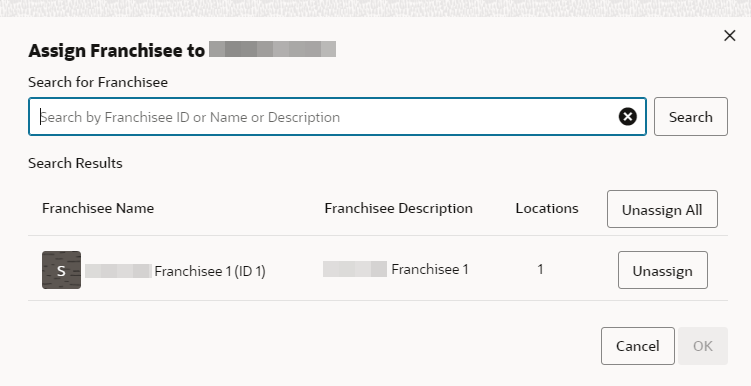
Choose Assign from the Actions menu, or click the Assign icon. Either action displays the Assign Franchisee dialog:
Figure 5-63 Assign Franchisee
-
Enter a full or partial franchisee ID, name or description in the Search for Franchisee field and click Search. A list of franchisees matching the search text is displayed in the Search Results grid.
Note:
The only franchisees to display are those to which the associate has access.
Figure 5-64 Assign Franchisee - Results
-
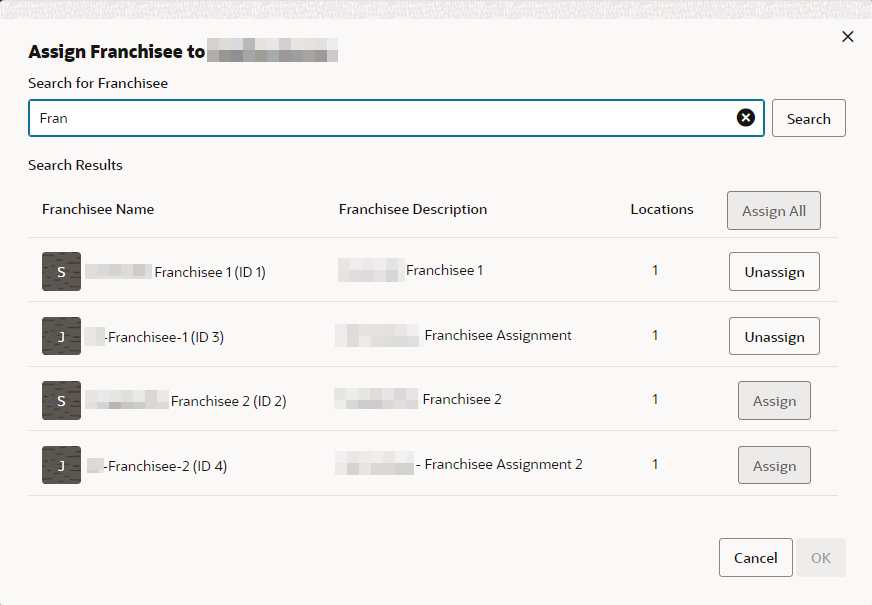
The Search Results list all franchisees that match the search criteria to which the associate has access. If the franchisee is already assigned to the customer, Unassign is enabled. If the franchisee is not assigned, Assign is enabled. In the row of the franchisee that you want to assign, click Assign.
-
To assign a Franchisee, click Assign.
-
To unassign a Franchisee, click Unassign.
-
-
Click OK to accept the assignment or Cancel to cancel. Either action returns you to the Franchisee Assignment page. If you click OK, the new franchisee assignment displays in the grid.
Unassign a Franchisee
To unassign a franchisee:
-
In the Assign Franchisee grid, select the franchisee that you want to unassign from the customer.
-
Choose Unassign from the Actions menu, or click the Unassign icon. Either action unassigns the franchisee from the customer and deletes the franchisee from the grid.
Note:
Click the Unassign All button to remove all assigned Franchisees.
Merge
Customer Merges combine multiple Customer records into one, new Customer record. This new Customer record includes the Transaction, Card, and Account information from all the merged Customer records.
To merge customer records:
-
From the Actions menu in the Customer Dashboard, choose Merge. This displays the Customer Merge window:
Figure 5-65 Customer Merge
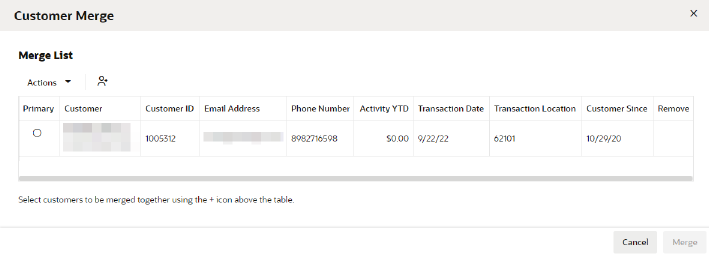
The Actions menu and corresponding icon lets you Add Customers to Merge.
The Customer Merge page offers the following information and features:
-
Primary – When selected, indicates the primary customer
-
Customer – The customer name and address
-
Customer ID – The ID of the Customer
-
Email Address – The customer email address
-
Phone Number – The customer phone number
-
Activity YTD – The amount of the customer's transactions for the year to date
-
Transaction Date – The date of the last transaction
-
Transaction Location – The location of the last transaction
-
Customer Since – The customer creation date
-
Remove – Click to remove a customer from the list
-
-
Click Merge to accept the merge, or click Cancel to close the window without saving.
Merging Customers
First: Add Customers to Merge
-
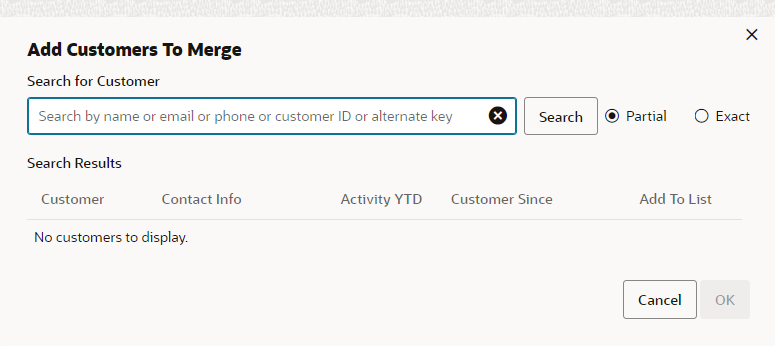
In the Customer Merge page, click the Actions menu and choose Add Customers to Merge, or click the Add Customers to Merge + icon. Either action displays the Add Customers to Merge dialog:
Figure 5-66 Add Customers to Merge
-
In the Search for Customer prompt, enter the Name, Email, Phone, ID, or Alternate Key of the customer you want to add to the Merge list. Select Partial to search on a partial entry, or Exact, to search for only exact matches.
-
Click Search. This displays the customers matching the search criteria in the Search Results grid:
Figure 5-67 Add Customers to Merge Results
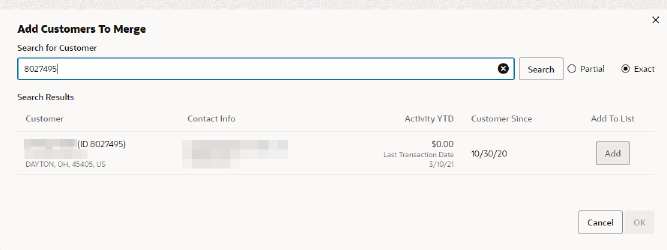
The grid displays the following information for each customer:
-
Customer – the customer name, ID, and primary address
-
Contact Info – the customer email address and phone number
-
Activity YTD - the amount of the customer's transactions for the year to date, and the date of the last transaction
-
Customer Since – the creation date of the customer
-
-
Click Add in the Customer row if you want to add the customer to the Customer Merge list. Add is replaced with Remove, which you can use to remove the customer.
Note:
You can only merge up to five customers at one time.
-
Click OK. This returns you to the Customer Merge page with the customers added to the Merge List.
Second: Merge Customers
-
In the Customer Merge page, review the Merge List and click Remove to remove any customers you do not want to merge.
-
Click Primary in the row of the customer that you want as the primary customer.
-
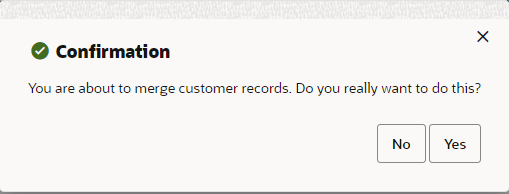
Click Merge to display a confirmation prompt:
Figure 5-68 Confirmation
-
To merge the customer records, click Yes. To exit without merging the customers, either click No or X.
Working with Payment Card Tokens
Note:
This menu option will only display if the customer has payment card tokens and if they have a Payment Card Token additional security permission. See Administrator Guide for more information.
Note:
There are three web services (Post, Get and Delete) that are used to manage the payment card tokens. See Batch Processing and Web Services Guide for more information.
Note:
A ‘SAVE_PAYMENT_CARD_TOKENS’ (customer) attribute will need to be assigned to the customer to support the Payment Card Token feature for Omni Channel. When a payment card is used to make a payment for purchases, the customer needs to give permission to save the payment card token information for future payments. The value will need to be set to Yes, for payment card tokens to be saved from the external systems.
Figure 5-69 Payment Card Tokens For Customer
The Payment Card Tokens window offers the following information:
-
Customer Name and ID
-
The user who last updated the payment card token table.
-
The Actions menu and corresponding icons let you Delete payment card tokens. See Delete or Delete All Payment Tokens for more information.
Note:
Payment Card Tokens can only be added via web service from integrated systems that interact directly with payment service providers. Examples: Cybersource and Adyen.
Payment Card Tokens fields include:
-
PSP Name (Payment Service Provider) - The name of the payment service provider that supplied the payment card token. (Examples: Cybersource, Adyen)
-
PSP Customer Token - The unique token provided by the payment service provider.
-
Source Customer ID - The customer ID sent to the payment service provider initially and associated with this payment card token.
-
Original Source system - The system that sent the initial request to the payment service provider.
-
Card Token - The unique value supplied by the payment service provider when the initial request for payment was sent.
-
Card Type - The credit or debit card type.
-
Card Last 4 - The last four digits of the card number used when the payment card token was generated.
-
Card Expiration - The month and year the card expires.
-
Card Alias - The name given to a card that can be used to identify a card used for multiple individuals on the same card for a household.
Note:
A separate unique payment card token is generated by the payment service provider when there is more than one individual on the card.
-
Create Date - The user that created the payment card token through the web service.
-
Created By - The date the payment card token was added into Customer Engagement.
-
Update Date - The user that last updated the payment card token.
Note:
The payment card token record can only be updated through the web service and is limited to the card expiration field.
-
Updated By - The date the payment card token record was updated.
The following actions for Payment Card Tokens include:
Refresh Payment Card Tokens Results
Click the Actions menu, then click Refresh, or click the Refresh icon to refresh the results.
Deleting a Payment Card Token
Highlight the row of the Payment Card Token you want to delete and click the Actions menu, then click Delete, or click the Delete icon to open the delete confirmation window. Click OK to delete the Payment Card Token for that Customer or Cancel to close the window without deleting the row.
Preference Center
The Preference Center page displays the contact preferences for a customer. For more information about how Preference Center channels are initially set up and the configuration is enabled, see the Oracle Retail Customer Engagement Cloud Service Implementation Guide.
Choose the Preference Center option on the Actions menu in the Customer Dashboard for access to the Preference Center page:
Figure 5-70 Preference Center

The Preference Center page offers the following information and features:
-
The customer name and ID
-
The Actions menu and corresponding icons let you Edit a preference.
-
Preference Type – Name of the preference center. This is displayed for all the channels in a preference center.
-
Channel –The communication channel
-
Opted In – Indicates whether the customer has opted to be contacted through the channel. If there is a check mark in the field, then the customer is contacted through the channel.
-
Frequency – The frequency at which the customer is contacted through the channel
-
Authorization – Name of the file in which the customer authorized communication
-
Communication Last Sent – Date the communication was last sent to the customer
-
Last Updated – Date and time the channel preferences for this customer were last updated
-
Last Updated By – ID of the user who last updated the channel preferences for this customer.
-
Uploaded By – User who last updated the image/file. This is populated by the logged in user who uploads the latest file on the preference.
Working with Preference Types
You can refresh, sort, view, add, edit and delete preference types, so that you can setup unlimited preference types to use with the Customer Preference Center. To access Preference Types:
-
Click the Tasks icon.
-
Click the Admin Task.
-
Click the Preference Types Task.
Figure 5-71 Preference Types
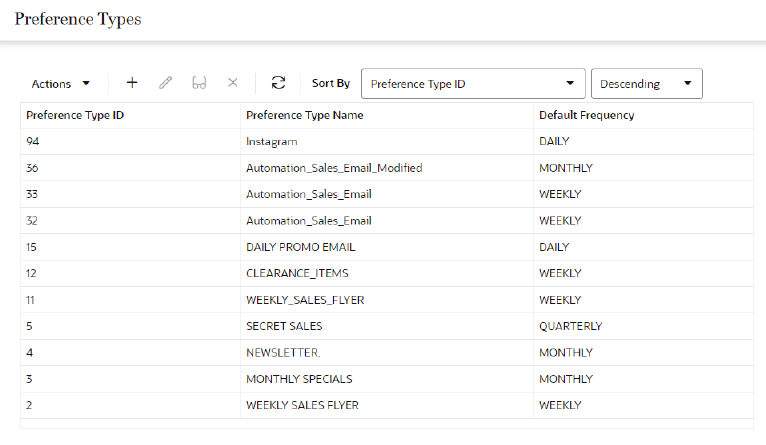
Sorting Preference Types
You can sort by:
-
Default Frequency
-
Preference Type ID
-
Preference Type Name
Preference types can be sorted ascending or descending from the list.
Adding a Preference Type
Click the Actions menu or the Add icon to open the Create Preference Type window.
Figure 5-72 Create Preference Type
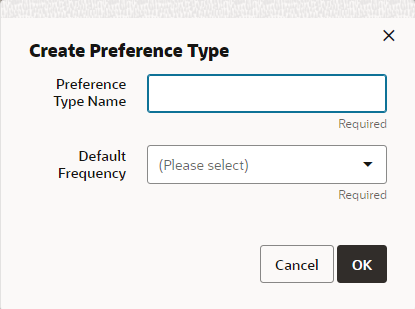
Type a Preference Type Name and choose one of the following default frequencies.
-
Anytime
-
Weekly
-
Monthly
-
Yearly
-
Daily
-
Fortnightly
-
Quarterly
Click OK to add the new Preference Type. Click Cancel to close the window.
Note:
Preference types are configured values and they may vary from what is listed. Contact your system administrator for more information.Editing a Preference Type
Highlight the row of the Preference Type you want to edit and click the Actions menu or the Edit icon to open the Edit Preference Type window.
Figure 5-73 Edit Preference Type
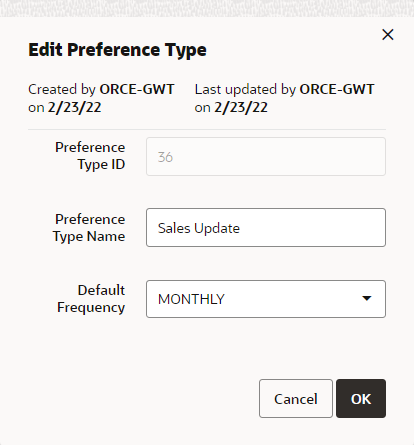
Edit the Preference Type Name or select a different Default Frequency and click OK. Or click Cancel to close the window and discard any changes.
Viewing a Preference Type
Highlight the row of the Preference Type you want to view and click the Actions menu, then click View, or click the View icon to open the View Preference Type window.
Figure 5-74 View Preference Type
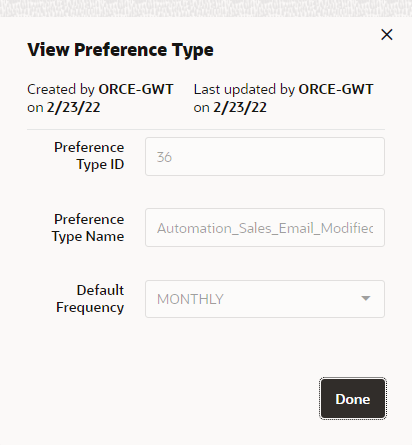
View the details of the Preference Type and click Done to close the window.
Editing a Preference
To edit a Preference:
-
In the Preference Center grid, select the preference that you want to edit.
-
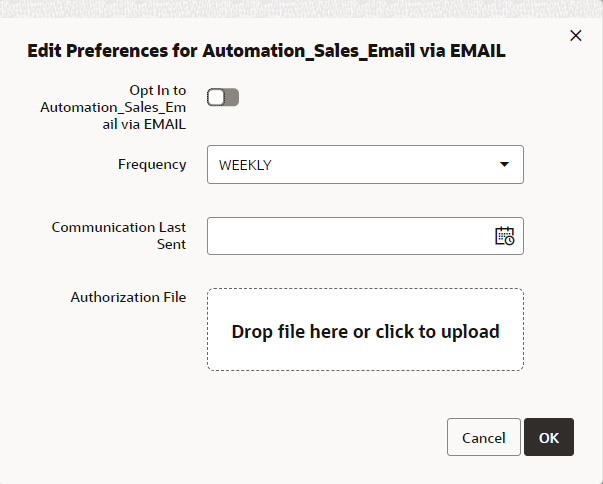
From the Actions menu, choose Edit, or click the Edit icon. This displays the Edit Preference dialog:
Figure 5-75 Edit Preferences
-
Edit the fields that you want to change:
-
Opt In to – Click to the on position to indicate that the customer accepts communication from this channel, or click off, to indicate the customer does not want communication.
-
Frequency – Select the frequency with which the customer receives communication from this channel.
-
Communication Last Sent – Click the date in the calendar on which communication from the channel was last sent.
-
Authorization File – Drag and drop a file authorizing the communication, or click in the field to search for a file to upload.
-
-
Click OK. This returns you to the Preference Center page.
Security Groups Assignment
You the ability to assign or unassign a Security Group to a customer, so that customer details will be protected based on the privileges for the assigned security group. Choose the Security Groups Assignment option on the Actions menu in the Customer Dashboard for access to the Security Groups page.
Figure 5-76 Security Groups
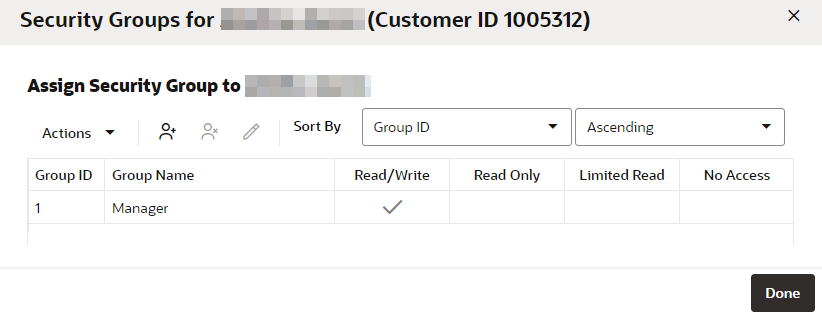
Security Groups can be sorted ascending or descending using the following options:
-
Group ID (default)
-
Group Name
Assign Security Group
To assign a Security Group do the following:
-
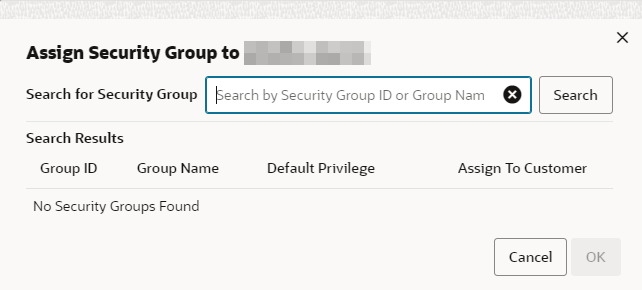
Click the Assign icon or the click the Action menu and click Assign. The Assign Security Group to Customer displays.
Figure 5-77 Assign Security Group
-
Enter the Security Group ID or Group Name.
-
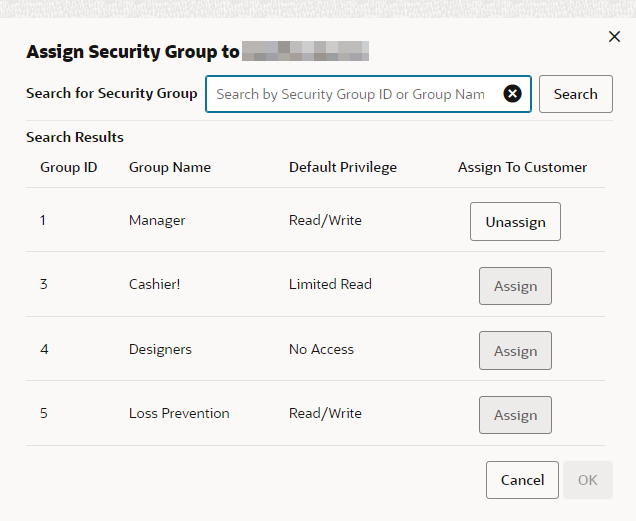
Click Search. The search results display.
Figure 5-78 Assign Security Group To Window
-
Click Assign to assign to customer, or click Unassign to remove the assignment.
-
Click OK to save the assignments or click Cancel to close the window without saving. A notification appears indicating a successful update.
Figure 5-79 Notification

Edit Security Group
To edit a Security Group do the following:
-
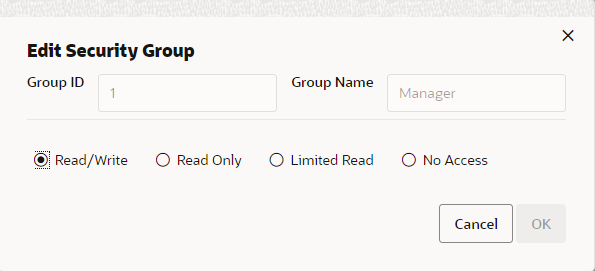
Click the Assign icon or the click the Action menu and click Edit. The Edit Security Group window displays.
Figure 5-80 Edit Security Group
-
Select a Privilege Type.
-
Read/Write - Users in the security group can read and update all data for customers who have had the security group applied.
-
Read Only - Users in the security group can read all data for customers who have had the security group applied, but cannot make updates.
-
Limited Read - Users in the security group can read some data for customers who have had the security group applied, but cannot read sensitive customer information (such as address, telephone numbers, and email addresses) and cannot make updates.
-
No Access - A user in the security group will not even see that the customer exists in the system.
-
-
Click OK to save the privileges or click Cancel to close the window without saving. A notification appears indicating a successful update.
Figure 5-81 Notification

Tasks
The Tasks page displays the tasks that are associated with the customer. Choose the Tasks option on the Actions menu in the Customer Dashboard for access to the Tasks page:
Figure 5-82 Customer Tasks
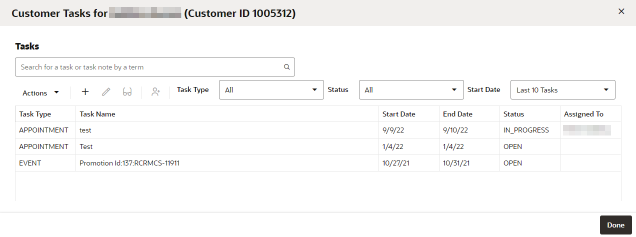
The Tasks page offers the following information and features:
-
The customer name and ID
-
The user who last updated the window and the date it was last updated
-
The Search panel lets you search for a task or task note by term
-
The Actions menu and corresponding icons let you Add, Edit, View, and Reassign a task
-
Task Type – The type of task. These are configured by the customer. See the
 Oracle Retail Customer Engagement Cloud Services Implementation
Guide
for information about configuring custom Task types -
Task Name – A name for the task that was entered by the user who created the task
-
Start Date – The start date of the task
-
End Date – The end date of the task
-
Status – The selected status of the task
-
Assigned to – The associate to whom the task is assigned
Adding a Task
To add a task:
-
Choose Add from the Actions menu, or click the Add icon. This displays the Create Task window:
Figure 5-83 Create Task
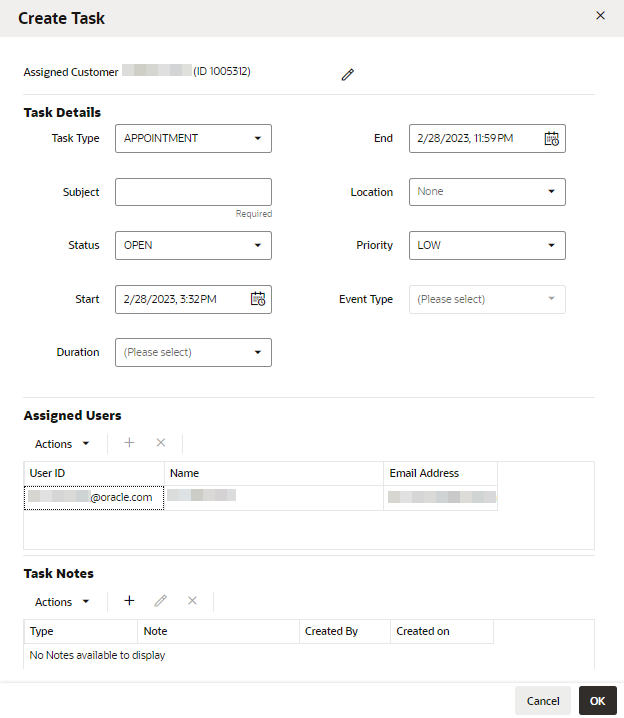
-
If you want to change the customer assigned to the task, click the Edit icon next to the Assigned Customer Name and ID. This displays the Edit Assigned Customer window:
Figure 5-84 Edit Assigned Customer
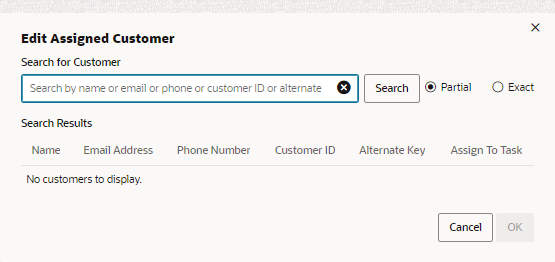
-
In the Search for Customer field, enter the Name, Email, Phone, Customer ID, or Alternate Key of the customer you want to search for. Select Partial to search for customers that partially match the search text, or Exact, to search for an exact match.
-
Click Search. This displays the list of matching customers under Search Results.
-
Select the customer in the list that you want to assign to the task and click OK, or click Cancel if you do not want to change the customer assignment. This returns you to the Create Task window. If you click OK, the Customer Name and ID for the selected customer precede the Task Details.
-
-
Enter the details for the new task. Mandatory fields are indicated with asterisks (*):
-
Task Type – Select a task type from the list. This list is determined by the customer.
-
Subject – Enter a subject. This will appear in the Task Name field.
-
Status – Select a status from among those on list:
-
Open – Set the status of your task to Open.
-
In Progress – Set the status of your task to In Progress
-
Cancelled – Set the status of your task to Cancelled.
-
Closed – Set the status of your task to Closed.
-
-
Start – Select a start date for the task from the calendar.
-
Duration – Select the duration of the task from the list (optional). Selecting one of the duration options will determine the value for the End Date/Time based on the option chosen.
-
End – If no selection was made in the Duration field, select an end date for the task using the calendar.
-
Location – Select a location from the list.
-
Priority – Select a priority level from the list. These are configured by the customer. See the Customer Engagement Cloud Services Implementation Guide for information about configuring custom Task Priority Codes.
-
Event Type – If you selected Event as the Task Type, select an Event Type from the list. For all other task types, this field is disabled.
-
-
Under Assigned Users, assign a user to the task. This defaults to the current logged-in user.
-
If you want to remove the current user, select the user and choose Remove from the Actions menu, or click the Remove icon. This clears the user from the grid.
Note:
If no user is assigned to the task, and you click OK in this window, a Confirmation prompt is displayed:
Figure 5-85 Confirmation
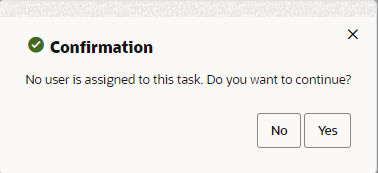
-
Click No if you want to return to the Create Task window.
-
Click Yes if you want to create the task without a user assigned.
-
-
If you want to add a user, remove the current user (see previous) and choose Add from the Actions menu, or click the Add icon. This displays an Add User to Task dialog:
Figure 5-86 Add User to Task - Search Results
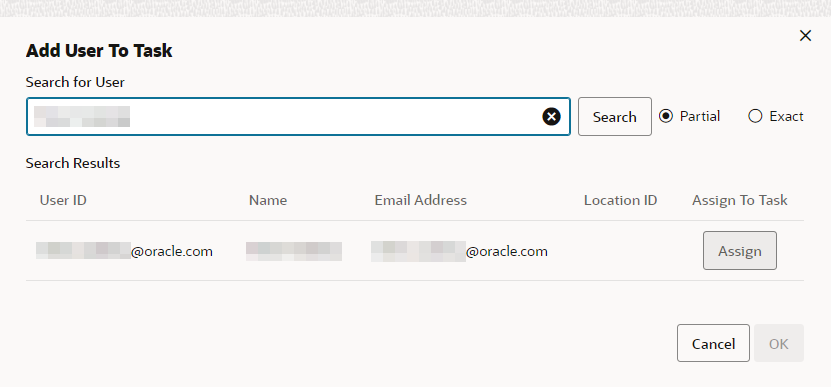
-
-
In the Add User to Task Search field, enter the User ID, Name, Email Address, or Location. Select Partial, to search a partial entry, or Exact, to search for only exact matches.
-
In the Search Results list, select the user you want to add to the task, and click Assign, then click OK. This returns you to the Create Task window.
-
If you want to add a note with more information about the task, in the Task Notes panel, choose Add from the Actions menu, or click the Add + icon. This displays a Create Note for Task window:
Figure 5-87 Create Note for Task
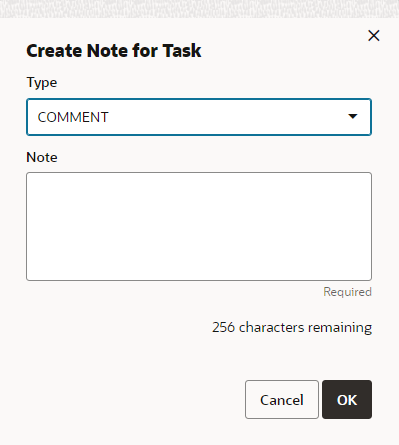
-
Select a note type from the Type list.
-
Enter a note of up to 256 characters in the Note box.
-
Click OK. This returns you to the Create Task window.
-
-
Click OK. This returns you to the Tasks page. The new task is displayed in the grid.
Editing a Task
To edit a task:
-
In the Tasks List, in the Customer Tasks window (see Figure 5-82, select the task that you want to edit.
-
Choose Edit from the Actions menu, or click the Edit icon. This displays the task in the Edit Task window:
Figure 5-88 Edit Task
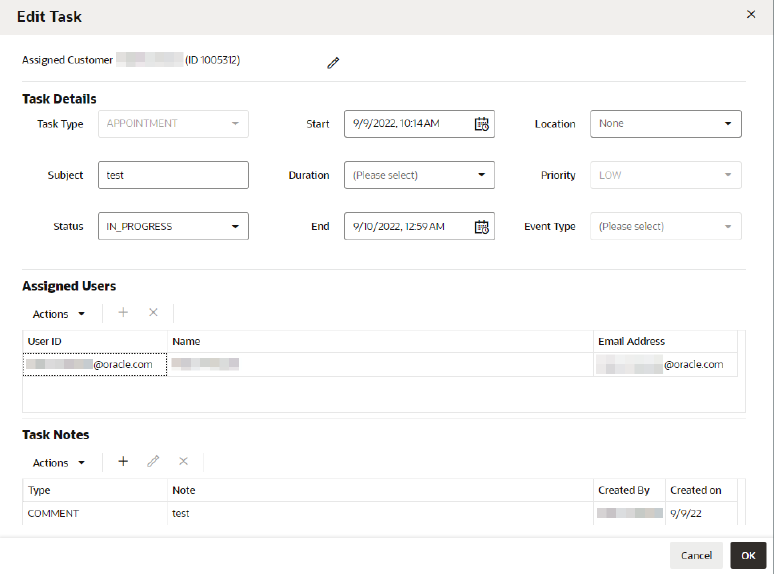
-
The user who created the task and the date it was created are displayed at the top of the window.
-
The Assigned Customer Name and ID precede the Task Details. You can change the assigned customer.
-
The Task Type and Event Type fields are not editable.
-
-
If you want to change the customer assigned to the task, click the Edit icon next to the Assigned Customer Name and ID. This displays the Edit Assigned Customer window. See Adding a Task for more information on editing the assigned customer.
-
Modify what you want to change in the Task Details, Assigned Users, and Task Notes panels. See Adding a Task for more information on entering information in these fields.
-
Click OK to return to the Customer Tasks page. Or, click Cancel to return to the Customer Tasks page without saving any of your changes.
If you clicked OK to save the changes, the Update User and Update Date are updated to that of the logged-in user and the date/time the changes were saved and displayed at the top of the Customer Tasks window.
Viewing a Task
To view a task:
-
In the Tasks List, in the Customer Tasks window (see Figure 5-82) select the task that you want to view.
-
Choose View from the Actions menu, or click the View icon. This displays the task details in view-only mode in the View Task window.
-
Review the task details. See Adding a Task for more information on the task details in these fields.
-
Click Done when you are finished reviewing the task details. This returns you to the Tasks page.