7 Offers
In Customer Engagement, Offers are price incentives given to the customer. These offers can often be reused in separate Promotions or Card Programs. To facilitate and ease the reuse of existing Offers, a library of Offers can be created in Customer Engagement.
Offer Types
The Offer Type determines the type of incentive provided by the Offer. Customer
Engagement has the following Offer Types:
-
Transaction Discount - A discount is prorated across all items within a transaction.
-
Line Item Discount - A discount is applied to specific line items within a transaction.
-
Fixed Quantity/Price - A fixed price is defined for various quantities of qualifying items.
-
Kit - A defined set of heterogeneous items that, when purchased together, trigger special pricing.
-
Gift with Purchase - A specific gift item is provided at a discounted price when the selected qualifying items are purchased.
-
Buy X Get X - The purchase of defined items at regular price allows the customer to receive discounts on the purchase of subsequent quantities of the same items of equal or lesser value.
-
Buy X Get Y - The purchase of defined items at regular price allows the customer to receive discounts on the purchase of subsequent different items at a discount.
-
Tiered Discount - A discount is applied to a defined set of items and the amount of the discount can vary at different quantity thresholds.
-
Buy X Get Points - The purchase of the qualifying items will result in the loyalty points being awarded to the loyalty program members.
-
Marketing Engagements - Create a bonus point earning opportunity for an event that happens outside of Customer Engagement.
Intended Use
In Customer Engagement, Offers can be assigned an Intended Use. This indicates the manner in which an Offer is likely to be used.
-
Any (Default) – An Offer that can be applied as a Product, Coupon, or Entitlement.
-
Coupon – An Offer that is applied to an item or transaction through a Coupon.
-
Product – An Offer that is applied directly to an item or transaction.
-
Entitlement – An Offer that is applied to an item or transaction as an Entitlement for a Customer, including Offers associated with Promotions or Card Programs.
-
Loyalty - An Offer that is applied to a transaction enabling the customer to earn loyalty points.
Offers Quick Search
Offers Quick Search displays a list of results as you type in characters in the search box. To use the Offers Quick Search do the following:
-
Click Tasks.
-
Click Campaign.
-
Click Promotion Home.
Note:
You will need the Promotion Home role in order to see this menu option.
-
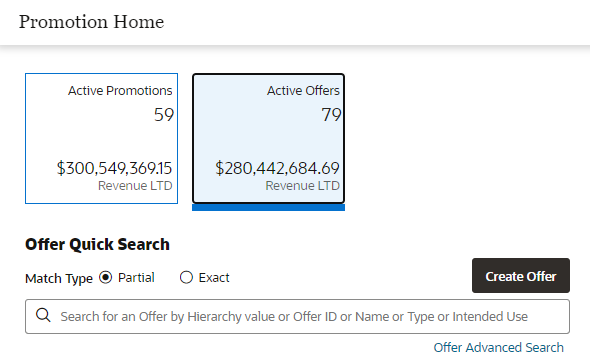
Click the Active Offers Metric Tile.
Figure 7-1 Promotion Home Active Offers Metric Tile
-
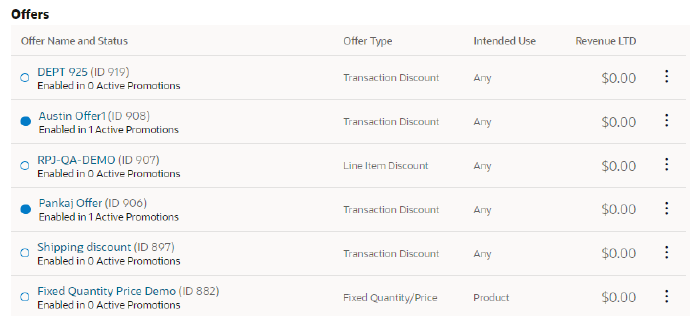
In the Search for Offers field, enter the Hierarchy Value, Offer ID, Name, Type, or intended use of the offer you want to search for. Click Partial to search for Offers that partially match the search text, or click Exact, to search for an exact match.
Figure 7-2 Offers
-
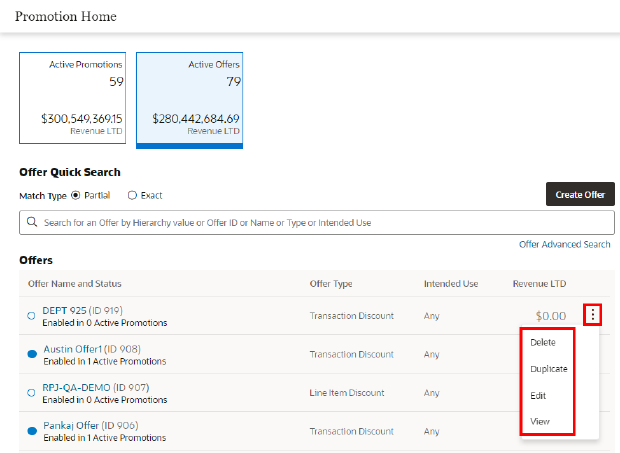
Click the Name which appears as a link in blue for any Offer to open the Offer Scorecard for that offer. See Offer Scorecard for more information. Use the Overflow Menu to Delete, Duplicate, Edit, or View the offer. See Deleting Offers, Duplicating Offers, Editing Offers, or Viewing Offers for more information.
Figure 7-3 Action Menu Options - Offers Quick Search
Offers Advanced Search
The Offer Advanced search allows you to select more criteria that are not available in the Offer Quick Search box.
Figure 7-4 Offer Advanced Search Window

The following Search fields are available:
-
Offer ID - This Text Field searches all the Offers currently present in the application. The default is an empty field.
-
Hierarchy Level - The Merchandise Hierarchy Level, which consists of: Item ID, Department, Sub-Department, Class, Sub-Class, and Style ID. This will default to All. Example: You select Hierarchy level as Department.
-
Hierarchy Value - The search box included on the top of the list allows you to search for a specific Department. As you begin to type, the application then displays any matching Departments. The field also includes a list of available departments from which to select. This will default to All.
-
Promotions - To search for Offers which are part of Promotions. This will default to All. Options include:
-
All
-
Active
-
Inactive
-
-
Offer Type -Search for Offers by Offer Type, which will be based on available Offer Types configured in the System Configuration module. Following are the current Offer Types. The default field is All.
-
Buy X Get Points
-
Buy X Get X
-
Buy X Get Y
-
Fixed Quantity/Price
-
Gift with Purchase
-
Kit
-
Line Item Discount
-
Marketing Engagements
-
Tiered Discount
-
Transaction Discount
-
-
Intended Use (Required) - Search for Offers by the Intended Use assigned. By default, All will be checked.
-
Any
-
Coupon
-
Product
-
Entitlement
-
Loyalty
-
Loyalty Marketing Engagement
-
-
Attribute Type - Search the Offer by the Attribute assigned to the Offer. The field will default to All.
-
Attributes Value - Type-ahead search according to the selected Attribute Type.
-
Created By- List of Associates who created Offers. This defaults to Everyone.
-
Franchisee ID - This Text Field searches for Offers by the Franchisee associated with the Offer. The Franchisee ID field will only be visible if the
EnableFranchiseSupportconfiguration is enabled and Franchisees are defined. Only Franchisees associated with the user are shown. This defaults to All.
Searching Offers
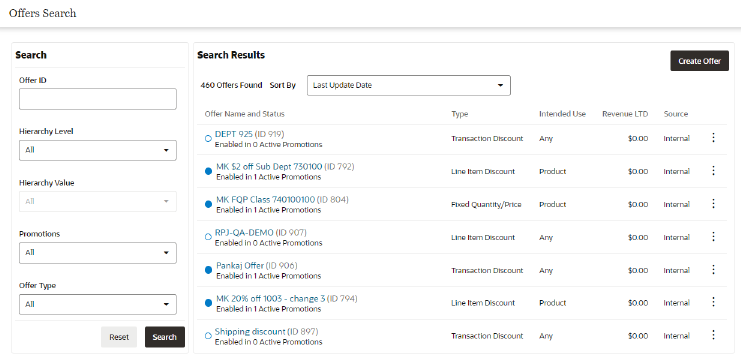
Once all the desired information has been entered, click Search to see the results.
Figure 7-5 Offers Search Results
Note:
Click Reset to clear all fields and return list values to the default selections. You can also click Search without entering any criteria to see a complete list of offers.
Creating Offers
In Customer Engagement, Offers are price incentives given to the customer. These Offers can often be reused in separate Promotions or Card Programs. To facilitate and reuse existing Offers, a library of Offers can be created in Customer Engagement.
Process by Offer Type
The Create Offers process depends on the type of offer you create with the Create Offer Wizard. In the wizard, the tabs are dynamic and vary by Offer Type.
Table 7-1 shows the Create Offer process by offer type and a link to its procedure. Refer to the section, Create Offers Procedure, for specifics about the steps to create offers.
Table 7-1 Create Offer Process by Offer Type
| Offer Type | Tab 1 | Tab 2 | Tab 3 | Tab 4 | Tab 5 | Tab 6 | Tab 7 |
|---|---|---|---|---|---|---|---|
|
Transaction Discount |
Information |
Franchisees Assignment |
Attributes |
Qualifying Items |
Award Items |
Shipping Awards |
Review Tab |
|
Line Item Discount |
Information |
Franchisees Assignment |
Attributes |
Qualifying Items |
Award Items |
Shipping Awards |
Review |
|
Fixed Quantity/Price |
Information |
Franchisees Assignment |
Attributes |
Qualifying Items |
Award Items |
Shipping Awards |
Review |
|
Gift with Purchase |
Information |
Franchisees Assignment |
Attributes |
Qualifying Items |
Award Items |
Shipping Awards |
Review |
|
Buy X Get X |
Information |
Franchisees Assignment |
Attributes |
Qualifying Items |
Award Items |
Shipping Awards |
Review |
|
Buy X Get Points |
Information |
Franchisees Assignment |
Attributes |
Qualifying Items |
Award Items |
Tender Type |
Review |
|
Kit |
Information |
Franchisees Assignment |
Attributes |
Qualifying Items |
Award Items |
Shipping Awards |
Review |
|
Buy X Get Y |
Information |
Franchisees Assignment |
Attributes |
Qualifying Items |
Award Items |
Shipping Awards |
Review |
|
Tiered Discount |
Information |
Franchisees Assignment |
Attributes |
Qualifying Items |
Award Items |
Review |
Not Applicable |
|
Marketing Engagements |
Information |
Franchisees Assignment |
Attributes |
Award Items |
Review |
Not Applicable |
Not Applicable |
Create Offers Procedure
The following procedure describes the steps to create an offer. Refer to specific details for each tab in these sections:
Procedure
To create an offer:
-
Click the Tasks icon.
-
Click Campaign.
-
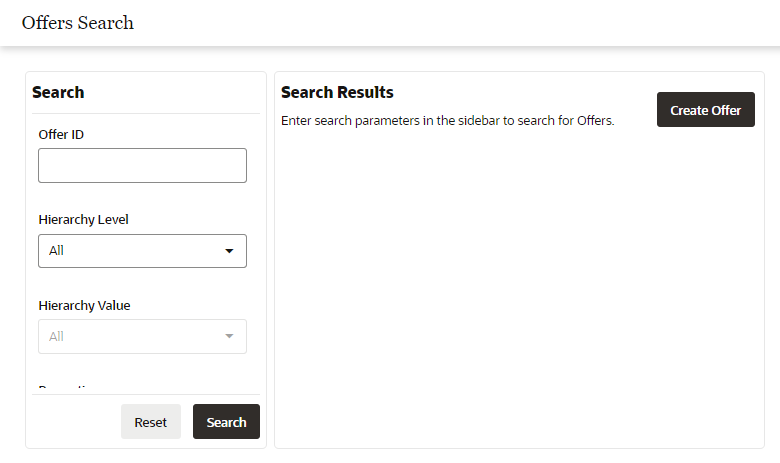
Click Offers Search. Results: The Offers Search window opens.
Figure 7-6 Offers Search
-
Click Create Offer. This opens the Create Offer Wizard. The Create Offer wizard may contain any of the following tabs, depending on configuration:
-
Information
-
Franchisees
-
Attributes
-
Qualifying Items
-
Award Items or Discount Tiers
-
Shipping Awards
-
Award Points
-
Review
-
-
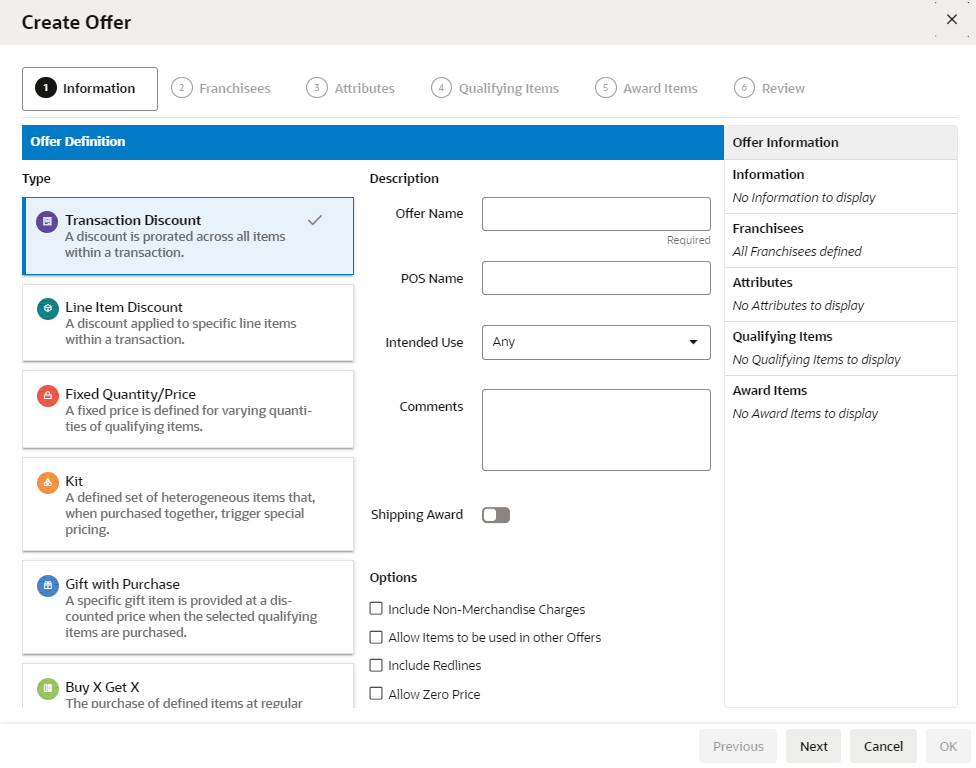
Update the Information tab. For details, refer to "Updating the Information Tab." After updating the Information tab, Click Next to continue to the next tab.
Figure 7-7 Information Tab
-
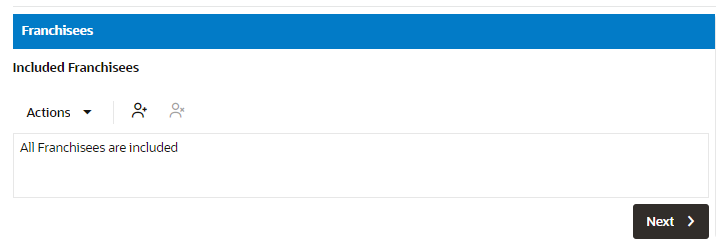
Update the Franchisees Assignment tab. For details, refer to "Updating the Franchisees Assignment Tab." After updating the Franchisees Assignment tab, Click Next to continue to the next tab.
Figure 7-8 Franchisee Tab
-
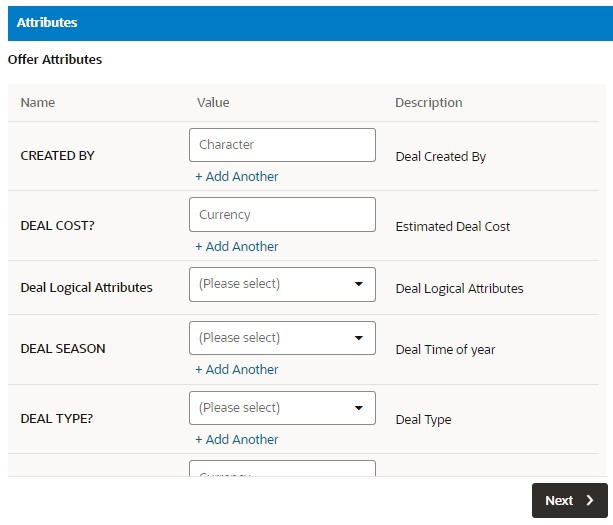
Update the Attributes tab. For details, refer to "Updating the Attributes Tab." Click Next to continue to the next tab.
-
This Attributes tab does not apply to the offer type, Marketing Engagements. Continue to Updating Award Points for Marketing Engagements.
Figure 7-9 Attributes Tab
-
-
Update the Qualifying Items tab. The Qualifying Items Tab is used to define which Items are included and excluded in the Offer. For details, refer to "Updating the Qualifying Items Tab."
After completing the Qualifying Items tab, click Next to continue to the next tab as listed in Table 7-5.
Figure 7-10 Qualifying Items Tab
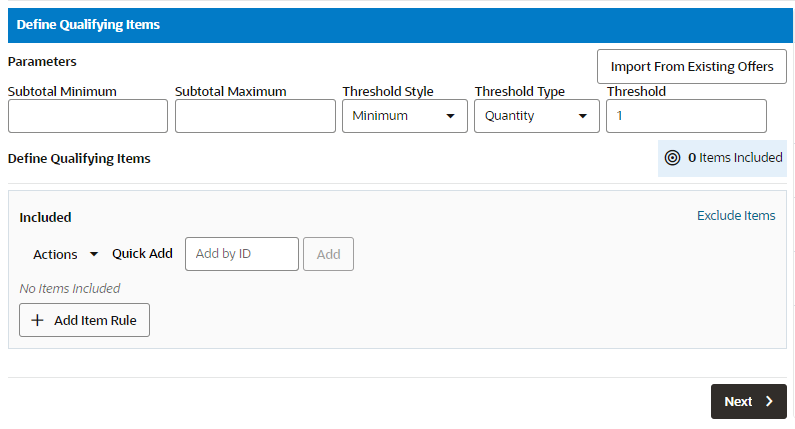
Table 7-5 lists the next section by offer type.
Table 7-2 Next Step After Defining Qualifying Items by Offer Type
Offer Type After Defining Qualifying Items, Continue To... Transaction Discount
Line Item Discount
Fixed Quantity/Price
Gift with Purchase
Buy X Get X
Buy X Get Points
Kit
Buy X Get Y
Tiered Discount
-
Update the Award Items tab. For details, refer to "Update Award Items Tab." Click Next to continue to the next tab.
After completing the Award Items tab, click Next to continue to the next tab as listed in Table 7-6.
Figure 7-11 Define Award Items Tab
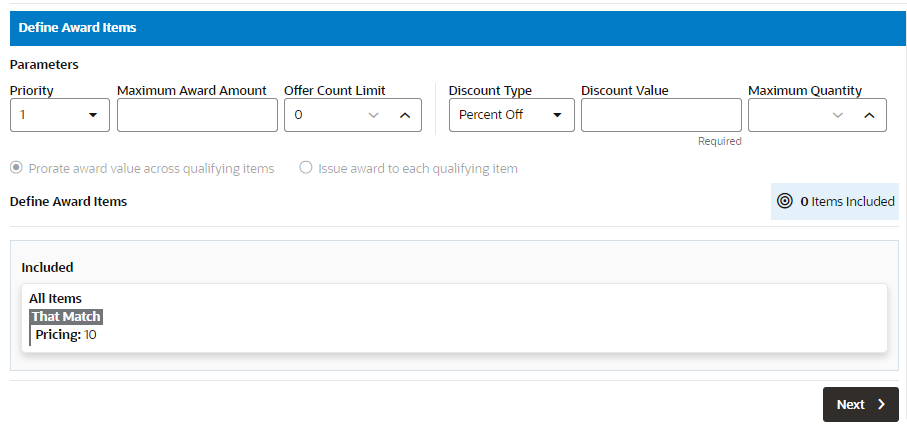
Table 7-6 lists the next section by offer type.
Table 7-3 Next Step After Defining Award Items/Points by Offer Type
Offer Type After Defining Award Items/Points, Continue To... Transaction Discount
Line Item Discount
Fixed Quantity/Price
Gift with Purchase
Buy X Get X
Buy X Get Points
Kit
Buy X Get Y
Tiered Discount
Marketing Engagements
-
Update the Shipping Awards tab. The Shipping Awards Tab is used to define what shipping methods and other award rules are used for the offer. For details, refer to "Update Shipping Awards Tab."
Figure 7-12 Shipping Awards Tab
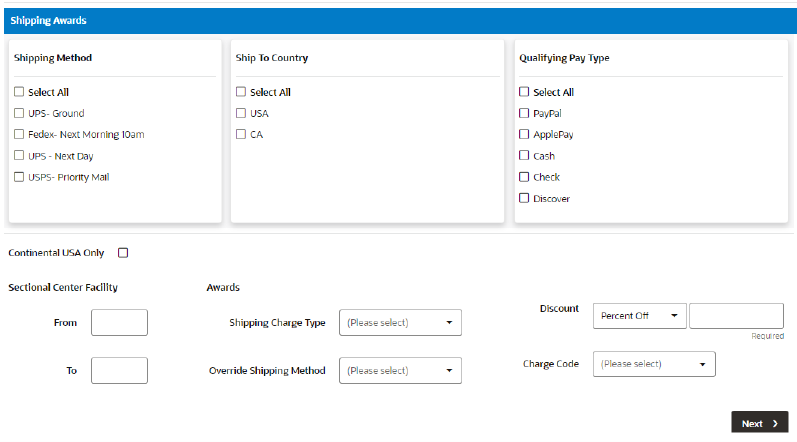
After completing the Shipping Awards tab, click Next to continue to the next tab as listed in Table 7-4.
Table 7-4 Next Step After Defining Shipping Awards by Offer Type
Offer Type After Defining Shipping Awards, Continue To... Transaction Discount
Line Item Discount
Fixed Quantity/Price
Gift with Purchase
Buy X Get X
Buy X Get Points
No shipping awards, continue to:
Kit
Buy X Get Y
Tiered Discount
Marketing Engagements
-
The Review tab displays key elements in the Offer Setup.
For details by offer type, refer to "Using the Review Tab."
Click OK to create the offer, or click Cancel to close without saving.
Note:
Before you save the offer, you can use the tab links along with Previous and Next to go back to any point in the create Offer process and make changes.
Figure 7-13 Review Tab - Example
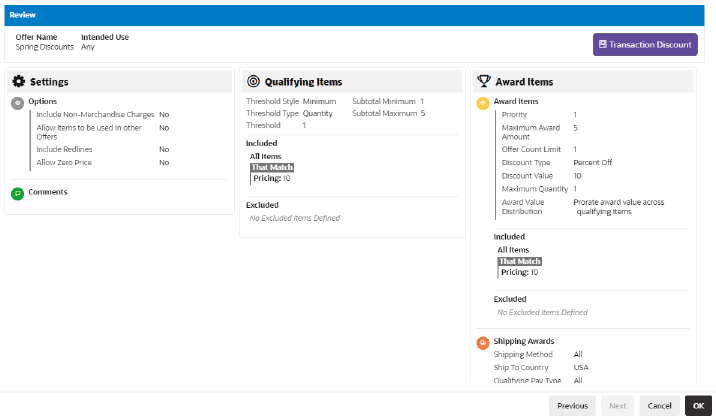
Updating the Information Tab
For Step 5 under the section Creating Offers update the Information Tab and return to Step 6.
Figure 7-14 Information Tab

The Information tab has these components:
-
Offer Information Panel
Note:
The read-only Offer Information Panel displays details throughout all tabs of the wizard.
Type Pane
Select the type of offer from the available options.
-
Transaction Discount
-
Line Item Discount
-
Fixed Quantity/Price
-
Kit
-
Gift with Purchase
-
Buy X Get X
-
Buy X Get Y
-
Tiered Discount
-
Buy X Get Points
-
Marketing Engagements
Description Pane
Update the fields in the Description Pane. Required fields are noted by an asterisk.
-
Offer Name (Required) – Enter a name for the offer.
-
POS Name – Enter the name for the Offer to be displayed in the POS system.
-
Intended Use (Required) – Select the type of Promotion in which the Offer is to be used.
-
Any (Default)
-
Coupon
-
Product
-
Entitlement
Note:
By Default, Loyalty is the only Intended Use available when creating Buy X Get Points. For Marketing Engagement Offers the only intended use is Loyalty Marketing Engagement.
-
-
Comments – Enter any comments about the Offer in the text box.
-
Shipping Award – If available, toggle the switch to activate the offer for shipping awards.
Options Pane
Select any available options to be applied to the Offer.
-
Include Non-Merchandise Charges – This Check Box determines whether non-merchandise charges are included in the Offer (The default is a clear check box that indicates No)).
-
Allow Items to be used in other Offers – This check box indicates whether the items used in the Offer can be used again in other Offers applied to a transaction. If clear (default), the items can only be used in one offer per transaction. If checked, the items can be used in more than one offer per transaction.
-
Include Redlines – This check box determines whether Redlines are included in the Offer (The default is a clear check box that indicates No).
-
Allow Zero Price – This check box determines whether zero-priced items are included in the Offer (The default is a clear check box that indicates No).
Time Rules
Time Rules are unavailable if Entitlement is selected for Intended Use in the Description Pane.
Adding Time Rules
Multiple Time Rules can be added to Offers. Perform the following steps to add Time Rules to Offers.
-
There are two methods to add Time Rules to an Offer, either:
-
Click +Add Time Rule.
-
Select the Quick Add option and enter a known Time Rule ID which you wish to associate with this new Offer.
-
-
Click Add to add that time rule to the Offer.
Creating New Time Rules
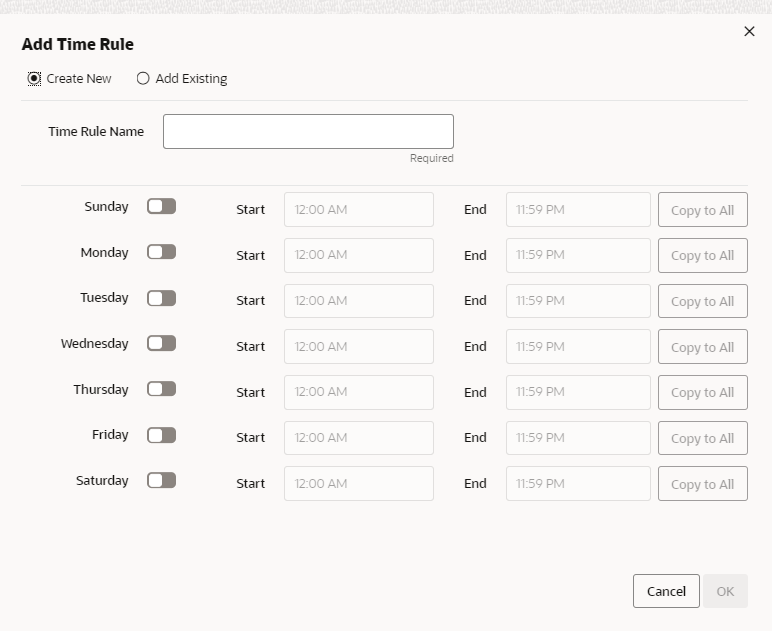
Perform the following steps to create a new Time Rule.
-
Click + Add Time Rule.
-
Select the Create New option.
Figure 7-15 Add Time Rule (Create New)
-
Update the following fields
-
Enter a Time Rule Name (required).
-
Select the Day of the Week for which the time rules will apply for this Offer.
-
Enter a Start Time for each day selected.
-
Enter an End Time for each day selected.
-
-
Optional: Click Copy To All to copy the settings (Start and End times) from the Day you select, to all days.
-
Click OK to accept the new time rule, or Cancel to close without saving.
Adding an Existing Time Rule
Perform the following steps to add an existing Time Rule.
-
Click + Add Time Rule.
-
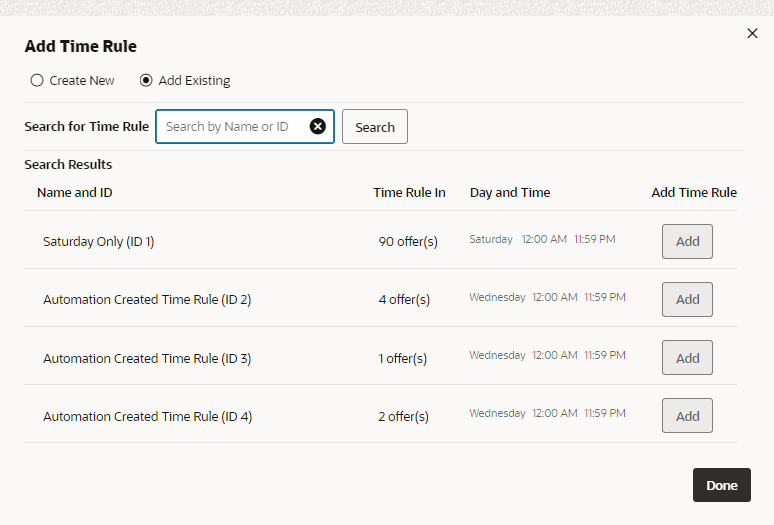
Select the Add Existing option.
Figure 7-16 Add Time Rule (Add Existing)
-
Enter a Time Rule Name or ID and click Search, or click Search to retrieve all existing Time Rules from which to select.
-
The Figure 7-16 window displays the available time rules to add to an existing offer. Information for each existing time rule includes:
-
Name and ID – The name and ID of the Time Rule
-
Time Rule In – The number of offers the Time Rule is already associated with.
-
Days – The days of the week the Time Rule is active.
-
Start – The Start time for each corresponding day.
-
End – The End time for each corresponding day.
-
Add – Adds a Time Rule.
-
-
Click Add for the desired Time Rule you wish to add to the Offer.
-
Click Done.
Updating the Franchisees Assignment Tab
For Step 6 under the section Creating Offers update the Franchisees Assignment tab and return to Step 7.
The Franchisees Assignment tab allows you to view or change the
Franchisees to which an Offer is assigned. The Franchisee tab is only
visible if the EnableFranchiseSupport configuration
is enabled, and Franchisees are defined. By default, all franchisees
are included on the Offer. If you are assigned to specific franchisees,
only those franchisees you are associated with are shown.
Figure 7-17 Franchisee Tab

Assigning a Franchisee
Perform the following steps to assign a franchisee.
-
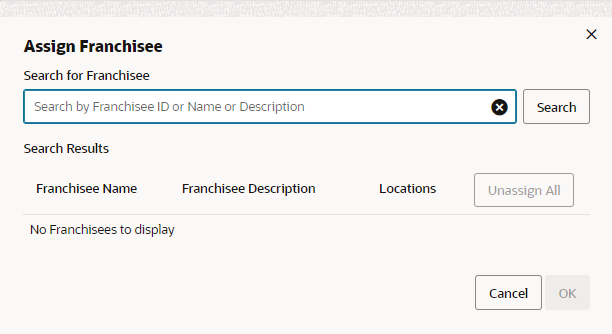
Click the Action Menu, and click Assign, or click the Add (+) icon. The Figure 7-18 window opens.
Figure 7-18 Assign Franchisee
-
Enter part or all of the Franchisee Name, Franchisee Description, or Location.
Note:
You also have the option to enter no search criteria and click Search to retrieve all available franchisees from which to select for assignment.
-
Click Search.
-
Click Assign All to assign all the search results, or click Assign for a specific franchisee.
-
Click OK to accept the changes or Cancel to close the window without saving.
Note:
A confirmation notification appears to confirm the Franchisees has been assigned.
After a Franchisee is assigned, it appears at the top of the list. The rest of the Franchisees are ordered by ID.
Unassigning a Franchisee
Perform the following steps to unassign a franchisee.
-
There are two ways to unassign a Franchisee assigned to an Offer.
-
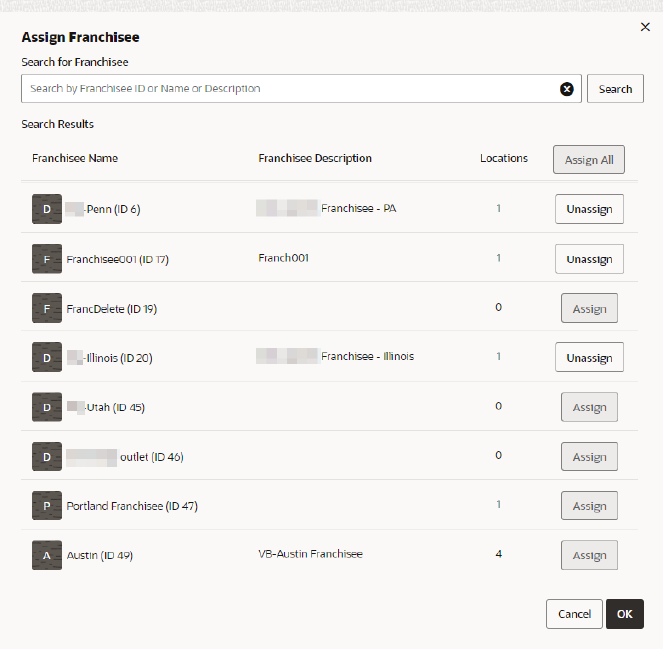
In the Figure 7-18 window, click Unassign on any Franchisees currently assigned to the Offer.
Figure 7-19 Assign Franchisee (Using the Unassign Button)
-
If Franchisees are listed on the Franchisee tab in the Included Franchisees table, highlight the row, and then select the Action Menu, and click Unassign, or click the Unassign X icon to remove the associated Franchisee.
-
-
A confirmation notification appears that confirms the Franchisees are deleted.
Updating the Attributes Tab
For Step 7 under the section Creating Offers update the Attributes tab and return to Step 8.
Figure 7-20 Attributes Tab

Perform the following steps to update the Attributes tab.
-
Enter the following for the Attributes Tab. Attributes can be added to the Offer to further distinguish qualifications for the Offer.
-
Select or enter the Values for each of the required attributes (indicated by an asterisk*).
-
Add Values for any optional attributes.
-
Select or enter the configuration value for the Attribute.
Note:
Repeat this step for all optional Attributes you wish to add to the Offer.
-
-
When finished defining any attributes for the Offer, click Next.
Updating the Qualifying Items Tab
For Step 8 under the section Creating Offers update the Qualifying Items and return to Step 9.
The Qualifying Items tab parameters are dynamic and vary based on the type of offer selected as listed in Table 7-5.
Note:
This tab does not apply to the offer type, Marketing Engagements. Continue to Updating Award Points for Marketing Engagements for this offer type.
Table 7-5 Qualifying Items by Offer Type
| Offer Type | Define Qualifying Items Section |
|---|---|
|
Transaction Discount |
|
|
Line Item Discount |
|
|
Fixed Quantity/Price |
|
|
Gift with Purchase |
|
|
Buy X Get X |
|
|
Buy X Get Points |
|
|
Kit |
|
|
Buy X Get Y |
|
|
Tiered Discount |
Define Qualifying Items for Offer Group 1
Follow the procedures in this section to update the Define Qualifying Items for Offer Group 1. Use this window to define which items are included and excluded in the Offer.
Update the Figure 7-21 for these type of offers:
-
Transaction Discount
-
Line Item Discount
-
Fixed Quantity/Price
-
Gift with Purchase
-
Buy X Get X
-
Buy X Get Points
Figure 7-21 Define Qualifying Items Window for Group 1

Update the Parameters Pane for Group 1
The following parameters are dynamic and vary based on the type of offer selected.
-
Subtotal Minimum – The minimum subtotal required for the transaction to be eligible for the discount.
-
Subtotal Maximum – The maximum subtotal required for the transaction to be eligible for the discount.
-
Threshold Style – The style of threshold to be set.
Note:
A threshold is the amount or quantity of qualifying items that are required to purchase in order to be eligible for this offer.Note:
The available options vary, depending upon the Offer Type selected.
-
Exact
-
Minimum
-
-
Threshold Type – The type of threshold.
-
Amount
-
Quantity
-
-
Threshold (Required) – The amount of the threshold
Import Items for Group 1
Import items into the Define Qualifying Items window by either:
Import Items from Existing Offers
-
Click Import From Existing Offers then enter the following information:
-
Enter some or all of the Offer Name, or Offer Type in the Search for Offer field. When searching by Offer ID the user must enter the exact ID.
-
Click one or more of the Import check boxes for the Offers you would like to import.
-
Click OK to import the Offer.
-
Import Items from a CSV file
Note:
Import from CSV is only available for the Offer Type of Buy X Get Y.There are two methods to import items in a CSV file, either:
-
Use the Action Menu.
-
Click the Actions Menu and select Import from CSV.
-
Drag and Drop the File
-
Click OK
-
-
Use File Explorer.
-
Click Upload. This displays the file selection menu where you can import a set of items in a comma-separated values (CSV) format.
-
Select a file from File Explorer.
-
Click Open.
-
Click OK.
-
Note:
When the file has been uploaded, the name of the file displays an X icon that allows you to remove the file.
Define Qualifying Items Pane for Group 1
There are three methods to define Qualifying Items, either:
-
Use the Quick Add option to enter a known Item ID which you wish to associate with this new Offer.
Click Add.
-
Click the Actions Menu and select Add Item Rule.
-
Click +Add Item Rule.
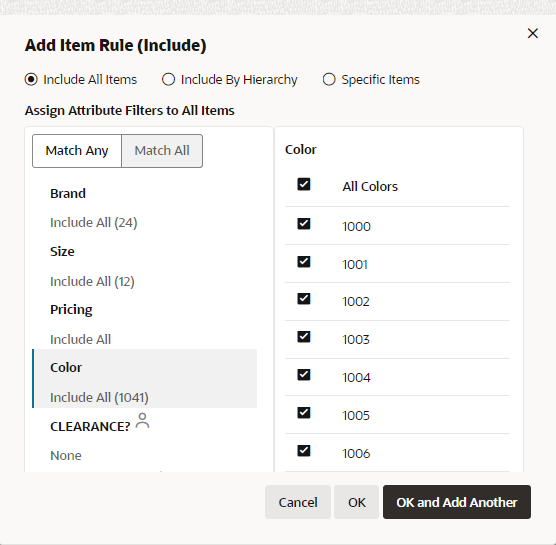
The Figure 7-22 window opens.
Figure 7-22 Add Item Rule
You can Add Item Rules by selecting either:
Include All Items
Perform the following steps to add Item Rules by including all items
-
Select Include All Items. This enables you to use Attribute Filters for all items.
Figure 7-23 Add Item Rule (Include All Items)

-
Click either Match Any or Match All.
-
In the left pane, select the desired attribute filter from the list of available choices Once selected, any associated values for the attribute appear in the right pane.
-
In the right pane, select or clear values of the selected attribute filter. Attributes like Season, Color, or Brand default to All selected. You can clear all values for that attribute by clearing the check mark in the top check box. Then you can sort through the list and choose specific value by selecting the associated check box.
-
Click OK to add the item rule to the Offer or click OK and Add Another to add another attribute and values. Click Cancel to close the window without adding the item rule.
Include by Hierarchy
Perform the following steps to add Item Rules by hierarchy.
-
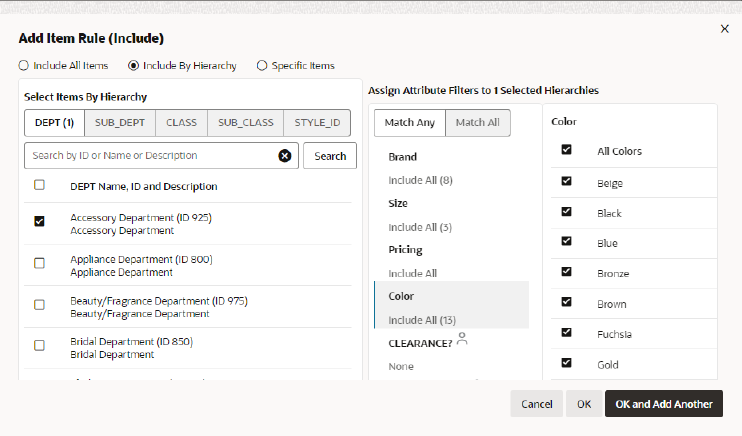
Select Include By Hierarchy. The Figure 7-24 window opens.
Figure 7-24 Add Item Rule (Include by Hierarchy)
-
There are two ways to search for items in the Include by Hierarchy window, either for:
-
All items -select one of the Hierarchy tabs such as (Department or Class, and click Search to retrieve all associated items for the hierarchy.
-
Specific items -select the check box for each item you want to add to the Offer.
-
-
Select Match Any or Match All.
-
In the center pane, select the desired Attribute Filter from the available choices. Once selected, any associated values for the attribute appear in the right pane.
-
In the right pane, select or clear values of the selected attribute filter. Attributes like Season, Color, or Brand default to All selected. You can clear all values for that attribute by clearing the check mark in the top check box. Then you can sort through the list and choose specific values by selecting the associated check box.
-
Click OK to add the item rule to the Offer or click OK and Add Another to add another attribute and values. Click Cancel to close the window without adding the item rule.
Specific Items
Perform the following steps to include Item Rules by specific items.
-
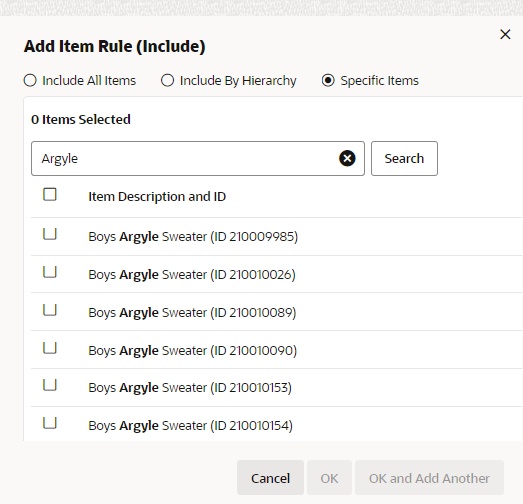
Select Specific Items. The Figure 7-25 window opens.
Figure 7-25 Add Item Rule (Specific Items)
-
Search for Specific Items.
In the Search box enter the ID or Description of the Item and click Search.A list of Items appear underneath the Search box.
-
Select Items. You can select either:
-
All Items by selecting the Item Description and ID check box.
-
Specific Items by selecting the check box for each item you want to add to the Offer.
-
-
Click OK to add the item rule to the Offer or click OK and Add Another to add another attribute and values, or click Cancel to close the window without adding the item rule.
Exclude Items
From the Figure 7-21, click the Exclude Items link.
Figure 7-26 Exclude Items
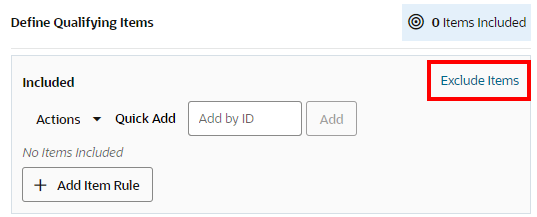
Excluding Items follows the same processes as:
Define Qualifying Items for Offer Group 2
Follow the procedures in this section to update the Define Qualifying Items for Offer Group 2. Use this window to define which Items are included and excluded in the Offer.
Update the Figure 7-27 for these type of offers:
-
Kit
-
Buy X Get Y
Figure 7-27 Define Qualifying Items Window for Offer Group 2
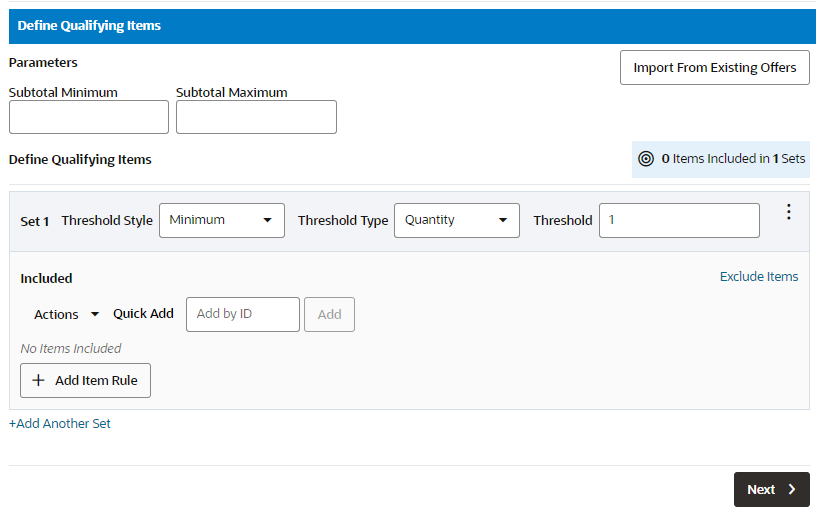
Update the Parameters Pane for Group 2
The following parameters are dynamic and vary based on the type of offer selected.
-
Subtotal Minimum – The minimum subtotal required for the transaction to be eligible for the discount.
-
Subtotal Maximum The maximum subtotal required for the transaction to be eligible for the discount.
-
Threshold Style – The style of threshold to be set.
Note:
The available options vary, depending upon the Offer Type selected.
-
Exact
-
Minimum
-
-
Threshold Type – The type of threshold.
-
Amount
-
Quantity
-
-
Threshold (Required) – The amount of the threshold
Note:
For KIT and BUY X Get Y offers, the Threshold Style, Threshold Type, and Threshold fields will appear in the Define Qualifying Items section. In these Offer Types, qualifying Items are organized in Sets. Each Set has an Include Item and Exclude Item section which contains one or more Items.
Import Items for Group 2
Import items into the Define Qualifying Items window by either:
Import Items from Existing Offers
-
Click Import From Existing Offers then enter the following information:
-
Enter some or all of the Offer Name, or Offer Type in the Search for Offer field. When searching by Offer ID the user must enter the exact ID.
-
Click one or more of the Import check boxes for the Offers you would like to import.
-
Click OK to import the Offer.
-
Import Items from a CSV file
There are two methods to import items in a CSV file, either:
-
Use the Action Menu.
-
Click the Actions Menu and select Import from CSV.
-
Drag and Drop the File
-
Click OK
-
-
Use File Explorer.
-
Click Upload. This displays the file selection menu where you can import a set of items in a comma-separated values (CSV) format.
-
Select a file from File Explorer.
-
Click Open.
-
Click OK.
-
Note:
When the file has been uploaded, the name of the file displays a close icon X that allows you to remove the file.
Define Qualifying Items Pane for Group 2
There are three methods to define Qualifying Items, either:
-
Use the Quick Add option to enter a known Item ID which you wish to associate with this new Offer.
Click Add.
-
Click the Actions Menu and select Add Item Rule.
-
Click +Add Item Rule.
The Figure 7-28 window opens.
Figure 7-28 Add Item Rule

You can Add Item Rules by selecting either:
Include All Items
Perform the following steps to add Item Rules by including all items
-
Select Include All Items. This enables you to use Attribute Filters for all items.
Figure 7-29 Add Item Rule (Include All Items)

-
Click either Match Any or Match All.
-
In the left pane, select the desired attribute filter from the list of available choices Once selected, any associated values for the attribute appear in the right pane.
-
In the right pane, select or clear values of the selected attribute filter. Attributes like Season, Color, or Brand default to All selected. You can clear all values for that attribute by clearing the check mark in the top check box. Then you can sort through the list and choose specific value by selecting the associated check box.
-
Click OK to add the item rule to the Offer or click OK and Add Another to add another attribute and values. Click Cancel to close the window without adding the item rule.
Include by Hierarchy
Perform the following steps to add Item Rules by hierarchy.
-
Select Include By Hierarchy. The Figure 7-30 window opens.
Figure 7-30 Add Item Rule (Include by Hierarchy)

-
There are two ways to search for items in the Include by Hierarchy window, either for:
-
All items - select one of the Hierarchy tabs such as (Department or Class, and click Search to retrieve all associated items for the hierarchy.
-
Specific items - select the check box for each item you want to add to the Offer.
-
-
Select Match Any or Match All.
-
In the center pane, select the desired Attribute Filter from the available choices. Once selected, any associated values for the attribute appear in the right pane.
-
In the right pane, select or clear values of the selected attribute filter. Attributes like Season, Color, or Brand default to All selected. You can clear all values for that attribute by clearing the check mark in the top check box. Then you can sort through the list and choose specific values by selecting the associated check box.
-
Click OK to add the item rule to the Offer or click OK and Add Another to add another attribute and values. Click Cancel to close the window without adding the item rule.
Specific Items
Perform the following steps to include Item Rules by specific items.
-
Select Specific Items. The Figure 7-31 window opens.
Figure 7-31 Add Item Rule (Specific Items)

-
Search for Specific Items.
In the Search box enter the ID or Description of the Item and click Search.A list of Items appear underneath the Search box.
-
Select Items. You can select either:
-
All Items by selecting the Item Description and ID check box.
-
Specific Items by selecting the check box for each item you want to add to the Offer.
-
-
Click OK to add the item rule to the Offer or click OK and Add Another to add another attribute and values, or click Cancel to close the window without adding the item rule.
Exclude Items
From the Figure 7-27 window, click the Exclude Items link.
Figure 7-32 Exclude Items
Excluding Items follows the same processes as:
Define Qualifying Items for Offer Tiered Discount
Follow the procedures in this section to update the Figure 7-33. Use this window to define which Items are included and excluded in the Tiered Discount offer.
Figure 7-33 Define Qualifying Items Window for the Offer Tiered Discount
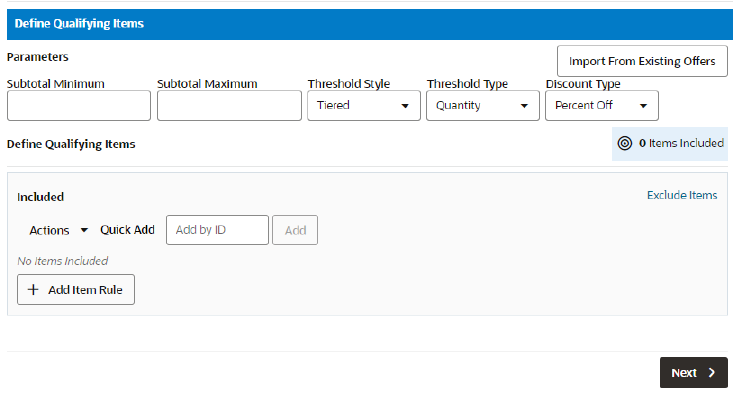
Update the Parameters Pane for Tiered Discount
The following parameters are dynamic and vary based on the type of offer selected.
-
Subtotal Minimum – The minimum subtotal required for the transaction to be eligible for the discount.
-
Subtotal Maximum The maximum subtotal required for the transaction to be eligible for the discount.
-
Threshold Style – The style of threshold to be set.
-
Tiered
-
-
Threshold Type – The type of threshold.
-
Amount
-
Quantity
-
-
Discount Type – The type of discount.
-
Percent Off – The discount is a certain percentage off of the qualifying items. The Discount Value field determines the percentage.
-
Amount Off – The discount is a fixed amount off of the qualifying items. The Discount Value field determines the amount.
-
Override Price – The new price for the qualifying item. The Discount Value field determines the new price.
-
Import Items for Tiered Discount
Import items into the Define Qualifying Items window by either:
Import Items from Existing Offers
-
Click Import From Existing Offers then enter the following information:
-
Enter some or all of the Offer Name, or Offer Type in the Search for Offer field. When searching by Offer ID the user must enter the exact ID.
-
Click one or more of the Import check boxes for the Offers you would like to import.
-
Click OK to import the Offer.
-
Import Items from a CSV file
There are two methods to import items in a CSV file, either:
-
Use the Action Menu.
-
Click the Actions Menu and select Import from CSV.
-
Drag and Drop the File
-
Click OK
-
-
Use File Explorer.
-
Click Upload. This displays the file selection menu where you can import a set of items in a comma-separated values (CSV) format.
-
Select a file from File Explorer.
-
Click Open.
-
Click OK.
-
CSV File Format
When importing items into an Item Eligibility rule, the CSV file listing the items must have the following fields for each line.
-
HIERARCHY LEVEL [required]
-
If the Hierarchy level is item, use the value _ITEM_ID_ for this field.
-
For a non-item Hierarchy level, use the value configured in System Configuration.
For information about System Configuration and configuring the names of Hierarchy levels, see the Oracle Retail customer Engagement Implementation Guide.
-
-
HIERARCHY VALUE [required]
-
BRAND [optional]
-
SEASON [optional]
-
COLOR [optional]
-
MIN PRICE [optional]
-
MAX PRICE [optional]
Each line in the CSV file corresponds to on Hierarchy level being imported.
A placeholder must be used for all fields. For example, to include an item with and ID of 343, from the Acme brand, colored brown, with a minimum price of 13.50, with no season, and with no maximumn price, the following line would be included in the CSV file:
_ITEM_ID_,343,Acme,,brown,13.50,
Note the empty SEASON and MAX PRICE fields in the example.
Note:
When the file has been uploaded, the name of the file displays a close icon X that allows you to remove the file.
Define Qualifying Items Pane for Tiered Discount
There are three methods to define Qualifying Items, either:
-
Use the Quick Add option to enter a known Item ID which you wish to associate with this new Offer.
Click Add.
-
Click the Actions Menu and select Add Item Rule.
-
Click +Add Item Rule.
The Figure 7-34 window opens.
Figure 7-34 Add Item Rule

You can Add Item Rules by selecting either:
Include All Items
Perform the following steps to add Item Rules by including all items
-
Select Include All Items. This enables you to use Attribute Filters for all items.
Figure 7-35 Add Item Rule (Include All Items)

-
Click either Match Any or Match All.
-
In the left pane, select the desired attribute filter from the list of available choices Once selected, any associated values for the attribute appear in the right pane.
-
In the right pane, select or clear values of the selected attribute filter. Attributes like Season, Color, or Brand default to All selected. You can clear all values for that attribute by clearing the check mark in the top check box. Then you can sort through the list and choose specific value by selecting the associated check box.
-
Click OK to add the item rule to the Offer or click OK and Add Another to add another attribute and values. Click Cancel to close the window without adding the item rule.
Include by Hierarchy
Perform the following steps to add Item Rules by hierarchy.
-
Select Include By Hierarchy. The Figure 7-36 window opens.
Figure 7-36 Add Item Rule (Include by Hierarchy)

-
There are two ways to search for items in the Include by Hierarchy window, either for:
-
All items - select one of the Hierarchy tabs such as (Department or Class, and click Search to retrieve all associated items for the hierarchy.
-
Specific items - select the check box for each item you want to add to the Offer.
-
-
Select Match Any or Match All.
-
In the center pane, select the desired Attribute Filter from the available choices. Once selected, any associated values for the attribute appear in the right pane.
-
In the right pane, select or clear values of the selected attribute filter. Attributes like Season, Color, or Brand default to All selected. You can clear all values for that attribute by clearing the check mark in the top check box. Then you can sort through the list and choose specific values by selecting the associated check box.
-
Click OK to add the item rule to the Offer or click OK and Add Another to add another attribute and values. Click Cancel to close the window without adding the item rule.
Specific Items
Perform the following steps to include Item Rules by specific items.
-
Select Specific Items. The Figure 7-37 window opens.
Figure 7-37 Add Item Rule (Specific Items)

-
Search for Specific Items.
In the Search box enter the ID or Description of the Item and click Search.A list of Items appear underneath the Search box.
-
Select Items. You can select either:
-
All Items by selecting the Item Description and ID check box.
-
Specific Items by selecting the check box for each item you want to add to the Offer.
-
-
Click OK to add the item rule to the Offer or click OK and Add Another to add another attribute and values, or click Cancel to close the window without adding the item rule.
Exclude Items
From the Figure 7-33, click the Exclude Items link.
Figure 7-38 Exclude Items 
Excluding Items follows the same processes as:
Update Award Items Tab
For Step 9 under the section Creating Offers update the Award Items tab and return to Step 10.
The Award Items tab defines which Items are included and excluded in the Offer, as well as to define the rules for the Award type and amount.
Table 7-6 Define Award Items by Offer Type
| Offer Type | Define Award Items Section |
|---|---|
|
Transaction Discount |
|
|
Line Item Discount |
|
|
Fixed Quantity/Price |
|
|
Gift with Purchase |
|
|
Buy X Get X |
|
|
Buy X Get Points |
|
|
Kit |
|
|
Buy X Get Y |
|
|
Tiered Discount |
Update Award Items for Group A
The Figure 7-39 defines award items for these type offers:
-
Transaction Discount
-
Line Item Discount
-
Fixed Quantity/Price
Figure 7-39 Define Award Items Tab Group A

Update the Parameters Pane for Group A
The following parameters are dynamic and vary based on the type of offer selected.
-
Priority – If more than one Offer can be applied to a Transaction, this selection menu determines the priority given to the Offer.
-
Maximum Award Amount – The maximum currency amount of the award.
-
Offer Count Limit – The maximum number of times the Offer can be applied to the same transaction. Available only if the Intended Use for the Offer is not Entitlement. Set to 0 (default) for no limit.
-
Discount Type – The type of discount.
-
Percent Off – The discount is a certain percentage off of the qualifying items. The Discount Value field determines the percentage.
-
Amount Off – The discount is a fixed amount off of the qualifying items. The Discount Value field determines the amount.
-
-
Discount Value – The amount of the discount.
-
Maximum Quantity – Maximum quantity of the matching items that can be used to satisfy the item rule.
-
Award application method – Determines how a discount is applied to the award Items. These options are only enabled for Amount Off discount types, and only if the Intended Use for the Offer is not Entitlement. This method has the following options:
-
Prorate award value across qualifying items - The amount of the discount is divided by the number of items and then that amount is applied to each Item.
-
Issue award to each qualifying items - The amount of the discount is applied to each Item.
-
Define Award Items for Group A
This pane lists Award items that were selected in Define Qualifying Items for Offer Group 1
-
Included Items - Lists the items that are included as Award Items.
-
Excluded Items - Lists the items that are excluded as Award Items.
Update Award Items for Offer Type Kit
The Figure 7-40 defines award items when the offer type is Kit
-
Kit
Figure 7-40 Define Award Items Tab for Offer Type Kit

Update the Parameters Pane for Offer Type Kit
The following parameters are dynamic and vary based on the type of offer selected.
-
Priority – If more than one Offer can be applied to a Transaction, this selection menu determines the priority given to the Offer.
-
Maximum Award Amount – The maximum currency amount of the award.
-
Offer Count Limit – The maximum number of times the Offer can be applied to the same transaction. Available only if the Intended Use for the Offer is not Entitlement. Set to 0 (default) for no limit.
Define Award Items
Update the following items:
-
Discount Type – From the list, select a type of discount, either:
-
Percent Off – The discount is a certain percentage off of the qualifying items. The Discount Value field determines the percentage.
-
Amount Off – The discount is a fixed amount off of the qualifying items. The Discount Value field determines the amount.
-
Override Price - The new price for the qualifying item. The Discount Value field determines the new price.
-
-
Discount Value – Enter the amount of the discount.
-
Maximum Quantity – Select the maximum quantity of the matching items that can be used to satisfy the item rule.
-
Award application method – Determines how a discount is applied to the award Items.
Note:
These options are only available when:
-
Amount Off is the discount type
-
the Intended Use for the Offer is not Entitlement
You can select from the following options:
-
Prorate award value across qualifying items - The amount of the discount is divided by the number of items and then that amount is applied to each Item.
-
Issue award to each qualifying items - The amount of the discount is applied to each Item.
-
This pane lists Award items that were selected in Define Qualifying Items for Offer Group 2.
-
Included Items - Lists the items that are included as Award Items.
-
Excluded Items - Lists the items that are excluded as Award Items.
Update Award Items for Gift with Purchase
The Figure 7-41 defines award items when the offer type is Gift with Purchase.
Figure 7-41 Define Award Items Tab for Gift with Purchase
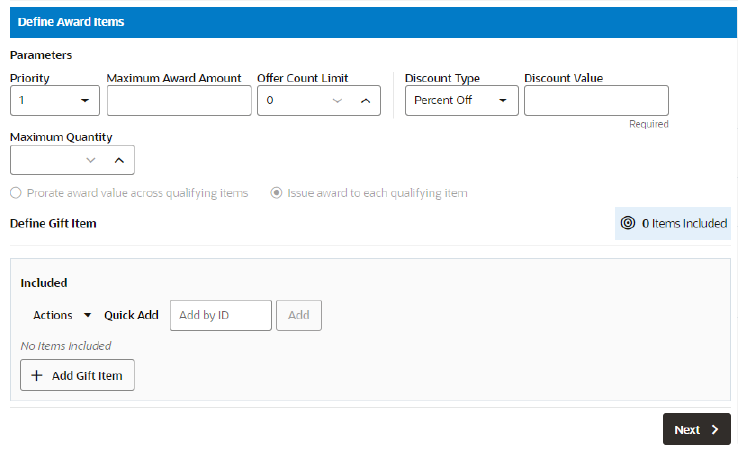
Update the Parameters Pane for Gift with Purchase
The following parameters are dynamic and vary based on the type of offer selected.
-
Priority – If more than one Offer can be applied to a Transaction, this selection menu determines the priority given to the Offer.
-
Maximum Award Amount – The maximum currency amount of the award.
-
Offer Count Limit – The maximum number of times the Offer can be applied to the same transaction. Available only if the Intended Use for the Offer is not Entitlement. Set to 0 (default) for no limit.
-
Discount Type – The type of discount.
-
Percent Off – The discount is a certain percentage off of the qualifying items. The Discount Value field determines the percentage.
-
Amount Off – The discount is a fixed amount off of the qualifying items. The Discount Value field determines the amount.
-
Override Price - The new price for the qualifying item. The Discount Value field determines the new price.
-
-
Discount Value – The amount of the discount.
-
Maximum Quantity – Maximum quantity of the matching items that can be used to satisfy the item rule.
-
Award application method – Determines how a discount is applied to the award Items.
Note:
These options are only available when:
-
Amount Off is the discount type
-
the Intended Use for the Offer is not Entitlement
You can select from the following options:
-
Prorate award value across qualifying items - The amount of the discount is divided by the number of items and then that amount is applied to each Item.
-
Issue award to each qualifying items - The amount of the discount is applied to each Item.
-
Adding Gift Items to an Offer
Perform the following steps to add Gift Items to an offer from the Figure 7-41 window.
-
Select a method from the Figure 7-41 window to add gift items.
-
Enter the exact item ID in the Quick Add field and then click Add.
-
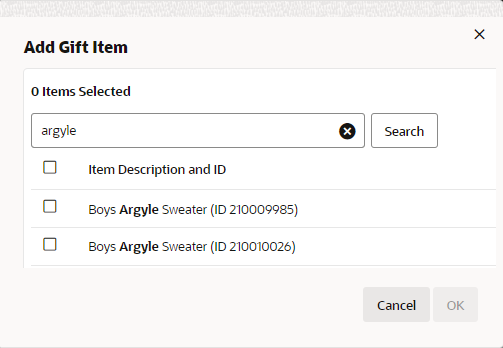
Click + Add Gift Item to open the Figure 7-42 window where you can search for items.
-
Click the Actions Menu and then select +Add Gift Item to open the Figure 7-42 window.
Note:
You may only add one Gift Item to the offer.
Figure 7-42 Add Gift Item
-
-
Select one check box to the left of the individual item you wish to add to the Offer.
-
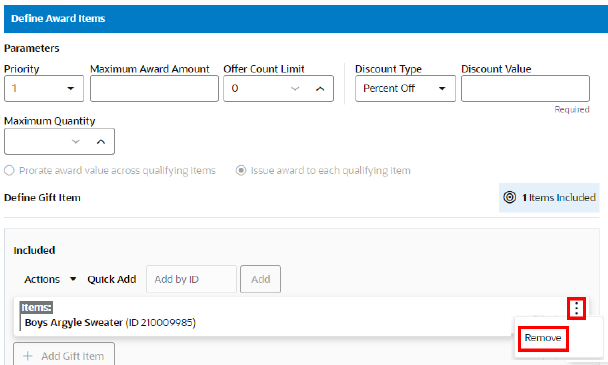
Optional: Click the Overflow Menu, then click Remove to remove a Gift Item and search for a different Gift Item.
Figure 7-43 Included Gift Item Overflow Menu (Remove)
-
-
Click OK to add the Gift Item to the Offer, or click Cancel to close the window without saving.
Update Award Items for Buy X Get X
The Figure 7-44 defines award items when the offer type is Buy X Get X
Figure 7-44 Define Award Items Tab Buy X Get X
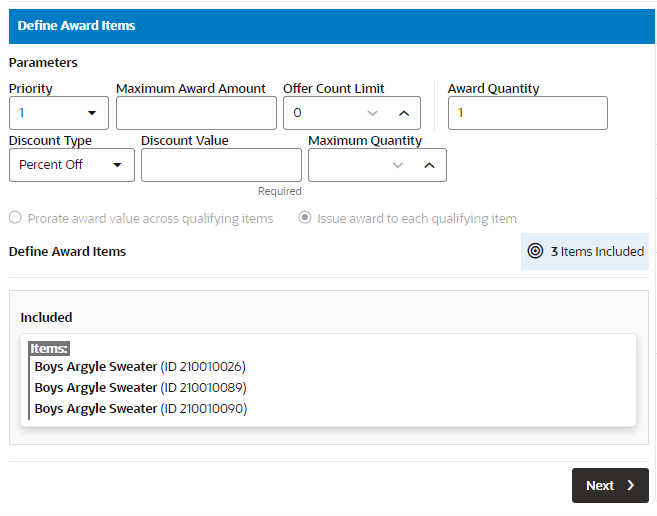
Update the Parameters Pane for Buy X Get X
The following parameters are dynamic and vary based on the type of offer selected.
-
Priority – If more than one Offer can be applied to a Transaction, this selection menu determines the priority given to the Offer.
-
Maximum Award Amount – The maximum currency amount of the award.
-
Offer Count Limit – The maximum number of times the Offer can be applied to the same transaction. Available only if the Intended Use for the Offer is not Entitlement. Set to 0 (default) for no limit.
-
Discount Type – The type of discount.
-
Percent Off – The discount is a certain percentage off of the qualifying items. The Discount Value field determines the percentage.
-
Amount Off – The discount is a fixed amount off of the qualifying items. The Discount Value field determines the amount.
-
Override Price - The new price for the qualifying item. The Discount Value field determines the new price.
-
-
Discount Value – The amount of the discount.
-
Maximum Quantity – Maximum quantity of the matching items that can be used to satisfy the item rule.
-
Award application method – Determines how a discount is applied to the award Items.
Note:
These options are only available when:
-
Amount Off is the discount type
-
the Intended Use for the Offer is not Entitlement
You can select from the following options:
-
Prorate award value across qualifying items - The amount of the discount is divided by the number of items and then that amount is applied to each Item.
-
Issue award to each qualifying items - The amount of the discount is applied to each Item.
-
Define Award Items
This pane lists Award items that were selected in Define Qualifying Items for Offer Group 1.
-
Included Items - Lists the items that are included as Award Items.
-
Excluded Items - Lists the items that are excluded as Award Items.
Update Award Items for Buy X Get Y
The Figure 7-45 defines award items when the offer type is Buy X Get Y.
Figure 7-45 Define Award Items Tab for Buy X Get Y
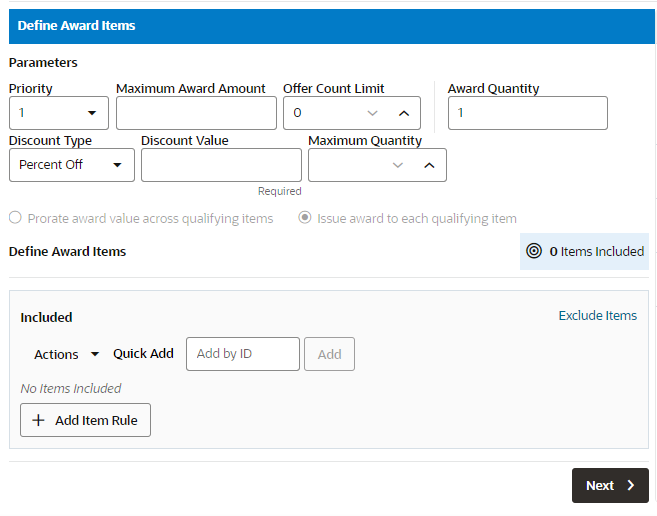
Update the Parameters Pane for Buy X Get Y
The following parameters are dynamic and vary based on the type of offer selected.
-
Priority – If more than one Offer can be applied to a Transaction, this selection menu determines the priority given to the Offer.
-
Maximum Award Amount – The maximum currency amount of the award.
-
Offer Count Limit – The maximum number of times the Offer can be applied to the same transaction. Available only if the Intended Use for the Offer is not Entitlement. Set to 0 (default) for no limit.
-
Discount Type – The type of discount.
-
Percent Off – The discount is a certain percentage off of the qualifying items. The Discount Value field determines the percentage.
-
Amount Off – The discount is a fixed amount off of the qualifying items. The Discount Value field determines the amount.
-
Override Price - The new price for the qualifying item. The Discount Value field determines the new price.
-
-
Discount Value – The amount of the discount.
-
Maximum Quantity – Maximum quantity of the matching items that can be used to satisfy the item rule.
-
Award application method – Determines how a discount is applied to the award Items.
Note:
These options are only available when:
-
Amount Off is the discount type
-
the Intended Use for the Offer is not Entitlement
You can select from the following options:
-
Prorate award value across qualifying items - The amount of the discount is divided by the number of items and then that amount is applied to each Item.
-
Issue award to each qualifying items - The amount of the discount is applied to each Item.
-
Define Award Items
This pane lists Award items that were selected in Define Qualifying Items for Offer Group 2.
-
Included Items - Lists the items that are included as Award Items.
-
Excluded Items - Lists the items that are excluded as Award Items.
Update Award Points for Buy X Get Points
The Figure 7-46 defines award points when the offer type is Buy X Get Points
Figure 7-46 Define Award Points Tab for Buy X Get Points
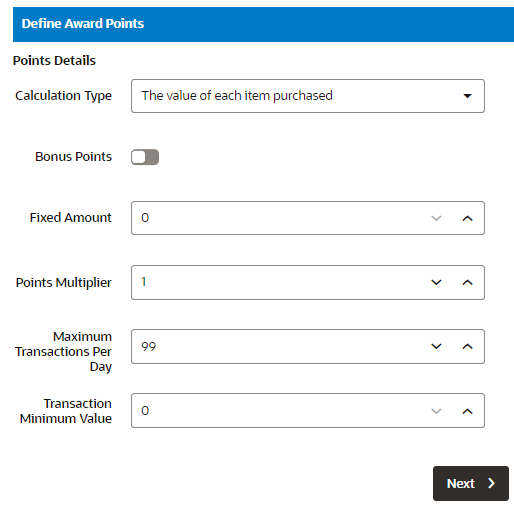
Define Award Points Buy X Get Points
The Award Points tab defines the points in the Offer, as well as to define the rules for the Calculation type and amounts.
Perform the following steps.
-
Update the items in the Points Detail pane.
-
Select the Calculation Type. Values include:
-
The value of each item purchased - The sale amount of each item purchased in the transaction.
-
The quantity of each item purchased - The quantity of each item purchased in the transaction.
-
The number of qualifying transactions - The number of qualifying transactions made by the Customer.
-
-
Bonus Points - Indicates whether this Issue Rule stipulates that the Loyalty Program issues points as Bonus Points. Toggle the switch to activate.
-
Fixed Amount - The Fixed Amount, if any, assigned to each transaction.
-
Points Multiplier - The number multiplied by the value indicated in the Calculation Type field. This field is active when the selected Calculation Type is either The value of each item purchased or The quantity of each item purchased.
-
Maximum Transactions Per Day - The maximum number of sales transactions in a single day that will be used to calculate Loyalty points.
-
Transaction Minimum Value - Minimum amount of a transaction for it to be applied to a Loyalty account.
-
-
When finished entering parameters for the Award Points, click Next to continue to Define Tender Type for Buy X Get Points.
Define Tender Type for Buy X Get Points
Tender eligibility rules determine whether a Customer Engagement element is enabled for a transaction, depending upon the tender used in a transaction.
Figure 7-47 Tender Type
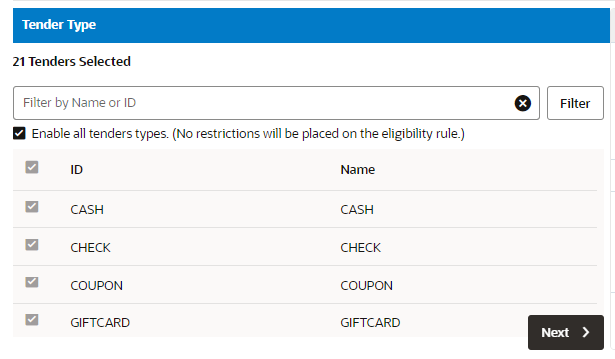
Perform the following steps.
-
At the top of the window, in the Filter box enter filter criteria such as Name or ID. A list of tender types matching the filter criteria displays. Select one or more tender types to activate eligibility for this Issue rule.
Note:
Select the Enable all tender types check box to indicate that all tenders are eligible for the Issue rule.
Note:
If a customer uses a tender that is unchecked, that transaction will not qualify for points issued by the Issue rule.
-
When finished selecting Tender Types, click Next. Continue to the Buy X Get Points Review tab.
Define Tiered Discount
When the offer type is Tiered Discount, use the Figure 7-48 window.
A discount is applied to a defined set of items, where the amount or percent of the discount depends on the quantity or amount of the items defined in the threshold.
Note:
At least two tiers must be defined for Tiered Discount Offer.
Figure 7-48 Define Tiered Discount
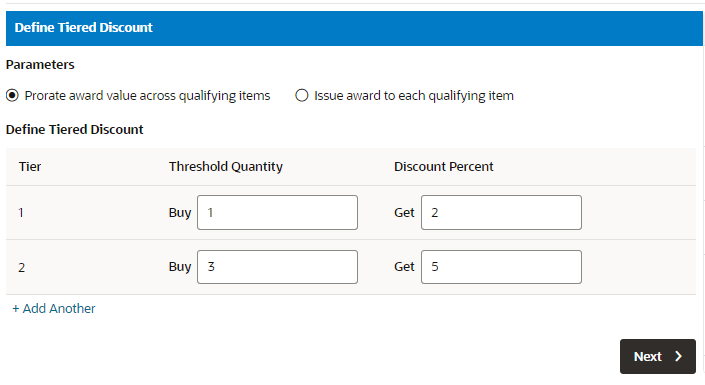
Perform the following steps to update the Figure 7-48 window
-
Enter the following information.
Parameters
-
Prorate award value across qualifying items - The amount of the discount is divided by the number of items and then that amount is applied to each Item.
-
Issue award to each qualifying items - The amount of the discount is applied to each Item.
For each Tier, enter the following information:
-
Buy - The quantity threshold that must be met or exceeded to qualify for the Tier-level discount.
-
Get - The discount applied to the Items in the Buy field. This field is only displayed when the discount type previously selected is Percent Off or Amount Off.
-
For - The price applied to the items in the Buy field. This field is only displayed if the discount type previously selected is Price Override.
-
-
Click + Add Another to add another tier or click the Remove Tier icon to remove a tier from the offer.
-
When finished defining Tiered Discounts for the Offer, click Next and advance to the Tiered Discount Review tab.
Updating Award Points for Marketing Engagements
The Figure 7-49 defines the points in the Offer, as well as to define the rules for the Calculation type and amounts.
Figure 7-49 Award Points Tab for Offer Type Marketing Engagements
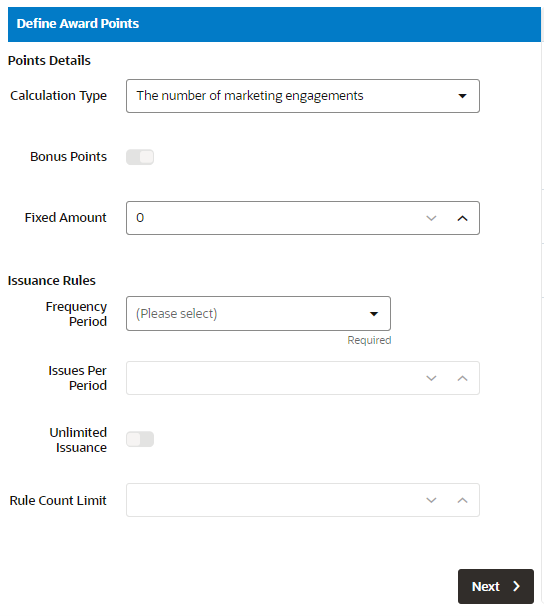
Perform the following steps to update the Figure 7-49 window.
-
Enter the following for the Award Points tab.
Points Details
-
Calculation Type: The number of marketing engagements - The number of times the customer interacts with marketing media, such as watching a video online. (default).
-
Bonus Points - Indicates whether this Issue Rule stipulates that the Loyalty Program issues points as Bonus Points (inactive).
-
Fixed Amount - The Fixed Amount, if any, assigned to each transaction.
Issuance Rules
-
Frequency Period - This field determines the time period used to control the frequency with which a Customer can earn points through marketing engagements. Options include:
-
One time only
-
Daily
-
Weekly
-
Monthly
-
Yearly
-
-
Issues Per Period - The number of times a Customer can earn points through marketing engagements during the Frequency Period. Set to 1 if the Frequency Period is One-time only
-
Unlimited Issuance - Determines whether points can be issued an unlimited number of times during the Frequency Period. Cleared if the Frequency Period is set to One-time only.
-
Rule Count Limit - The total number of times a Customer can earn points through marketing engagements. Set to 1 if the Frequency Period is One-time only
-
-
When finished defining Awards Points, click Next. Continue to the Marketing Engagements Review tab.
Update Shipping Awards Tab
For Step 10 under the section Creating Offers update the Shipping Awards tab and return to Step 11.
Update the Figure 7-50 when the offer type is:
-
Transaction Discount
-
Line Item Discount
-
Fixed Quantity/Price
-
Gift with Purchase
-
Buy X Get X
-
Kit
-
Buy X Get Y
Perform the following steps to update the Figure 7-50.
-
Enter the following information for the Shipping Awards tab.
Figure 7-50 Shipping Awards Tab

-
Shipping Method – This table lists the shipping methods that will qualify the shipping award. Select the shipping methods eligible for the Offer (Optional).
-
Ship To Country – This table specifies the countries which make eligible the shipping award on the Offer. Select the Ship to Countries for the Offer (Optional).
-
Qualifying Pay Type – This table lists the payment types required on the transaction to qualify for the shipping award. Select the Pay Types for the Offer (Optional).
-
Continental US Only – If the Continental USA Only check box is checked, the Offer applies only to states in the continental USA (excluding Hawaii and Alaska).
-
Sectional Center Facility From – This represents the first three positions of the postal code, for the sectional center facility. This will be the starting point of the range of postal code the shipment destination must fall under to qualify for the Shipping award (Optional).
-
Sectional Center Facility To – This represents the first three positions of the postal code, for the sectional center facility. This will be the ending point of the range of postal code the shipment destination must fall under to qualify for the Shipping award (Optional).
-
When finished defining the Shipping Award rules for the Offer, click Next.
Awards
-
Shipping Charge Type – Customer defined Charge Types that qualify for the shipping award discount, such as, Base or Upgrade.
-
Override Shipping Method – If a Shipping Method was defined, selecting this check box dictates overriding that shipping method for this new method. These codes are defined in a Configuration called Shipping Method Codes.
-
Discount – Select the type of shipping discount to apply.
-
Percent Off – Apply a percentage discount, specified in the Discount Value, to the shipping charge. For example, 40% off shipping.
-
Amount Off – Apply a discount amount, specified in the Discount Value, to the shipping charge. For example, $5.00 off shipping.
-
Override Price – Override the shipping price to the Discount Value. For example, $2.99 shipping.
-
-
Charge Code – Select from the list to select a code that will appear on the order when using the Amount off or Percent Off (Optional).
-
-
Continue with the Review tab by offer type in the section, Using the Review Tab.
Using the Review Tab
For Step 11 under the section Creating Offers check the Review tab for your offer.
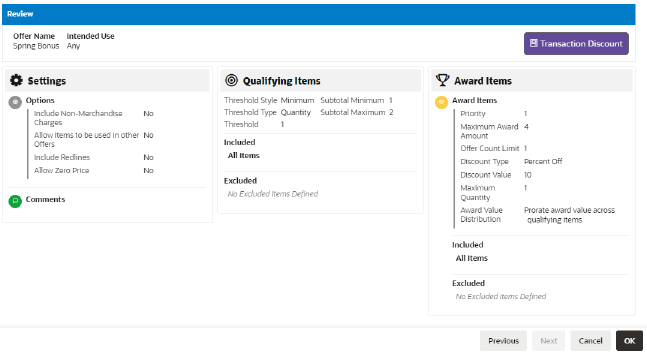
The Review tab displays key elements in the Offer Setup.
The following sections describe the review process for each type of offers.
Transaction Discount Review
The Review tab displays key elements in the Offer Setup.
Perform the following steps to review and then accept or change the offer.
-
Review the Figure 7-51 for the Transaction Discount Offer.
Figure 7-51 Review Tab - Transaction Discount
-
Click OK to create the offer, or click Cancel to close without saving.
Note:
Before you save the offer, you can use the tab links along with Previous and Next to go back to any point in the create Offer process and make changes.
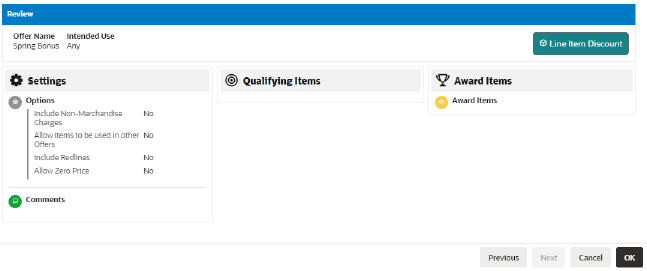
Line Item Discount Review
The Review tab displays key elements in the Offer Setup.
Perform the following steps to review and then accept or change the offer.
-
Review the Figure 7-52 for the Line Item Discount Offer.
Figure 7-52 Review Tab - Line Item Discount
-
Click OK to create the offer, or click Cancel to close without saving.
Note:
Before you save the offer, you can use the tab links along with Previous and Next to go back to any point in the create Offer process and make changes.
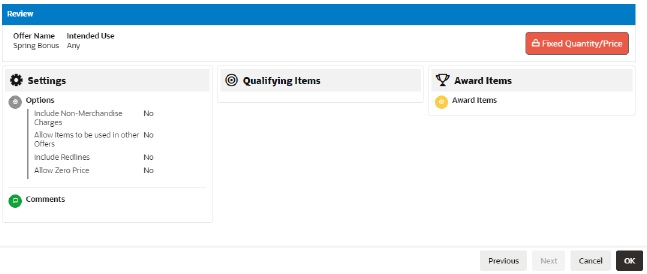
Fixed Quantity/Price Review
The Review tab displays key elements in the Offer Setup.
Perform the following steps to review and then accept or change the offer.
-
Review the Figure 7-53 for the Fixed Quantity/Price Offer.
Figure 7-53 Review Tab - Fixed Quantity/Price
-
Click OK to create the offer, or click Cancel to close without saving.
Note:
Before you save the offer, you can use the tab links along with Previous and Next to go back to any point in the create Offer process and make changes.
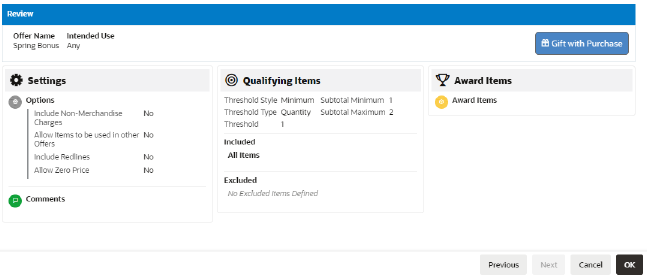
Gift with Purchase Review
The Review tab displays key elements in the Offer Setup.
Perform the following steps to review and then accept or change the offer.
-
Review the Figure 7-54 for the Gift with Purchase Offer.
Figure 7-54 Review Tab - Gift with Purchase
-
Click OK to create the offer, or click Cancel to close without saving.
Note:
Before you save the offer, you can use the tab links along with Previous and Next to go back to any point in the create Offer process and make changes.
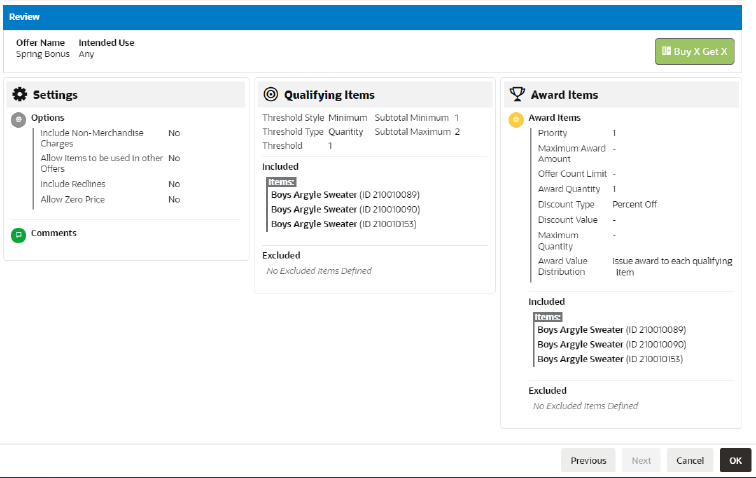
Buy X Get X Review
The Review tab displays key elements in the Offer Setup.
Perform the following steps to review and then accept or change the offer.
-
Review the Figure 7-55 for the Buy X Get X Offer.
Figure 7-55 Review Tab - Buy X Get X
-
Click OK to create the offer, or click Cancel to close without saving.
Note:
Before you save the offer, you can use the tab links along with Previous and Next to go back to any point in the create Offer process and make changes.
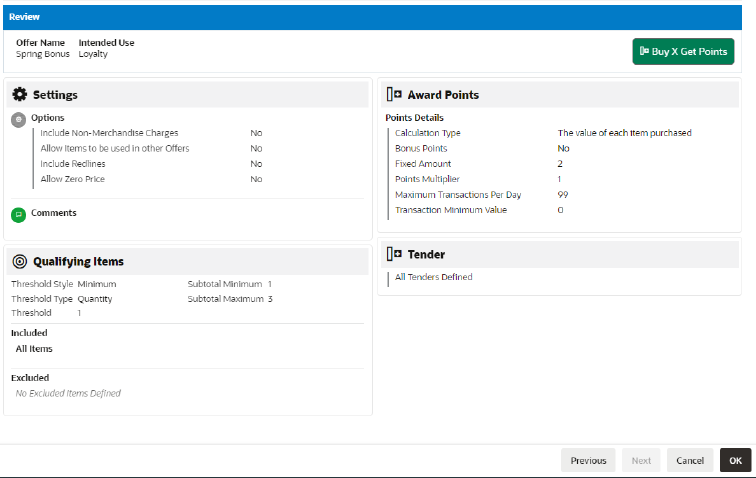
Buy X Get Points Review
The Review tab displays key elements in the Offer Setup.
Perform the following steps to review and then accept or change the offer.
-
Review the Figure 7-56 for the Buy X Get Points Offer.
Figure 7-56 Review Tab - Buy X Get Points
-
Click OK to create the offer, or click Cancel to close without saving.
Note:
Before you save the offer, you can use the tab links along with Previous and Next to go back to any point in the create Offer process and make changes.
Kit Review
The Review tab displays key elements in the Offer Setup.
Perform the following steps to review and then accept or change the offer.
-
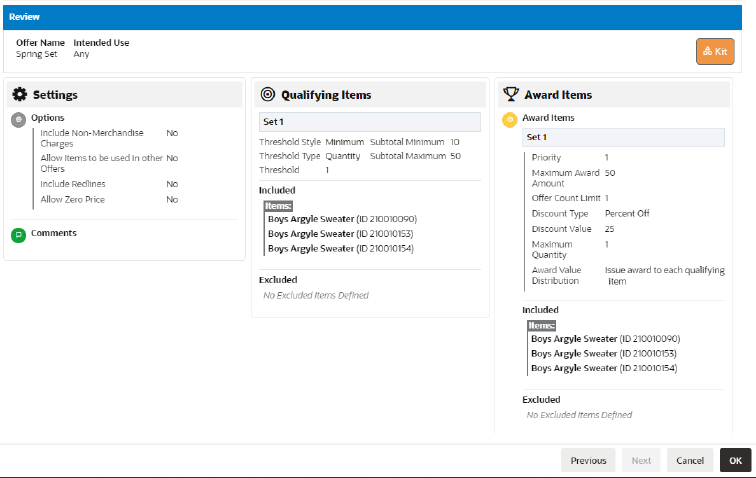
Review the Figure 7-57 for the Kit Offer.
Figure 7-57 Review Tab - Kit
-
Click OK to create the offer, or click Cancel to close without saving.
Note:
Before you save the offer, you can use the tab links along with Previous and Next to go back to any point in the create Offer process and make changes.
Buy X Get Y Review
The Review tab displays key elements in the Offer Setup.
Perform the following steps to review and then accept or change the offer.
-
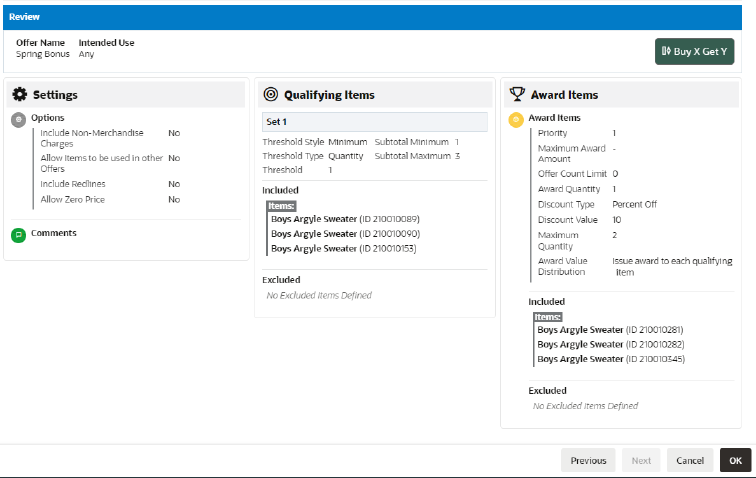
Review the Figure 7-58 for the Buy X Get Y Offer.
Figure 7-58 Review Tab - Buy X Get Y
-
Click OK to create the offer, or click Cancel to close without saving.
Note:
Before you save the offer, you can use the tab links along with Previous and Next to go back to any point in the create Offer process and make changes.
Tiered Discount Review
The Review tab displays key elements in the Offer Setup.
Perform the following steps to review and then accept or change the offer.
-
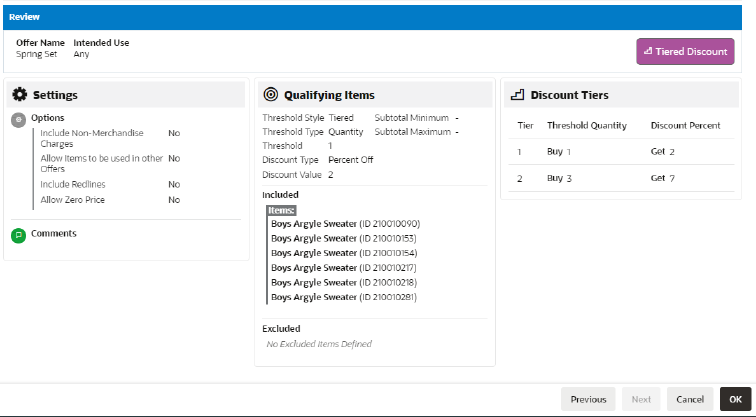
Review the Figure 7-59 for the Tiered Discount Offer.
Figure 7-59 Review Tab - Tiered Discount
-
Click OK to create the offer, or click Cancel to close without saving.
Note:
Before you save the offer, you can use the tab links along with Previous and Next to go back to any point in the create Offer process and make changes.
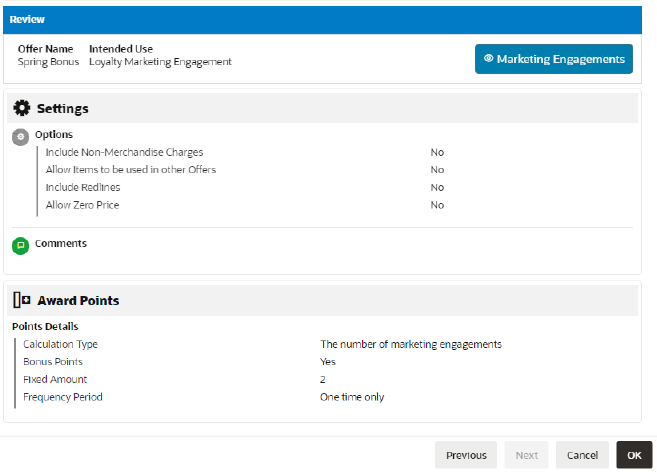
Marketing Engagements Review
The Review tab displays key elements in the Offer Setup.
Perform the following steps to review and then accept or change the offer.
-
Review the Figure 7-60 for the Marketing Engagements Offer.
Figure 7-60 Review Tab - Marketing Engagements
-
Click OK to create the offer, or click Cancel to close without saving.
Note:
Before you save the offer, you can use the tab links along with Previous and Next to go back to any point in the create Offer process and make changes.
Deleting Offers
You can access an offer for deleting using the following methods to display the Delete option:
-
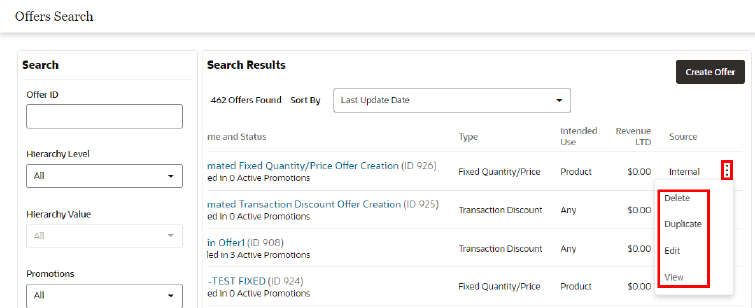
Offers Search Results
-
Click the Overflow Menu icon on the far right in the data display section for each individual Offer on the Offer Advanced Search window (Offer Record Result Section).
-
Click Delete.
Figure 7-61 Overflow Menu Options (Offers Advanced Search)
-
-
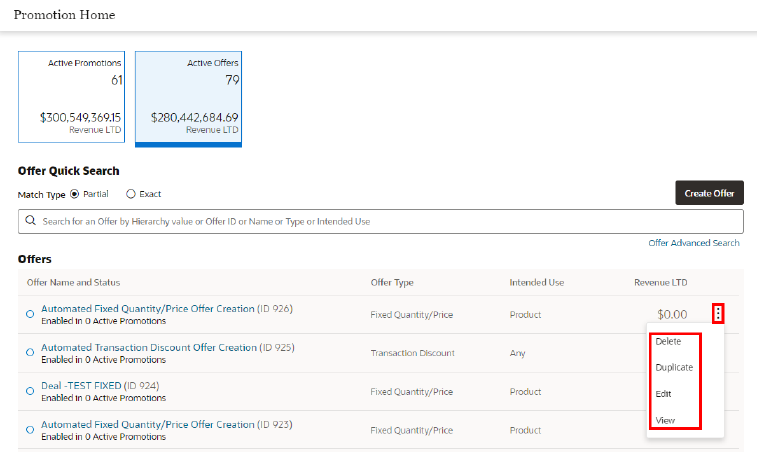
Offer Quick Search
-
Click the Overflow Menu icon on the far right in the data display section for each individual Offer on Offer Quick Search window.
-
Click Delete.
Figure 7-62 Overflow Menu Options (Offer Quick Search)
-
-
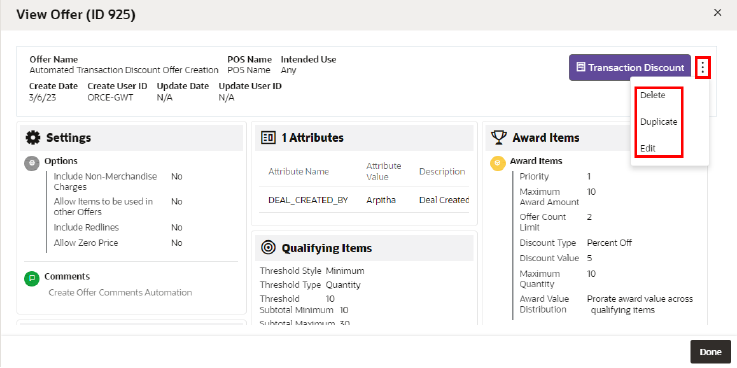
View Offer View
-
Click the Overflow Menu icon on the far right in the data display section for each individual Offer while Viewing Offers.
-
Click Delete.
Figure 7-63 View Offer (Delete)
-
For detailed information on each section while editing an offer see Creating Offers.
Editing Offers
You can access an offer for editing using the following methods to display the Edit option:
-
Offers Search Results
-
Click the Overflow Menu icon on the far right in the data display section for each individual Offer on the Offer Advanced Search window (Offer Record Result Section).
-
Click Edit.
Figure 7-64 Overflow Menu Options (Offers Advanced Search)

-
-
Offer Quick Search
-
Click the Overflow Menu icon on the far right in the data display section for each individual Offer on Offer Quick Search window.
-
Click Edit.
Figure 7-65 Overflow Menu Options (Offer Quick Search)

-
-
View Offer View
-
Click the Overflow Menu icon on the far right in the data display section for each individual Offer while Viewing Offers.
-
Click Edit.
Figure 7-66 View Offer (Edit)

-
For detailed information on each section while editing an offer see Creating Offers.
Duplicating Offers
You can duplicate an offer using the following methods to display the Duplicate option:
-
Offers Search Results
-
Click the Overflow Menu icon on the far right in the data display section for each individual Offer on the Offers Advanced Search window.
-
Click Duplicate.
Figure 7-67 Overflow Menu Options (Offers Advanced Search)

-
-
Offers Quick Search
-
Click the Overflow Menu icon on the far right in the data display section for each individual Offer while Viewing Offers.
-
Click Duplicate.
Figure 7-68 Quick Offers Search Overflow Menu icon Options

-
-
View Offer View
-
Click the Overflow Menu icon on the far right in the data display section for each individual Offer while Viewing Offers.
-
Click Duplicate.
Figure 7-69 View Offer (Duplicate)

-
For detailed information on each section after duplicating an offer see Creating Offers.
Viewing Offers
You can access an offer for viewing using the following methods to display the View option:
-
Offers Search Results
-
Click the Overflow Menu icon on the far right in the data display section for each individual Offer on the Offer Advanced Search window (Offer Record Result section).
-
Click View.
Figure 7-70 Overflow Menu Options (Offers Advanced Search)

-
-
Offer Quick Search
-
Click the Overflow Menu icon on the far right in the data display section for each individual Offer on Offer Quick Search window.
-
Click View.
Figure 7-71 Overflow Menu Options (Offer Quick Search)

-
For detailed information on each section while Viewing an offer see Creating Offers.
Offer Scorecard
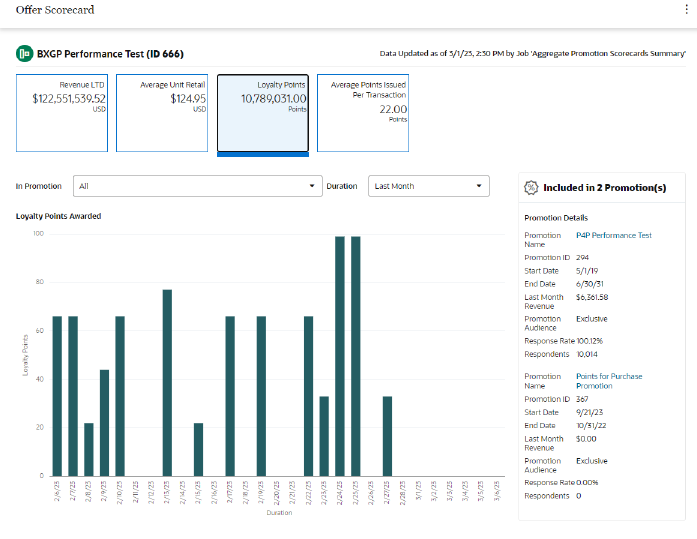
The Offer Scorecard displays information about the Offer response in a Promotion. You have the ability to periodically review the response data on Offers that are part of promotions. The Offer Scorecard also displays additional tiles for Loyalty related offers.
Figure 7-72 Offer Scorecard
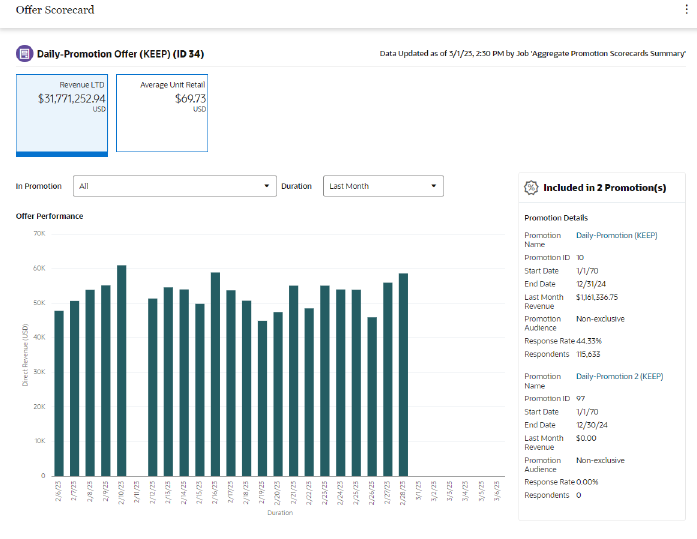
Figure 7-73 Offer Scorecard - Loyalty
Offer Scorecard Feature Bar
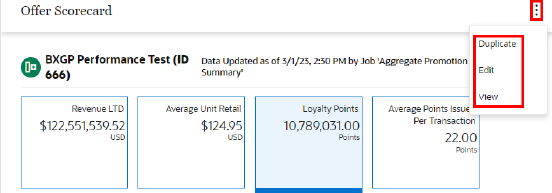
The Offer Scorecard Feature Bar contains the following information:
-
Title of the window.
-
Action Menu with the ability to View, Edit, or Duplicate the Offer.
Figure 7-74 Action Menu Options
Metric Tiles
Each offer presents a different set of Metric Tiles, click each one to see more information.
Revenue LTD
The Revenue LTD Metric Tile is: Total Direct Revenue generated Lifetime to Date (LTD) from the Offer.
Offer Performance
-
In Promotion Filter – List of all the Promotions that the offer is associated with.
-
Duration– Durations include:
-
Last Week - Offer performance for Last Week (7 days (Current date (-1)) display.
-
Last Month (Default) – Offer performance for Last Month (Current date (-1)) display.
-
Last 6 Months – Offer performance for Last 6 Months converted into weeks (Current date (-1)) display.
-
Last Year – Offer performance for Last 12 months (Current date (-1)) display.
-
Lifetime to Date – Offer performance for the last 5 years (Current date (-1)) display.
-
Graph
-
The bar graph dynamically updates the Offer performance based on the value selected for the In Promotion and Duration.
-
By default the Offer performance graph displays for All the Promotions which the Offer is part of for the Last Month.
-
The graph represents a plot between the Direct Revenue on Y-axis and Duration on X-axis for each individual Promotion.
Promotion Details Side Panel
-
Promotion Name – Name of the Promotion.
-
Click the Promotion Name link from the Promotion Details panel on the Offer Scorecard window to display the View Promotion window for the selected promotion on the same tab. Click Done to return to the Offer Scorecard.
See Viewing a Promotion to learn more about the information on that window.
-
-
Promotion ID – ID of the Promotion.
-
Start Date – The date the Promotion begins.
-
End Date – The date the Promotion ends.
-
Revenue – Offer's Revenue display depending on the value selected in the duration.
-
Promotion Target – Indicates the type of targeting used by the Promotion (Nonexclusive or Exclusive).
-
Response Rate – Calculated by dividing the total number of Respondents by the Total number targeted. Set to 100.00 for Non-Targeted customers.
-
Respondents – Number of Customers in the Target who have responded to the Offer in the Promotion. This is the same as the Total for Non-Targeted customers.
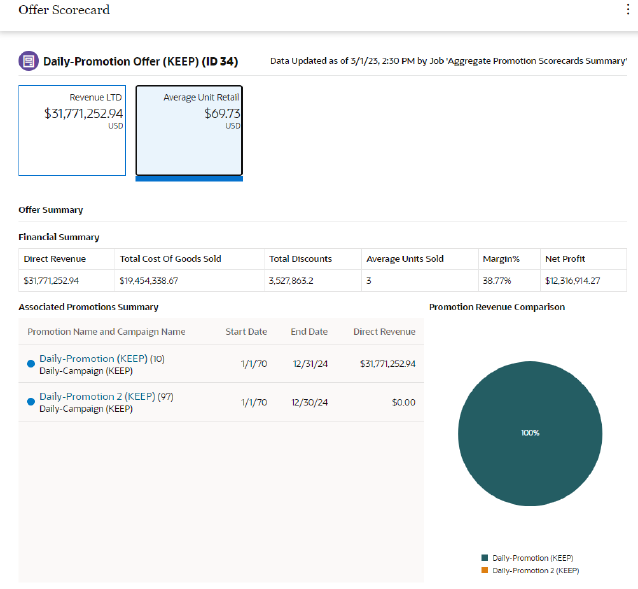
Average Unit Retail Tile
The Average Unit Retail calculated for a given item over a select period of time. To calculate AUR, you simply take the total revenue (or net sales) divided by the number of units sold.
Figure 7-75 Average Unit Retail Tile
Financial Summary
-
Direct Revenue – Sum Total of the Revenue generated using the offer.
-
Total Cost of Goods Sold – The sum total of the cost of all the items sold on which the offer was applied.
-
Total Discounts – Sum Total of the Discounts.
-
Average Units Sold – Total Number of Items Sold /Total Number of unique Transactions.
-
Margin % – Net Profit /Direct Revenue
-
Net Profit – Direct Revenue minus Total Cost Of Goods Sold
Associated Promotions Summary
Data Section
-
A full circle represents an Active Promotion or an Empty circle represents an Inactive Promotion.
-
Promotion Name and Campaign Name – Name of the Promotion and Campaign.
-
When a user selects the promotion name from the list of promotions on the Offer Scorecard window, the system displays the View Promotion window for the selected promotion on the same tab. See Viewing a Promotion for more information.
-
-
Promotion ID – Contains the Title ID and the Promotion ID in parenthesis.
-
Start Date – The date the promotion begins.
-
End Date – The date the promotion ends.
-
Direct Revenue – Total extended price of all line items associated with the Promotion's Offers.
Promotion Revenue Comparison
Pie Chart
-
The pie chart shows the pictorial representation of the direct revenue generated from the respective promotions.
-
The title of the pie chart is Promotion Revenue Comparison.
-
The maximum of top ten promotions by direct revenue display.
-
Each sector of the pie chart represents the direct revenue earned by an individual promotion with a different color.
-
A legend displays to the right of the pie chart and is linked with the information displayed in the pie chart.
Note:
To close the Offer Scorecard, click the close icon X associated with the Offer Number in the Open Tasks area at the top of the window.
Engagements
The number of times customers interact with marketing media, such as watching a video online.
Figure 7-76 Engagements Metric Tile
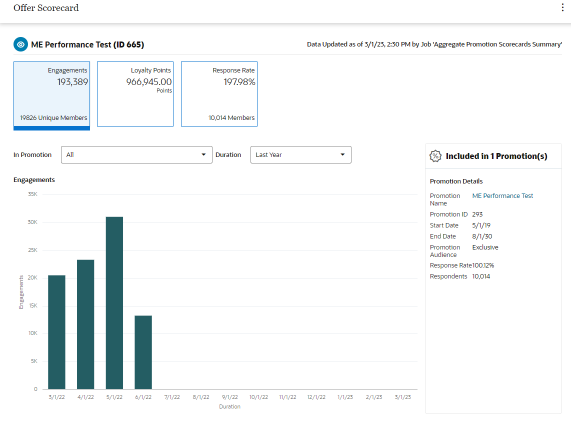
-
In Promotion - You can choose to view by All promotions (default) or select from the list of promotions associated with the offer.
-
Duration– Durations include:
-
Last Week - Offer performance for Last Week (7 days (Current date (-1)) display.
-
Last Month (Default) – Offer performance for Last Month (Current date (-1)) display.
-
Last 6 Months – Offer performance for Last 6 Months converted into weeks (Current date (-1)) display.
-
Last Year – Offer performance for Last 12 months (Current date (-1)) display.
-
Lifetime to Date – Offer performance for the last 5 years (Current date (-1)) display.
-
Graph
-
The bar graph will dynamically update the Offer performance based on the value selected for the In Promotion and Duration.
-
By default the Offer performance graph displays for All the Promotions which the Offer is part of for the Last Month.
-
The graph represents a plot between the Engagements on Y-axis and Duration on X-axis for each individual Promotion.
Promotion Details Side Panel
-
Promotion Name – Name of the Promotion.
-
Click the Promotion Name link from the Promotion Details panel on the Offer Scorecard window to display the View Promotion window for the selected promotion on the same tab. Click Done to return to the Offer Scorecard. See Viewing a Promotion to learn more about the information on that window.
-
-
Promotion ID – ID of the Promotion.
-
Start Date – The date the Promotion begins.
-
End Date – The date the Promotion ends.
-
Promotion Audience – Indicates the type of targeting used by the Promotion (Nonexclusive or Exclusive).
-
Response Rate – Calculated by dividing the total number of Respondents by the Total number targeted. Set to 100.00 for Non-Targeted customers.
-
Respondents – Number of Customers in the Target who have responded to the Offer in the Promotion. This is the same as the Total for Non-Targeted customers.
Loyalty Points
Total points issued during the Promotion period to the members against their purchase activity. The Points are calculated as defined in the Offers which is the part of this Promotion.
Figure 7-77 Loyalty Points Metric Tile
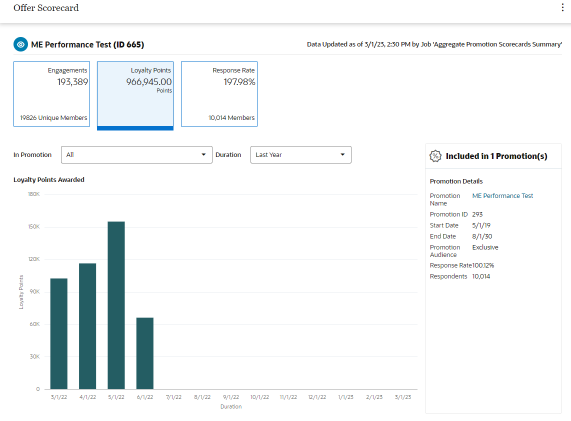
-
In Promotion - You can choose to view by All promotions (default) or select from the list of promotions associated with the offer.
-
Duration– Durations include:
-
Last Week - Offer performance for Last Week (7 days (Current date (-1)) display.
-
Last Month (Default) – Offer performance for Last Month (Current date (-1)) display.
-
Last 6 Months – Offer performance for Last 6 Months converted into weeks (Current date (-1)) display.
-
Last Year – Offer performance for Last 12 months (Current date (-1)) display.
-
Lifetime to Date – Offer performance for the last 5 years (Current date (-1)) display.
-
Graph
-
The bar graph will dynamically update the Offer performance based on the value selected for the In Promotion and Duration.
-
By default the Offer performance graph displays for All the Promotions which the Offer is part of for the Last Month.
-
The graph represents a plot between the Loyalty Points on Y-axis and Duration on X-axis for each individual Promotion.
Promotion Details Side Panel
-
Promotion Name – Name of the Promotion.
-
Click the Promotion Name link from the Promotion Details panel on the Offer Scorecard window to display the View Promotion window for the selected promotion on the same tab. Click Done to return to the Offer Scorecard. See Viewing a Promotion to learn more about the information on that window.
-
-
Promotion ID – ID of the Promotion.
-
Start Date – The date the Promotion begins.
-
End Date – The date the Promotion ends.
-
Promotion Audience – Indicates the type of targeting used by the Promotion (Nonexclusive or Exclusive).
-
Response Rate – Calculated by dividing the total number of Respondents by the Total number targeted. Set to 100.00 for Non-Targeted customers.
-
Respondents – Number of Customers in the Target who have responded to the Offer in the Promotion. This is the same as the Total for Non-Targeted customers.
Average Points Issued Per Transaction
Average number of points issued per Transaction during the Promotion period to the members against their purchase activity. The Average Value (Total Points issued/Number of Transaction).
Figure 7-78 Average Points Issued Per Transaction Metric Tile
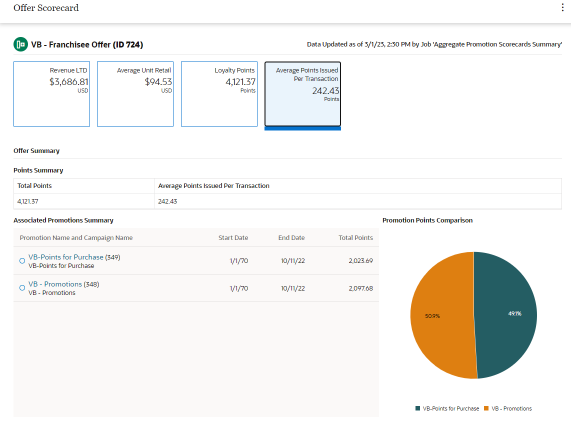
Offer Summary - Points Summary
-
Total Points – Sum Total of the Points generated using the offer.
-
Average Points Issued Per Transaction – Average number of points issued per Transaction during the Promotion period to the members against their purchase activity. The Average Value (Total Points issued/Number of Transaction).
Associated Promotions Summary
Data Section
-
A full circle represents an Active Promotion or an empty circle represents an Inactive Promotion.
-
Promotion Name and Campaign Name – Name of the Promotion and Campaign.
-
When a user selects the promotion name from the list of promotions on the Offer Scorecard window, the system displays the View Promotion window for the selected promotion on the same tab. See Viewing a Promotion for more information.
-
-
Promotion ID – Contains the Title ID and the Promotion ID in parenthesis.
-
Start Date – The date the promotion begins.
-
End Date – The date the promotion ends.
-
Total Points – Total points distributed with all the Promotion's Offers.
Promotion Points Comparison
Pie Chart
-
The pie chart shows the pictorial representation of the points distributed from the respective promotions.
-
The title of the pie chart is Promotion Points Comparison.
-
The maximum of top ten promotions by direct revenue display.
-
Each sector of the pie chart represents the points distributed by an individual promotion with a different color.
-
A legend displays to the right of the pie chart and is linked with the information displayed in the pie chart.
Note:
To close the Offer Scorecard, click the close icon X associated with the Offer Number in the Open Tasks area at the top of the window.
Response Rate
Calculated by dividing the total number of Respondents by the Total number targeted. Set to 100.00 for Non-Targeted customers.
Figure 7-79 Response Rate Metric Tile
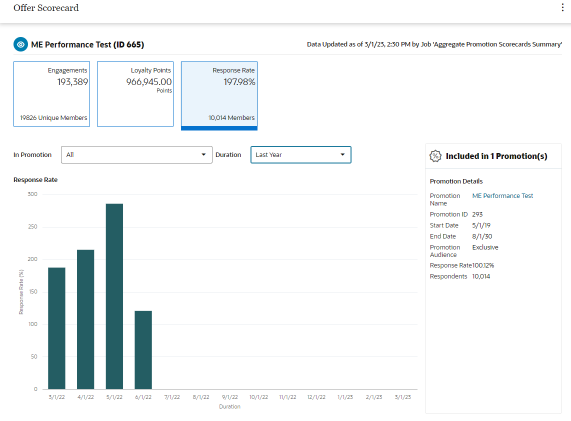
Graph
-
The bar graph will dynamically update the Offer Response Rate based on the value selected for the In Promotion and Duration.
-
By default the Response Rate performance graph displays for All the Promotions which the Offer is part of for the Last Month.
-
The graph represents a plot between the Response Rate on Y-axis and Duration on X-axis for each individual Promotion.
Promotion Details Side Panel
-
Promotion Name – Name of the Promotion.
-
Click the Promotion Name link from the Promotion Details panel on the Offer Scorecard window to display the View Promotion window for the selected promotion on the same tab. Click Done to return to the Offer Scorecard. See Viewing a Promotion to learn more about the information on that window.
-
-
Promotion ID – ID of the Promotion.
-
Start Date – The date the Promotion begins.
-
End Date – The date the Promotion ends.
-
Promotion Audience – Indicates the type of targeting used by the Promotion (Nonexclusive or Exclusive).
-
Response Rate – Calculated by dividing the total number of Respondents by the Total number targeted. Set to 100.00 for Non-Targeted customers.
-
Respondents – Number of Customers in the Target who have responded to the Offer in the Promotion. This is the same as the Total for Non-Targeted customers.