4 Extension
RDS Architecture Basics
The defining feature of RDS is the data of each participating product resides in a single dedicated read-only schema, e.g., MFCS. Product data is made accessible to the customer in a dedicated companion, writeable schema using synonyms. All custom data objects are created in this companion, writeable schema. Management and retention of these objects is wholly the responsibility of the customer.
The product data in RDS is a replica of selected data residing in an operations system such as MFCS. The MFCS replica contains more than 700 views. Nonetheless, RDS is not part of MFCS (nor any other participating product), but a repository of MFCS data. Moreover, the data exchange is one way from MFCS to RDS. Any data movement, directly or indirectly, from RDS to MFCS is orchestrated by the customer.
Note:
Only views on replicated tables are accessible. Specifically, replicated tables are not accessible. Moreover, the data exchange is one way from any custom product schema (for example, MFCS_RDS_CUSTOM) to RDS. Any data movement, directly or indirectly, from RDS to a product (for example, MFCS) is orchestrated by the customer. RDS schema are accessible from services, Data Visualization, the APEX UI. There is no other access pathway.
Although data from multiple products reside in RDS, there is only an informal guarantee that if there are no updates to a given set of data items, then eventually all accesses will return temporally consistent results. What this statement means is that after sufficient time has passed, RDS accurately reflects the state of the enterprise at some point in time in the recent past (recent could be measured in seconds, minutes, or hours). What qualifies as sufficient time depends on the temporal consistency of the separate subsystems that make up the enterprise, which depends metaphorically speaking on when each system closes its book. Temporal consistency also depends on the replication lag, which varies depending on system loading. This lag, however, is expected to be minimal under normal operating conditions. Temporal consistency may prove decidedly less relevant than semantic and data model differences between the products that reflect the specific problems each product was devised to solve.
Refer to your product data model to determine what data is available in RDS. Bear in mind, the data is a replica of inserts and updates as well as deletes. The point is, the data retention policy in RDS is effectively replicated from the operations system. Selected audit/delete tables are also retained. The retention period of audit/delete data is one year. Retention of audit/delete data beyond one year is the responsibility of the customer. The retention period is not configurable.
Environment Considerations
When embarking on the customization of a product, it is important to understand how the RDS implementation environment, which is a SaaS offering, differs from PaaS and on-premises. First of all, some or all product customization will be accomplished by making modifications to RDS (the product implementation guide will provide details on product customization). Those modifications are achieved using APEX.
APEX is a low code development environment. As a result it does not anticipate the need for (and does not provide) development life cycle tools. Application user interfaces are composed in an application builder. RESTful services are built in a similar fashion. In fact, one constructs most database objects using a UI rather than by executing code. One can, however, use the SQL Workshop to compose small amounts of PL/SQL (e.g., 100s to 1000s of lines of code). There is no access to SQL*Developer or SQL*Loader. In fact, most consoles are unavailable. It is an ideal environment for most business savvy users, but may be foreign to the skilled PL/SQL, front end, or back end developer. It is important to note that customizations that require coding will use SQL and PL/SQL. Moreover, most data interchange will rely on JSON formatted messages. All the examples in this document will employ JSON.
When using APEX, SQL command line type activities are performed in the SQL Commands tool within the SQL Workshop. For SQL script development (for blocks of code where reuse is anticipated), however, one uses the SQL Scripts tool.
When using APEX, one logs into a workspace and that workspace provides access to a single schema. Cross-schema queries are immediately available for replicated views. Cross-schema access of custom database objects, however, requires custom grants. For example:
grant select on my_table to ce_rds_customLastly, it is important to remember that since RDS is a SaaS offering, some tools and features may not be available or availability may be provided with some limitations. It is important that one understand the dependencies inherent in customizations that one wishes to migrate. Expect to review these dependencies with an Oracle Representative.
ORDS RESTful Services
The point of this section is not to say everything that needs to be said about RESTful Services. Rather it will describe some patterns one is likely to encounter and how they might be implemented. Those patterns are as follows:
-
Data producing services or outbound integrations are one of the most likely patterns one will implement. Such services are typically pull producers that generate a chunk of data in response to an explicit request. A less common producer is one which continues to generate data without external prompting by invoking an external data consuming service. In this case, the service is either governed by the DBMS_SCHEDULER or by and external scheduling system.
-
Data consuming services or inbound integrations insert data into RDS. The inbound data originates in an external system. There is no need to insert data found in the participating products or subscribe to RICS data originating in these products because it is already being replicated.
-
Bulk import and export services represent another inbound and outbound integration pattern. In this case, however, data is transferred through object storage rather than through the service itself. The role of the service is to initiate the transfer.
-
The last services pattern concerns process orchestration and monitoring. These service patterns start, stop, and monitor jobs. In most cases, these services will run asynchronously. For example, they will submit a job for future execution and return immediately.
Oracle RESTful Data Services play a role in every integration. Services either directly transfer the data or initiate that transfer through object storage. For a pull pattern, the service queries ADW and then returns the query result as its response. For a push pattern, the service is invoked with a payload that is inserted in a ADW table. In the case of a bulk export integration, the service initiates the export and then returns a response indicating whether the export was successfully initiated or not. Lastly, a bulk import integration service initiates the import and then returns a response indicating whether the import was successful or not. Additional services are required to monitor the progress of import and export jobs.
In most cases, the pattern chooses itself for a given task. Synchronous data services that push or pull data in response to an explicit request are simple to implement. The problem is that simple producers do not tend to scale to large volumes of data. First, there is a non-negotiable hard limit of 300 seconds on query duration. If the query exceeds this limit, the caller will return a socket hang up error. Moreover, it is also worth remembering that the database is not infinitely scalable. Specifically, there are only so many connections available (a max of 100) and there is only so much CPU capacity. One can't split a huge bulk data task into a multitude of smaller subtasks and expect them to require fewer CPU seconds. In the worst case, a backlog of REST invocations builds, and invocations start timing out.
Implementing a RESTful Service in APEX
In order to implement the examples below, you will need:
-
Access to the APEX UI and Workspace so that you can create a service
The following paragraphs will only provide an overview of how one creates a RESTful service. Consult Chapter 7 of the SQL Workshop Guide, Enabling Data Exchange with RESTful Services. The chapter describes in detail how one creates a RESTful service in APEX. Bear in mind, documentation is version specific. Although documentation across versions tends to be quite similar, it is generally best to consult the documentation for the version of APEX one is using.
To begin, navigate to the APEX UI and select a workspace, such as MFCS, then follow the steps below:
-
From the APEX UI navigate to the RESTful Services page (i.e., from the APEX Navigation Bar SQL Workshop > RESTful Services).
-
Click Modules
-
Click Create Module
-
Name your module "imp_guide" and set the Base Path to "/imp_guide/"
-
Click Create Module
A module represents a collection of related services. Begin creating the first service by creating a template. The steps are as follows:
-
Click Create Template
-
Set the URI Template to "hello_world/:name"
-
Click Create Template
The ":name" path component allows us to introduce and demonstrate a bind variable.
The last step is to create a handler for the service. Create the handler by following steps below:
-
Click Create Handler
-
Set the Method to GET
-
Set Source Type to Collection Query
-
Set the Source to "select 'Hello World! ' || :name as response from dual"
-
Click Create Handler
The full URL is displayed on the ORDS Handler Definition page. The URL has the following form:
https://<host>/<tenant-name>/ords/<workspace>/imp_guide/hello_world/<your-name>Note that the URL for service handler is displayed on the handler definition page.
Since this is a GET service, it can be tested from a browser. The response for this service, if your_name was john would be:
{
  "items": [
    {
      "response": "Hello World! john"
    }
  ],
  "hasMore": false,
  "limit": 25,
  "offset": 0,
  "count": 1,
  "links": [
    {
      "rel": "self",
      "href": "https://<host>/<tenant-name>/ords/mfcs/imp_guide/hello_world/john"
    },
    {
      "rel": "describedby",
      "href": "https://<host>/<tenant-name>/ords/mfcs/metadata-catalog/imp_guide/hello_world/item"
    },
    {
      "rel": "first",
      "href": "https://<host>/<tenant-name>/ords/mfcs/imp_guide/hello_world/john"
    }
  ]
}
Query parameters become bind variables. For example:
-
Edit the Source of your hello_world service to be "select 'Hello World! ' || :name || ' ' || nvl(:last_name, 'Smith') as response from dual"
-
Apply Changes.
The response for this service, if your_name was john?last_name=jones would be:
{
  "items": [
    {
      "response": "Hello World! john jones"
    }
  ],
  "hasMore": false,
  "limit": 25,
  "offset": 0,
  "count": 1,
  "links": [
    {
      "rel": "self",
      "href": "https://<host>/<tenant-name>/ords/mfcs/imp_guide/hello_world/john?last_name=jones"
    },
    {
      "rel": "describedby",
      "href": "https://<host>/<tenant-name>/ords/mfcs/metadata-catalog/imp_guide/hello_world/item"
    },
    {
      "rel": "first",
      "href": "https://<host>/<tenant-name>/ords/mfcs/imp_guide/hello_world/john?last_name=jones"
    }
  ]
}
Before proceeding:
-
Create the hello_world service in the APEX UI.
-
Test the service from a browser. You should be challenged (if you have not already been authenticated) when invoking the service. Use your IDCS login credentials to authenticate.
Invoking a RESTful Service from POSTMAN
In order to implement the example below, you will need:
-
The hello_world service described above.
-
Access to POSTMAN. The discussion below assumes familiarity POSTMAN.
-
The ORDS OAUTH credentials created in Obtaining ORDS Service Credentials.
Invoking a RESTful service from POSTMAN combines access token generation with endpoint access. Using POSTMAN allows you to test your services as well as simulate the fundamental tasks performed in service-based integration. To invoke your hello_world service using POSTMAN, follow these steps:
-
Open Postman and create a new request by clicking on the "New" button in the top left corner of the application. Select HTTP Request.
-
In the "Enter URL or paste text" field, enter the endpoint of the hello_world service.
-
The default HTTP method is GET. Examine the other methods, but leaving the setting as GET.
-
Click the Params tab and add the last_name parameter (i.e., key is last_name, value is Smith for example).
-
Click the Authorization tab.
-
Select the OAuth 2.0 type from the drop-down menu.
-
Click on the "Get New Access Token" button.
-
In the "Get New Access Token" popup window, fill in your access token URL (IDCS Authorization Server endpoint URL), client ID, client secret, grant type, and scopes.
-
Once you have filled in the required fields, click on the Get New Access Token button.
-
POSTMAN will then display the token details, such as the access token, refresh token, and token expiration time.
-
Finally, click the Use Token to apply the token to your service.
-
-
Once you have configured the request, click on the "Send" button to send the request to the RESTful service.
-
You will see the response from the RESTful service in the "Response" section of the request window. You can view the response headers, body, and status code to verify that the request was successful.
Before proceeding invoke your hello_world service from POSTMAN.
ORDS PRE-HOOK
Oracle REST Data Services (ORDS) provides the ability to use PL/SQL based pre-hook functions that are invoked prior to an ORDS based REST call. These functions can be used for a variety of purposes including auditing, custom authentication and authorization, and metrics gathering.
Each provided RDS workspace comes pre-configured with a simple
pre-hook function named ORDS_PREHOOK, and it has
a default implementation that simply returns true. As such, it has no effect on the REST calls made into custom applications.
It is provided as a starting point for extension to teams that required
additional processing on each REST call. For those teams, replacing
the implementation of the ORDS_PREHOOK function will
enable the additional capabilities they require. For more information
on pre-hook functions, please refer to Oracle REST Data Services Installation, Configuration,
and Development Guide: Overview of Pre-hook Functions.
Be aware that some extensions, such as those provided by the Oracle Retail Cloud Value team, use ORDS PRE_HOOK to enhance security. Incomplete configuration of these extensions as well as failure to communicate their presence to the broader customer implementation team can result in unexpected authentication failures.
Using RDS to Build a Data Consuming Service
In order to implement the example below, you will need:
-
Access to the APEX UI.
-
Access to POSTMAN. The discussion below assumes familiarity POSTMAN.
-
The ORDS OAUTH credentials created in Obtaining ORDS Service Credentials.
A data consuming service updates an existing a custom RDS table, emphasis on custom. All the replicated views and tables in RDS are read-only. If you want to add data to RDS, you will need to create a table for it. The semantics of http methods strongly encourages you to use the POST, PUT, and DELETE methods modification, specifically, it discourages creating GET handlers that have side effects. From the service implementation perspective, a data consuming service is no different than the POST service described in POST Services. The difference is that the service source unpacks the payload (or query string parameters) and then inserts a new record or updates an existing record based on the results of that unpacking.
For example, the following service source inserts a row into a table name hello_world_names. This table has two columns, last_name and first_name. The first name is part of the URL and the last name is found in the body of the post method.
declare
    payload varchar2(128) := :body_text;
    response varchar2(64);
    first_name varchar2(64) := :name;
    last_name varchar2(64);
begin
    last_name := nvl(json_value(payload, '$.last_name'),
                   'no_last_name_given');
    insert into hello_world_names (last_name, first_name)
      values (last_name, first_name);
    htp.prn('{"status":"success"}');
end;
Before proceeding:
-
Create hello_world_names table in your RDS.
-
Add (create) a POST handler for your hello_world service described in POST Servicesto insert a row in the hello_world_names. Use the example source above.
-
Test your new POST handler using POSTMAN.
Jobs
An asynchronous approach is generally called for when the likely wait time for process completion is high. A data export to object storage is generally a good candidate for an asynchronous start. In the simplest case, one needs to implement three data services: job start, job stop, and job status. The DBMS_SCHEDULER package provides the functionality one would need for these services. There is, of course, the option to schedule an export job to repeat and obviate the need to create a job start service. One could still use a job start service to invoke an unscheduled export.
One uses the DBMS_SCHEDULER.create_job procedure to create a job that can be started asynchronously. A typical approach would be to use create job to wrap a procedure. The create job invokes the procedure immediately (by setting the start_date to SYSTIMESTAMP) upon creation and is dropped automatically upon completion. The service would return a unique job name or execution id to be used to stop and monitor the job.
Another service is used to monitor the job status using the returned execution id. The monitoring service would be used to poll the status of the job. The job status is obtained by executing a query on the DBMS_SCHEDULER.user_scheduler_job_run_details. A complete reference implementation of an asynchronous job start and monitoring framework is available on My Oracle Support. To view the reference implementation:
-
Login to my oracle support.
-
Search for Oracle Retail Data Store Documentation Library
-
Navigate to Sample Code
-
Click on the link Sample Code
Retail Home Integrations
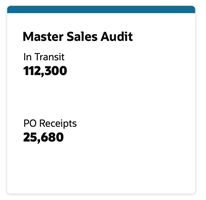
A Retail Home integration is an example of outbound integration with a user interface or portal. Retail Home Metric tiles without charts are quite simple to implement. For example, the following data service source (with a source type of collection query) will populate the 2 Metric Tile below:

select
   'PO Receipts' as NAME, 25680 as VALUE,
   'N' as   "VALUE_FORMAT" from dual
union
select
   'In Transit' as name, 112300 as value,
   'N' as "VALUE_FORMAT" from dual
This data service response is:
{"items":[
      {"name":"In Transit","value":112300,"value_format":"N"},
      {"name":"PO Receipts","value":25680,"value_format":"N"}
   ],
   "hasMore":false,
   "limit":25,
   "offset":0
   "count":2,
   "links":[...]
}
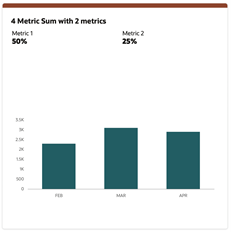
Producing a 4 Metric Summary, however, is more complicated and requires one use a source type of PL/SQL (the following code only provide values for two of four metrics).

declare
    response varchar2(4000);
begin
    SELECT json_object (
        'items' value
            json_array(
                json_object ('name' value 'Metric 1',
                   'value' value 0.5,
                   'valueFormat' value 'PC'),
                json_object ('name' value 'Metric 2',
                   'value' value 0.25,
                   'valueFormat' value 'PC')
            ),
        'chart' value
            json_object ('type' value 'bar',
                'items' value
                   json_array(json_object('name' value 'FEB',
                                          'value' value 2300),
                              json_object('name' value 'MAR',
                                          'value' value 3100),
                              json_object('name' value 'APR',
                                               'value' value 2900)
                            ),
                         'valueFormat' value 'S',
                         'seriesName' value 'Sales',
                         'valueLabel' value 'Amount'
                        )
        )
    into response FROM DUAL;
    htp.print(response);
end;
Filters, if used, become query string parameters and values in the URL. The query string parameters manifest in the source as bind variables.
Monitoring Resource Consumption in RDS
Although ADW is self-tuning, it cannot ensure that one's business priorities and resource consumption are well aligned. For example, the resource consumption of a new, as yet to be tuned, report may adversely impact higher priority tasks. By monitoring the consumption and performance of RDS, one is able to pinpoint which tasks could benefit from additional attention. In some cases, however, even well tuned tasks are long running and resource intensive. If these tasks are of lower priority, the user would like to run them at a lower priority. Ultimately, monitoring allows the user to both effectively employ compute services and determine if resource consumption matches business priorities. Control, on the other hand, gives the user a means to align resource consumption with priorities. Exerting control will be the subject of another chapter whereas this chapter will focus on monitoring using AWR reports.
AWR reports are used to monitor activity in ADW. This section will discuss how to obtain AWR reports, but it will not discuss how to interpret those reports. Given that each customer's monitoring needs differ, there is no ready to use AWR report access built into RDS. In other words, an AWR report is obtained via a customer implemented data service.
There are two steps to creating an AWR report, obtaining snap ids and generating the report using the appropriate pair of snap ids. Sample code for obtaining snap ids is shown in Listing 1. The code is used as the source for a ORDS GET handler. It illustrates the use of two bind variables. The first is part of the URI template, the begin_interval_time. The second optional query string parameter is the end interval time. The times are given as dates for simplicity, but snap ids are based on timestamps. If the query parameter is not given, the value is null.
Note that a procedure, HTP_PRN_CLOB, is used to output the response. HTP.print, which is ultimately used to output the response, only handles varchar2 args. Varchar2 strings have a maximum size of 4000 characters, which is often insufficient. Hence, the output of the query is put into a CLOB. The CLOB is then output using HTP_PRN_CLOB, which is shown in Listing 2.
The second step is generating the report. I hard code the snap ids for simplicity. Using the code in Listing 3 as the source of a GET handler and the URL of the data service, a browser will render the report. It would not be difficult to add additional bind variables to allow one to create a narrower snap id interval and combine the snap id query and the report generation.
LISTING 1: OBTAINING SNAP IDS
DECLARE
    from_begin_interval_time date := to_date(:from, 'YY-MM-DD');
    to_end_interval_time date := null;
    db_id NUMBER;
    inst_id NUMBER;
    response clob;
BEGIN
   dbms_output.enable(1000000);
   if :to is not null then to_end_interval_time := to_date(:to, 'YY-MM-DD') + 1;
   end if;
   SELECT dbid INTO db_id FROM v$database;
   SELECT instance_number INTO inst_id FROM v$instance;

   SELECT json_arrayagg(
                json_object(
                    'snap_id' value snap_id,
                    'begin_interval_time' value begin_interval_time,
                    'end_interval_time' value end_interval_time
                    returning clob format json)
                returning clob) into response
              FROM   dba_hist_snapshot
              WHERE  dbid = db_id
              AND    instance_number = inst_id
              and    begin_interval_time >= from_begin_interval_time
              and    (to_end_interval_time is null or
                      to_end_interval_time >= end_interval_time)
              ORDER BY snap_id DESC;
    HTP PRN CLOB(response);
END;
LISTING 3: GENERATING THE AWR REPORT
DECLARE
    db_id NUMBER;
    inst_id NUMBER;
    start_id NUMBER;
    end_id NUMBER;
    response clob := null;
BEGIN
   dbms_output.enable(1000000);
   SELECT dbid INTO db_id FROM v$database;
   SELECT instance_number INTO inst_id FROM v$instance;
   start_id := 12133;
   end_id := 12134;

   FOR v_awr IN
     (SELECT output FROM
TABLE(DBMS_WORKLOAD_REPOSITORY.AWR_REPORT_HTML(db_id,inst_id,start_id,end_id)))
     LOOP
     response := response || v_awr.output;
   END LOOP;
   HTP PRN CLOB(response);
END;
Invoking External Services
External services can be invoked using the APEX_WEB_SERVICE package. The UTL_HTTP is not supported. Specifically, the use of the UTL_HTTP requires white listing using the access control list (ACL). The privileges to modify the ACL are not available in any of the product schema.
In Context Launch of an APEX App
In context launch of an APEX App entails navigating to an APEX App from within a product application using a URL. Once you have deployed your application, loaded the data, and created users, you can publish your production URL. You can determine the production URL for your application by either:
-
Selecting the application on the Application home page and right clicking the Run button. Then, select Copy link address or Copy link location depending on your browser.
-
Running the application and then copying the URL.
Invoking an APEX app with one or more query parameters requires that the APEX App Session State Protection and Application Items be appropriately configured.
-
In your APEX App navigate to Shared Components > Security > Session State Protection. Navigate to the Set Page and Item Protection page of your published launch page, for example, your App Home page. Next, set page access restriction to Unrestricted. Always treat query parameter input as untrusted and sanitize it.
-
Next navigate to Shared Components > Application Logic > Application Items. Create an application item of the same name as your query parameter.
See Oracle APEX for additional details on URL syntax and managing session state.
Launching APEX Apps from Retail Home
It is quite simple to configure Retail Home to facilitate the launch of an APEX application.
-
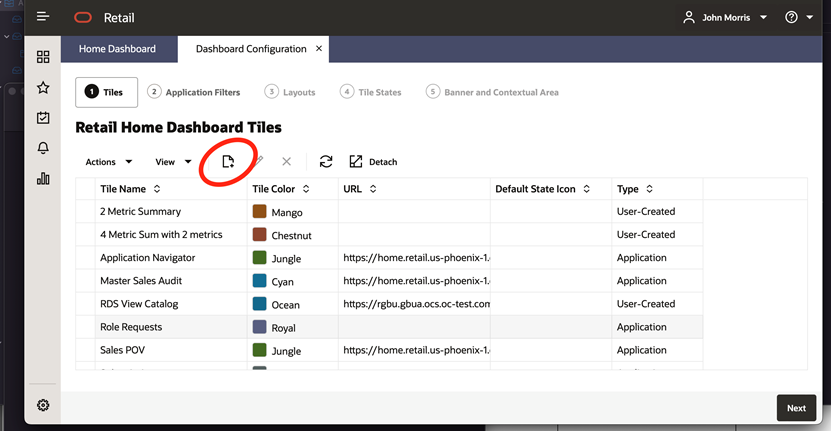
Navigate to the Dashboard Configuration tab and tap the Create button.
Figure 4-1 Dashboard Configuration Tab

-
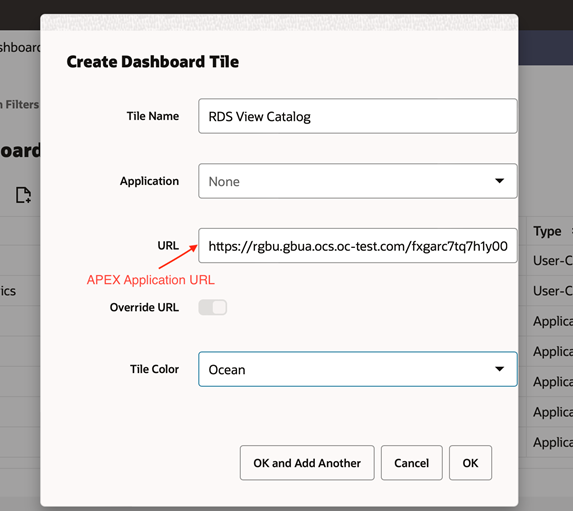
Fill in the Create Dashboard Tile Dialog. Note there is a field for specifying a URL for you new dashboard tile.
Figure 4-2 Create Dashboard Tile
