Notification-Based Monitoring
POM can be used in combination with the data in RDS to establish automated process monitoring. A POM batch job can be setup to call a RDS data service to generate and send the Alert to the associated application such as Merchandising.
This document describes the steps needed to setup such an automated process. These steps are:
-
Setup a notification type in Retail Home
-
Implement a RESTful service in RDS
-
Setup a job in POM to invoke that service
RDS-POM integration will be illustrated for an alert that returns the counts of stock counts that are open for more than seven days.
Setting up the Notification Type
Typically, an alert/notification results from the monitoring activity. As a first step, a notification type associated with this monitoring activity needs to exist or be setup in Retail Home. Refer to Retail Home documentation for details on how to create a notification type. For the example at hand the notification type is MerchStockCountAlert and is setup for the MFCS application.
Implementing a RESTful Service in RDS
The first step is to create the data service boiler plate, which consists of the following:
-
creating a module
-
creating a URI template, and lastly
-
creating a POST handler
The steps below describe the implementation of an open stock count RESTful service suitable for integration with POM.
The alert service must conform to the POM specification. There are two relevant specifications. The first concerns the format of the JSON body in the POST, which is shown in the following table. The alert service need not use any of the details in the body of the POST message.
|
Endpoint to start a job. Method: POST Body: |
| Attribute | Description |
|---|---|
|
cycleName |
Name of the Cycle - Nightly, Hourly_1, Adhoc etc. |
|
flowName |
Name of the Flow. |
|
processName |
POM process name |
|
jobName |
POM job name |
|
agentExecutionId |
A unique ID assigned by POM for every job run (Re-run of a failed job would have a different id compared to the initial run) |
|
parameters |
Job Parameters (Pipe delimited key-value pairs -- hey1=value1||key2=value2) |
The second specification concerns the response returned. If the notification object is not null, the content will be sent as a notification by POM.
| Attribute | Description |
|---|---|
|
executionId |
Unique Id returned by the target app to POM for status tracking |
|
executionInfo |
Any additional info the target app would like to share with POM |
|
notification |
This is an optional entry that can contain the following attributes. The url, type, and severity fields are optional. "notification": { "info": "<message>", "url": null, "type": "ErrorNotification", “severity":1 } |
|
status |
Submitted/ Running/Error/Completed |
Create a Stock Count Module
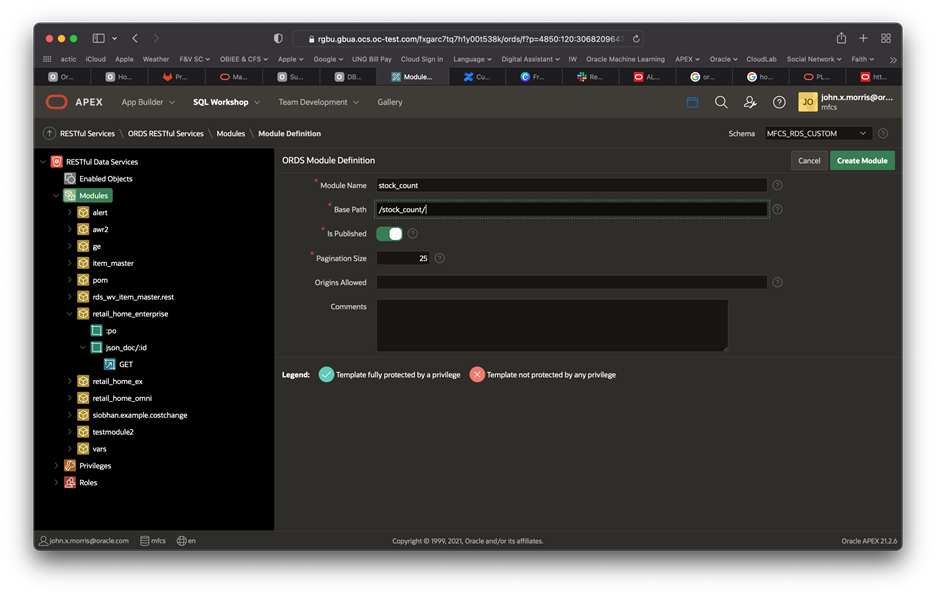
The first step is to create a module. Module is a hierarchical organizing construct. The user may have multiple services associated with it or just one. The following screen shot illustrates what the create module screen looks like prior to creating the module. Note the module name is stock_count and the base path is /stock_count/.
Create a URI Template
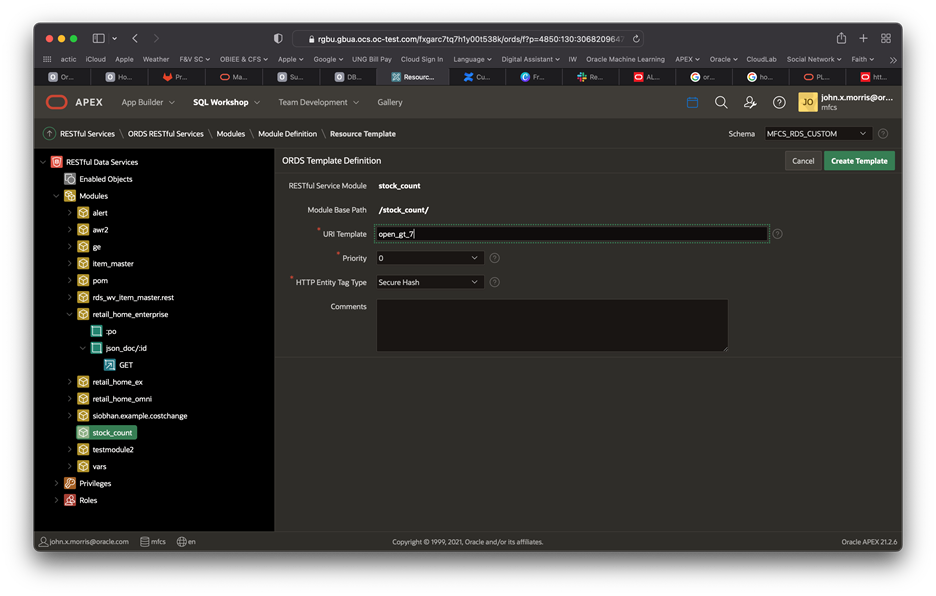
Once the module is created, create the URI template. Note the URI template is set to open_gt_7, i.e., stock counts open for more than seven days.
Create a POST Handler
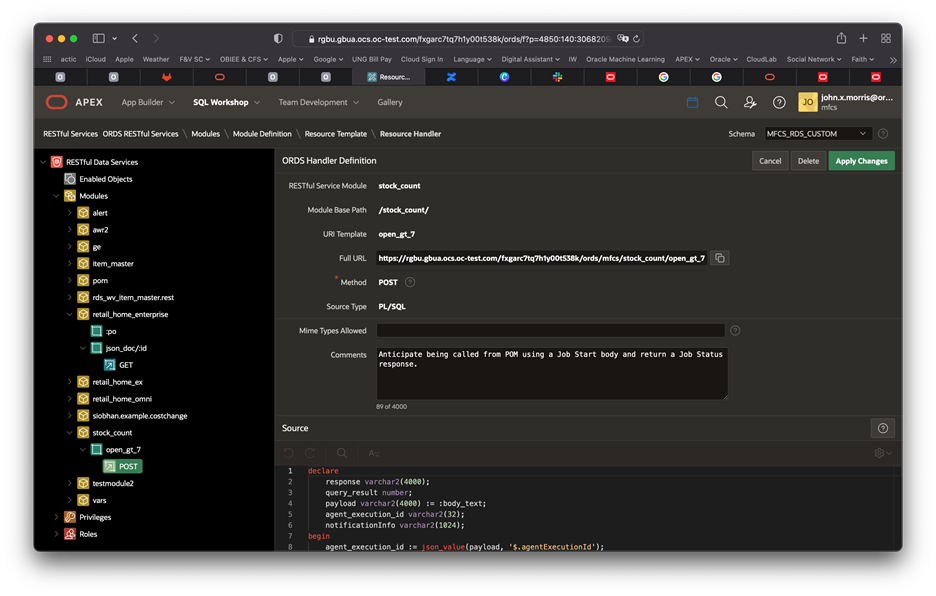
The last step is to create a POST handler. Note the method is POST and the source type is PL/SQL.
The source of the example alert service is in Listing 1. The body, a sample of which is shown in Listing 2, of the alert service invocation is accessed using the :body_text implicit parameter -- a bind variable. This variable can only be read once; so, retrieve it and store it in a variable. Unpacking the payload and crafting a response will be common tasks for most RESTful services. The example below illustrates some but not all that one might encounter. Bear in mind, the example below does not show any error handling. Experimentation and experience will determine what level of error handling is warranted. Listing 3 shows a response.
declare
    -- The :body_text bind variable is an implicit parameter.
    -- It can only be read once, so it is captured in a variable
    -- called payload.
    payload varchar2(4000) := :body_text;
    -- The result of the stock count query
    query_result number;
    -- Note that varchar2 is set to the maximum. If the response
    -- could exceed 4000 characters, a CLOB would be needed and
    -- one could not use htp.print directly.
    response varchar2(4000);
    -- The response will return the agentExecutionId in
    -- response as the executionId.
    agent_execution_id varchar2(32);
    -- The notification info destination.
    notificationInfo varchar2(1024);
begin
    -- Get the agent execution id from the payload (i.e., body text).
    agent_execution_id := json_value(payload, '$.agentExecutionId');
    -- Get a count of stock counts that have been open for more than
    -- 7 days and put it in query result.
    SELECT count(1)
        into query_result
        FROM rds_wv_stake_prod_loc spl,
            rds_wv_stake_head s
        WHERE s.stocktake_date BETWEEN sysdate - 7 AND sysdate
        AND s.delete_ind = 'N'
        AND spl.cycle_count = s.cycle_count
        AND s.stocktake_type = 'B'
        AND spl.processed != 'S'
        AND spl.cycle_count = s.cycle_count;
    -- Craft notificationInfo as a human readable string.
    notificationInfo := 'Number of stock counts that have been ' ||
        'open for more than 7 days is ' || to_char(query_result) || '.';
    -- Craft the required JSON response. There is no executionInfo.
    select json_object('status' value 'success',
            'executionInfo' value '',
            'executionId' value agent_execution_id,
            'notificationInfo' value notificationInfo) into response from dual;
    -- Output the response - note htp.print is used here. htp.print
    -- only supports varchar2 so another approach would be needed
    -- if the response is likely to exceed 4000 characters. This could
    -- if error handling (not shown) were to return a stack trace.
    htp.print(response);
end;
Listing 1: An Alert service conforming to POM Requirements
A sample payload for the above job is:
{
   "cycleName": "cycle1",
   "flowName": "flow1",
   "processName": "process1",
   "jobName": "job1",
   "agentExecutionId": "agentExecutionId1234",
   "parameters": ""
}
Listing 2: A Sample Payload
The response of the above service, given the payload in Listing 2 is:
{
   "status":"success",
   "executionInfo":null,
   "executionId":"agentExecutionId1234",
   "notificationInfo":"Number of stock counts that have been open for more than 7 days is 0."
}
Listing 3: A Sample Response
Setting up the POM Job
The user now needs to setup an Adhoc batch job in POM which calls the RESTful service described above. Adding such a job is done through the spreadsheet as described in the next section. The user then uploads the spreadsheet to POM then schedules to run at the desired time.
When the job executes, it will invoke the RESTful service which will return a response with notification content. POM will then send a notification to the associated application based on the designated notification type. The notification will contain the notification content returned from the RESTful service.
Adding the Adhoc Job in Batch Schedule Spreadsheet
Entries as shown below as an example need to be added in the specified tabs of the batch schedule spreadsheet for every Adhoc job created for an alert.
Figure 4-3 Process Tab
-
ProcessName – Add a unique process name in upper case with no spaces. Use an underscore if needed. It should end with XXX_PROCESS.
-
Description – Short description of the process without any special characters.
-
Application Name – Mention the application name where the batch process belongs to. E.g., MFCS
-
DependencyType – This needs to be set to ‘Time’.
-
AdhocInd – It will be ‘Y’ as we are creating an adhoc job here.
Figure 4-4 Job Tab
-
JobName – Unique job name for each alert in upper case only with no spaces. Use an underscore if needed. It should end with XXX_JOB.
-
Description – Short description of the job without any special characters.
-
RmsBatch, ScriptFolder and RmsWrapper – Irrelevant for alerts and can be left empty.
-
ParameterValue – This holds the two parameters needed to identify the notification type and the RDS endpoint. For the example at hand, these are:
-
notificationType: This is the notification type setup in Retail Home as described in the Setting Up a Notification Type section at the top of this document: MerchStockCountAlert.
-
restPath : This points to the endpoint defined above: mfcs/stock_count/open_gt_7.
-
-
These need to be separated by a double pipe as depicted in the Job tab screen shot above.
-
ApplicationName – Mention the same application name entered in Process tab. Here, it’s RMS.
-
Modules – Job can be associated with a module of the application.
-
JobType – The job type associated with RDS alerts is RDSAlert.
Figure 4-5 ProcessJobMapping
-
To map the new process and jobs (it’s one-to-one for adhoc jobs), enter the created ProcessName, JobName and the day(s) of the week on which the specific Process/Job needs to be run. If the Job will run on daily basis, leave ‘DaysOfTheWeek’ column blank.
Figure 4-6 Schedule
Ensure that the ‘Version’ is updated to a version greater than the ‘Current Version’ in POM Application. In this example, the version should be changed on the spreadsheet to 22.1.302.2.1 or 22.1.302.3.
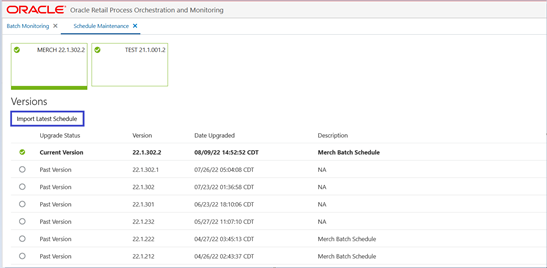
Uploading the Batch Schedule Spreadsheet in POM
-
Login to POM UI and navigate to Tasks -> Schedule Maintenance.
-
Select the Application Scheduler tile and click ‘Import Latest Schedule’ button.
-
Upload the spreadsheet containing the new Adhoc job for alert.
Figure 4-7 Upload Batch Schedule
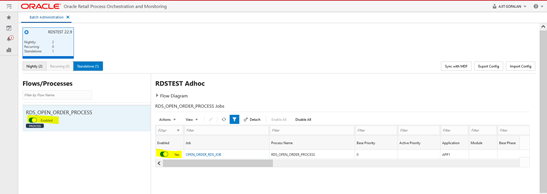
Enable the Newly Added Process/Job
Note that any new job introduced through the spreadsheet will be added in the disabled state. Enable it using the Batch Administration screen.
Figure 4-8 Batch Administration Screen
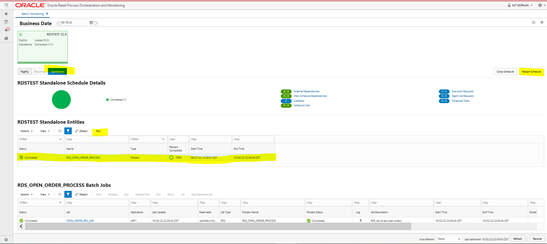
Starting/Restarting the Scheduler Day
You will need to start a new scheduler day or restart the existing scheduler day on the Batch Monitoring screen for the new changes to take effect in the next batch run. See the Batch Monitoring screen shot below.
You can now run the Alert job in POM in one of two ways:
-
Direct run through the Batch Monitoring screen or
-
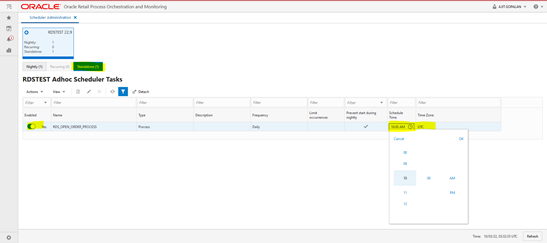
Schedule it to run using the POM Scheduler Administration screen.
Direct Run
On the Batch Monitoring screen, select the Standalone tab below the tile area. Then select the previously added RDS Alert process in the Standalone Entities table and click on the run action button above the table.
Figure 4-9 Batch Monitoring
Schedule through the Scheduler Administration Screen
You can use the POM Scheduler Administration screen to schedule the newly added job to run as frequently as needed.
Figure 4-10 Scheduler Administration
