3 Fiscal Document Management
RFMCS main objective is the management of fiscal documents and the support to fiscal document receiving and generation.
Fiscal Document Receiving is the set of RFMCS features meant to support the receiving of fiscal documents associated with a transaction and based on a pre-defined processing workflow.
Manage Document Receipt
The receiving of fiscal documents can be initiated from external applications by leveraging REST services available to submit a fiscal document to RFMCS. Consult the Retail Fiscal Management Cloud Service Inbound and Outbound Integration Guide for details.
Irrespectively of that, it is possible to start the receiving of a fiscal document from the Fiscal Document Receiving screens. This functionality is accessed from the main RFM task list under Documents > Manage Document Receipt.
Figure 3-1 Manage Document Receipt - Search
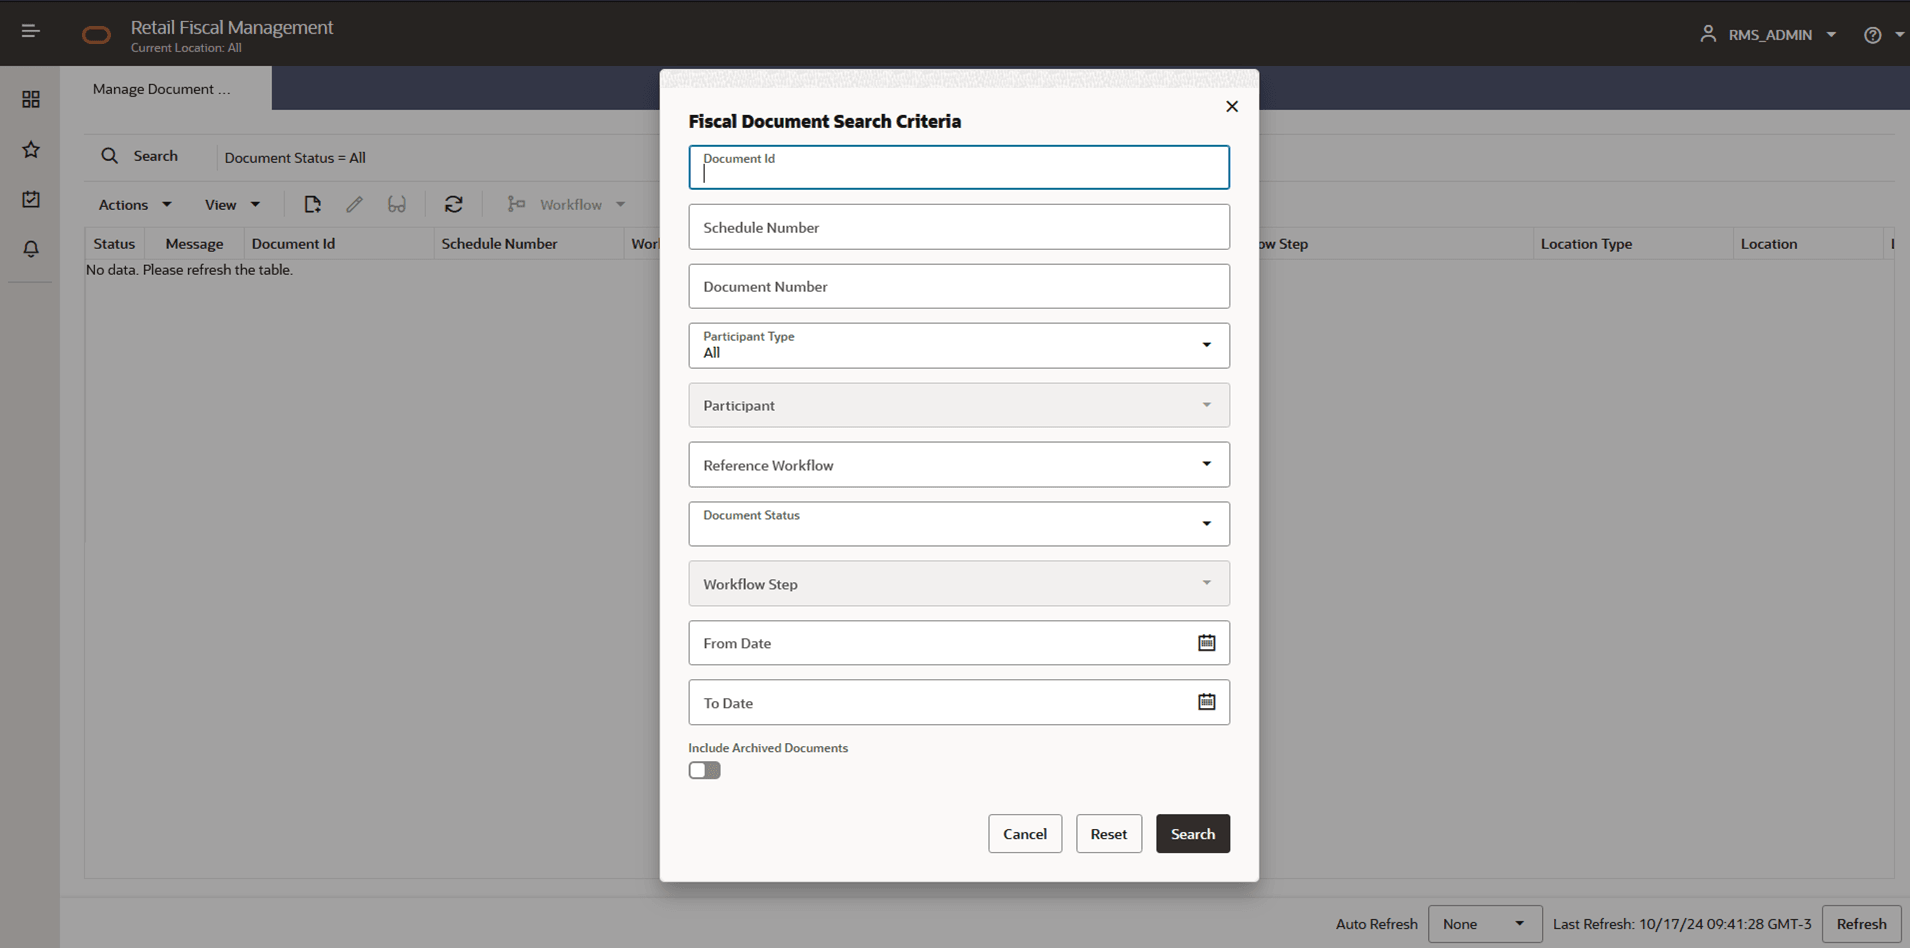
Manage Document Receipt screen will call a search criteria popup screen every time it is launched. In this search criteria the following search options are available:
-
Document Id: Internal ID associated with a fiscal document. This field will have a hyperlink to the detailed fiscal document screen.
-
Schedule Number: Internal sequence assigned to the fiscal document representing the ID sent to inventory systems for physical receipt.
-
Document Number: External fiscal document number assigned by the document issuer.
-
Participant type: (“All”, “Location”, “Partner”, “Supplier Site”)
-
Participant: Based on the type, this search field will display a list of all entities available in FDR data.
-
Reference Workflow: Workflow to which the document is linked.
-
Document Status: (“All”, “Error”, “In Progress”, “Action Required”, “Completed”, “Rejected”, “Deleted”.)
-
Workflow Step: Step of the workflow in which the document is found.
-
From date interval: Based on the document Create Date field.
-
To date interval: Based on the document Create Date field.
-
Include Archived Documents: Determines whether the search considers the processed documents already in HIST repository.
Figure 3-2 Manage Document Receipt
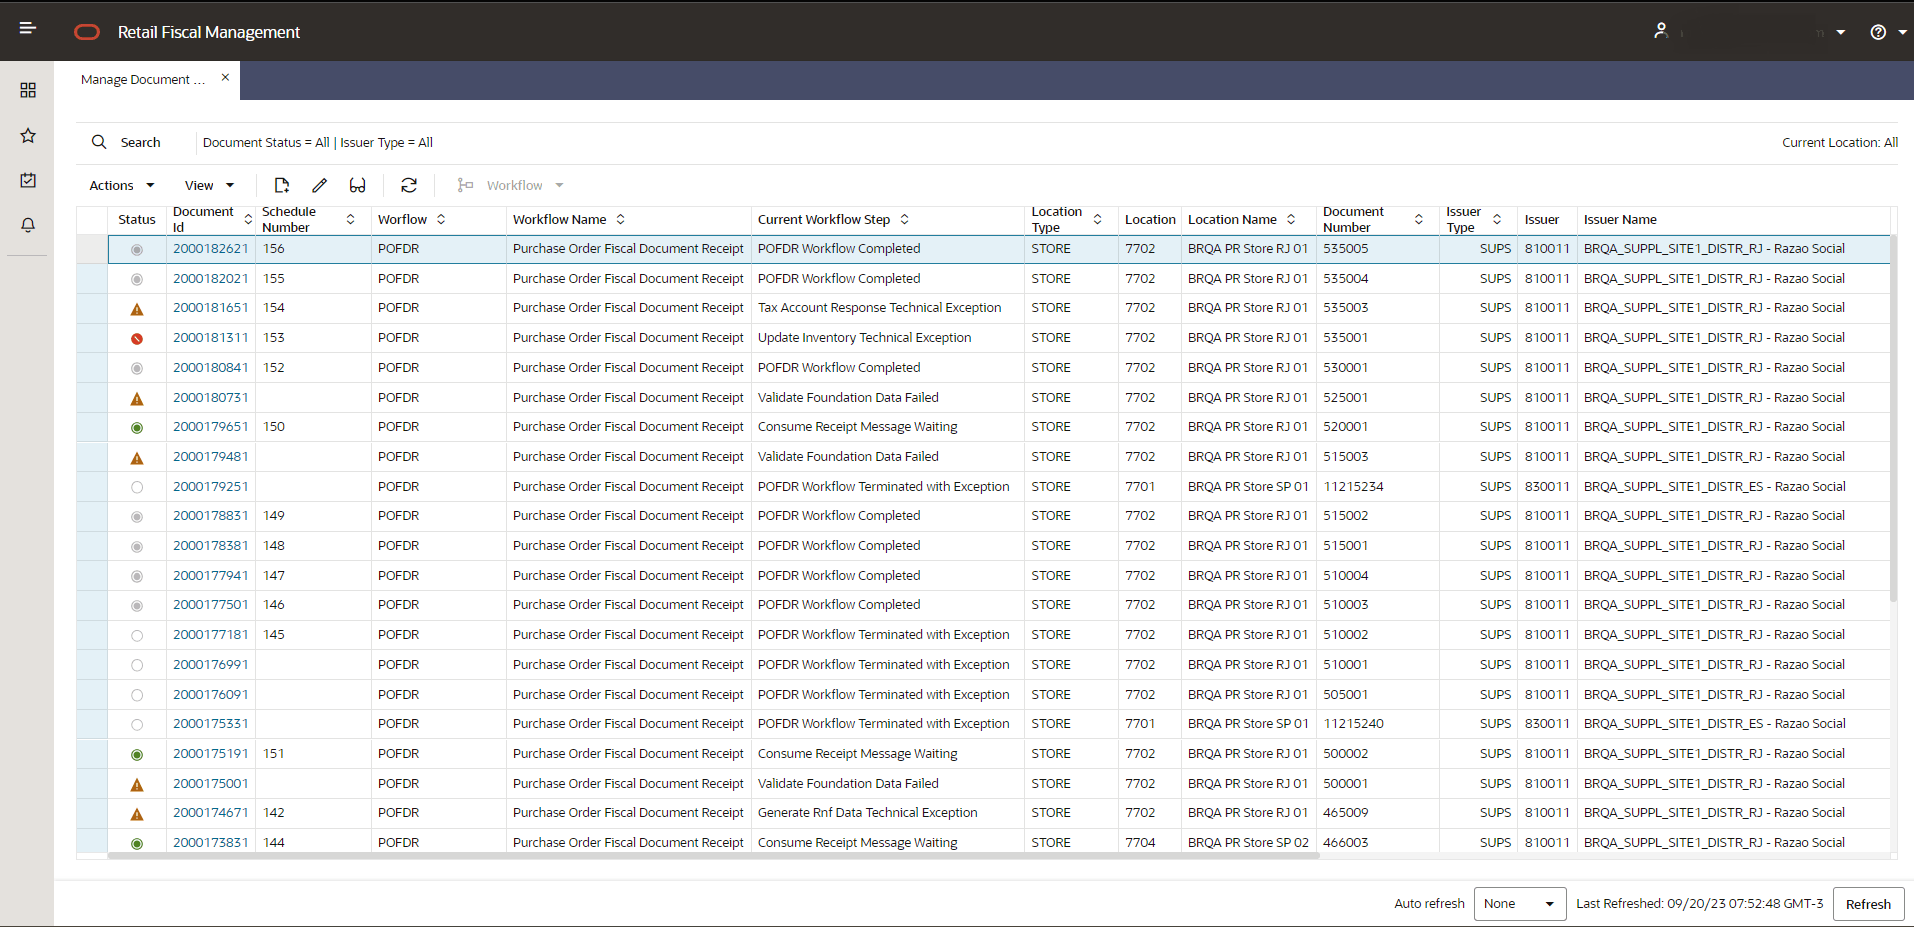
Table 3-1 Manage Document Receipt Screen Fields
| Field | Description | ||||||||||||||
|---|---|---|---|---|---|---|---|---|---|---|---|---|---|---|---|
|
Status |
The status of each document will be:
|
||||||||||||||
|
Document ID |
Internal sequence for each document. This field will be a hyperlink to the Fiscal Document Detail Screen in edition or view mode, depending on user profile access. |
||||||||||||||
|
Document Number |
External document Number. |
||||||||||||||
|
Schedule Number |
Internal sequence generated during the submit for physical receipt step. This number will be the sent in SCHEDULE_NBR field of the ASNIN message sent to inventory systems. |
||||||||||||||
|
Workflow |
Workflow Prefix identification. |
||||||||||||||
|
Workflow Name |
Name associated with the workflow prefix |
||||||||||||||
|
Current Workflow Step |
Workflow detailed step description according to the workflow setup. |
||||||||||||||
|
Location Type |
Merchandise Location Type (Store, WH) where document is being received |
||||||||||||||
|
Location |
Location ID where document is being received. |
||||||||||||||
|
Location Name |
Location Name where document is being received |
||||||||||||||
|
Participant Type |
“Store”, “Warehouse”, “Partner”, “Supplier Site” |
||||||||||||||
|
Participant |
Vendor or location ID |
||||||||||||||
|
Participant Name |
Vendor or location Name |
||||||||||||||
|
Transaction Type |
Transaction type associated with the document (PO, TSF, and so on) |
||||||||||||||
|
Transaction Name |
Description of the transaction associated with the document (Purchase Order, Transfer, and so on) |
||||||||||||||
|
Transaction Number |
Transaction number (PO number, transfer number, and so on) |
||||||||||||||
|
Document Type |
Document type associated to the workflow setup |
||||||||||||||
|
Doc Issue Date |
Date when the document was issued (same as Government approval date). |
||||||||||||||
|
Create Date |
Date when the document was inserted in FDR. |
||||||||||||||
|
Total of Document |
Total value of the document. |
||||||||||||||
|
Items |
Total number of items in the document. |
||||||||||||||
|
Message |
Link button to the detailed message, error log, or report available for the document current status/scenario. |
In the Manage Document Receipt screen´s task bar, the following options will be available:
-
In Actions and in separated buttons:
-
Create: Will open a popup screen to upload a fiscal document
-
Edit: Will get into the document detail in edit mode
-
View: will get into the document detail in view mode
-
Refresh: will refresh the list of documents based on current filter criteria
-
-
In View:
-
Manage Columns
-
Sort
-
-
Workflow: Will open the dynamic list of option within the workflow for the document selected. This list will vary depending on the workflow and the current processing step.
Figure 3-3 Upload Fiscal Document
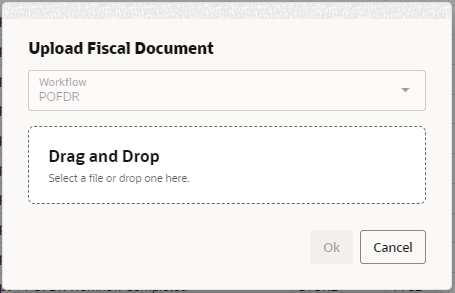
Although the Fiscal Document Receiving architecture was designed to support the receipt of a document without any user
intervention by leveraging REST services and a complete automated workflow process, it is possible to manually add a new document
to be processed by using the “Create” button: ![]() . This feature allows a manual upload of a fiscal document and the association to a workflow to process it.
. This feature allows a manual upload of a fiscal document and the association to a workflow to process it.
The Upload Fiscal Document screen allows the selection of the workflow and the fiscal document to be processed. The file can also be dragged and dropped directly in the screen.
Depending on the workflow, a specific type of document is expected and validations will take place to make sure the valid document is uploaded for a selected workflow.
Once the file is dropped in this screen and the OK button is pressed, the workflow will be called to process the document. In case of success, the new document will be displayed in the Manage Document Receipt screen and the workflow processing will be initiated.
Manage Document Generation
The generation of fiscal documents can only be initiated from external applications by leveraging REST services available to request a fiscal document to RFMCS. Consult the Retail Fiscal Management Cloud Service Inbound and Outbound Integration Guide for details.
Irrespective of that, it is possible to visualize and follow the document creation workflow processing from the Fiscal Document Generation screen. This functionality is accessed from the main RFM task list under Documents > Manage Document Generation.
Figure 3-4 Manage Document Generation - Search
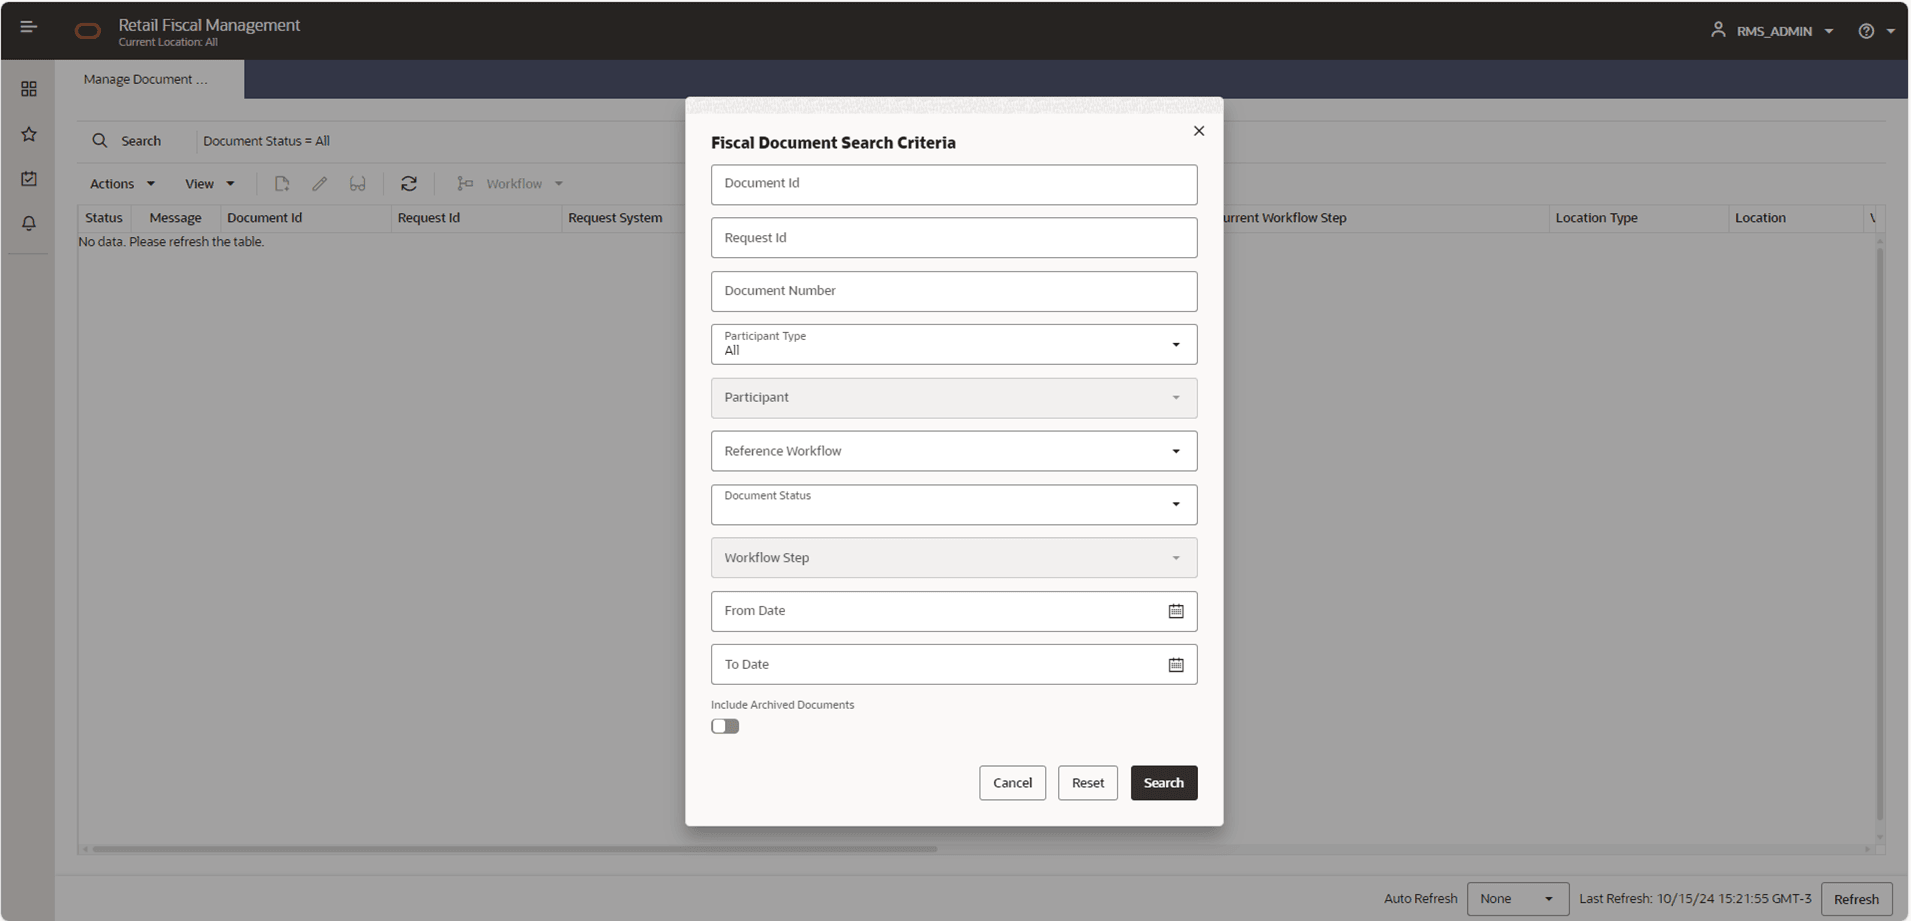
Manage Document Generation screen will call a search criteria popup screen every time it is launched. In this search criteria the following search options are available:
-
Document Id: Internal ID associated with a fiscal document. This field will have a hyperlink to the detailed fiscal document screen.
-
Request Id: Internal sequence assigned to the fiscal document by the time the request is received in RFMCS.
-
Document Number: External fiscal document number to be assigned by to the document during the workflow process.
-
Participant Type: (“All”, “Location”, “Partner”, “Supplier Site”)
-
Participant: Based on the type, this search field will display a list of all entities available in FDG data.
-
Reference Workflow: Workflow to which the document is linked.
-
Document Status: (“All”, “Error”, “In Progress”, “Action Required”, “Completed”, “Rejected”, “Deleted”, “Canceled”, “Nullified”)
-
Workflow Step: Step of the workflow in which the document is found.
-
From date interval: Based on the document Create Date field.
-
To date interval: Based on the document Create Date field.
-
Include Archived Documents: Determines whether the search considers the processed documents already in HIST repository.
Figure 3-5 Manage Document Generation
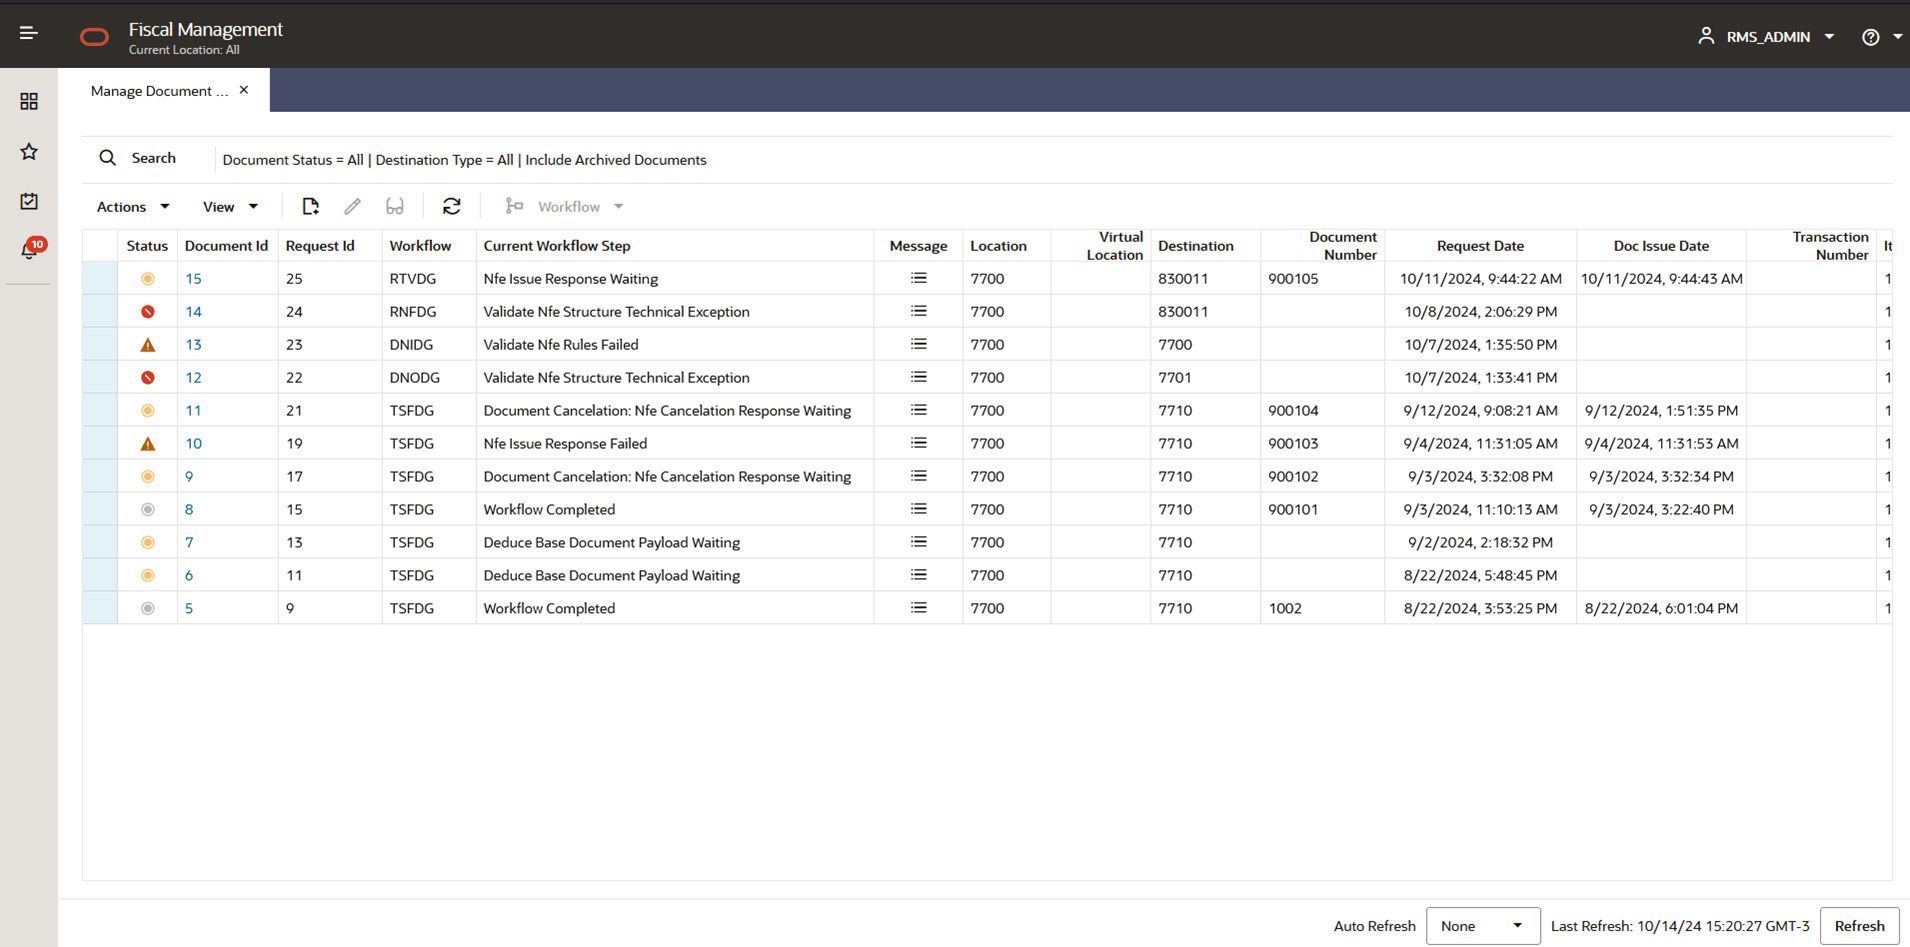
Table 3-2 Manage Document Generation Screen Fields
| Field | Description | ||||||||||||||||||
|---|---|---|---|---|---|---|---|---|---|---|---|---|---|---|---|---|---|---|---|
|
Status |
The status of each document will be:
|
||||||||||||||||||
|
Document ID |
Internal sequence for each document. This field will be a hyperlink to the Fiscal Document Detail Screen in edition or view mode, depending on user profile access. |
||||||||||||||||||
|
Document Number |
Document Number assigned to the document during the workflow process. This number will come from the Fiscal Document Sequence setup. |
||||||||||||||||||
|
Request Id |
Internal sequence generated for each document request |
||||||||||||||||||
|
Request Date |
Date when the document request was consumed |
||||||||||||||||||
|
Workflow |
Workflow Prefix identification. |
||||||||||||||||||
|
Workflow Name |
Name associated with the workflow prefix |
||||||||||||||||||
|
Current Workflow Step |
Workflow detailed step description according to the workflow setup. |
||||||||||||||||||
|
Location Type |
Merchandise Location Type (Store, WH) where document is being received |
||||||||||||||||||
|
Location |
Location ID where document is being received. |
||||||||||||||||||
|
Location Name |
Location Name where document is being received |
||||||||||||||||||
|
Virtual Location |
Virtual location ID (in case of warehouse) |
||||||||||||||||||
|
Participant Type |
Participant type: “Store”, “Warehouse”, “Partner”, “Supplier Site” |
||||||||||||||||||
|
Participant |
Participant Id |
||||||||||||||||||
|
Participant Name |
Participant Name |
||||||||||||||||||
|
Transaction Type |
Transaction type associated with the document (TSF, RTV, and so on) |
||||||||||||||||||
|
Transaction Name |
Description of the transaction associated with the document (Transfer, Return to Vendor, and so on) |
||||||||||||||||||
|
Transaction Number |
Available for some of the transaction types |
||||||||||||||||||
|
Document Type |
Document type associated to the workflow (for example, “Nota Fiscal Eletronica”) |
||||||||||||||||||
|
Doc Issue Date |
Date when the document was issued (same as Government approval date). |
||||||||||||||||||
|
Items |
Total number of items in the document. |
||||||||||||||||||
|
Message |
Link button to the detailed message, error log or report available for the document current status/scenario. |
In the Manage Document Generation screen´s task bar, the following options will be available:
-
In Actions and in separated buttons:
-
Edit: Opens the document detail in edit mode
-
View: Opens the document detail in view mode
-
Refresh: Refreshes the list of documents based on current filter criteria
-
-
In View:
-
Manage Columns
-
Sort
-
-
Workflow: Opens the dynamic list of option within the workflow for the document selected. This list varies depending on the workflow and the current processing step.
Fiscal Document Screen
The detail fiscal document screen will be opened from Manage Document Receipt screen, by the Edit button or through the hyperlink in the fiscal document ID. This screen will have the entire fiscal document information and the processing steps, logs, errors, and integration messages.
Figure 3-6 Fiscal Document Screen – Document Tab
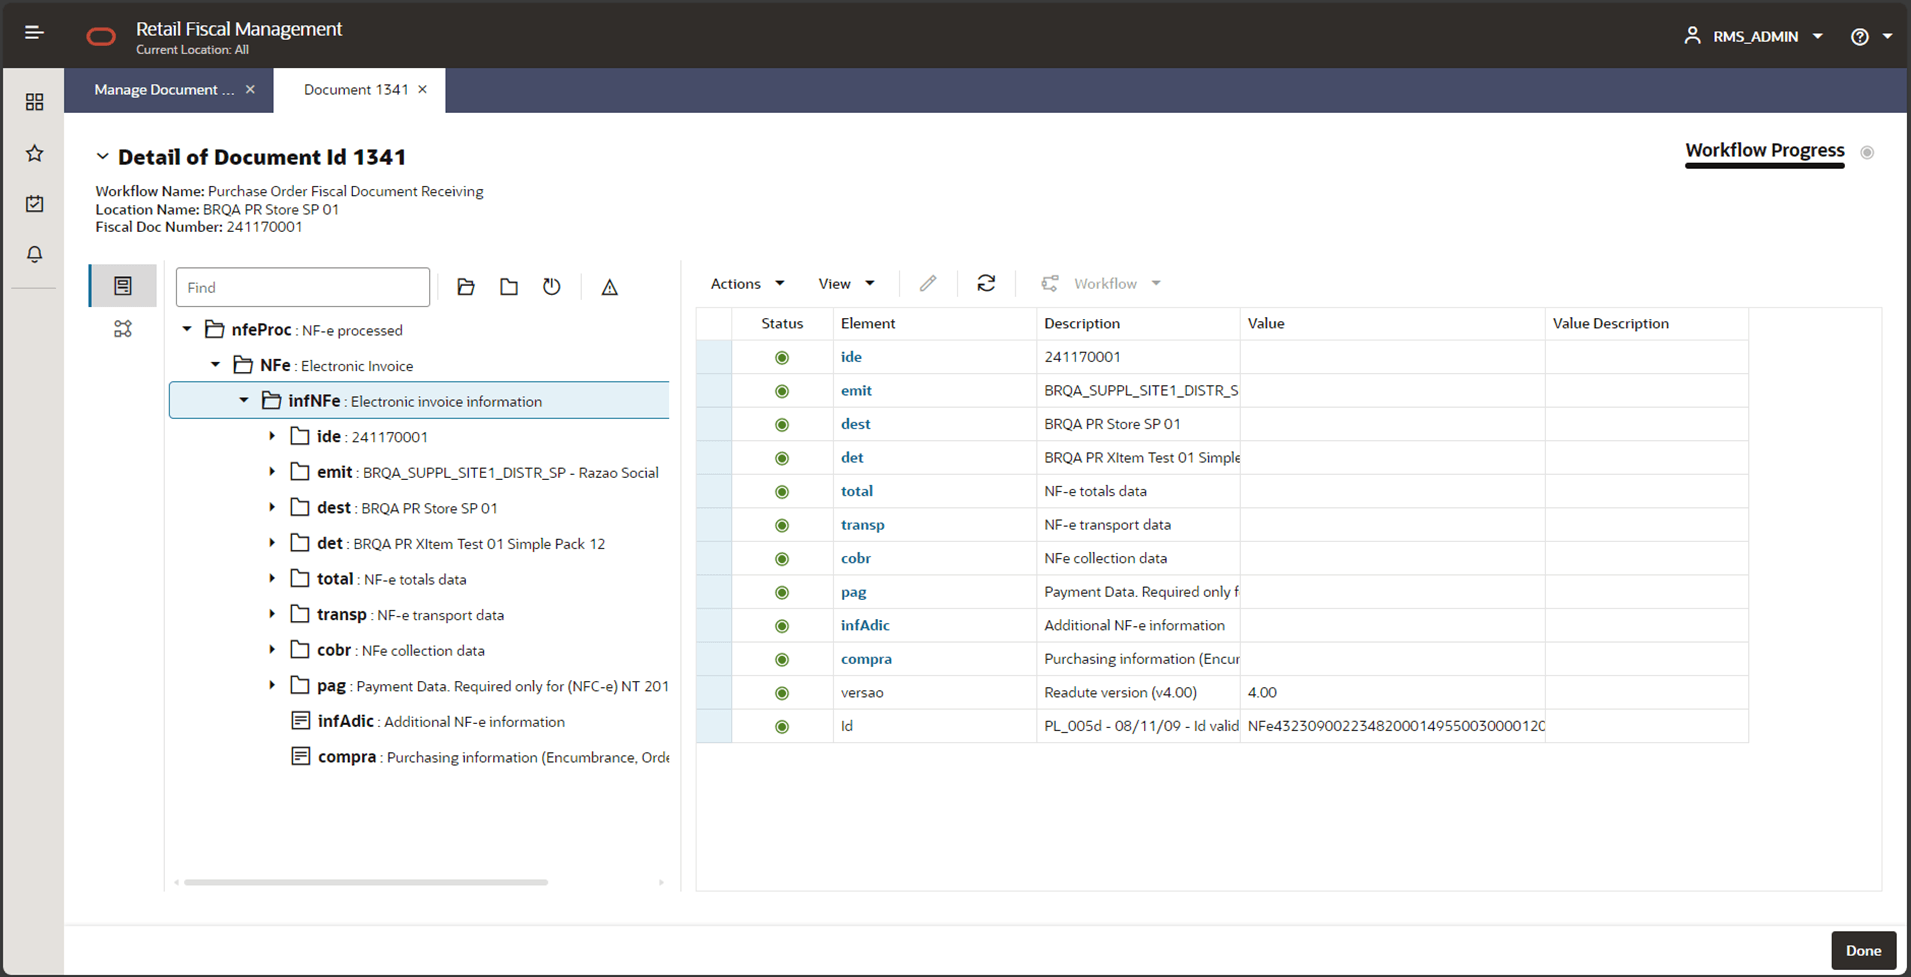
The Fiscal document detail screen has two separated tabs that can be reached by clicking on the left side bar which will have two options:
-
 Document
-
 Workflow
In the header section of the screen the below information is presented:
-
Detail of Document Id: document id being viewed/edited.
-
Workflow Progress: to show the progress of the workflow completeness.
-
Document Status: icon-based document status
In the Document screen, it is displayed the fiscal document in a folder structure with the sub-level nodes being displayed as the nodes are opened. The folder structure on the left side of the screen will have only nodes up to the lowest level present in the document being displayed. This view represents the original fiscal document structure including tag names and descriptions. An additional setup allows the description of the folders/tags to be fetched from lower levels in order to make the visualization more meaningful. This view also leverages translation capabilities.
The screen section with the folder structure view will have some options in a task bar as follows:
-
Find: this is a search box where specific tag names or description can be inserted in order to move the focus to the first match line
-
 Expand All:
will expand all folders of the document tree
-
 Collapse
All: will fold back all folders of the document tree
-
 Reset: will bring
the initial view of the document. For the Brazilian NFe document the initial view will start at the fourth level of the folder
structure.
-
 Action Required: will move the focus to the first line that matches the status Action Required.
The grid of the Document screen view has the following fields:
Table 3-3 Manage Document Receipt Grid Fields
| Field | Description | ||||
|---|---|---|---|---|---|
|
Status |
The status of the specific tag:
|
||||
|
Element |
Name/code of the specific tag |
||||
|
Description |
Element tag description. The description will be fetched from the fiscal document payload setup if available. |
||||
|
Value |
Value of the tag. Only tags with value (data) will be displayed with exception of the “deduced tags”. |
||||
|
Value Description |
In case a value is fetched from a pre-defined list, the description will be fetched in this column according to the payload setup if available |
In the Fiscal Document screen, in Document tab, the available options in the task bar are the following:
-
In Actions and in separated buttons:
-
Edit: Depending on the scenario, it will be possible to call an Edit screen. This screen may have different capabilities depending on the workflow being processed.
-
Refresh: will refresh the list of documents based on current filter criteria
-
-
In View:
-
Manage Columns
-
Sort
-
-
Workflow: Will open the dynamic list of options within the workflow for the document based on the current processing step.
Figure 3-7 Fiscal Document - Edit Item/PO Screen
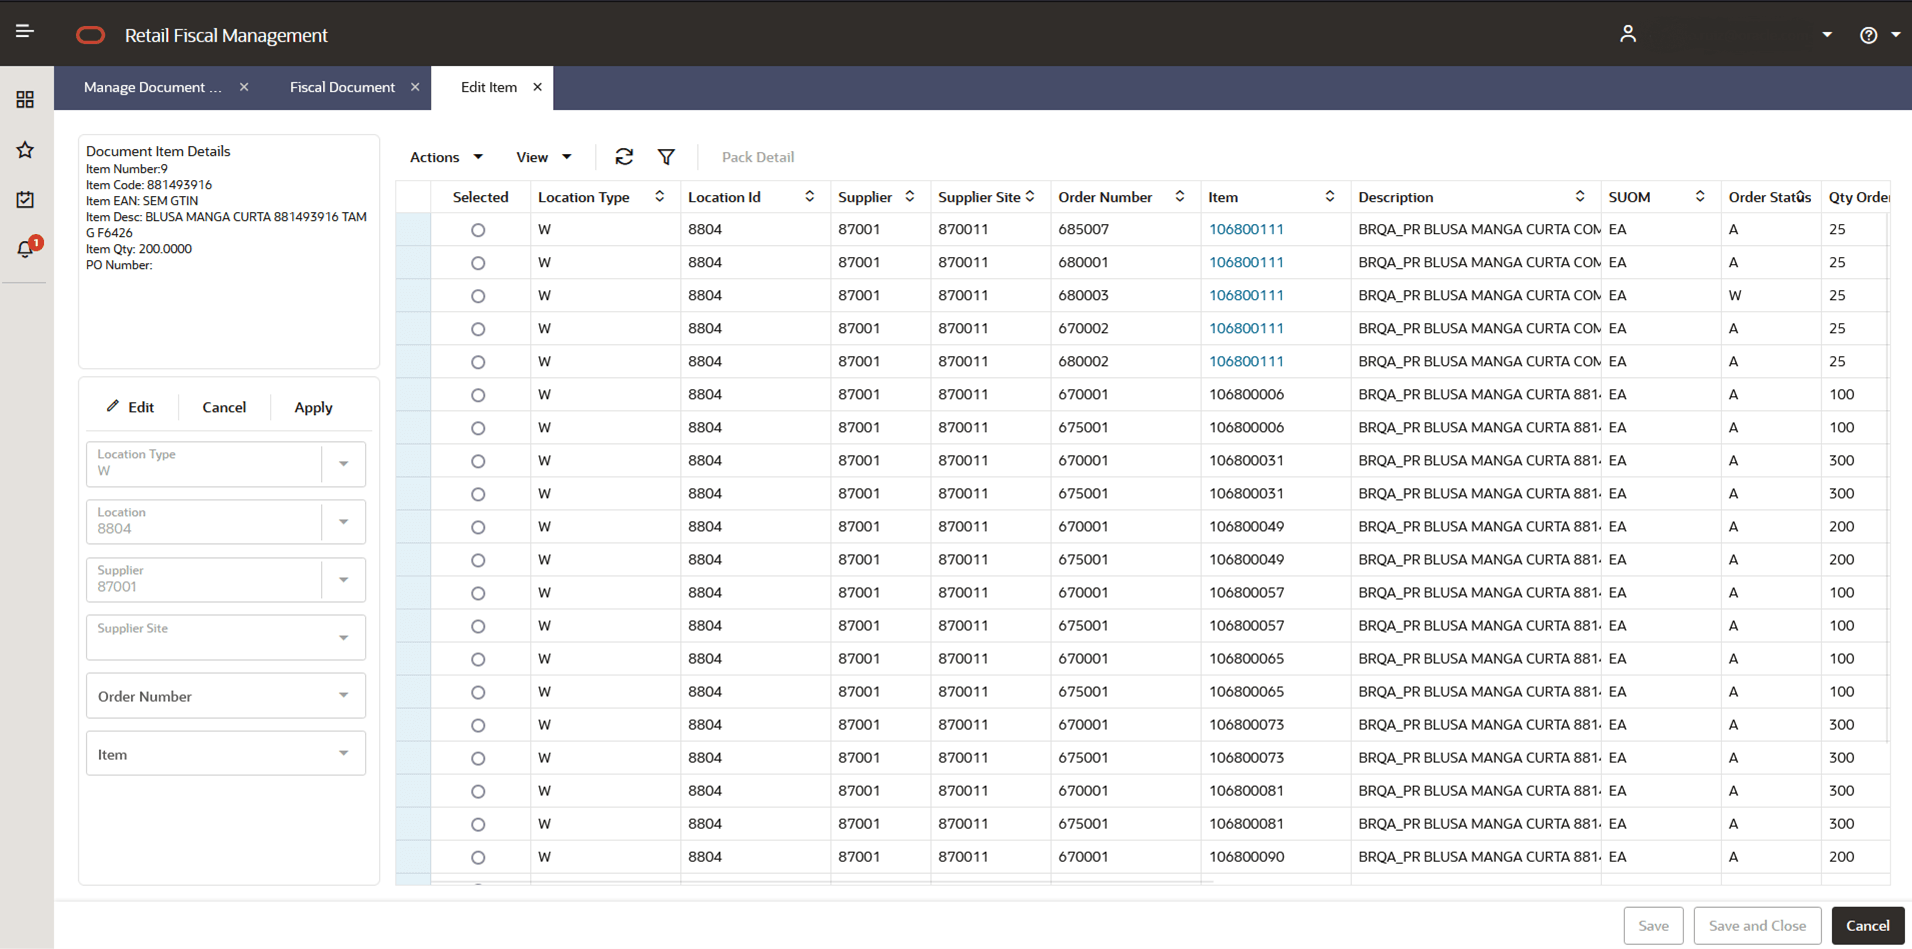
Exclusively for FDR and depending on the workflow step, the Edit button in Fiscal Document – Document tab screen will be enabled for a user action. The items or lines with the “Action Required” icon will identify the records where the Edit button will become enabled. Depending on the workflow being processed this button will have different actions available. For example, in the POFDR workflow, this action will be enabled in case the deduction step is not completed successfully and will call another screen named Edit Item screen. The purpose of this action will be to manually perform the association of the item in the fiscal document and the item and Purchase order available in the system.
The Edit Item screen will be opened in a new tab and will have the document item details being edited, a search criteria section and a grid. The list of fields in each section will be defined as bellow:
Document Item Details: a list of the main information associated with the item that is being edited. For POFDR this information are fetched from the fiscal document: item number, code, EAN, description, quantity and number of the PO.
Search Criteria: the search criteria will be enabled for edition by clicking on the “Edit” button and will have Location Type, Location, Supplier, Supplier Site, Order Number and Item as the available options. Once the search criteria are defined, you can apply them in the “Apply” button and the screen grid will be refreshed based on it.
Edit item screen grid:
Table 3-4 Fiscal Document - Edit Item/PO Screen Grid Fields
| Field | Description |
|---|---|
|
Selected |
Select Record checkbox (radio) |
|
Supplier |
Supplier code |
|
Supplier Site |
Supplier site code |
|
Order Number |
Purchase order number |
|
Item |
Item code |
|
Description |
Item description |
|
SUOM |
Item standard unit of measure |
|
Order Status |
Purchase order status |
|
Qty Ordered |
Quantity ordered for the item |
|
Qty Received |
Quantity already received for the item in the PO |
|
Qty Cancelled |
Quantity canceled for the item in the PO |
|
Supplier Pack Size |
Quantities of items in the purchase pack unit |
|
Complex Pack |
Indicator for complex pack items. In case the item is a complex pack, the “Pack Detail” button is enabled. |
|
Selected Component |
In case the item is a complex pack, user must select a component which will be displayed in this column |
|
Component Desc |
Description of the component item |
|
Pack Comp Qty |
Pack composition for the selected components |
|
Pack Quantity Ordered |
Quantity of component items ordered based on the pack quantity ordered |
In case the item in the grid is a complex pack, the “Pack Detail” button is enabled. The item code in this case is also displayed as a hyperlink. Both the button and the link will open a popup screen for the selection of the component of the complex pack.
Figure 3-8 Pack Detail
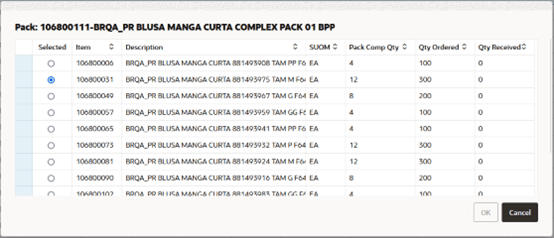
After performing the manual selection of the item component or the regular item and PO, the “Save” button will trigger the validation of this step and will resume the workflow processing for the document. In case more than one item requires edition, the validation will be made after each edition action performed until the last item with an action required is edited and the document´s workflow can proceed.
Figure 3-9 Fiscal Document - Edit Document Data
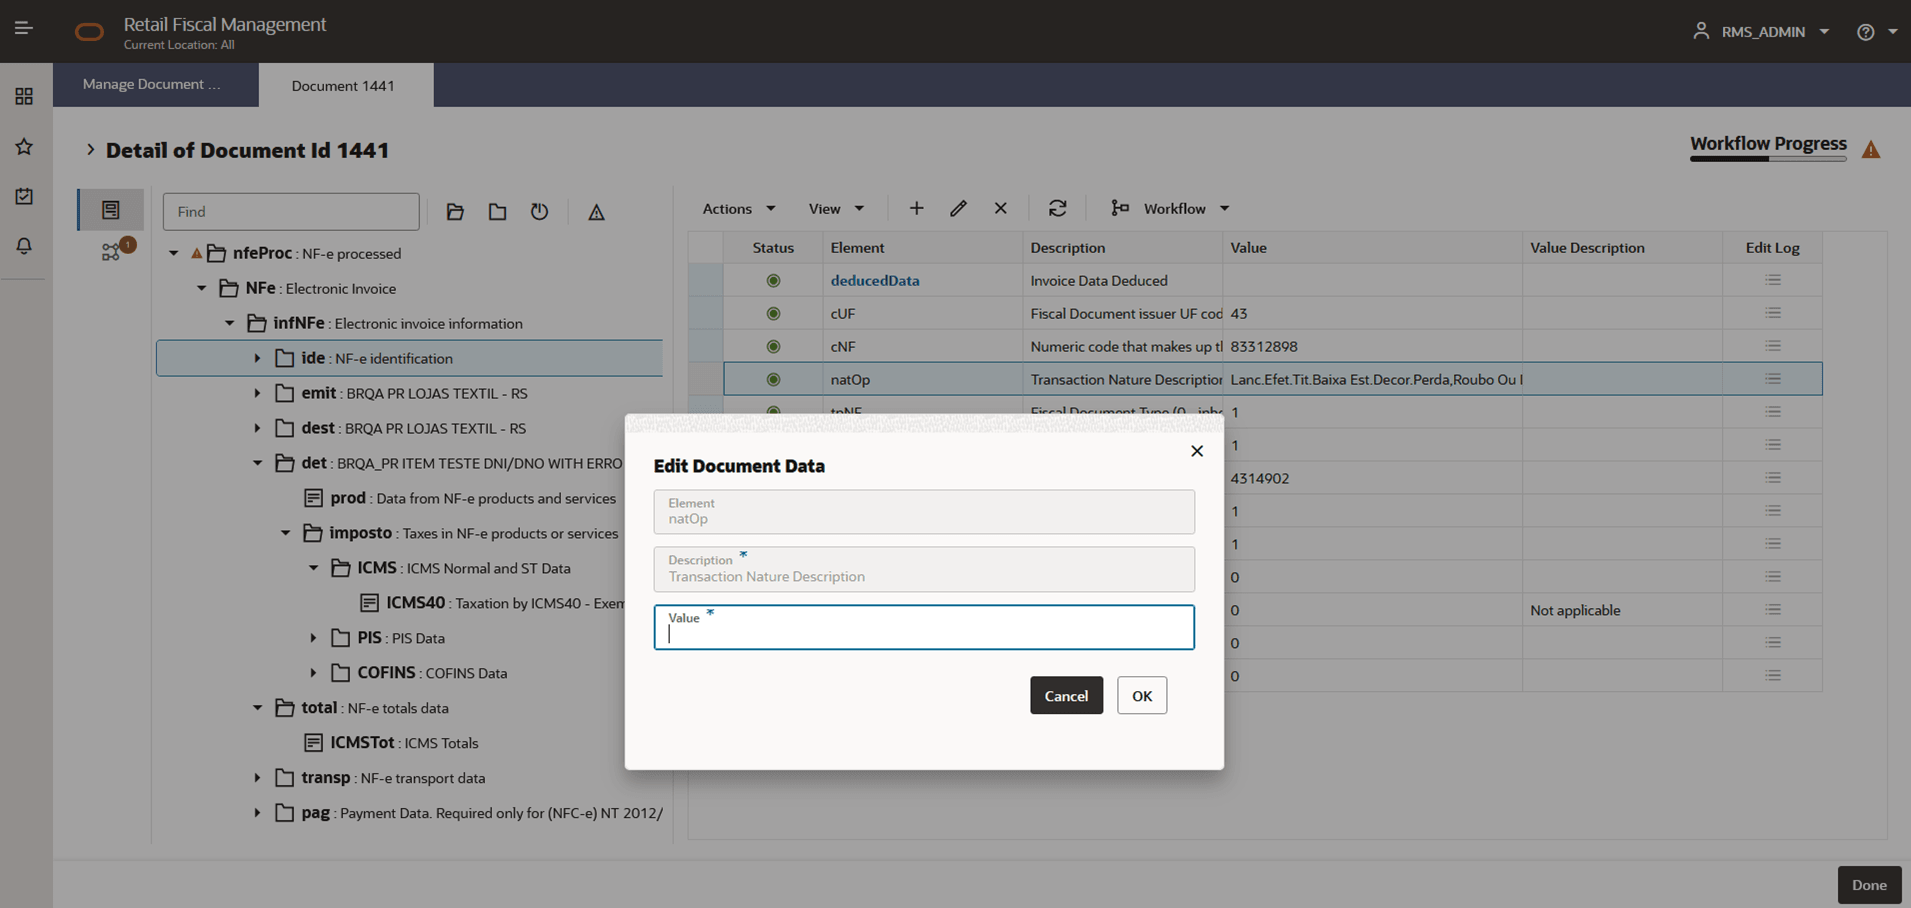
Exclusively for FDG, for some tags and for some document status, the Edit button will be enabled, allowing users to edit the value of a selected tag in the fiscal document tab. This is used to update specific tags that might have caused a document to be rejected by Government. The specific tags are pre-defined and are not tags that impact the document taxation or values. Only fiscal codes and descriptions can be edited.
Figure 3-10 Fiscal Document Screen – Workflow Tab
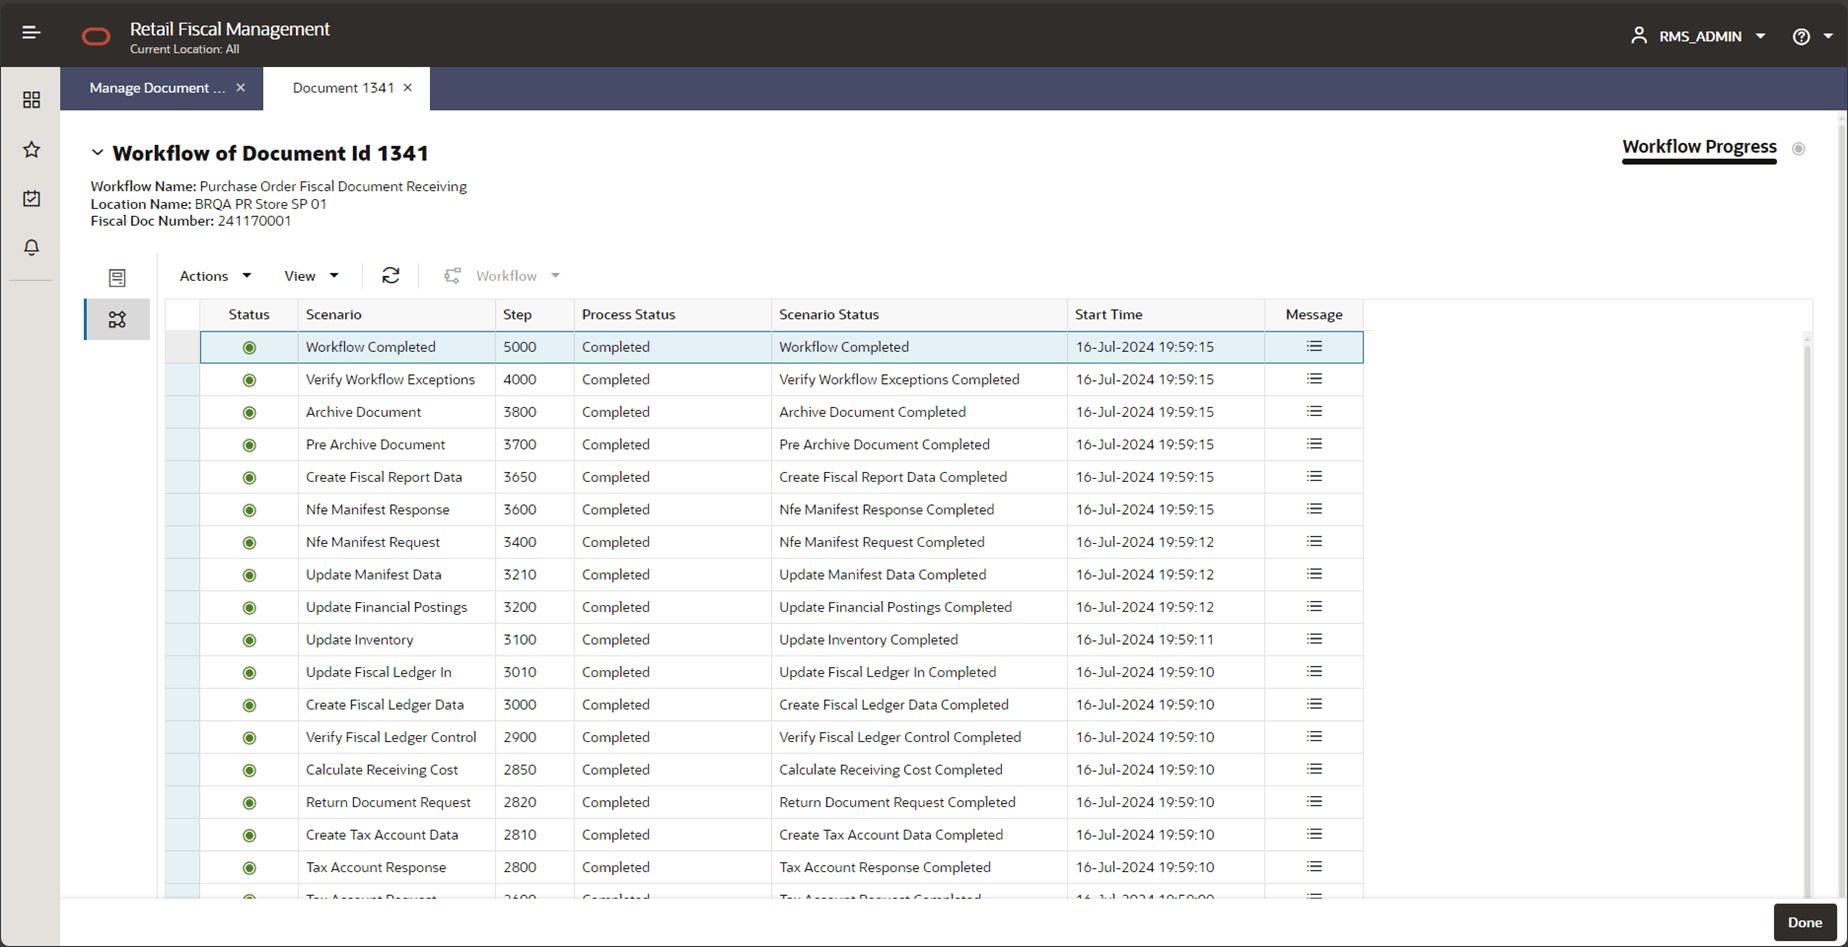
In the Workflow screen, the steps in the workflow to which the document is submitted are displayed. This view shows the steps applied or being applied to the document, the status of the execution and a “Message” button that will show Errors, Message Data and Reports (when applicable).
Table 3-5 Fiscal Document Screen – Workflow Tab Grid Fields
| Field | Description | ||||||
|---|---|---|---|---|---|---|---|
|
Status |
The status of the specific tag:
|
||||||
|
Scenario |
Description of the scenario executed as per the workflow setup |
||||||
|
Step |
Numeric sequence associated to the scenario in the workflow setup |
||||||
|
Process Status |
Description of the processing status of the scenario |
||||||
|
Scenario Status |
Detailed description of the processing status of the scenario |
||||||
|
Start Time |
Date/time of the scenario start execution |
||||||
|
Message |
Link button to the detailed message, error log or report available for the scenario. |
Figure 3-11 Message Popup
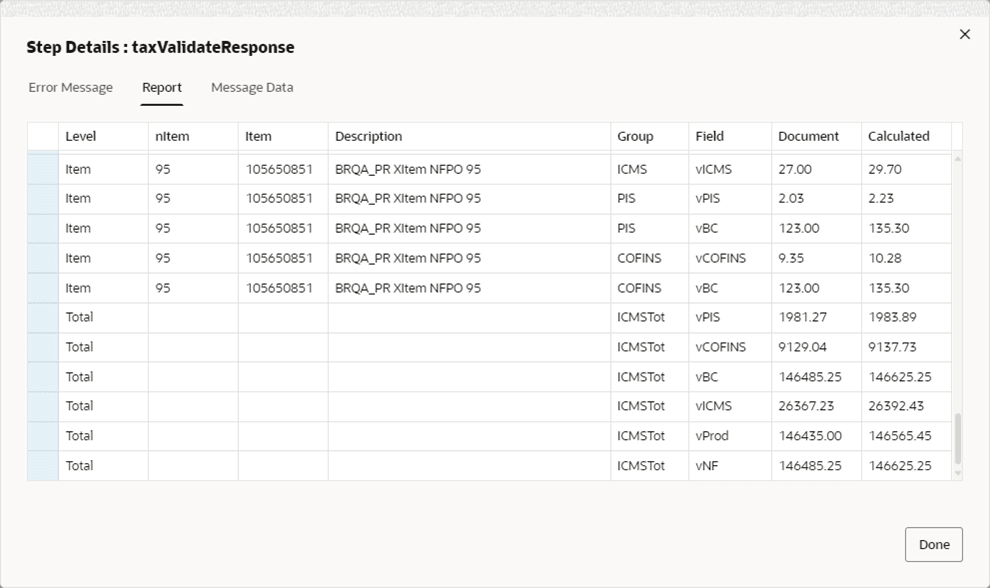
The “Message” popup screen is called from the Workflow tab of Fiscal Document screen. Depending on the scenario this screen will be opened directly in the Report, Error Message or Message Data tabs.
The Error Message tab will bring the error code and message in case of fail or technical exceptions in the scenario execution.
For scenarios where external or internal integration payloads are generated, the payload itself will be available in the Message screen in the Message Data tab.
The Report tab will have data for specific scenarios when applicable, for a better visualization of the Message Data tab content.
In the Fiscal Document screen, in Workflow tab, the available options in the task bar are the following:
-
In Actions and in separated buttons:
-
Refresh: will refresh the list of documents based on current filter criteria
-
-
In View:
-
Manage Columns
-
Sort
-
-
Workflow: Will open the dynamic list of actions available for the document based on the current processing step.
Fiscal Ledger Balance Sheet
RFMCS enables a fiscal document-based lot control, meant to support balance requirements for taxes, returns and anything that requires the control of fiscal inventory at item/location level. The fiscal ledger consists in controlling all entries and exits of items with fiscal documents at location level.
Fiscal Ledger will be fed with fiscal document information as part of a transaction workflow processing. It will be possible to perform manual updates in the Fiscal Ledger via the Fiscal Ledger Balance Sheet screen. This functionality is accessed from the main RFM task list under Documents > Fiscal Ledger Balance Sheet.
Figure 3-12 Fiscal Ledger Balance Sheet Screen - Search
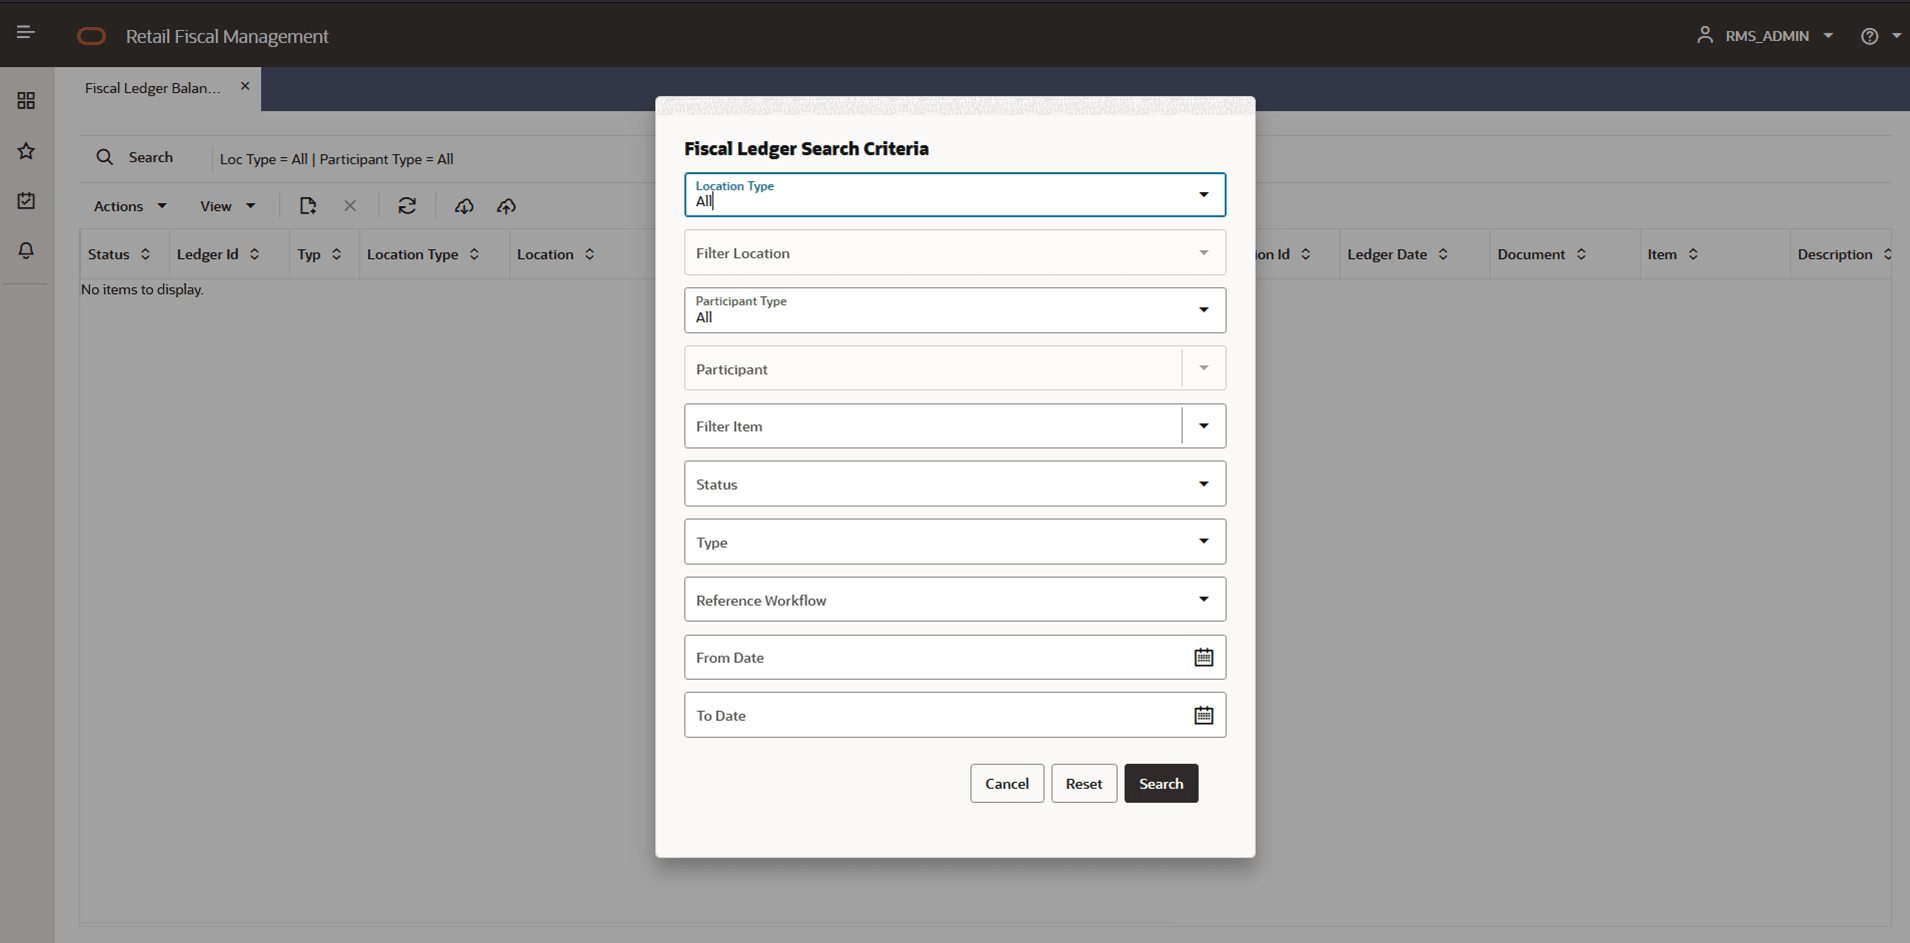
Fiscal Ledger Balance Sheet screen will call a search criteria popup screen every time it is launched. In this search criteria the following search options are available:
-
Location Type: Options: “All”, “Store”, “Warehouse”.
-
Filter Location: If Store or Warehouse is selected in previous field, this field will make it possible to select either a store or warehouse.
-
Participant type: Options: “All”, “Store”, “Warehouse”, “Supplier”.
-
Participant: Based on the type, this search field will display a list of all entities. available.
-
Filter Item: List of items.
-
Status: “Processed” or “Canceled”.
-
Type: “IN” or “OUT”.
-
Reference Workflow: Workflow associated with the fiscal ledger record.
-
From Date: Start date for the interval.
-
To Date: End date for the interval.
Figure 3-13 Fiscal Ledger Balance Sheet Screen
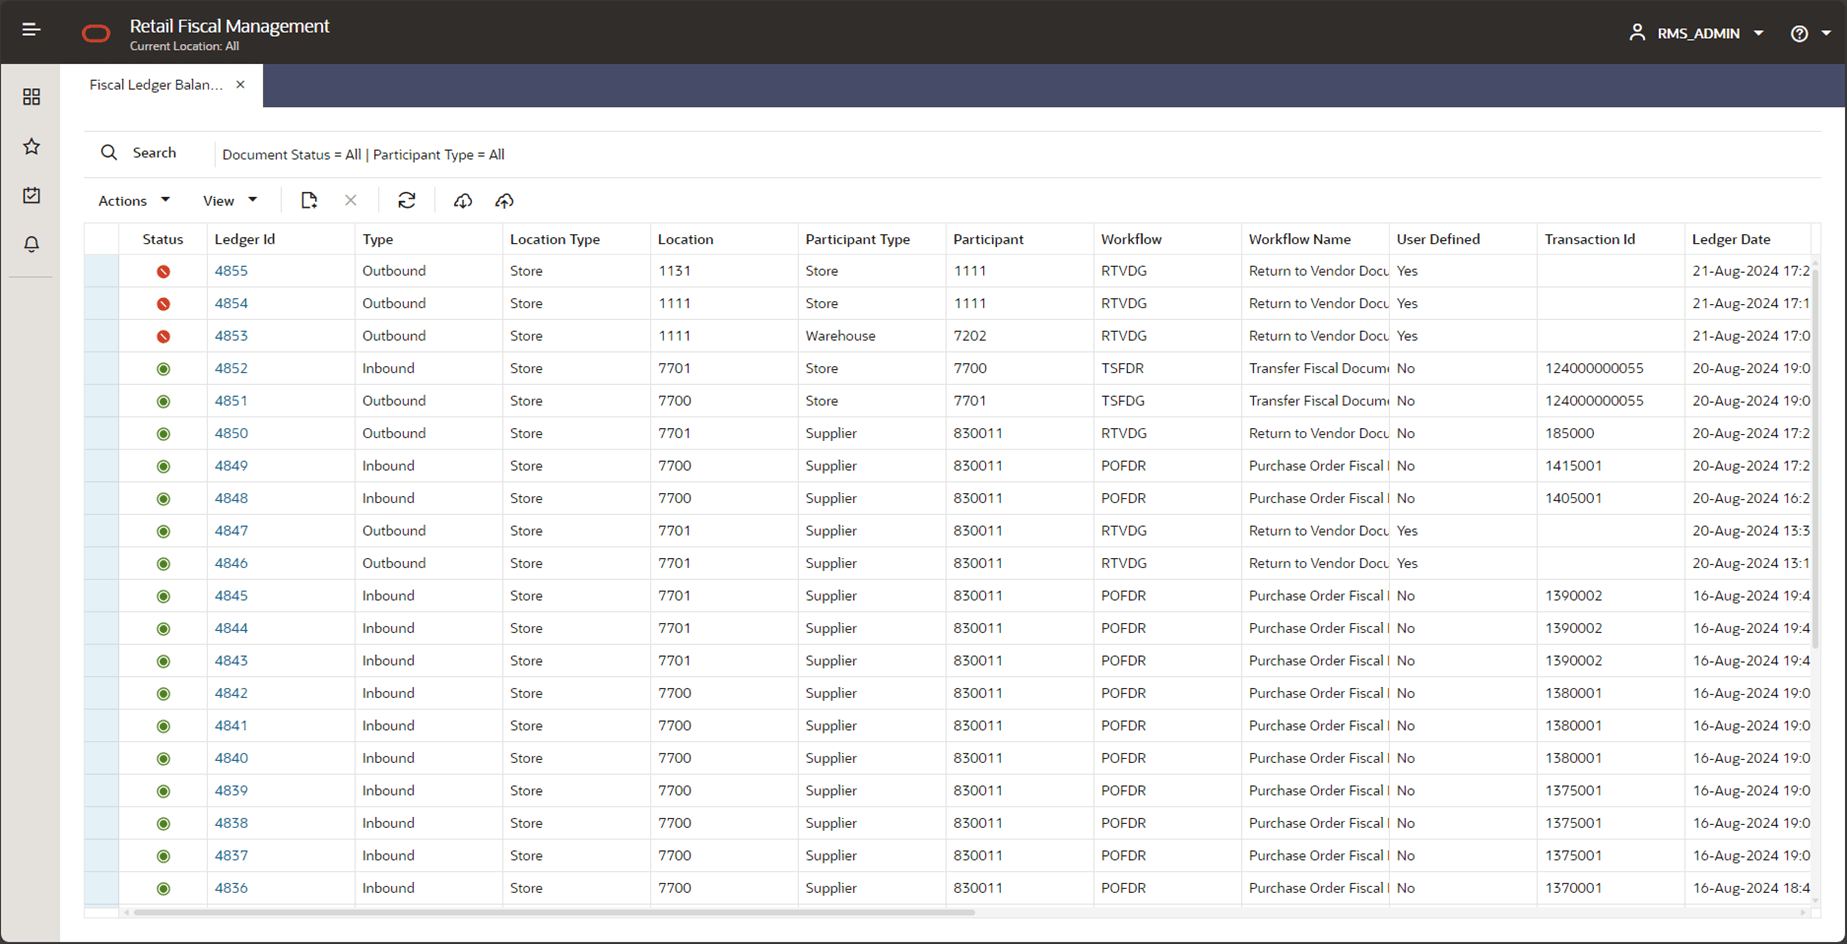
Table 3-6 Fiscal Ledger Balance Sheet Screen Fields
| Field | Description | ||||
|---|---|---|---|---|---|
|
Status |
The status of each ledger record will be:
|
||||
|
Ledger Id |
Fiscal ledger record ID (internal sequence). This field will be a hyperlink to the Fiscal Ledger Tax Detail Screen. |
||||
|
Type |
Balance Type: IN or OUT. |
||||
|
Location Type |
Location type: “All”, “Store”, “Warehouse” |
||||
|
Participant Type |
Participant entity type: “All”, “Store”, “Warehouse”, “Supplier” |
||||
|
Participant |
Participant entity Id |
||||
|
Workflow |
Workflow prefix code. |
||||
|
User Defined |
Indicates if the record was created via Maintenance screen (Y) or via a regular workflow update (N) |
||||
|
Transaction Id |
Transaction ID associated with the item/document/workflow (PO number, transfer number, etc.). |
||||
|
Ledger Date |
Date of the creation of the ledger record |
||||
|
Document |
Document number associated with the ledger record. This field will be a hyperlink to the Detail Document Screen in View mode |
||||
|
Item |
Item code |
||||
|
Description |
Item description |
||||
|
Item UOM |
Item unit of measure |
||||
|
Item Document Qty |
Quantity of UOM for the item in the associated document. |
||||
|
Unit Cost |
Cost of the item in the fiscal document |
||||
|
Net Received Qty |
Quantity of UOM for the item effectively received (removing returns, damaged, etc.) This quantity will represent the quantity effectively received and used to update inventory. |
||||
|
Balance |
available quantity for the item in fiscal ledger |
||||
|
Reference Doc Id |
Referenced document used in the balance. This reference is exclusive for OUT type records. |
||||
|
Method |
Method used by the referenced document in a balance record. Exclusive to OUT type records. |
||||
|
Simple Pack |
Indicator of simple pack |
In the Fiscal Ledger Balance Sheet screen´s task bar, the following options will be available:
-
In Actions and in separated buttons:
-
Create: Will open a popup screen to create a ledger record
-
Delete: Will open a dialog confirmation box to cancel a selected ledger record.
-
Refresh: will refresh the list of records based on current filter criteria
-
-
In View:
-
Manage Columns
-
Sort
-
-
Download: Will open a dialog box to download a fiscal ledger maintenance template.
-
Upload: Will open a dialog box to upload a fiscal ledger maintenance template.
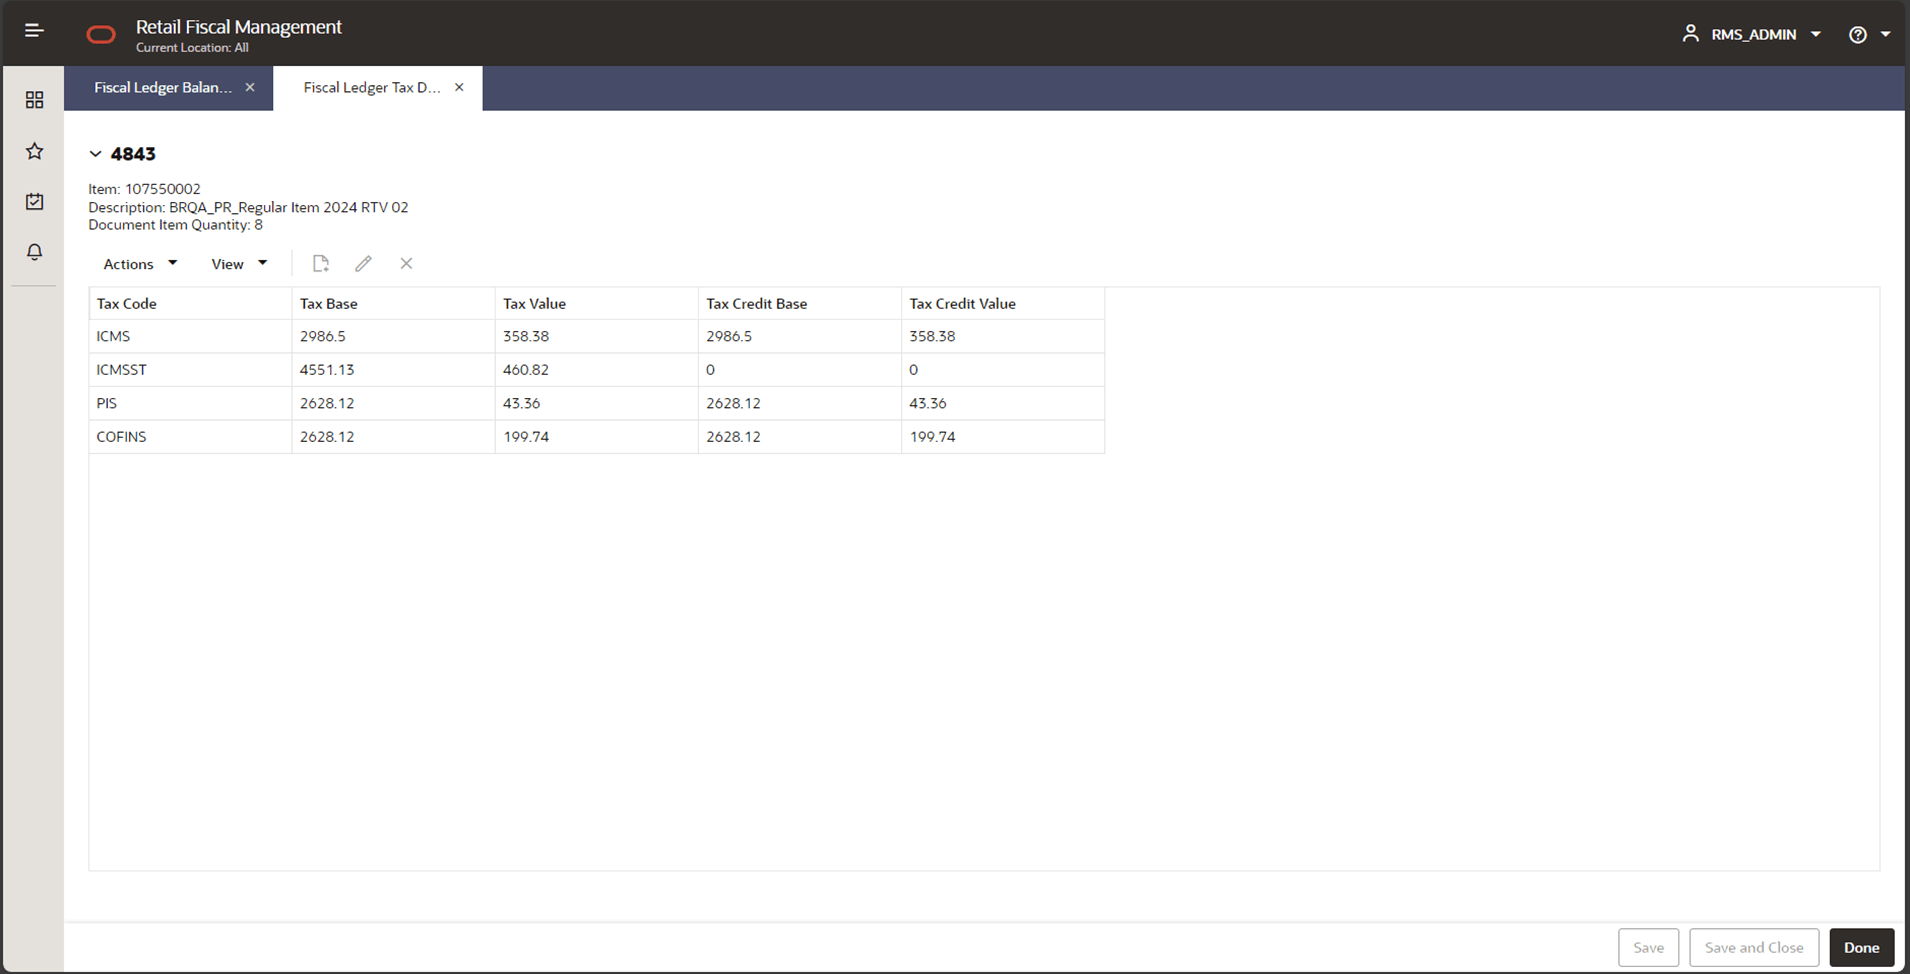
Table 3-7 Fiscal Ledger Tax Details Screen Fields
| Field | Description |
|---|---|
|
Tax Code |
Tax code associated to the item in the document |
|
Tax Base |
Tax basis to which the tax is applied |
|
Tax Value |
Tax amount of the tax applied to the item |
|
Tax Credit Base |
Tax credit basis in case the tax has any credit to be accounted |
|
Tax Credit Value |
Tax credit amount calculated for the item |
Figure 3-14 Create a Fiscal Ledger Record
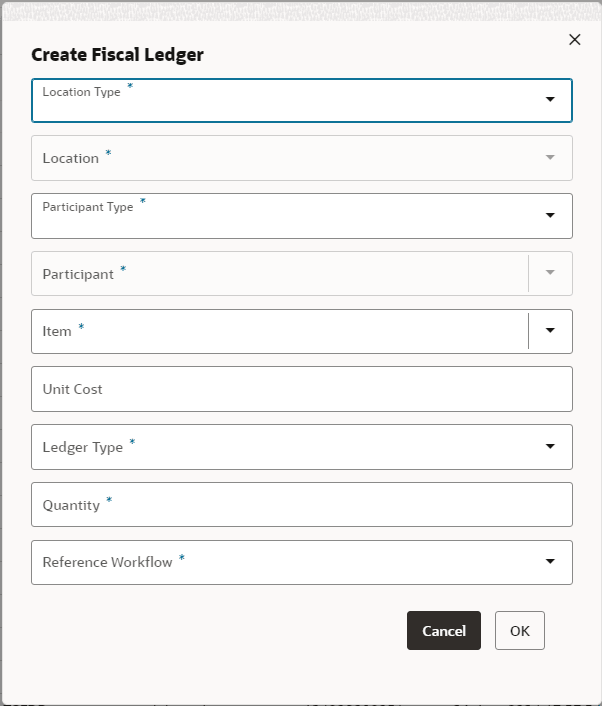
It is possible to manually add a new ledger record using the Create button: ![]() . This feature allows a manual insertion of
a fiscal ledger record, not associated to a fiscal document.
. This feature allows a manual insertion of
a fiscal ledger record, not associated to a fiscal document.
The fields required are:
-
Location type: LOV with the following list of values: All, Store, Warehouse
-
Filter Location: Based on the location type defined, this filter will list the locations from RMS tables (WH, STORE)
-
Participant Type: Participant entity type: This field is optional and when not informed, the participant type and participant ID will be the same location selected in the previous fields.
-
Participant: Based on the participant type selected, this filter will list the entities from RMS tables (SUPS, PARTNER, WH and STORE)
-
Filter Item: Filter of all items in ITEM_MASTER table
-
Unit Cost: Inform the gross cost of the item that is present in the fiscal document.
-
Ledger Type: IN:OUT
-
Quantity: Quantity of the item SUOM to be considered for the fiscal ledger record
-
Reference Workflow: Reference workflow where the new record will be associated.
Figure 3-15 Download
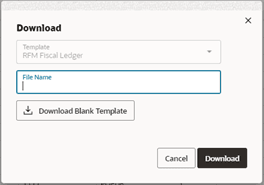
By clicking the Download button in the task bar from the Fiscal Ledger Balance Sheet screen, it is possible to download records based on the current search criteria applied to the screen.
It is also possible to download a blank template from the screen.
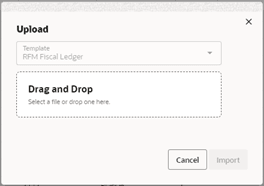
By clicking on the Upload button in the task bar, it will be possible to upload the Fiscal Ledger template.
Figure 3-16 Upload
