4 Foundation Data
Configuration of user access, transaction codes and download and upload of setup data.
User Assignment
Fiscal Document Management features will have location level restriction applied to users. A user from one location may not have access to documents from other locations. This functionality is accessed from the main RFM task list under Foundation > User Assignment
Figure 4-1 User Assignment - Search
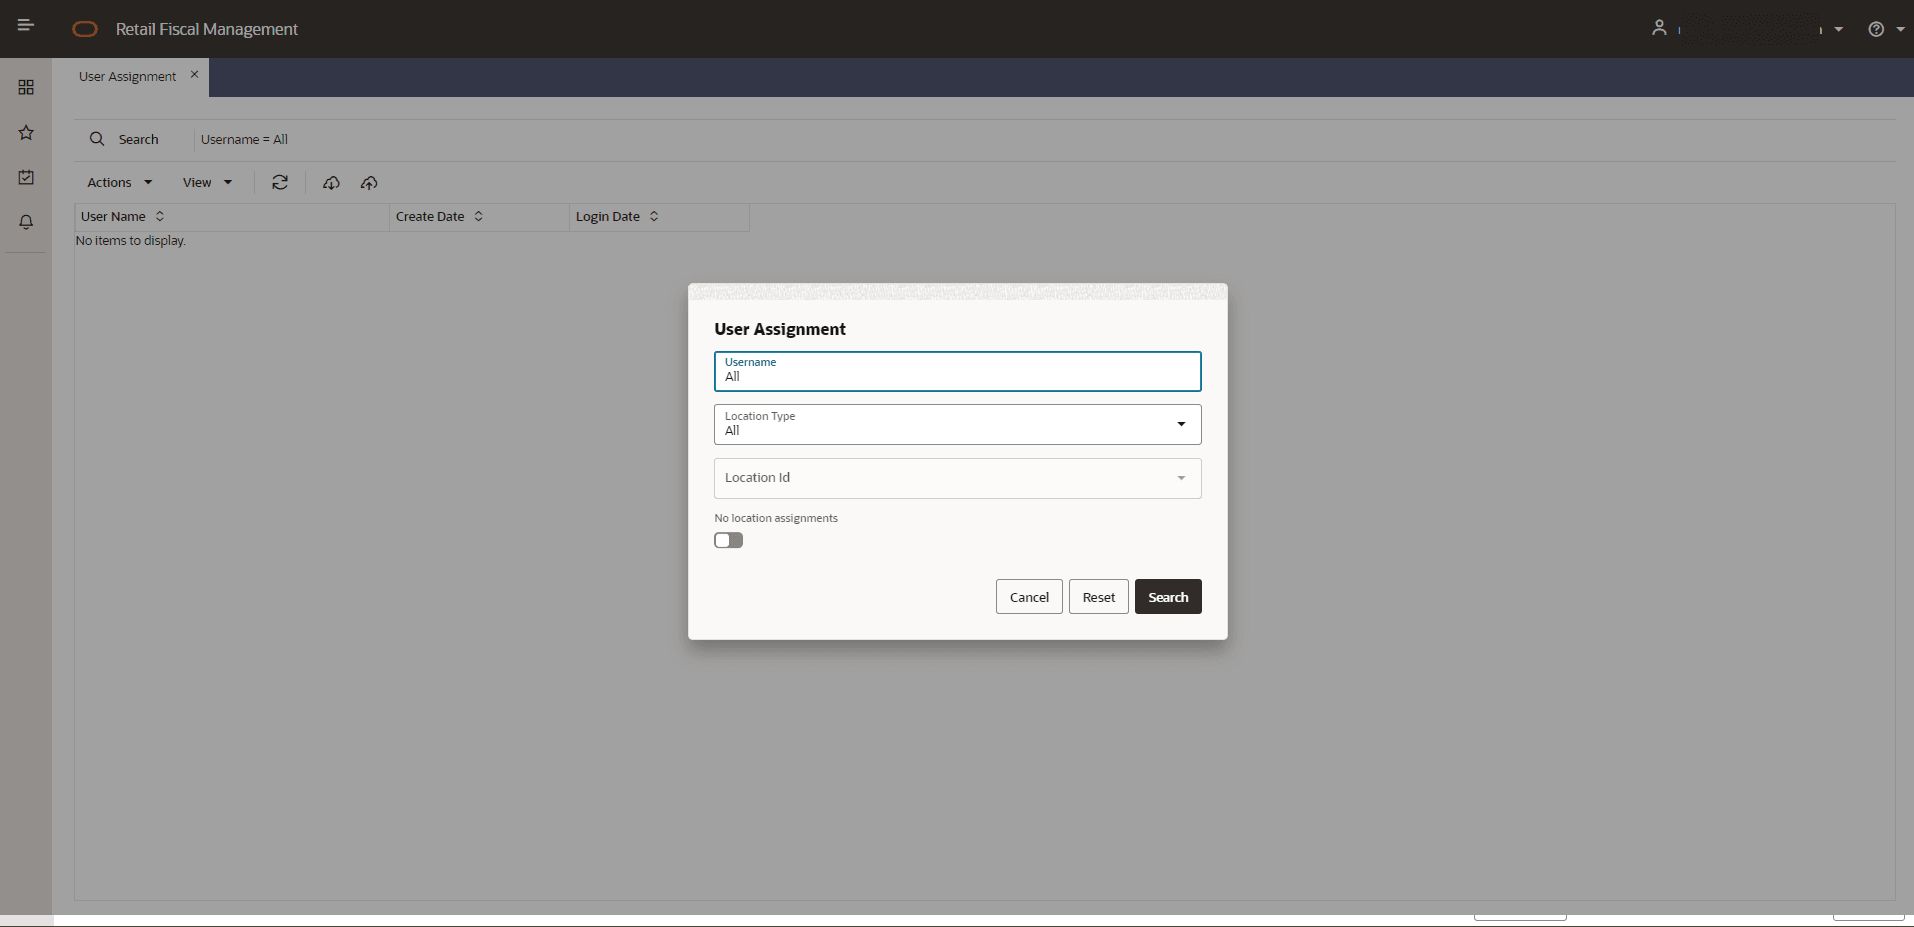
In this search criteria the following search options are available:
-
Username: users from IDCS that have already access to RFMCS
-
Location Type: (“All”,”Store”,”Warehouse”)
-
Location: Filtered based on the location type selected
-
“No location” switch button, to filter users that have no location assignment
Figure 4-2 User Assignment
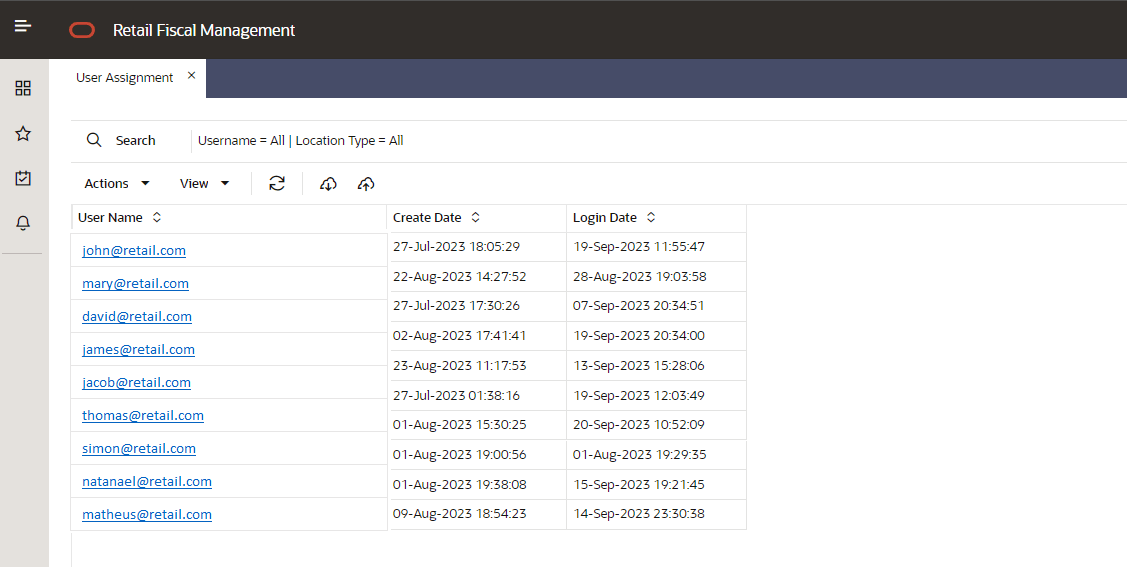
The users displayed in this screen will be the users created in IDCS with access to the application RFMCS.
By clicking on the username hyperlink, the “Manage User Assignment” screen is displayed.
Figure 4-3 Manage User Assignment – Location Assignment
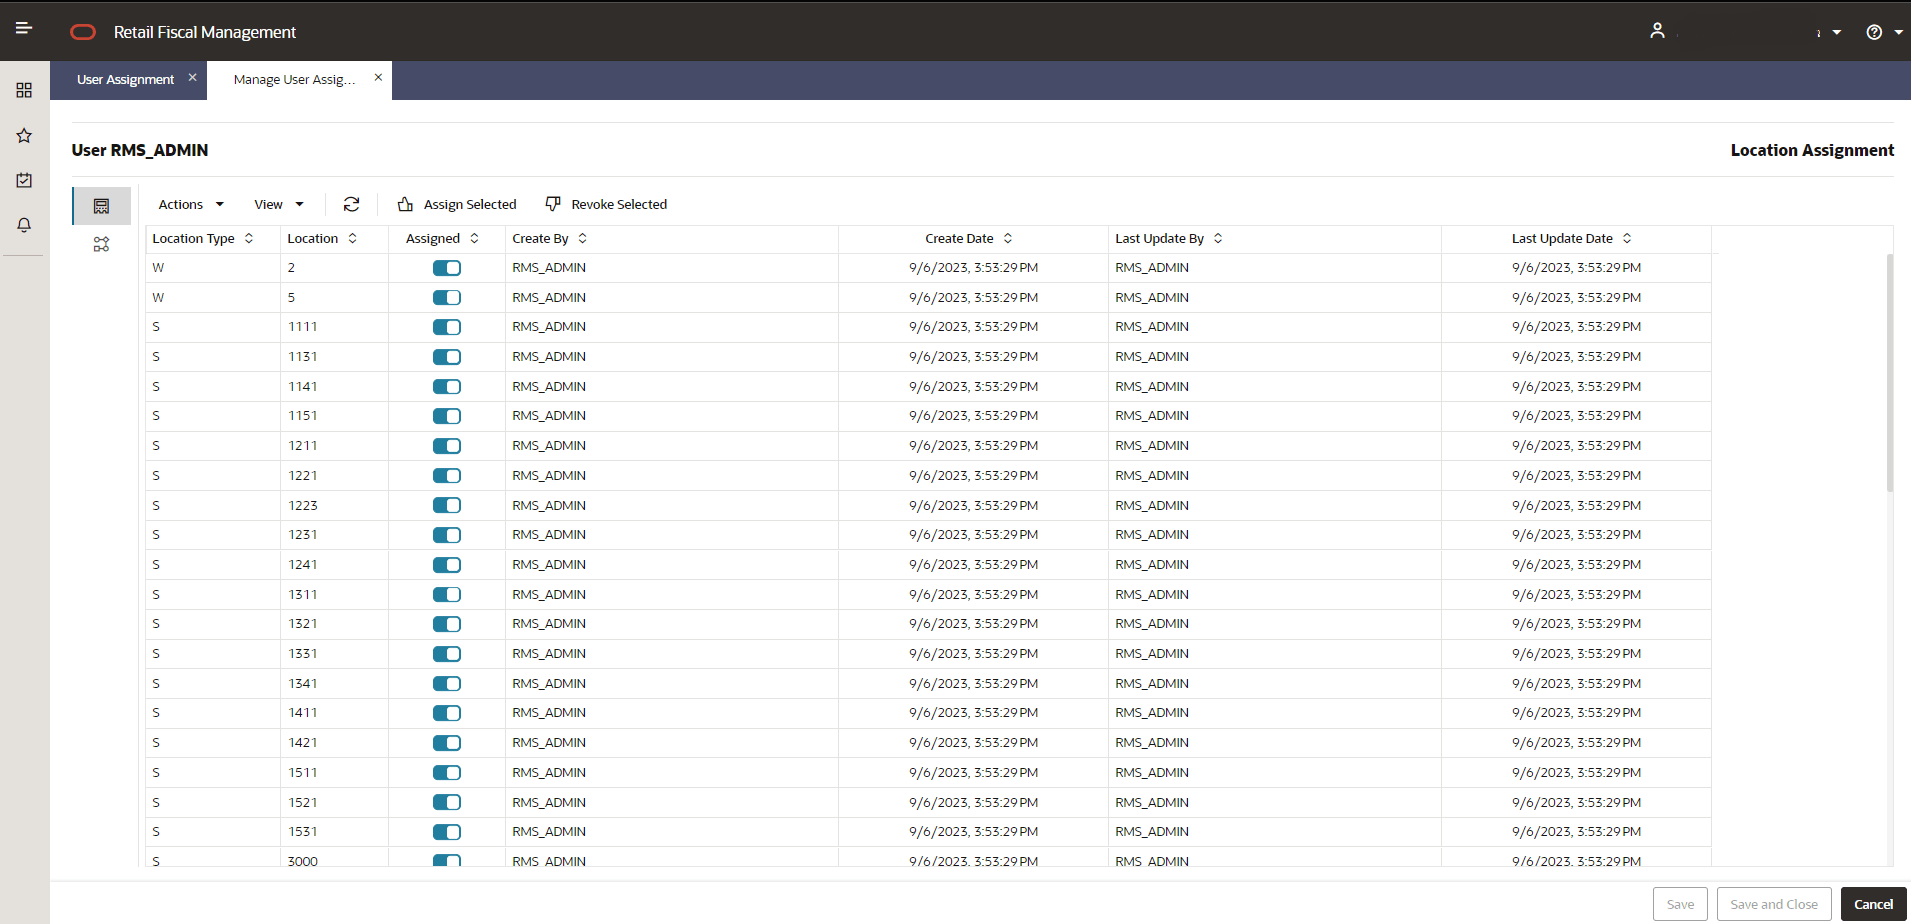
The Manage User Assignment screen has two separated tabs that can be reached by clicking on the left side bar which will have two options:
![]() — Location Assignment
— Location Assignment
![]() — Workflow Assignment
— Workflow Assignment
In the Location Assignment screen, it is possible to assign or remove location assignments for the user. This action can be taken line by line or by selecting multiple lines.
Figure 4-4 Manage User Assignment – Workflow Assignment
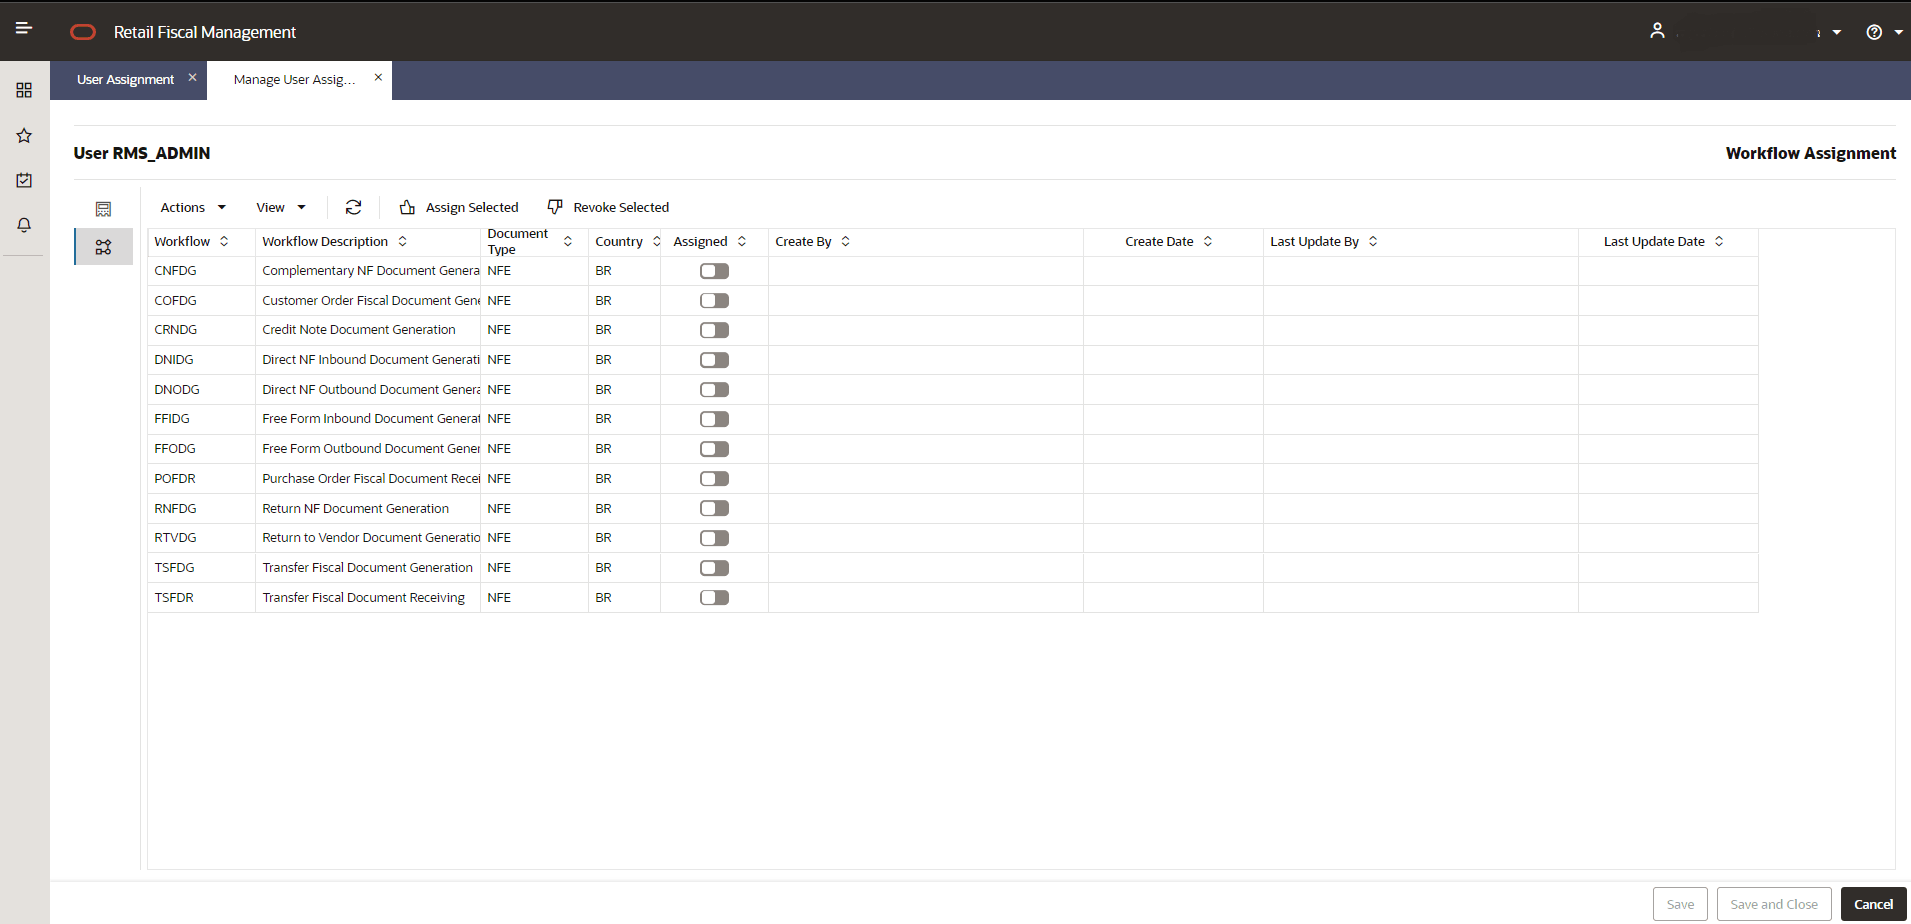
In the Workflow Assignment, the available workflows can also be assigned to the user. The purpose of this feature is to allow the access restriction to specific workflows. In this case, it will be possible to have users with access to Document Receiving workflows, but not to document generation workflows, for instance.
By clicking on the Download button in the task bar from the User Assignment screen, it will be possible to download the users with or without assignments. The download will use the current search criteria applied to the screen.
Figure 4-5 Download
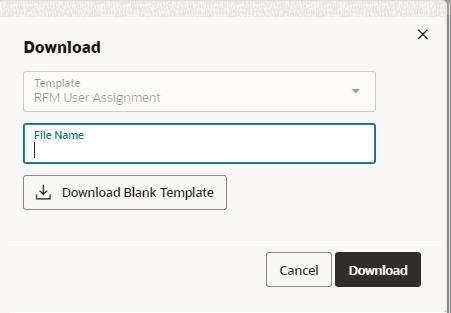
It is also possible to download a blank template from the screen.
The user assignment template will allow the same maintenance as available in the Manage User Assignment screen by leveraging a spreadsheet template.
By clicking on the Upload button in the task bar, it will be possible to upload the user assignment template.
Figure 4-6 Upload
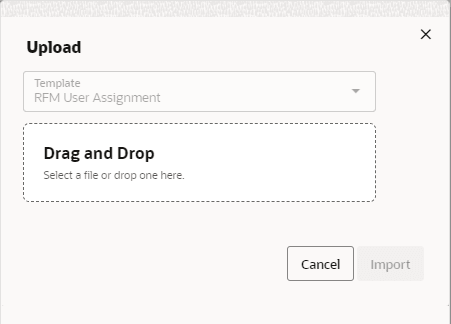
Note:
In Fiscal Document Receiving features, only users with at least one location assigned will be able to open the screens. Documents will be filtered by the assigned location and workflows.
Manage Transaction Codes
Transaction codes are used to provide consolidated and calculated data used to generate financial postings. In RFMCS the transaction codes can be configured, including the calculation and application rules. A set of pre-configured transaction codes is available for each workflow supported. This functionality is accessed from the main RFM task list under Foundation > Manage Transaction Codes
Figure 4-7 Manage Transaction Codes - Search
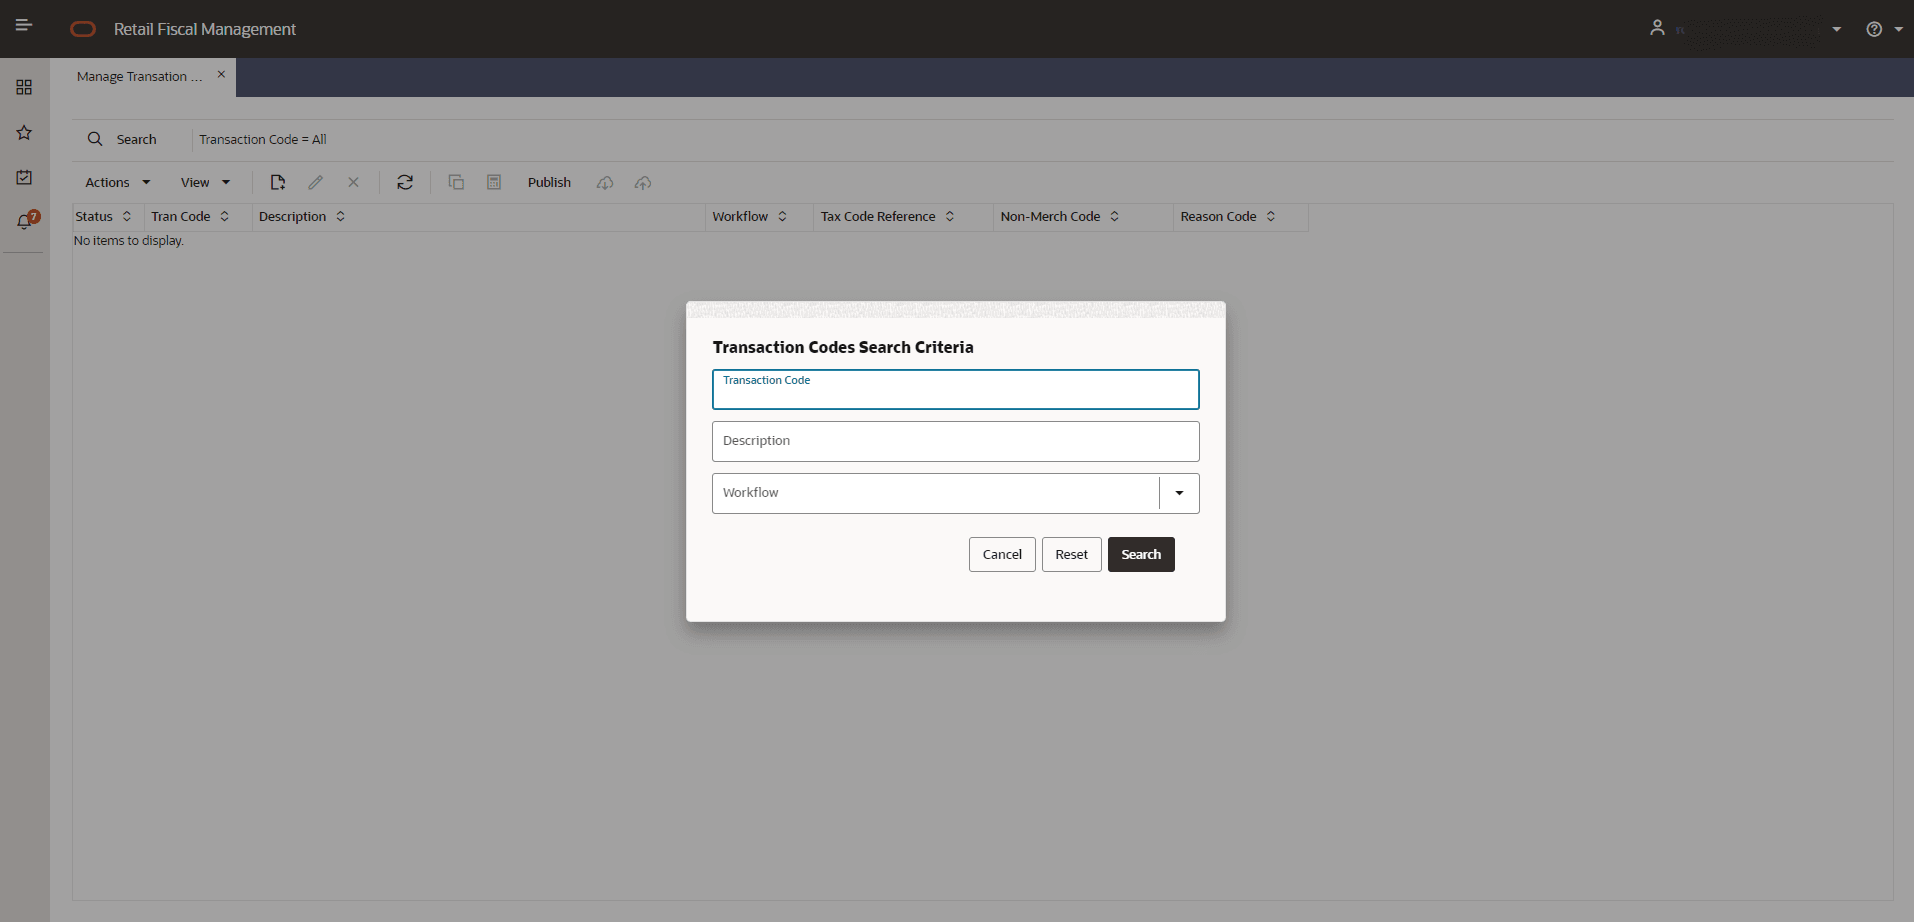
Manage Transaction Codes screen will call a search criteria popup screen every time it is launched. In this search criteria the following search options are available:
-
Transaction Code: Search by transaction code informed.
-
Description: Search by transaction code description.
-
Workflow: Search by workflow
Figure 4-8 Manage Transaction Codes
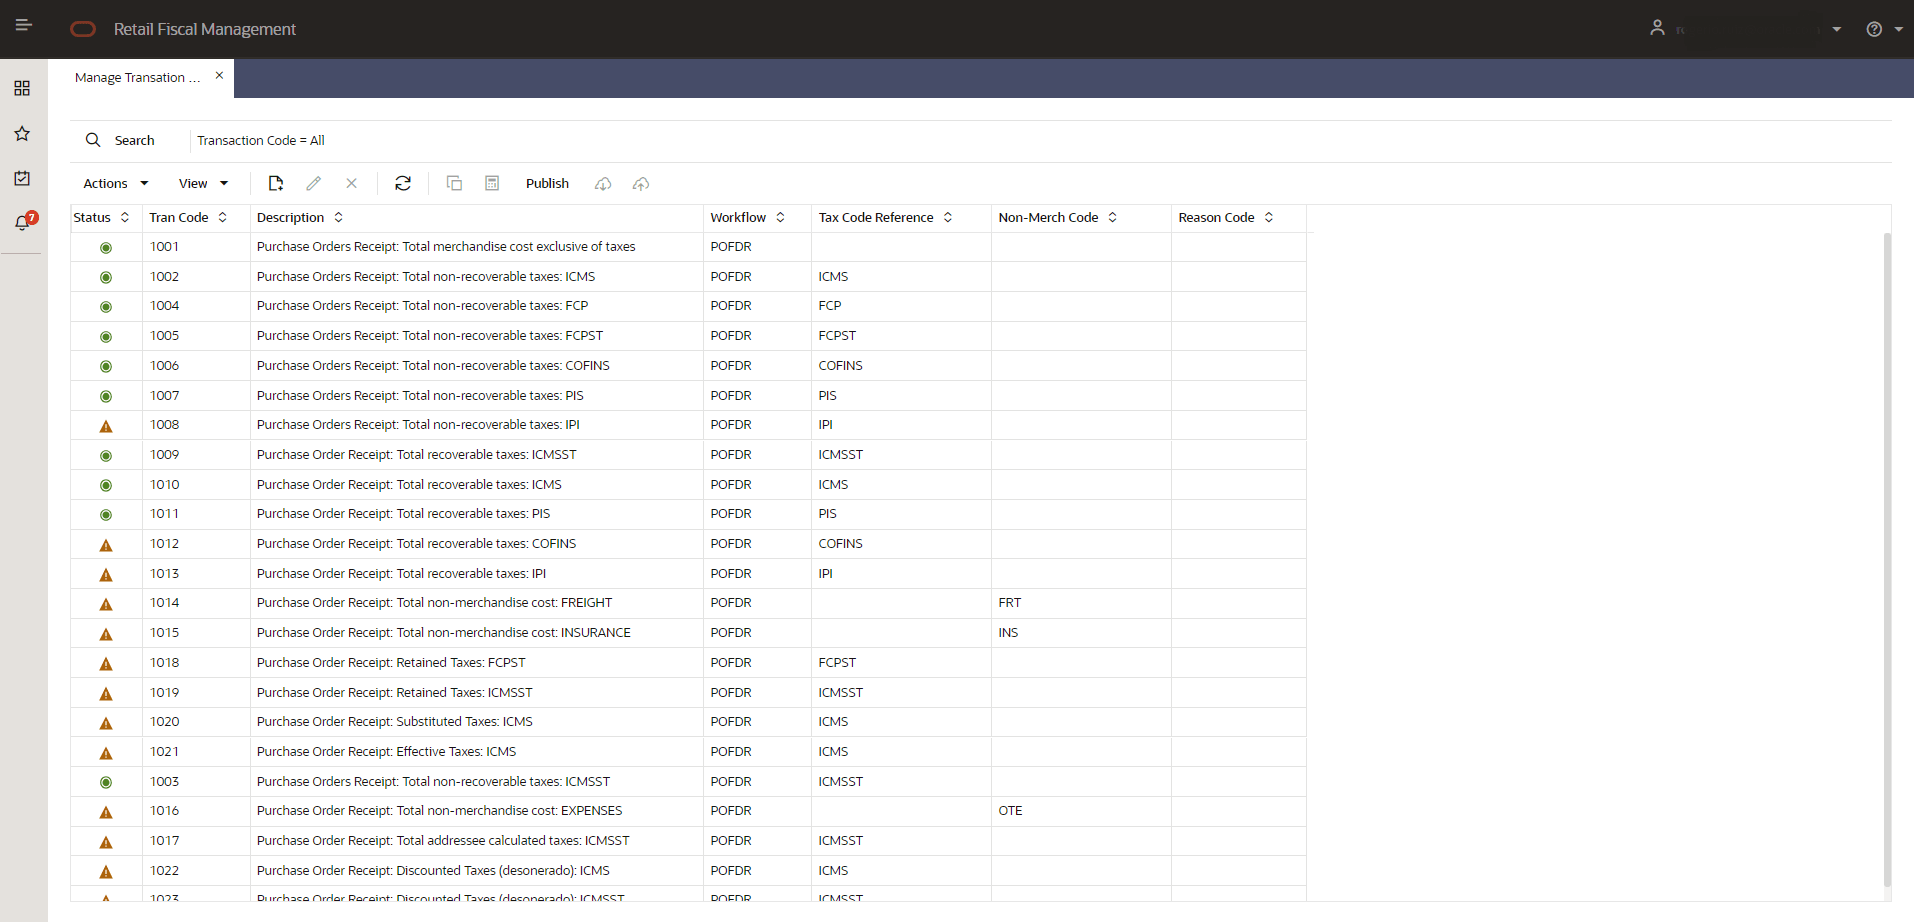
Table 4-1 Manage Transaction Codes - Fields
| Field | Description | ||||
|---|---|---|---|---|---|
|
Status |
Status of the transaction code publication:
A tran code will have "green" status after the action "Publish". Once that is done, the trancode will be considered for the workflow process to be applied. |
||||
|
Tran Code |
Transaction Code. This is a user defined numeric value that will have duplicity constraint applied. A range of codes will be reserved for product delivered setups. Codes from 1 to 9999 will be product reserved. Customer defined codes will use 10000 to 99999. |
||||
|
Description |
Description of the tran code. This is a user defined information |
||||
|
Workflow |
Workflow to which this tran code will be applied |
||||
|
Tax Code Reference |
Attribute of the transaction code. The tax code will be used to identify which tax the trancode is applied. Although the calculation logic will not be validated against this field, it will be used to perform cross reference with GL. |
||||
|
Non-Merch Code |
Similar to the tax code ref, this code is to be used to filter the trancode and to identify the category of data the calculation will be applied. |
||||
|
Reason Code |
Similar to the tax code ref, this code is to be used to filter the trancode and to identify the category of data the calculation will be applied. |
In the Manage Transaction Codes screen´s task bar, the following options will be available:
-
In Actions and in separated buttons:
-
Create: Will open a popup screen to create a new transaction code
-
Edit: Will open a popup screen to update the transaction code
-
Delete: Will open a dialog confirmation box to delete the selected tran code record
-
-
In View:
-
Manage Columns
-
Sort
-
-
 Copy From Existing: Will duplicate the selected tran code into a new one.
-
 Calculations: Will open the Transaction Codes Calculation setup screen
-
Publish: Will publish a configured transaction code and make it available to the system. If a record is selected, the publication will be done exclusively for that record. If no record is selected, the publication will be done for all records in Worksheet status and with valid calculations setup.
-
Download: Will open a dialog box to download a transaction code maintenance template.
-
Upload: Will open a dialog box to upload a transaction code maintenance template.
By clicking on the Download button in the task bar from the Manage Transaction Codes screen, it will be possible to download records based on the current search criteria applied to the screen.
Figure 4-9 Download
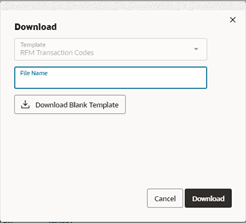
It is also possible to download a blank template from the screen.
By clicking on the Upload button in the task bar, it will be possible to upload the Transaction Codes template.
Figure 4-10 Upload
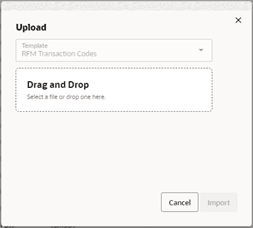
Creating a Transaction Code
Transaction codes can be created by uploading a template with the necessary information. The creation via the screen is also possible in the Manage Transaction Codes screen.
Figure 4-11 Create Transaction Codes
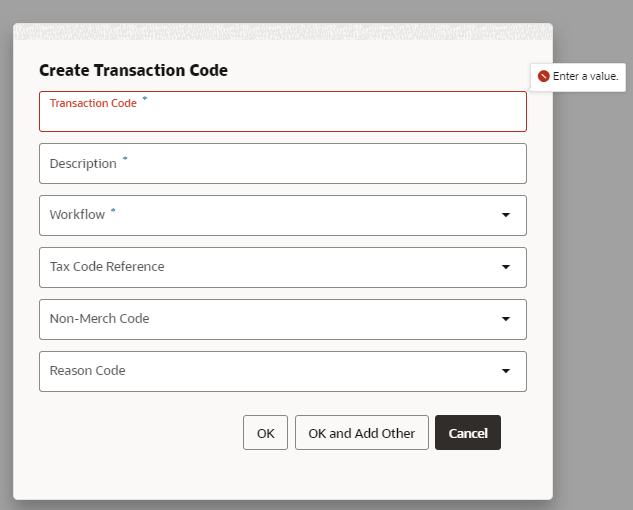
It is possible to manually add a new tran code using the “Create”
button: ![]() .
.
The fields required are:
-
Transaction Code: User defined code to be associated. There is a range from 10000 to 99999 to be used.
-
Description: Description to be associated to the transaction code.
-
Workflow: Workflow to which this tran code will be applied.
-
Tax Code Reference: Attribute of the transaction code. The tax code will be used to identify which tax the tran code is applied. Although the calculation logic will not be validated against this field, it will be used to perform cross reference with GL
-
Non-Merch Code: Similar to the tax code ref, this code is to be used to filter the tran code and to identify the category of data the calculation will be applied. To be used in GL cross reference too. Source of LOV (new RFM code/detail)
-
Reason Code: Similar to the tax code ref, this code is to be used to filter the trancode and to identify the category of data the calculation will be applied. To be used in GL cross reference too. Source of LOV (new RFM code/detail)
Once the tran code is created, it is necessary to configure the tran code calculation rules.
Figure 4-12 Transaction Code Calculation Setup
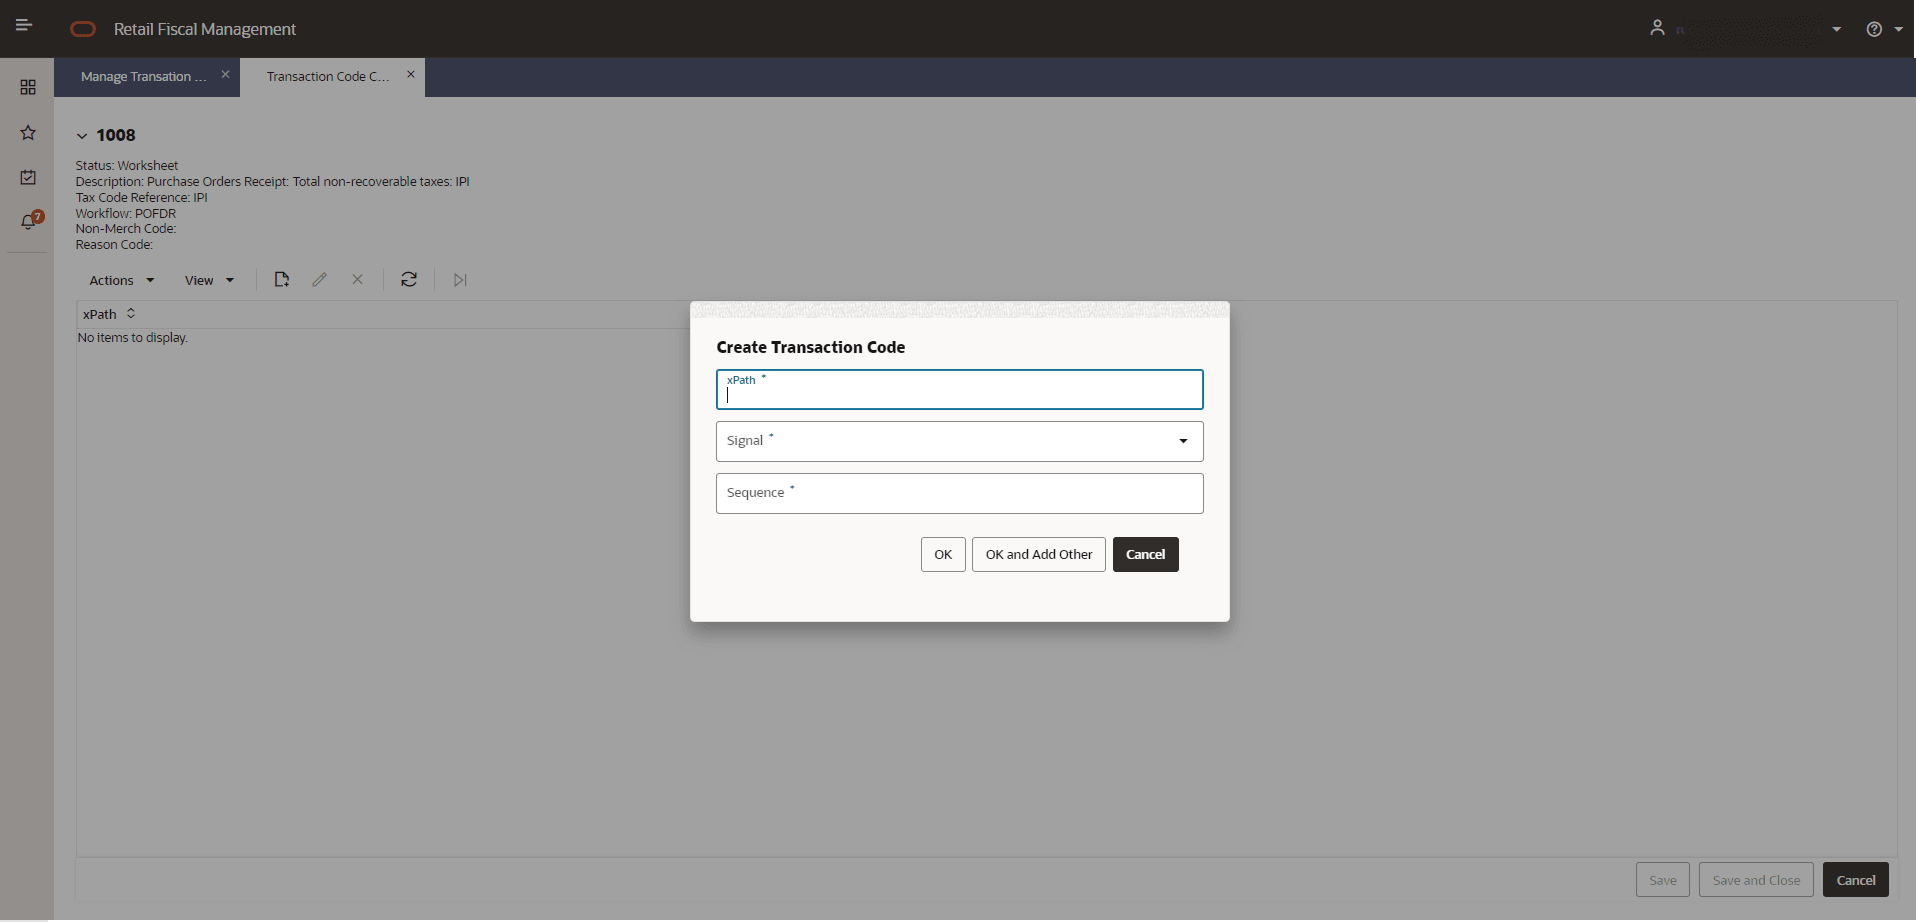
The required information to setup the transaction code calculation is:
-
xPath: xPath of the tag in the fiscal document that will be used to perform a mathematical operation
-
Signal: Mathematical signal to be applied to the value of the tag
-
Sequence: Sequence of application for the calcualtion setups
Note:
RFMCS will manage the fiscal documents in a XMLDB data type. With this approach, the document will be processed by leveraging a xml structure which gives the possibility of mapping specific tags by following a hierarchy path.
Figure 4-13 Transaction Code Calculation Setup - Example for PO Receipt Cost
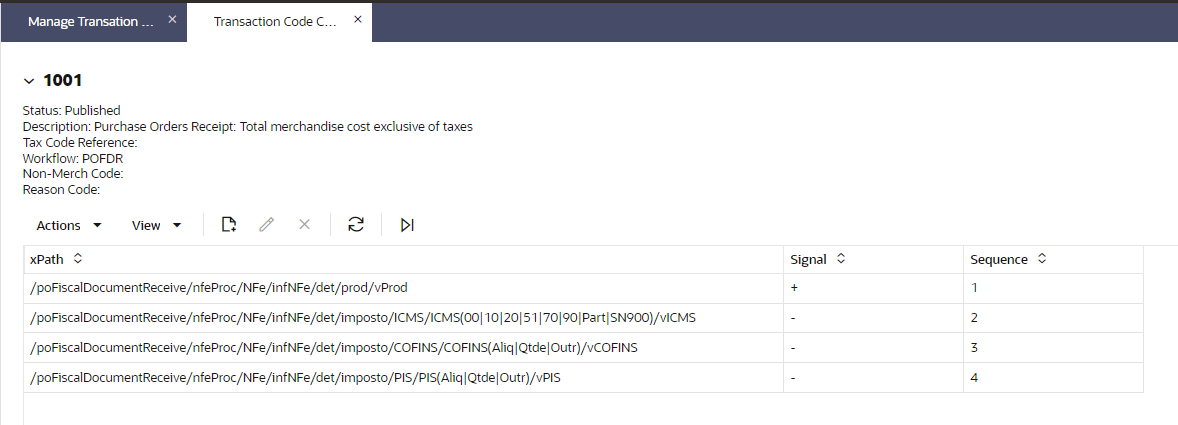
Example of xPath Setup. This setup considers the POFDR workflow and the Brazilian NFe document. The xPath used to fetch the proper tags in the document is based on the workflow and the original document xml hierarchy.
After configuring the xPaths to be used in the tran code calculation it is possible to perform a test to confirm the expected calculation is working as expected.
Figure 4-14 Transaction Code Calculation Test
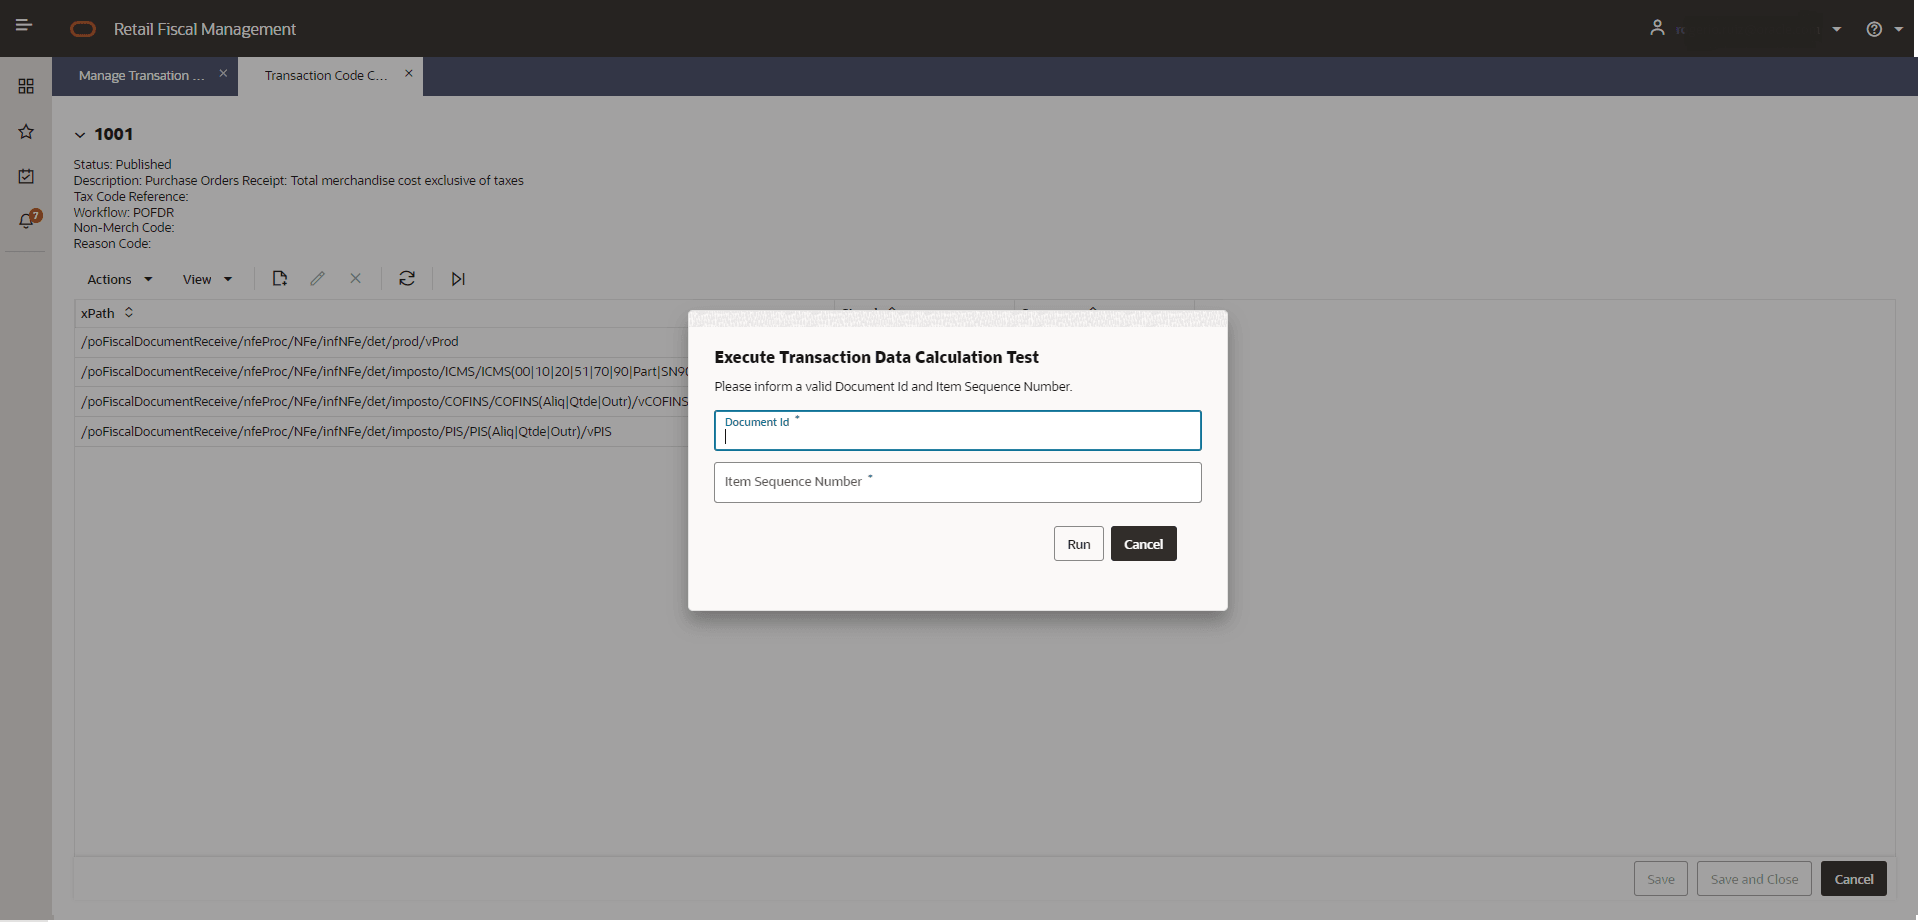
Using the ![]() Test button in Transaction
Codes Calculation Setup screen, the setup can be tested by informing
a document id and the item sequence in the document.
Test button in Transaction
Codes Calculation Setup screen, the setup can be tested by informing
a document id and the item sequence in the document.
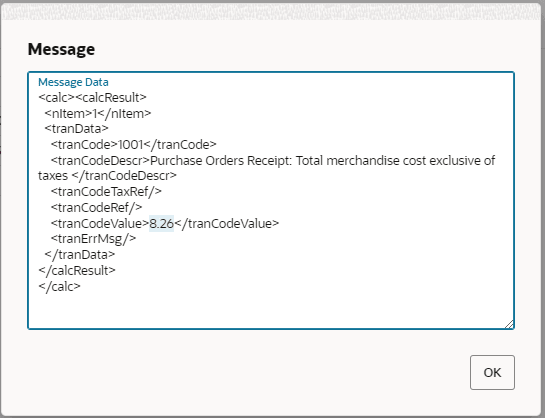
A message box will be displayed with the result of the calculation:
Figure 4-15 Transaction Code Calculation Test – Result Message Box
Manage Data Loading
Set up data configuration via download and upload is available from the main RFMCS task list under Foundation > Manage Data Loading > Download Setup Data and Foundation > Manage Data Loading > Upload Setup Data
Figure 4-16 Download Setup Data
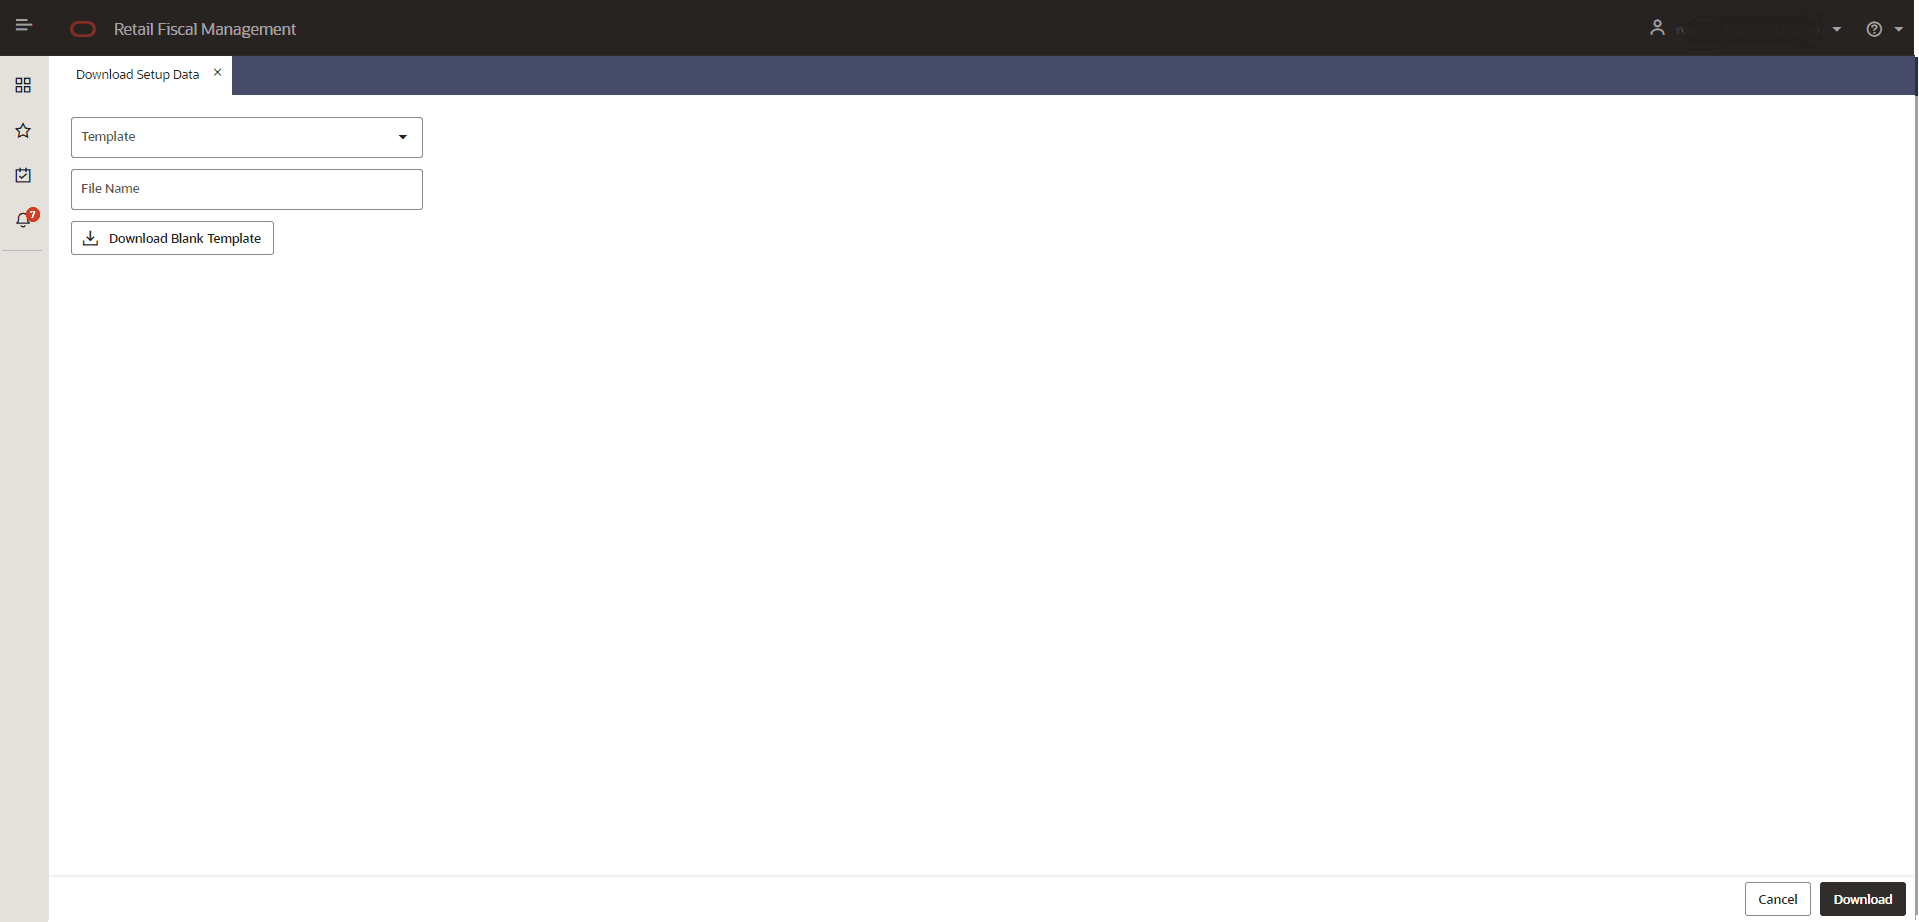
Download Setup Data will have the following fields:
-
Template: List of available templates for setup data. The available list is:
-
Item Fiscal Attributes
-
Entity Fiscal Attributes
-
Fiscal Ledger
-
Transaction Codes
-
User Assignments
-
GL Accounts
-
GL Cross Reference
-
-
File Name: Inform a name for the file to be generated.
-
Download Blank Template: Download an empty file for the selected template.
Note:
Downloading a template will always bring the complete set of available data. Be aware that by choosing a template, the entire set of records will be downloaded.Figure 4-17 Upload Setup Data
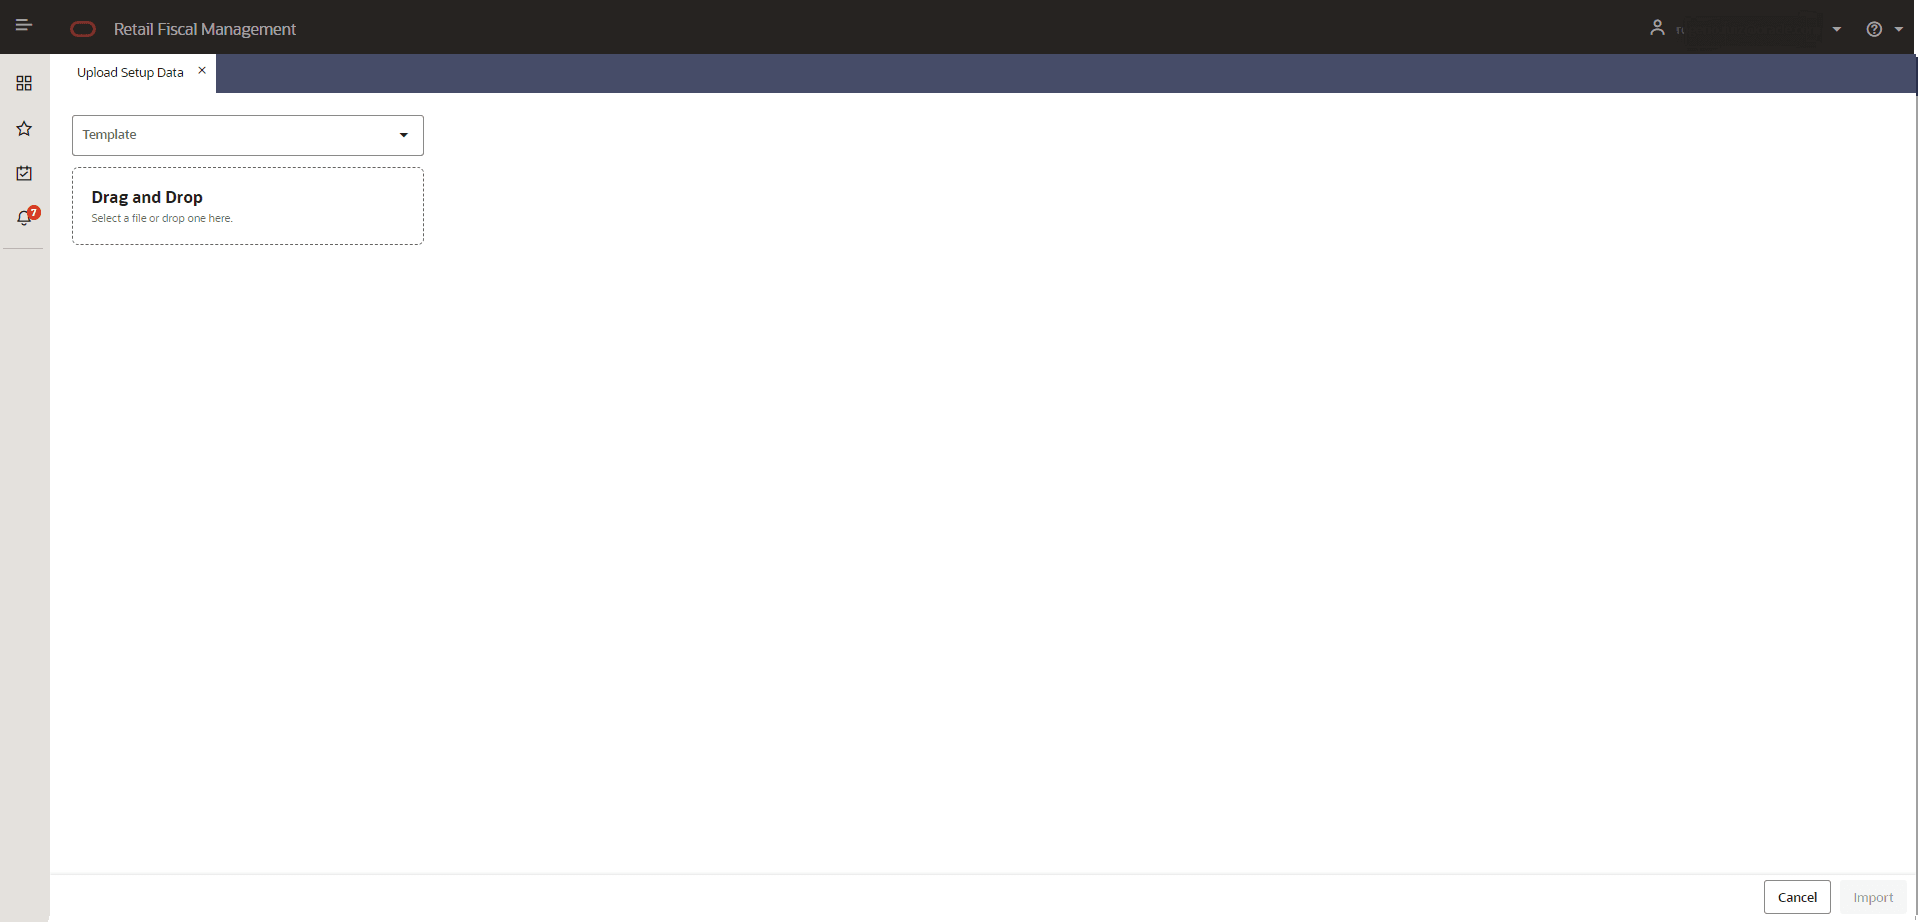
Upload Setup Data will have the following fields:
-
Template: List of available templates for setup data.
-
Drag and Drop / Select File: Select file or drag and drop in the transfer area.
Manage Document Sequence
The Manage Document Sequences feature allows the creation of sequences at a fiscal document issuing location level, with the possibility of having more than one sequence available for the same location. This functionality is accessed from the main RFM task list under Foundation > Manage Document Sequence.
Figure 4-18 Manage Document Sequence - Search
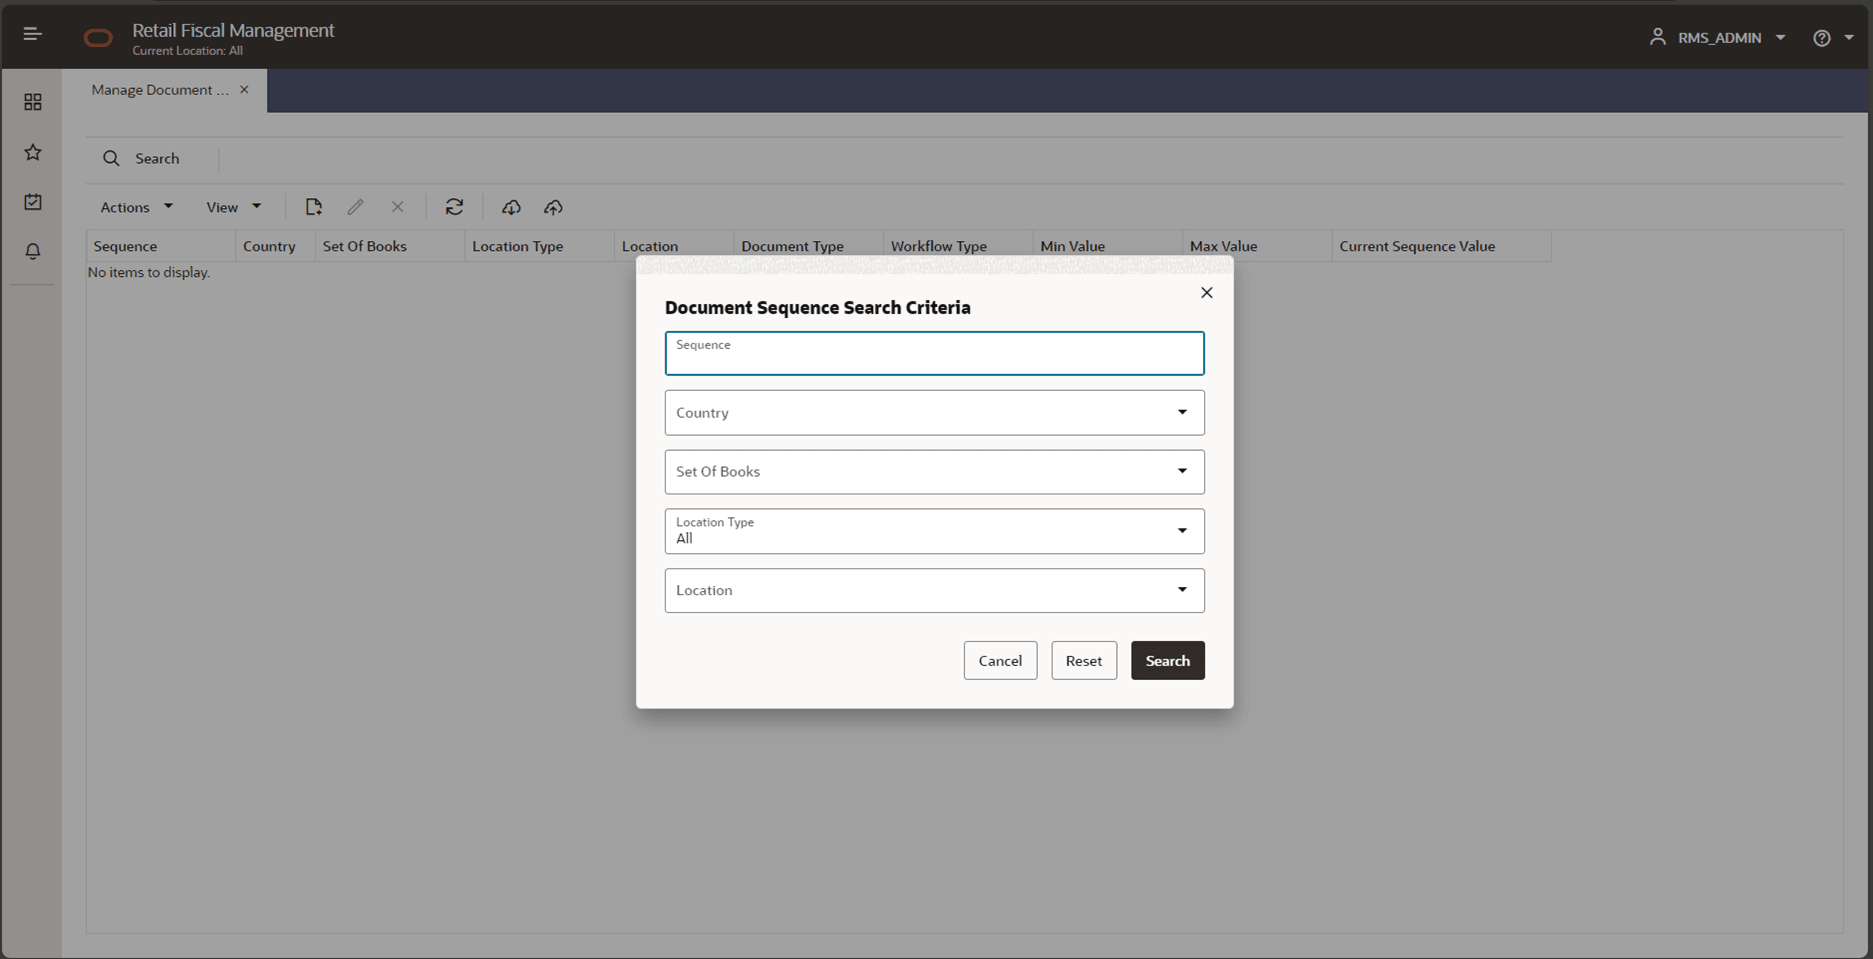
In this search criteria the following search options are available:
-
Sequence: User-defined sequence code.
-
Country: From the country code list of values.
-
Set of Books: From the set of books list of value. Sequences can be created at the SOB level, which will result in the usage of same sequence for all locations within the same SOB.
-
Location Type: Filtered from the SOB selected.
-
Location Code: Filtered from location type selected.
Figure 4-19 Manage Document Sequence
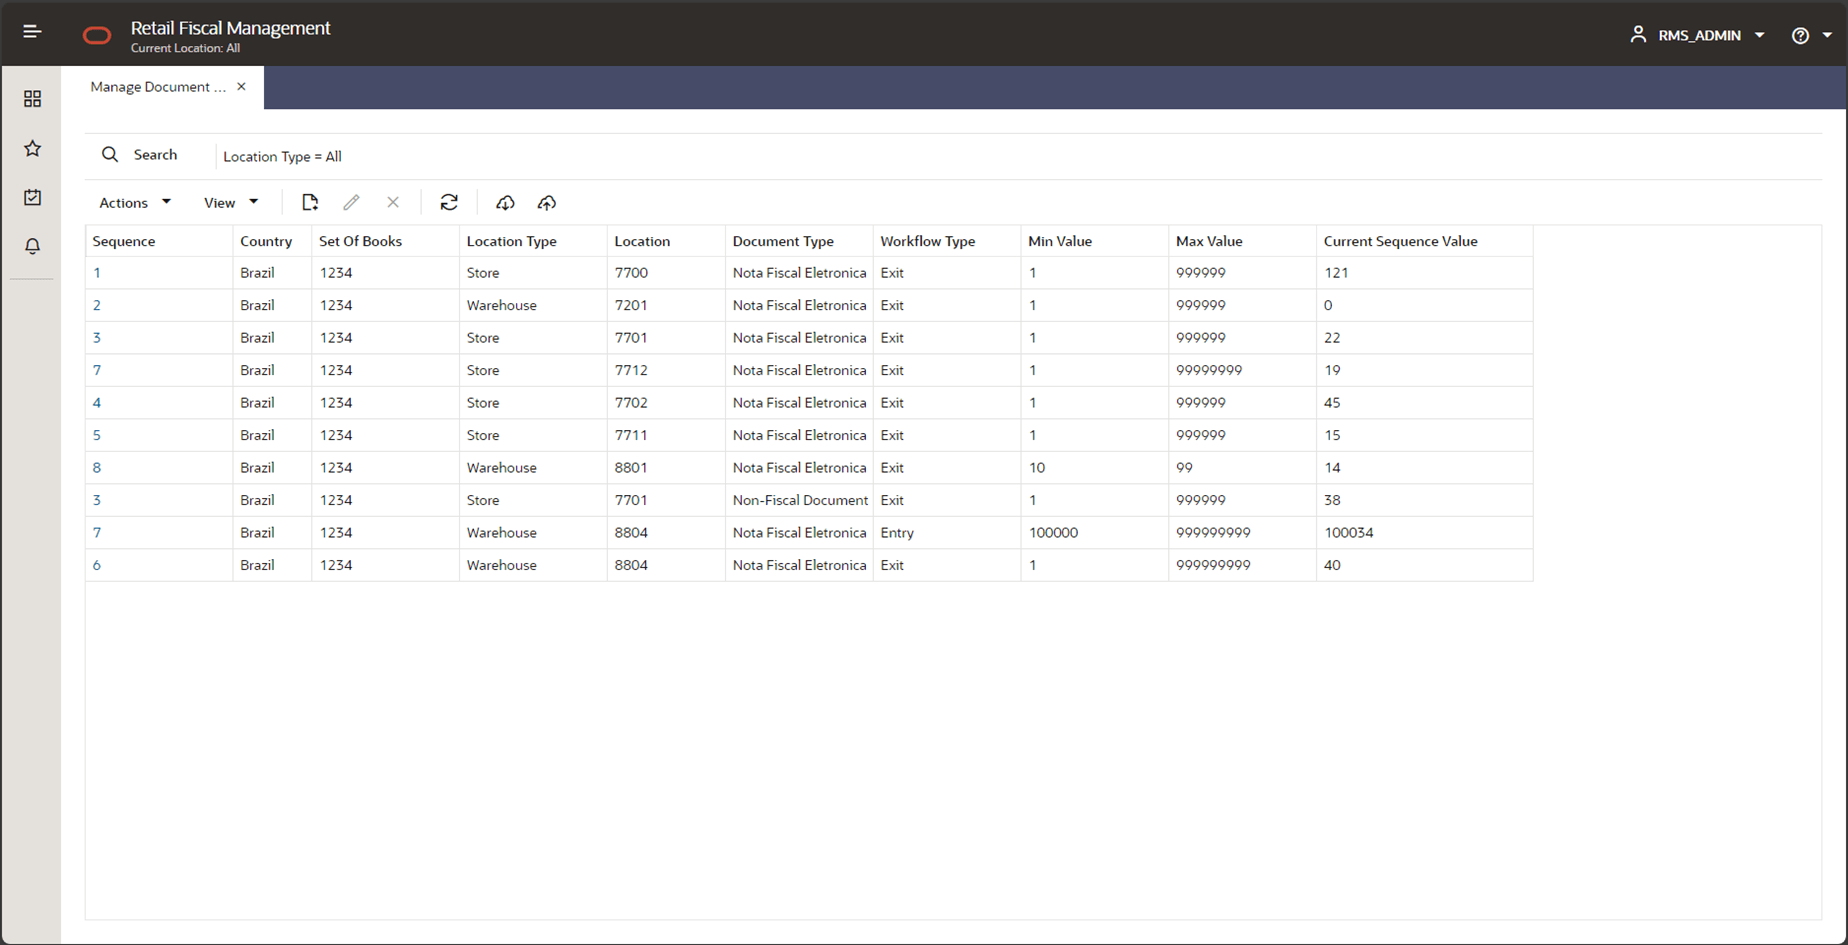
The sequences displayed in this screen will be used by the Fiscal Document Generation workflows prior to submitting documents to fiscal approval integration.
Table 4-2 Manage Document Sequence Screen Fields
| Field | Description |
|---|---|
|
Sequence |
User-defined sequence code. |
|
Country |
From the country code list of values. |
|
Set of Books |
From the set of books list of value. Sequences can be created at the SOB level which will result in the use of the same sequence for all locations within the same SOB. |
|
Location Type |
Filtered from the SOB selected. |
|
Location Code |
Filtered from location type selected. |
|
Document Type |
Document type from the list of values. |
|
Min Value |
Initial value of the sequence. |
|
Max Value |
Maximum value of the sequence. |
|
Current Sequence Value |
Current value already used by the sequence. |
By clicking the sequence hyperlink or the Edit button, the “Sequence Extensions” screen is displayed.
Figure 4-20 Manage Document Sequence – Sequence Extensions
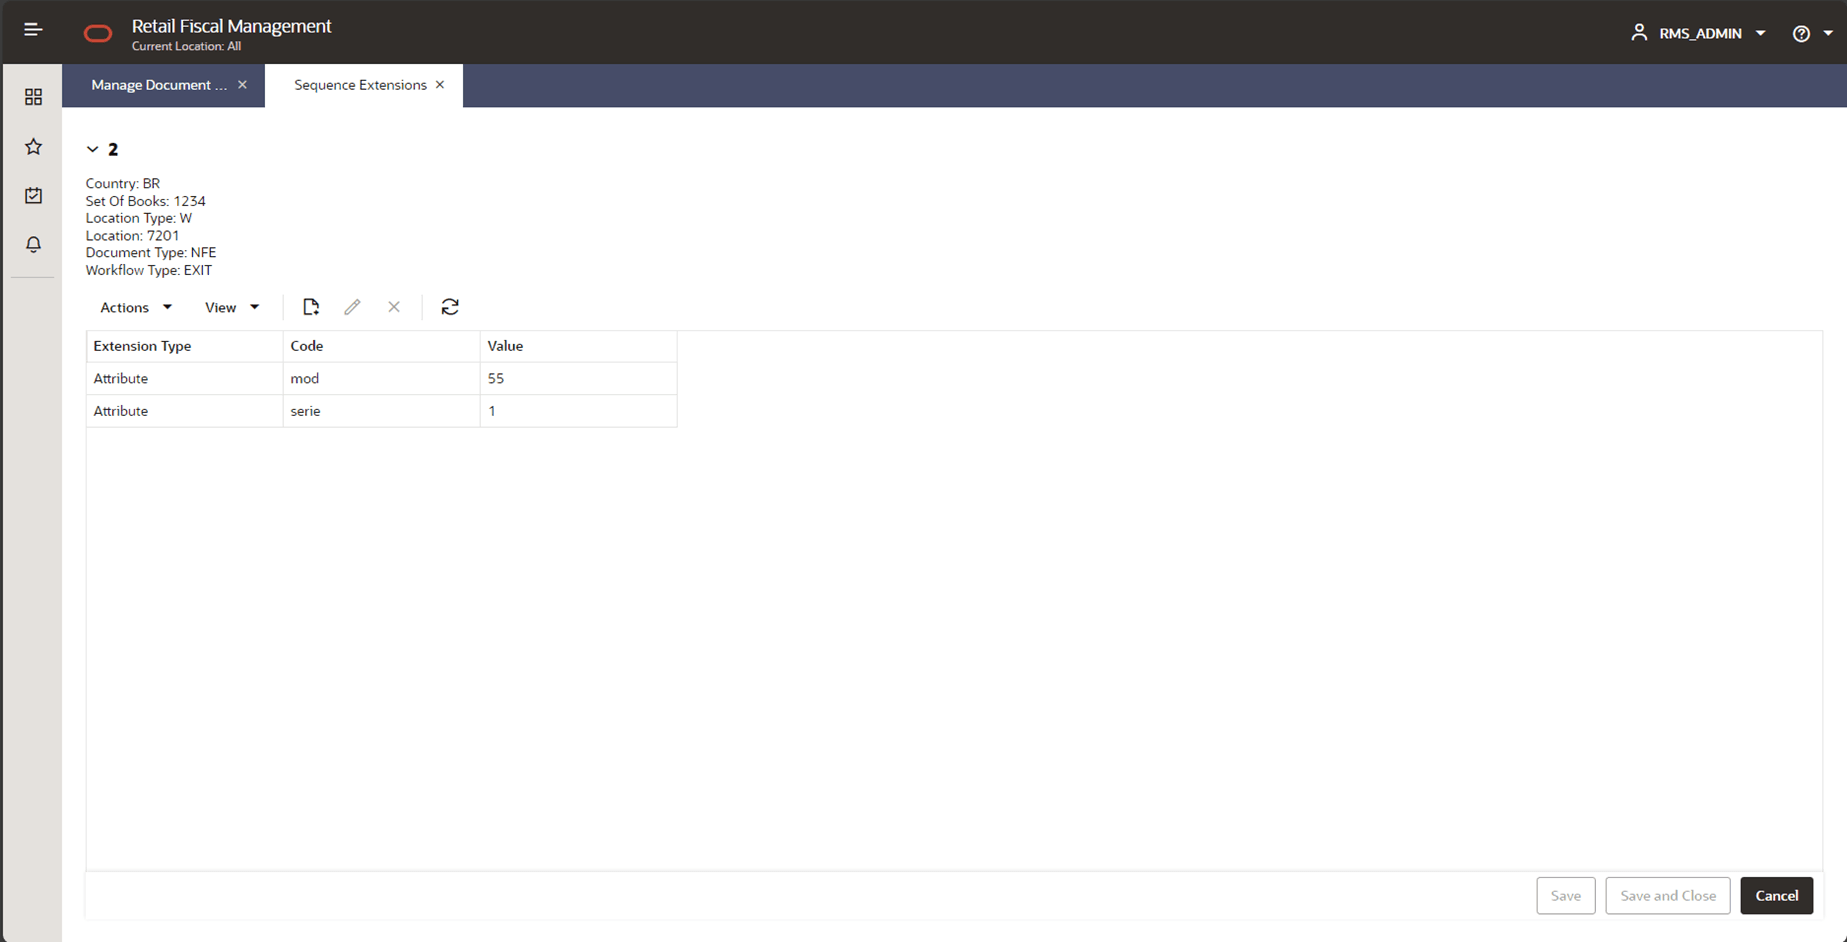
The Sequence Extensions screen has the summary of the sequence information for reference and has the list of extensions associated.
Table 4-3 Sequence Extension Grid
| Field | Description |
|---|---|
|
Extension Type |
Attribute or Filter. |
|
Extension Code |
From the code list of values, filtered by the extension type selected. |
|
Value |
Depending on the extension code selected, a list of values will be displayed. Free text values are also a possibility, depending upon the extension code. |