3 Process Orchestration and Monitoring
Dashboards and Tiles
When Oracle Retail Process Orchestration and Monitoring (POM) is provisioned as part of your Oracle Retail subscription, then Retail Home can be populated with tiles and a banner with details on Batch Schedules, Batch Progress, Favorites, Notifications, and so on. To import this content into your Retail Home environment, you must go to the Application Navigator Setup, select the application row in the table, and click Refresh Seed Data. The application name in the table must be Process Orchestration and Monitoring as the seed data is linked to that name only. The sample dashboards created by the seed data import are described below.
Batch Metrics
Dashboard Tiles – Favorites and Notifications
Batch Status Banner
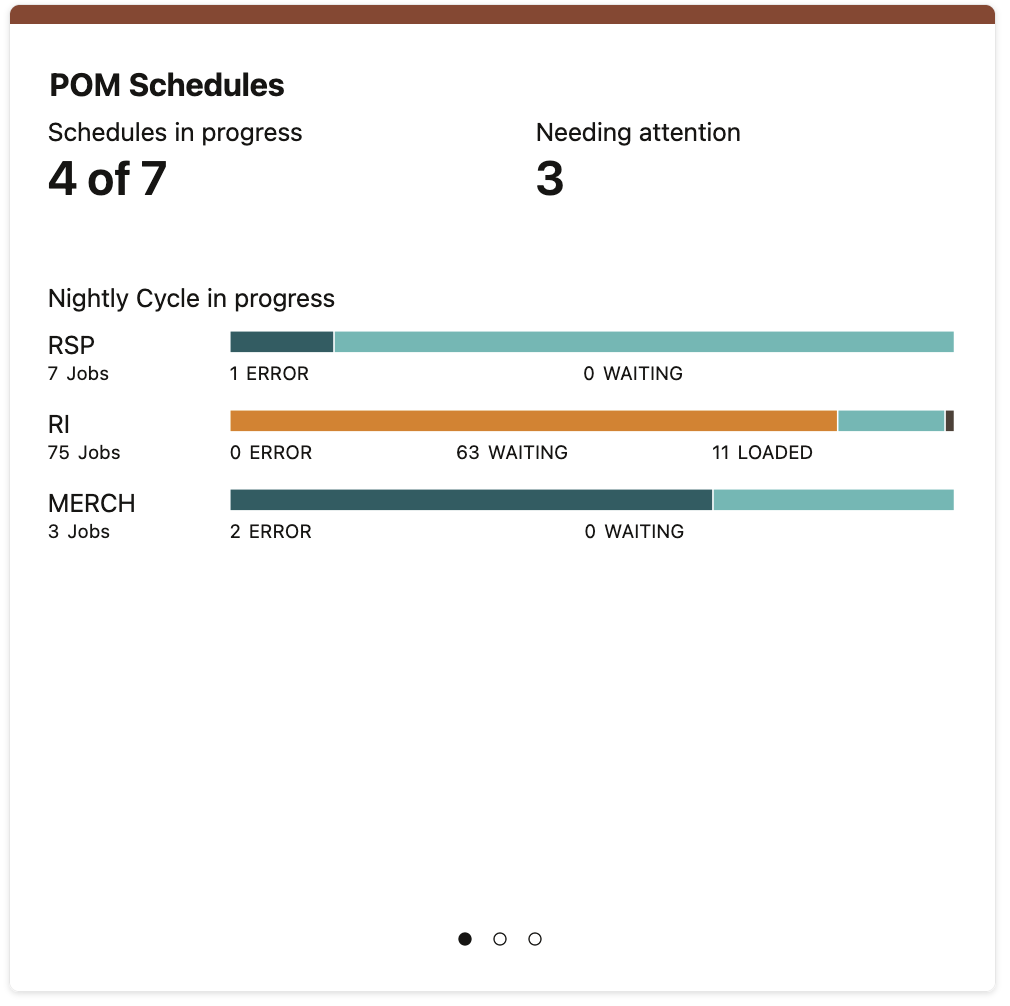
This dashboard tile provides a runtime view of the batch schedules and their progress for the selected business day. The metrics are populated for a business date where at least one schedule is active. If none are found, it will be populated for the most recent business date where at least one schedule was active.
To configure Retail Home Dashboard to display the Batch Metrics tile.
-
Login to Retail Home as an administrator (having the role RETAIL_HOME_ADMIN) and open the Settings > Dashboards and Reports > Dashboards > Dashboard Configuration tab.
-
From the first step in the process flow on this tab, create a new dashboard tile to display your report.
-
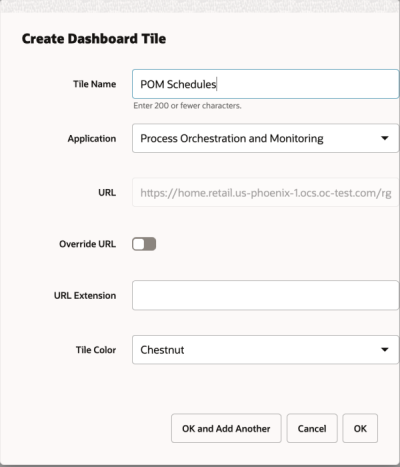
The tile name is shown in the header bar of the tile.
-
The application should be selected as Process Orchestration and Monitoring.
-
The URL can be left as the default one for the application, or you can replace it with a custom link.
-
Lastly, choose a color for the tile.
When you are finished, the configuration should appear like the example below. Click OK to save the tile configuration.
Now click through the process flow until you reach the Layouts screen. It is typical that at least one layout will already exist, as it is typical to create one for the RETAIL_HOME_ADMIN to test configurations, but if you do not have any layouts created, add one for the role of your choice, such as BATCH_ADMINISTRATOR_JOB. Once the layout is created, locate your new tile in the panels on the right and click the plus sign next to it to move it to the right-most list. Keep the tile size as 2x2.

Advance to the Tile States screen.
-
Select your Role and Tile from the dropdown menus.
-
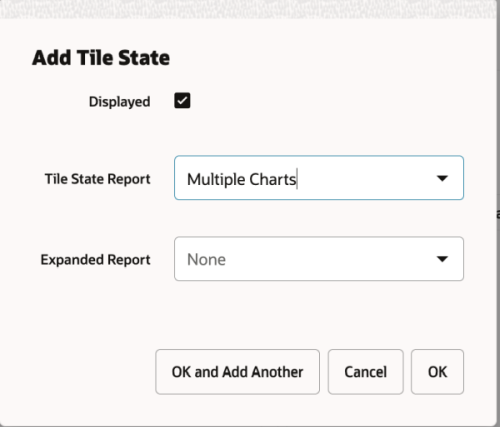
From the main table on the left side, use the Add action to add the report Multiple Charts as a tile state in this tile.
-
Ensure the Displayed checkbox is enabled.
-
Add three Multiple Charts reports to display Nightly, Hourly, and Ad hoc schedule batch metrics.
When you are finished, the configuration should appear like the example below. Click OK to save the tile state.
Now click on a Tile State Report and add Data Sources in the panels on the right by clicking on the Add icon.
-
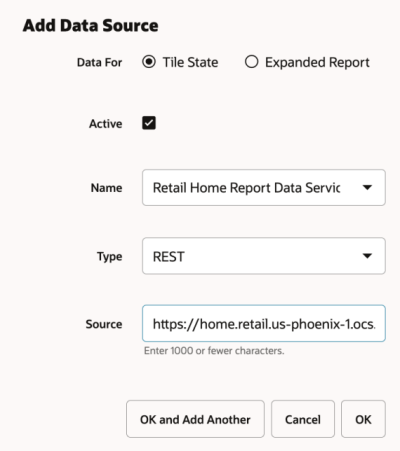
The Data For should be selected as Tile State
-
Ensure the Active checkbox is enabled
-
The Name should be selected as Retail Home Report Data Service.
-
The Type should be selected as REST
-
The Source should be selected as follows for each tile.
-
Nightly:
<pom_appserver_url>/ProcessServices/services/private/retailhome/schedules?cycleType=NIGHTLY&skipVersion=true -
Hourly:
<pom_appserver_url>/ProcessServices/services/private/retailhome/schedules?cycleType=HOURLY&skipVersion=true -
Ad hoc
<pom_appserver_url>/ProcessServices/services/private/retailhome/schedules?cycleType=ADHOC&skipVersion=trueReplace the <pom_appserver_url> component above with the URL appropriate for your environment.
-
When you are finished, the configuration should appear like below.
Click OK to save the changes and the Tile States configuration should appear like the example below.

Return to the Home Dashboard tab. Select your dashboard from the dropdown menu and click Refresh to reload the tiles. If you had to create the layout, then you may need to close the tab completely and re-open it first. The new tile should appear in the dashboard and pull the data from POM Batch Scheduler.
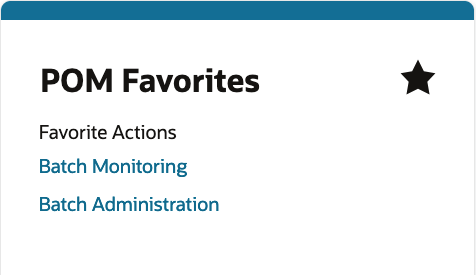
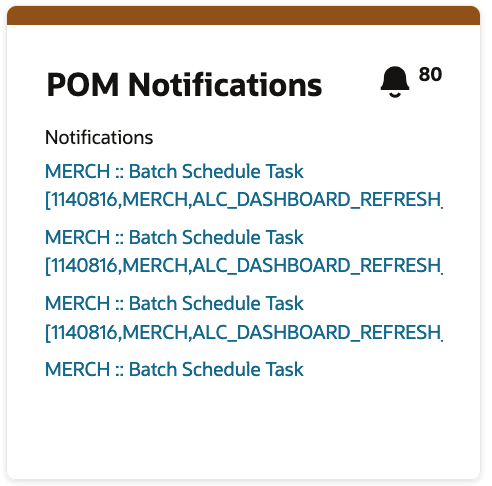
POM supports displaying the Favorites and Notifications tile states. The Favorites report will display the items (tasks, reports, etc.) that have been marked as a "favorite" by the user within the POM application. The user can click on a favorite item to launch the item in the POM application within a separate browser window. The Notifications report will display the unread notifications for the current user. The user can click on a notification to launch that notification in the POM application within a separate browser window.
The steps to configure the tile and layout are similar to creating the Batch Metrics tile. You can create one tile with two pages for Favorites and Notifications or one tile for each of them. Then advance to the Tile States screen.
-
Select your Role and Tile from the dropdown menus.
-
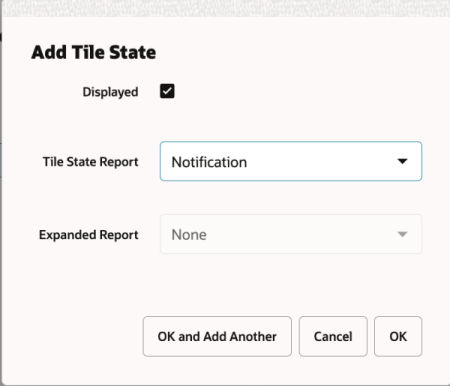
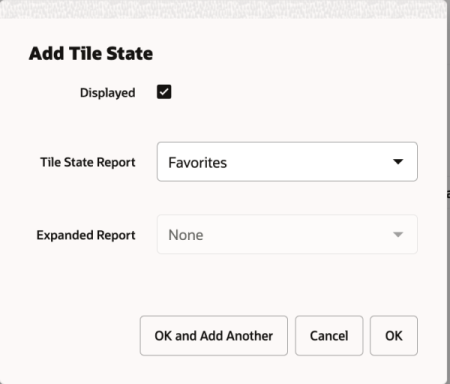
From the main table on the left side, use the Add action to add the report Notifications as a tile state in this tile.
-
Ensure the Displayed checkbox is enabled.
When you are finished, the configuration should appear like the example below. Click OK to save the tile state. Repeat the same steps for Favorites.
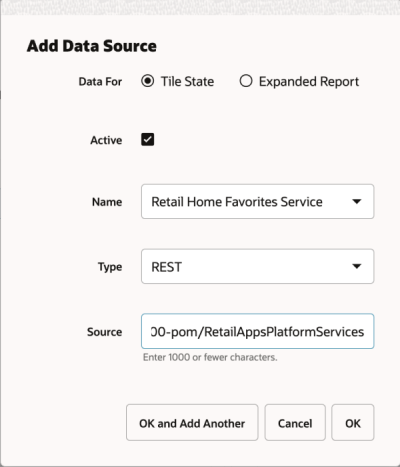
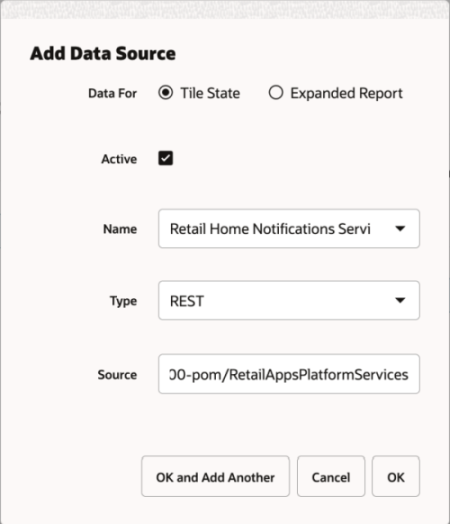
Now click on a Tile State Report and add Data Sources in the panels on the right by clicking on the ‘Add’ icon.
-
Select Data For – Tile State
-
Ensure the Active checkbox is enabled
-
The Name should be automatically selected as Retail Home Favorites for favorites and Retail Home Notifications Service for notifications.
-
The Type should be selected as REST
-
The Source is the same for both notifications and favorites and should be entered as follows for each tile.
-
<pom_appserver_url>/RetailAppsPlatformServicesReplace the <pom_appserver_url> with the URL appropriate for your environment.
-
When you are finished, the configuration should appear like below.
Click OK to save the changes and the Tile States configuration should appear like the example below.


Return to the Home Dashboard tab. Select the dashboard you configured from the dropdown menu and click Refresh to reload the tiles. If you had to create the layout, then you may need to close the tab completely and re-open it first. The new tile should appear in the dashboard and pull the data from POM’s Favorites and Notifications.
For users assigned to BATCH_ADMINISTRATOR_JOB and BATCH_ADMINISTRATOR_JOB_PREPROD roles, the Retail Home Dashboard will display a Batch Schedule banner while batch jobs are currently running or active automatically when POM is added in the Application Navigator. This may be useful for your users as some Oracle Retail solutions do not allow users to access the application while a batch process is running. Please consult the product-specific documentation for more details on which solutions are impacted.

The banner displays the following for the current business date:
-
The number of schedules complete out of total number of schedules.
-
After a schedule is complete, a Complete status beside the schedule name along with the completion time.
-
If a schedule is currently running, the banner shows the percentage of completion.
-
If a schedule has not started, the banner shows 0% Complete for the schedule.
Administration Tools
Resource Bundle Customization
Process Orchestration and Monitoring supports the use of the following Retail Home tasks:
-
Resource Text Strings
-
Import Management
Resource Text Strings
Importing Management
The Resource Text Strings screen provides the capability to customize the resources present in the resource bundles in Process Orchestration and Monitoring. These text strings are used as the labels and descriptions for all metrics and attributes in the base catalog.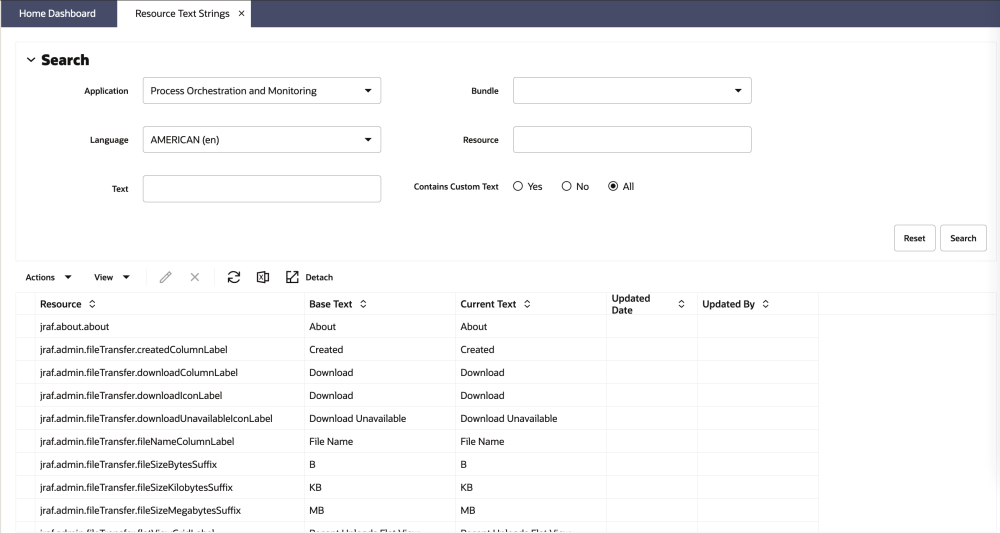
During or after your implementation of Process Orchestration and Monitoring, you may decide that some attributes or metrics need to be re-labeled to have more meaningful values for your users. From this screen, you can edit the default labels and they are persisted to POM as part of the nightly batch process.
Users may leverage these actions in the Resource Text Strings screen for POM data:
-
Edit
-
Search
-
Export to Excel
Note:
You should not add or delete rows as such changes will not be picked up by POM.
Process Orchestration and Monitoring also supports exporting the text strings displayed in the Resource Text Strings screen, modifying them from Excel, and then importing them from the Import Management screen. Do not try to create an Excel file for import, as it would not contain the required formatting needed for importing. Instead, you should always start with an export of the data from Retail Home that you then can update. When you import the text strings, the new values should appear in the Current Text field in Resource Text Strings.
For more details on the resource bundle and import management screens, refer to the Oracle Retail Home Administration Guide.
Customer Modules
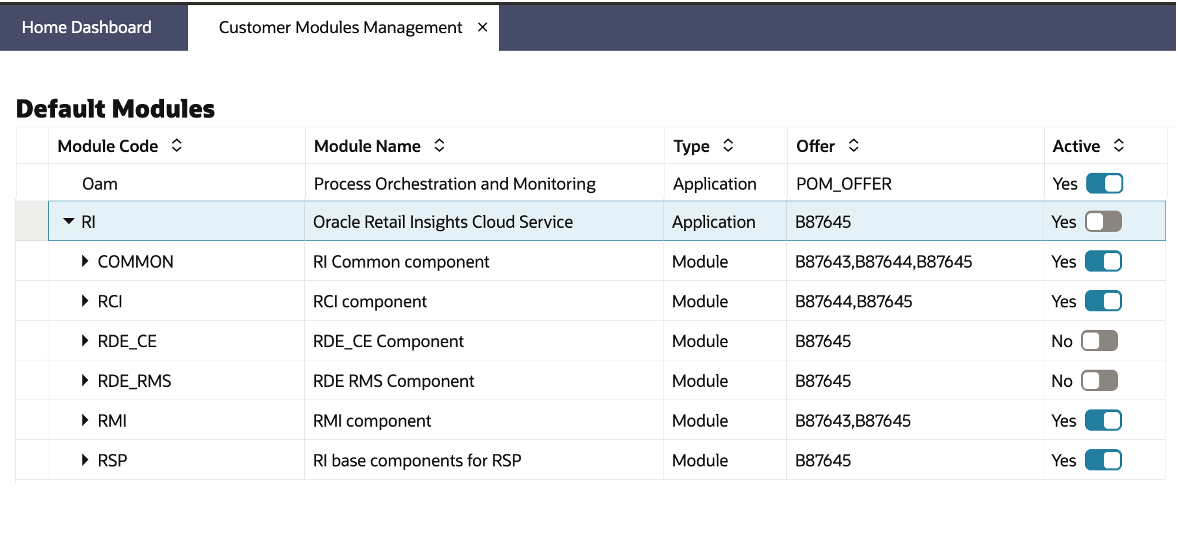
The Retail Home Customer Modules Management page gives customer administrators the ability to activate or deactivate provisioned applications and modules. Scheduled batch processes may also be ready to execute or halted when those processes are tied to activated or deactivated applications and modules respectively.
The Customer Modules Management page can be launched from the Retail Home Settings menu's Application Administration section. The management of customer modules in Retail Home requires applications to be configured first since information about modules resides in the applications' Module Definition Framework (MDF) data.
Sync Modules between Retail Home and POM
Once any module is activated or deactivated from Retail Home's Customer Module Management, the changes should be synced with POM so that the jobs for the activated modules are added to the nightly batches and the jobs for the deactivated modules are removed from the nightly batches.
-
In Retail Home’s Customer Modules Management tab, activate or deactivate a few modules using the switch

-
Click the 'Save' button in Customer Modules Management. All changes are saved.
-
Log in to POM Application URL and navigate to Tasks → Batch Administration.
-
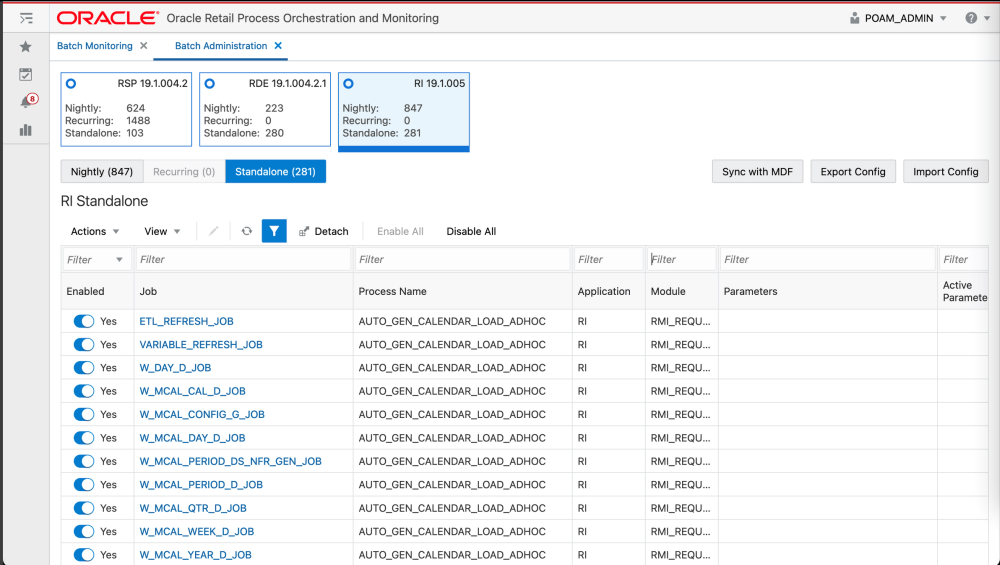
Click on a schedule. The RI and the RI Batch Jobs are loaded in the table.
-
Click the Sync with MDF button (above the table) and then the OK button in the warning message pop-up. After this button is clicked, the modules will be synced via background service calls.

-
While the synchronization is in progress, a message will be displayed indicating that some features are disabled.

-
Once the sync is complete, a JSON file with the batch schedule summary is downloaded. This file contains the current and previous status of an application and module in MDF and POM after sync.
-
For Example:
{"scheduleName":"RI","synced":true,"enabledModules":[{"state":"MATCHED_MODULE","mdfStatus":"ENABLED","prevMdfStatusInPom":"ENABLED","prevStatusInPom":"ENABLED","publishToPom":true,
"applicationName":"RI","moduleName":"RMI_SI_ONORDER","matchedModule":true},{"state":"MATCHED_MODULE","mdfStatus":"ENABLED","prevMdfStatusInPom":"ENABLED","prevStatusInPom":"ENABLED","publishToPom":true,"applicationName":"RI","moduleName":"RMI_SI_WHOLESALE","matchedModule":true},{"state":"MATCHED_MODULE","mdfStatus":"ENABLED","prevMdfStatusInPom":"ENABLED","prevStatusInPom":"ENABLED","publishToPom":true,"applicationName":"RI","moduleName":"RMI_SI_DEAL_INCOME","matchedModule":true},{"state":"MATCHED_MODULE","mdfStatus":"ENABLED","prevMdfStatusInPom":"ENABLED","prevStatusInPom":"ENABLED","publishToPom":true,"applicationName":"RI","moduleName":"RMI_SI_NETCOST","matchedModule":true},{"state":"MATCHED_MODULE","mdfStatus":"ENABLED ","prevMdfStatusInPom":"ENABLED","prevStatusInPom":"ENABLED","publishToPom":true,"applicationName":"RI","moduleName":"RMI_SI_PRICE","matchedModule":true},{"state":"MATCHED_MODULE","mdfStatus":"ENABLED","prevMdfStatusInPom":"ENABLED","prevStatusInPom":"ENABLED","publishToPom":true,"applicationName":"RI","moduleName":"RMI_SI_MARKDOWN","matchedModule":true},{"state":"MATCHED_MODULE","mdfStatus":"ENABLED","prevMdfStatusInPom":"ENABLED","prevStatusInPom":"ENABLED","publishToPom":true,"applicationName":"RI","moduleName":"RCI_SI_SALES","matchedModule":true}]
-
-
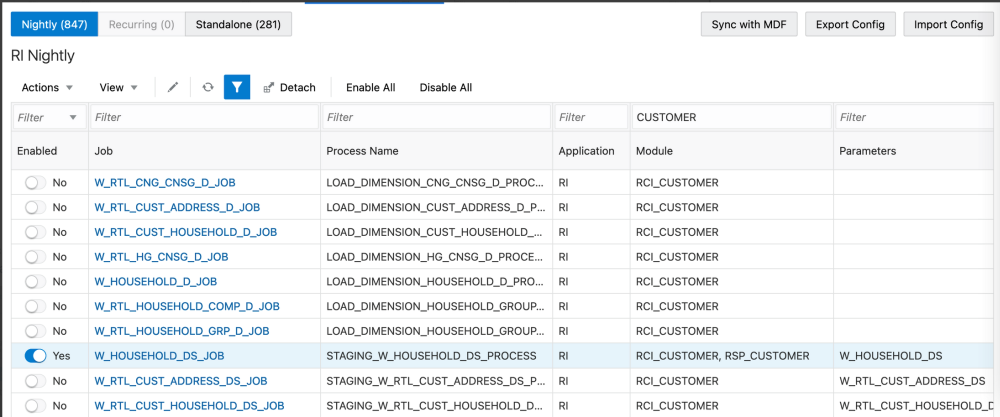
Click the Nightly or Standalone tab above the table and enter a filter for the Module column (based on the modules that were activated/deactivated in Step 2 and click 'Enter'. The jobs are enabled or disabled based on the set-up done in Customer Modules Management. An example of jobs for RCI_CUSTOMER and RSP_CUSTOMER is shown below.
Make Changes Effective Today
The changes are effective on the next day’s batch run. However, if you want the changes to take effect on the current day, navigate to Tasks → Batch Monitoring.
-
Click on a schedule, for example RI, to list the schedule’s batch jobs in the table. If the jobs are not listed, change the Business Date to the Last Schedule Date to load the schedule’s batch jobs.
-
Click Restart Schedule button so that the MDF changes are reflected in the new schedule. Click 'OK' in the Confirmation pop-up. After a few seconds, a message is displayed indicating that the selected schedule has been restarted.

-
To validate the restart updated correctly, on the same screen, filter the Job column (such as, W_HOUSEHOLD) to check the status of the jobs. The status is either Loaded or Disabled based on the switch activation in Customer Modules Management.

Subscription Metrics Dashboard
POM is not a cloud service that is sold separately and therefore does not have a metric associated with it like other cloud services. However, the report can still be used for POM in order to display the current version of the solution, as well as previous versions, if desired.