3 Security
Dynamic Data Service provides table level, row level, and column level security. All the end points are protected with basic authentication and role based authorization.
There are three security groups that provide role based authorization.
There are three Roles and three Groups.
Roles:
-
AdminRole - Users with this role have access to all the functions of the DDS app. They can also setup the security permissions for other users.
-
OperatorRole - Users with this role have the ability to read, write and modify content in the schemas and tables. However they will not have access to the admin functions and cannot setup security permissions.
-
MonitorRole - Users with this role can only read the data from schemas and tables. They also will not have access to security setup functions.
Groups:
-
RicsAdminGroup - Users that belong to this group can perform all operations
-
RicsOperatorGroup - Users that belong to this group can perform all operations except security setup
-
RicsMonitorGroup - Users that belong to this group can only perform read only operations
The following table lists all the functions which can be performed by the roles and groups mentioned above.
Table 3-1 Functions Performed by Roles and Groups
| Role Name | Admin Role | Operator Role | Monitor Role |
|---|---|---|---|
| Group Name | RicsAdminGroup | RicsOperatorGroup | RicsMonitorGroup |
|
Create Access Level |
Yes |
No |
No |
|
Delete Access Level |
Yes |
No |
No |
|
Create Security Group |
Yes |
No |
No |
|
Delete Security Group |
Yes |
No |
No |
|
Create Table Level Security |
Yes |
No |
No |
|
Delete Table Level Security |
Yes |
No |
No |
|
View Table Definition |
Yes |
Yes |
Yes |
|
Create Queries |
Yes |
Yes |
Yes |
|
Run Queries |
Yes |
Yes |
Yes |
|
View Table Data |
Yes |
Yes |
Yes |
|
Modify Table data |
Yes |
Yes |
No |
|
Delete Table Data |
Yes |
Yes |
No |
|
Bulk Update Table Data |
Yes |
Yes |
No |
Table Level Security
Table level security defines who can access a table with set of allowed permissions. A table cannot be accessed if table level security is not setup.
Table level security is associated with the following information.
-
Schema Name
-
Table Name
-
Security Group - Provides who can access the table
-
Access Level - Provides permissions
Table level securities are set up for all tables when default security is setup using the end point. Every table is setup to be accessed by users in all security groups with default permissions.
Example
Table - DdsAdminGroup, DdsAdminAccessLevel
Table - DdsOperatorGroup, DdsOperatorAccessLevel
Table - DdsMonitorGroup, DdsMonitorAccessLevel
IDCS Security Setup
For getting access to RICS DDS REST services you need to create a client app in IDCS. IDCS app generates an access token that will be used for making publishing service calls. Follow steps for creating the client app in IDCS.
Create OAuth2 Client Application in IDCS
Use Retail Home for creating the client app in IDCS. Once app is created you will get cli-ent id and client secret both of them necessary to get access token. Follow the instructions below for generating the access token and making service call using OAuth2 token.
-
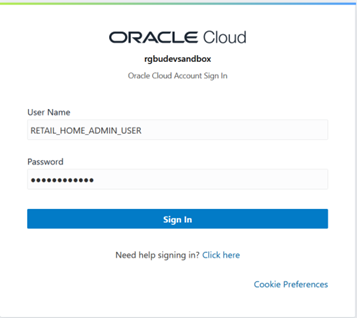
Login into retail home as retail home administrator.
-
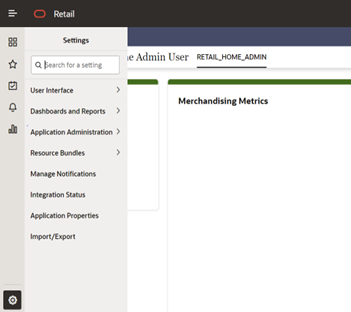
In retail home screen click on Settings menu icon on the left and then click on Application Administration.
-
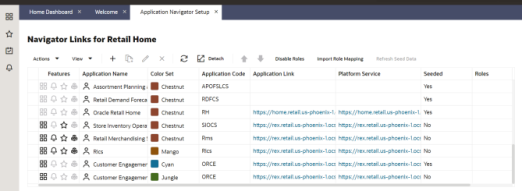
On the Application Administration menu click on Application Navigator Setup. Notice all the hosted applications are listed here with their application and platform service url.
Settings -> Application Administration->Application Navigator Settings
-
Look for application with name RICS. If you are not seeing RICS, application try refreshing seed. Steps
-
Select the row with the application code as Rms.
-
Click the Refresh Seed Data button on top right corner of the menu.
-
Wait for some time and refresh the screen.
-
RICS should reflect now.

-
-
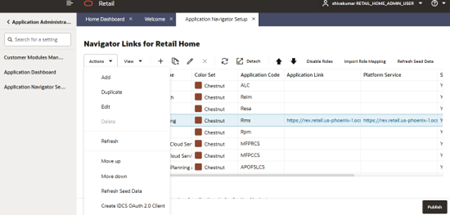
If RICS application is not reflecting even after following step 4. Select the row with the application code as RMS and click on the Actions menu on top left. Select Create IDCS OAuth 2.0 Client. A dialog will open for entering oauth2 client details.
Note:
Create IDCS OAuth 2.0 Client option is available only for applications those have platform service URL mentioned. RICS is making use of Merch platform service as both the apps are sharing same IDCS tenancy.
-
Skip this step if RICS application is not showing up. One of either Step 5 or Step 6 needs to be followed.
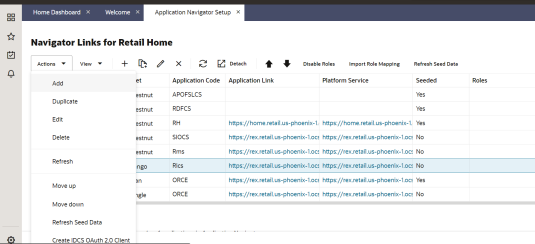
Select a row with application code as RICS. Click on the Actions menu on top left and select Create IDCS OAuth 2.0 Client. A dialog will open for entering oauth2 client details.
-
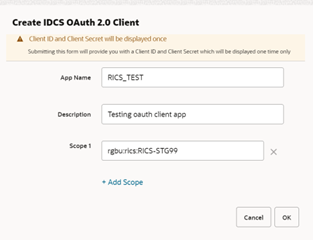
This dialog takes the following values:
-
App Name is 2-100 characters and will be used as the name in IDCS. Provide unique application name.
-
Description is a detailed description of the application.
-
Scope: <Custom environment-specific scope>
The scope pattern that is used in the RICS IDCS app creation template is rgbu:rics:<SERVICETYPE>-<ENVIRONMENT> where SERVICETYPE is RICS and EN-VIRONMENT is the environment type (STG, PRD, UAT, DEV1, DEV2, and so on).
For example:
"scope": "rgbu:rics:RICS-PRD""scope": "rgbu:rics:RICS-STG"
-
-
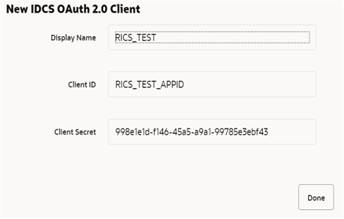
When the application is created, another dialog will open to show the client ID and client secret of the new application. These values should be copied down to a safe location, as they will only be shown once. Retail Home cannot retrieve the credentials again after the dialog is closed.
-
The Client ID and Client Secret from previous step will be used for generating access token.
Sample code for generating Access Token:
clientId=RICS_TEST_APPID
clientSecret=998e1e1d-f146-45a5-a9a1-99785e3ebf43
idcsUrl=https://idcs-234e8f7334564936aa0ed93f2c39e9ca.identity.pint.oc9qadev.com
scope=rgbu:rics:RICS-STG99
ec=$(echo -n "$clientId:$clientSecret" | base64 -w 0)

AccessToken=$(curl -iv \
-H "Authorization: Basic $ec" \
-H "Content-Type: application/x-www-form-urlencoded;charset=UTF-8" \
--request POST $idcsUrl/oauth2/v1/token \
-d "grant_type=client_credentials&scope=$scope" | grep -o -P '(?<=access_token":").*(?=","token_type)')

echo $AccessToken
-
Now a service call can be made by passing along the access token generated in previous step.
Here is sample curl command with Bearer token and the DDS get schemas endpoint:
ddsGetSchema-sUrl=https://rex.retail.us-phoenix-1.ocs.oc-test.com:443/rgbu-rex-eit-stg99-rics/dynamic-data-service-web/resources/dds/schemas
curl -ivkL --noproxy '*' -H "Authorization: Bearer $AccessToken"  -H "Con-tent-Type: application/xml" -X GET $ddsGetSchemasUrl
Sample Response:
{
    "schemas": [
        "DDS_RIBEH",
        "RFI_TEST"
    ],
    "userInRoles": [
        "AdminRole"
    ]
}