3 RPASCE Virtual Machine
RPAS Cloud Edition (RPASCE) Virtual Machines (VMs) provide a way for anyone to be up and running using the RPASCE software as quickly as possible without having to deal with all the steps around setting up the RPASCE server, UI and its applications. The VMs are created for Oracle consultants and partners who want to get a quick feel of the application without having to set up the hardware and software resources necessary for trying out RPASCE solutions.
RPASCE VMs are not a replacement or substitution for pre-production Cloud Environments (STAGE, Dev, and so on). Note that the VMs are only provided to give a quick feel of the application and are not intended to be used as full-blown implementation tool.
This chapter lists the steps necessary to deploy an RPAS Cloud Edition VM, launch the UI and connect to the application included in the VM. All the components - RPASCE server, UI, PDS (Planning Data Store) are all local to the VM. Disregard the version numbers shown in the images in this chapter as the steps are the same across different versions.
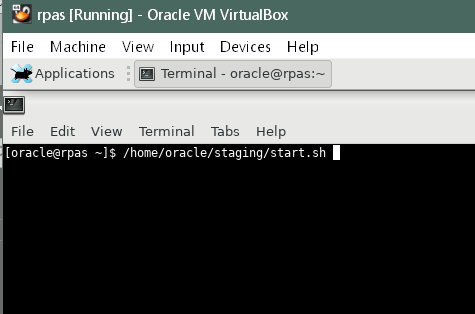
Contrary to previous versions of the RPASCE VMs where the RPASCE server and UI software were directly installed in the VM they are now deployed using Docker inside the VirtualBox VM. Therefore, the RPASCE server, UI and database processes are running inside their silos known as containers inside the VM. For more information on Docker, refer to the URL:
Note:
The VMs do not include Retail Home, Science, or RI components. It only contains the base planning application. Also, the VMs do not use IDCS or Object Storage. Notifications are currently not supported in the VM.
VirtualBox Software
Download the Oracle VirtualBox software that is available for Windows, Mac, Linux and Solaris from the following link. For Windows, select the download link for Windows Hosts:
https://www.virtualbox.org/wiki/Downloads
Note:
For a straight forward installation, use the VirtualBox version 6.1 from the older downloads section. Version 7 and later versions require Python and certain Python bindings, refer to VirtualBox software documentation for more information.
Note:
The previously mentioned Operating System is the OS of the host machine where the VirtualBox software will be installed and not the OS of the VM image itself. For most installers this will be a Windows system as shown in Figure 3-1.
Figure 3-1 VirtualBox Platform Packages
System Requirements
The Oracle VirtualBox software has the following system requirements:
-
16 GB RAM
-
Quad-core CPU
-
50 GB free disk space
VM Image
Download the VM the same way as you download the Starter Kit using the Patches & Updates tab from the My Oracle Support dashboard. Refer to "RPAS Package Location" for instructions on My Oracle Support downloads.
Figure 3-2 VM Download

After downloading the VM, unzip the archive to obtain the file
with the .ovf extension.
VM Setup
Perform the following steps to import the downloaded RPASCE VM image file using VirtualBox software and then start it.
-
Start the VirtualBox software
-
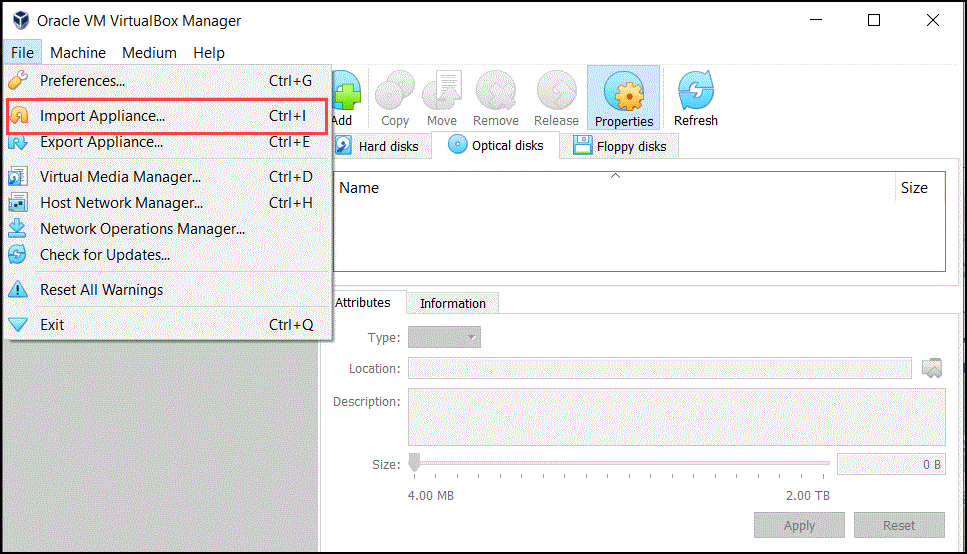
From the main menu, click File and then select Import Appliance… as shown in Figure 3-3
Figure 3-3 Main Menu: Import Appliance…
-
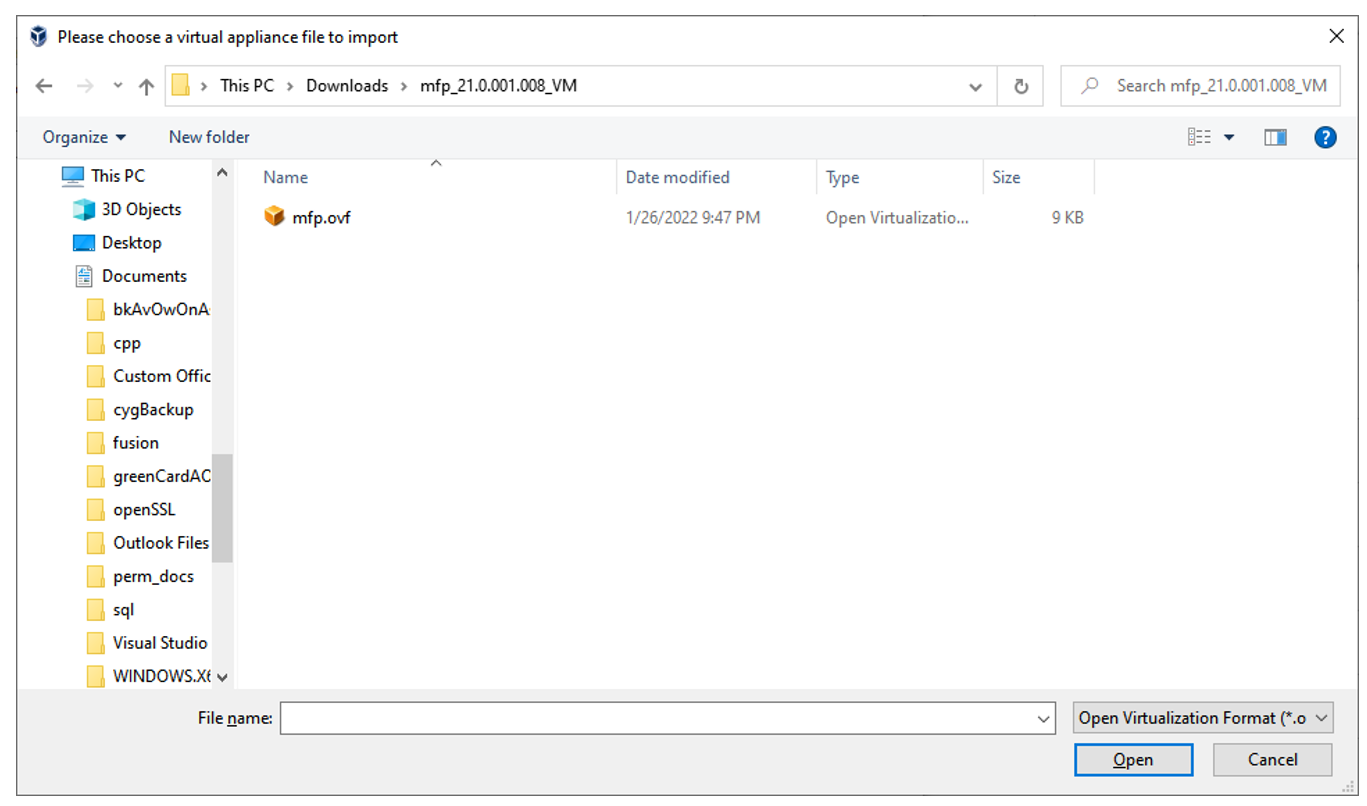
Browse to the downloaded VM base image (
.ovffile). Select the VM file with the.ovfextension and click Open.Figure 3-4 Downloaded VM Base Image
-
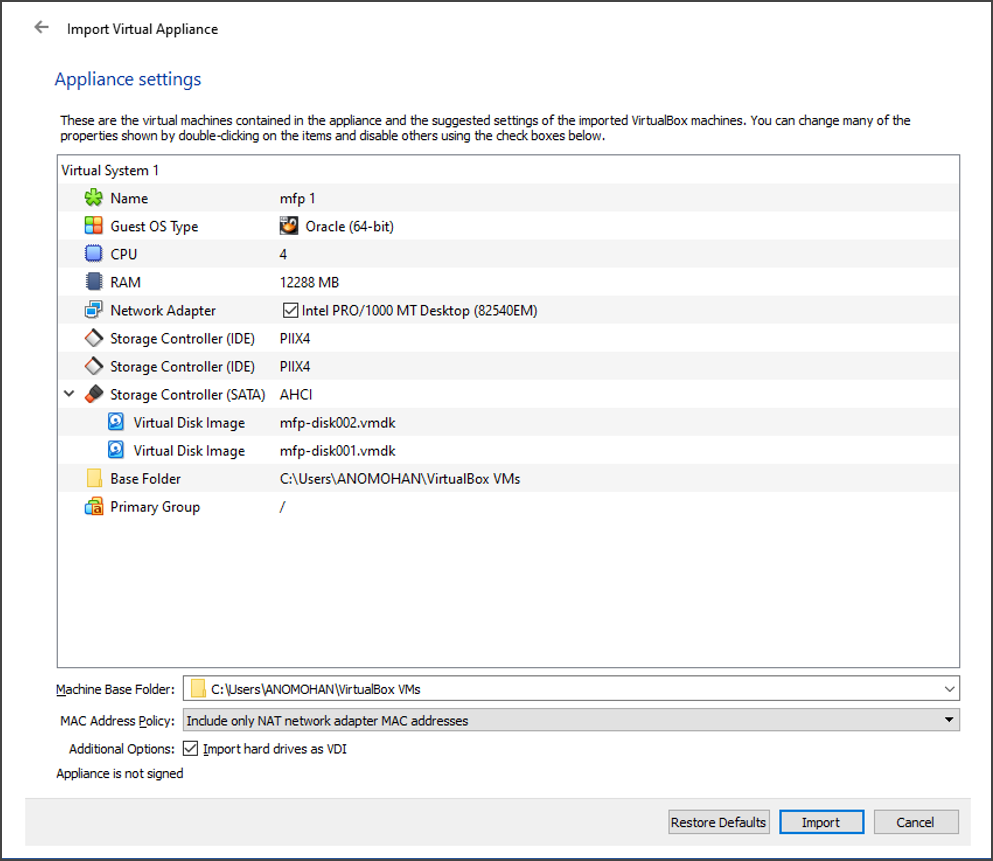
On the screen shown in Figure 3-5, change the name of the VM or increase the RAM used for a smoother VM experience, but choose the RAM setting carefully. The memory given to VM will not be available to your host OS while the VM is running, and this can significantly impact the performance of your host OS if tit is already running low on memory due to other applications.
Click Import.
Figure 3-5 Change the Name and RAM of the VM file
Note:
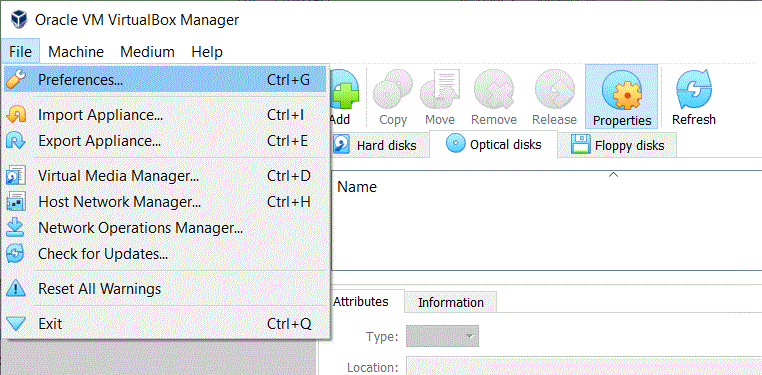
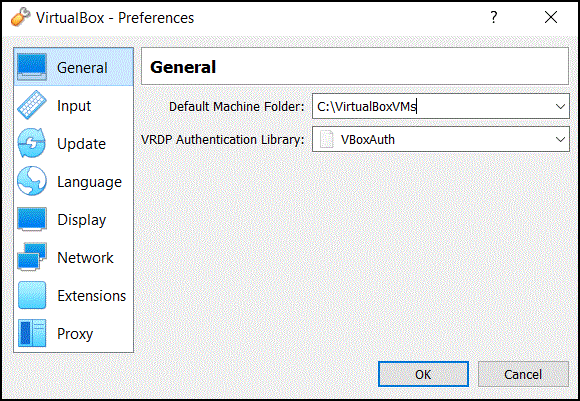
This step creates a large file of around 40 GB on your local disk. The default location of these files is the location where VirtualBox is installed (usually the C drive for Windows). If the default location does not contain at least 50 GB of free space, then change the default location as described here:
-
Click File and then select Preferences…
-
Change the location of the Default Machine Folder to a drive that has enough space.
Wait for the image to get imported. It might take a few minutes.
-
-
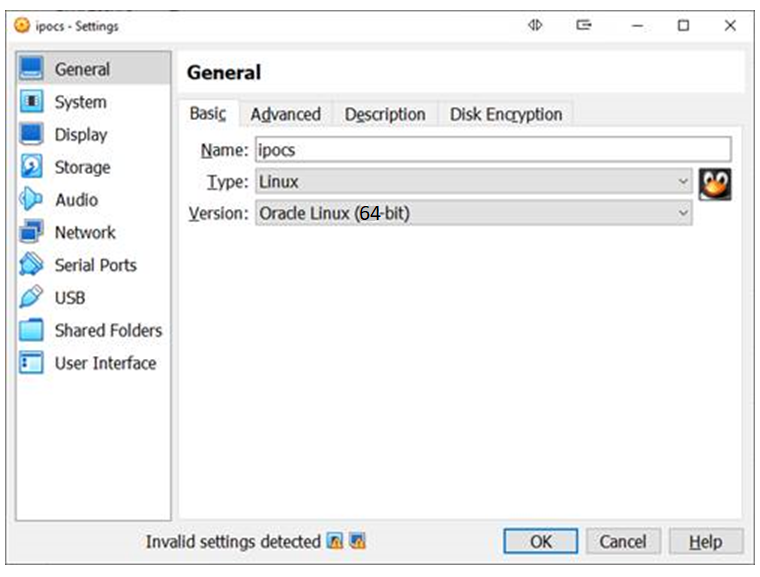
Prior to deployment, verify that the Basic settings are correct to avoid receiving an error message that indicates that the inappropriate kernel is being used for your CPU.
-
Click the Settings icon to verify the settings for the selected VM.
Figure 3-6 Settings Icon

-
From the left panel, click General and then select the Basic tab.
Figure 3-7 Basic Tab
-
Verify that the System Type and Version are appropriate and match your CPU.
Example:
Type:
LinuxVersion:
Oracle Linux (64-bit) -
-
If your machine has more than 16 GB of memory, increase the memory used by the VM. Note that the post-build batch for the initial application build will not work without at least 12 GB of memory allocated.
Click the Settings icon to change the settings for the selected VM.
From the left panel, click System and then move the slider to desired memory.
Note:
Sometimes the settings screen shows an invalid settings warning. This warning can be ignored.
Figure 3-8 System Memory Slider

-
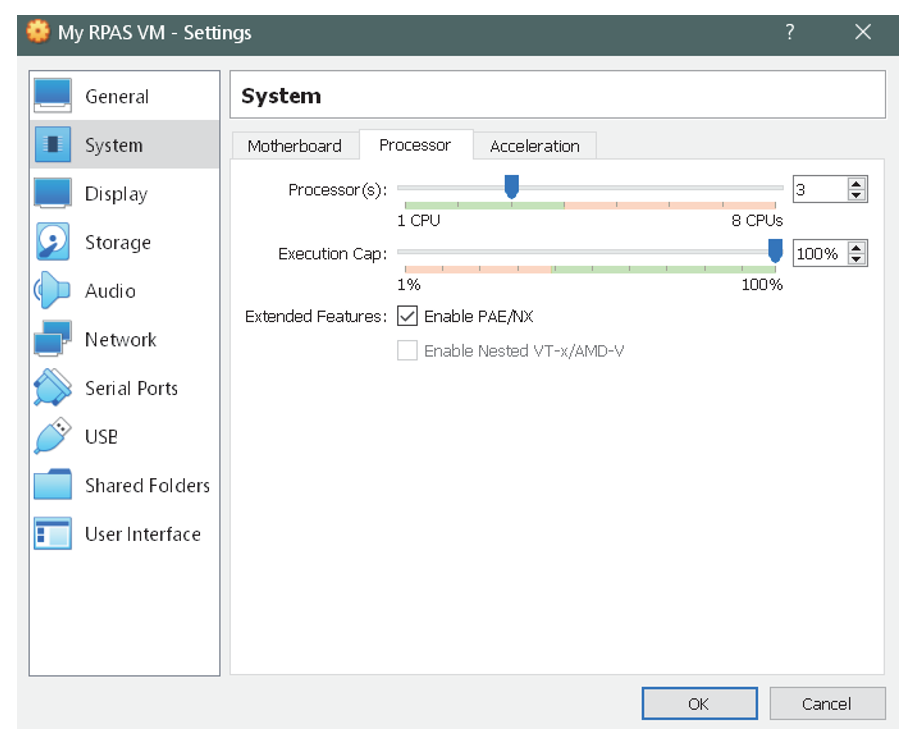
Select the Processor tab. If you run into any performance issues while using the VM and your host machine has multi-core processors, you may increase the available CPU for the VM by increasing the number of processors in the Processor tab (Figure 3-9).
Figure 3-9 System Processor CPU Change
-
Optional step- Only perform this step if someone else will use an RPASCE VM on the same network.
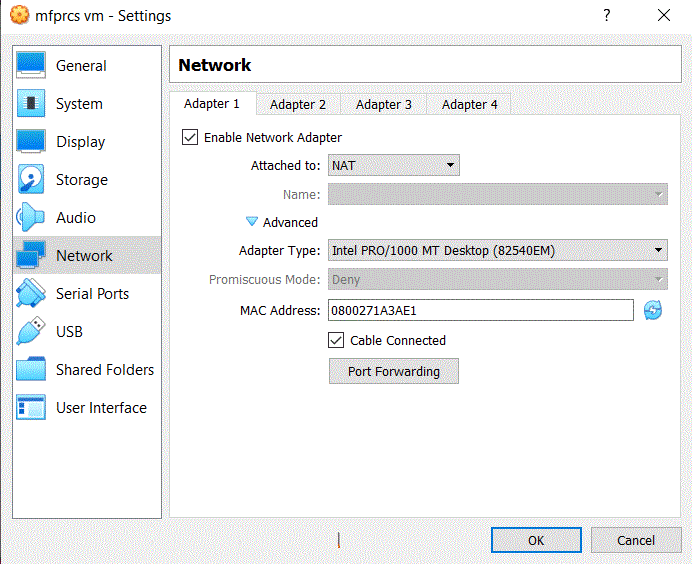
From the left panel, click Network and then click the Circle icon next to the MAC Address text box. This gives the virtual network card in the VM a new random MAC address. If the MAC Address setting is not visible, then click the Advanced icon.
Figure 3-10 New Random MAC Address for the Virtual Network Card
-
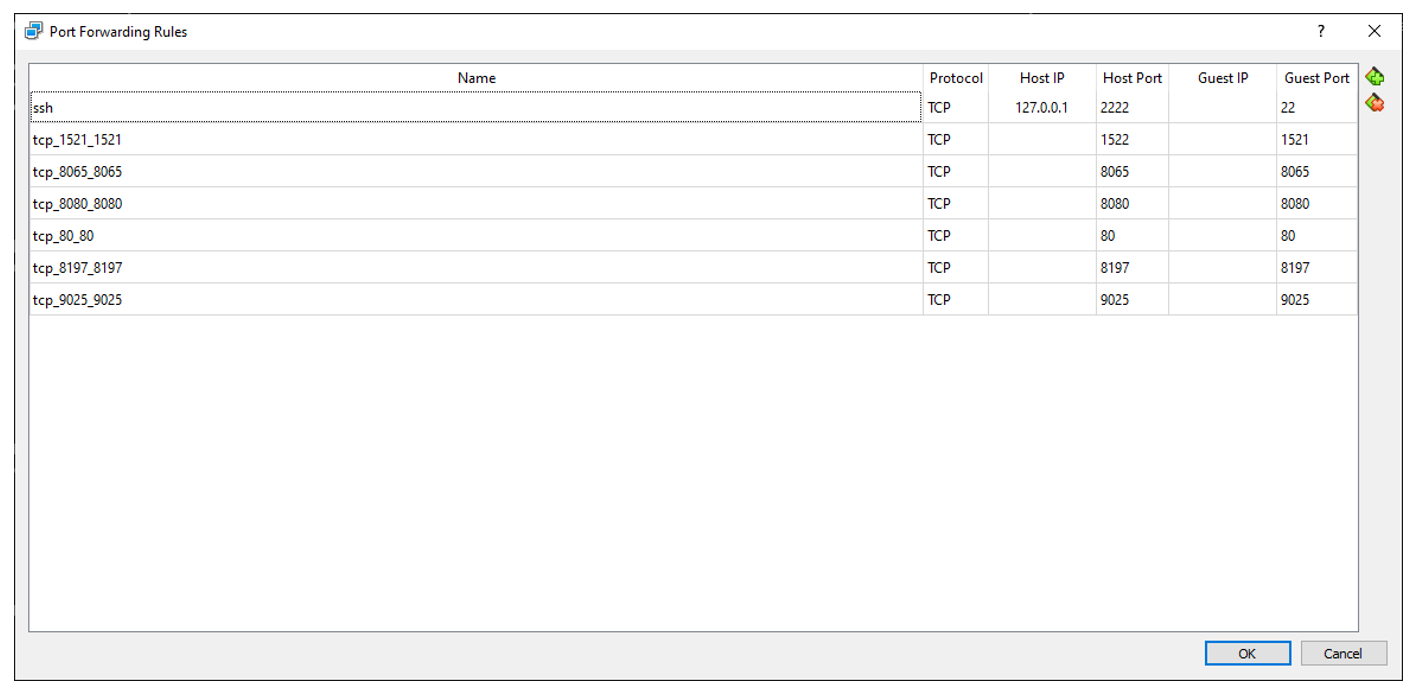
Click Port Forwarding.
You should see the rule that forwards port 8080 inside the VM to port 8080 on the host machine. If you have some other application running on port 8080 of the host machine change the host port to an unused port number.
Figure 3-11 Port Forwarding Rules Window
Click OK.
-
Start the imported image.
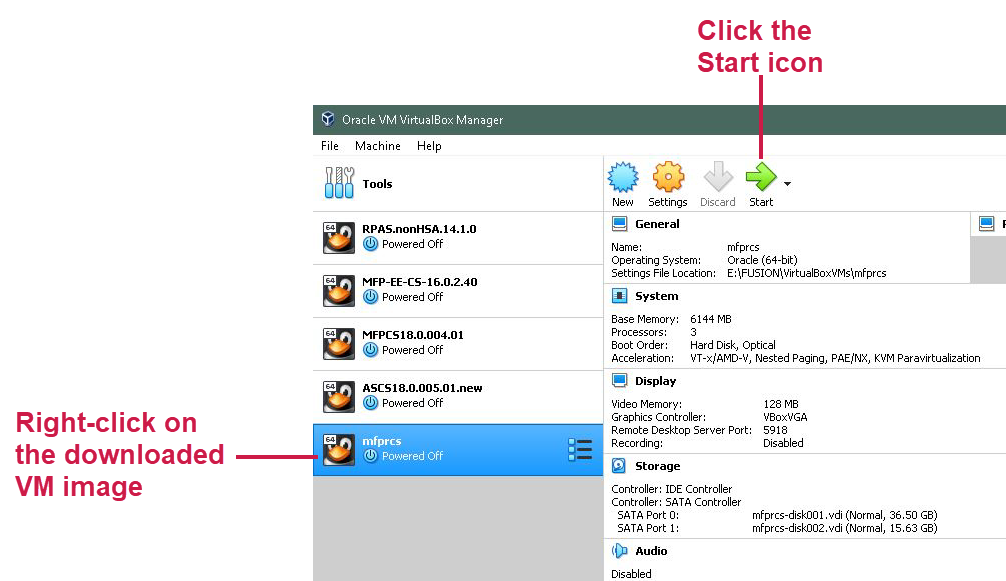
From the left panel of the VirtualBox, right-click on the VM image you downloaded and select Start. Alternately you can select the image and click the Start arrow icon from the top menu.
Figure 3-12 Starting the VM Image
-
In the grub boot-loader screen there is no action required. Let the VM automatically boot the default kernel.
Wait for OS to finish loading and it displays similar messages as shown in Figure 3-13.
Figure 3-13 Load Messages

-
In a browser on the host machine launch the following URL:
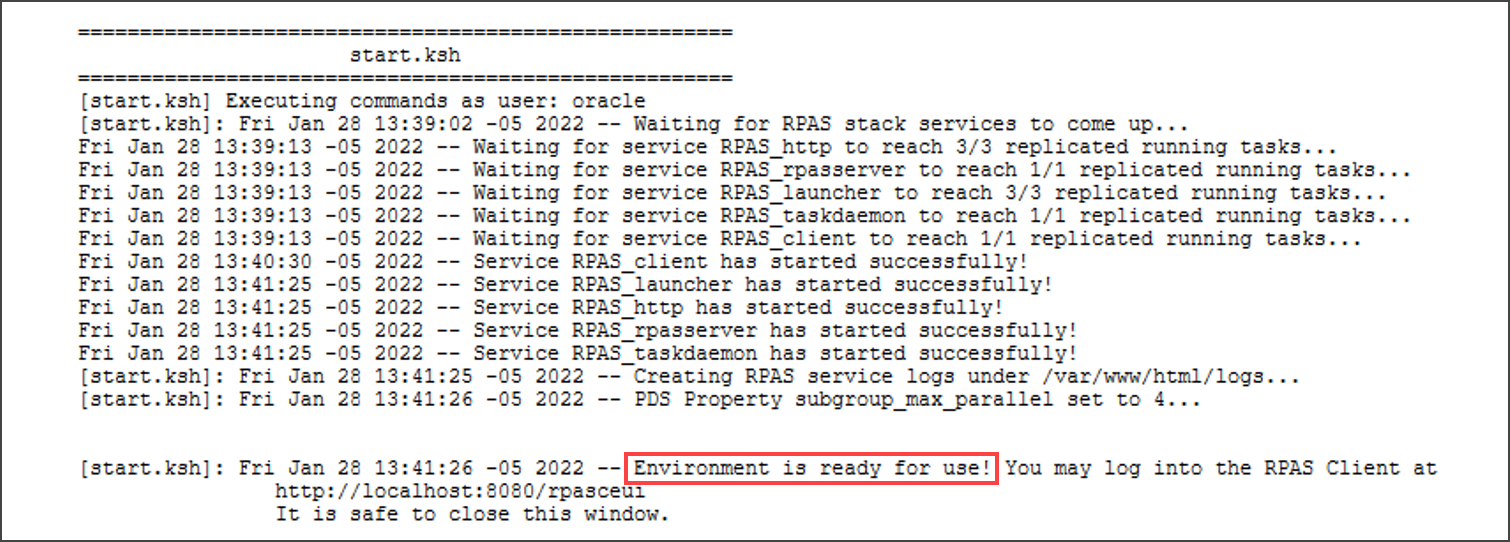
http://localhost/logs/startup.logWhen the VM is ready to be used, an Environment is ready for use! message displays as shown in Figure 3-14.
Figure 3-14 VM is Ready Message
Note:
This page may show older logs too, it is critical to check that the date and time matches the current time. The time shown is GMT-5 hours. Also, while waiting for the VM to be ready, refresh the page manually as it does not auto refresh.
Using the VM
All the necessary processes needed for using the RPASCE application in the VM automatically start when the VM boots up. The system just needs a few minutes after the login screen appears to bring up all of the necessary processes. However depending on the resources available to the VM, the time required for startup will differ.
Launching the RPASCE User Interface
Perform the following steps to launch the RPASCE User Interface (UI).
-
Open a browser on the host machine where you started the VirtualBox software and paste the URL into the address bar and press Enter
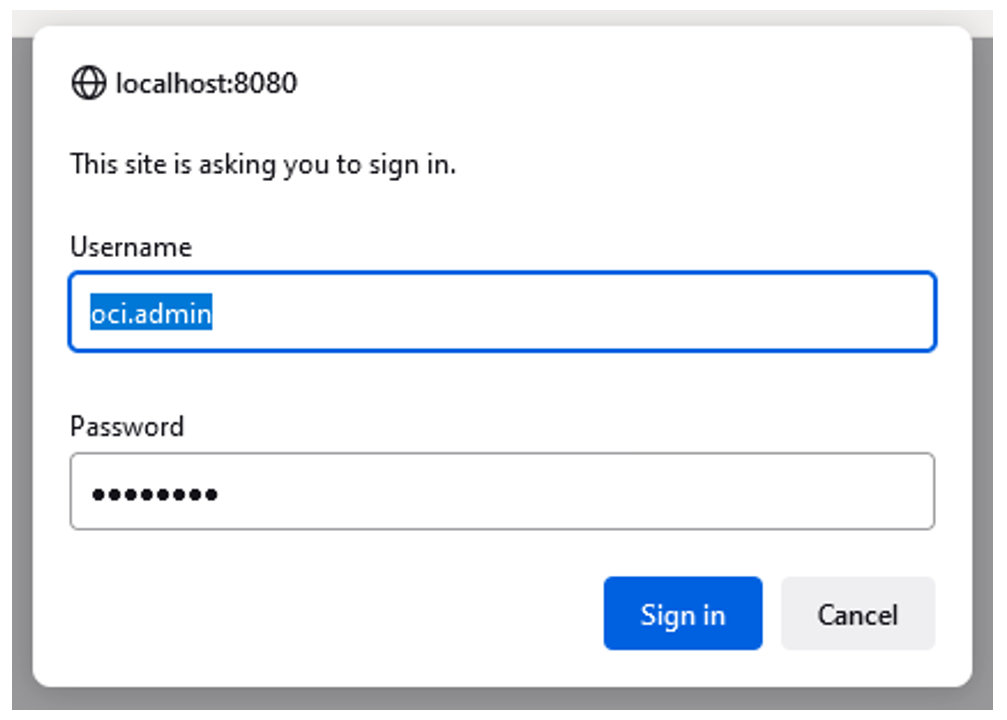
http://localhost:8080/rpasceui/Figure 3-15 shows the RPASCE UI Sign In, enter the Username: oci.admin and the Password: Orcl1234.
Figure 3-15 RPASCE UI Sign In
The VM does not come with any applications prebuilt. Therefore on the initial login, a user only has bootstrap access and no task flows. Users can use the Online Admin Tools to build a GA or extended application.
-
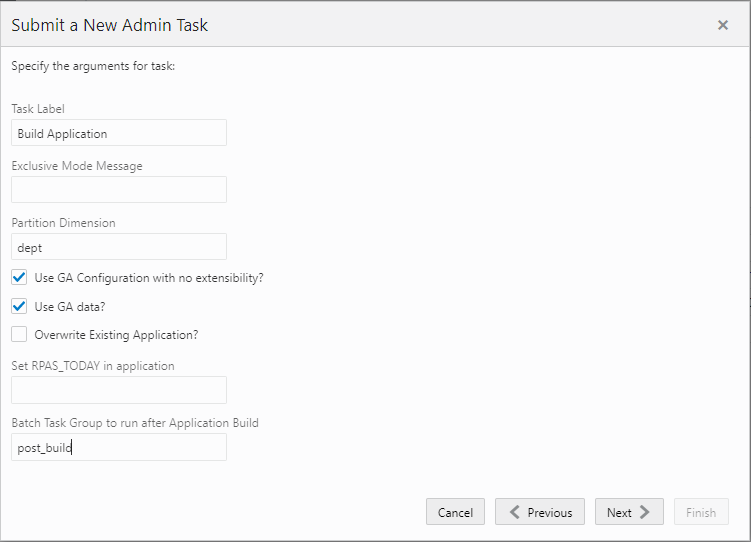
To build the GA app using the input files present in the VM select the GA check boxes as shown in Figure 3-16.
Refer to either the Oracle Retail Inventory Planning Optimization Cloud Service Administration Guide for more details about building the application.
Figure 3-16 Select Options for GA App Build
Note:
Hierarchy data is now loaded after the application is built as a post-build step. Run the post_build batch that is available as part of GA.
Alternately the load Dimension Data task is available in the online Admin Tools and can be used to load the hierarchy data.
For providing input files for building the application, refer to the section, Copying Files between the VM and the Host Desktop.
If Use GA data? is selected, it is recommended to set
RPAS_TODAYin the application to 20190331 (March 31, 2019).
Copying Files between the VM and the Host Desktop
Perform the following steps to share files and folders between the desktop and the VM.
-
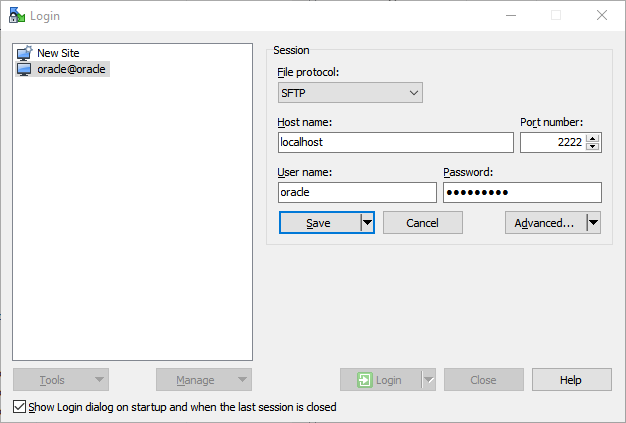
Use an application like WinSCP to connect to the SSH port of the VM on 2222.
Enter the Username as: oracle and the Password as: oraclev21.
Figure 3-17 Sharing Files
-
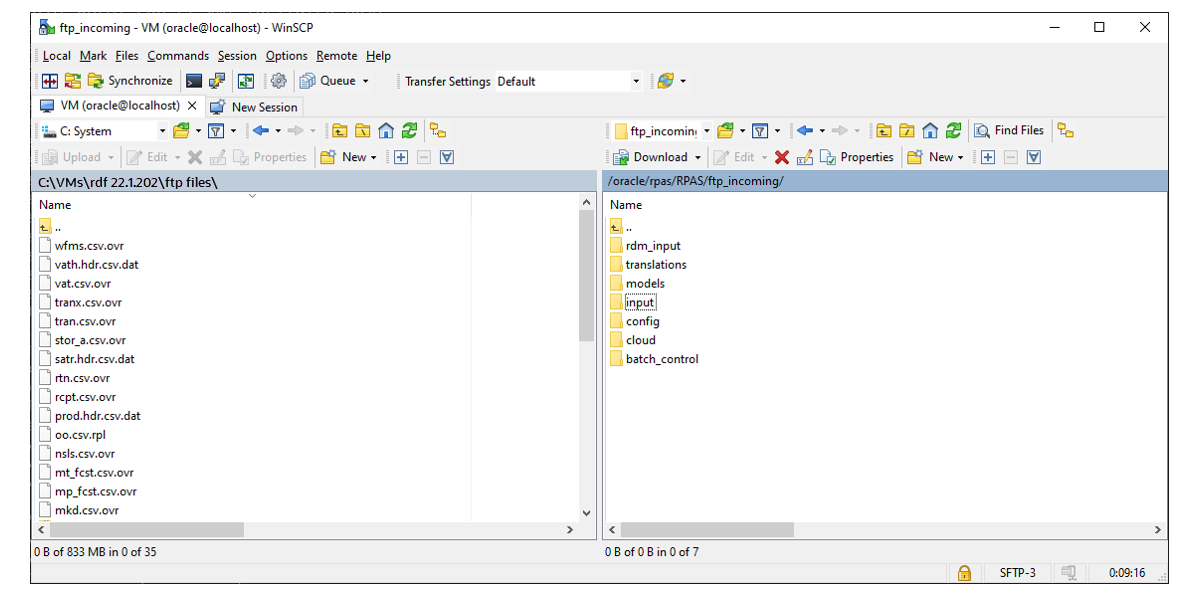
The incoming FTP location inside the VM is:
/oracle/rpas/RPAS/ftp_incomingThe outgoing FTP location inside the VM is:
/oracle/rpas/RPAS/ftp_outgoingThe VM still uses the incoming and outgoing FTP locations although now in the Oracle Cloud RPAS applications use object storage for incoming and outgoing locations.
Note:
For more details about placing files in incoming location for application build, batch or other OAT tasks, refer to the Oracle Retail Inventory Planning Optimization Cloud Service documentation set.
Figure 3-18 FTP Locations
Users in the VM
The following users are present in the VM.
The password for all users is set to: Orcl1234.
Note:
It is not possible to add new users to the VM.
| User Label | User Name | Administrator |
|---|---|---|
|
OCI Administrator |
oci.admin |
Yes |
|
Admin User 2 |
user2 |
Yes |
|
Admin User 3 |
user3 |
Yes |
|
Admin User 4 |
user4 |
Yes |
|
Admin User 5 |
user5 |
Yes |
|
Admin User 6 |
user6 |
Yes |
|
Admin User 7 |
user7 |
Yes |
|
Admin User 8 |
user8 |
Yes |
|
Admin User 9 |
user9 |
Yes |
|
Admin User 10 |
user10 |
Yes |
|
Non-Admin User 1 |
nonadm1 |
No |
|
Oracle Internal User |
oracleintuser |
Yes |
|
Non-Admin User 2 |
nonadm2 |
No |
|
Administrator |
adm |
Yes |
|
Administrator1 |
adm1 |
Yes |
|
Administrator2 |
adm2 |
Yes |
|
Administrator4 |
adm4 |
Yes |
|
Administrator7 |
adm7 |
Yes |
|
Administrator10 |
adm10 |
Yes |
|
Admin User 1 |
user1 |
Yes |
Using SQL Developer
It is possible to connect a SQL developer running on the host machine to the database running in the VM.
Set the password for all the schema users as: Orcl1234
Enter the Service name as: ORCLPDB1
Figure 3-19 Database Connection
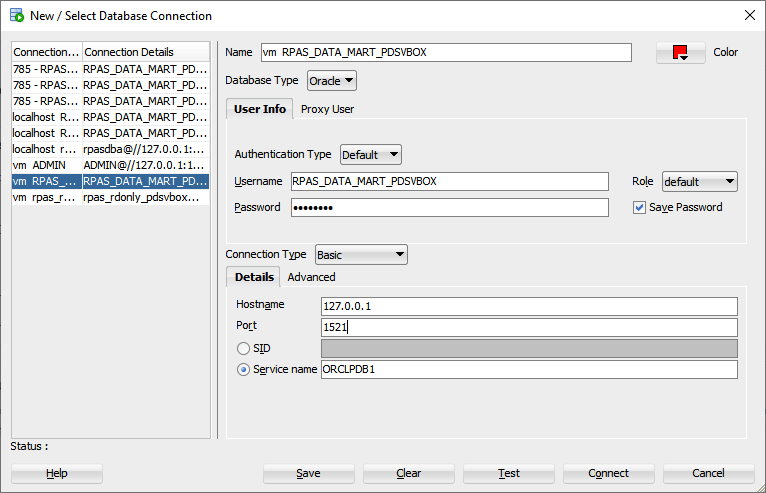
Table 3-1 lists the schema users
Table 3-1 Schema Users
| Schema User | Username |
|---|---|
|
rpas_data_mart |
RPAS_DATA_MART_PDSVBOX |
|
rpas_patch_user |
RPAS_PATCH_PDSVBOX |
|
rpas_batch_user |
RPAS_BATCH_PDSVBOX |
|
rpas_dimload_user |
RPAS_DIMLOAD_PDSVBOX |
|
rpas_factload_user |
RPAS_FACTLOAD_PDSVBOX |
|
rpas_hiermgr_user |
RPAS_HIERMGR_PDSVBOX |
|
rpas_wkbk_user |
RPAS_WKBK_PDSVBOX |
|
rpas_etl_user |
RPAS_ETL_PDSVBOX |
|
rpas_rdonly_user |
RPAS_RDONLY_PDSVBOX |
|
rpas_report_user |
RPAS_REPORT_PDSVBOX |
Troubleshooting
If you have any of the following issues, follow the steps for troubleshooting:
Network Issues
If you have many network interfaces you might have to make changes to Network Settings screen before starting the VM. The VM image has been tested only with Ethernet and Wi-Fi. If you use power line Ethernet or a network dongle or you have multiple network interface cards in your system you might need to make changes in the VM network settings screen.
Depending on your system configuration, you might need to enable additional adapters.
VirtualBox Error
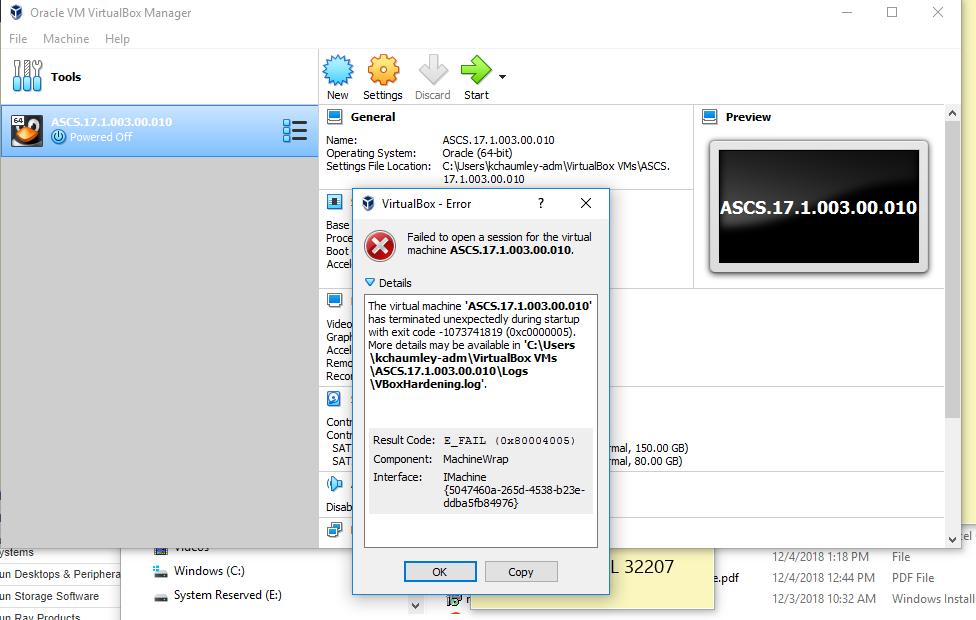
If you receive the following error shown in Figure 3-20 while starting the image, you might have an unsupported version of VirtualBox. Install the latest VirtualBox software.
Figure 3-20 VirtualBox Error
UI Login Issues
If you have trouble logging into the UI, check if port 8080 is being used by some other application on your host machine. Change the port mapping in the VM Network Setup screen and use the new port.
For any application related issues check the logs at this URL:
SQL Developer Login Issues
If you have trouble connecting to the database using SQL developer, check if port 1521 is being used. Change the port mapping in the VM Network Setup screen and use the new port.