14 Manage Scaling Parameters
This chapter describes the functionality that allows users to manage scaling parameters.
Manage Scaling Parameters Workspace, Steps, and Views
The Manage Scaling Parameters workspace allows you to adjust or expand inventory levels to meet changing demands or business needs.
The following table lists the workspaces, steps, and views of the Manage Scaling Parameters task.
Table 14-1 Manage Scaling Parameters Workspace, Steps, and Views
| Workspace | Steps | Tab | Views |
|---|---|---|---|
|
Manage Scaling Parameters |
|||
Manage Scaling Parameters Workspace
To build the Manage Scaling Parameters workspace, perform these steps:
-
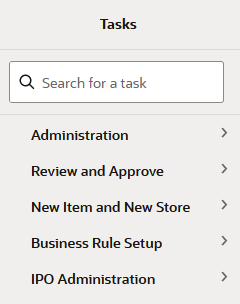
From the left sidebar menu, click Task Module to view the available tasks.
Figure 14-1 Task Module
-
Click the IPO Administration activity and then click Lifecycle Allocation and Replenishment to access the available workspaces.
-
Click Manage Scaling Parameters. The Manage Scaling Parameters wizard opens.
-
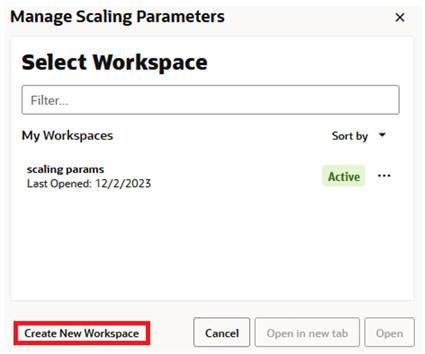
You can open an existing workspace, but to create a new workspace, click Create New Workspace.
Figure 14-2 Create New Workspace
-
Enter a name for your new workspace in the label text box and click OK.
-
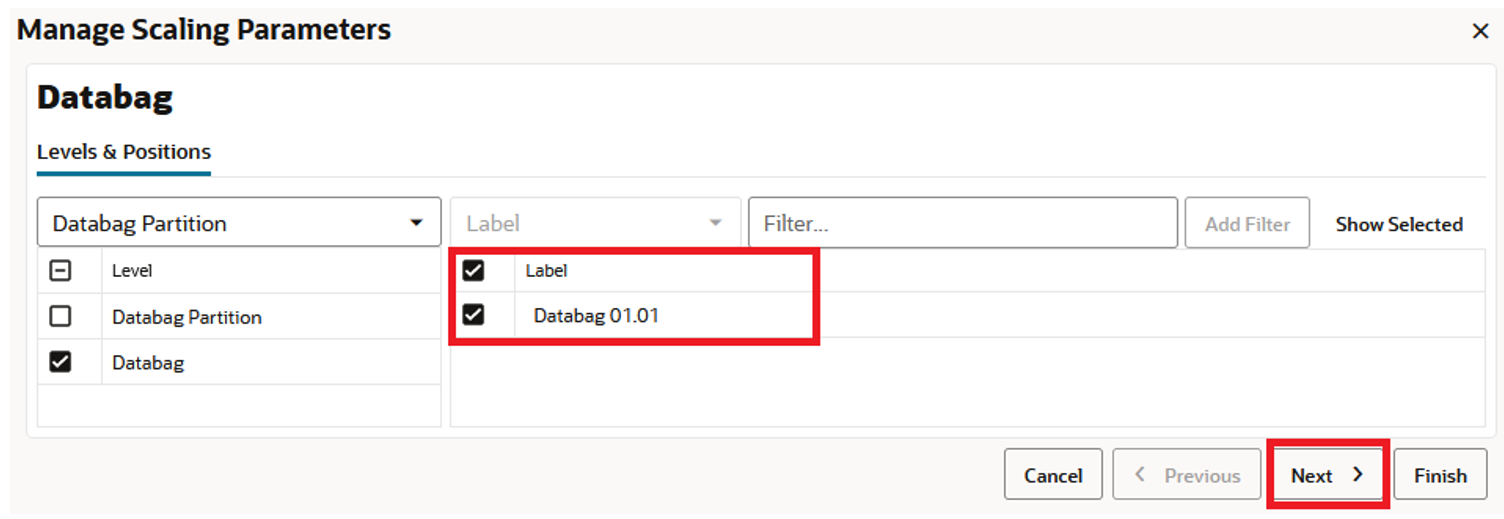
The Workspace wizard opens. Select the databags you want to work with and click Next.
Figure 14-3 Workspace Wizard: Select Databags
-
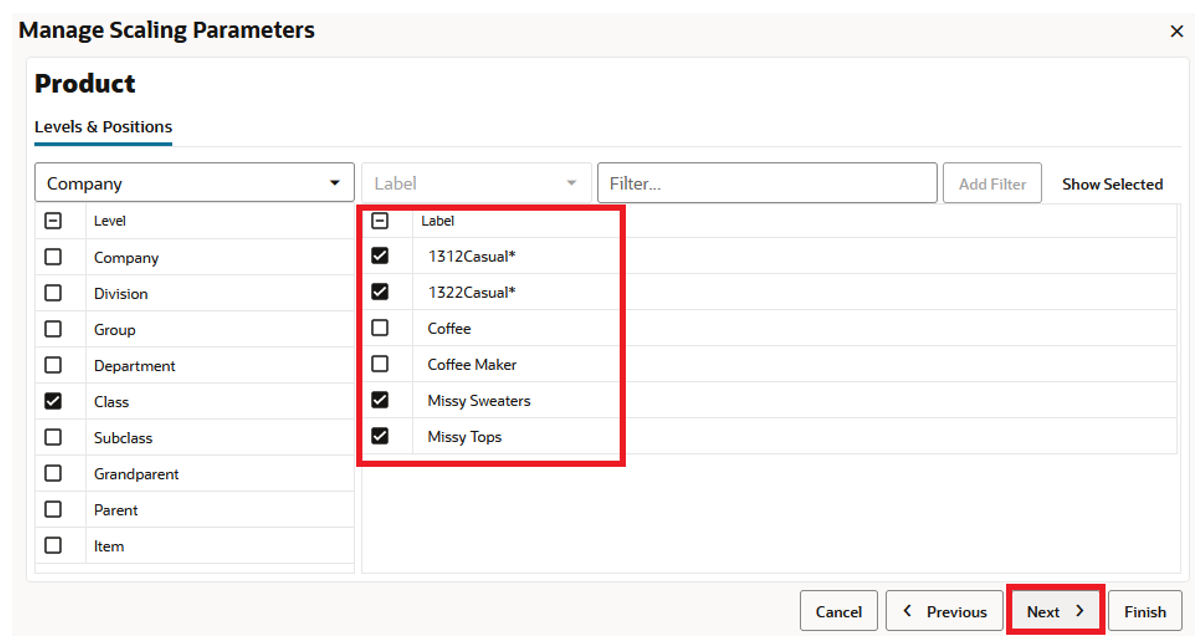
The Workspace wizard opens. Select the products you want to work with and click Next.
Figure 14-4 Workspace Wizard: Select Product
-
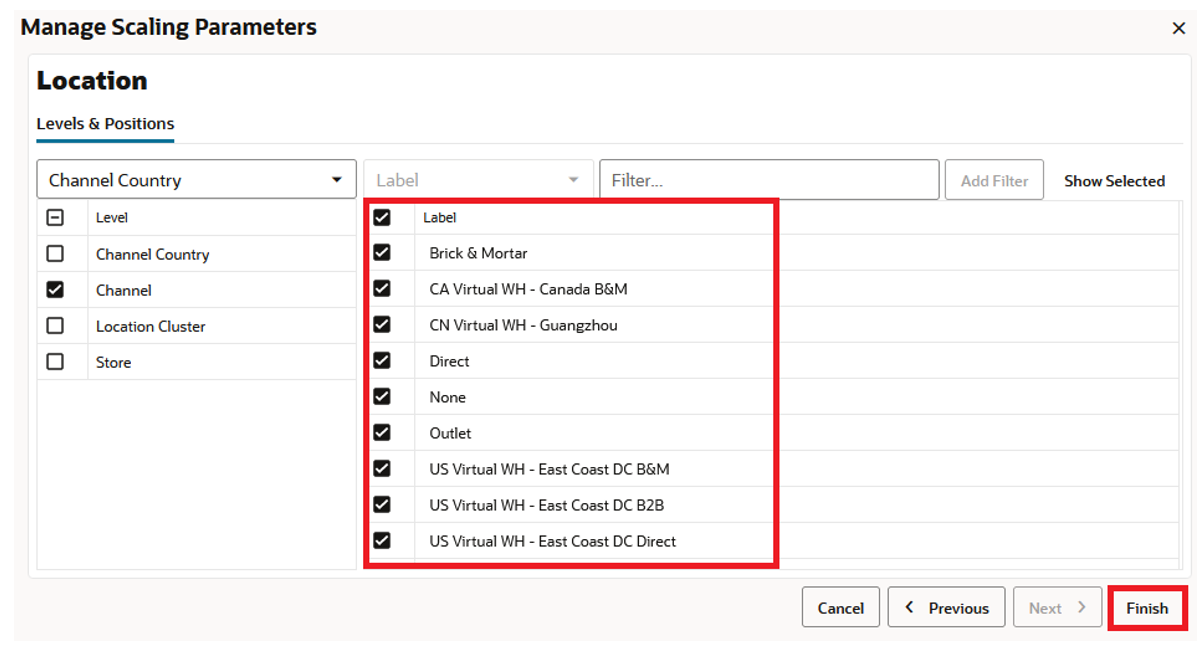
Select the locations you want to work with and click Finish.
Figure 14-5 Workspace Wizard: Select Location
-
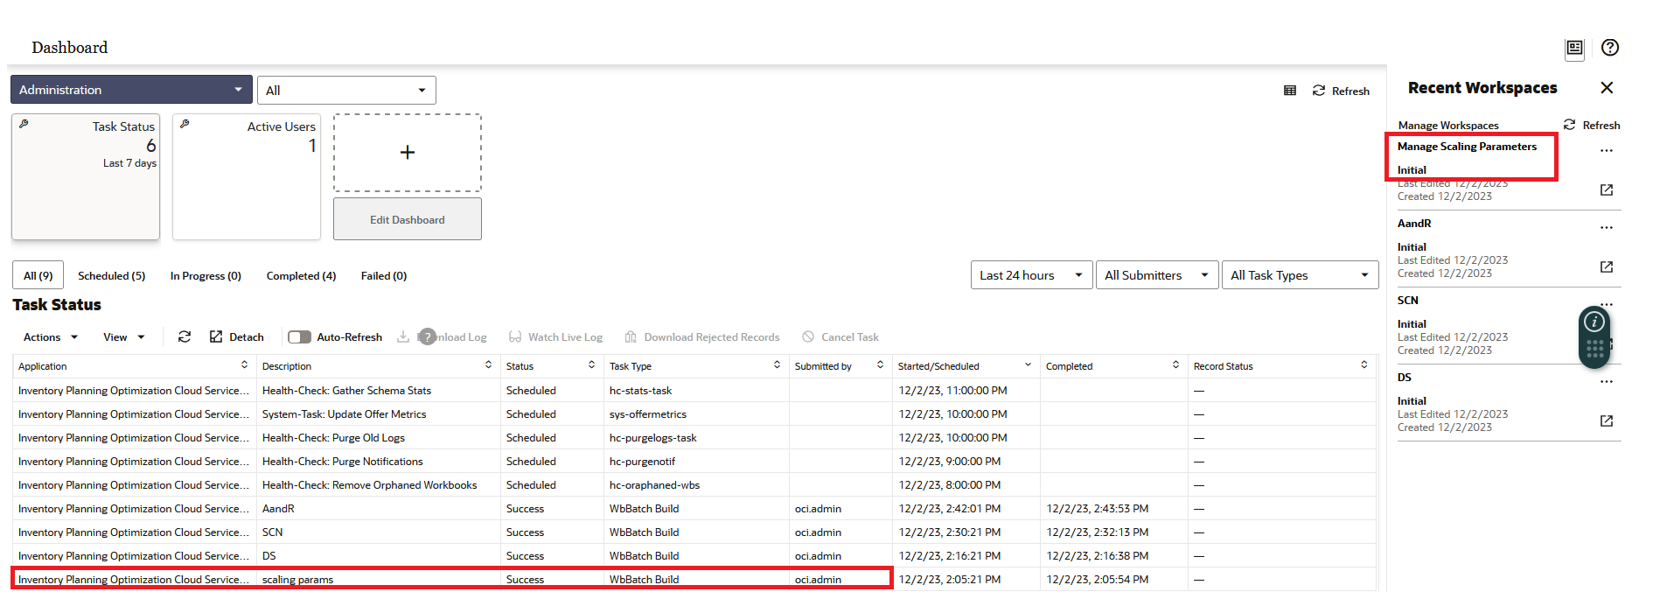
The wizard notifies you that your workspace is being prepared. Successful workspaces are available from the Dashboard.
Figure 14-6 Successful Workspace Build: Manage Scaling Parameters
Manage Scaling Parameters Step
The Manage Scaling Parameters workspace consists of these views:
Constraint Groups View
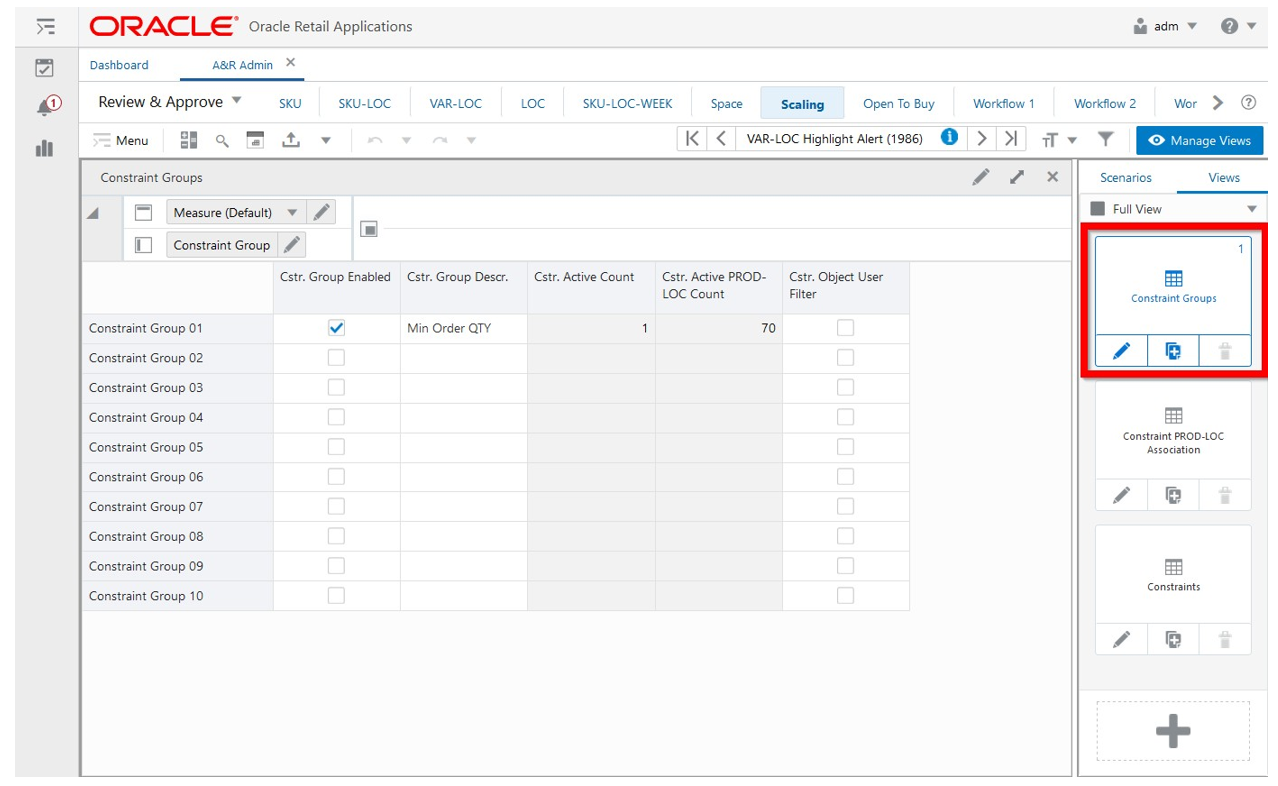
The Constraint Groups View, under the Scaling tab, allows you to define a constraint group to be set up to configure constraints to be applied to product and location combinations.
Figure 14-7 Constraint Groups View
Constraint Groups View - Default Profile Measures
The default measure profile available in the Constraint Groups view contains the following measures.
Cstr. Group Enabled
Constraint Group Enabled is an editable measure to enable or disable a constraint group. Each row (or list) represents a different constraint group.
Cstr. Group Descr.
Constraint Group Description is an editable measure to enter a user-defined constraint group description.
Cstr. Active Count
Constraint Active Count is a calculated measure to display the total number of constraints in use (active) for the constraint group.
Cstr. Active PROD-LOC Count
Constraint Active PROD-LOC Count is a calculated measure that displays the total number of product and location combinations that are associated with an active constraints within the constraint group. For example, if the constraint group has two active constraints being applied to product and location combinations then this value is the total of both.
Cstr. Object User Filter
Constraint Object User Filter is an editable measure to select the constraint group to filter the views within the Allocation and Replenishment workspace. When selected, and after the workspace calculation (either Calculate or F9) is run, the views in the Allocation and Replenishment workspace are filtered based on the product and locations associated with active constraints within the selected constraint groups.
Constraints View
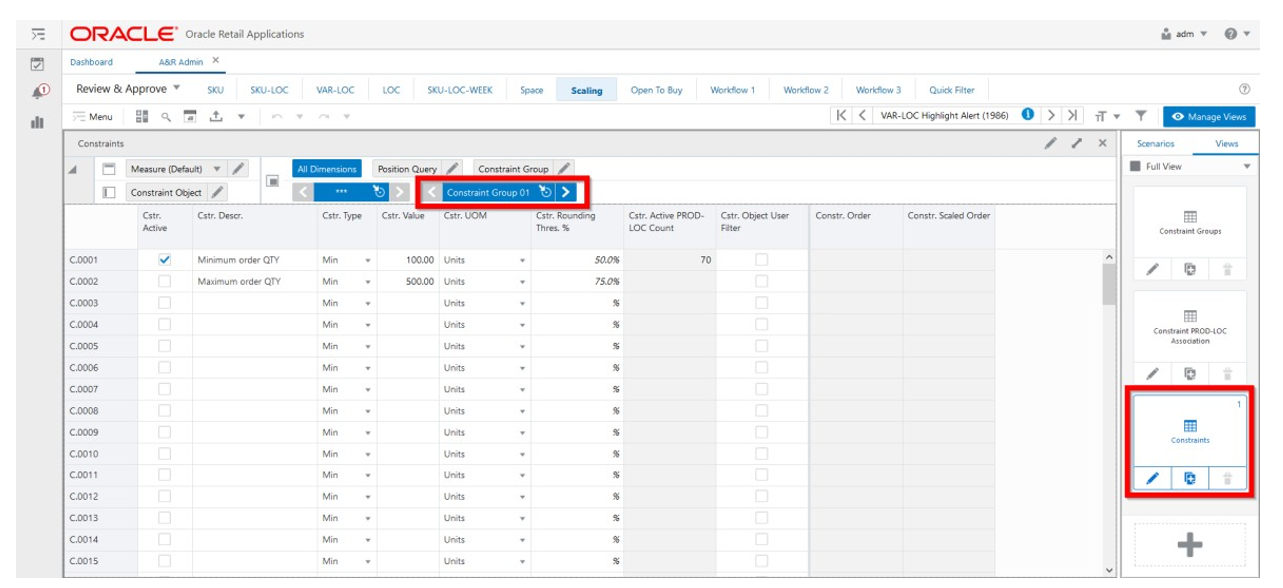
The Constraints View, under the Scaling tab, allows you to define the constraints, within a constraint group, that is used by the scaling process. This is the view where the constraint parameters are set (for example, a minimum order quantity of 500 units).
Figure 14-8 Constraints View
Constraints View - Default Profile Measures
The default measure profile available in the Constraints view contains the following measures.
Cstr. Active
Constraint Active is an editable measure to enable or disable a constraint within the constraint group. Each row (or list) represents a different constraint.
Cstr. Descr.
Constraint Description is an editable measure to enter a user-defined constraint description.
Cstr. Type
Constraint Type is an editable measure to select the type of constraint being defined. Valid values are:
-
Min
When the constraint is for minimum order quantity.
-
Multiple
When the constraint is for multiple order quantity.
Cstr. Descr.
Constraint Description is an editable measure to enter the value for the constraint related to the selected type (Cstr. Type). For example, if the constraint is for a minimum order quantity, then this measure holds the number of units (for example, 500).
Cstr. Rounding Thres. %
Constraint Rounding Threshold Percentage is an editable measure to enter the threshold percentage to be used in the scaling calculation to know if the suggested order is either scaled up or scaled down.
Cstr. Active PROD-LOC Count
Constraint Active Product-Location Count is a calculated measure to display the total number of product and location combinations that are associated with the constraint.
Cstr. Object User Filter
Constraint Object User Filter is an editable measure to select the constraint to filter the views within the Allocation and Replenishment workspace. When selected, and after the workspace calculation (either Calculate or F9) is run, the views in the Allocation and Replenishment workspace are filtered based on the product and locations associated within the selected constraints.
Constr. Order
Constraint Order is a calculated measure to display the total order, in the selected Unit of Measurement (UOM), for the items associated with the constraint. By default IPOCS-Lifecycle Allocation and Replenishment uses units and the value displayed is the suggested replenishment units calculated by IPOCS-Lifecycle Allocation and Replenishment. When you select a different UOM, then the UOM conversion factor is used to convert the suggested replenishment units into the selected UOM.
Constr. Scaled Order
Constraint Scaled Order is a calculated measure to display the total order after the scaling is run for the selected UOM and for the items associated with the constraint. By default, IPOCS-Lifecycle Allocation and Replenishment uses units and the value displayed is the result of the scaling applied to the suggested replenishment units calculated by IPOCS-Lifecycle Allocation and Replenishment. When you select a different UOM, then the UOM conversion factor is used to convert into the selected UOM the result of the scaling applied to the suggested replenishment units.
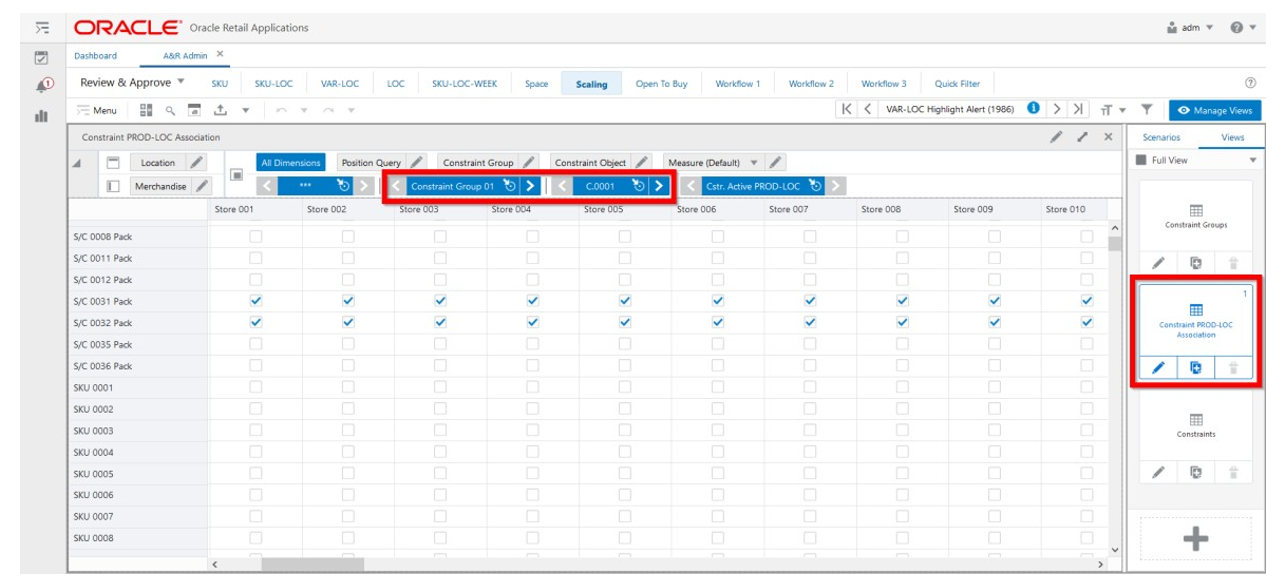
Constraints PROD-LOC Association View
The Constraints PROD-LOC Association View, under the Scaling tab, allows you to select the product and location combinations to be included in each constraint that is used by the scaling process.
Figure 14-9 Constraints PROD-LOC Association View
Constraints PROD-LOC Association View - Default Profile Measures
The default measure profile available in the Constraints PROD-LOC Association view contains the following measure.
Cstr. Active PROD-LOC
Constraint Active Product-Location is an editable measure to associate a product and location combination to the constraint. When selected, the product and location combination is associated with the constraint and is used by the scaling process. When not selected, the product and location combination is not associated.