Advanced Options Panel
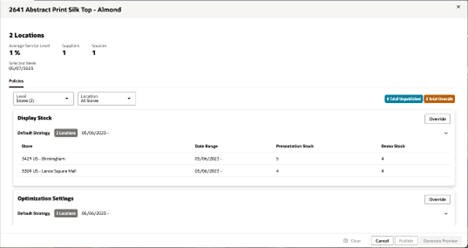
Use the Advanced Options (AO) panel to create and modify policy overrides and review alert details. The AO panel always displays data based on the entire week of the cell that you selected to launch it; as well as the locations from the table selected to launch it.
Figure 1-20 AO Panel

Level and Location
The Level and Location fields permit navigation up and down the supply chain for the product and selected week.
The Level field provides selection of the supply chain tier, for example, Warehouses or Stores.
You can select an individual or all of the locations within the selected level in the Location field. The location selection field is used to not only view policies but also to define the locations to which a policy edit will apply.
Figure 1-21 Level and Location Fields
Policy Tab
Each policy type will have a card on the Policies tab.
If policy types are defined or overridden, then they are displayed in a table. If none are defined, then an Override button is still available.
| Columns | Explanation |
|---|---|
| Stores/Warehouses | The locations that have defined policies. |
| Data Range | The dates for when the policy applies. Note that it is possible to not specify an end date if the policy is continual. |
| Policy Values | One column is providedfor each field that is part of the policy (for example, Presentation Stock). |
Default rule values are displayed within the white Default Strategy tables.
All policy changes that have been made and published in the Inventory Planning application will be displayed in the table.
Note:
Only data that is after today's date can be deleted or edited.Figure 1-22 Overrides Table

Policy changes that have not yet been published in the AO Panel will be shown in the blue Unpublished table. This data will be discarded if you close without publishing or generating a preview. Data in this table can be deleted or edited.
Override
Use the Override button to input new policy overrides for the locations selected in the Locations field.
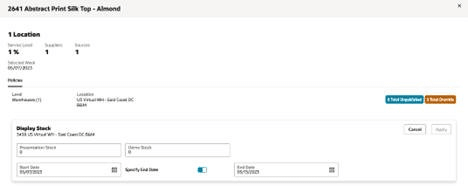
Click the Override button to display an edit area.
Figure 1-23 Override Button

The Edit Area displays a number of fields that can be specified for the relevant policy type, including:
- Policy Fields:Fields that can each be altered.
- Start Date:The first date of the alteration.
- Specify End Date:A switch that allows no end date to be specified.
- End Date:The last date of the alteration (not displayed if the Specify End Date is toggled off).
All alterations must overlap with the AO Panel's Selected Week.
To make the same policy overrides to several stores:
- Before creating the override, refine the set of stores receiving the override by setting the Inventory Plan View filters to the desired stores.
- Launch the AO panel from the All Stores table.
- Select All Stores in the Location field.
- On the policy type to be overridden, click Override.
- Fill in the field level changes.
- Click Apply. Once an override is created it must be published before it will be effective in the inventory plan calculation.
Figure 1-24 Edit Area
