2 Manage Documents
The Document Maintenance window offers a single screen view of the selected Document for different Document types including Merchandise and Non Merchandise Invoices, Credit Notes, Debit Notes, Credit Memos, and Credit Note Requests. This window can be accessed using any of the following options:
-
By clicking Save on the Create Document dialog during a document creation.
-
By selecting an existing document in the Search Results pane and selecting Edit/View from the Action menu.
-
By clicking the Doc ID hyperlink.
Note:
Though the document is hyperlinked using the Doc ID field, the Doc ID field value by itself may not be unique and it is the data combination on the row that defines the document being opened.
Note:
Only documents manually created in Invoice Match or entered via invoice induction in Invoice Match are editable through the user interface with the exception of the Add Comments.
Search for a Document
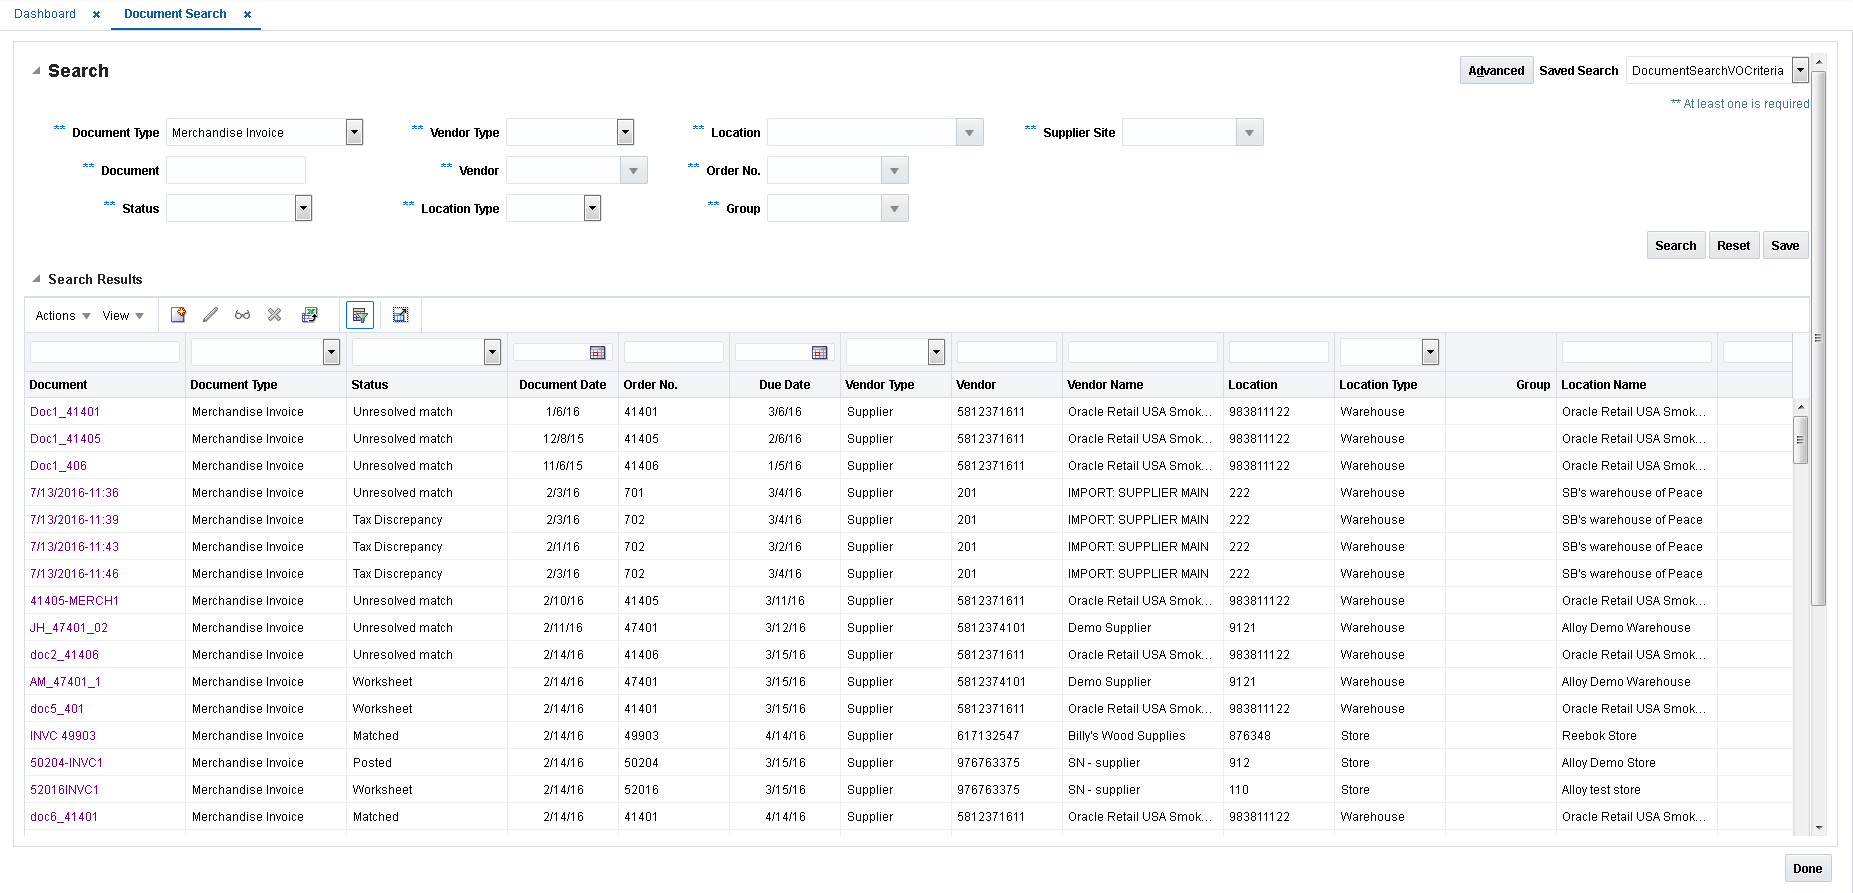
Navigate: From the Tasks menu, select Document Maintenance > Document Search. The Document Search window opens.
Figure 2-1 Document Search Window

-
Enter criteria as desired to make the search more restrictive. You must enter at least one search criterion.
Note:
You can also select the Advanced button to allow for additional fields to be included in the criteria. The Advanced criteria panel includes an Add Fields button which includes even more fields including Reference Fields 1 - 4 which can be included in the selection criteria. -
Click Search. The search results pane displays the documents that match the search criteria.
Figure 2-2 Document Search Results
-
Select the invoice you want to edit (or view) and navigate to the document maintenance screen.
Header Pane
The Document Maintenance Header pane contains the header level details of the selected document.
Figure 2-3 Document Maintenance Header Pane

The following display-only fields appear in the Header pane:
-
Document – This field displays the Document ID which is an identifier of the Document in Invoice Match. This is unique by vendor, document type, and document date.
-
Document Date – This field displays the Document Date which corresponds to the date on the document.
-
Order No. – This field displays the order number associated with the document
-
Location – This field displays the billing location on the document.
-
Supplier – This field displays the supplier or vendor on the document. This field is labeled Vendor if the Vendor Type is not Supplier.
-
Supplier Site – This field displays the supplier site on the document.
-
Total Amount – This field displays the total amount or value of the document.
Header Tab
Figure 2-4 Document Maintenance Header Tab
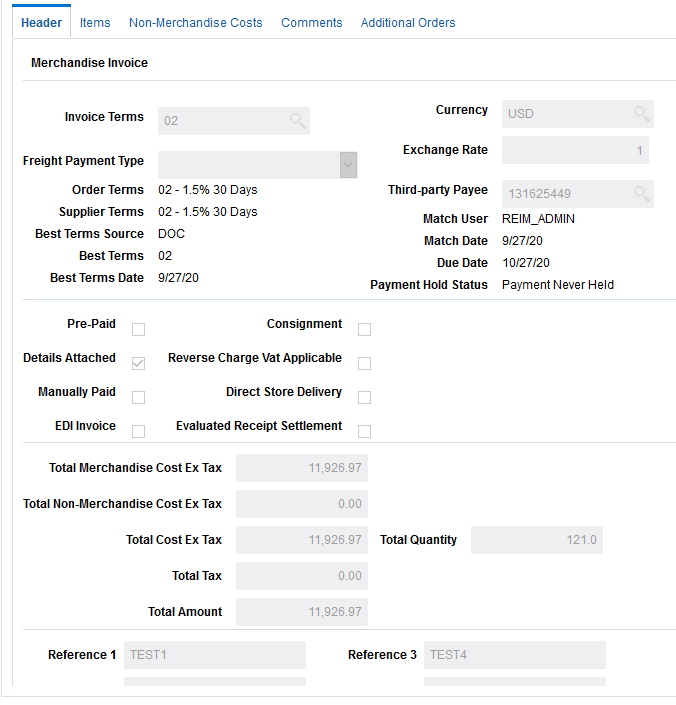
The Header Tab shows general information about the document and allows some data to be edited. Some key editable fields on the Header Tab include:
-
Invoice Terms
-
Freight Payment Types
-
Third-party Payee
-
User Reference Fields 1 through 4
-
Total Amount
-
Total Quantity
Credit Note Request and Credit Note documents include a section for Credit Note Match Keys which are fields used in the Credit Note Automatch batch program.
Items Tab
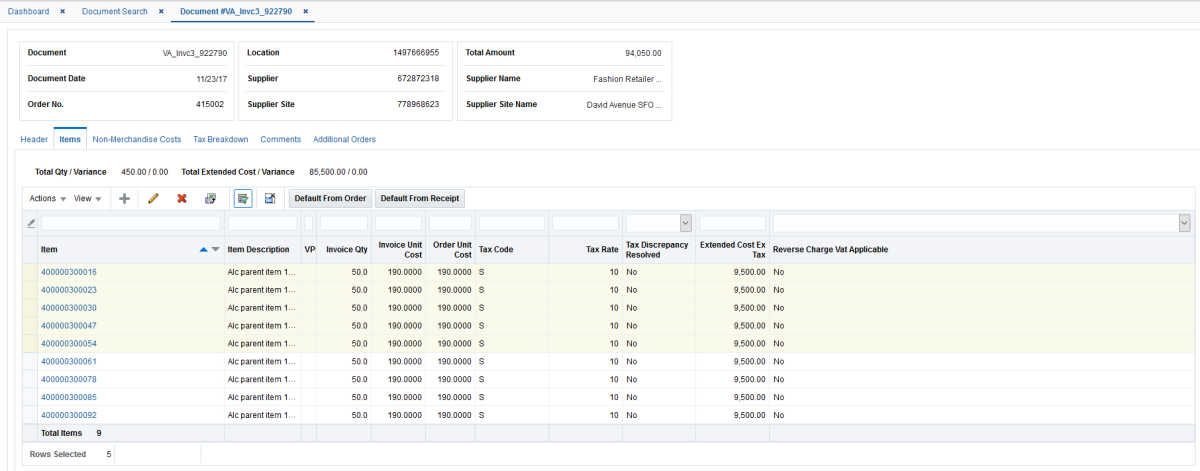
Figure 2-5 Document Maintenance Items Tab

The Items tab allows for the capture of invoice detail information including Items, Quantities, Cost, and Tax information.
Note:
In a Global Tax environment the Tax Code column will display Multiple as a hyperlink when multiple taxes apply to an item. Selecting the hyperlink will display the item taxes.
This tab is hidden for non-merchandise invoices and for non-merchandise fixed deal documents. For non-merchandise fixed deal documents, relevant details are entered on the Deal Billing details tabs. All the fields available in Create mode on this tab are also enabled when the document is accessed in Edit mode in any of the following document-status combinations:
-
Merchandise Invoice – Worksheet/ Ready for Match/ Unresolved Match*
*Edit allowed if no action has been taken and discrepancies have not been resolved
-
Credit Note – Worksheet/ Approved
-
Credit Note Request – Worksheet/Approved
-
Credit Memo – Worksheet/ Approved
-
Debit Memo – Worksheet/Approved
Note:
Only documents manually created though the user interface or through invoice induction are editable through the user interface, with the exception of adding comments on the Comments tab.
In a Single Tax Environment when documents are manually created or uploaded into Invoice Match using EDI or induction, when detail lines are added to the document, the system checks in Merchandising to see whether the item is eligible for Reverse Charge VAT. If the item is eligible, the information is saved against the detail line. Overall applicability of Reverse Charge VAT is determined at a document level.
The tax fields in the tab are available only if tax validation is enabled in Invoice Match. If the tax validation is set to retailer, then the tax fields are defaulted based on the values defined in the Merchandising system and are not editable on this screen. For tax validation type of vendor or reconcile, entry/edit of values is permitted via the UI.
Adding an Item to a Document
Perform the following procedure to add an item to an existing document:
-
Perform a search for the invoice to which you want to add an item. See Search for a Document.
-
From the Search Results pane, click the invoice you want to update. The Document Maintenance screen opens.
Figure 2-6 Document Maintenance Screen
-
From the Items tab of the Document Maintenance screen, select Add from the Actions menu. The Add Item screen opens.
Figure 2-7 Add Item Screen

-
Enter data for the item you are adding to the document. The following fields are available:
Table 2-1 Add Item Screen Fields
Field Description Item
Enter or search for the item to add to the document.
Quantity
The quantity to be used for the new item.
Unit Cost
The unit cost to be used for the new item.
Note:
In a Single tax environment, Tax Code and single Tax Rate fields replace the tax table and Add Tax Dialog discussed below.
-
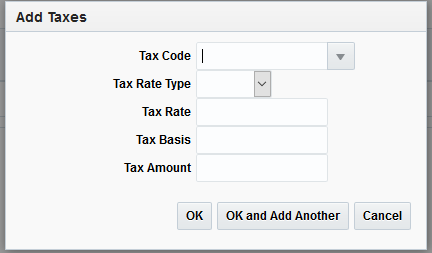
Optionally, you can select the 'Default Taxes' button to call the merchandise system to automatically calculate the taxes for the item, or you can manually enter the tax details for the item. To manually enter the taxes, from the Taxes Details section, select Create from the Actions menu. The Add Taxes dialog appears.
Figure 2-8 Add Taxes Dialog
-
Enter information for the following fields:
Table 2-2 Add Taxes Dialog Fields
Field Description Tax Code
The tax code to be used for the item.
Tax Rate Type
Select the tax rate type to be used. Options are Percent or Per Unit.
Tax Rate
This field defaults to the tax rate of the tax code if it is entered. The user has the option to make changes.
Tax Basis
Tax Basis is the amount which against which taxes should be calculated.
When the Tax Rate is Percent, the default value for tax basis is the item quantity * unit cost. However, the value can be changed.
When Tax Rate is Per Unit, the tax basis is null.
Tax Amount
The Tax Amount associated with the item.
-
Once the tax information is entered, choose one of the following options.
-
Click OK to add the tax information and return to the Add Item screen.
-
Click OK and Add Another to add additional item/tax information.
-
Click Cancel to return to the Add Item screen.
-
-
From the Add Item screen, click OK to add the item and return to the Document Maintenance screen.
Mass Maintenance
When invoice details are built using either Default from PO or Default from Receipt, quite often several records on the same invoice can have incorrect information in one of the fields. In this situation, the default from receipt (or PO) would contain several rows in the item table on the invoice that all need the same correction. In this situation, you can use Mass Update to correct multiple items at one time.
-
Perform a search for the invoice you want to update. See Search for a Document.
-
From the Search Results pane, click the invoice you want to update. The Document Maintenance screen opens.
Figure 2-9 Document Maintenance Screen

-
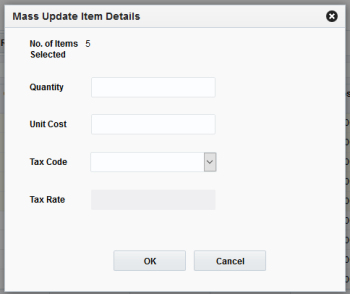
From the Items tab of the Document Maintenance screen, highlight the items you want to update and select Edit from the Actions menu. The Mass Update Item Details dialog opens.
Figure 2-10 Mass Update Item Details Dialog
-
Enter data for the field(s) you want to update. The following fields are available to update:
Table 2-3 Mass Update Item Details Dialog Fields
Field Description Quantity
The quantity to be used to update the selected items.
Unit Cost
The unit cost to be used to update the selected items.
Tax Code
The tax code to be used to update the selected items.
This field is disabled if the Tax Validation Type is set to System, if any one of the selected items has the Reverse VAT indicator set, or if the VAT region of the supplier site does not match the VAT region of the location on the invoice.
Tax Rate
This field defaults to the tax rate of the tax code if it is entered. The user has the option to make changes.
Note:
In Global Tax environment, the screen will include an option to default taxes using the tax engine to recalculate them. The Global Tax environment replaces the tax code and rate fields with a tax table allowing multiple taxes to be associated with the items selected for mass maintenance.
-
Click OK to update the fields and return to the Document Maintenance screen.
Non-Merchandise Costs Tab
Figure 2-11 Document Maintenance Non-Merchandise Costs Tab

The Non-Merchandise Costs tab captures the non-merchandise costs on the document including non-merchandise totals and their associated taxes. All the fields available during create on this tab are also enabled when the document is called up in edit mode for the following document-status combinations:
-
Merchandise Invoice – Worksheet/Ready for Match/ Unresolved Match*
*Edit allowed if no action has been taken and discrepancies have not been resolved
-
Non Merchandise Invoice – Worksheet/ Approved
-
Credit Note – Worksheet/ Approved
-
Credit Note Request – Worksheet/ Approved
-
Credit Memo – Worksheet/ Approved
-
Debit Memo – Worksheet/ Approved
The tax fields in the tab are available only if tax validation is enabled in Invoice Match. Irrespective of the tax validation type, the tax fields are available for entry and edit for the tax validation types of Retailer, Vendor, or Reconcile.
Note:
In global tax environment, the tax fields are replaced with a tax table. When a row is highlighted in the non-merchandise table, the taxes associated with the non-merchandise code are shown in the tax table and can be edited accordingly.
Tax Breakdown Tab
Figure 2-12 Document Maintenance Tax Breakdown Tab

This Tax Breakdown tab captures all tax amounts (including detail level as well as non-merchandise tax components) at a tax code level and is accessible only if taxes are enabled in Invoice Match. All the fields available during create on this tab are enabled when this tab is accessed in edit mode for the following documents status combinations:
-
Merchandise Invoice – Worksheet/ Ready for Match/ Unresolved Match/ Multi-Unresolved Match
-
Non Merchandise Invoice – Worksheet/ Approved
-
Credit Note – Worksheet/ Approved
-
Credit Note Request – Worksheet/Approved
-
Credit Memo – Worksheet/ Approved
-
Debit Memo – Worksheet/ Approved
Note:
This tab is disabled and auto-populated based on the invoice details added if the Default Taxes from Header option is set. If the option is set, all tax amounts on the Detail lines as well as the Non Merch Codes in the document are rolled up by Tax Code and populated in the Tax Codes table. Each time a detail row is updated the same update is reflected in the Tax Header. For a particular document, the user can override the automatic generation of taxes by selecting the Allow Editing of Tax Amount check box. This makes the tax values editable for this document during the current maintenance session.
Add Comments
Figure 2-13 Document Maintenance Comments Tab

The Comments tab allows you to add or modify comments attached to a document.
Add a Comment
Perform the following procedure to add a comment to a document:
-
On the comments tab, select Create from the Action menu. A new comment is added to the comment table. The Date and User ID fields are populated with the date the comment is being created and the user ID of the logged in user.
-
In the Usage Type field, select whether the comment is External or Internal.
-
In the Item field, specify whether the item should allow detail level comments specific to an item on the invoice. Items allowed for selection using the LOV are restricted to the items on the invoice. This field is not displayed for non-merchandise invoices as there are no item details on these documents.
-
In the Comments field, enter comments with regard to the specific resolution actions or details on the invoice that might be relevant for audit or further financial reconciliation.
-
Click Save to save the new comment.
Add Deal Billing Details
Figure 2-14 Document Maintenance Deal Billing Details Tab

The Deal Billing Details tab displays details of linked deals and derived income for documents that are linked to deal invoicing for fixed and bill back deals Such documents are generally uploaded from Merchandising. This tab is disabled if the Document being Created/Edited/Viewed does not have associated deal information. In the create flow the presence of deal information can be indicated by specification of a Deal Type on the create document dialog. If a document is linked to a deal then the Deal Billing Details tab is enabled and the corresponding Invoice Maintenance Detail tab is disabled. Line item or Merchandise hierarchy details are entered via this tab and taxes captured on this tab drive tax breakdown calculation for such documents. Note that the Deal Detail tab will not show deal details for off invoice deals that are associated with an invoice. The default columns and fields vary slightly based on whether the deal is fixed or complex.
Note:
The Edit option in the Action menu is only available for the following document status combinations that have a deal associated:
-
Credit Note – Worksheet/Approved
-
Credit Note Request – Worksheet/Approved
-
Credit Memo – Worksheet/Approved
-
Debit Memo – Worksheet/Approved
Add Deal Billing Details
Perform the following procedure to add deal billing details to a document:
-
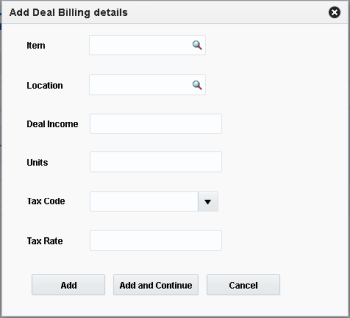
Select Add from the Action menu. The Add Deal Billing Details dialog is displayed.
Figure 2-15 Add Deal Billing Detail Dialog
-
Enter the deal billing details for the following fields:
-
Item – This field allows selection of an item defined in Merchandising. Enter a value if available or select the item by querying for the item based on Item Number, Item Description, or VPN Number. (Item is only entered on Complex Deals.)
-
Department, Class, and Subclass – (These fields are available if the Deal Type is Fixed.) These fields allow selection of a department, class, and subclass. Valid values in Merchandising are available for selection.
-
Location – This field allows selection of a location defined in Merchandising. Only locations on the deal specified are available for selection.
-
Deal Income – This field allows for entry of deal income for the Item Location line (or for the merchandise category in the case of fixed deal).
-
Units – This field allows for entry of item units relevant to the income figure.
-
Tax Code – This field allows for selection of tax codes available in Invoice Match.
-
Tax Rate – This field defaults to the tax rate associated with the selected tax code on the invoice date. It can be edited to reflect the value on the invoice. This field is displayed only if taxes are enabled in Invoice Match.
-
-
Click Add to save the new deal billing details. You are returned to the Deal Billing Details tab.
You can add the details to the deal billing details table at any time by clicking Add and Continue.
Note:
In a Global Tax environment, the tax fields are replaced with a tax table, enabling multiple taxes to be associated with the item.
Add Purchase Orders
The Additional Orders tab is displayed on Merchandise Invoices when the Match Across Multiple Purchase Orders Supplier option is checked at either the Supplier or the Supplier Group level.
Figure 2-16 Document Maintenance Additional Orders Tab

Add Additional Orders
Perform the following procedure to add additional purchase orders to a document:
-
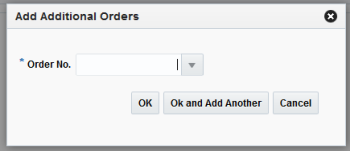
Select Create from the Action menu. The Add Additional Orders dialog is displayed.
Figure 2-17 Add Additional Orders Dialog
-
From the Order No. field, select an additional Purchase Order against which the Invoice is raised.
-
Click OK to add the purchase order to the invoice and close the Add Additional Orders dialog. Click OK and Add Another to add the PO to the invoice, clear the PO field, and keep the Add Additional Orders dialog open in order to enter another PO.
Manage EDI Documents
For many customers, the majority of documents are loaded in Invoice Match through Electronic Data Interchange (EDI). When Invoice Match receives an EDI file, it performs a pre-validation to ensure that the basic file format and data is correct. If the records pass the initial validation, they are loaded into the staging tables. From there, the system attempts to load the records into the Invoice Match base tables. If the data passes that level of validation, the documents are created in the base tables, are purged from the staging tables, and the documents are ready to be matched. If the data does not pass this validation, depending on the type of errors, users can manually correct the inaccurate data using the EDI Maintenance and Document Maintenance screens, or fix the data in the EDI file and reprocess.
On merchandise documents, the Supplier Site should be populated in the Vendor ID field in the EDI layout. The EDI load program should use the Supplier Site to look up the parent supplier in Merchandising. The parent supplier in Merchandising is then populated as the Vendor ID in Invoice Match and the original value of the Vendor ID from the EDI file (that is, the Supplier Site) populates the Supplier Site ID in Invoice Match. From a validation perspective, Invoice Match does not accept Supplier in the Vendor field of the EDI file. Therefore, if the Supplier Site is invalid, the user should fix the Supplier Site (provided in the EDI file) and not the derived data (Supplier). Once the Supplier Site is fixed, Invoice Match derives the correct Supplier.
Non-merchandise documents can be either for Suppliers or for Partners. If the non-merchandise document is for a Supplier, the Vendor ID field must be populated with the Supplier Site and Invoice Match derives the Supplier as it does for merchandise invoices. For Partner non-merchandise documents, the Partner ID is sent in the Vendor Reference field and passed on to Invoice Match.
Search for an EDI Document
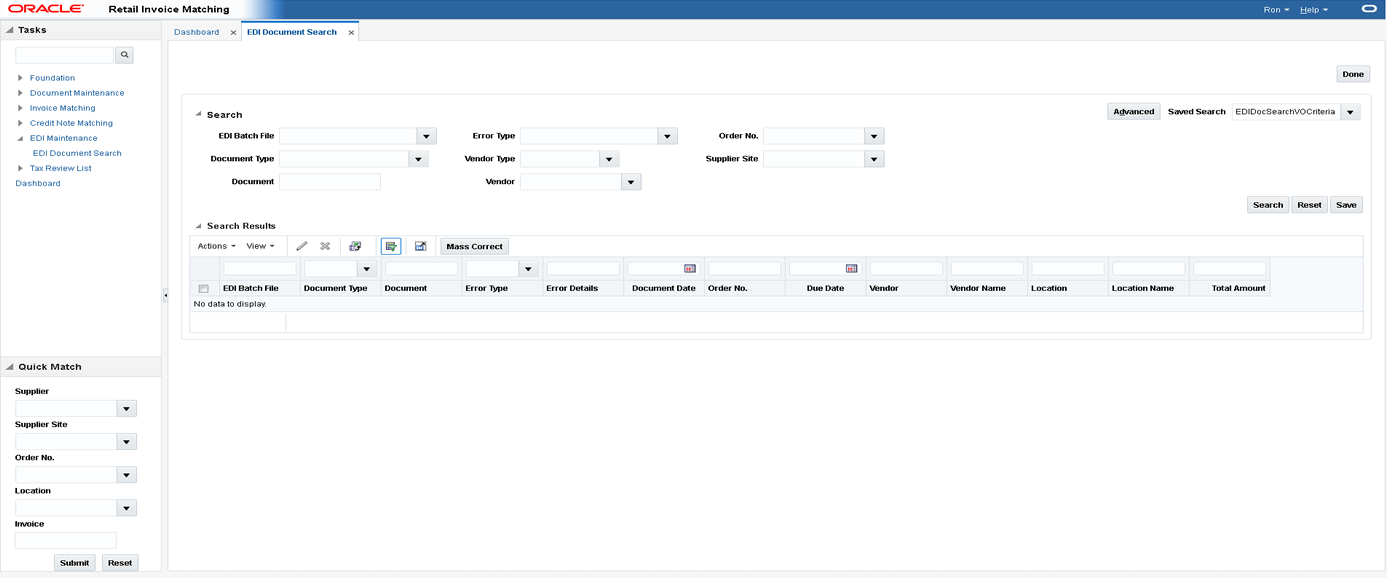
Navigate: From the Tasks menu, select EDI Maintenance > EDI Document Search. The EDI Document Search window opens.
Figure 2-18 EDI Document Search Window
-
Enter criteria as desired to make the search more restrictive. You must enter at least one search criterion. The following criteria are available:
-
EDI Batch File – This field allows for filtering documents with errors based on the EDI Batch File. The list of values displays all EDI Batch Files with errors.
-
Document Type – This field is a drop down list which lists the type of document being queried.
-
Document – This field represents the document ID which is a unique identifier assigned by the supplier of the document being referenced.
-
Error Type – This field allows filtering by error type (for example, rule violation). Typing the first letter of the description selects it. If more than one choice starts with the same letter, continuing to press that letter will cycle through the matching choices in the order in which they appear in the list.
-
Vendor Type – This field represents the type of vendor on the document being referenced.
-
Vendor/Supplier – The label on this field is displayed as Vendor if the Vendor Type has been changed to a value other than supplier. By default the vendor type field will be set to Supplier and this field should display the supplier label. This field allows filtering documents based on the vendor on the document being referenced.
-
Order No. – This field allows filtering documents based on the order number associated with the document. This field is available only if the Vendor Type is Supplier.
-
Supplier Site – This field allows filtering documents based on the supplier site on the document being referenced. This field is available only if the Vendor Type is Supplier.
-
-
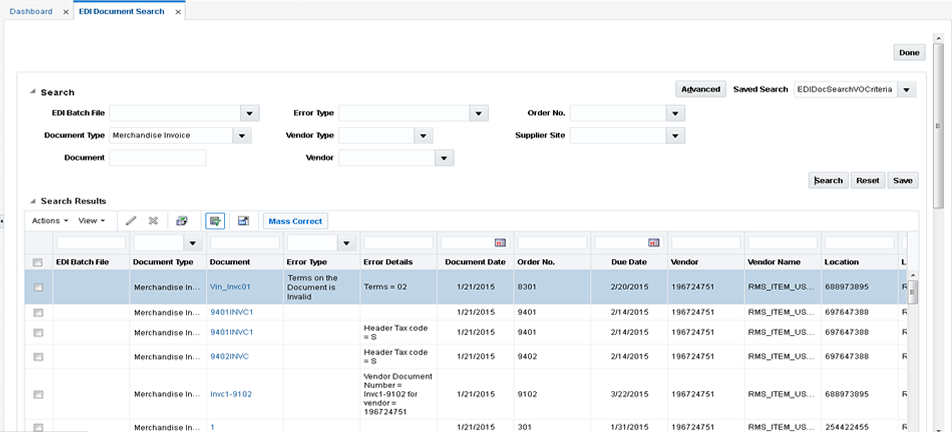
Click Search. The results are displayed in the Search Results table. The user has the ability to select rows by checking a checkbox to select them, and then choose an action for the selected rows. The Document ID field is hyperlinked so users can quickly open a document in Document Maintenance for editing.
Figure 2-19 EDI Search Results
Fix EDI Errors
The following procedure describes how to address EDI errors using the Document Maintenance window.
-
To fix a single document, select any error for that document in the results table and select Edit from the Action menu, or click on the document hyperlink. The Document Maintenance screen loads and all of the errors on the document are displayed in a popup. The popup includes all errors on the document, not just the errors from the Header Details Tab. Errors on the key fields on the header are listed first, followed by other errors on the header, and then errors on other tabs. If the number of errors exceeds the space on the popup, the popup displays as many errors as the space allows and then display a vertical scroll bar to allow users to scroll down to see the additional errors. If an error involves a discrepancy between multiple fields, the error is shown without the field reference. All fields with errors are highlighted in red.
-
The initial load of the screen takes the user to the Header Details Tab. This is true even if there are no errors on the header. In that case, users view the errors in the popup, and then click on the tab where the errors exist. For EDI generated documents, key fields are editable.
-
Click the fields with errors and the error details are displayed. Proceed to fix all errors on all tabs.
-
Once all errors on the document are fixed, click Save or Save and Close. When all errors are fixed, Invoice Match moves the corrected document from Staging to the Invoice Match base tables. If you are unable to fix all errors on a document, you will not be able to save changes, and have to cancel out of the document.
Note:
It is possible that additional errors exist on an EDI document that are not fixable through the EDI Maintenance process. In those cases, users receive an error explaining that additional errors exist that must be fixed in the vendor's EDI file and resubmitted for processing.
Mass Correct EDI Errors
To fix multiple documents at the same time, select any error for those documents in the results table, and select Mass Correction from the Action menu. Mass correction is only allowed for documents for the same supplier. Therefore, if multiple documents are selected that belong to different suppliers, they receive an error.
Mass Correction can only be used to fix two types of errors: Invalid Items and Invalid Purchase Order Numbers. If none of the documents selected are eligible for mass correction (that is, do not have Invalid Item or Order Number error), an error is displayed.
When Mass Correction is selected, the Mass Correction popup displays and displays the Supplier selected for Mass Correction.
Mass Correction – Order Number
The following procedure describes how to address EDI Order Number errors using Mass Correction.
-
From the Mass Correction popup, select Order No in the Type field.
All invalid PO Numbers from the rows selected before clicking Mass Correction display in the Old Order No list of values.
-
Select one PO Number and then select a new PO number from the New PO No list of valid POs for the Supplier. Click Replace.
The system performs a search and replace of the invalid PO number. It replaces the PO number on all of the selected documents that contain that same invalid value in the PO number field. It is possible that a selected document may have a different PO number that is invalid and in that case it would not be replaced.
The Confirmation dialog displays the number of replacements made.
Mass Correction – Invalid Item
The following procedure describes how to address EDI Invalid Item errors using Mass Correction.
-
From the Mass Correction popup, select Item in the Type field.
All invalid items from the rows selected before clicking Mass Correction display in the Old Item list of values.
-
Select one Item and then select a new item from the New Item list of values, or search for the new item using the item number or description field search. This searches all valid items for that Supplier. Click Replace.
The system replaces that item on all of the selected documents regardless of the error codes on those documents.
The Confirmation dialog displays the number of replacements made.
Note:
If any of the selected documents has Header level errors with the Supplier, which would impact the ability to determine valid items, when users select Type - Item, the system prompts the user to fix those errors first
Pre-Pay a Merchandise Invoice
Navigate: From the Tasks menu, select Document Maintenance > Document Search. The Document Search window opens.
-
From the Document Search window, perform a search for merchandise invoices. See Search for a Document for additional information.
-
In the Search Results pane, highlight the unpaid, unmatched merchandise invoice request you want to prepay and select Prepay Documents from the Action menu. The invoice is marked as pre-paid.
Note:
Pre-paid invoices are still eligible for matching. Double-payment is prevented by the Invoice Match system verifying whether the pre-paid flag is set to yes. When a pre-paid invoice is matched, the invoice is not sent to the financial system for payment: it has already been paid. Instead, the appropriate accounting entries are sent to the general ledger to reflect the matched action.
Note:
Your can prepay multiple documents at once by highlighting all the documents you want to prepay and selecting the Prepay Documents action.
Releasing an Invoice on Hold
There is a supplier option which allows the retailer to stop a matched invoice from posting to the financial system until all Credit Note Requests associated with the invoice have been matched to Credit Notes. This ensures the retailer that they are fully compensated for overcharges on the invoice before releasing the invoice for payment. Occasionally, the retailer may wish to release a held invoice before all the Credit Note Requests have been matched. This can be accomplished from the Document Maintenance screen as follows:
Navigate: From the Tasks menu, select Document Maintenance > Document Search. The Document Search window opens.
-
From the Document Search window, perform a search to find the invoice you which to release from hold.
See Search for a Document for additional information.
-
In the Search Results pane, highlight the merchandise invoice you wish to release, and select Release Hold from the Action menu. The hold is taken off the invoice, and it will be posted in the next batch run.
Note:
You can release multiple documents at once by highlighting all the documents you want to release and selecting the Release Hold action.
Edit an Existing Group of Documents
Documents entered through Group Entry will stay in worksheet status until they are approved. While the documents are in worksheet status, the group is available to be edited by calling up the group in the group entry screen using the procedure outlined here:
Navigate: From the Tasks menu, select Document Maintenance > Document Search. The Document Search window opens.
-
From the Document Search window, perform a search for the document group you wish to edit. See Search for a Document for additional information.
-
In the Search Results pane, highlight one of the documents from the group you want to edit and select Group Entry from the Action menu. The group is called up in the Group Entry dialog in Edit mode.
-
Use the forward or backward arrows to navigate to the document you wish to edit.
Void a Credit Note Request
A retailer may occasionally determine that the Credit Note associated with a Credit Note Request is never going to be received. This may be because the supplier provided proof that the perceived overcharge on the invoice was actually correct, or it may be because the retailer has decided to write-off the overcharge. In either case, the retailer has the option to remove the Credit Note Request from Invoice Match by voiding it using the following procedure:
Navigate: From the Tasks menu, select Document Maintenance > Document Search. The Document Search window opens.
-
From the Document Search window, perform a search for credit note requests. See Search for a Document for additional information.
-
In the Search Results pane, highlight the credit note request you want to void and select Void from the Action menu. The Confirm Write Off dialog is displayed.
-
From the Confirm Write Off dialog, click Yes. The credit note request is voided and you are returned to the Search Results window.
Note:
Credit Note requests that are in Matched status cannot be voided.
Reverse a Debit Memo
Navigate: From the Tasks menu, select Document Maintenance > Document Search. The Document Search window opens.
-
From the Document Search window, perform a search for debit memos. See Search for a Document for additional information.
-
In the Search Results pane, highlight the debit memo you want to reverse and select Reverse from the Action menu. The Reverse Debit Memo dialog is displayed.
-
From the Reverse Debit Memo dialog, select the items that need to be reversed and included on the Credit Memo.
-
Adjust the quantity or cost associated with those items, and select a Reason Code.
-
Click Submit, and the system creates a Credit Memo in Approved status for the selected line item quantities and costs.
Note:
The Reverse Debit Memo dialog also allows the ability to reverse a portion of the Debit Memo by selecting individual line items, or a portion of a line item.
Note:
Credit Memos created via the reversal process can be deleted until they are in Posted status. If deleted, the remaining cost/quantities available for reversal on the debit memo will be updated.