7 Manage LPO Recommendations
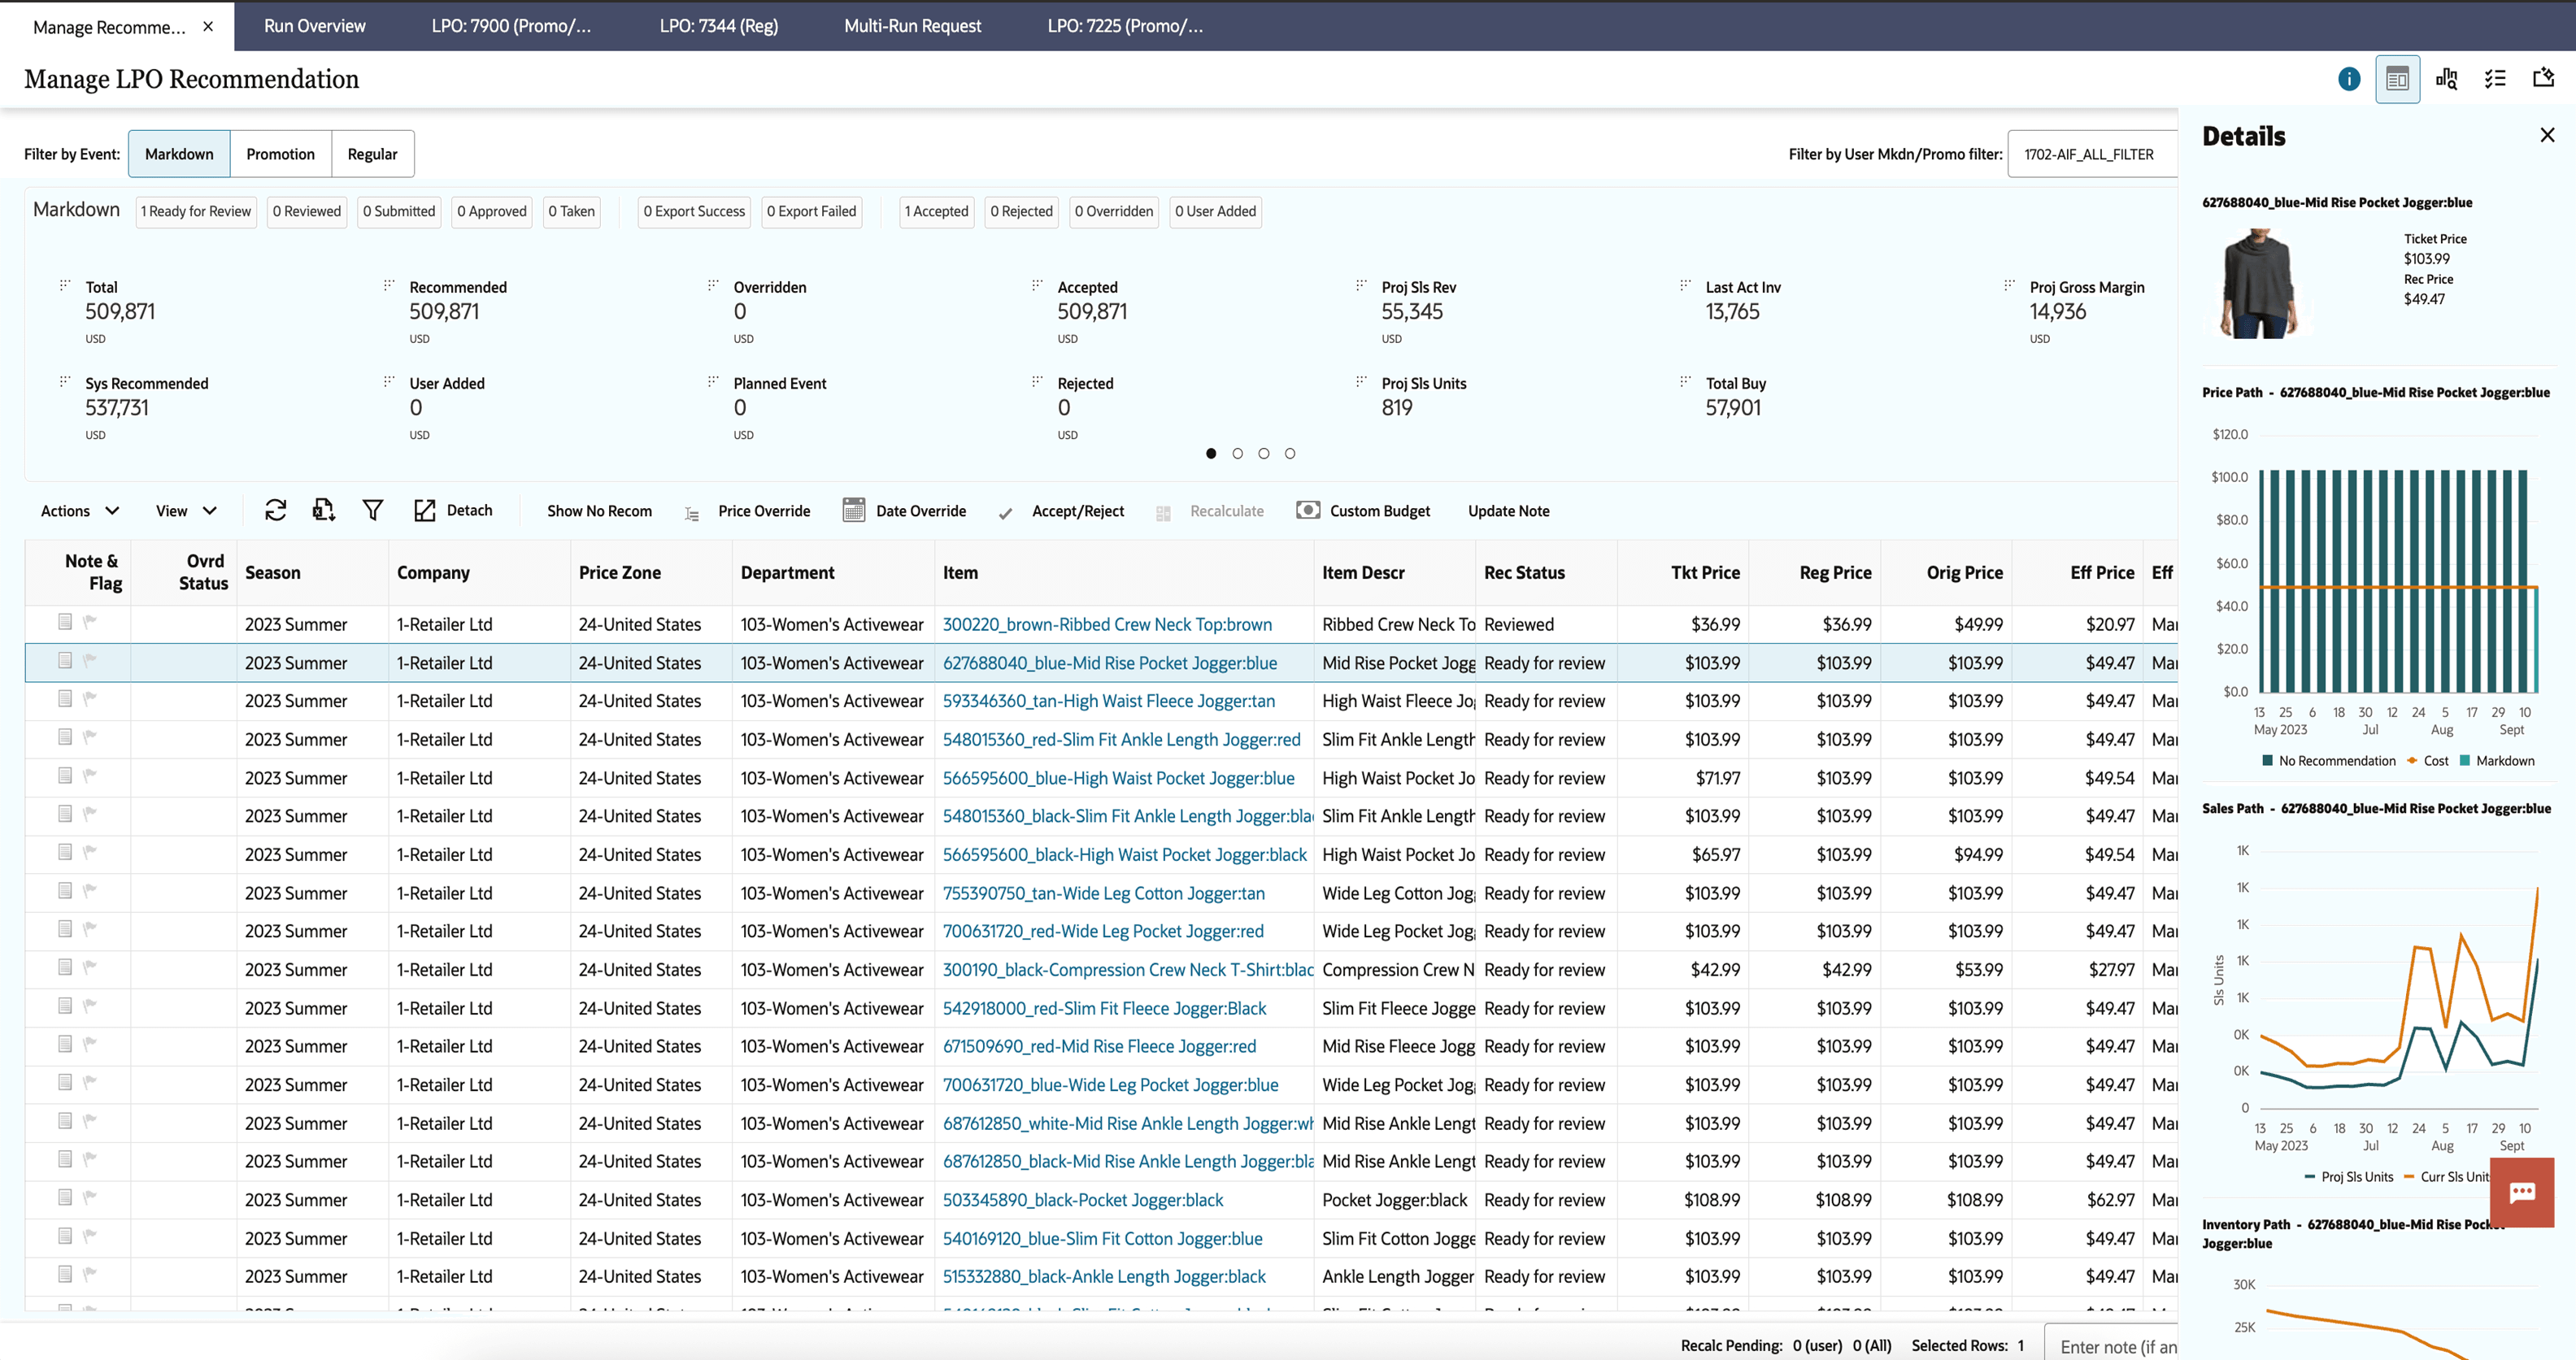
The Manage LPO Recommendations screen is used to review the recommendations, modify the recommendations, and send the recommendations to a price execution system. It consists of five components, as shown in the following figure: User Filter, Filter by Event, Summary Metrics, Reports, Item Recommendations table with bulk operations, and BI/Contextual Area.
Manage LPO Recommendations - UI Components
This section describes the components of the Manage LPO Recommendations UI.
User Filter
The User Filter, shown in the following figure, is used to filter by location, merchandise, price zone, season, effective week, and product attributes. Users can save multiple filters for each user and separate multiple user filters for promotion/markdown and regular recommendations. You can click the filter icon at the top to expand the panel. This panel is collapsed by default, except for the first time you log in or when you click Create New Filter. When you log in for first time, you must set the filter and select Apply. The set of merchandise or locations that will be available to you are based on the data security set for your user ID. For example, if a particular user ID cannot access the Europe locations, then that user will not be able to see any recommendations for Europe locations.
Figure 7-2 Manage LPO Recommendations - Filter by User - Promo/Mkdn
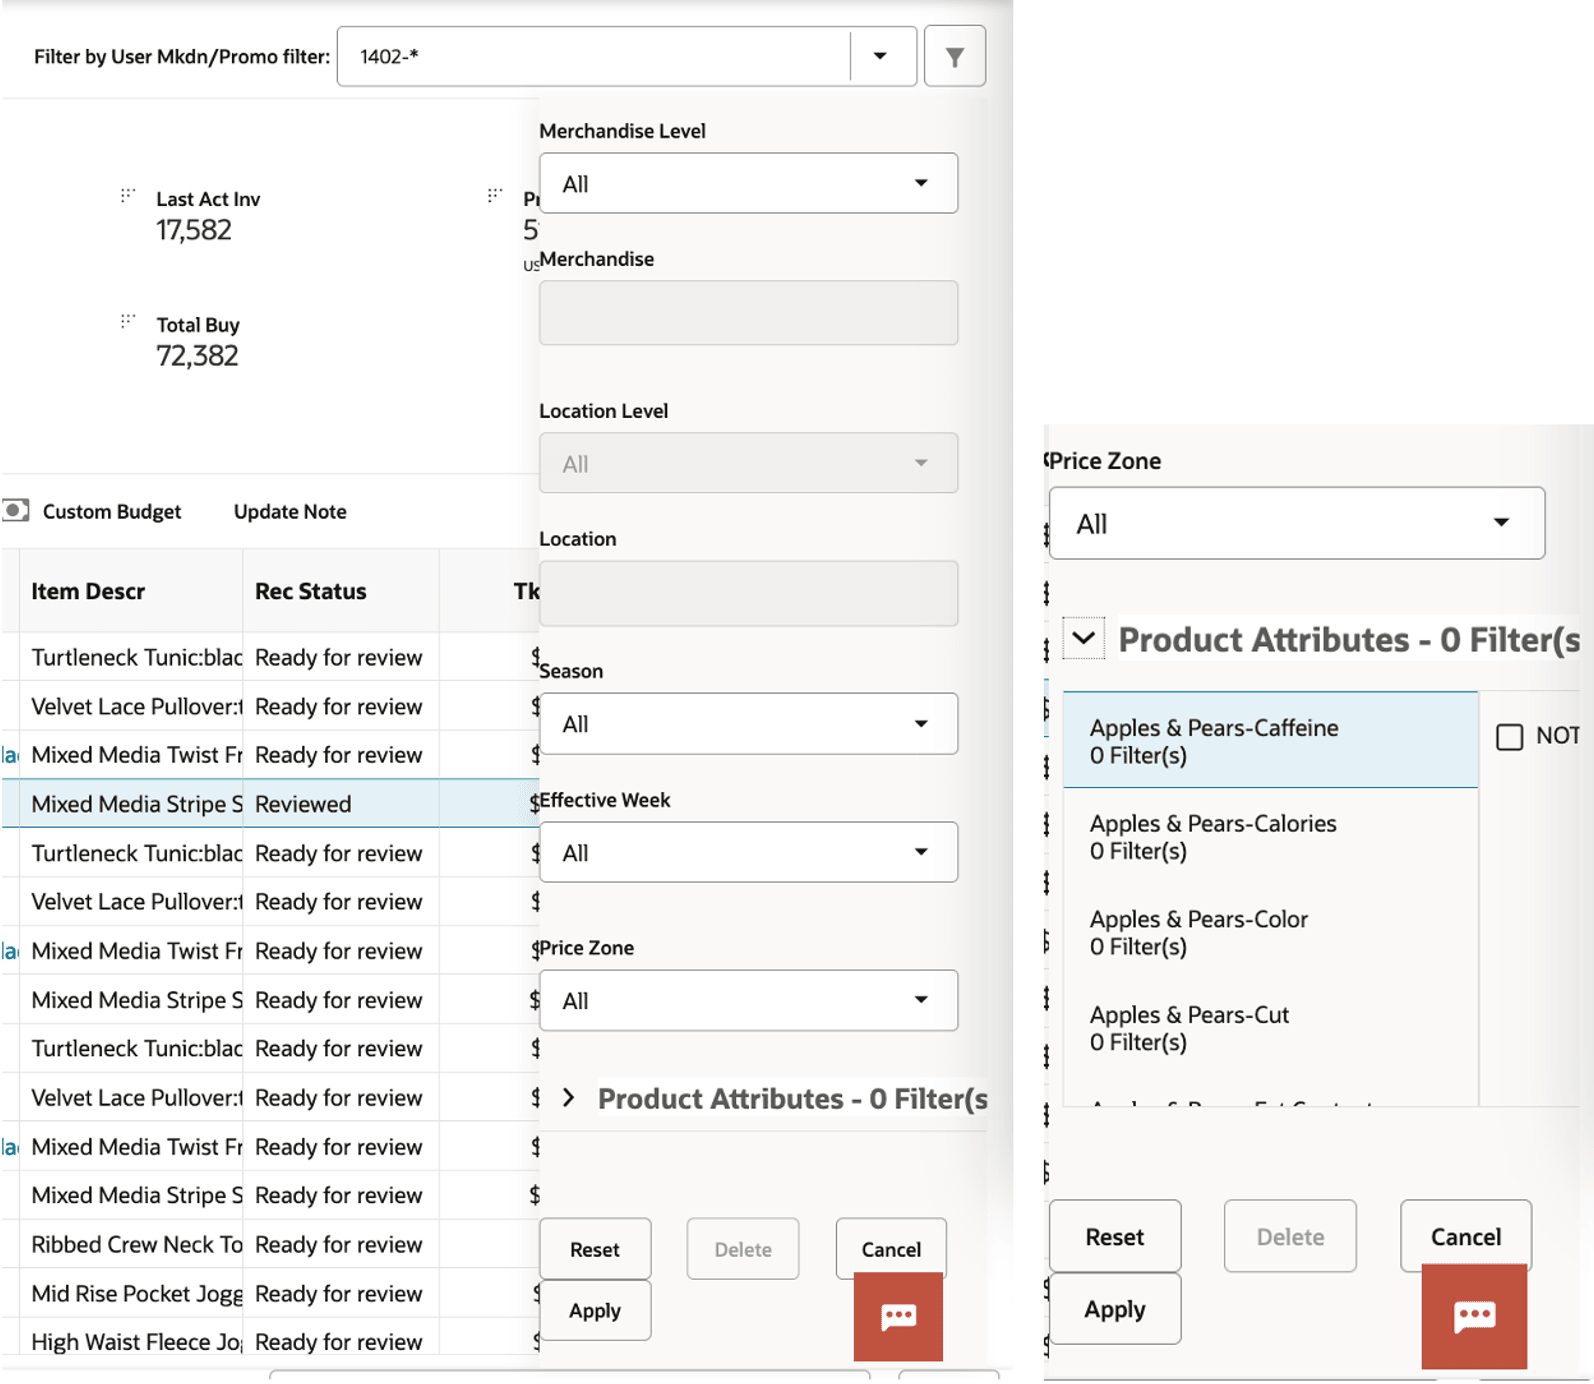
Description of "Figure 7-2 Manage LPO Recommendations - Filter by User - Promo/Mkdn"
Figure 7-3 Manage LPO Recommendations - Filter by User - Regular
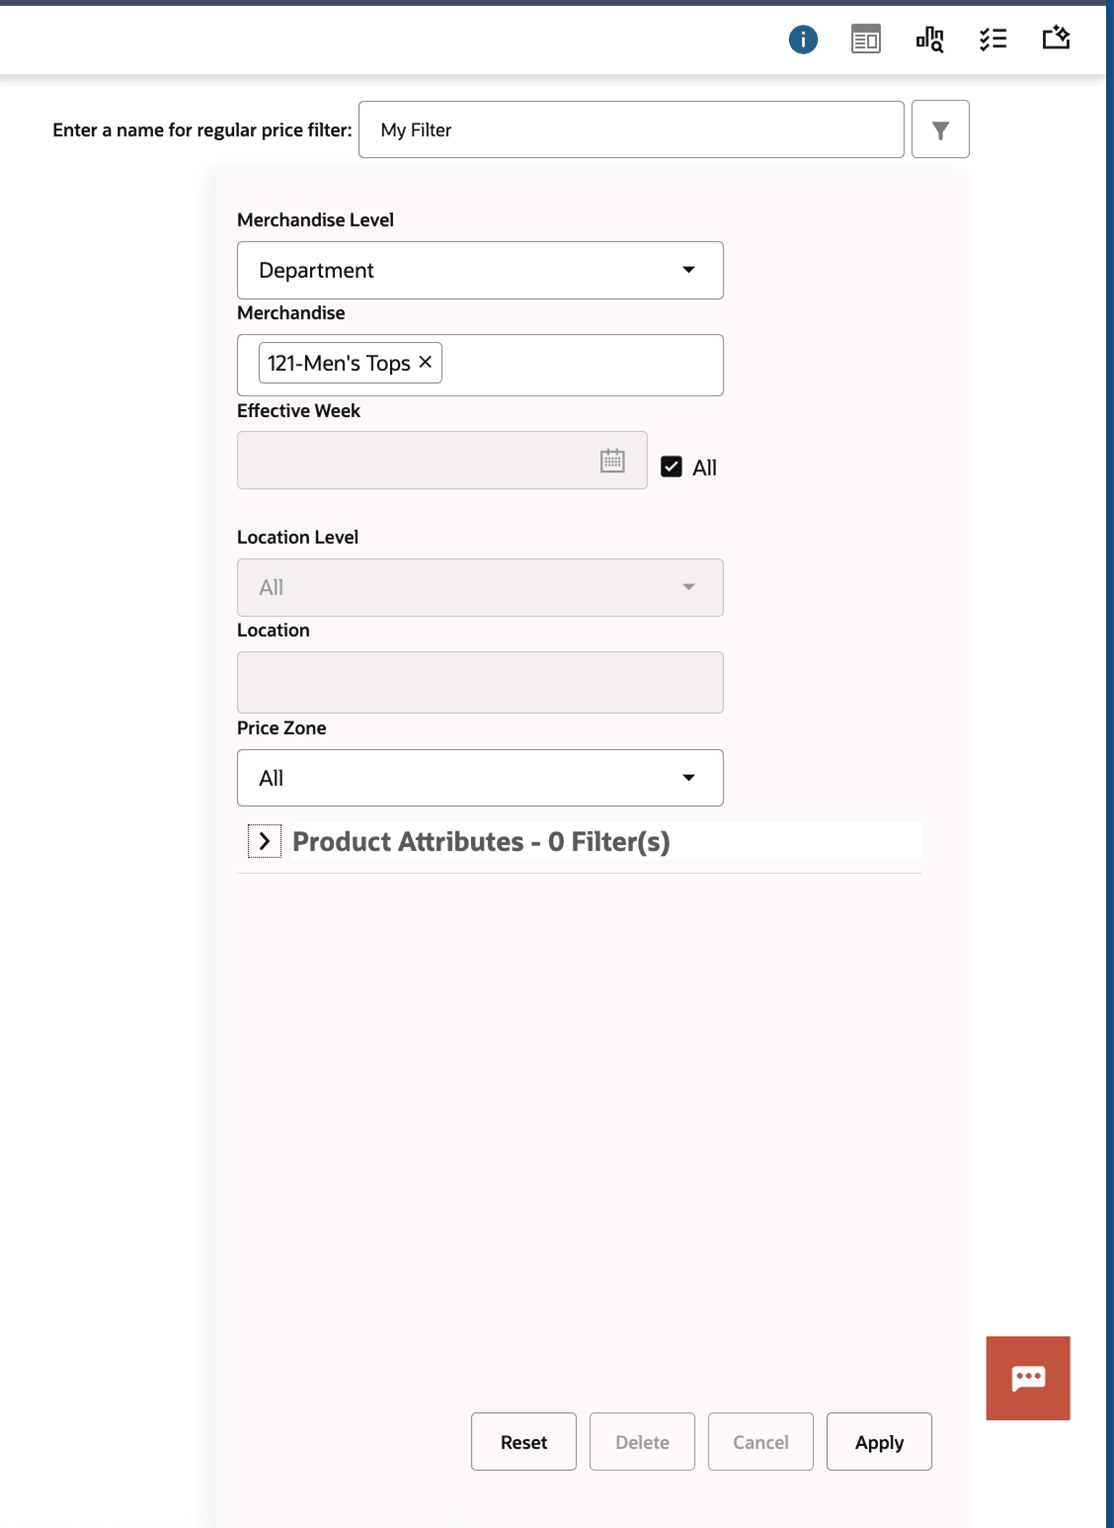
Filter by Event
Filter by Event, shown in the following figure, is used to filter the recommendations by pricing events such as Promotion, Markdown, No Recommendation, or Regular. Clicking each type will add the recommendations of that type to the table below.
Figure 7-4 Manage LPO Recommendations - Filter by Event

Description of "Figure 7-4 Manage LPO Recommendations - Filter by Event"
Summary Metrics
Summary Metrics, shown in the following figure, displays the metrics in a film strip style, for Markdowns, Promotions, No Recommendation, and Regular recommendations.
It shows the following:
-
Projected amount (budget used) for Accepted, Overridden, Recommended, User Added, Planned, and Rejected Promotion or Markdown recommendations.
-
The count of recommendations (items) by recommendation status: Ready for Review, Reviewed, Submitted, and Approved and count of recommendations (items) by price change status: Accepted, Rejected, Overridden, or User Added.
-
Further, this panel shows the running total of all selected item recommendations from the table below.
Each summary film strip can be customized to add, delete, or reorder from the list of available metrics.
Figure 7-5 Manage LPO Recommendations - Summary Metrics - Markdown

Description of "Figure 7-5 Manage LPO Recommendations - Summary Metrics - Markdown"
Figure 7-6 Manage LPO Recommendations - Summary Metrics - Promotion

Figure 7-7 Manage LPO Recommendations - Summary Metrics - No Recommendation

Reports
The Reports filmstrip allows you to add, delete, or reorder any reports that exist either in the Data Visualizer or in APEX. You must specify the report URLs in Manage System Configurations > RSE_DYNAMIC_URL. Clicking the Report Header link for each report navigates to the respective Data Visualizer or the source report page.
Figure 7-8 Manage LPO Recommendations - Reports

Item Recommendations with Bulk Actions
The Item Recommendations table, shown in the following figure, shows relevant information for each item.
-
The table actions are used to select multiple items for a price change operation such as accept, reject, override, or add a promotion, markdown, or regular price change.
-
A user can also move the effective start/end dates for a promotion/markdown.
-
Once you make the necessary price or date changes, you can click Recalculate, which updates all the projected metrics for the modified items.
-
When you are satisfied with the recommendations, you can perform recommendation status operations such as Review, Submit, or Approve. Submit or Approve not only send recommendation to the Export Interface, but when integrated with RPCS, also push recommendations in corresponding statuses through a web service.
Figure 7-9 Manage LPO Recommendations - Item Recommendations

Description of "Figure 7-9 Manage LPO Recommendations - Item Recommendations"
For details, see Appendix: Promotion and Markdown - Run Overview and Appendix: Regular - Manage LPO Recommendations.
Table 7-1 Manage LPO Recommendations - Item Recommendations - Actions
| Field | Description |
|---|---|
|
Action |
Click the Note icon to add any text comment to the recommendation. The Flag icon is used to flag a recommendation. These two icons are also displayed in the Review Exception screen. |
|
Actions |
Price or Date override operation for the item is successful. Recalculate icon is added to denote that the recalculation of projected metrics is pending. |
|
Actions |
Price or Date override operation for the item is not successful. You must either modify the rounding criteria/tolerance used or modify the pricing logic (percentage versus price point). |
|
Action - Wrap Text |
Wrap the longer texts for better viewability. |
|
Action - DD-MM-YY |
When clicked, all the dates in the table are displayed in DD-MMM-YY format. |
Table 7-2 Manage LPO Recommendations - Item Recommendations - Status
| Status | Description |
|---|---|
| Ready for Review | The optimization process is complete, and the run status and item recommendations are ready for review. |
| Reviewed | The analyst finished reviewing the price recommendations and changes the item recommendation status to Reviewed so that it is sent to the buyer for approvals. |
| Submitted | The recommendations have been reviewed and submitted or approved for execution. The recommendations are ready for export to other applications. |
| Approved | The recommendations have been reviewed and approved for execution. The recommendations are ready for export to other applications. |
| Rejected | The recommendations have been reviewed and rejected for execution. |
| Export Success | The export of recommendations to other systems have been successful. |
| Export Failed | The export of recommendations to other systems has failed. |
| Taken | The recommendations have been approved by an external system (for example, RPCS) and sent to LPO. |
| Auto Approved | The recommendations have been auto approved for execution as they have met the auto approval criteria. |
BI/Contextual Area Components
This section describes the UI components of the BI/Contextual Area.
Job Status
Figure 7-10 Manage LPO Recommendations - Contextual Area - Job Status
Item Details
The Item Details area can be expanded whenever you select the item and click the Details icon on the top right corner of the screen. For the selected item, you can see the Item Details, Image of the item, Projected Price Path, Sales Path, Inventory Path, and Gross Margin Path.
Figure 7-11 Manage LPO Recommendations - Contextual Area - Item Details - Price Path
Single Recommendation Information
The Single Recommendation Information area can be expanded whenever you select the item and click the Single Recommendation Information icon on the top right corner of the screen. For the selected item, you can a summary of the recommendation, current and projected metrics, product and location hierarchy details, product attributes and custom attributes.
Figure 7-12 Manage LPO Recommendations - Contextual Area - Single Recommendation Information
Figure 7-13 Manage LPO Recommendations - Contextual Area - Single Recommendation Information - Projected Metrics
BI/Contextual Area Rules Panel
The Rules panel can be expanded whenever you select the item and click the Rules icon on the top right corner of the screen. For the selected item, you can see a summary of the rules applied on the item recommendation.
Figure 7-14 Manage LPO Recommendations - Rules Panel - Promotion and Markdown
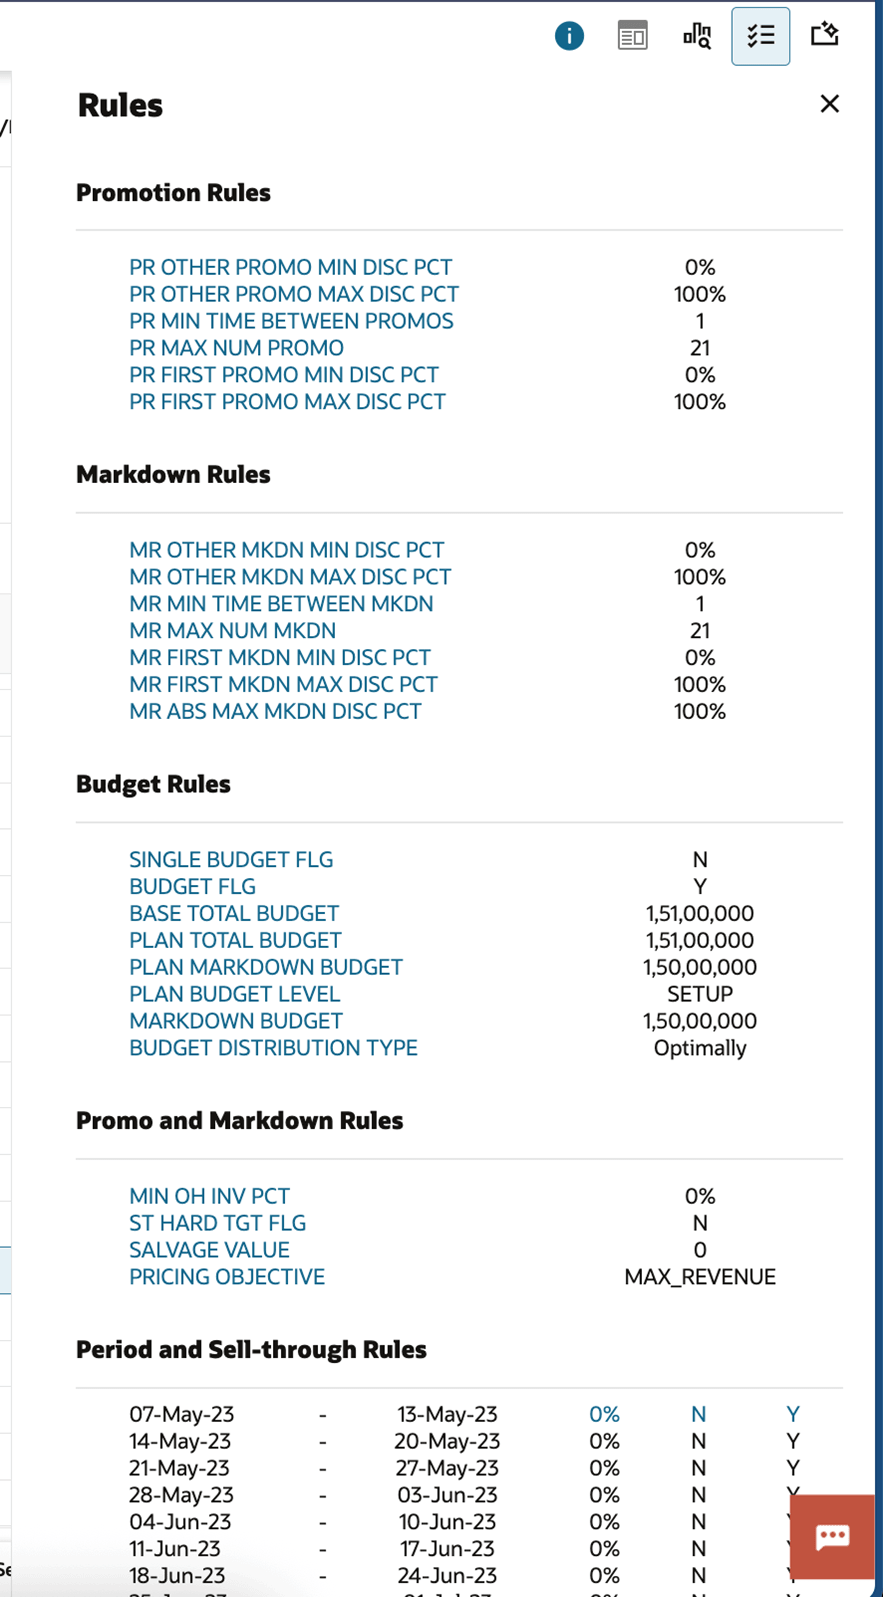
Figure 7-15 Manage LPO Recommendations - Rules Panel - Regular
GenAI Explanation
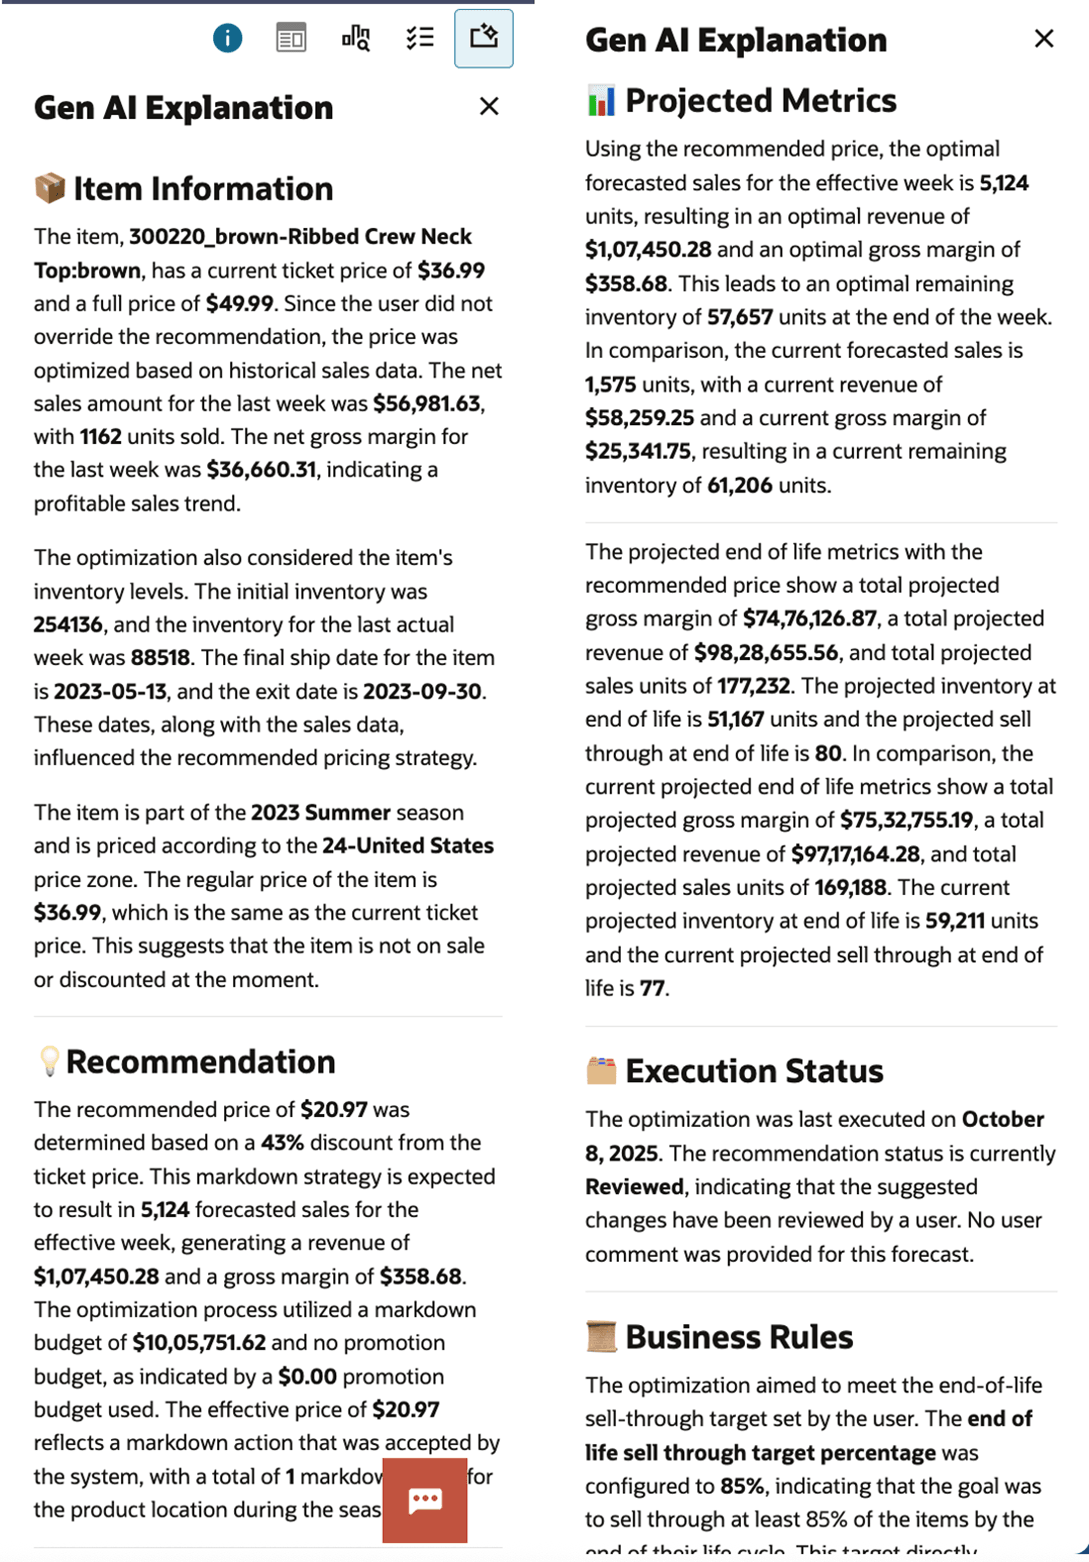
GenAI-powered explainability provides clear, human-readable summaries that explain the system’s price recommendations and reasoning behind each price recommendation for each item within Manage LPO Recommendations. GenAI serves as a digital assistant, automatically organizing and presenting all relevant information in a straightforward, easy-to-understand format.
Below are the sections and the types of information you will see:
Item Information
Displays the item’s name, current and full price, season, and price zone. Provides sales performance and inventory details, including recent sales figures, gross margin, and inventory levels. Indicates key dates such as the final ship and exit dates used in pricing recommendations.
Recommendation
Shows the recommended price (for example, $20.97), the applied markdown percentage, expected sales and revenue, and which budget was used. Indicates if the recommendation was accepted and how many markdowns have been taken.
Projected Metrics
Compares forecasted sales, revenue, gross margin, and inventory for the effective week and at end of life using both recommended and current prices—so users can easily see the expected improvement.
Manage LPO Recommendations - User Actions
This section describes the user actions available for managing LPO recommendations.
Show No Recom
-
Non-Forecasted: Items that cannot be forecasted.
-
No Recommendation: Items that have valid forecast data, but LPO does not recommend a new price and suggests retaining the current retail price.
Figure 7-17 Manage LPO Recommendations - Show No Recom

Price Override
Price Override is used to either modify the discount (or price) for an item for which the system recommends a promotion or markdown or add a promotion or markdown to an item that did not receive a promotion or markdown. The former is counted towards Overrides, and the latter is counted towards User Added.
When you select recommendations and click Price Override, it displays a Price Override screen. You can select Price Type as Promotion or Markdown. Then, you can use either a percentage logic or a Price point logic. Depending on the supplied price ladders (options are price point or % off ladder), the price override is applied as follows:
Table 7-3 Manage LPO Recommendations - Price Override
| Price Type | Logic | Price Ladder Assigned | Calculation of Override Price |
|---|---|---|---|
|
Promotion |
Percentage |
Percent Off Original or Ticket Price ladder (for example, 5%, 10%, …) |
First % off ladders are converted into amounts either using the original or current price specified in the UI. After applying the discount as specified, the nearest price on the ladder subject to rounding criteria and tolerance is used. |
|
Promotion |
Percentage |
Price point ladder (for example, 13.97, 15.97, 16.97, …) |
After applying the discount as specified, the nearest price on the ladder subject to rounding criteria and tolerance is used. |
|
Promotion |
Price point |
Price point ladder (for example, 13.97, 15.97, 16.97, …) |
Price point is applied as selected from the drop-down list. If a price point higher than the current ticket price is selected, that item's price override will not be successful. |
|
Markdown |
Percentage |
Percent off Original Price or Current ticket price ladder (for example, 10%, 20%, 30%…) |
First % off ladders are converted into amounts either using the original or current price specified in the UI. After applying the discount as specified, the nearest price on the ladder subject to rounding criteria and tolerance is used. |
|
Markdown |
Percentage |
Price point ladder (for example, 13.97, 15.97, 16.97…) |
After applying the discount as specified, the nearest price on the ladder subject to rounding criteria and tolerance is used. |
|
Markdown |
Price point |
Price point ladder (for example, 13.97, 15.97, 16.97, …) |
Price point is applied as selected from the drop-down list. If a price point higher than the current ticket price is selected, that item's price override will not be successful. |
This can be illustrated through an example. Consider Original Price as 159.99 and Ticket Price as 127.99 (20% Off). Suppose the price ladder supplied is of type PT (Percentage Off Ticket Price), with points {0%, 5%, 15%, 20%, 25%, 30%}. If the user requests 22% and uses Original Price, then translating the PT ladder with % off from the Original Price provides the following results: {159.99, 151.99, 135.99, 127.99, 119.99, 111.99}. So, 22% off on the Original Price would give us 124.792. Depending on the tolerance and rounding criteria, different results are possible, as explained below.
-
If tolerance is 0%, then 124.792 is not on the price ladder and the price override is unsuccessful.
-
If tolerance is 3%, then the tolerance is 3% * 159.99 = 4.7997. 124.792 +/- 4.7997 gives a lower bound of 119.99 and upper bound of 129.59. This means that price points 119.99, 127.99 are available for to be selected, depending on the rounding logic. If rounding is up, then best price that is close to 124.792 and within tolerance of 3% would give 127.99. If rounding is down, then best price that is close to 124.792 and within tolerance of 3% would give 119.99
Similar to Accept/Reject operation errors, the price override can only be calculated on items that do not have pending calculations and are in Ready for Review status only.
Figure 7-18 Manage LPO Recommendations - Override Price Percentage
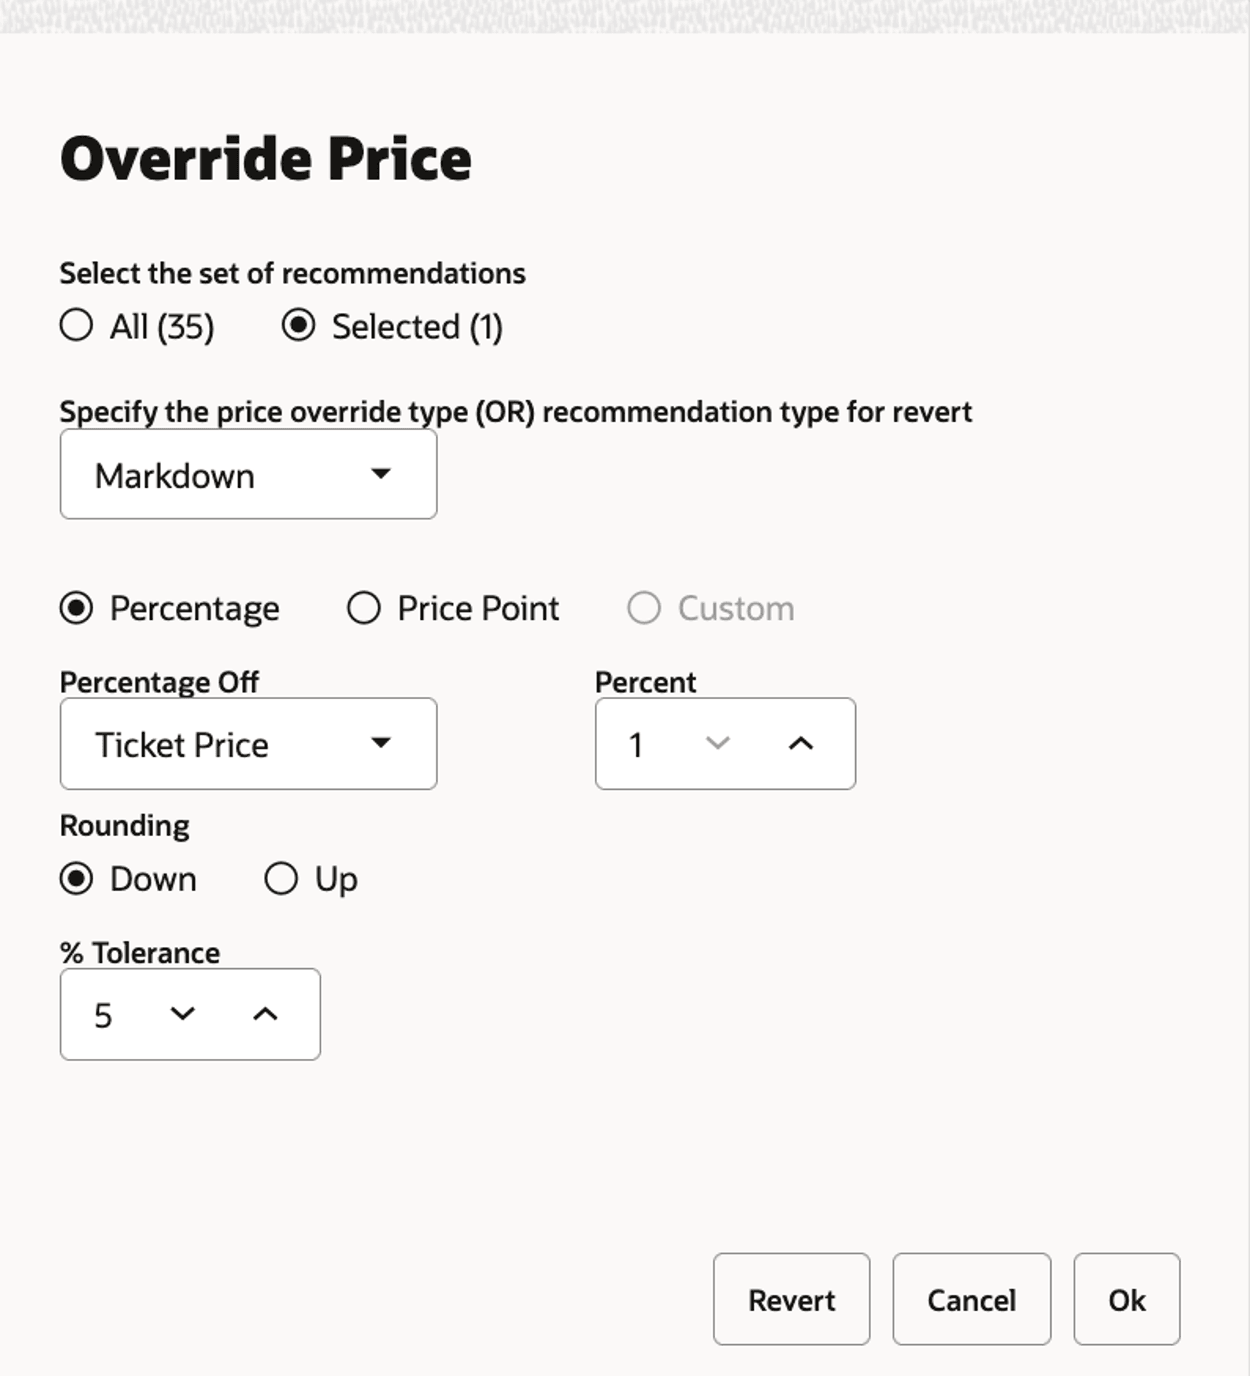
Description of "Figure 7-18 Manage LPO Recommendations - Override Price Percentage"
Figure 7-19 Manage LPO Recommendations - Manage Override Price for Price Point
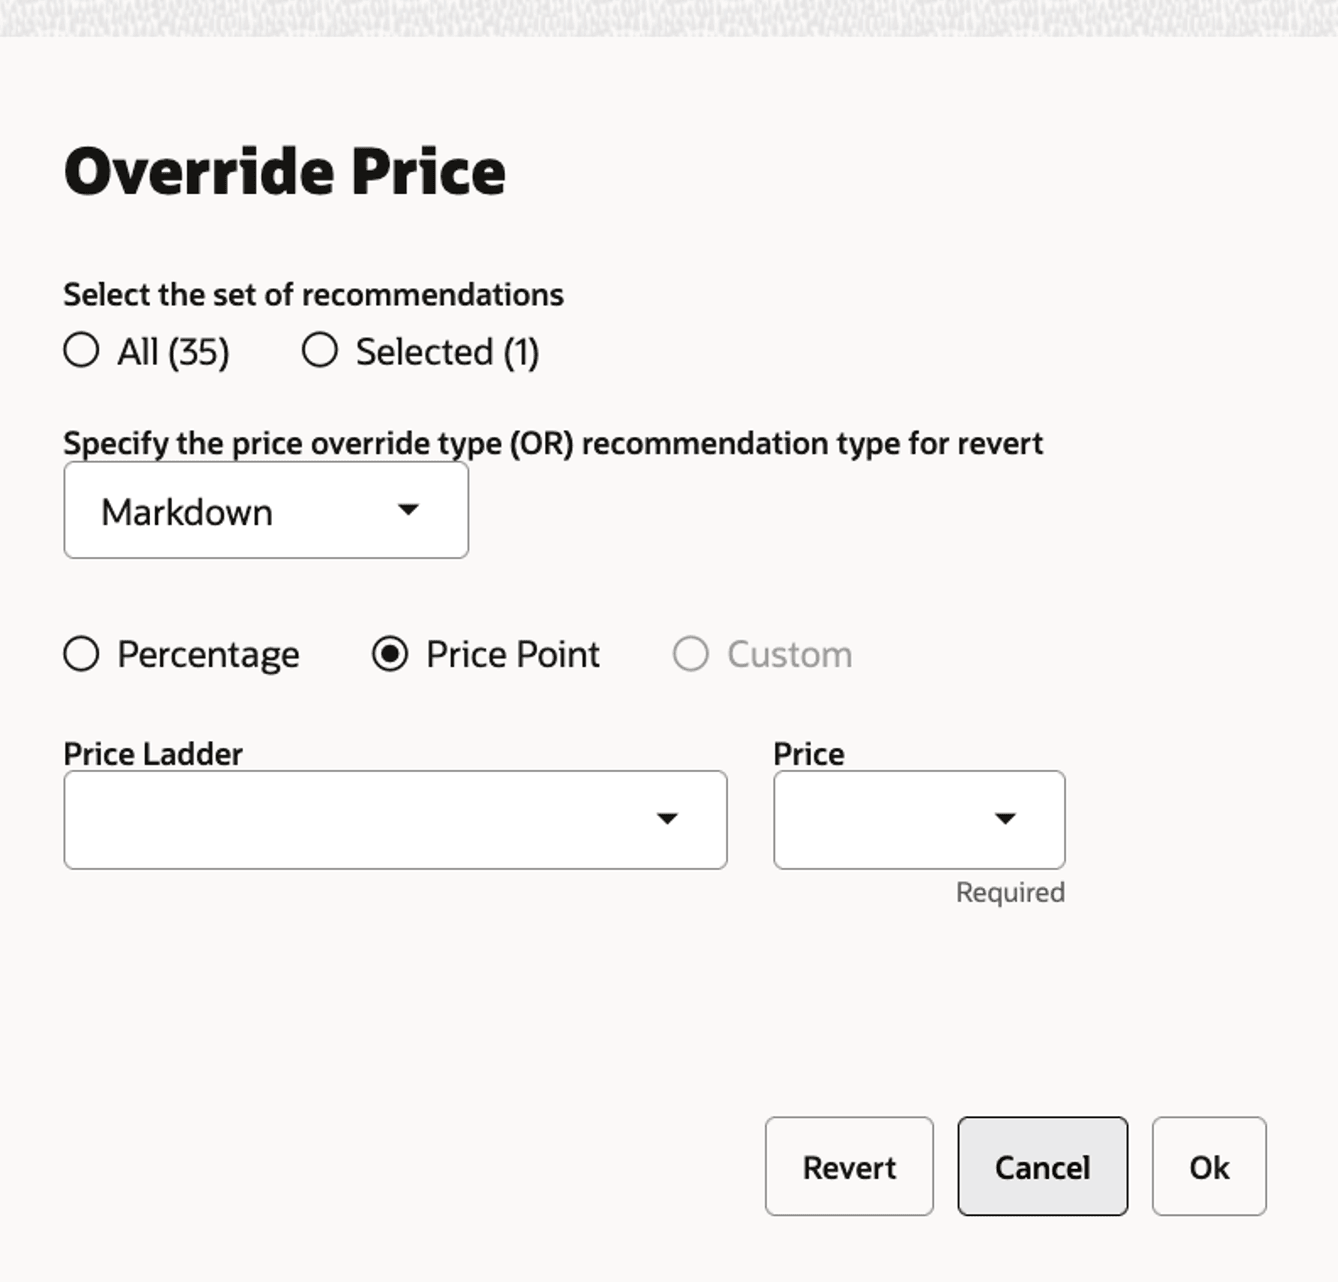
Description of "Figure 7-19 Manage LPO Recommendations - Manage Override Price for Price Point"
Date Override
Date Override is used to adjust the effective start and end dates for a promotion or the effective start date for a markdown recommendation. You can select the recommendations that are in Ready for Review status and click Date Override, which displays the Override Effective Dates screen, as shown in the following figure. You can select Price Type and then pick the corresponding dates from the date picker. The Price Type can be either Promotion or Markdown.
The Promo Bdgt Used and Mkdn Bdgt Used values are updated respectively after the recalculation, which reflects projected sales from the current date to the newly selected effective date. This behavior can be controlled using the configuration parameter PRO_DATE_OVERRIDE_RECALCULATE, where Y enables adjustment and N (the default) leaves the value unchanged.
Figure 7-20 Manage LPO Recommendations - Date Override
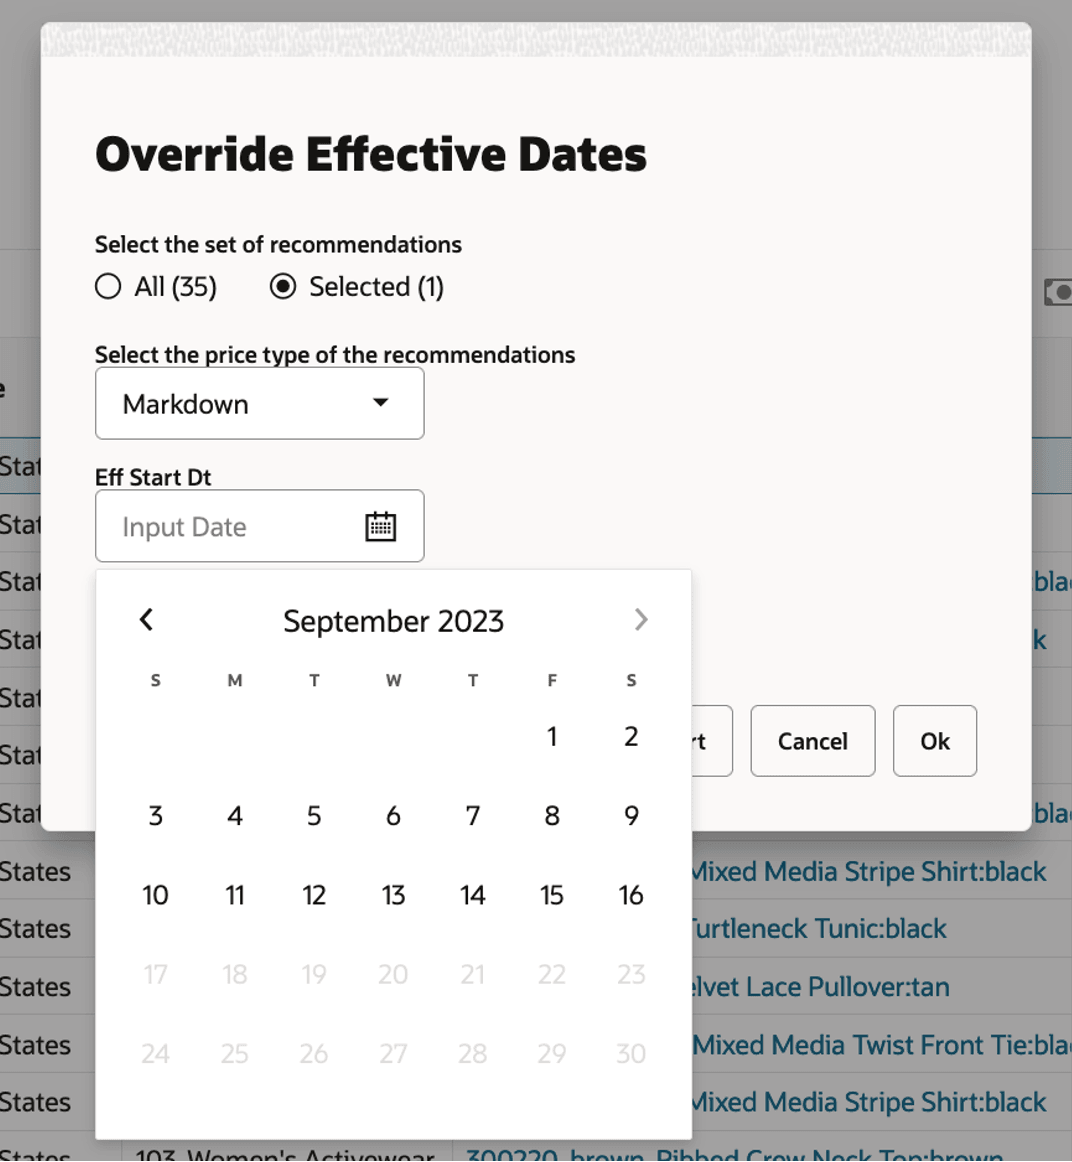
Description of "Figure 7-20 Manage LPO Recommendations - Date Override"
If you wanted to modify the effective start date for a Markdown recommendation, but accidentally selected both Promotion and Markdown recommendations, after the Date Override operation, the system will update only the effective start date, and the budget used value only for Markdown. Successful date overrides are shown with a green check mark and a recalculate icon; the latter indicates that this item must be submitted for a recalculation in order to adjust the projected metrics due to the date override.
Accept or Reject
Accept or Reject can be used to accept or reject the recommended price. Accept means that recommended price will be used for that item. Reject means that the item will be kept at its current ticket price. Accept or Reject operations can only be performed on items that do not have a Recalculate pending icon and are in Ready for Review status only; otherwise, it throws an error as shown in the following figures.
Figure 7-21 Manage LPO Recommendations - Accept/Reject Recommendation
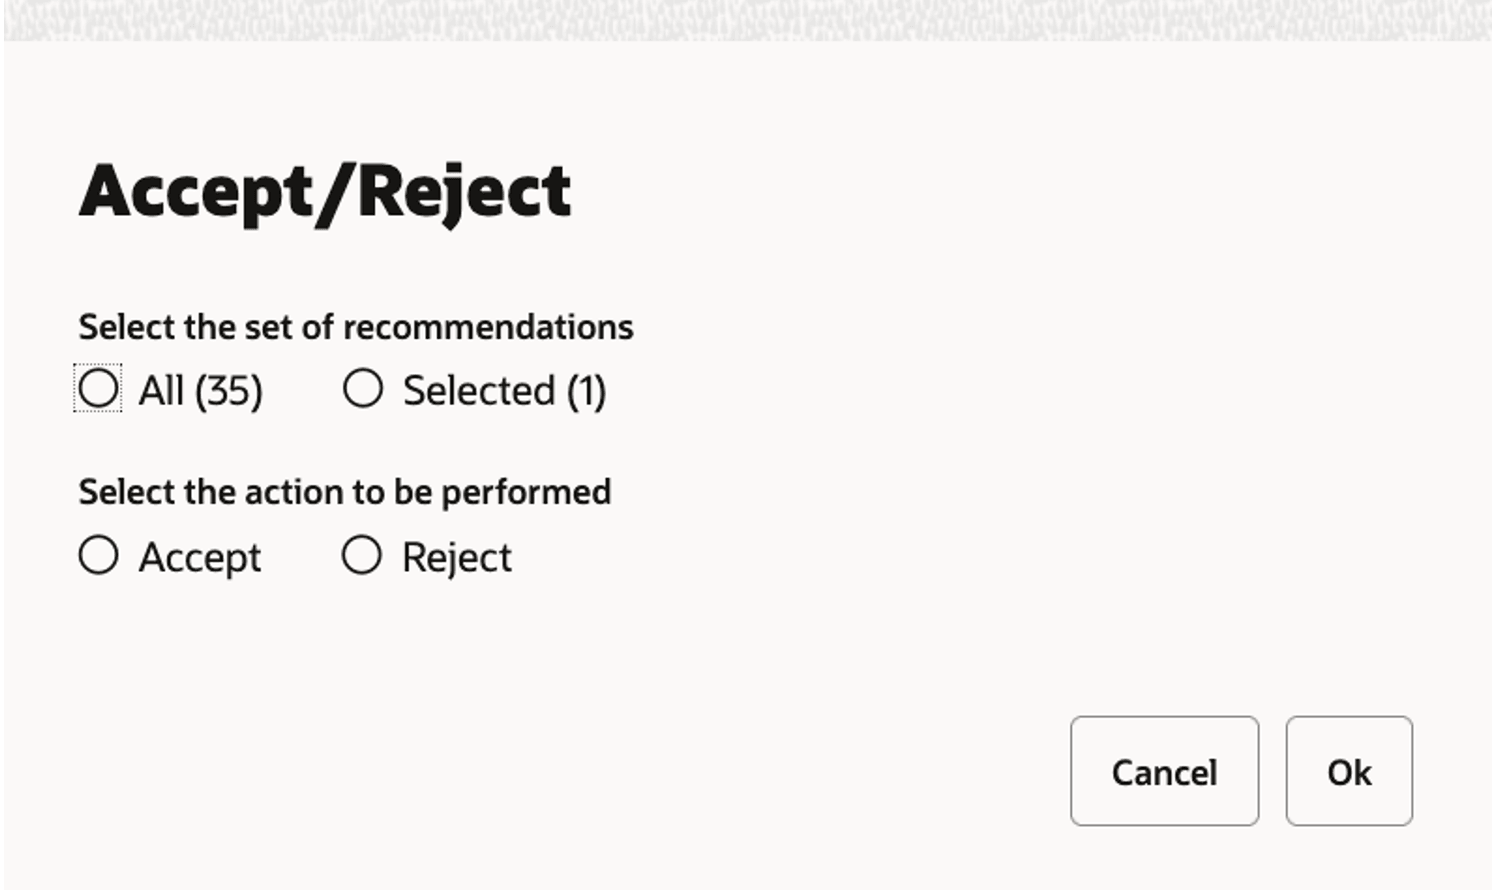
Description of "Figure 7-21 Manage LPO Recommendations - Accept/Reject Recommendation"
Figure 7-22 Manage LPO Recommendations - Reject Recommendation Error
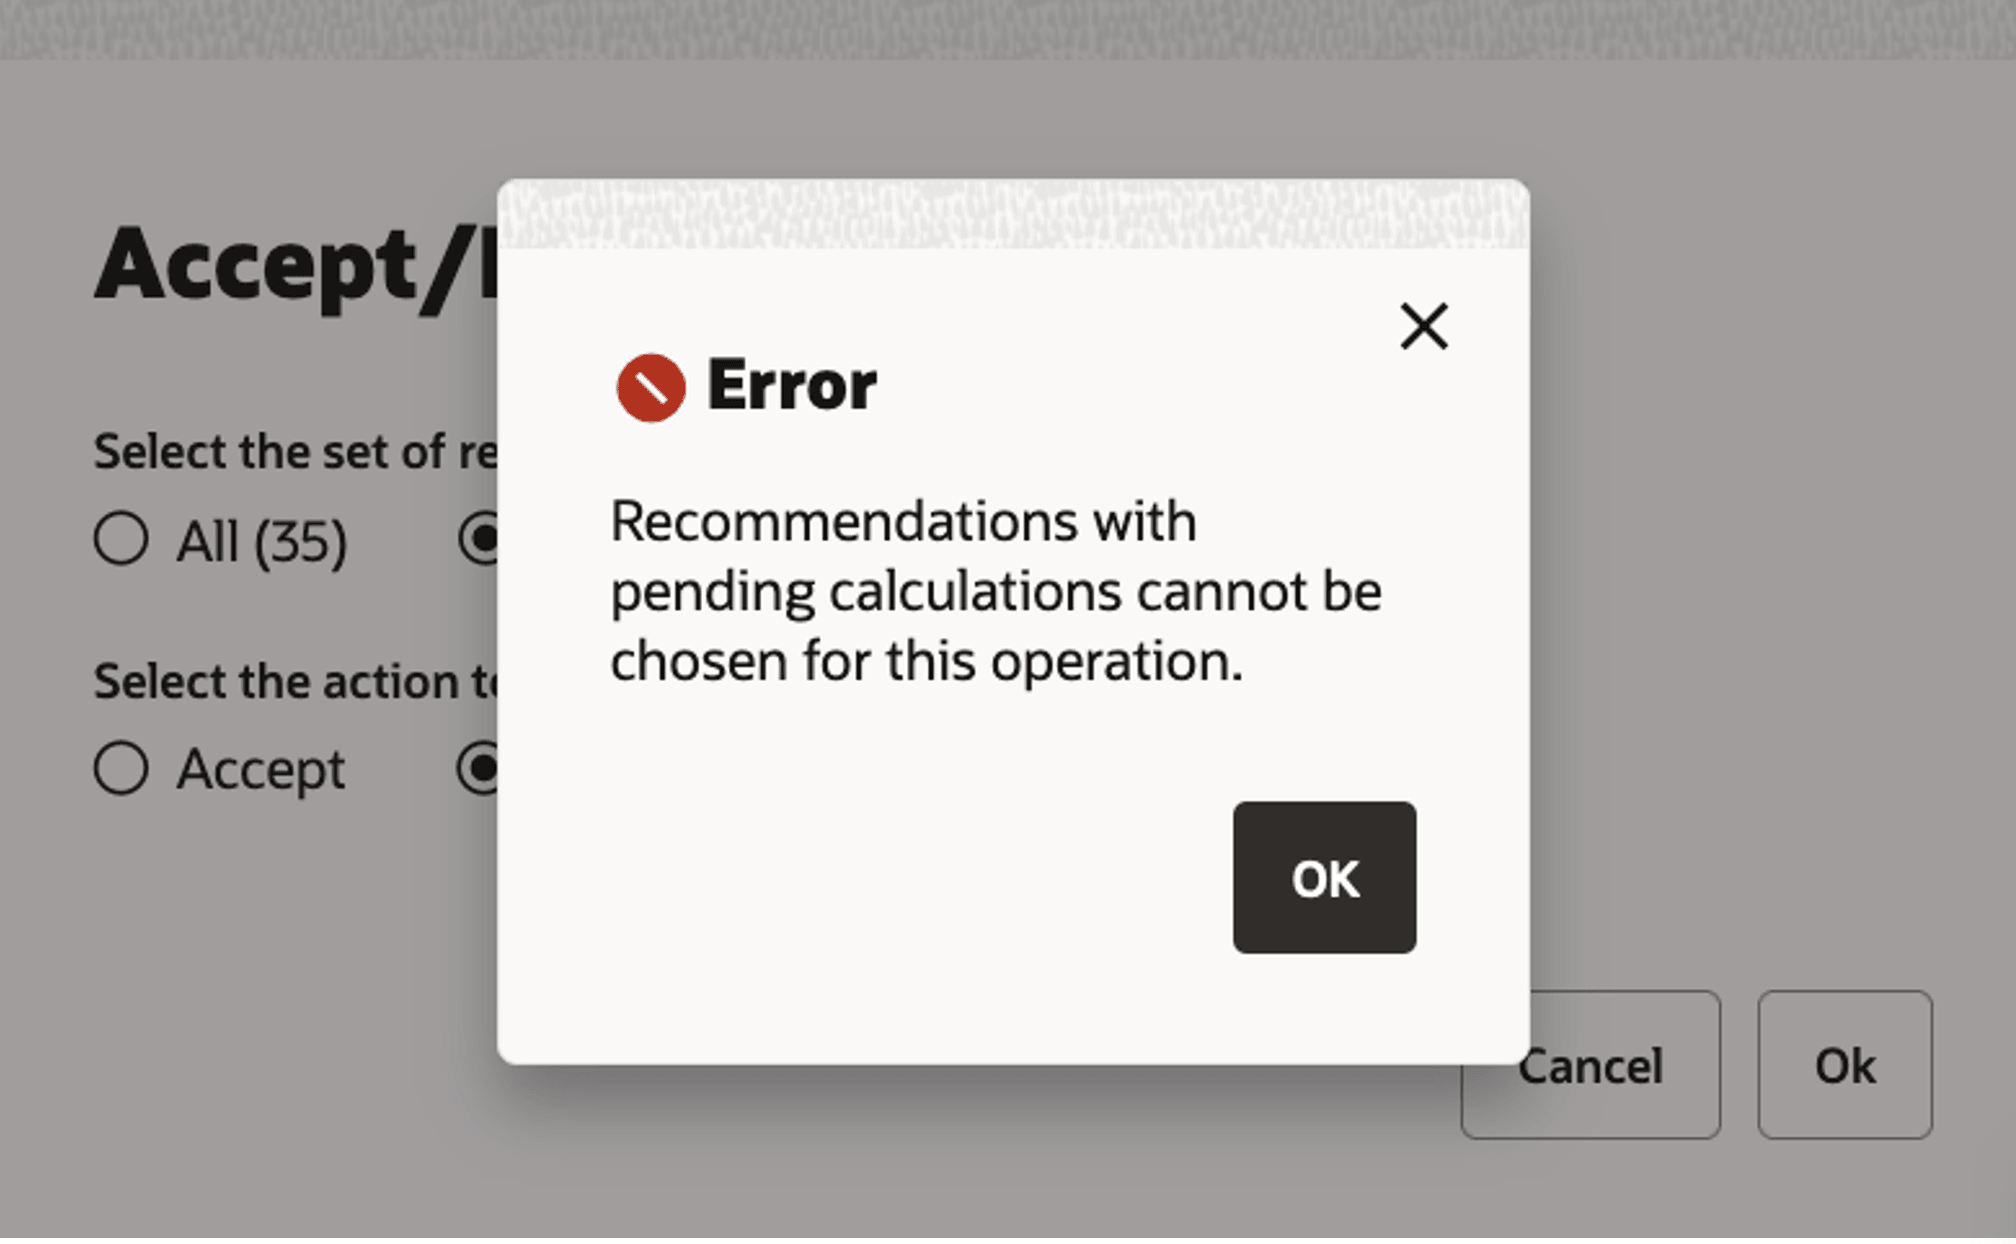
Description of "Figure 7-22 Manage LPO Recommendations - Reject Recommendation Error"
Figure 7-23 Manage LPO Recommendations - Accept Recommendation Error
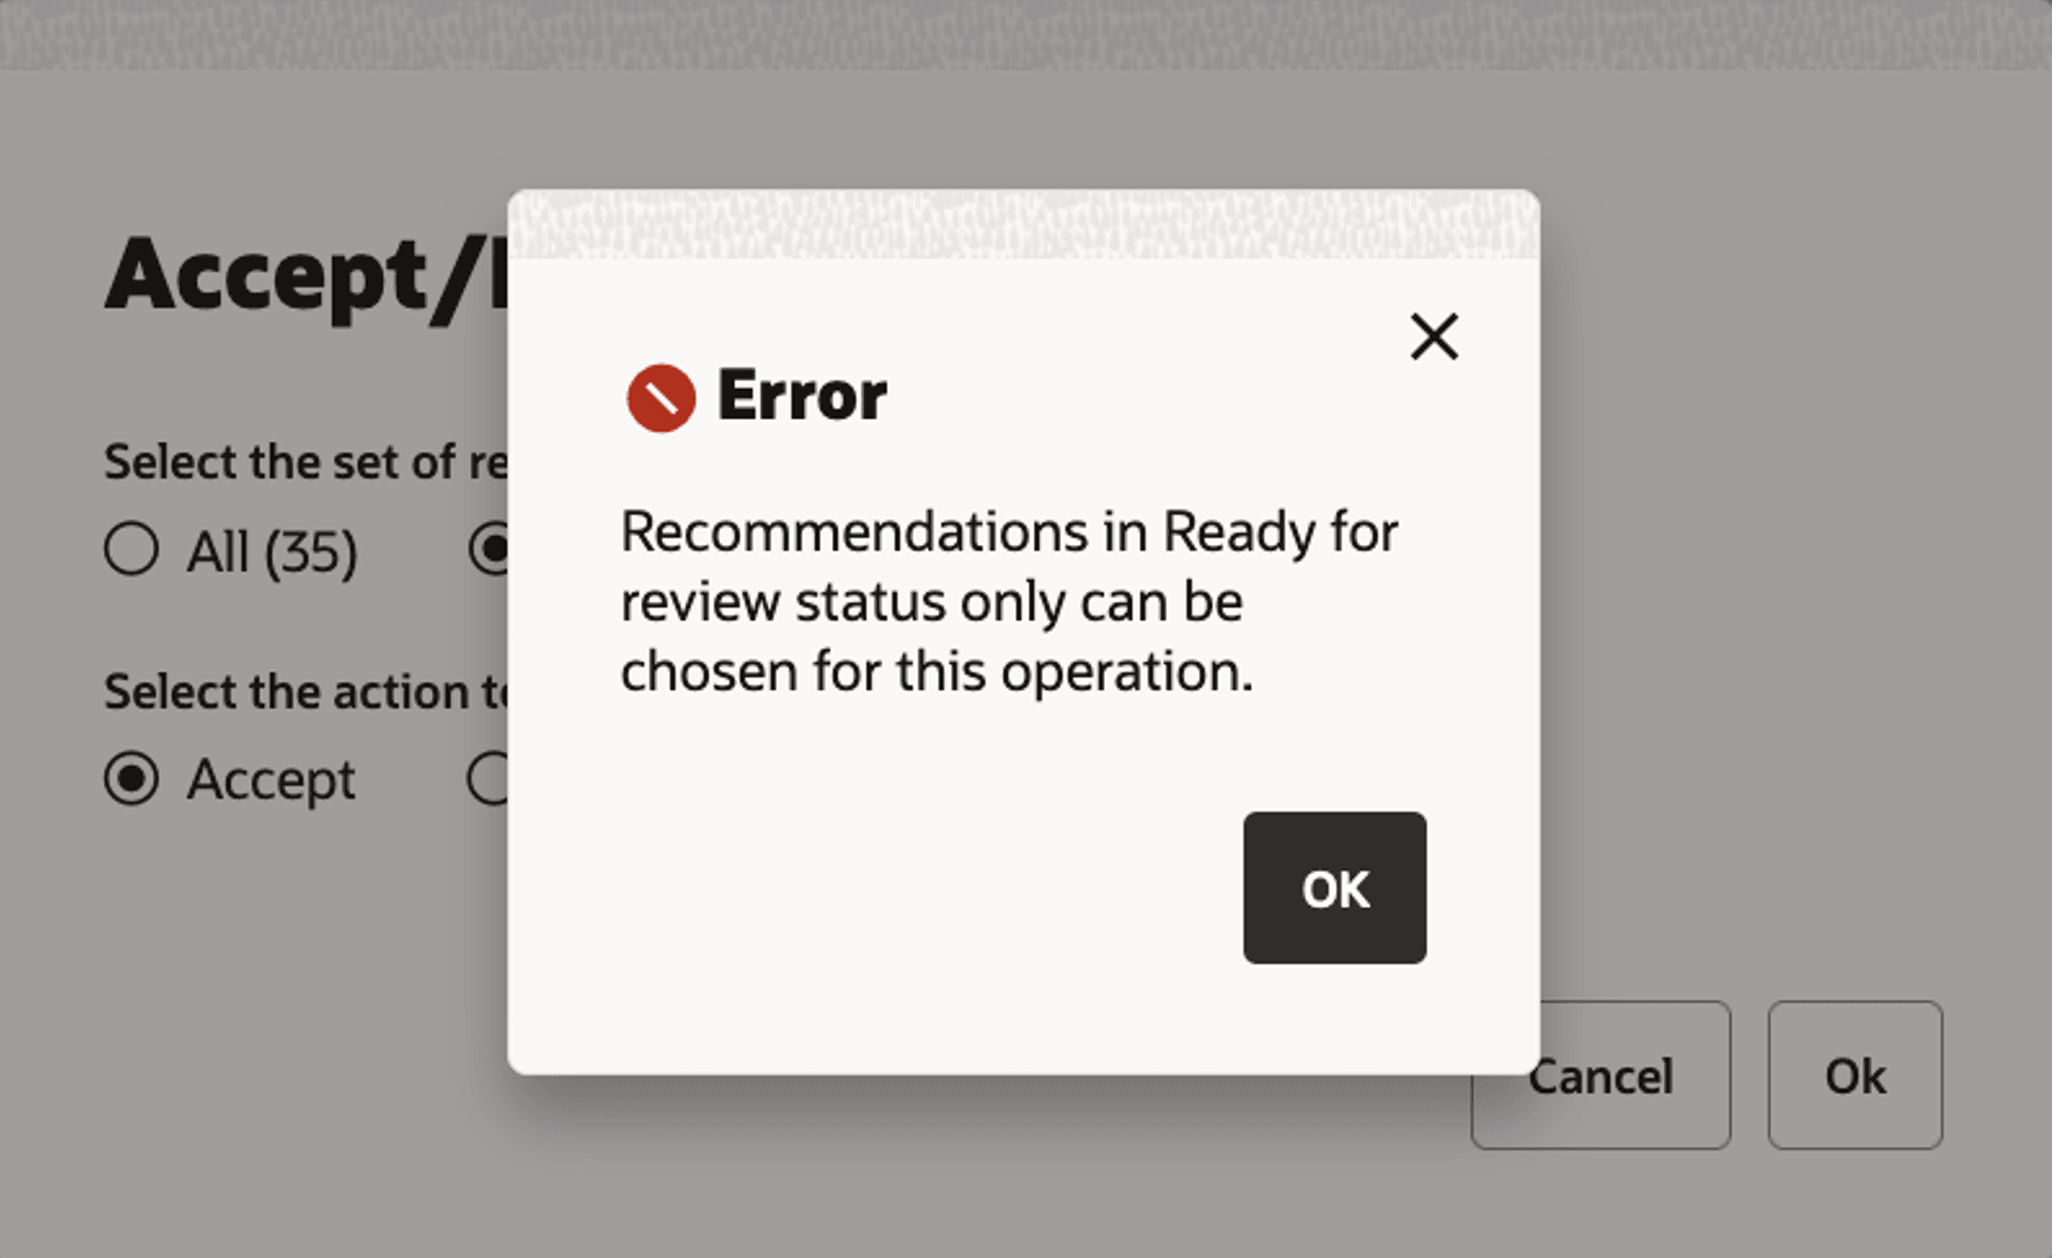
Recalculate
After the price or date override is completed, clicking Recalculate recalculates all of the projected metrics, based on the overrides. A confirmation message is displayed once the button is clicked, and the projected metrics override is performed.
Custom Budget
The Custom Budget functionality allows you to select recommendations that meet a specified budget for a defined time frame. For example, you might know the markdown budget for only the effective period or for the next two months and want the system to pick recommendations that fit within these parameters. Users are not required to select recommendations manually; instead, the operation considers all items that satisfy the criteria specified in the User Filter.
Clicking Custom Budget opens the Custom Optimize to Budget screen, where you can specify a budget for promotions and markdowns (either together or separately), set the time frame, select your optimization objective, and choose whether to retain any work previously performed on recommendations.
To improve user experience, your selections for checkboxes—including Retain Overridden Promotions, Retain Overridden Markdowns, Include Planned Promotions, Retain Approved, Retain Reviewed, Retain Submitted, and Separate Budgets—are automatically saved and restored each time you access the Custom Budget window, even after actions such as Revert or Optimize. This ensures that your preferences are consistently applied across sessions and helps streamline your workflow.
The Revert option lets you reset prices back to the batch recommendations.
Figure 7-24 Manage LPO Recommendations - Custom Optimize to Budget
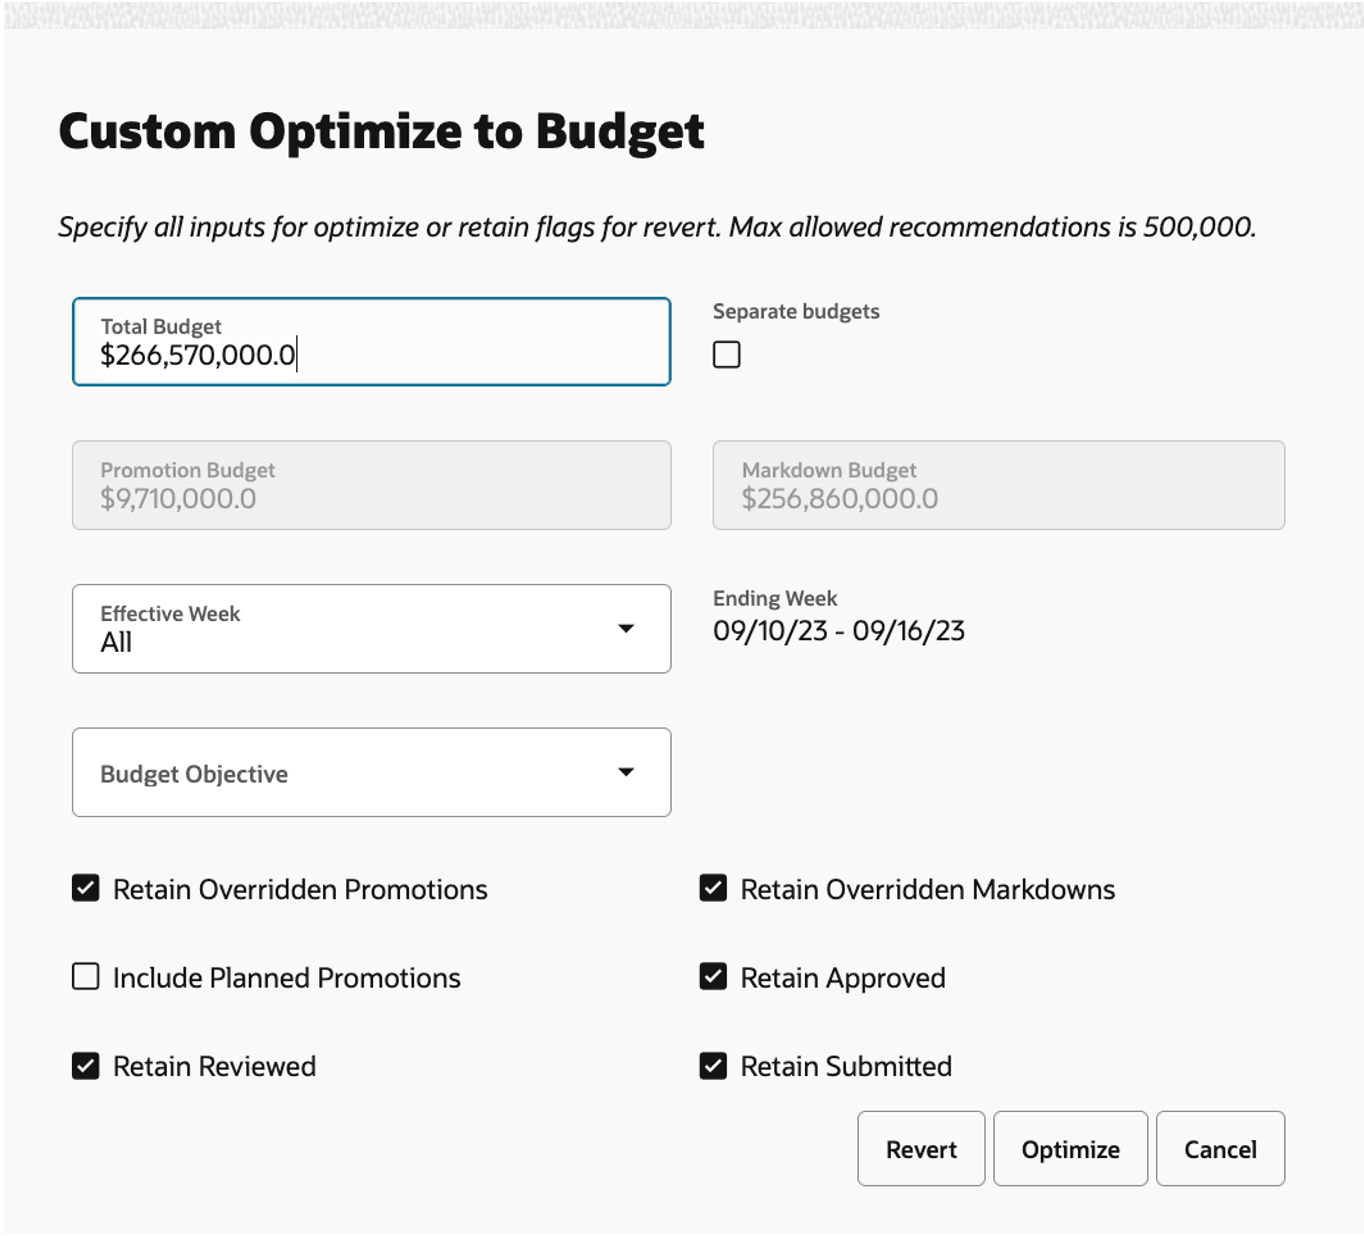
Description of "Figure 7-24 Manage LPO Recommendations - Custom Optimize to Budget"
When you select Reset or Optimize, the custom budget optimization job is submitted, and a push notification is sent to you to indicate the status of this job. It can be one of the following:
-
Custom Budget Reset was successful.
-
The Custom Budget Optimization was successful.
-
Budget needed (1,234,567) for all retained items exceeds the specified Total Budget.
-
Budget needed (1,234,567) for all retained items exceeds the specified Promotion Budget.
-
Budget needed (1,234,567) for all retained items exceeds the specified Markdown Budget.
-
The Custom Budget operation encountered a system error.
Figure 7-25 Manage LPO Recommendations - Custom Budget Notifications
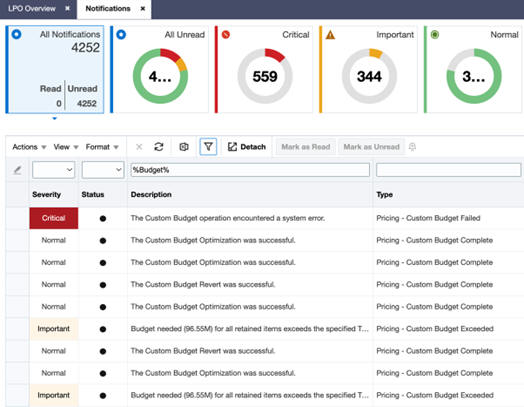
Description of "Figure 7-25 Manage LPO Recommendations - Custom Budget Notifications"
Pivot Table
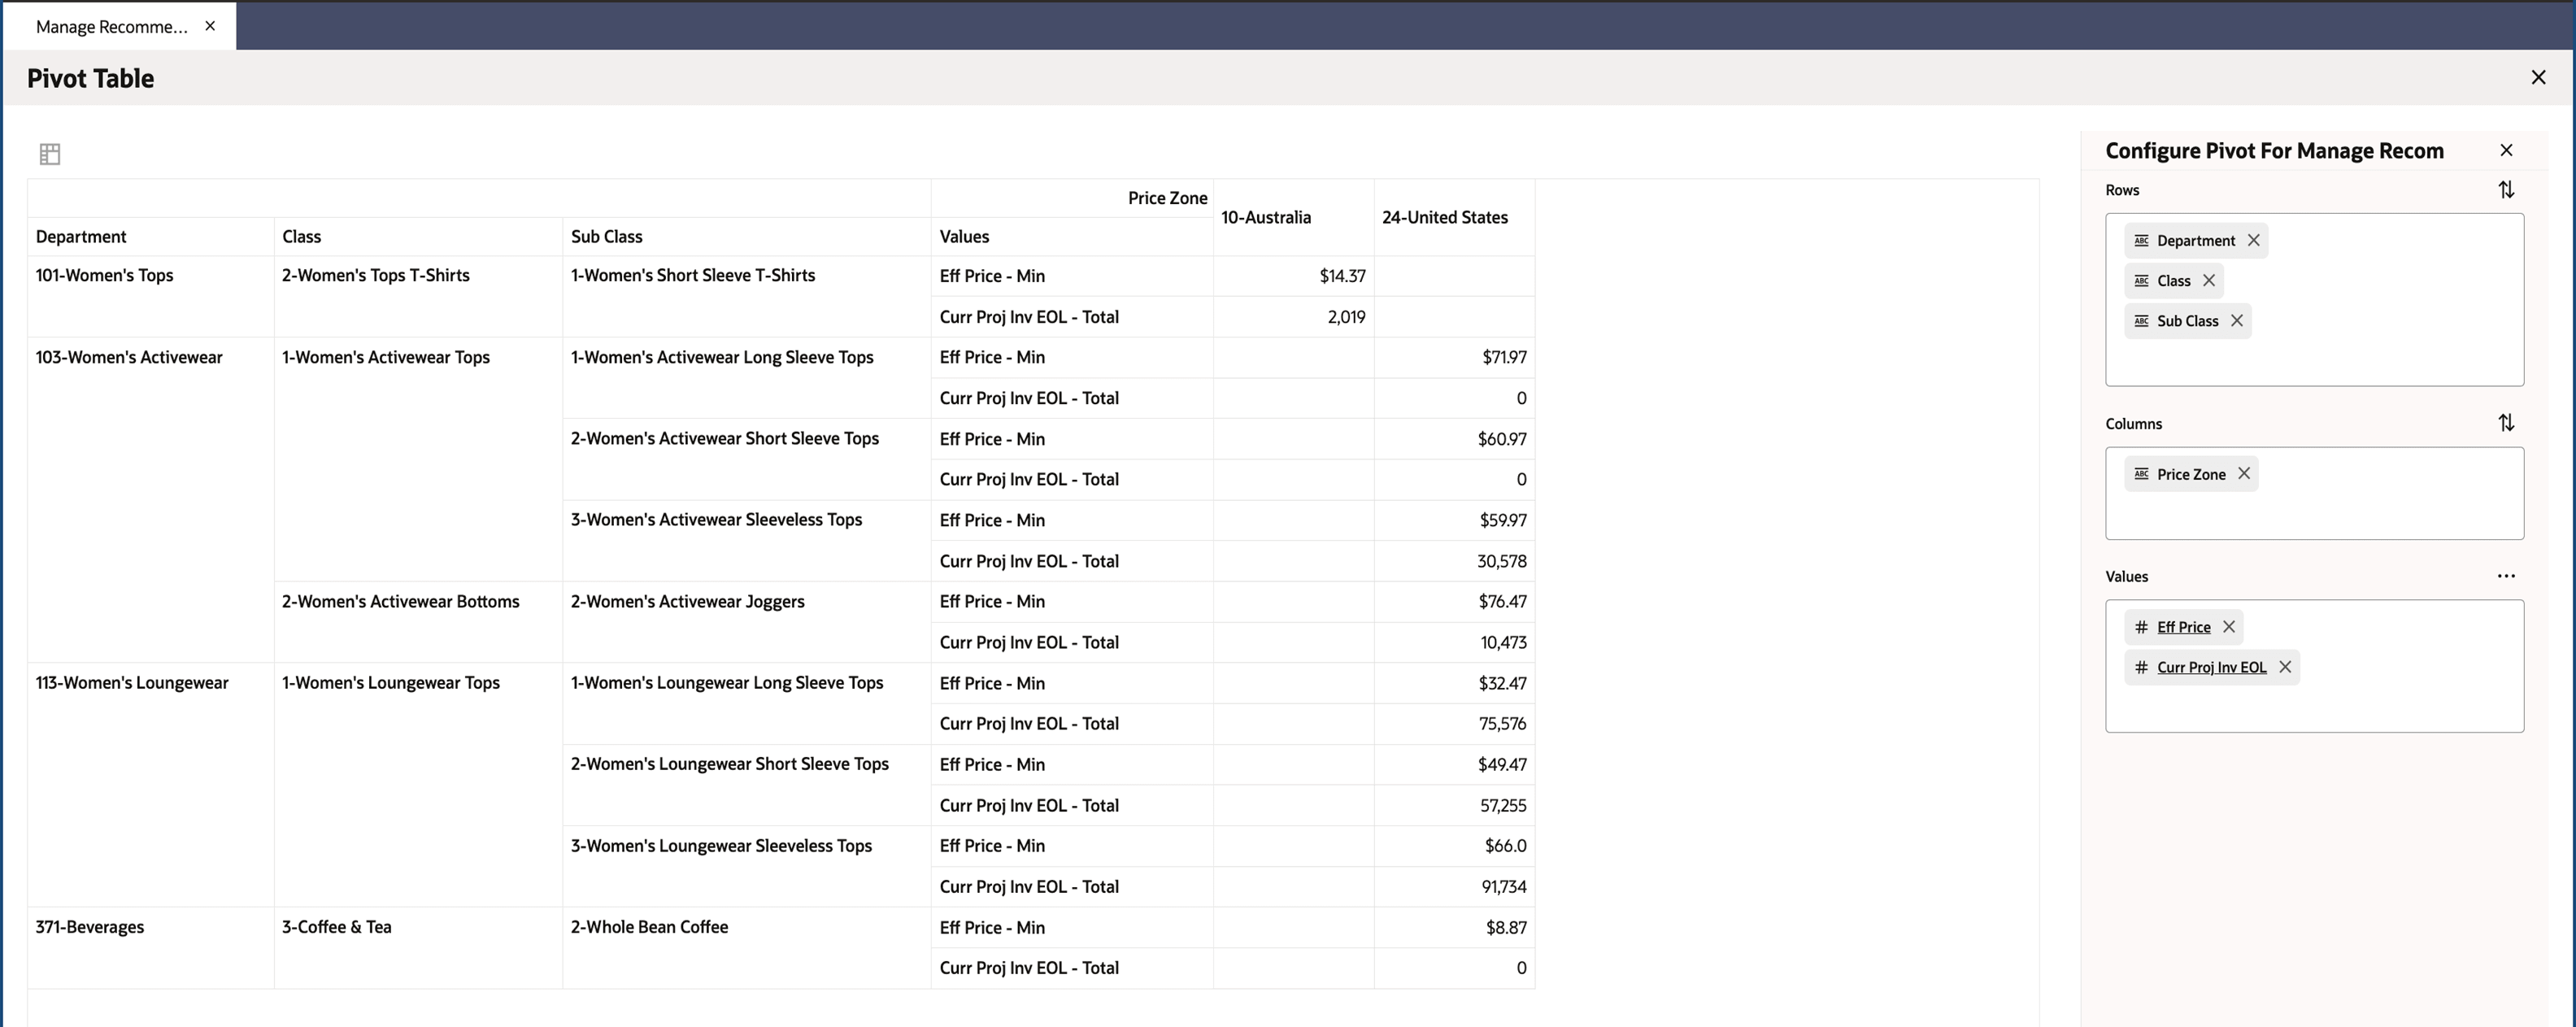
Pivot table functionality enables you to quickly summarize, analyze, and visualize recommendation data from multiple perspectives. You can easily configure rows, columns, and values such as Departments, Class, Sub Class, Price Zones, and key metrics (for example, Recommended Price, Total Inventory, and so on) using a flexible drag-and-drop interface. The Pivot Table can be accessed by selecting the Pivot option from the Actions menu in the Manage LPO Recommendations table.
The configured pivot table also can be retrieved for later use.
Figure 7-26 Manage LPO Recommendations - Pivot Table
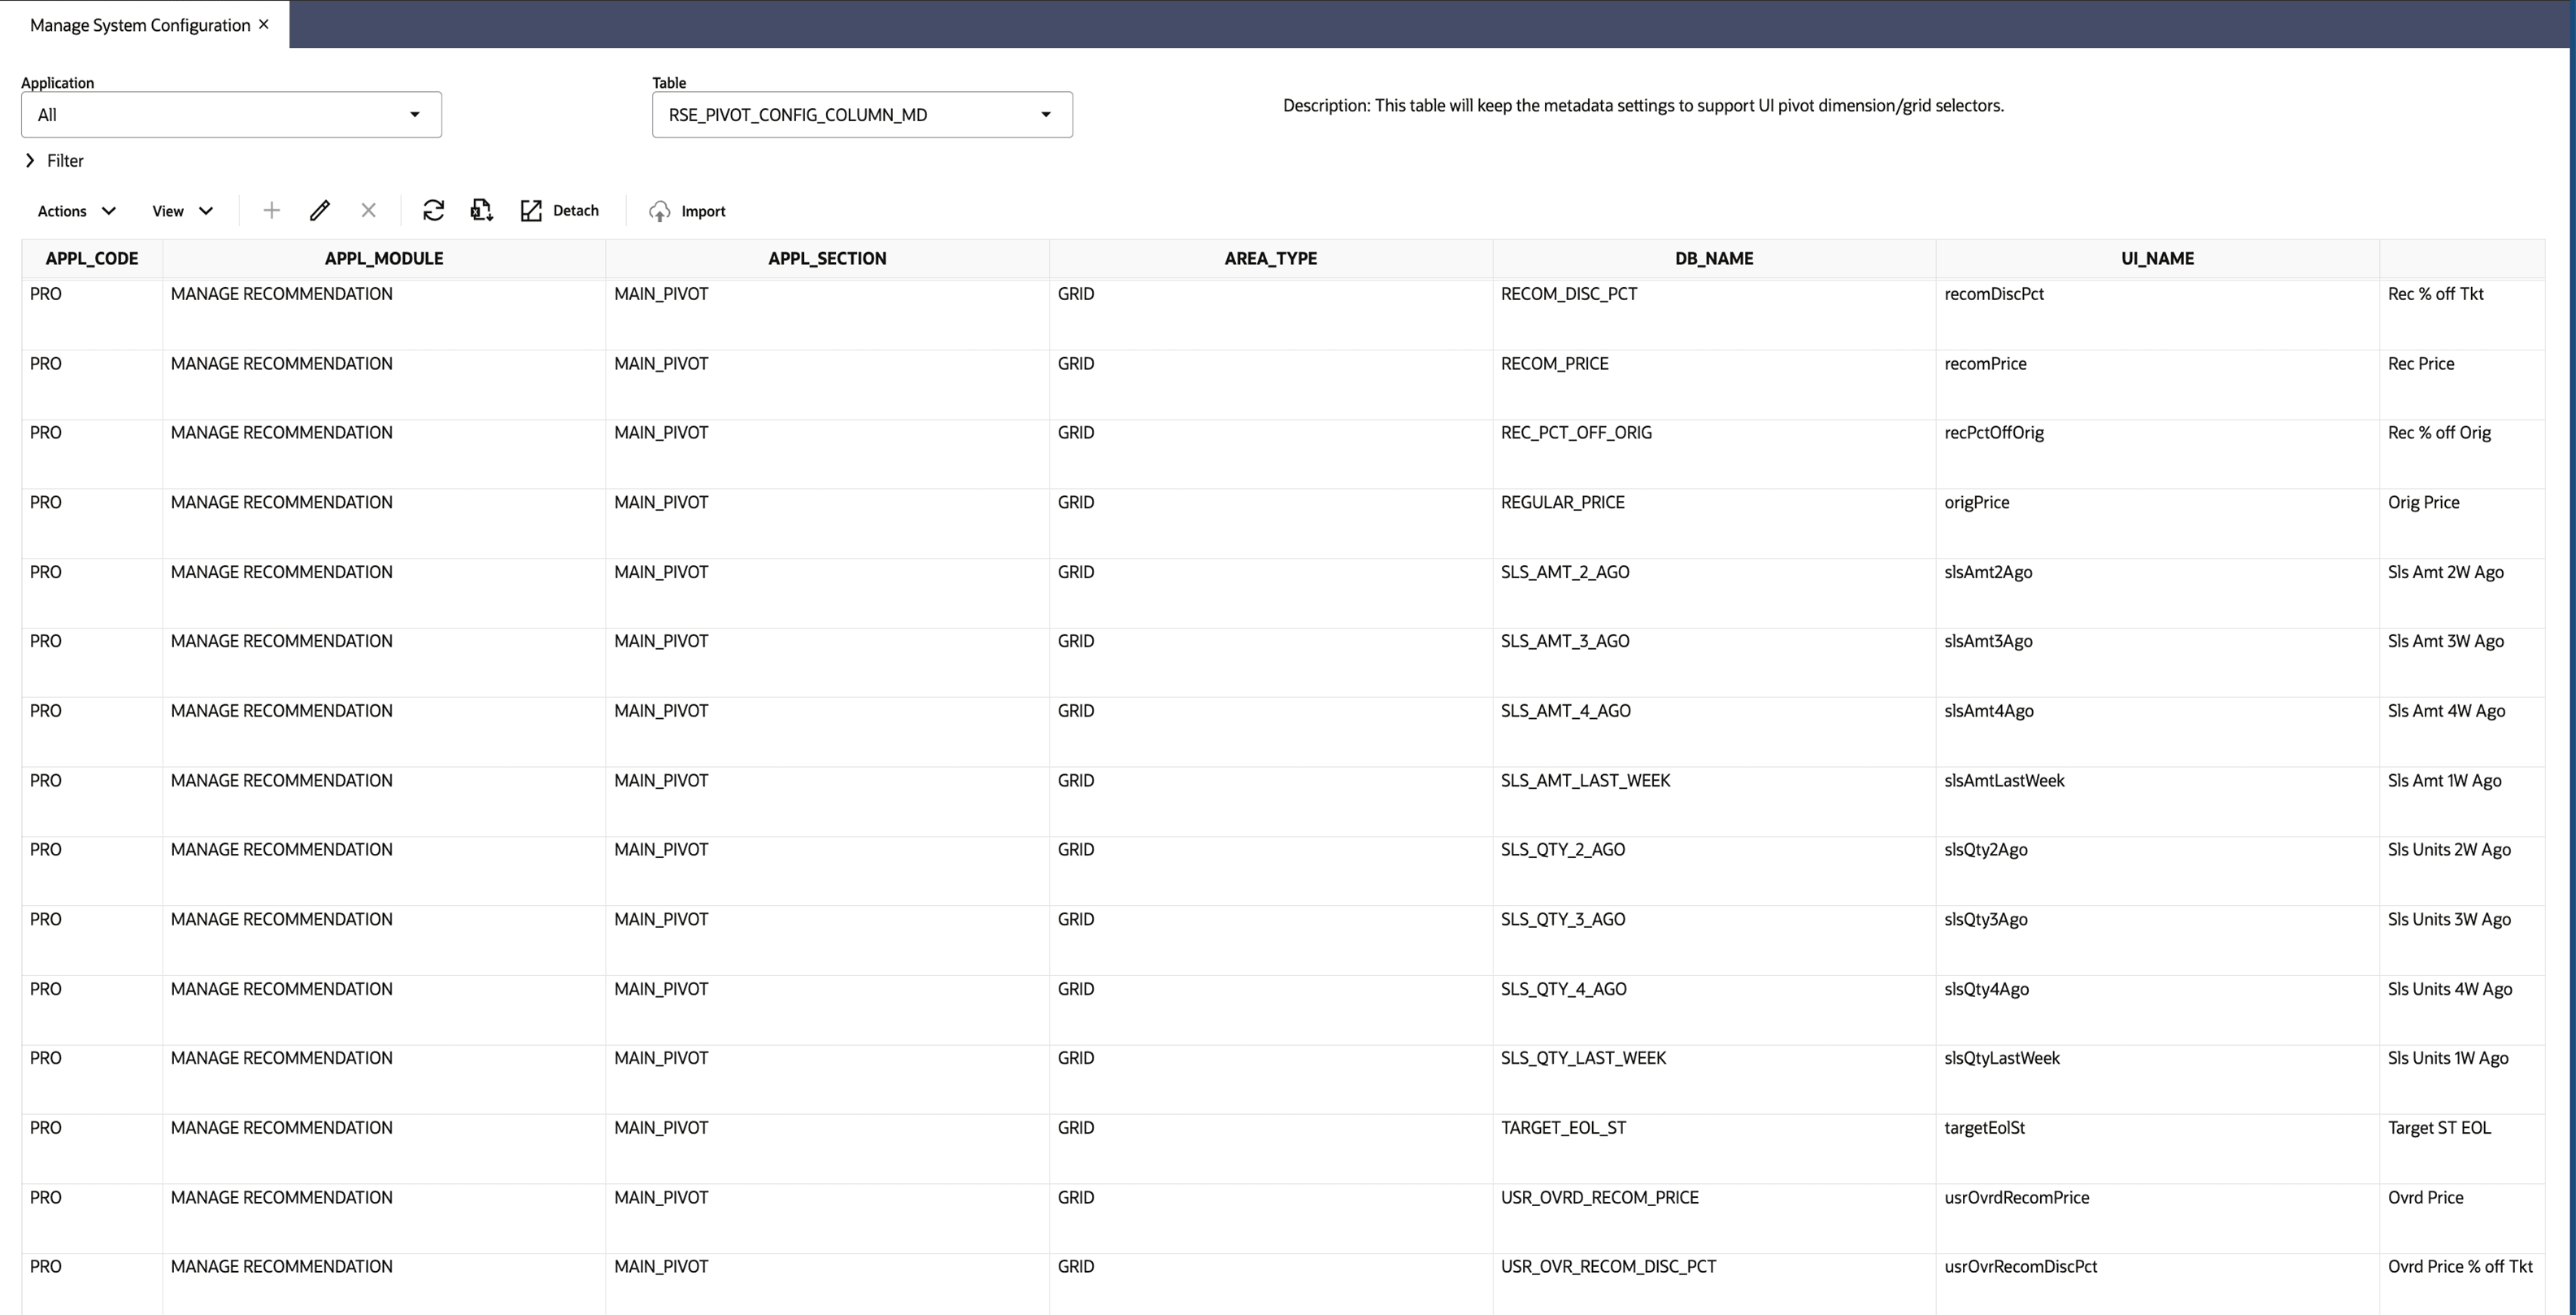
Users can specify which columns are available for pivoting and select aggregation options
through the metadata table RSE_PIVOT_CONFIG_COLUMN_MD. These settings
are managed through Manage System Configurations.
Figure 7-27 Manage LPO Recommendations - Pivot Table Configuration
Computed Columns
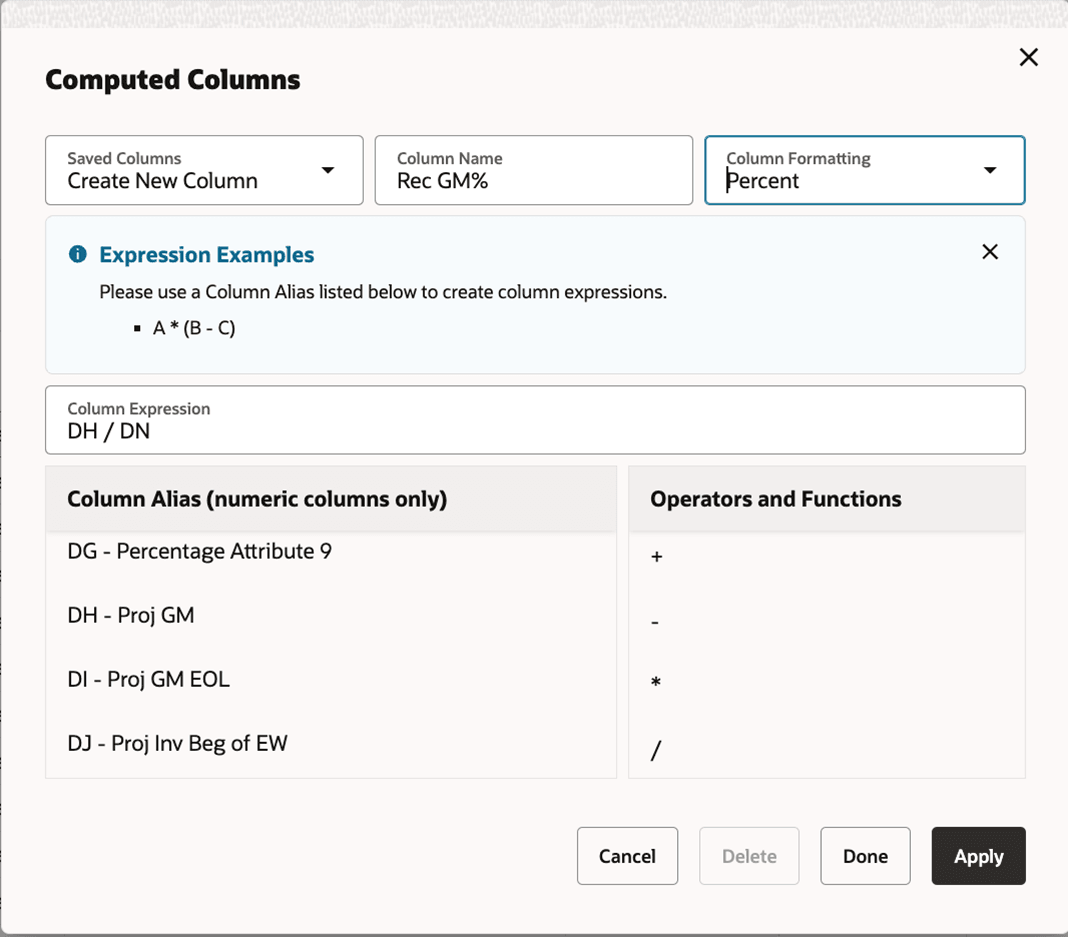
You can define custom calculations, such as “Rec GM % = Proj Gross Margin $/Proj Sales $” using available data fields and have these metrics displayed in your workspace for actionable insights. To add a custom calculated metric, select Computed Columns from the View Menu in the Manage Recommendations table and create a new column with your chosen expression.
Figure 7-28 Manage LPO Recommendations - Computed Columns
Update Note
Figure 7-29 Manage LPO Recommendations - Update Note
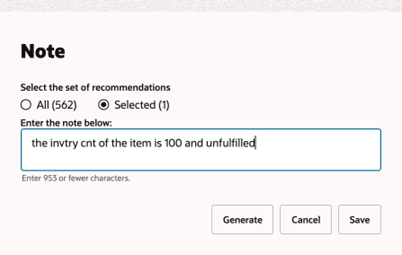
Figure 7-30 Manage LPO Recommendations - Update Note Generate
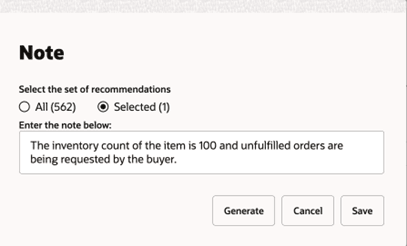
Finish
Clicking Finish in the footer allows the user to Review/Submit/Approve the item recommendation for selected items or all items.
Once the review of recommendations is complete by a user with the role of Analyst or Super User, the user can select the recommendations (items) and click Review. All reviewed recommendations are sent to the user with the Buyer role for Submit or Approve operations.
Figure 7-31 Manage LPO Recommendations - Finish
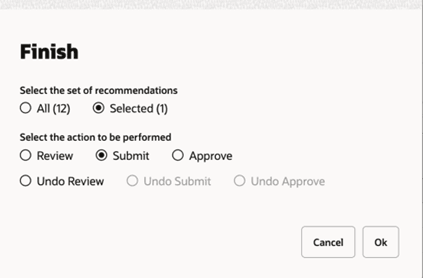
Select the action to be performed:
-
Review
Once the review of recommendations is complete by a user with the role of Analyst or Super User, the user can select the recommendations (items) and click Review. All reviewed recommendations are sent to the user with the Buyer role for Submit or Approve operations.
-
Submit or Approve
A user with the Buyer role can Submit or Approve recommendations. An item that is in Reviewed status can only be Submitted or Approved; otherwise, it throws an error, as shown in the following figures.
Figure 7-32 Manage LPO Recommendations - Finish Reviewed and Export Failed Status
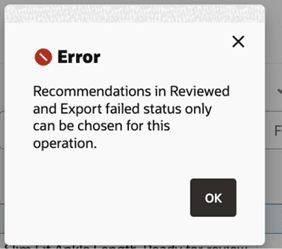
When you want to make further changes to the recommendations, you have the option to select the recommendations and click Undo Review / Undo Submit / Undo Approve, which will revert the recommendation status to Ready for Review.
Export
Once the recommendation has been Submitted or Approved, the recommendation goes to the export view and will be available for exporting as a flat file. When integrated with Oracle Pricing Cloud Service, the web service request is initiated when the user clicks the Approve or Submit button. There are two options for flat files, one at the STORE-level and another at the recommendation level on the location or price zone dimension, depending on the parameter (store or zone) specified for the export job. Export data is available in these views: PRO_PRICE_RECOM_INT_VW (store-level), PRO_PRICE_RECOM_LVL_INT_VW OR PRO_REG_PRICE_RECOM_INT_VW (store-level), and PRO_REG_PRICE_RECOM_LVL_INT_VW.
