3 Transfers
Transfers are an inventory transaction that moves one or more items from one location to another. In some cases, transfers can also be created to pass through a finisher location to have activities performed on the items being transferred, such as ticketing, re-packing, or item transformations.
Create a Transfer
To create a transfer:
-
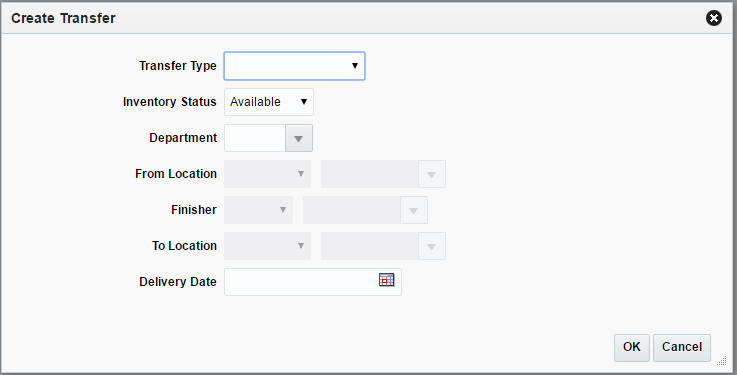
From the Tasks menu, select Inventory > Transfers > Create Transfer. The Create Transfer pop-up appears.
Figure 3-1 Create Transfer Pop-up
-
In the Transfer Type field select the type of transfer. The options are: Administrative, Book Transfer, Confirmation, Intercompany, Manual Requisition, Reallocation Transfer, and Return to Vendor.
-
In the Inventory Status field, select the inventory status. The options are: Available and Unavailable.
-
In the Department field, enter, select or search for the department from which the items will be transferred. If items from multiple departments are to be transferred, then leave this blank.
-
In the From Location field, select Store or Warehouse. Then enter, select or search for the location.
-
In the Finisher field, select either Internal or External option. Enter, select or search for the finisher ID, if the transfer will pass through a finisher.
Note:
Finishers are required for transfer that will have work orders, transformations, or packaging instructions.
-
In the To Location field, select Store or Warehouse. Then enter, select or search for the location.
-
In the Delivery Date field, enter the earliest date that the transfer can be delivered to the store or warehouse or use the Calendar icon to select a date.
-
Click OK to save any changes. The Transfer page appears.
-
Click Cancel to return to the Tasks menu without saving changes.
Transfer Header
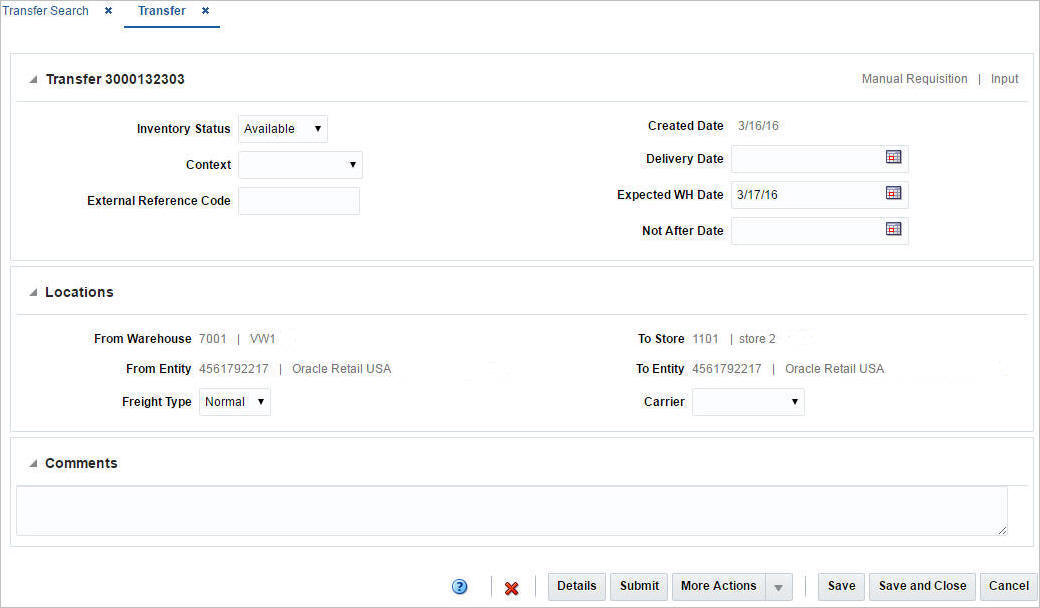
Once a transfer is created, the Transfer page appears. The Transfer page allows you to enter additional information about the transfer.
Figure 3-2 Transfer Page
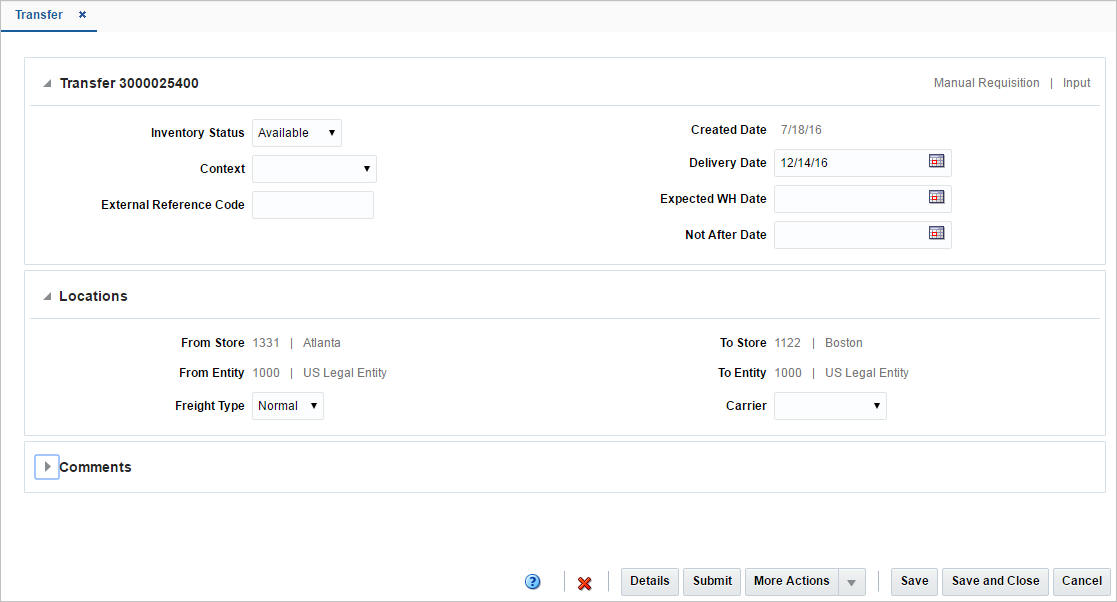
Table 3-1 Transfer Header - Fields and Description
| Fields | Description |
|---|---|
|
Title |
The title displays the Transfer ID to the top left of the header. The Transfer Type and Status is displayed at the top right of the header. |
|
Department |
This field displays the department ID and the department. |
|
Inventory Status |
This field displays inventory status. The options are Available and Unavailable. |
|
Context |
Select the context from the list. The options are: Promotion, Customer Transfer, Store Requisition, and Repairing. |
|
External Reference Number |
Enter the external reference number. This can be used to specify audit trail reference to external system when an external transaction initiates master record creation in Merchandising. |
|
Created Date |
This field displays the date on which the transfer was created. |
|
Delivery Date |
The date on which the transfer is expected to be delivered at the location. |
|
Expected WH Date |
The date on which the transfer is expected to be delivered at the warehouse. |
|
Not After Date |
The last day upon which a location can ship the requested merchandise. |
Note:
The Delivery Date, Expected WH Date, and Not After Date fields are editable. However, the remaining fields are displayed based on the information entered in the Create Transfer pop-up.
Locations
The Locations section includes the following fields.
Table 3-2 Locations - Fields and Description
| Field | Description |
|---|---|
|
From Store/Warehouse |
This field displays the ID and description of the source location on the transfer. |
|
From Entity |
This field displays the transfer entity ID and description. |
|
Freight Type |
This field displays the type of freight. The options are: Normal, Expedite, and Hold. |
|
To Store/Warehouse |
This field displays the ID and description of the destination location on the transfer. |
|
To Entity |
This field displays the transfer entity ID and description. |
|
Carrier |
Select the carrier type from the list. |
Transfer - More Actions Menu
Use the More Actions menu to navigate to the following pages. The More Actions menu contains the following options.
Figure 3-3 Transfer - More Actions Menu

Table 3-3 Transfer - More Actions Menu and Description
| Icon/Buttons | Description |
|---|---|
|
Delete Up Charges |
This option allows you to delete all the up charges associated with this transfer permanently. |
|
More Actions |
You can navigate to open the following pages by clicking the More Actions menu:
|
Transfer Details
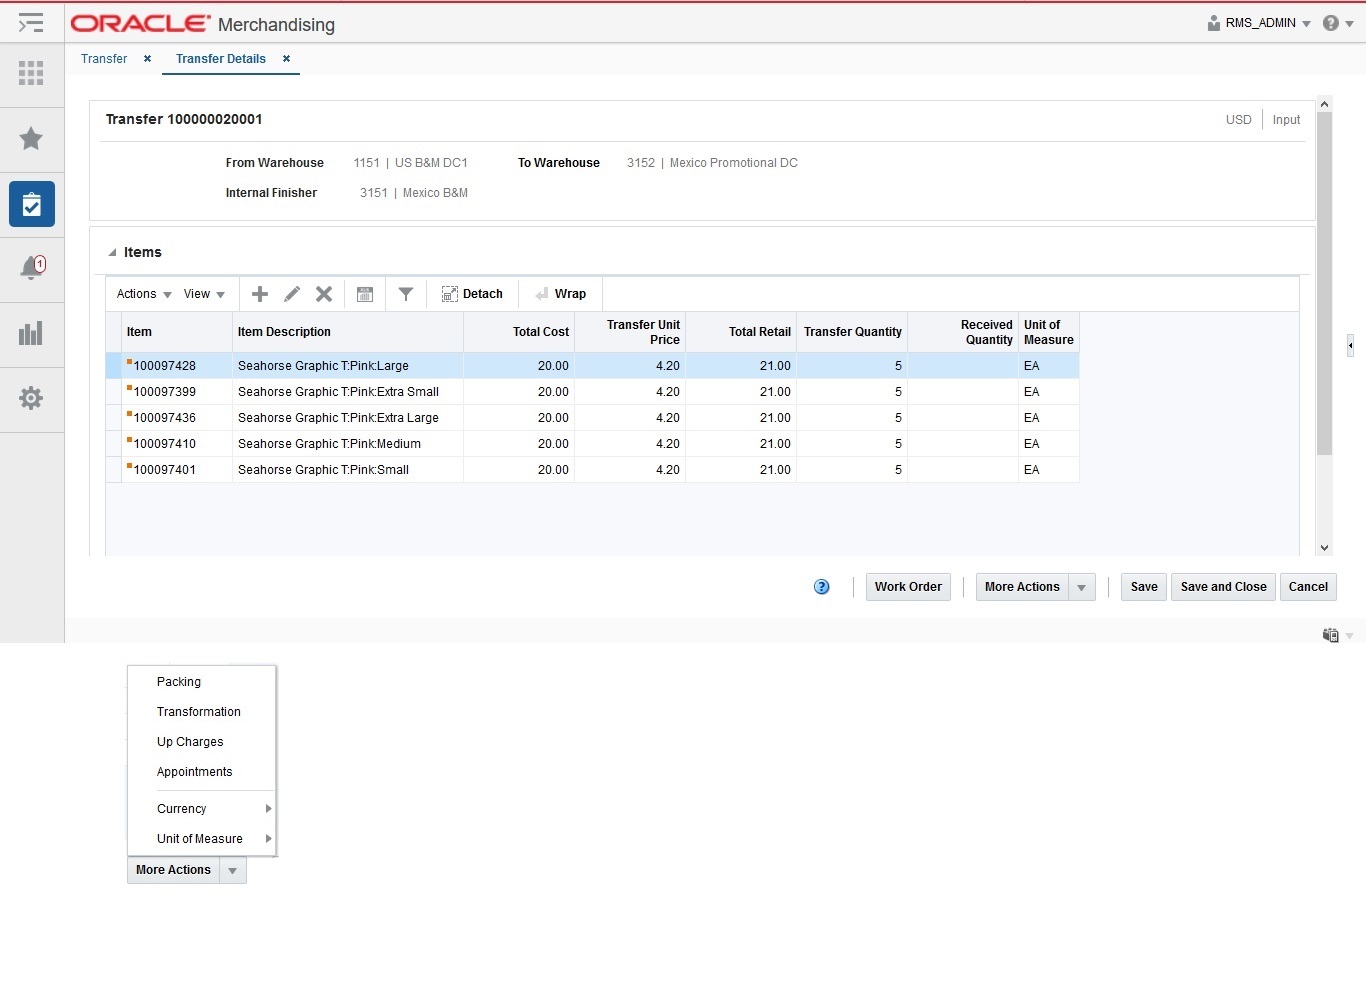
The Transfer Detail page allows users to add the list of items to be transferred.
You can access the Transfer Details page by clicking Details on the Transfer page.
Figure 3-4 Transfer Details Page
Items
In the Items section you can maintain the list of items on the transfer.
Add Items
To add items to a transfer:
-
From the Actions menu, click Add or click the Add icon
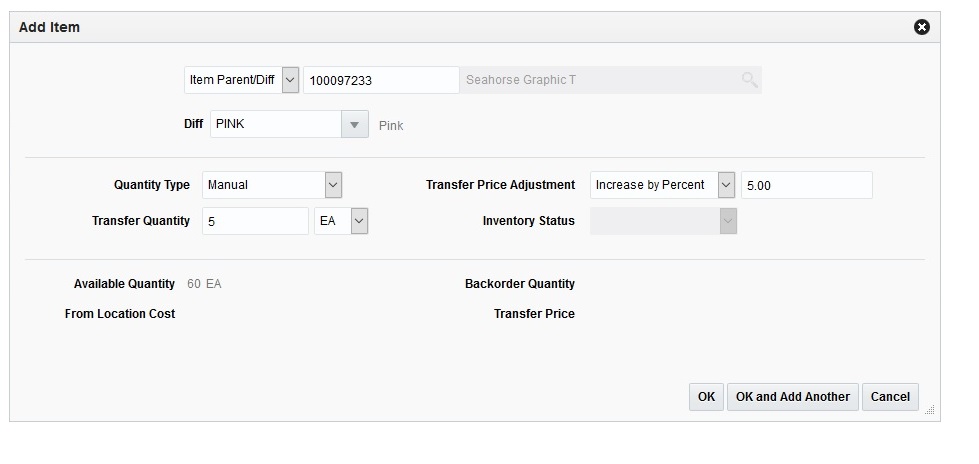
 . The Add Item pop-up appears.
Figure 3-5 Add Item Pop-up
-
In the Type field, select how you would like to add items to the transfer. The options are: Item, Item Parent, Item Parent/Diff, Item List and Upload List.
Depending on you selection, the next fields will change to allow you select items by desired level.
-
Item – You can enter, select or search transaction level items to add to the transfer.
-
Item Parent – You can enter, select or search items that are at the parent level to add its transaction level children items to the transfer.
-
Item Parent / Diff – You can enter, select or search parent level items, further there will be option to select differentiator. Based on the selection, all transaction level items associated with selected diff will be added to the transfer.
-
Item List – You can enter, select or search item list to add transaction level items contained therein to add to the transfer.
-
Upload List – This option allows you to upload data file containing items to add to the transfer. The file must be in csv format. There will be validations to ensure that only valid items are added.
-
-
In the Quantity Type field, select the quantity from the list. The options are Manual and Total Stock on Hand.
-
In the Transfer Quantity field, enter the quantity of the item that has to be transferred.
-
In Transfer Cost Adjustment field, select the type of transfer cost adjustment you want to make. The options are: Decrease by Percent, Decrease by Amount, Increase by Percent, Increase by Amount, Set Price.
Note:
Transfer Cost Adjustment is only enabled for the Intercompany transfer type.
-
In the Inventory Status field, select the inventory status from the list.
-
In the Available Quantity field, the quantity that is available for transfer is displayed.
-
The From Location Cost field displays the cost for transferring an item from the location.
-
The Backorder Quantity field displays the customer back-orders for an item.
-
The Transfer Cost field displays the transfer cost and the cost varies based on the selected Transfer Cost Adjustment Type and the Adjustment Value.
-
Then choose one of the following options.
-
Click OK to add the item to the table and close the pop-up.
-
Click OK and Add Another to add additional items.
-
Click Cancel to reject all entries and close the pop-up.
-
Transfer Details - More Actions Menu
Use the More Actions menu to navigate to other pages or to change the view of the items added to the transfer.
Figure 3-6 Transfer Details - More Actions Menu
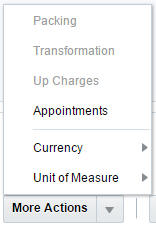
Table 3-4 Transfer Details - More Actions Menu and Description
| Icon/Buttons | Description |
|---|---|
|
More Actions |
|
Currency View
You can toggle between following currencies:
-
From Location
-
To Location
-
Primary
The currency toggle determines that the monetary values on the screen will be shown in From Location's currency or To Location's currency or Primary Currency.
Unit of Measure View
You can toggle between the following units of measure:
-
Unit of Transfer - indicates the multiple of the standard UOM used for transferring
-
Standard UOM - is the unit of measure used for inventory for the item, such as eaches, meters, or pounds.
The UOM toggle determines weather the quantities on the screen will be shown in standard UOM or Transfer UOM.
Add a Work Order
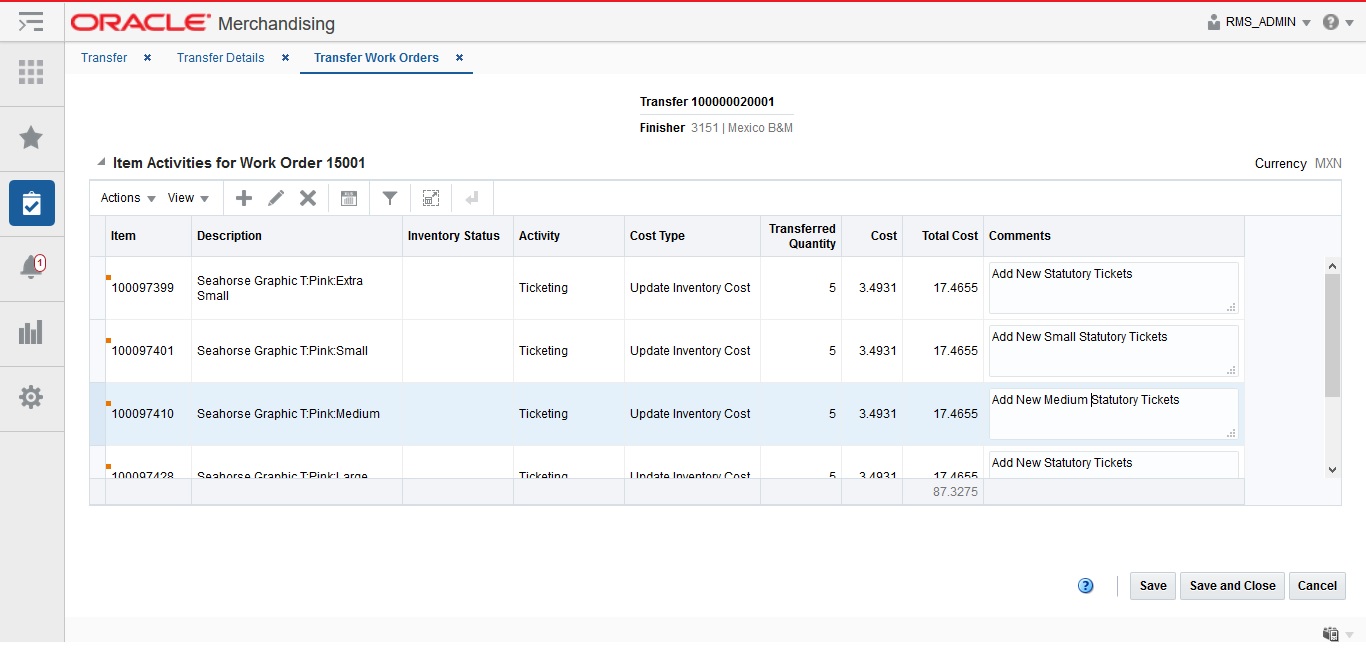
The Transfer Work Order allows you to define activities that are completed by the finisher before the transfer is completed. You must select a finisher when creating the transfer in order to access the page. Work order activities are required for each item when a transfer contains a finisher. To add a work order to a transfer, select the Work Order button on the Transfer Details page to display the Transfer Work Orders page.
At the top of the Transfer Work Orders page, the transfer number and finisher are displayed. Below this, the label of the Item Activity section displays the work order number. In addition the currency is displayed in the top right corner of the section label. Once activities are added, you can add comments for the item activity directly in the table.
Figure 3-7 Transfer Work Orders Page
Add an Item Activity
To add an activity for one or more items to the current work order, follow the steps below.
-
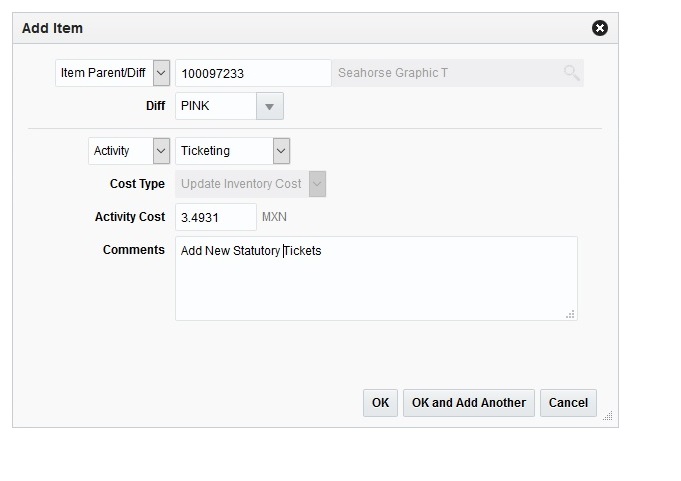
In the Item Activity section, select Actions > Add, or use the Add icon
 . The Add Item pop-up appears.
Figure 3-8 Transfer Work Order Add Items Pop-up
-
Select an item type from the list. Then enter or search for the item.
-
In the Diff field, enter, select or search for the diff.
Note:
This field is only enabled, if you select the item type Item Parent/Diff.
-
Select if you want to add an activity or template (a template is a pre-defined set of work order activities). Then select the corresponding activity or template.
-
In the Cost Type field, select the cost type from the list.
-
In the Activity Cost field, enter the costs.
-
In the Comments field, enter a comment, if necessary.
-
Then choose one of the following options.
-
Click OK to add the item activity/template to the table and close the pop-up.
-
Click OK and Add Another to add additional item activities/templates.
-
Click Cancel to reject all entries and close the pop-up.
-
-
In the Transfer Work Order page, save your changes.
Edit an Item Activity
To edit an item activity previously added, follow the steps below.
-
In the Item Activities section, select Actions > Edit, or use the Edit icon
 . The Edit Item pop-up appears.
-
Edit the activity cost and/or the comments.
-
Then choose one of the following options.
-
Click OK to add your changes to the table and close the pop-up.
-
Click Cancel to reject all entries and close the pop-up.
-
-
In the Transfer Work Order page, save your changes.
Manage Work Order Templates and Activities
Work orders in Merchandising are used to specify the tasks that are to be performed by the internal or external finisher for items on a transfer. These are used to describe the tasks in detail and are used for both basic tasks (e.g. re-ticketing, ironing, etc.) and more complicated tasks that require other mapping in Merchandising such as item transformation and repacking. Any transfer that involves a finisher must have at least one work order task associated with each item on the transfer. Various activities can be pre-defined along with cost in Merchandising and templates can also be created involving multiple activities. Work order templates and activities are created, maintained or deleted in Merchandising through spreadsheet upload and download processes. These processes are accessed through the main Merchandising task list under Foundation Data > Download Foundation Data and Foundation Data > Upload Foundation Data.
To add or update work order templates and activities, you will select the template type of Inventory from the Download Data screen and then the template Work Orders. Click the Download button and when prompted, choose to either open the .ods file that is generated or save the file and open it separately in the spreadsheet application of your choice. Once opened, there will be five sheets that can be modified - Transfer WO Activities, Transfer WO Activities Trans, Work Order Templates, Work Order Template Trans, Work Order Template Details.
Add a Work Order Activity
To add a new activity, start in the Transfer WO Activities tab, and, in a blank line in the template, select the action type of Create. Next enter a unique activity code (up to 10 characters) and the description for the activity in the primary language (as defined in the Merchandising system options) of up to 250 characters. Next, cost for this activity can be specified optionally. A cost is not required for an activity until it is applied to the transfer. Finally, select the accounting method, which determines how the cost for this activity should be handled when a transfer occurs; Post to Financials, which means the work order cost will only impact Stock Ledger and not the weighted average cost of the item, or Update Inventory Cost, which means it will impact both Stock Ledger and the weighted average cost of the item. The valid values for cost type are held in Code and Descriptions under code type ACTP. (e.g., adding the cost to the value of the item, or expensing the cost of the activity). Valid values for this field are 'Post to Financial' and 'Update Inventory Cost' and are stored on the code tables for code type ACTP.
Next, if you wish to add translations for the activity description in languages other than the primary language, this can be done in the Transfer WO Activities Trans tab. Navigate to a blank row and select the action type of Create and the language in which the translated description will be entered. Then, enter the activity code for which the translation applies. Finally, enter the translated description. The translated description can also be up to 250 characters long. This is an optional step.
Add a Work Order Template
To add a new work order template, start in the Work Order Templates tab, and, in a blank line in the template, select the action type of Create. Next enter a unique work order template ID (up to 10 characters) and the description for the template in the primary language (as defined in the Merchandising system options) of up to 120 characters.
Next, if you wish to add translations for the work order template in languages other than the primary language, this can be done in the Work Order Template Trans tab. Navigate to a blank row and select the action type of Create and the language in which the translated description will be entered. Then, enter the work order template ID for which the translation applies. Finally, enter the translated description. The translated description can also be up to 120 characters long. This is an optional step.
Next, the activities that belong to this template must be added. To do this, move to the Work Order Template Details tab in the spreadsheet. Again, navigate to a blank row in the sheet and select an action type of Create. Enter the work order template ID that you added in the Work Order Templates tab. Then add a valid activity code. Next, specify the cost for the activity. This cost can be different than the activity cost defined earlier. Finally comments can be added optionally of up to 2000 characters. If you are adding a new detail to an existing template, this same process would apply, just using the existing template instead.
Update Work Order Activity or Template
If you would like to update any details for existing work order activity or template, a similar process will be followed as that described above for creating new activity or template respectively. First, download the spreadsheet, and then navigate to the tab where you would like to make your updates.
The following columns can be updated in each tab:
-
Transfer WO Activities - Activity Description, Unit Cost
-
Transfer WO Activities Trans - Activity Description
-
Work Order Templates - Work Order Template Description
-
Work Order Template Trans - Work Order Template Description
-
Work Order Template Details - Activity Cost, Comments
In the tab where you are going to make your updates, select the action type of Update, and then correct the value in the spreadsheet.
Deleting a Work Order Activity or Template
If you wish to delete a work order activity or template, update the action column to select Delete in each of the tabs where it occurs. A work order activity cannot be deleted if it's a part of work order on a transfer or template. Similarly if a work order template is associated with a transfer then it can't be deleted.
Uploading Changes
For all actions defined above, once all the updates have been made to the data in the spreadsheet, save the file and close it. Then, return to the Merchandising screens and select Foundation Data > Upload Foundation Data from the main task list. In this screen, select the template type Inventory and the template Work Orders. This will generate a process description automatically, but this can be updated if desired. Lastly, select the Browse button and navigate to the directory where you saved the updated spreadsheet.
To review the status of the upload and check whether any errors occurred, select the Foundation Data > Review Status task from the main task list.
See also Download/Upload Data from Spreadsheets and View Data Loading Status.
Define Item Packaging
The Transfer Item Packing page allows you to send instructions to the finisher to tell them how items and packs should be shipped to the final location. For example, you may elect to have the finisher take individual bulk items and have them re-packed into specific pre-pack configurations.
The following packaging combinations may occur:
Pack to Components
|
Pack 1 |
becomes |
Item 1 |
|
Item 2 |
||
|
Item 3 |
Pack to Pack
Complete Packs:
|
Pack 1 made up of: |
2 of Item 1 |
becomes |
Pack 2 made up of: |
2 of Item 1 |
|
3 of Item 2 |
2 of Item 2 |
|||
|
3 of Item 3 |
2 of Item 3 |
Packs with Remainders:
|
Pack 1 made up of: |
2 of Item 1 |
becomes |
Pack 2 made up of: |
2 of Item 1 |
|
3 of Item 2 |
2 of Item 2 |
|||
|
3 of Item 3 |
1 of Item 3 |
|||
|
Remaining items |
1 of item 2 |
|||
|
2 of item 3 |
Components to Pack
|
Item 1 |
becomes |
Pack 1 |
|
Item 2 |
||
|
Item 3 |
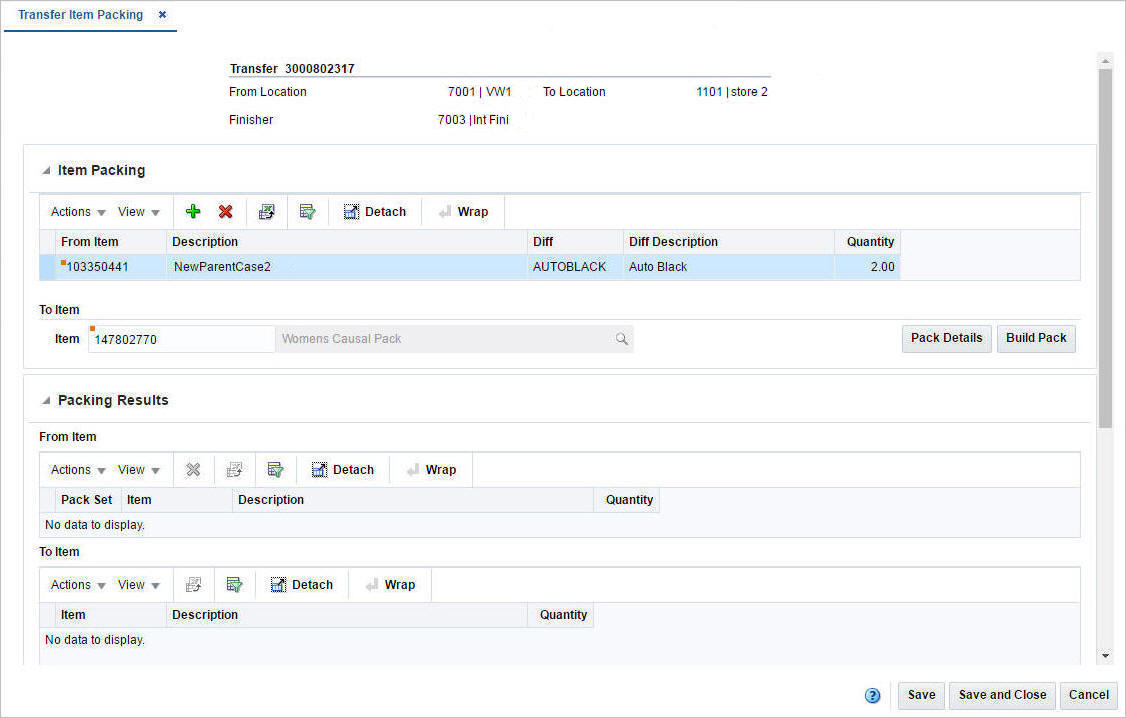
At the top of the page, the transfer number, from and to locations, and the finisher are displayed. The page also contains:
-
Header
The header displays the transfer number, the from/to location and the finisher.
Figure 3-9 Transfer Item Packing Page
Item Packing
The Item Packing section contains a table listing the "from" items that have been added and will be the starting point of the packing. It also contains the "to" item, which defines how the from items will be packed.
Packing Results
The Packing Results section shows the results of building a pack based on the information that was entered in the Item Packing section.
To pack an item on a transfer, follow the steps below.
-
Create a transfer.
For more information about how to create a transfer, see the start of the Transfers chapter.
-
Add a transfer work order activity.
For more information about how to add a transfer work order activity, see the Add a Work Order section.
-
In the Transfer Details page, select More Actions > Packing. The Transfer Item Packing page appears.
Add Items and Explode Pack
To add a pack and explode the pack item to its components, follow the steps below.
-
In the Item Packing section, select Actions > Add, or use the Add icon
 . The Add Item pop-up appears.
-
In the From Item field, enter or search for the from pack.
-
Select the Explode Pack checkbox, to explode the pack.
The pack item will be exploded to its component items and displayed as a new pack set in the Packing Results section.
-
Then choose one of the following options.
-
Click OK to add the item and close the pop-up.
-
Click OK and Add Another to add additional items.
-
Click Cancel to reject all entries and close the pop-up.
-
To change the pack, follow the steps below.
-
In the Item Packing section, select Actions > Add, or use the Add icon
 . The Add Item pop-up appears.
-
In the From Item field, enter or search for the from pack.
-
Select the Explode Pack checkbox, to explode the pack.
The pack item will be exploded to its component items and displayed as a new pack set in the Packing Results section.
-
Then choose one of the following options.
-
Click OK to add the item and close the pop-up.
-
Click OK and Add Another to add additional items.
-
Click Cancel to reject all entries and close the pop-up.
-
-
In the To Item area, enter or search for the to pack item that is on the transfer.
-
Then click Build Pack. The new pack is created and displayed in the Packing Results section.
-
To view the pack details, click Pack Details. The Pack Item Details are displayed.
-
-
Then save your entries.
Define Item Transformations
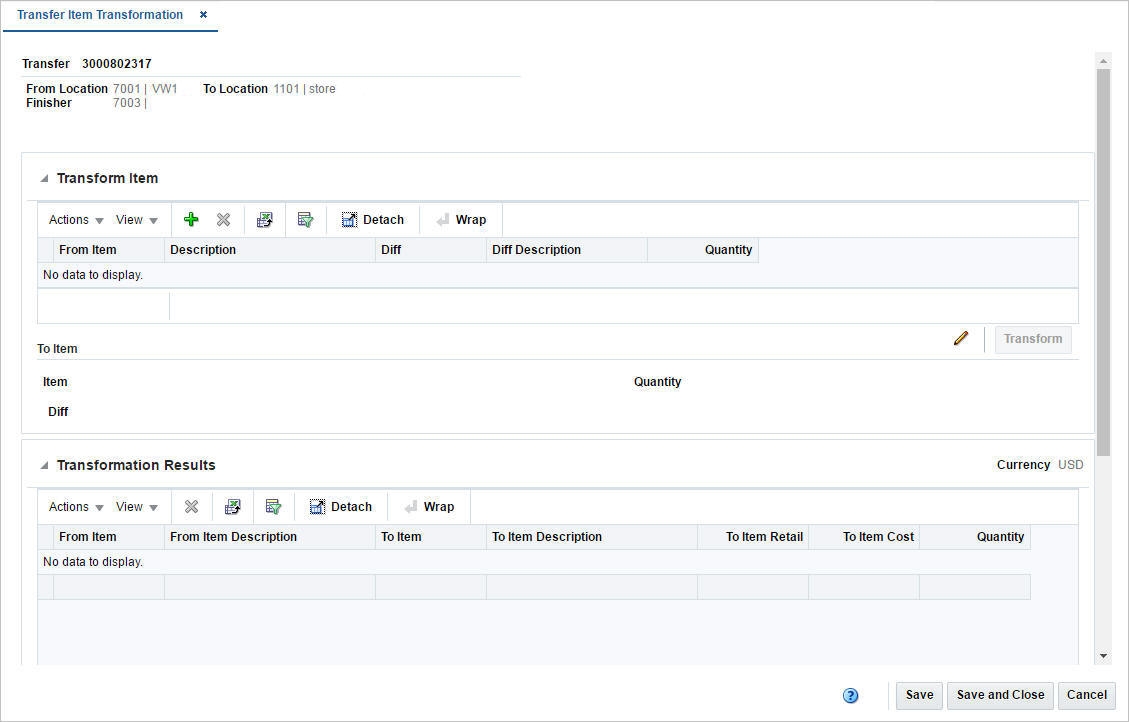
The Transfer Item Transformation page allows you to convert one item to another item at a finisher. You may change one item to a different item or you may consolidate multiple items into one item.
There are certain conditions that must be met before you complete an item transformation. When you transform the first item into a second item, both items must exist in approved status before you can complete the transformation. The entire quantity of item on a transfer must be transformed into the same item.
There are two types of item transformation that can occur:
Table 3-5 Item Transformation
| Item | becomes | item |
|---|---|---|
|
One to One |
||
|
Item 1 |
becomes |
Item 2 |
|
Item A |
becomes |
Item X |
|
Item B |
becomes |
Item Y |
|
Item C |
becomes |
Item Z |
|
Many to One |
||
|
Item 1 |
becomes |
Item 2 |
|
Item A |
becomes |
Item X |
|
Item B |
becomes |
Item X |
|
Item C |
becomes |
Item X |
The Transfer Item Transformation page displays the transfer number, the from and to locations, and the finisher at the top of the page.
Figure 3-10 Transfer Item Transformation
Transform Item
The Transform Item section is visible if you are not in View mode and the Status is Input, otherwise the section is hidden.
The Transform Item section contains two sub-sections, the From Item table and the To Item area.
The From Item table displays the following fields by default:
-
From Item
-
Description
-
Diff
-
Diff Description
-
Quantity
To Item
The To Item area displays the item, item description, diff and diff description as well as the quantity.
You can edit the to item and diff in this area by clicking the Edit icon ![]() .
.
You can finalize the transformation of the items in this area by clicking the Transform button.
The Transform button is only enabled if From Item and To Item sections are populated. When you click the button the Transform Item section is cleared, the items are transformed and displayed in the Transformation Results section.
Transformation Results
The From Item table displays the following fields by default:
-
From Item
-
Description
-
To Item
-
To Item Description
-
To Item Retail
-
To Item Cost
-
Quantity
Transform an Item
To transform an item, follow the steps below.
-
Create a transfer.
For more information about how to create a transfer, see the start of the Transfers chapter.
-
Add a transfer work order activity.
For more information about how to add a transfer work order activity, see the Add a Work Order section.
-
In the Transfer Details page, select More Actions > Transformation. The Transfer Item Transformation page appears.
Add and Transform an Item
To add a from item, follow the steps below.
-
In the Transform Item section, select Actions > Add, or use the Add icon
 . The Add Item pop-up appears.
-
In the From Item pop-up:
-
In the Item field, enter or search for an item. This field is a required field.
-
In the Diff field, enter, select or search for the diff. This field is only available if the parte item has diff.
-
-
In the To Item section:
-
In the Item field, enter or search for an item or parent item that you want the from item to become.
Note:
The to item you select must be an approved item.
-
In the Diff field, enter, select or search for the diff. This field is only available if the to item is a parent item.
-
-
Then choose one of the following options.
-
Click OK to add the from/to item and close the pop-up.
-
Click OK and Add Another to add additional from/to items.
-
Click Cancel to reject all entries and close the pop-up.
-
-
Then click Transform. The items that have been transformed for the transfer are displayed in the Transformation Results section.
-
Save your entries.
Edit the To Item
To edit the "to" item before transforming, follow the steps below.
-
In the To Item area, click the Edit icon
 . The Edit Item pop-up appears.
-
Edit the fields as necessary.
-
Then choose one of the following options.
-
Click OK to add your change to the table and close the pop-up.
-
Click Cancel to reject the entries and close the pop-up.
-
Manage Up Charges
An up charge is a cost associated with moving items between locations in the Merchandising. Up charges may be included to account for work associated with the transfer of goods (for example, cost that the origin location incurs to prepare the items for shipping).
Each up charge has a calculation basis of value or specific, a cost basis of either weighted average cost (when using average cost method) or unit cost (when using standard cost method), component currency, and up charge group, which is used to group up charge components together to show a total sum on the Transfer Up Charge page.
The Transfer Up Charges page allows you to view the up charges that are associated with a specific transfer/item/from location/to location combination. Up charge groups are a combination of up charge components.
Figure 3-11 Transfer Up Charges Page
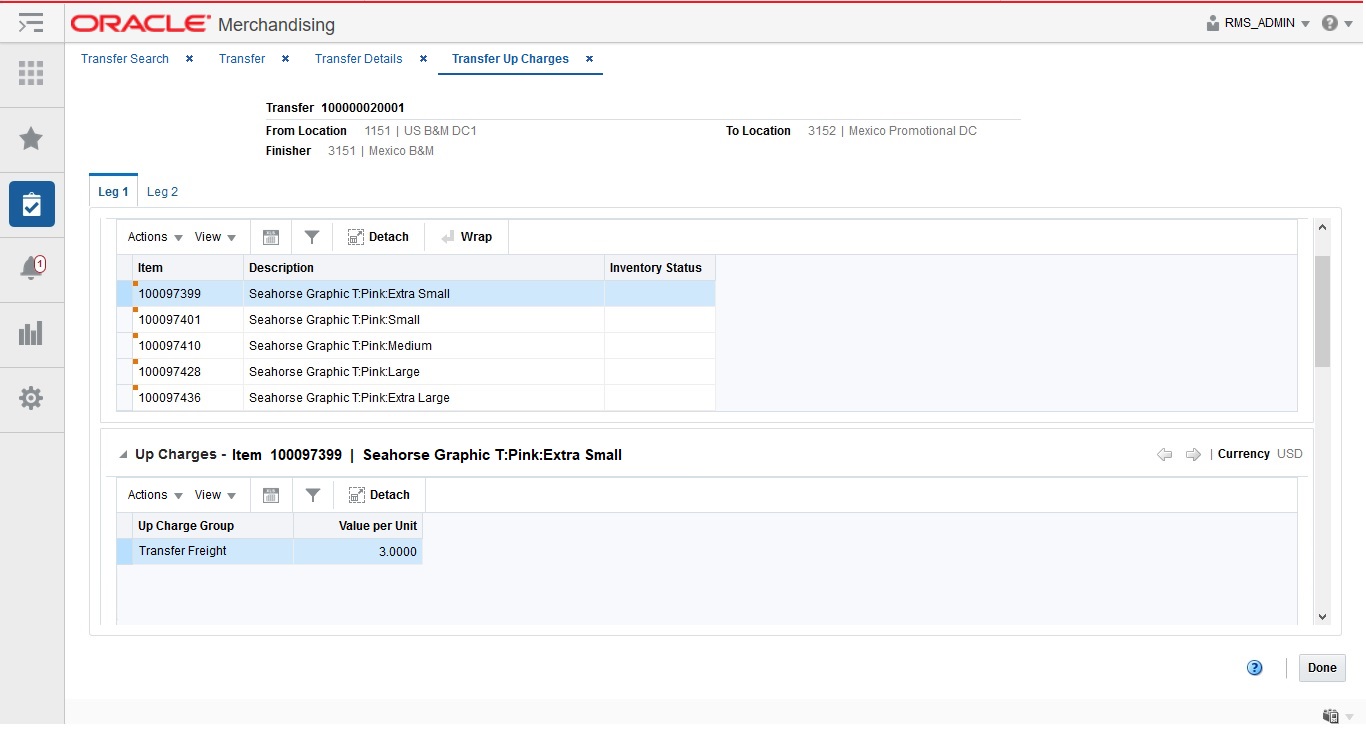
The Transfer Up Charges page displays the transfer and the from and to locations at the top of the page. And also includes the following sections:
Items
The Item section displays the items on the transfers that have up charges defined, including information such as item, item description and Inventory Status.
For transfers with finishing, select the tab Leg 2 to view the item information of the second leg.
Manage Transfers
Managing transfers involves performing one or more of the following tasks:
-
Searching for a transfer
-
Creating from an existing transfer
-
Editing a transfer
-
Viewing a transfer
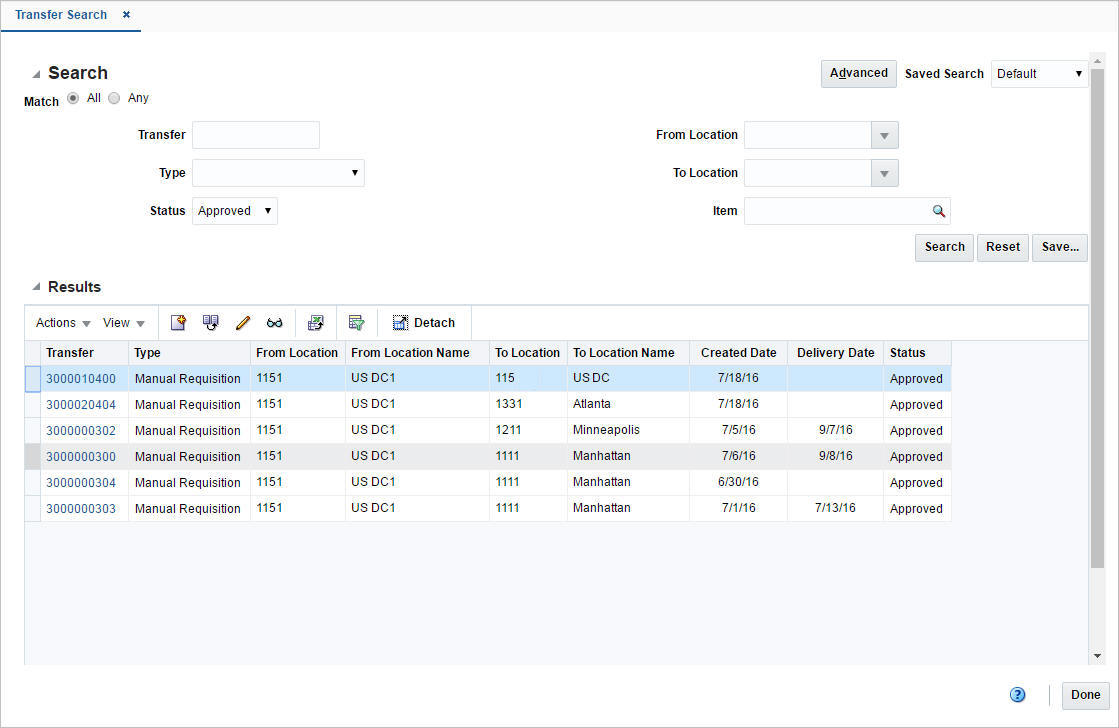
To manage transfers, access the Transfer Search page by selecting Inventory > Transfers > Manage Transfers, the Transfer Search page appears.
Figure 3-12 Transfer Search Page
Search for a Transfer
To search for a transfer:
-
Provide search criteria in the search section. The criteria can be provided either in Basic or Advanced mode, depending on the requirement. Basic is the default mode when the search page is entered.
Click Advanced to access the search panel in advanced mode. You can return to Basic mode by clicking Basic.
Search for a Transfer Through the Basic Search Criteria
To search for a transfer through the basic search criteria.
-
Enter or select one or all of the following basic search criteria.
Table 3-6 Transfer Search - Basic Search Criteria
Field Description Match option
Check radio button All or Any.
All - only transfer matching all entered search criteria are shown.
Any - transfer matching any of the entered search criteria are shown.
Transfer
Enter the transfer ID.
Type
Select the transfer type from the list.
Status
Select the status of the transfer. The options are: Input, Submitted, Approved, Closed, Deleted, and In Progress.
From Location
Enter, select or search for the location ID.
To Location
Enter, select or search for the location ID.
Item
Enter the item number or search for the item.
Note:
For more information about searches, see Search Screens in the Oracle® Retail Merchandising Do the Basics User Guide.
-
Click Search. The transfers that match the search criteria are displayed in the Results section.
-
Click Reset to execute the saved search.
-
Click Done to close the page.
Search for a Transfer Through the Advanced Search Criteria
To search for a transfer through the advanced search criteria:
-
Enter or select one or all of the following advanced search criteria. Click Add Fields to add more fields for the advanced search. To remove the field from the search, click the x right next to the field.
Table 3-7 Transfer Search - Advanced Search Criteria and Description
Fields Description Match option
Check radio button All or Any.
All - only transfer matching all entered search criteria are shown.
Any - transfer matching any of the entered search criteria are shown.
Transfer
Enter the transfer ID.
Type
Select the transfer type from the list.
Status
Select the status of the transfer. The options are: Input, Submitted, Approved, Closed, Deleted, and In Progress.
From Location
Enter, select or search for the location ID.
To Location
Enter, select or search for the location ID.
Department
Enter, select or search for the department.
Class
Enter, select or search for the class number.
Subclass
Enter, select or search for the subclass.
Item
Enter the item number or search for the item.
-
To narrow down the search, use the list next to the search fields. For example, determine if the entered value should equal or not equal the search result.
-
Click Search. The transfers that match the search criteria are displayed in the Results section.
-
Click Reset to clear the search section and results.
-
Click Done to close the page.
Create a Transfer from Existing
To create a deal from an existing transfer:
-
From the Tasks menu, select Inventory > Transfers > Manage Transfers. The Transfer Search page appears.
-
Enter or select search criteria as desired to make the search more restrictive.
-
Click Search. The transfers that match the search criteria are displayed in the Results section.
-
Select a transfer in the Results section
-
Then select Actions > Create from Existing or click the Create from Existing icon
 . The Transfer page appears. The data of the selected transfer is displayed. Change the data as necessary.
For more information about transfers, see the Transfer Header section.
Figure 3-13 Transfer - Create From Existing
-
Then choose one of the following options.
-
Click Save to save to create the transfer.
-
Click Save and Close to create the transfer and close the page.
-
Click Cancel to reject all entries and return to Transfer Search page.
-
Edit a Transfer
To edit a transfer:
-
From the Tasks menu, select Inventory > Transfers > Manage Transfers. The Transfer Search page appears.
-
Select the transfer you want to edit.
-
From the Actions menu, select Edit or click the Edit icon.
 . The Transfer page appears.
Figure 3-14 Edit Transfer Page
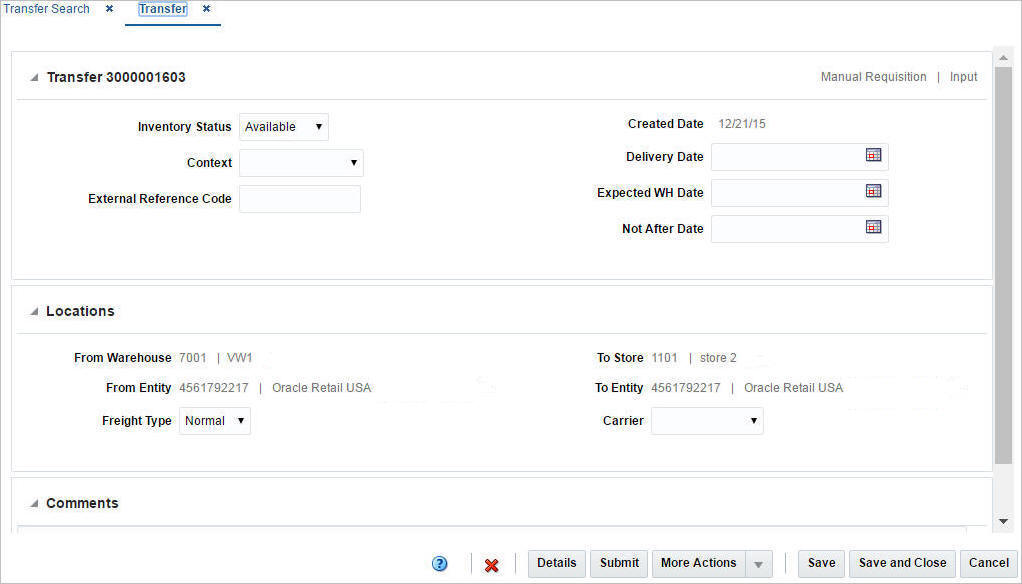
-
Make the necessary changes and click save your changes.
Maintaining Transfer Details
To maintain transfer Details follow the steps below.
-
From the Tasks menu, select Inventory > Transfers > Manage Transfers. The Transfer Search page appears.
-
Enter or select search criteria as desired to make the search more restrictive.
-
Click Search. The transfers that match the search criteria are displayed in the Results section.
-
In the Transfer column, click the transfer link, or mark a record and select Actions > Edit, or use the Edit icon
 . The Transfer page appears.
Editing Transfer Details Items
To edit transfer details items:
-
In the Items section, select the transfer details of the item you want to edit.
-
From the Actions menu, click Edit or click the Edit icon
 .
.
-
Edit the quantity type and the transfer quantity as necessary.
-
Then choose one of the following options.
-
Click OK to save the changes and close the page.
-
Click Cancel to reject your entries and close the page.
-
Approve a Transfer
When a transfer is added to the system, it must go through a series of checks before it can be executed. Depending on your user role, you may not be able to move the transfer to the next status. A transfer may be in any of the following statuses.
Table 3-8 Transfer Approval Process - Status and Definition
| Status | Definition |
|---|---|
|
Input |
The transfer has been started, but not completed. |
|
Submitted |
The transfer has been completed and is pending in review. |
|
Approved |
The transfer has been reviewed and has been approved. |
|
In Progress |
The transfer has been shipped to the next receiver in the transfer. |
|
Deleted |
The transfer is marked for deletion. It will be deleted by a regularly scheduled batch program. |
|
Closed |
The transfer has been received at the final location and is complete. |
Submit a Transfer for Approval
To submit a transfer for approval, follow the steps below.
-
From the Tasks menu, select Inventory > Transfers > Manage Transfers. The Transfer Search page appears.
-
Restrict your search to transfers in Input status.
-
Click Search. The transfer that match the search criteria are displayed in the Results section.
-
In the Transfer column, click the Transfer link, or mark a record and select Actions > Edit, or use the Edit icon
 . The Transfer page appears.
-
Click the Submit button. The status of the transfer changes to Submitted.
-
Save your changes.
Approve a Transfer
To approve a transfer, follow the steps below.
-
From the Tasks menu, select Inventory > Transfers > Manage Transfers. The Transfer Search page appears.
-
Restrict your search to transfers in Submitted status.
-
Click Search. The transfer that match the search criteria are displayed in the Results section.
-
In the Transfer column, click the Transfer link, or mark a record and select Actions > Edit, or use the Edit icon
 . The Transfer page appears.
-
Click the Approve button. The status of the transfer changes to Approved.
-
Save your changes.
Ship a Transfer
To ship a transfer, follow the steps below.
-
From the Tasks menu, select Inventory > Transfers > Manage Transfers. The Transfer Search page appears.
-
Enter criteria to find the transfer you wish to ship. Only transfers in Approved status can be shipped. Click Search. The transfers that match the search criteria are displayed in the Results section.
-
In the Transfer column, click the Transfer link, or select Actions > Edit, or use the Edit icon (
 ). The Transfer page appears.
-
Click the Ship button. The status of the transfer changes to In Progress and the BOL number that has been created for the shipment is displayed.
-
Click Save and Close to save your changes and close the page.
Note:
This option is available only when the system options Allow Shipping / Receiving at Stores (for store sourced transfers) and/or Allow Shipping / Receiving at Warehouses (for warehouse sourced transfers) are set to Yes.
Close a Transfer
To close a transfer, follow the steps below.
-
From the Tasks menu, select Inventory > Transfers > Manage Transfers. The Transfer Search page appears.
-
Restrict your search to transfers in In Progress status.
-
Click Search. The transfer that match the search criteria are displayed in the Results section.
-
In the Transfer column, click the Transfer link, or mark a record and select Actions > Edit, or use the Edit icon
 . The Transfer page appears.
-
Click the Close button. The status of the transfer changes to Closed.
-
Save your changes.