5 Return to Vendor
Depending on your supplier agreements, you may be able to return product at that has not sold at the end of a season or based on other issues with the product. This is done using the Return to Vendor transaction in Merchandising.
Create a Return to Vendor
To create a return to vendor (RTV) order:
-
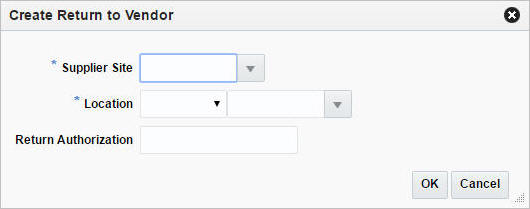
From the Tasks menu, select Inventory > Create Return to Vendor. The Create Return to Vendor pop-up appears.
Figure 5-1 Create Return to Vendor Pop-up
-
In the Supplier Site field, enter, select or search for the supplier site. This field is a required field.
-
In the Location field, select the location type from the list. Possible options are Store and Warehouse. Then enter, select or search for the location. This field is a required field.
-
In the Return Authorization field, enter the supplier's return authorization number as necessary. This is a required field.
-
Then choose one of the following options.
-
Click OK to create the return to vendor order. The Return to Vendor page appears.
For more information about the RTV page, see the Manage Returns To Vendor section.
-
Click Cancel reject all entries and close the page.
-
Return to Vendor
The Return to Vendor (RTV) page allows you to create and maintain RTV orders. When creating an RTV, the details that you entered in the pop-up are defaulted into the page. You can then add the items that will be returned.
Figure 5-2 Return to Vendor Page
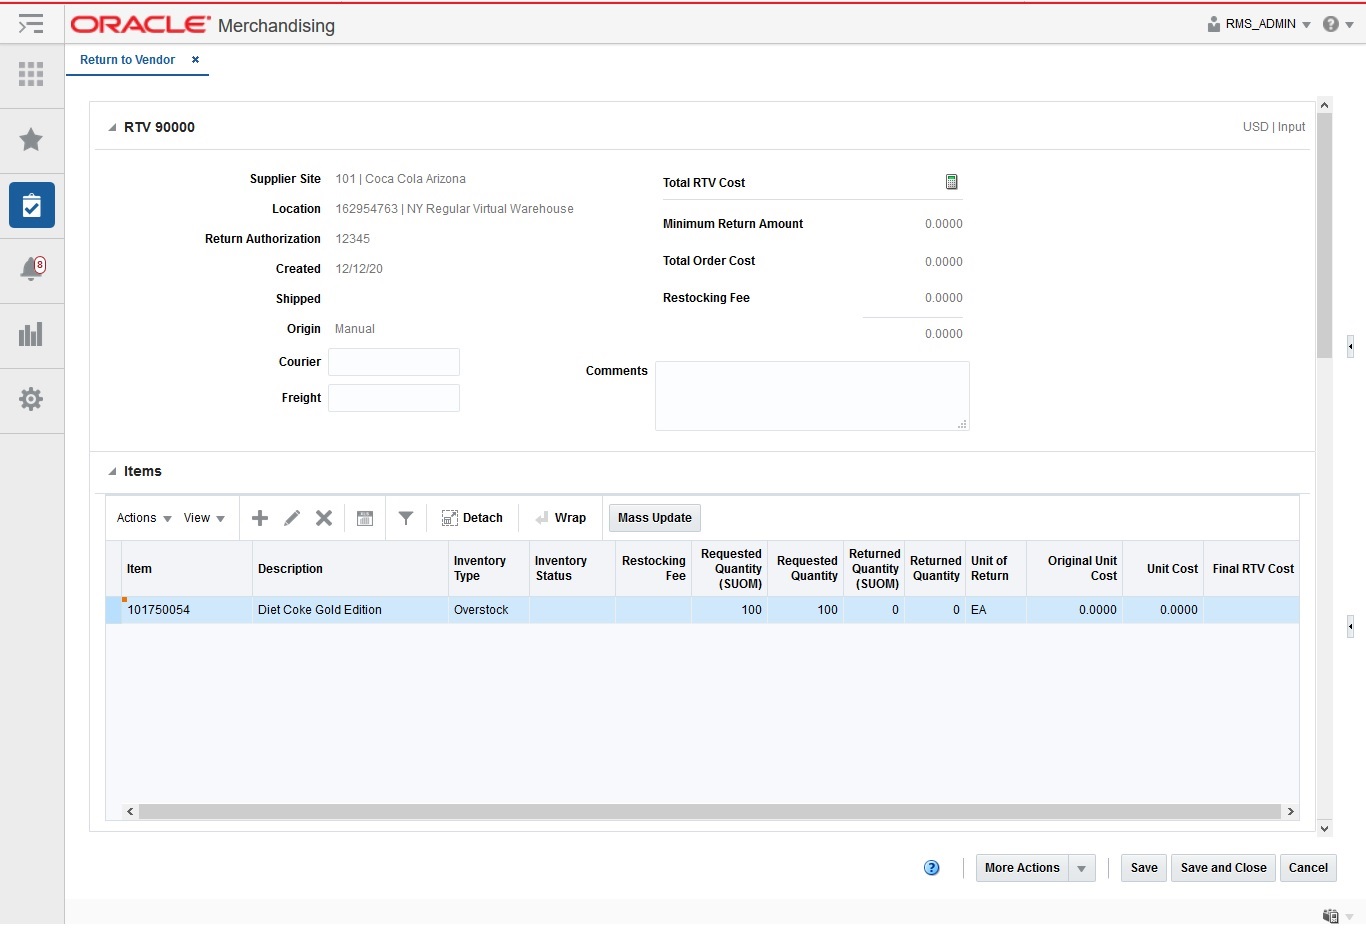
Table 5-1 Return to Vendor Header - Fields and Description
| Fields | Description |
|---|---|
|
Title |
The title displays RTV ID to the top left of the head container. The Currency and the RTV status is displayed with a separator between them to the top right of the head container. |
|
Supplier Site |
This field displays the supplier ID and the supplier site. |
|
Location |
This field displays location ID. |
|
Return Authorization |
This field displays the supplier's return authorization number. |
|
Created |
This field displays the date on which the RTV was created. |
|
Shipped |
This field displays the date on which the RTV was shipped. The Shipped field will only be displayed once the RTV has been shipped. |
|
Origin |
This field specifies the source of the RTV is generation. Possible values can be Manual, Externally Generated, Mass Return Transfer, Customer Return, Transfer, Allocation and Ownership Change. |
|
Courier |
Enter the courier name, if applicable. |
|
Freight |
Enter the freight number. |
|
Total RTV Cost |
Click the Calculator icon to kick-off the RTV Cost recalculation. |
|
Minimum Return Amount |
The amount is displayed by default. |
|
Total Order Cost |
The amount is displayed by default. |
|
Restocking Fee |
The amount is displayed by default. |
|
Comments |
Enter any additional comments as necessary. |
Note:
The Courier, Freight, and Comments fields are editable. The remaining fields are displayed based on the information entered in the Create Return to Vendor page.
Add Items
In the Items section you can add, edit or delete inventory information for the items on the RTV order.
To add items:
-
In the Return to Vendor page, go to Items section.
-
Then select Actions > Add, or click the Add icon
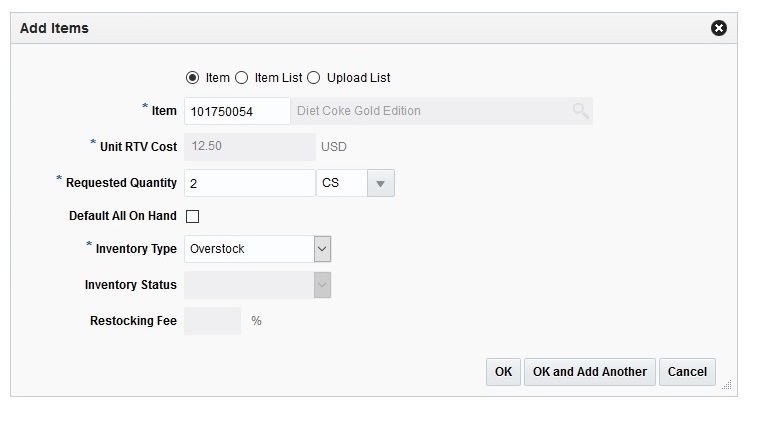
 . The Add Items pop-up appears.
Figure 5-3 Add Items Pop-up
-
Select any one of the following options: Item, Item List, or Upload List.
-
Depending on you selection, the next fields will change to allow you select items by desired level.
-
Item – You can enter, select or search transaction level items to add to the RTV.
-
Item List – You can enter, select or search item list to add transaction level items contained therein to add to the RTV.
-
Upload List – This option allows you to upload data file containing items to add to the RTV. The file must be in csv format. There will be validations to ensure that only valid items are added.
-
-
In the Unit RTV Cost field, defaults to the item's unit RTV cost, adjust the cost as necessary.
This field is a required field when you add an item. This field is not available when you add an item list.
-
If you add a dynamic item list, the Rebuild checkbox is displayed. If you select the checkbox, the item list is rebuild by a background process, once you click OK.
-
In the Requested Quantity field, enter the return quantity. When you add an item, enter, select or search for the unit of the return quantity. This field is a required field.
-
You can check the Default All On Hand checkbox to return all the stock on hand value to the supplier.
-
In the Inventory Type fields, select either of the following inventory type: Overstock, Unavailable Inventory. This field is a required field.
-
In the Restocking fee % field, enter the percentage that is applied for restocking fees.
-
Then choose one of the following options.
-
Click OK to add the items to the table and close the pop-up.
-
Click OK and Add Another to add additional items.
-
Click Cancel to all entries and close the pop-up.
-
Supplier Details
To view the supplier details:
-
From the Tasks menu, select Inventory > Manage Returns to Vendor. The RTV Search page appears.
-
Enter or select search criteria as desired to make the search more restrictive.
-
Click Search. The RTVs that match the search criteria are displayed in the Results section.
-
In the RTV column, click the RTV link, or mark a record and select Actions > Edi/View or use corresponding icons. The Return to Vendor page appears.
-
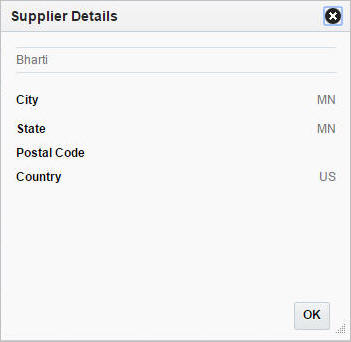
From the More Actions menu, click Supplier Details. The Supplier Details pop-up appears.
Figure 5-4 Supplier Details Pop-up
-
The Supplier Site details, City, State, Postal Code, Country are displayed.
-
Click OK to close the pop-up.
Manage Returns To Vendor
The Manage Returns to Vendor option opens the RTV Search page. Managing returns to vendor involves performing one or more of the following tasks:
-
Searching for returns to vendor
-
Editing returns to vendor
-
Viewing returns to vendor
Search for an RTV
You can access the RTV Search page from the Task menu, select Inventory > Manage Returns to Vendor. The RTV Search page appears.
In the RTV Search page you can search for returns to vendor by specifying various search criteria. You can choose to access returns to vendor in the search results in edit or view mode depending on security privileges. There are also options for creating a new return to vendor.
Figure 5-5 RTV Search Page
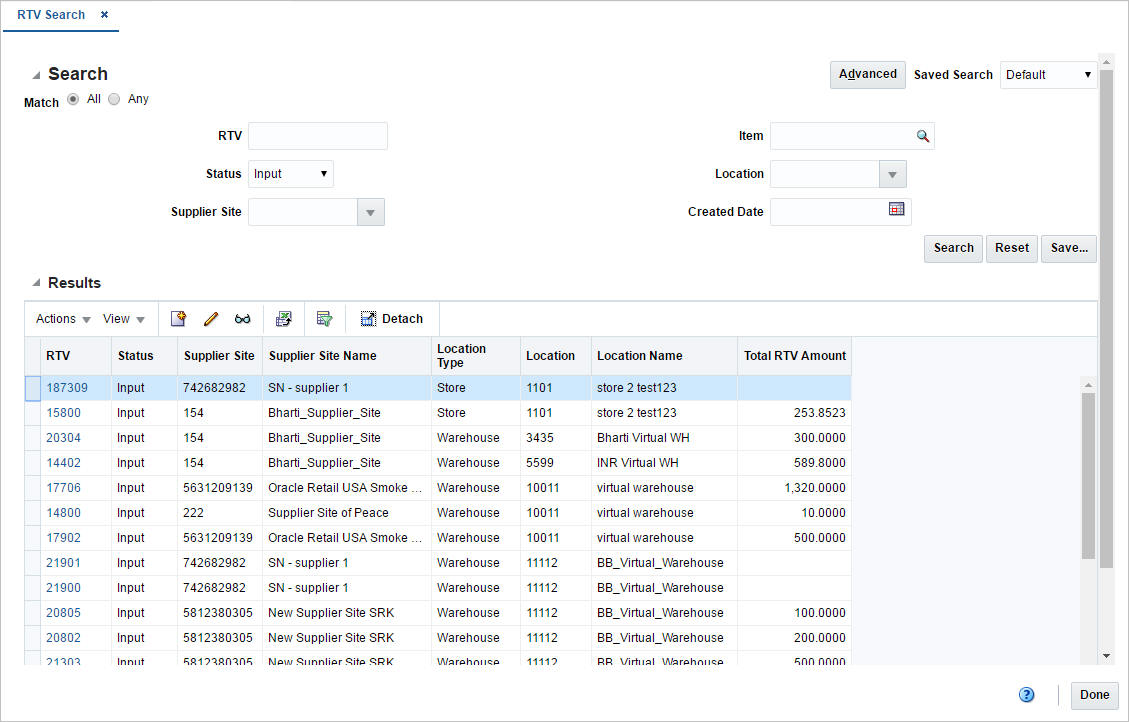
To search for an RTV:
-
From the Tasks menu, select Inventory > Manage Returns to Vendor. The RTV Search page appears.
-
You can search for a returns to vendor by providing search criteria in the search section. The criteria can be provided either in Basic or Advanced mode, depending on the requirement. Basic is the default mode when the search page is entered. Click Advanced to access the search panel in advanced mode. You can return to Basic mode by clicking Basic.
Search for an RTV Through the Basic Search Criteria
To search for an RTV order through the basic search criteria:
-
Enter or select one or all of the following basic search criteria.
Table 5-2 RTV Search - Basic Search Criteria
Search Field Description Match option
Check radio button All or Any.
All - only RTVs matching all entered search criteria are shown.
Any - RTVs matching any of the entered search criteria are shown.
RTV
Enter the RTV number.
Status
Select the status of the return to vendor from the list. The options are: Input, Approved, In Progress, Shipped, and Cancelled.
Supplier Site
Enter, select or search for the supplier site.
Item
Enter or search for the item.
Location
Enter, select or search for the location.
Created Date
Enter the date the RTV is created or use the Calendar icon to select a date.
Note:
For more information about searches, see Search Screens in the Oracle® Retail Merchandising Do the Basics User Guide.
-
Click Search. The RTV orders that match the search criteria are displayed in the Results section.
-
Click Reset to execute the saved search.
-
Click Done to close the page.
Search for an RTV Through the Advanced Search Criteria
To search for an RTV through the advanced search criteria:
-
Enter or select one or all of the following advanced search criteria. Click Add Fields to add more fields for the advanced search. To remove the field from the search, click the x right next to the field.
Note:
For more information about searches, see Search Screens in the Oracle® Retail Merchandising Do the Basics User Guide.
-
To narrow down the search, use the list next to the search fields. For example, determine if the entered value should equal or not equal the search result.
-
Click Search. The RTV orders that match the search criteria are displayed in the Results section.
-
Click Reset to clear the search section and results.
-
Click Done to close the page.
Edit an RTV
To edit an RTV order, follow the steps listed below.
-
From the Tasks menu, select Inventory > Manage Returns to Vendor. The RTV Search page appears.
-
Enter or select search criteria as desired to make the search more restrictive.
-
In the Results section, select the return to vendor you want to edit.
-
Then select Actions > Edit, or click the Edit icon.
 . The Return to Vendor page appears in Edit mode.
-
Edit the RTV as necessary.
For more information about the Return to Vendor page, see the Manage Returns To Vendor section.
-
Save your changes.
Edit Items
To edit items, follow the steps below.
-
In the Return to Vendor page, go to Items section.
-
Select a record in the table.
-
Then select Actions > Edit, or click the Edit icon
 . The Edit Items pop-up appears.
-
Edit the fields as necessary.
-
Then choose one of the following options.
-
Click OK to add your changes to the table and close the pop-up.
-
Click OK and Edit Another to edit additional items.
-
Click Cancel to all entries and close the pop-up.
-
Mass Update
To update the restocking fee for all items displayed in the Items section, follow the steps below.
-
In the Items section, select Actions > Mass Update, or use the Mass Update button The Mass Update page appears.
-
In the Restocking Fee field, enter the percentage that is applied for restocking fees.
-
Then choose one of the following options.
-
Click OK to apply the restocking fee percentage for all items in the table and close the page.
-
Click Cancel to all entries and close the page.
-