3 Custom Validation Rules
The Custom Validation Rules functionality in Merchandising provides you with flexibility to supplement built-in validations on key data entities, like items and purchase order, by defining validations specific to your business needs. These rules are then executed during approval or activation processes.
As part of the rule creation, you will choose tables and columns to build a query that will check for the presence or absence of a condition. Also part of the definition is the error message that would be presented to the user if the rule is violated and the order in which it should be executed, if you have more than one custom rule for an entity. Upon successful approval, the rules will be validated each time a specific event takes place, like submitting an item, approving a purchase order, or activating a partner.
Following validation types are entitled for Custom Validation Rules:
-
Item Submission/Approval
-
Purchase Order Submission/Approval
-
Supplier Activation/Deactivation
-
Partner Activation/Deactivation
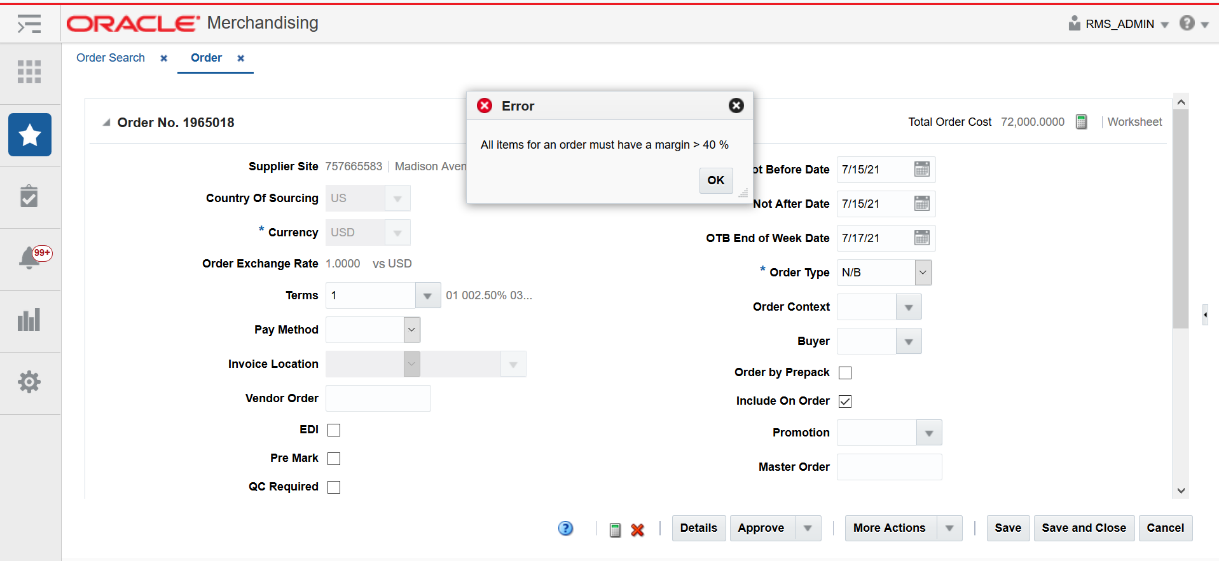
An approved rule will be executed through all ways of executing the specific event the rule is defined for, after the base validations have been completed. For example, if a rule is defined for purchase order approval, the rule is validated through all modes of order creation - manual creation, replenishment, spreadsheet upload, etc.
Figure 3-1 Custom Rule Validation for Order Approval
Defining Custom Validation Rules
Validation Rule wizard, accessed from the Create Custom Validation Rule option in the Application Administration menu in the Merchandising task list or via the Manage Custom Validation Rules search results, allows you to create and manage validation rules. The most elementary details which are needed to create a validation rule on an entity are description, type, associated error, execution sequence, and the query. The wizard also supports complex calculations involving multiple columns from one or more database tables.
Overview
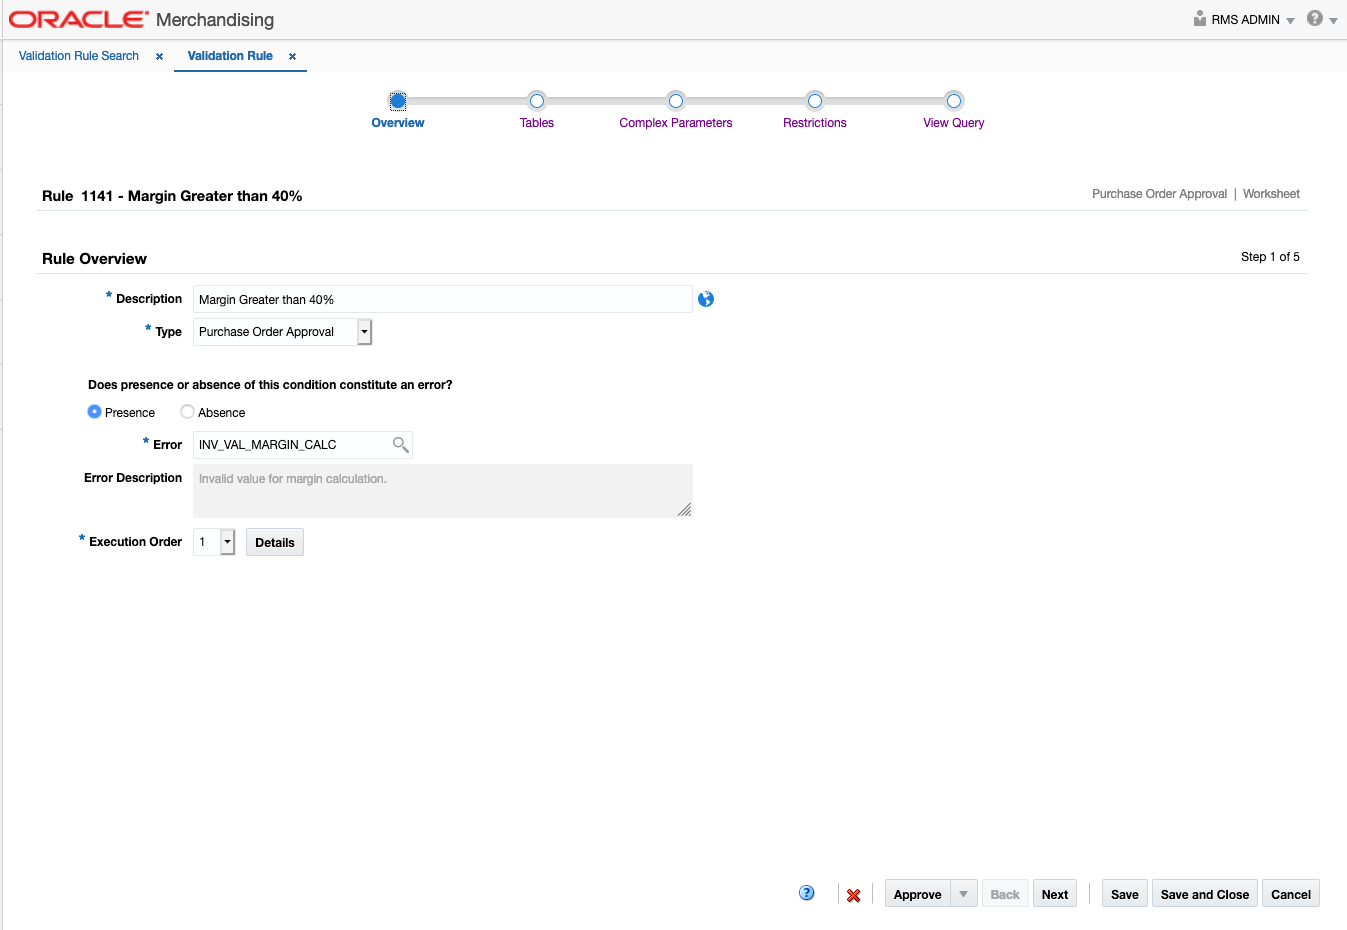
The first step in the Validation Rule wizard is the rule overview stop, which allows you to define basic information and characteristics for a rule. As per your rule definition. For each rule, you must define the following:
-
Description - A description for the rule.
-
Type - Determine the event for when rule is executed. Valid values are:
-
Item Submission
-
Item Approval
-
Purchase Order Submission
-
Purchase Order Approval
-
Supplier Activation
-
Supplier Deactivation
-
Partner Activation
-
Partner Deactivation
-
In addition, this determines the metadata corresponding to the event. See the Metadata section below for more details on what is available for each event type.
-
Presence/Absence - Specify whether the rule triggers an error when the constraint condition is met (presence) or when the data does not exist in the data set (absence).
-
Error - Associate a predefined error with the rule. Custom error messages can be added using the spreadsheet download/upload functionality in Merchandising. See the Merchandising Implementation Guide for more details.
-
Execution Order - Determine the order in which rules are executed within a type after the base rules are executed. Maximum execution order for a validation type is 20. However, there is no limit on number of rules at each execution order. Clicking on the Details button will show you the other rules that have been approved for the selected type to help in deciding on the execution order for your rule.
Tables
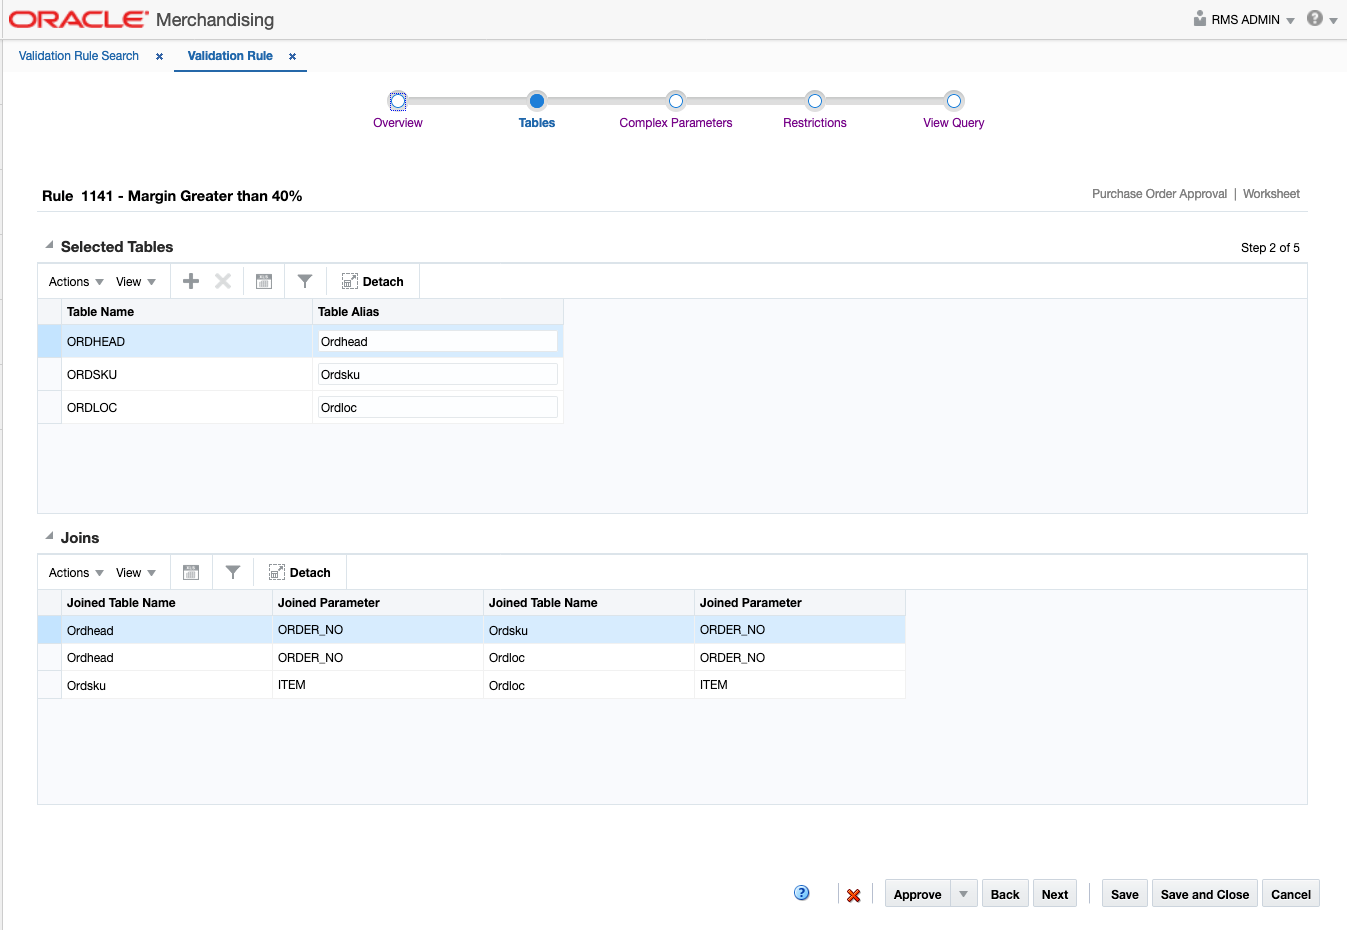
This stop in the wizard allows you to add tables to a rule and view the joins between the tables.
Selected Tables
By default, the primary table associated with the selected validation type is added to the rule, but you can also add tables to a rule from the list of available tables, as needed to define your rule, and define an alias for the added tables. For example, if you choose the rule type Purchase Order Approval, the ORDHEAD table is automatically added, but you may also want to include some of the other ordering tables like ORDLOC. The availability of tables is driven by metadata for each validation type (see "Migrating Custom Validation Rules" for more information).
Joins
Based on tables added, the joins are automatically added to restrict the dataset. For example, in the image below, you can see that a join was automatically added on ORDER_NO when the ORDLOC table was added to the rule. The only edits allowed for table joins are for cases where there is an ambiguity in columns names amongst tables, such as if you add the same table twice. For example, you may choose to add ITEM_MASTER twice for an item approval rule if you are needing to valid something for a parent or child item during approval. When a table can be joined with more than one selected table, you can choose which one to add in the join from a list provided.
Complex Parameters
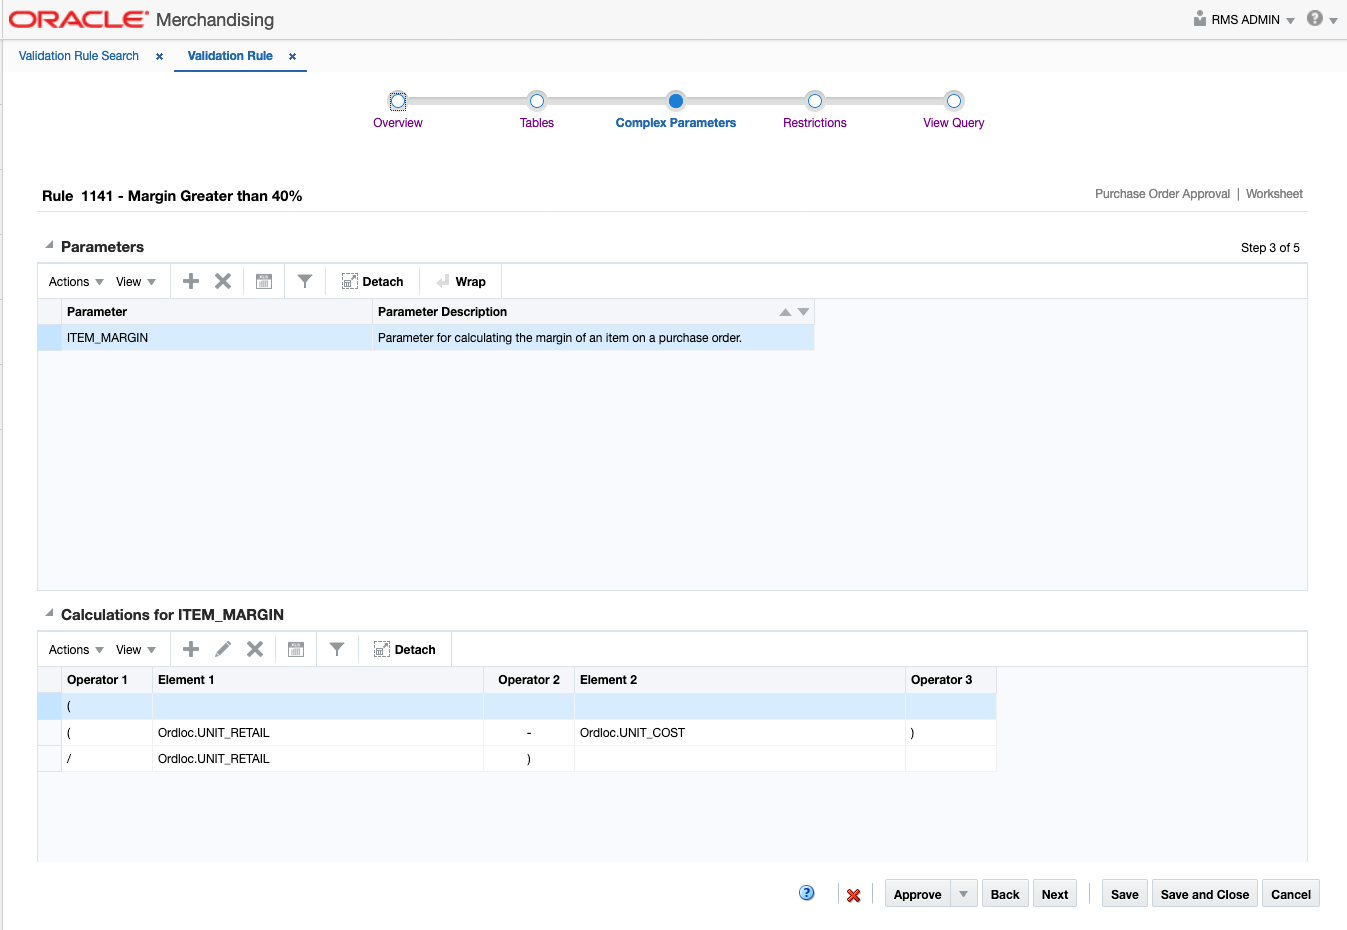
The next step in the rule setup, Complex Parameters, is optional. It allows you to define named parameters which are derived by applying arithmetic operators on columns from the selected tables. Later, you can add restrictions to the rule using these complex parameters. In the below example, a complex parameter for calculating an item's margin on a purchase order is shown.
Once you have determined the complex parameter required for a rule, begin by providing the name and description for the parameter. And then, add underlying calculations by choosing required arithmetic operators from the provided list and columns that are available in the tables that were previously added to the rule. As necessary, a calculation can extend through multiple lines under calculations section.
Restrictions
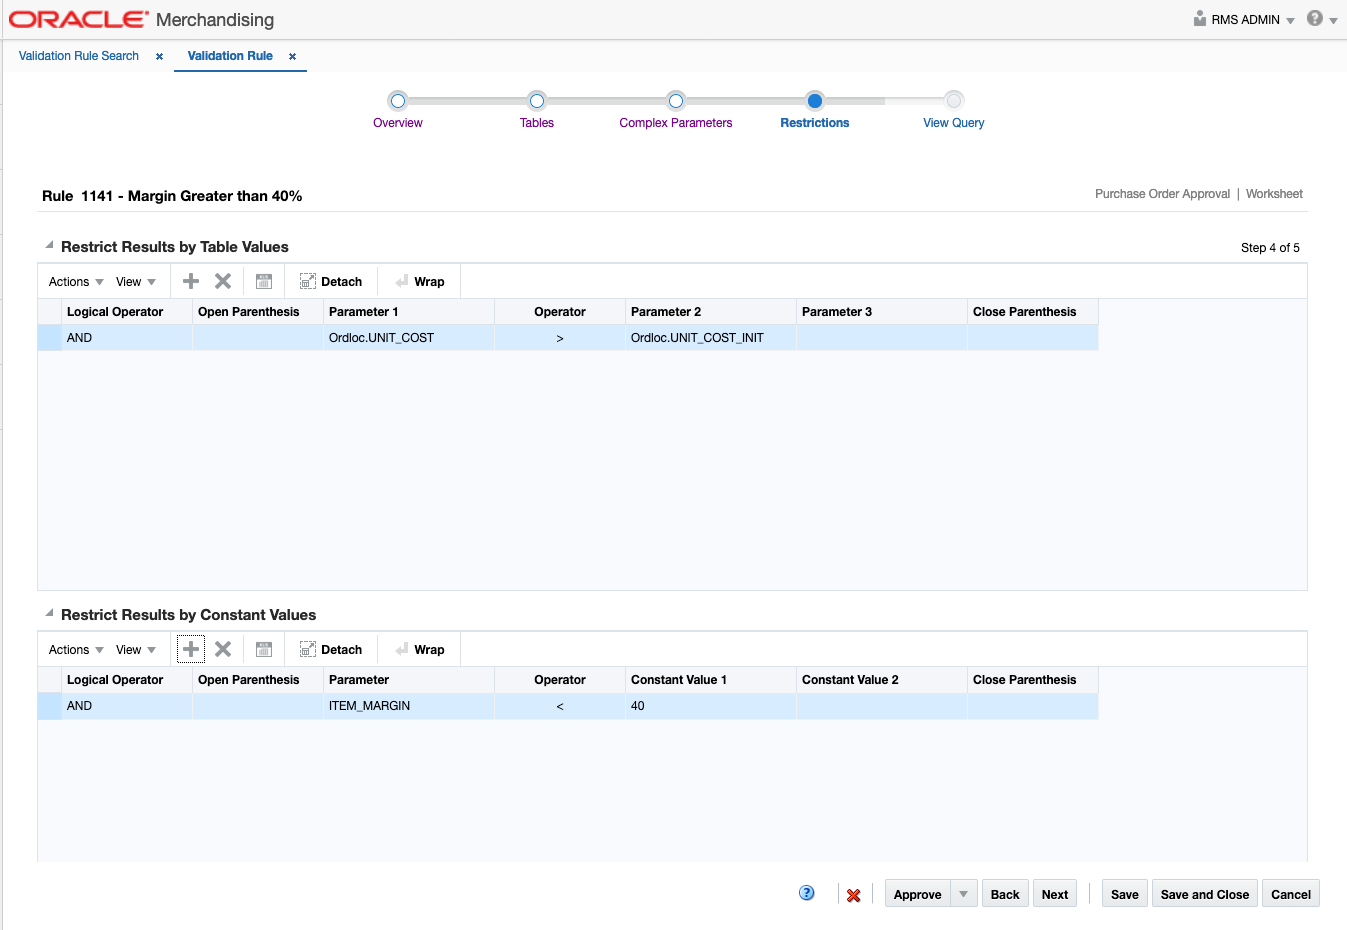
The Restrictions stop in the Validation Rule setup. At least one restriction is required, as this is what defines the rule. These constraints can be added by table values or by constants.
Restrict Results by Table Values
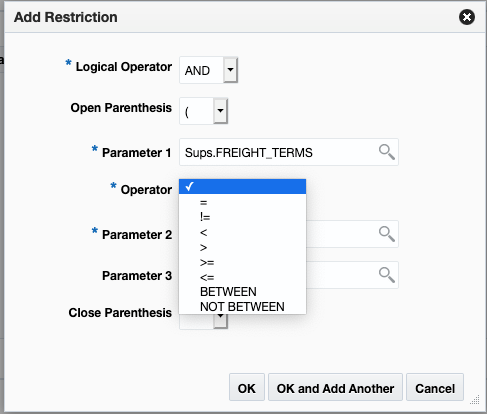
In this section, you can define restrictions by comparisons between two table columns. These would supplement the joins already defaulted to join the tables by their primary key. The comparisons can be defined using various operators, as shown below. You can also define the restriction as an AND or OR condition. Columns on the tables that were added to the rule and complex parameters can be used here.
Restrict Results by Constant Values
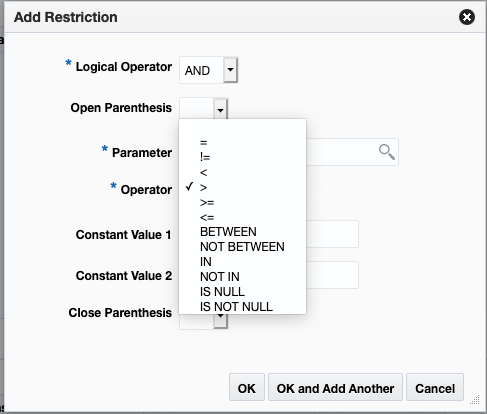
In this section, you can define restrictions by comparing table columns or complex parameter definitions to a constant value. The comparisons can be defined using various operators, as shown below. You can also define the restriction as an AND or OR condition.
Note:
When the rule query is constructed, strings are systematically enclosed within single quotes as required by SQL syntax. To avoid built-in functions like USER, GET_USER converting into a string due to above, enclosed built-ins within single quotes (') and pipe (||) operators when adding restrictions by constant values, e.g. if you are adding restriction to validate users stored in the table against your application login user, add GET_USER function as '||GET_USER||' in the Add Restriction popup.
View Query
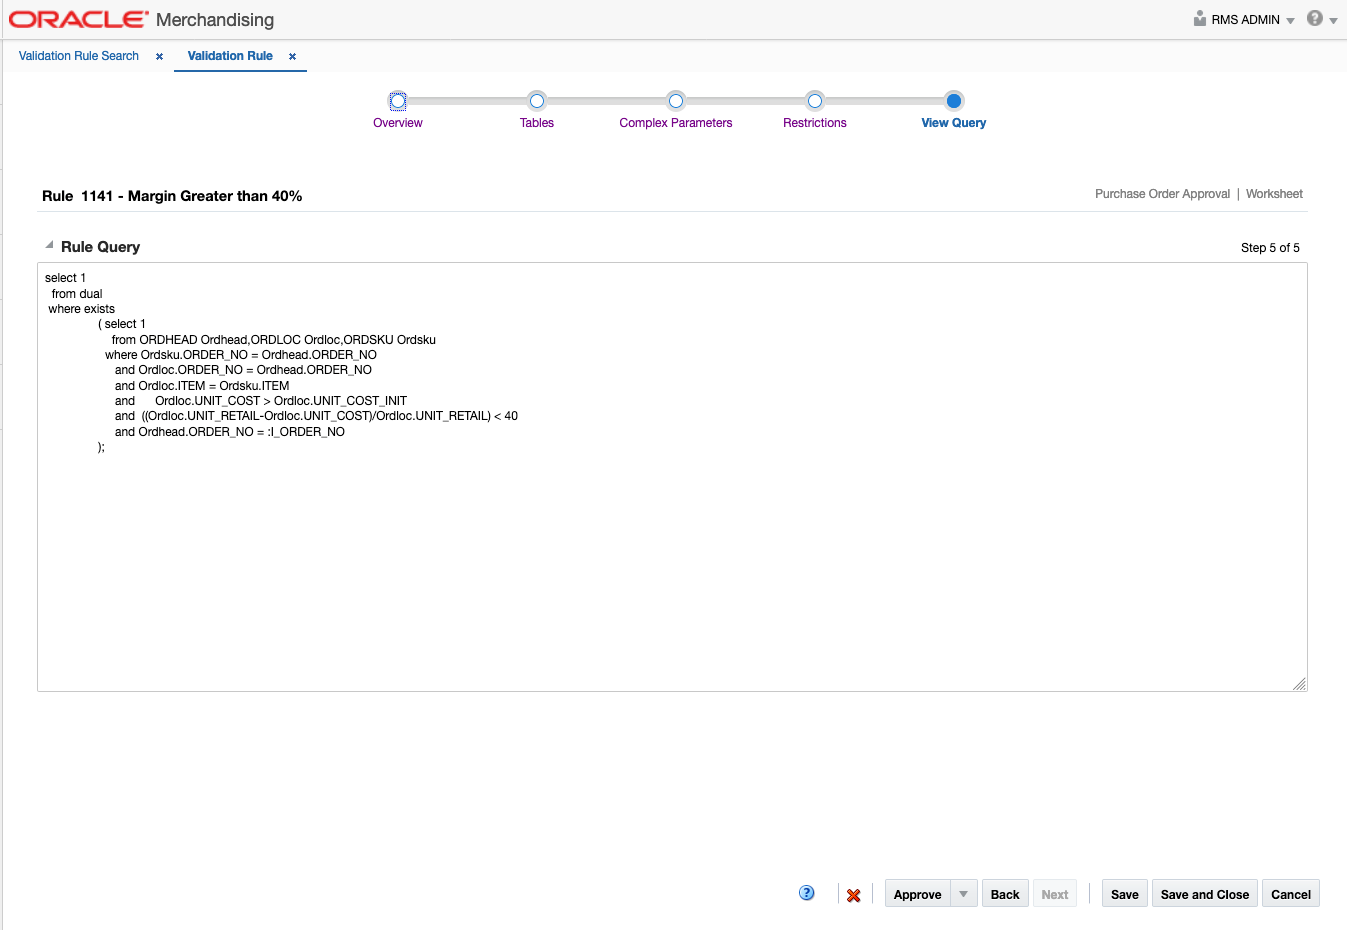
The last step in the wizard is to view the query that you have created based on the tables, complex parameters, and restrictions you've added. In the SQL query construct, the WHERE clause is designed to validate restrictions using "EXISTS" or "NOT EXISTS" conditions based on the setting for whether the presence or absence constitutes an error. You can validate the rule gives you the desired results by accessing the Data Viewer, copying the generated query, and replacing the input parameter. For example, in the image below the input parameter :I_ORDER_NO can be replaced by an actual order number for testing.
Approving Rules
A rule will not be run until it has been approved. Once you are satisfied with the rule construction, you can select to approve the rule and it will be executed the next time a user takes the action defined in the rule type (e.g. approve an item). To deactivate a rule, you can set it to Closed status or move it back to Worksheet status and to edit the rule or delete it if it is no longer valid. Existing rules are accessed through the Manage Custom Validation Rules option in the Merchandising task list under Application Administration.
Migrating Custom Validation Rules
If you have defined custom validation rules in one environment, such as a pre-production environment, and want them migrated to another environment, such as a production environment, this will require an SR to be logged, as this activity requires the support from the Oracle Cloud Operations team.
Rule Metadata
The below table outlines the metadata corresponding each validation type. This includes automatically added table and the additional tables which are available for your selection while defining a rule.
| Table | Item Submission/ Approval | PO Submission/ Approval | Supplier Activation/ Deactivation | Partner Activation/ Deactivation |
|---|---|---|---|---|
|
ADDR |
Y |
Y |
Y |
|
|
ALLOC_DETAIL |
Y |
|||
|
ALLOC_HEADER |
Y |
|||
|
CLASS |
Y |
Y |
||
|
CLASS_CFA_EXT |
Y |
Y |
||
|
DEPS |
Y |
Y |
||
|
DEPS_CFA_EXT |
Y |
Y |
||
|
FUTURE_COST |
Y |
|||
|
ITEM_CHRG_DETAIL |
Y |
|||
|
ITEM_CHRG_HEAD |
Y |
|||
|
ITEM_EXP_DETAIL |
Y |
Y |
Y |
|
|
ITEM_EXP_HEAD |
Y |
Y |
Y |
|
|
ITEM_HTS |
Y |
Y |
||
|
ITEM_HTS_ASSESS |
Y |
Y |
||
|
ITEM_IMAGE |
Y |
Y |
||
|
ITEM_IMAGE_TL |
Y |
Y |
||
|
ITEM_IMPORT_ATTR |
Y |
Y |
||
|
ITEM_LOC |
Y |
Y |
||
|
ITEM_LOC_CFA_EXT |
Y |
Y |
||
|
ITEM_LOC_SOH |
Y |
Y |
||
|
ITEM_LOC_TRAITS |
Y |
Y |
||
|
ITEM_MASTER |
Automatically added |
Y |
Y |
Y |
|
ITEM_MASTER_CFA_EXT |
Y |
Y |
Y |
Y |
|
ITEM_SEASONS |
Y |
Y |
||
|
ITEM_SUPP_MANU_COUNTRY |
Y |
Y |
Y |
|
|
ITEM_SUPP_UOM |
Y |
Y |
Y |
|
|
ITEM_SUPPLIER |
Y |
Y |
Y |
|
|
ITEM_SUPPLIER_CFA_EXT |
Y |
Y |
Y |
|
|
ITEM_SUPPLIER_COUNTRY |
Y |
Y |
Y |
|
|
ITEM_SUPPLIER_COUNTRY_CFA_EXT |
Y |
Y |
Y |
|
|
ITEM_SUPPLIER_COUNTRY_LOC |
Y |
Y |
Y |
|
|
ITEM_SUPPLIER_COUNTRY_LOC_CFA_EXT |
Y |
Y |
Y |
|
|
ITEM_TICKET |
Y |
Y |
||
|
ITEM_XFORM_DETAIL |
Y |
Y |
||
|
ITEM_XFORM_HEAD |
Y |
Y |
||
|
ORDCUST |
Y |
|||
|
ORDCUST_DETAIL |
Y |
|||
|
ORDHEAD |
Automatically added |
Y |
||
|
ORDHEAD_CFA_EXT |
Y |
Y |
||
|
ORDHEAD_DISCOUNT |
Y |
|||
|
ORDHEAD_REV |
Y |
Y |
||
|
ORDLC |
Y |
|||
|
ORDLOC |
Y |
|||
|
ORDLOC_CFA_EXT |
Y |
|||
|
ORDLOC_DISCOUNT |
Y |
|||
|
ORDLOC_EXP |
Y |
Y |
||
|
ORDLOC_REV |
Y |
|||
|
ORDSKU |
Y |
|||
|
ORDSKU_CFA_EXT |
Y |
|||
|
ORDSKU_HTS |
Y |
Y |
||
|
ORDSKU_HTS_ASSESS |
Y |
Y |
||
|
ORDSKU_REV |
Y |
|||
|
ORG_UNIT |
Y |
|||
|
ORG_UNIT_ADDR_SITE |
Y |
|||
|
OTB |
Y |
|||
|
PACKITEM |
Y |
Y |
||
|
PACKITEM_BREAKOUT |
Y |
Y |
||
|
PARTNER |
Y |
Y |
Y |
Automatically added |
|
PARTNER_CFA_EXT |
Y |
Y |
Y |
Y |
|
PARTNER_ORG_UNIT |
Y |
|||
|
RELATED ITEM_DETAIL |
Y |
|||
|
RELATED_ITEM_HEAD |
Y |
|||
|
RPM_CLEARANCE |
||||
|
RPM_CLEARANCE_GROUP |
||||
|
RPM_FUTURE_RETAIL |
||||
|
RPM_ITEM_ZONE_PRICE |
Y |
|||
|
RPM_MERCH_RETAIL_DEF |
||||
|
RPM_PRICE_CHANGE |
||||
|
RPM_PRICE_CHANGE_GROUP |
||||
|
RPM_ZONE |
||||
|
RPM_ZONE_GROUP |
||||
|
RPM_ZONE_LOCATION |
||||
|
SE_EVALUATION_RESULTS |
Y |
Y |
Y |
|
|
SE_EVALUATION_RESULTS_TL |
Y |
Y |
Y |
|
|
STORE |
Y |
Y |
||
|
STORE_CFA_EXT |
Y |
Y |
||
|
STORE_HIERARCHY |
Y |
Y |
||
|
SUBCLASS |
Y |
Y |
||
|
SUBCLASS_CFA_EXT |
Y |
Y |
||
|
SUP_INV_MGMT |
Y |
Y |
Y |
|
|
SUP_TRAITS |
Y |
Y |
Y |
|
|
SUPS |
Y |
Y |
Automatically added |
Y |
|
SUPS_CFA_EXT |
Y |
Y |
Y |
Y |
|
SUPS_IMP_EXP |
Y |
Y |
Y |
Y |
|
UDA |
Y |
|||
|
UDA_ITEM_DATE |
Y |
Y |
||
|
UDA_ITEM_FF |
Y |
Y |
||
|
UDA_ITEM_LOV |
Y |
Y |
||
|
UDA_VALUES |
Y |
|||
|
VAT_DEPS |
Y |
|||
|
VAT_ITEM |
Y |
Y |
||
|
WH |
Y |
Y |
||
|
WH_CFA_EXT |
Y |
Y |