1 Create a Cost Change
Cost Management refers to the procedure of maintaining the cost of the different items that are used in the retailer's setup and allow the user to manage any cost changes that occur during the lifecycle of these items.
You can manage cost changes in two different ways:
-
The Cost Change by Item option is used when a cost change needs to be defined at the item/supplier/country of sourcing level.
-
The Cost Change by Location option is used when a cost change needs to be defined at the item/supplier/country of sourcing/location level.
Cost Change by Item
Open the Cost Change or Cost Change by Item page:
From the Tasks menu, select Cost > Cost Change by Item. The Cost Change by Item page appears.
Additionally, you can access the Cost change through the Item Search page.
-
From the Tasks menu, select Items > Manage Items. The Item Search page appears, search for the desired item.
-
In the Results section, select Actions > Cost Change or use the Cost Change button. The Cost Change page appears.
-
In the Cost Change field, enter a description for the change.
-
In the Reason field, enter, select or search for a reason code for the cost change.
-
In the Effective Date field, enter the effective date for the cost change, or use the Calendar icon to select a date.
Change Costs by Item
The initial cost of an item is established at item set-up. The cost of an item can be adjusted in the item record till the item is approved. Any cost changes past that will need to be handled through the cost change pages.
When submitted through EDI, you review the cost change, then submit the cost change for approval.
When entered manually, you enter the cost change, an event description, an effective date and a reason code. Then you can submit the cost change for approval.
Note:
You cannot create a cost change for a transformed sellable item.
After you approve the cost change, the item/supplier cost record is updated and any outstanding purchase orders that have not been received are recalculated, if designated on the cost change, based on the updated cost.
You can access the Cost Change by Item page in different ways:
-
From the Tasks menu, select Cost > Create Cost Change by Item. The Cost Change by Item page appears.
You can also access the Cost Change by Item page through the Cost Change Search.
-
From the Tasks menu, select Cost > Manage Cost Changes. The Cost Change Search page appears.
-
Enter or select search criteria as desired to make the search more restrictive.
-
Click Search. The cost changes that match the search criteria are displayed in the Results section.
-
In the Results section, select a cost change.
-
Select Actions > Edit, or use the Edit icon
 . The Cost Change by Item page appears.
Additionally, you can access the Cost change through the Item Search page.
-
From the Tasks menu, select Items > Manage Items. The Item Search page appears.
-
Search for the desired item.
-
In the Results section, select a record.
-
Then select Actions > Cost Change, or use the Cost Change button. The Cost Change by Item page appears.
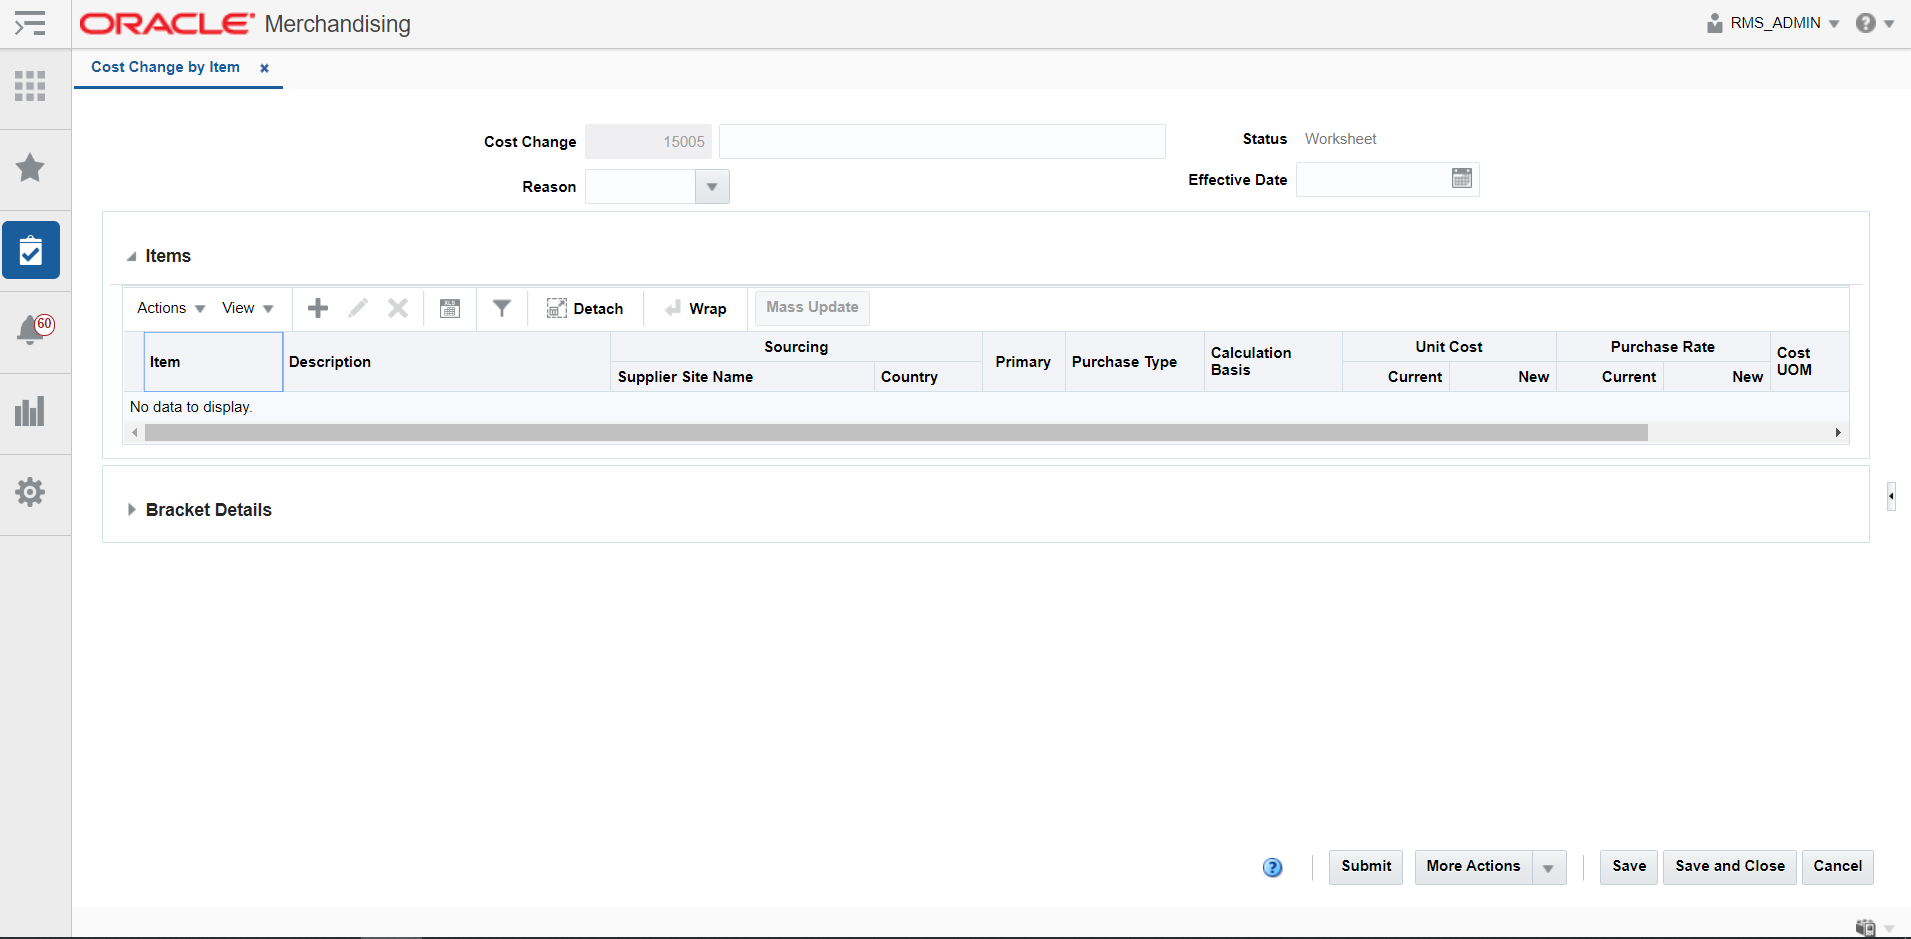
The page includes the following sections:
Figure 1-1 Cost Change by Item Page
Header
The cost change header section includes the following fields.
Table 1-1 Cost Change Header - Fields and Description
| Fields | Description |
|---|---|
|
Cost Change |
Enter a description for the cost change. This field contains the cost change number by default. |
|
Reason |
Enter, select or search for the reason for the cost change. |
|
Status |
The cost change status is displayed. |
|
Effective Date |
Enter the date on which the cost changes become effective, or use the Calendar icon to select a date. |
Bracket Details
The Bracket Details section is only available if bracket costing is applicable. The table contains the bracket details for the highlighted item for a supplier that supports bracket costing.
For items with brackets defined, the old unit cost and the new unit cost information is shown in the Bracket Details section and not in the Items section.
For items with no brackets defined, the cost information is displayed in the Item section and the Bracket Details section remains collapsed.
Add Items to a Cost Change
To add items for a cost change, follow the steps below.
-
In the Cost Change or Cost Change by Item page, go to Items section.
-
Select Actions > Add, or use the Add icon
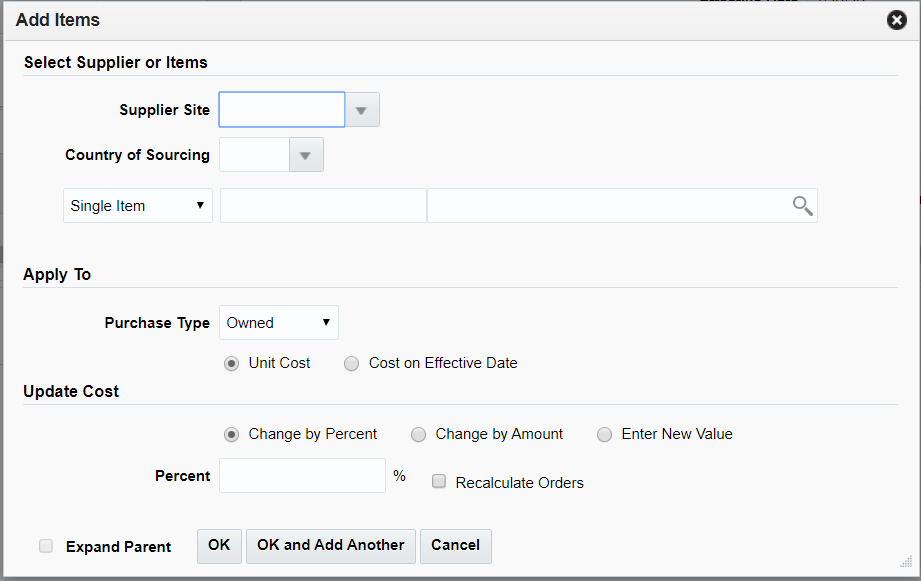
 . The Add Items pop-up appears.
Figure 1-2 Add Items Pop-up
-
In the Select Supplier or Items section, enter the following fields.
-
In the Supplier Site field, enter, select or search for the supplier site.
-
In the Country of Sourcing field, enter, select or search for the sourcing country.
-
In the Item field, enter, select or search for the item.
Note:
If you have accessed the Cost Change page through the Item Search, the selected item is displayed in this field. You cannot change the item and the Item List field is disabled.
-
In the Item List field, enter, select or search for the item list.
-
Select the Expand Parent checkbox to indicate that all the child items linked with the selected parent item need to be added to the cost change.
-
-
In the Apply To section, select the Purchase Type of the Items to which the Cost Change should be applied. In case of the Purchase Type is Owned, Select whether the change is applicable to Unit Cost or Cost on Effective Date. In case the Purchase type is Consignment or Concession specify if the Calculation basis should be overridden.
The Update Cost section is refreshed based on the Purchase Type selected
-
For a Purchase type of Owned, in the Update Cost section, select the mode of how the cost change should be applied through one of the following radio buttons.
-
Select Change by Percent to indicate the cost change in percent. The Percent field enables, enter the percent by which the cost changes. Use a negative symbol (-) before the percent to indicate a decrease in cost by percent.
-
Select Change by Amount to indicate the cost change by a certain amount. The Amount field enables, enter the amount by which the cost changes. Use a negative symbol (-) before the amount to indicate a decrease in cost by amount. Then enter, select or search for the currency.
-
Select Enter New Value to enter a new unit cost value for the item. The New Value field enables, enter the new cost of the item. The amount entered becomes the cost of all items selected for the cost change. Then enter, select or search for the currency.
-
Select the Recalculate Order checkbox to recalculate any outstanding purchase orders that have not been received based on the updated cost.
For a Purchase type of Consignment or Concession, the cost can be modified based on the Calculation basis which can be set to be either Cost per Unit or Purchase Rate. For a Calculation basis of Cost per Unit the cost change can specified by percent, by amount or based on a new value in a manner similar to the how a change is specified for a Purchase Type of Owned. For a Calculation basis of Purchase Rate, the New Purchase Rate value will need to be specified in percentage
-
-
Select the Expand Parent checkbox to indicate that all the child items linked with the selected parent item need to be added to the cost change.
-
Then choose one of the following options:
-
Click OK to add the item.
-
Select OK and Add Another to add additional items.
-
Click Cancel to reject all entries and close the pop-up.
-
Note:
Cost changes created at the parent item level will be cascaded only to those SKUs which have the same purchase type for the selected location. Any SKU having a different purchase type at that location will not be impacted by such a change.
Mass Update
Use the Mass Update option in the actions menu to apply the cost changes to the selected items in the table. To update the costs for multiple items, follow the steps below.
-
In the Cost Change or Cost Change by Item page, go to the Items section.
-
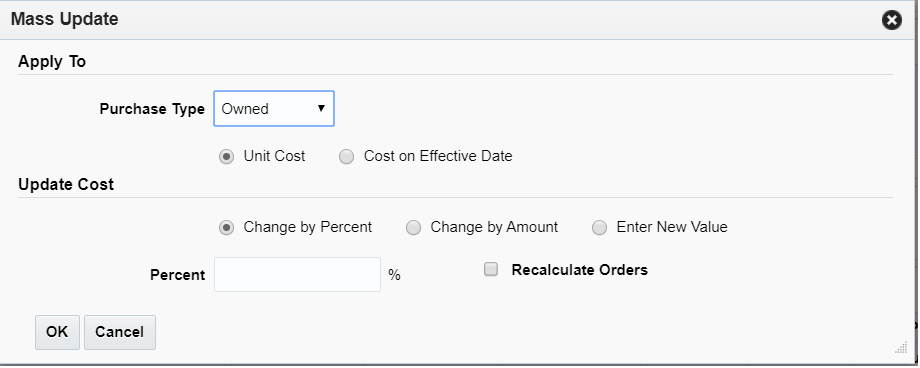
Mark the records you want to update in the table. Click the Mass Update button. The Mass Update pop-up appears.
Figure 1-3 Mass Update Pop-up
-
In the Apply To section, select the Purchase Type of the Items to which the Cost Change should be applied. In case of the Purchase Type is Owned, select whether the change is applicable to Unit Cost or Cost on Effective Date. In case the Purchase type is Consignment or Concession specify if the Calculation basis should be overridden.
The Update Cost section is refreshed based on the Purchase Type selected.
-
For a Purchase type of Owned, in the Update Cost section, select the mode of how the cost change should be applied through one of the following radio buttons.
-
Select Change by Percent to indicate the cost change in percent. The Percent field enables, enter the percent by which the cost changes. Use a negative symbol (-) before the percent to indicate a decrease in cost by percent.
-
Select Change by Amount to indicate the cost change by a certain amount. The Amount field enables, enter the amount by which the cost changes. Use a negative symbol (-) before the amount to indicate a decrease in cost by amount. Then enter, select or search for the currency.
-
Select Enter New Value to enter a new unit cost value for the item. The New Value field enables, enter the new cost of the item. The amount entered becomes the cost of all items selected for the cost change. Then enter, select or search for the currency.
-
Select the Recalculate Order checkbox to recalculate any outstanding purchase orders that have not been received based on the updated cost.
For a Purchase type of Consignment or Concession, the cost can be modified based on the Calculation basis which can be set to be either Cost per Unit or Purchase Rate. For a Calculation basis of Cost per Unit the cost change can specified by percent, by amount or based on a new value in a manner similar to the how a change is specified for a Purchase Type of Owned. For a Calculation basis of Purchase Rate, the New Purchase Rate value will need to be specified in percentage
-
-
Then choose one of the following options:
-
Click OK to apply the change to items in the selection.
-
Click Cancel to reject changes made and close the pop-up.
-
Add Bracket Details
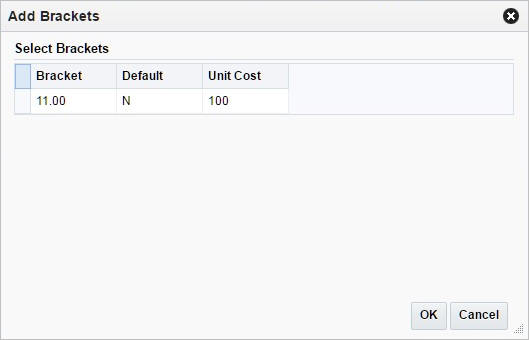
This option is only available if there are already existing brackets set up in the system. A location may have multiple brackets linked to it, all of which are added when the location is added. You can delete one or more of the brackets. Later, you can add these deleted brackets again by using the Add option.
To add the bracket details of cost change:
-
In the Cost Change or Cost Change by Item page, go to the Bracket Details section.
-
Select Actions > Add, or click the Add icon
 . The Add Brackets pop-up appears.
Figure 1-4 Add Brackets Pop-up
-
Select one or more of these brackets to add them back to the current cost change.
-
Then choose one of the following options.
-
Click OK to add the brackets to the current cost change.
-
Click Cancel to close the pop-up.
-
Cost Change by Location
The Cost Change by Location option is used when a cost change needs to be defined at the item/supplier/country of sourcing/location level.
When submitted through EDI, you review the cost change, then submit the cost change for approval.
When entered manually, you enter the cost change, an event description, an effective date and a reason code. Then submit the cost change for approval.
Note:
You cannot create a cost change for a transformed sellable item.
After you have approved the cost change, the item/supplier cost record is updated and any outstanding purchase orders that have not been received are recalculated.
You can access the Cost Change by Item page in different ways:
-
From the Tasks menu, select Cost > Manage Cost Changes. The Cost Change Search page appears.
-
Enter or select search criteria as desired to make the search more restrictive.
-
Click Search. The cost changes that match the search criteria are displayed in the Results section.
-
In the Results section, select a cost change by location.
-
Select Actions > Edit, or use the Edit icon
 . The Cost Change by Location page appears.
The page includes the following sections:
Figure 1-5 Cost Change by Location Page
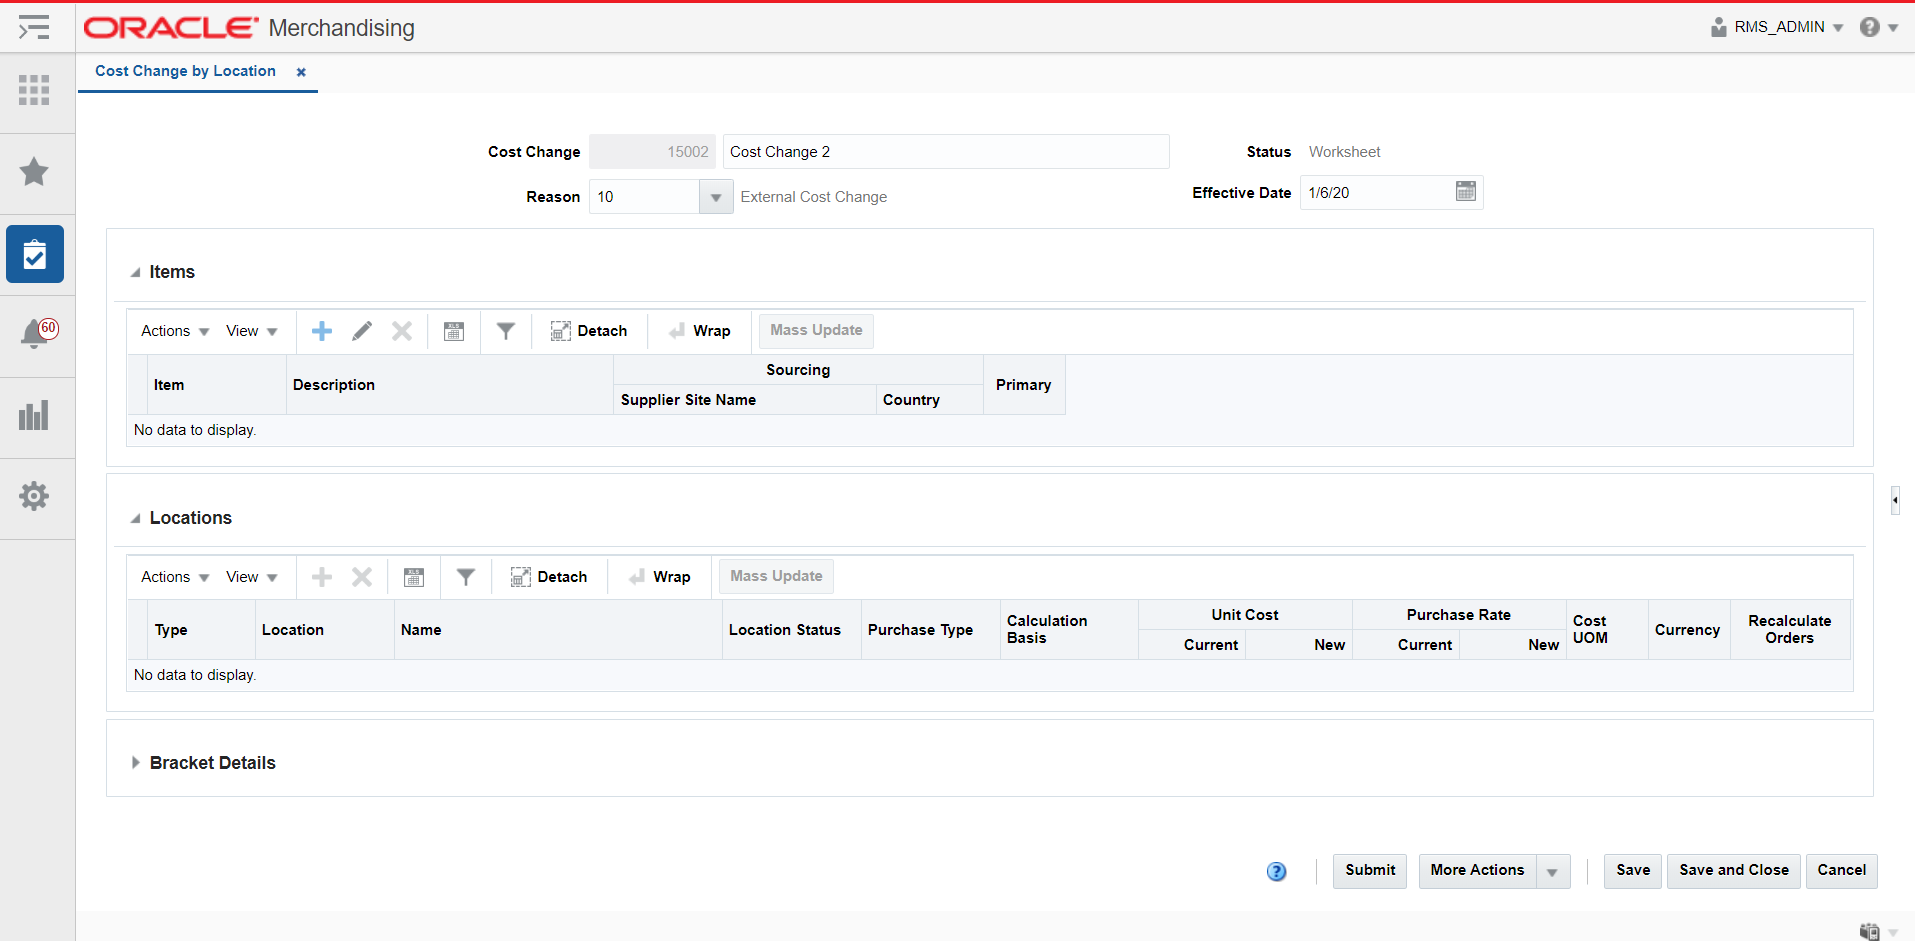
Header
The cost change header section includes the following fields.
Table 1-2 Cost Change Header - Fields and Description
| Fields | Description |
|---|---|
|
Cost Change |
Enter a description for the cost change. This field contains the cost change number by default. |
|
Reason |
Enter, select or search for the reason for the cost change. |
|
Status |
The cost change status is displayed by default. |
|
Effective Date |
Enter the date on which the cost changes become effective, or use the Calendar icon to select a date. |
Locations
The Locations section contains the location details for the selected record in the Items section. You can add, delete and mass update locations for the cost change.
Bracket Details
The Bracket Details section is only available if bracket costing is applicable. The table contains the bracket details for the highlighted item for a supplier that supports bracket costing.
For items with brackets defined, the old unit cost and the new unit cost information is shown in the Bracket Details section and not in the Items section.
For items with no brackets defined, the cost information is displayed in the Item section and the Bracket Details section remains collapsed.
Cost Change by Location Toolbar
For information about the toolbar, see “Screen Level Action - Icons and Buttons" in the Oracle Retail Merchandising Do the Basics User Guide.
Create Cost Changes by Location
To create a cost change by location, follow the steps below.
Open the Cost Change or Cost Change by Item page:
-
From the Tasks menu, select Cost > Create Cost Change by Location. The Cost Change by Location page appears.
-
In the Cost Change field, enter a description for the change.
-
In the Reason field, enter, select or search for a reason code for the cost change.
-
In the Effective Date field, enter the effective date for the cost change, or use the Calendar icon to select a date.
Add Items to a Cost Change
To add items to a cost change, follow the steps below.
-
In the Cost Change by Location page, go to the Items section.
-
Select Actions > Add, or use the Add icon
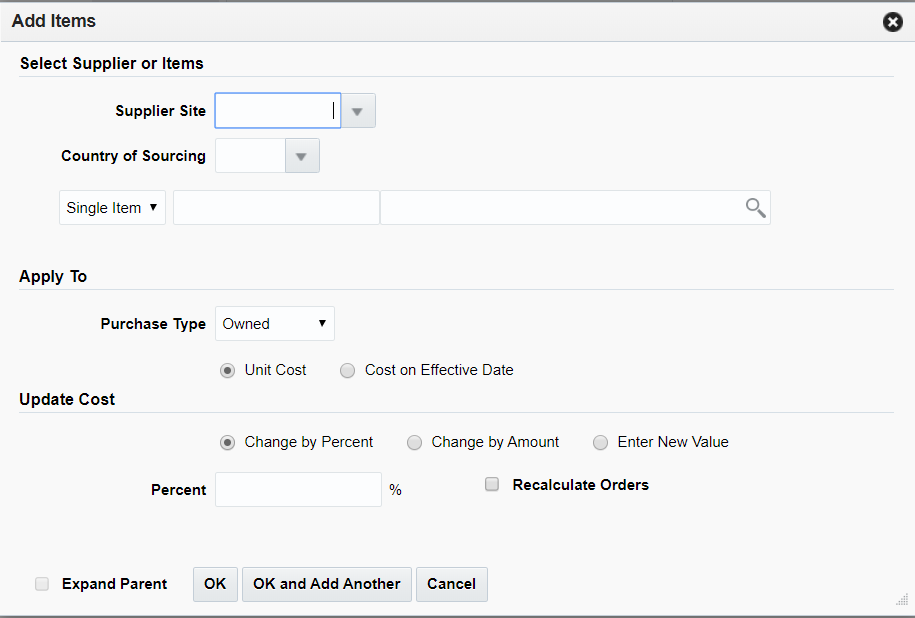
 . The Add Items pop-up appears.
Figure 1-6 Add Items Pop-up
-
In the Select Supplier or Items section, enter the following fields.
-
In the Supplier Site field, enter, select or search for the supplier site.
-
In the Country of Sourcing field, enter, select or search for the sourcing country.
-
In the Item field, enter, select or search for the item.
Note:
If you have accessed the Cost Change page through the Item Search, the selected item is displayed in this field. You cannot change the item and the Item List field is disabled.
-
In the Item List field, enter, select or search for the item list.
-
-
In the Apply To section, select the Purchase Type of the Items to which the Cost Change should be applied. In case of the Purchase Type is Owned, Select whether the change is applicable to Unit Cost or Cost on Effective Date. In case the Purchase type is Consignment or Concession specify if the Calculation basis should be overridden.
The Update Cost section is refreshed based on the Purchase Type selected.
-
For a Purchase type of Owned, in the Update Cost section, select the mode of how the cost change should be applied through one of the following radio buttons.
-
Select Change by Percent to indicate the cost change in percent. The Percent field enables, enter the percent by which the cost changes. Use a negative symbol (-) before the percent to indicate a decrease in cost by percent.
-
Select Change by Amount to indicate the cost change by a certain amount. The Amount field enables, enter the amount by which the cost changes. Use a negative symbol (-) before the amount to indicate a decrease in cost by amount. Then enter, select or search for the currency.
-
Select Enter New Value to enter a new unit cost value for the item. The New Value field enables, enter the new cost of the item. The amount entered becomes the cost of all items selected for the cost change. Then enter, select or search for the currency.
-
Select the Recalculate Order checkbox to recalculate any outstanding purchase orders that have not been received based on the updated cost.
For a Purchase type of Consignment or Concession, the cost can be modified based on the Calculation basis which can be set to be either Cost per Unit or Purchase Rate. For a Calculation basis of Cost per Unit the cost change can specified by percent, by amount or based on a new value in a manner similar to the how a change is specified for a Purchase Type of Owned. For a Calculation basis of Purchase Rate, the New Purchase Rate value will need to be specified in percentage.
-
-
Select the Expand Parent checkbox to indicate that all the child items linked with the selected parent item need to be added to the cost change.
-
Then choose one of the following options:
-
Click OK to add the item.
-
Select OK and Add Another to add additional items.
-
Click Cancel to reject all entries and close the pop-up.
-
Mass Update Items
Use the Mass Update option in the actions menu to apply the cost changes to the selected items in the table. To update the costs for multiple items, follow the steps below.
-
In the Cost Change by Location page, go to the Items section.
-
Mark the records you want to update in the table. Click the Mass Update button. The Mass Update pop-up appears.
Figure 1-7 Items - Mass Update Pop-up

-
In the Apply To section, select the Purchase Type of the Items to which the Cost Change should be applied. In case of the Purchase Type is Owned, Select whether the change is applicable to Unit Cost or Cost on Effective Date. In case the Purchase type is Consignment or Concession specify if the Calculation basis should be overridden.
The Update Cost section is refreshed based on the Purchase Type selected.
-
For a Purchase type of Owned, in the Update Cost section, select the mode of how the cost change should be applied through one of the following radio buttons.
-
Select Change by Percent to indicate the cost change in percent. The Percent field enables, enter the percent by which the cost changes. Use a negative symbol (-) before the percent to indicate a decrease in cost by percent.
-
Select Change by Amount to indicate the cost change by a certain amount. The Amount field enables, enter the amount by which the cost changes. Use a negative symbol (-) before the amount to indicate a decrease in cost by amount. Then enter, select or search for the currency.
-
Select Enter New Value to enter a new unit cost value for the item. The New Value field enables, enter the new cost of the item. The amount entered becomes the cost of all items selected for the cost change. Then enter, select or search for the currency.
-
Select the Recalculate Order checkbox to recalculate any outstanding purchase orders that have not been received based on the updated cost.
For a Purchase type of Consignment or Concession, the cost can be modified based on the Calculation basis which can be set to be either Cost per Unit or Purchase Rate. For a Calculation basis of Cost per Unit the cost change can specified by percent, by amount or based on a new value in a manner similar to the how a change is specified for a Purchase Type of Owned. For a Calculation basis of Purchase Rate, the New Purchase Rate value will need to be specified in percentage
-
-
Then choose one of the following options:
-
Click OK to apply the change to items in the selection.
-
Click Cancel to reject changes made and close the pop-up.
-
Add Locations to a Cost Change
To add the locations to a cost change:
-
In the Cost Change by Location page, go to the Locations section.
-
Select Actions > Add, or click the Add icon
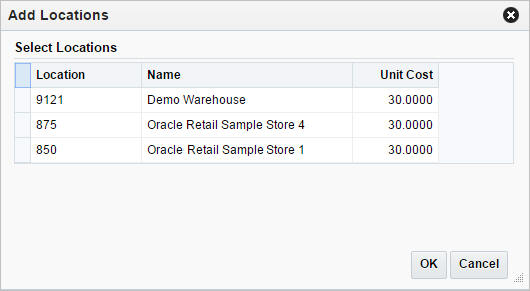
 . The Add Locations pop-up appears.
Figure 1-8 Add Locations Pop-up
-
All locations initially removed from the cost change, because no new cost was specified, are displayed.
-
Select one or more locations in the table.
-
Then select one of the following options.
-
Click OK to add the locations to the cost change and close the pop-up.
-
Click Cancel to reject all entries and close the pop-up.
-
Mass Update Locations
Use the Mass Update option in the actions menu to apply the cost changes to the selected locations in the table. To update the costs for multiple locations, follow the steps below.
-
In the Cost Change by Location page, go to the Locations section.
-
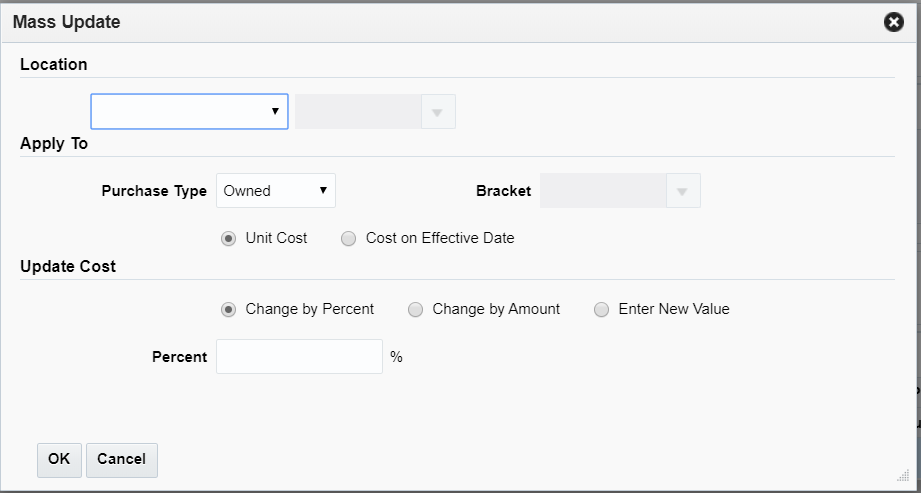
Mark the records you want to update in the table. Click the Mass Update button. The Mass Update pop-up appears.
Figure 1-9 Locations - Mass Update Pop-up
-
In the Location section, select the location information for the mass update.
-
In the Apply To section, select the Purchase Type of the Items to which the Cost Change should be applied. In case of the Purchase Type is Owned, Select whether the change is applicable to Unit Cost or Cost on Effective Date. In case the Purchase type is Consignment or Concession specify if the Calculation basis should be overridden.
The Update Cost section is refreshed based on the Purchase Type selected. The user can also select a bracket for update.
-
For a Purchase type of Owned, in the Update Cost section, select the mode of how the cost change should be applied through one of the following radio buttons.
-
Select Change by Percent to indicate the cost change in percent. The Percent field enables, enter the percent by which the cost changes. Use a negative symbol (-) before the percent to indicate a decrease in cost by percent.
-
Select Change by Amount to indicate the cost change by a certain amount. The Amount field enables, enter the amount by which the cost changes. Use a negative symbol (-) before the amount to indicate a decrease in cost by amount. Then enter, select or search for the currency.
-
Select Enter New Value to enter a new unit cost value for the item. The New Value field enables, enter the new cost of the item. The amount entered becomes the cost of all items selected for the cost change. Then enter, select or search for the currency.
-
Select the Recalculate Order checkbox to recalculate any outstanding purchase orders that have not been received based on the updated cost.
For a Purchase type of Consignment or Concession, the cost can be modified based on the Calculation basis which can be set to be either Cost per Unit or Purchase Rate. For a Calculation basis of Cost per Unit the cost change can specified by percent, by amount or based on a new value in a manner similar to the how a change is specified for a Purchase Type of Owned. For a Calculation basis of Purchase Rate, the New Purchase Rate value will need to be specified in percentage
-
-
Then choose one of the following options:
-
Click OK to apply the change to items in the selection.
-
Click Cancel to reject changes made and close the pop-up.
-