7 Data Viewer
Data Viewer is a workspace that provides read-only access to the Merchandising functional data in production environments and read/write access in non-production environments. In production environments, this extension is a workspace for customer support personnel to view the data to troubleshoot issues. In non-production environments, there is more flexibility to assist with conversion of data, configuration of the solution, and some minor data correction, when required. This chapter provides the steps to configure your workspace in a SaaS environment. This will need to be done for each of your environments where you want this enabled.
Workspace
A workspace <RETAILER_WORKSPACE> is predefined for you and is where workspace users can view the application data. The workspace has the privilege to the allocated <RETAILER_WORKSPACE_SCHEMA> database schema. The schema has the synonyms with read only privileges (in production) or read-write privileges (in non-production) to the Merchandising database tables and views. There are a few tables that are excluded, which are either used internally only (e.g. temp tables) or tables in the encrypted schema.
Users and Roles
Data Viewer has two types of users, workspace viewer and workspace administrators. As a workspace administrator, you can create and edit workspace viewer accounts, monitor the activities.
For SaaS implementations, the first time that you access the Data Viewer, only the person designated as your initial service administrator (such as, the receiver of the welcome email) will be setup with access. You will need to log in with that username/password in order to provide other users with access, including other administrators. Before you create accounts for your users, you must create users in Oracle Cloud Infrastructure Identity and Access Management (OCI IAM) with the same user name.
Create a Workspace Viewer
Perform the following procedure to create a workspace viewer:
-
Log in to Merchandising.
Although data from other Merchandising cloud services can also be viewed using this capability, the only access for this link is in Merchandising.Note:
-
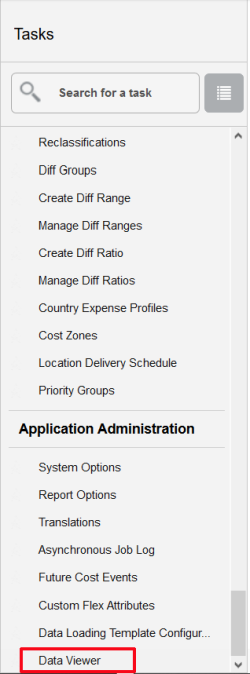
From the Tasks list, under Application Administration, select Data Viewer.
Figure 7-1 RMFCS Task Menu

Note:
If you do not see this link, validate that your role is associated with the DATABASE_VIA_APPLICATION_EXPRESS_INQUIRY_DUTY and/or VIEW_DATABASE_VIA_APPLICATION_EXPRESS_PRIV. -
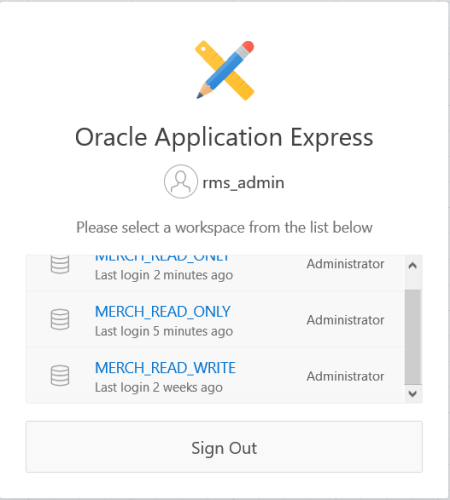
Select the appropriate APEX workspace.
Figure 7-2 APEX Workspace Selection Dialog

-
From the Administration drop down menu, select Manage Users and Groups.
Figure 7-3 APEX Administration Drop Down Menu

-
From the Manage Users and Groups window, click Create User.
Figure 7-4 Oracle APEX Manage Users and Groups Window

-
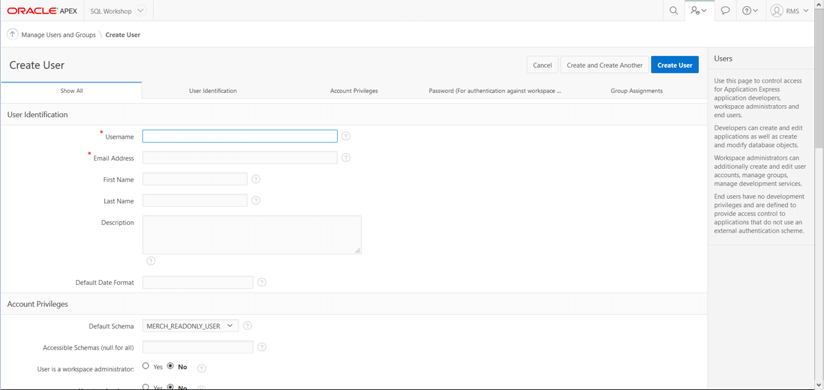
From the Oracle APEX Create User window, create a new workspace viewer account and ensure that the default <RETAILER_WORKSPACE_SCHEMA> is assigned.
Figure 7-5 Oracle APEX Create User Window

-
Assign the new workspace viewer with the following settings:
-
User is a workspace administrator – No
-
User is a developer – Yes
-
App Builder Access – No
-
SQL Workshop Access – Yes
-
Team Development Access – No
-
Set Account Availability – Unlocked
-
Require Change of Password on First Use – No
-
-
Once all information is entered, click Create User to complete the user creation.
Note:
The users you are creating in Data Viewer should already exist in IDCS or OCI IAM. See also the Oracle documentation on Application Express for more details on using this tool.