1 Overview
This document addresses aspects of security that are mentioned in the Merchandising Cloud Services Security Guide and describes them in more detail as well as outlines how they are used in Merchandising’s Location Destination specifically.
Application Functional Security
Merchandising’s Location Destination functional security supports a role-based, declarative model where resources are protected by roles that are assigned to users. Roles are associated to one or more duties, which are logical groupings of privileges, which provide different access rights. In this manner, an application role becomes the container that grants permissions to its members to access the application tasks, screens and the functionality within.
Roles
Roles, also referred to as Job Roles, align with titles or jobs within a retailer's organization, such as a Application Administrator or Supply Chain Analyst. Roles are used to classify users based on job responsibilities and actions to be performed in the application. One or more duties as well as individual privileges, if desired, can be assigned to roles. When a user logs into the application, based on the roles assigned to the user, the system determines which privileges have been granted to the user and the system features are enabled accordingly.
All users intending to access Merchandising’s Locations Destination, which is a JET-based solution, must be assigned the PLATFORM_SERVICES_ADMINISTRATOR_ABSTRACT role (for non-production environments, this role would need a _PREPROD suffix). This role is needed to access JET-specific platform services, which includes the setting of the user’s language preference. See the ‘Merchandising Cloud Service Suite Authentication, Authorization and Data Filtering’ chapter of the Merchandising Cloud Services Security Guide for more details.
Duties
Duties are tasks one must perform in the context of their job. Duties in Merchandising’s Location Destination are logical groupings of privileges or other duties that grant users access to a set of functionally related tasks within the solution.
Privileges
Privileges are used to grant permission to access links into workflows, screens, actions and in some cases specific fields within the application. Privileges that grant access to related functionality are grouped together into duties that permit a user to perform a complete task to fulfill responsibilities within the context of their job.
Data Filtering
The Oracle Retail Merchandising set of solutions offer an optional layer of data filtering in the solution user interface, which limits the data end users see based on levels in the merchandise and organizational hierarchies.
Data filtering in the Locations Destination is completely determined by the setup performed in Merchandising. Whether or not this is used in your environment, is controlled by a system option in the Merchandising solution, which is also where all the configuration for this functionality is managed.
This data level filtering is configured by assigning users to a data security group. The group then is assigned to levels of the merchandise and organizational hierarchy. All users within a group will have similar access to a particular section of the merchandise or organizational hierarchy. For example, a group may be defined for a particular division, giving users across application job roles, access to the departments, classes, subclasses, and items in that division.
All Merchandising users must be included in the user/group relationships configured in Merchandising so that they are able to access the data needed to perform their jobs. With data filtering enabled, users are only be able to work with items that are part of the merchandise hierarchy to which they have been given data filtering access. Similarly, users are only able to work with locations (or zones containing locations) that are part of the organizational hierarchy to which they have been given data filtering access.
To implement data filtering, see the Manage Data Filtering chapter in the Oracle Retail Merchandising Administration Guide.
Enabling Access
Granting access to the Locations Destination requires setup in OCI IAM, and the Retail Application Administration Console (RAAC) from both Merchandising and the Locations Destination. When you access RAAC from Merchandising, you can view and manage only roles, duties and privileges for managing access within the ADF Merchandising UI shell. When you access RAAC from the Locations Destination, you view and manage only roles, duties and privileges for managing access within the Locations Destination JET UI.
Steps
- In OCI IAM, grant a user administration access to the following roles. For details on how to do this, see the Retail Identity Management Startup Guide for OCI IAMOCI Startup.
- Locations Destination Administrator role (FND_APPLICATION_ADMINISTRATOR_JOB) (for non-production environments, this role would need a _PREPROD suffix).
- PLATFORM_SERVICES_ADMINISTRATOR_ABSTRACT role.
- All users intending to access Merchandising’s Locations Destination, which is a JET-based solution, must be assigned the PLATFORM_SERVICES_ADMINISTRATOR_ABSTRACT role (for non-production environments, this role would need a _PREPROD suffix). This role is needed to access JET-specific platform services, which includes the setting of the user’s language preference. See the ‘Merchandising Cloud Service Suite Authentication, Authorization and Data Filtering’ chapter of the Merchandising Cloud Services Security Guide for more details.
- Ensure you have performed the Enablement Steps for the new duties/privileges introduced. See the release notes for details and refer to the Policy Patching section in the Merchandising Cloud Services Administration Guide while performing the below steps.
- Ensure the Locations Destination Access Duty (RMS_LOCATIONS_DESTINATION_ACCESS_DUTY) and the View Locations Destination Priv (VIEW_LOCATIONS_DESTINATION_PRIV) have been added to your environment.
- Enablement Steps
For new/updated duties and privileges, the following actions are required in the order described below in order to enable the features. If this update doesn't contain changes related to one of the steps below, it can be skipped and you can move to the next one. For more information on the workflows used to support the actions described below, see the Merchandising Cloud Services Administration Guide.
Step 1: Remove Privileges and/or Duties
For each of the privileges described as removed in Appendix D – What's New, do the following:
- Select Settings > Security > Role Mappings
- Search for every instance of the removed privileges and delete from the roles.
For each of the duties that were listed as removed in Appendix D – What's New, you do not need to delete them, but you may choose to, in order to stay in closer alignment with the base configuration. If you choose to delete these duties, then follow these steps:
- Select Settings > Security > Role Mappings
- Search for every instance of the removed duties and delete them
Step 2: Add New Duties
For each of the new duties listed in Appendix D – What's New, follow these steps:
- Select Settings > Security > Roles
- Click on the Add iconic button or select Add from the Actions menu
- Add the first new duty, including the name (duty identifier), and optionally the description in the popup displayed. Then click OK.
- Repeat for all new duties.
Step 3: Map New Duties to Roles
Each of the new duties should then be added to the roles that require the access.
- Select Settings > Security > Role Mappings
- Select a role that will be assigned one or more of the duties
- For each role, click Select and Add and then select the duties you want to add to the role using the popup
- Repeat for each role where you want to add the new duties
Step 4: Add Child Duties
For any new duty listed in Appendix D – What's New that contains other duties, the child duty will also need to be mapped to the new duty using the below steps.
- Select Settings > Security > Role Mappings
- Highlight the parent duty
- Click Select and Add and then select the duties you want to add to the role using the popup.
- Repeat until you have added all child duties to the parent duties
Step 5: Synchronize Changes to Duty to Role Mappings
Each role then needs to have the changes synchronized.
- Select Settings - Security - Policy Patching
- Select Sync with Patch to view the details
- Under the Base Policies tab, working through the roles one at a time, select the checkbox next to each the duties
- Click Copy to Custom and then select the role
- Repeat until you have synchronized each role
Note: the Copy to Custom option does not clear the check boxes that you selected, so be sure to de-select the check boxes after each role.
Step 6: Synchronize Privileges with New Duties
Each new duty then needs to have its privileges synchronized.
- Select Settings > Security > Policy Patching
- Select Sync with Patch
- Under the Base Policies tab, working through the duties one at a time, select the checkbox next to each the corresponding privileges
- Click Copy to Custom and then select the duty
- Repeat until you have synchronized each duty
Note:
The Copy to Custom option does not clear the check boxes that you selected, so be sure to de-select the check boxes after each duty.
Step 7: Synchronize Modified Privileges
Each privilege that had changed permissions will need to be synchronized to update these permissions for the patch.
- Select Settings > Security > Policy Patching
- Select Sync with Patch
- Under the Base Policies tab, select the checkbox next to each the corresponding privileges and click Sync
- Repeat this for each privilege that had updated permission
- Map the Locations Destination Access Duty to the same user in Merchandising’s Application Administration Console (RAAC). See the Merchandising Security Guide for details of the Locations Destination Access Duty and the View Locations Destination Priv.
Table 1-1 Locations Destination Access Duty Mapping
Functional Area Duty Duty Description Privileges Contained Within Organizational Hierarchy - Locations Destination Locations Destination Access Duty A duty for accessing the Locations Destination, which serves as a hub for creating, viewing and maintaining location-related foundation data.
NOTE: This controls access to the Locations Destination from the Merchandising ADF UI. To control access to workflows within the Locations Destination JET UI, see the Locations Destination Security Guide.
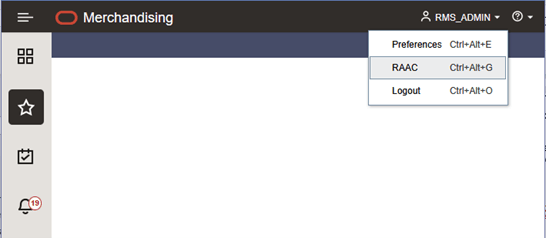
View Locations Destination Priv - To access RAAC for Merchandising security setup, from Merchandising, select ‘RAAC’ from the user menu.
Figure 1-1 Merchandising User Menu
- If you attempt to map the Locations Destination Access Duty to a role in the Role Mapping screen in Merchandising’s Application Administration Console (RAAC) via the Select and Add option and find that the duty is not available to be added, then the Enablement Steps have likely been missed. Refer back to the Enablement Steps provide above in Step 2b.
- To access RAAC for Merchandising security setup, from Merchandising, select ‘RAAC’ from the user menu.
- Begin granting access to other roles as desired via the Locations Destination’s Application Administration Console (RAAC). See the Locations Destination Security Guide for details of the duties and privileges used to manage access within the Locations Destination.
- To access Retail Application Administration Console (RAAC) for the Locations Destination, follow these steps:
- In Merchandising open the Tasks list from the sidebar menu.
- Click the Foundation Data folder.
- Click the Location Foundation folder.
Figure 1-2 Location Foundation Folder in Merchandising Tasks List
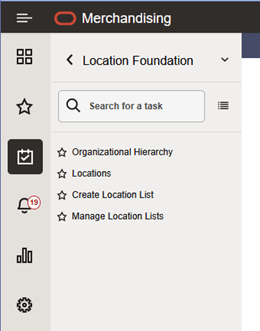
- Click the ‘Locations’ link in the Location Foundation folder. The Locations Destination opens in a new browser tab. If the user does not yet have access to entities within the Locations Destination, the main content area on this page will appear blank. A user with the Foundation Application Administrator role will have access to all entities within the Locations Destination.
Figure 1-3 Locations Destination Landing Page
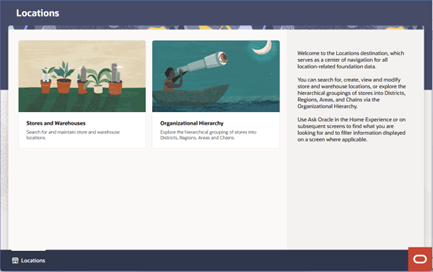
- Click the ‘O-tag’ Oracle icon in the bottom right corner of the screen. The Home Experience opens.
Figure 1-4 Locations Destination – Home Experience – Product Map View
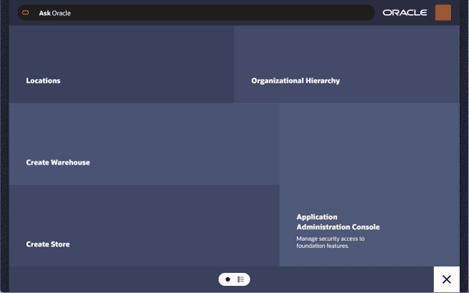
- Scroll to find the ‘Application Administration Console’ option (located in the bottom right of the Product Map view), or search for it using the search bar at the top of the page.
- To access Retail Application Administration Console (RAAC) for the Locations Destination, follow these steps: