6 Review Replenishment Results
Buyer Worksheet
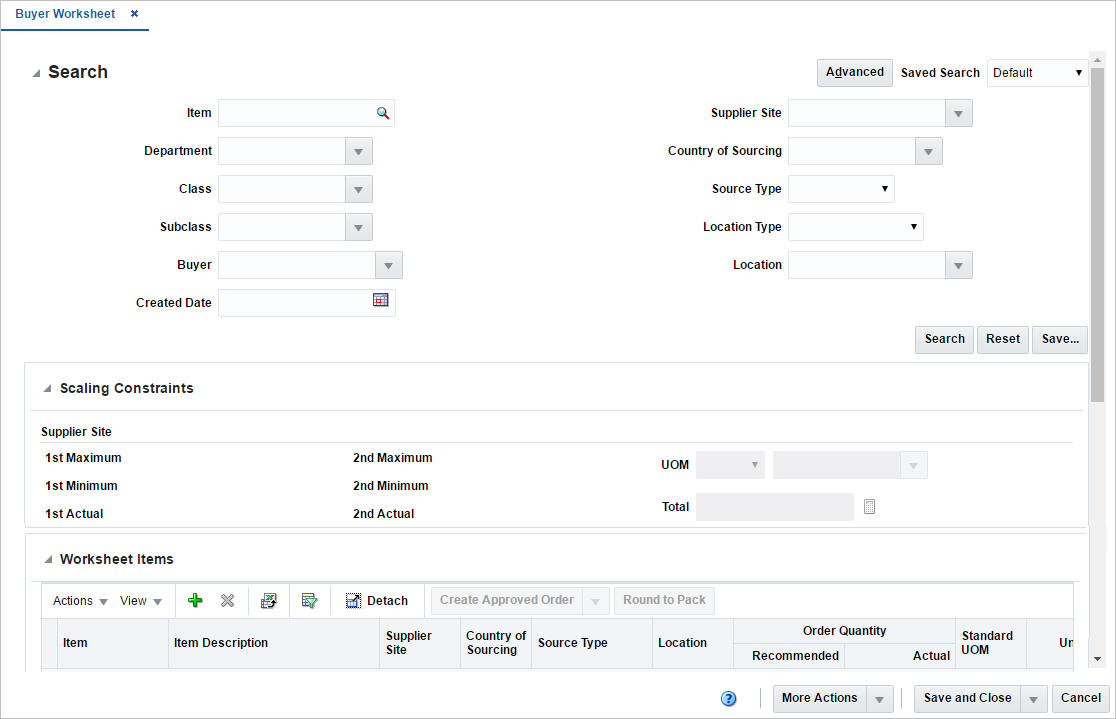
The Buyer Worksheet is a tool in Merchandising to help create replenishment orders using the outputs of replenishment and investment buy. Recommended order quantities are written for review before order creation.
The Buyer Worksheet window allows you to review the replenishment results of item/locations, and review replenishment and investment buy recommendations before making purchase orders. You can also add or edit item quantities manually.
Figure 6-1 Buyer Worksheet Window
Searching for a Buyer Worksheet
To search for a buyer worksheet
-
From the Task menu, select Replenishment > Buyer Worksheet. The Buyer Worksheet Search window appears.
-
You can search for a buyer worksheet using basic or advanced search criteria, depending on the requirement. The basic mode is the default search mode.
-
Click Advanced to access the search section in advanced mode.
-
Click Basic to return to the basic mode.
-
Searching for a Buyer Worksheet Through the Basic Search Criteria
To search for a buyer worksheet using basic search criteria.
-
Enter, select or search for one or all of the following basic search criteria.
Table 6-1 Buyer Worksheet Search - Basic Search Criteria and Description
Fields Description Item
Enter, select or search for the item ID.
Department
Enter, select or search for the department.
Class
Enter, select or search for the class.
Subclass
Enter, select or search for the subclass.
Buyer
Enter, select or search for the buyer.
Created Date
Enter the date or use the Calendar icon to select the created date.
Supplier Site
Enter, select or search for the Supplier Site.
Country of Sourcing
Enter, select or search for the country of sourcing.
Source Type
Select a source type from the list. For example, select Replenishment.
Location Type
Select a location type from the list. For example, select Store.
Location
Enter, select or search for the location ID.
-
Click on the Saved Search list to select one of the saved search criteria. Selecting a saved search populates the search section with the saved search criteria. If the run automatically function is enabled for the search, the search is executed immediately.
You can also personalize your saved searches by selecting Personalize. The Personalized Saved Search window appears.
For more information about the Personalized Saved Search, see Personalize Saved Search in the Oracle® Retail Merchandising Do the Basics User Guide.
-
Click Search. The items of the buyer worksheet are displayed in the Worksheet Items section.
-
Click Reset to clear the search section and results.
-
Click Save As... to save the current search criteria. The Create Saved Search window appears.
For more information about how to save your search criteria, see Create Saved Search in the Oracle® Retail Merchandising Do the Basics User Guide.
-
Click Done to close the window.
Searching for a Buyer Worksheet Through Advanced Search Criteria
To search for a buyer worksheet using advanced search criteria, follow the steps below.
-
To search using advanced search criteria, enter or select one or all of the advanced search criteria.
Table 6-2 Buyer Worksheet Search - Advanced Search Criteria and Description
Fields Description Item
Enter, select or search for the item ID.
Department
Enter, select or search for the department.
Class
Enter, select or search for the class.
Subclass
Enter, select or search for the subclass.
Buyer
Enter, select or search for the buyer.
Created Date
Enter the date or use the Calendar icon to select the created date.
Supplier Site
Enter, select or search for the Supplier Site.
Country of Sourcing
Enter, select or search for the country of sourcing.
Source Type
Select a source type from the list. For example, select Replenishment.
Location Type
Select a location type from the list. For example, select Store.
Location
Enter, select or search for the location ID.
-
To narrow down the search, use the list next to the search fields. For example, determine if the entered value should be equal or not equal to the search result.
-
Click on the Saved Search list to select one of the saved search criteria. Selecting a saved search populates the search section with the saved search criteria. If the run automatically function is enabled for the search, the search is executed immediately.
You can also personalize your saved searches by selecting Personalize. The Personalized Saved Search window appears.
For more information about the Personalized Saved Search, see Personalize Saved Search in the Oracle® Retail Merchandising Do the Basics User Guide.
-
Click Search. The items on the buyer worksheet are displayed in the Worksheet Items section.
-
Click Reset to clear the search section and results.
-
Click Save As... to save the current search criteria. The Create Saved Search window appears.
For more information about how to save your search criteria, see Create Saved Search in the Oracle® Retail Merchandising Do the Basics User Guide.
-
Click Add Fields to add more fields for the advanced search. To remove the field from the search, click the x right next to the field.
-
Click Reorder to change the order of the available search fields. The Reorder Search Fields window appears.
-
Select the desired search field and use the up and down arrows to rearrange the order of the fields.
-
Click OK to confirm the new order of the fields and close the window.
-
Click Cancel to reject any changes and close the window.
-
-
Click Done to close the window.
Scaling Constraints
The Scaling Constraints section displays the scaling information from the supplier inventory management constraints, if defined.
To view the scaling constraints of an item or several items:
-
Select a record or several records in the Worksheet Items table.
-
Select the unit of measure (UOM) type and the UOM.
-
Then click the Calculate Scaling Constraints Totals icon
 .
.
-
The Scaling Constraints are displayed.
If the selected items do not share a common inventory management level and hierarchy, you receive a warning when you click the Calculate icon, informing you that the constraints cannot be displayed.
-
For example, if the inventory management level of all the selected rows is at the supplier/department level, and all selected rows are for the same supplier/department, the scaling constraints are displayed.
-
However, if one item is in a different department, or is for a different supplier, then the constraints cannot be displayed.
The Scaling Constraints section contains the following fields.
Table 6-3 Scaling Constraints - Fields and Description
| Fields | Description |
|---|---|
|
1st Maximum |
Displays the 1st maximum value of the constraint. |
|
1st Minimum |
Displays the 1st minimum value of the constraint. |
|
1st Actual |
Displays the 1st actual value of the constraint. |
|
2nd Maximum |
Displays the 2nd maximum value of the constraint. |
|
2nd Minimum |
Displays the 2nd minimum value of the constraint. |
|
2nd Actual |
Displays the 2nd actual value of the constraint. |
|
UOM |
Select the unit of measure (UOM) from the list. For example, select Amount. Then enter, select or search for the desired unit. For example, enter USD. |
|
Total and Calculate Scaling Constraints Totals icon |
Use the Calculate Scaling Constraints Totals icon |
Worksheet Items
This section displays the items of the buyer worksheet. You can add and delete items from the buyer worksheet as well as create orders in this section.
Figure 6-2 Worksheet Items

Adding an Item to a Buyer Worksheet
To add an item to a buyer worksheet follow the steps listed below.
-
From the Tasks menu, select Replenishment > Buyer Worksheet. The Buyer Worksheet window appears.
-
Enter or select search criteria as desired to make the search more restrictive.
-
The search results are displayed in the Worksheet Items section.
-
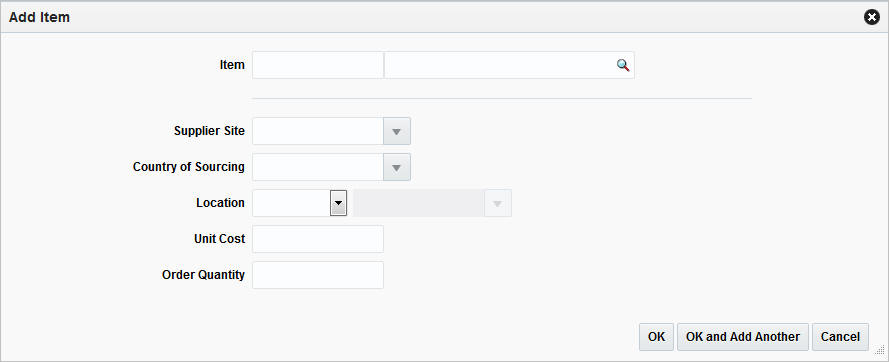
Select Actions > Add or use the Add icon
 . The Add Item window appears.
Figure 6-3 Add Item Window
-
In the Item field, enter, or search for the item.
-
In the Supplier Site field, enter, select or search for the corresponding supplier site.
-
In the Country of Sourcing field, enter, select or search for the corresponding country.
-
In the Location field, select the location type from the list. Then enter, select or search for the location.
-
In the Unit Cost field, enter the unit cost of the item.
-
In the Order Quantity field, enter the order quantity of the item.
-
Then choose one of the following options.
-
Click OK to save the current item and close the window.
-
Click OK and Add Another to add additional items.
-
Click Cancel to reject all entries and close the window.
-
-
Creating a Worksheet Order
To create a worksheet order from a buyer worksheet follow the steps below.
-
From the Tasks menu, select Replenishment > Buyer Worksheet. The Buyer Worksheet window appears.
-
Enter or select search criteria as desired to make the search more restrictive.
-
The search results are displayed in the Worksheet Items section.
-
Select the items which should be included on the order.
-
Then select Actions > Create Worksheet Order or select the Create Worksheet Order in the drop down action button in the table. The Order Search window appears with the following search criteria populated.
-
Order Type
-
Not Before and Not After Date, populated with the current system date
-
Origin, populated with Buyer Worksheet
-
-
Click Search. The search results are shown in the Results section.
-
In the Order column, click the order number link, or mark a record and select Actions > Edit, or use the Edit icon
 . The Order window appears.
-
The order status is Worksheet. The items previously selected are attached to the order with the defined unit cost and ordered quantity. Edit the order, as necessary.
-
Then choose one of the following options.
-
Click Save to save the current order.
-
Click Save and Close to save the current order and close the window.
-
Click Cancel to reject all entries and close the window.
-
Creating a Submitted/Approved Order
To create a submitted/approved order from a buyer worksheet follow the steps below.
Note:
The Create Order button is labeled either Create Submitted Order or Create Approved Order, depending on your user privileges.
-
From the Tasks menu, select Replenishment > Buyer Worksheet. The Buyer Worksheet window appears.
-
Enter or select search criteria as desired to make the search more restrictive.
-
The search results are displayed in the Worksheet Items section.
-
Select the items which should be included on the order.
-
Then select Actions > Create Submitted/Approved Order or use the Create Submitted/Approved Order button. The Order Search window appears with the following search criteria populated.
-
Order Type
-
Not Before and Not After Date, populated with the current system date
-
Origin, populated with Buyer Worksheet
-
-
Click Search. The search results are shown in the Results section.
-
In the Order column, click the order number link, or mark a record and select Actions > Edit, or use the Edit icon. The Order window appears.
-
The order status is Submitted/Approved. The items previously selected are attached to the order with the defined unit cost and ordered quantity. Edit the PO as necessary.
-
Then choose one of the following options.
-
Click Save to save the current order.
-
Click Save and Close to save the current order and close the window.
-
Click Cancel to reject all entries and close the window.
-
Add to Order
To add items of a buyer worksheet to an existing order, follow the steps below.
-
From the Tasks menu, select Replenishment > Buyer Worksheet. The Buyer Worksheet window appears.
-
Enter or select search criteria as desired to make the search more restrictive.
-
The search results are displayed in the Worksheet Items section.
-
Select the items which should be included on the order.
-
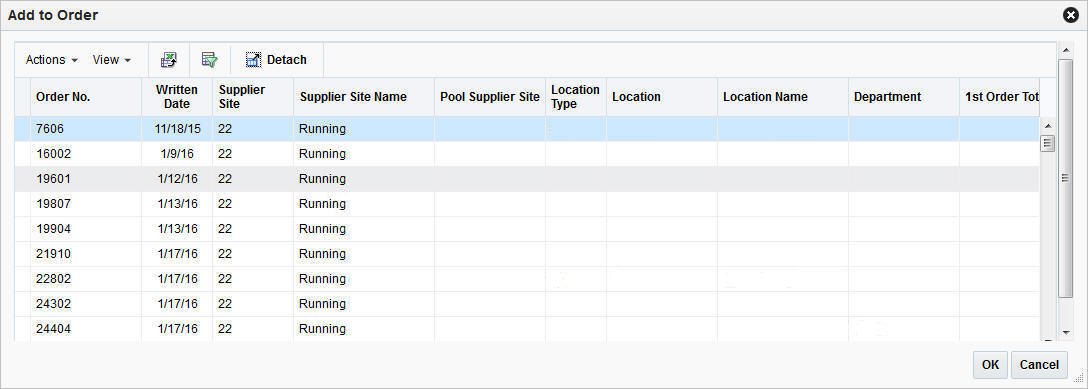
Then select Actions > Add to Order. The Add to Order window appears.
Figure 6-4 Add to Order Window
-
Use the Query by Example icon
 to search for the order number.
-
Select the order to which you wish to add the item.
-
Then, choose one of the following options.
-
Click OK to add the selected items to the order.
-
Click Cancel to close the window.
-
Split by Supplier
To split items of a buyer worksheet by supplier follow the steps below.
-
From the Tasks menu, select Replenishment > Buyer Worksheet. The Buyer Worksheet window appears.
-
Enter or select search criteria as desired to make the search more restrictive.
-
The search results are displayed in the Worksheet Items section.
-
Select the item you want to split by supplier.
-
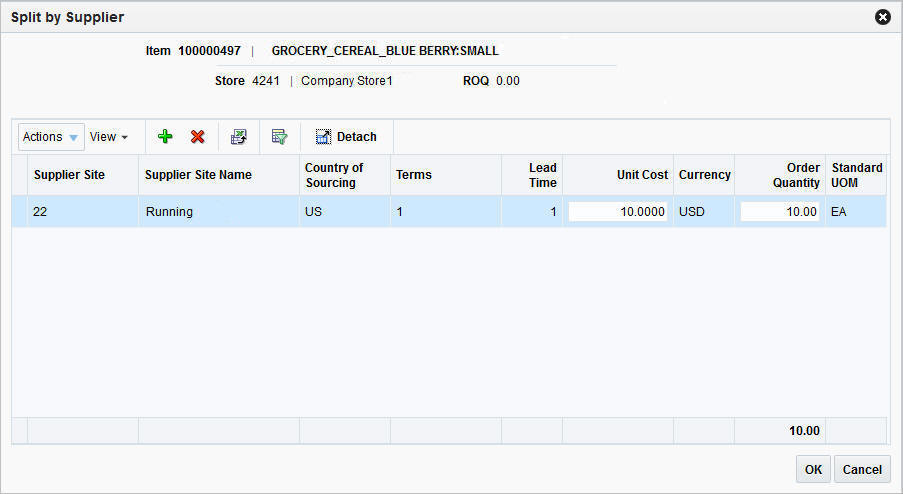
Then select Actions > Split by Supplier. The Split by Supplier window appears.
Figure 6-5 Split by Supplier Window
-
Then add a new supplier by selecting Actions > Add or by using the Add icon
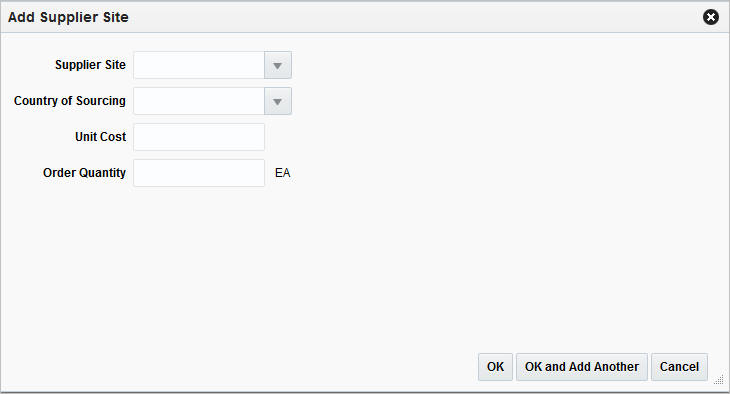
 . The Add Supplier Site window appears.
Figure 6-6 Add Supplier Site Window
-
In the Supplier Site field, enter, select or search for the supplier site.
-
In the County of Sourcing field, enter, select or search for the corresponding country.
-
In the Unit Cost field, enter the unit cost for the item.
-
In the Order Quantity field, enter the ordered quantity of the item.
-
Then choose one of the following options.
-
Click OK to add the supplier site to the table and close the window.
-
Click OK and Add Another to add additional supplier sites.
-
Click Cancel to reject all entries and close the window.
-
-
-
In the Split by Supplier window, edit the Order Quantity and Unit Cost columns as necessary.
-
Then, choose one of the following options.
-
Click OK to split the order quantity as defined and close the window.
-
Click Cancel to reject all entries and close the window.
-
View Replenishment Results for Purchase Orders
The Replenishment Results window allows you to review all the data related to an item/location replenishment after the replenishment batches are run.
The Replenishment Results window allows you to view and edit replenishment parameters and quantities for an item on a purchase order. You can change the replenishment method of an item on the purchase order and then recalculate the order quantities of the item based on the change. You can also override existing quantities and manually enter an order quantity for the item.
Note:
The Replenishment Results function is only available from the Buyer Worksheet window, when the selected source type is Replenishment.
You can access the Replenishment Results window in three different ways:
-
From the Task menu, select Orders > Manage Order, search for desired PO. Open the Order window. Then select Details > More Actions > Replenishment Results.
-
From the Task menu, select Orders > Manage Order, search for desired PO. Open the Order window. Then select Details > in the Items table Actions > Replenishment Results.
-
From the Task menu, select Replenishment > Buyer Worksheet > in the Worksheet Items table, select Actions > Replenishment Results.
Results for Order
In the Results for Order table you can view items/location combinations on the order for which replenishment results exists. The information shown in the remaining sections depends on the record you selected in the Results for table.
The table displays the following columns by default:
-
Item
-
Item Description
-
Location
-
Location Type
-
Location Name
-
Replenishment Date
-
Cross Dock Warehouse Name
-
Allocation
-
Order Quantity
-
Order Cost
-
Total Cost
-
Country of Sourcing
-
Pre scaled CostPrescaled Quantity
Method
This section contains information about the replenishment method.
-
The right hand corner of this section displays the Method field, select a method from the list for the section to expand. For more information about the available methods, see the Activating Items on Replenishment chapter, section "Replenishment Methods".
-
The fields displayed in the Method section are based on the selected method.
Order Timing
This section contains information about the order process defined for the item. The section displays the following fields.
Table 6-4 Ordering Time - Fields and Description
| Fields | Description |
|---|---|
|
Ready at Supplier Site |
Contains the supplier lead time, the number of lead days the supplier needs. |
|
From Pickup to Receiving |
Contains the number of days it takes for the item to reach the receiving location, either store or warehouse. |
|
From Warehouse to Receiving |
Contains the number of days it takes for the item to reach the store. |
|
Next Order Lead Time |
Contains the calculated lead time for the next review cycle used in the replenishment calculations. Contains the number of days it takes to place the next order. |
|
Order Lead Time Date |
Contains the number of days, when the next order is placed. |
|
Review |
Contains the information on how often the order is reviewed. |
|
Next Review in |
Contains the number of days when the next review of the order takes place. |
Results
This section contains information about the order of the selected item.
In the right hand corner of the section the standard unit of measure of the selected item as well as the pack size information is displayed.
-
To view the pack size information hover over the View Pack Sizes.
-
The hover window displays the inner, case, cases per pallet and store order multiple information.
The Results section further displays the fields shown in the table below.
Table 6-5 Results - Fields and Description
| Fields | Description |
|---|---|
|
Order Point |
Determines at what point an order needs to be placed for an item/location. Contains the minimum number of units you want on hand for the item. When the net available inventory falls below the order point, the item is replenished. |
|
Order Up to Point |
Determines the level to which inventory needs to be ordered – often the maximum quantity for the item/location. Contains the maximum number of units you want on hand for the item. |
|
Recommended Order Quantities: Contains the original recommended order quantity before any recalculations were performed on the quantity. |
|
|
Original Raw |
Contains the raw recommended order quantity (ROQ) calculated by the system before any pack size rounding, proration and so on was performed on the quantity. |
|
Simple Pack Original Raw |
Contains the original recommended order quantity (ROQ) for the item's simple pack before any recalculations were performed on the quantity. |
|
Simple Pack Raw |
Contains the raw recommended order quantity (ROQ) for the item's simple pack calculated by the system before any pack size rounding, proration, and so on was performed on the quantity. |
|
Prescaled |
Contains the recommended order quantity (ROQ) for the item/location before order scaling processing was performed on the quantity and after pack size rounding, proration, and so on was performed. |
|
Order |
Contains the actual recommended order quantity (ROQ) for the item/location after all pack size rounding, proration and scaling logic is performed on the order quantity |
|
Sourced to Contract |
Contains the recommended order quantity (ROQ) for the item/location that was to be sourced using contracts. |
|
Contract |
Displays the contract number, if applicable. |
|
Generated Forecast Result: This section is only displayed for items with a forecast. The fields in this section depend on the selected replenishment method. |
|
|
Minimum Supply |
Contains the forecasted amount over the minimum time supply days. Used for the time supply replenishment methods. |
|
Time Supply Horizon |
Contains the forecasted amount over the time supply horizon. Used for the time supply replenishment methods. |
|
Maximum Supply |
Contains the forecasted amount over the maximum time supply days. Used for the time supply replenishment methods. |
|
Next Order Lead Time |
Contains the Next review cycles lead time forecast. This value is used in the dynamic order quantity calculations. |
|
Current Order Lead Time |
Contains the forecasted amount over the order lead time. Used for the dynamic replenishment methods. |
|
Review Time |
Contains the forecasted amount over the review time. Used for the dynamic replenishment methods. |
|
Days Added to Forecast |
Contains the number of days added to the next or current order lead time during the replenishment calculation due to a location being closed for delivery. |
|
Safety Stock |
Contains the quantity of the calculated safety stock for the item/location. |
|
Lost Sales |
Contains the quantity of the calculated lost sales for the item/location. |
|
Inventory Selling Days |
Contains the quantity of the calculated lost sales for the item/location. |
Expected Available Inventory
This section contains inventory information.
Stock On Hand
This section displays the following quantities of the selected item:
-
On Hand
Contains the current stock on hand position of the item at the location.
-
Pack on Hand
Contains the current stock on hand position of the item at the location as a component of a pack.
This field is only available, if the location is a warehouse.
Inbound
This section contains the quantity of incoming items for the selected item/location combination.
Table 6-6 Inbound - Fields and Description
| Fields | Description |
|---|---|
|
In Transit |
Displays the number of items in transit to the current location. |
|
Pack in Transit |
Contains the quantity of the item that is currently in transit to the location as a component of a pack. This field is only displayed when the location is a warehouse. |
|
Transfer Expected |
Contains the quantity of the item expected for transfers to the location. |
|
Pack Transfer Expected |
Contains the quantity of the item expected for transfers to the location as a component of a pack. This field is only displayed when the location is a warehouse. |
|
Inbound Allocations |
Contains the quantity of the item on allocations to the location. |
|
On Order |
Contains the current on-order position of the item at the location |
Outbound
This section contains the quantity of outgoing items for the selected item/location combination.
Table 6-7 Outbound - Fields and Description
| Fields | Description |
|---|---|
|
Return to Vendor |
Contains the quantity of the item waiting to be returned to the vendor from the location. |
|
Outbound Allocations |
Contains the quantity of the item on allocations out of the location. |
|
Transfer Out Reserved Quantity |
Contains the quantity of the item reserved for transfers from the location. |
|
Pack Transfer Out Reserved Expected |
Contains the quantity of the item reserved for transfers from the location as a component of a pack. |
Due Order
This section is displayed, if the due order processing is set for the item/supplier combination. The section contains the following fields and checkbox:
-
Location Due checkbox
Select the Location Due checkbox to indicate if the item/location is due.
-
Estimated Stock Out
Contains the estimated stock out (ESO) quantity for the item/location.
-
Accepted Stock Out
Contains the accepted stock out (ASO) quantity for the item/location.