4 Setting Up Data
Purpose: Follow the steps below to set up data for the Routing Module as part of Order Broker Cloud Service installation. The Routing Module enables you to search for locations to fulfill orders, create orders across the enterprise, and track order activity.
Other setup steps and options: See the Online Help for more information on setting up data, including steps for configuration of the Routing Engine, as well as steps required for:
-
Configuring the Supplier Direct Fulfillment module.
-
Configuring the Store Connect module.
-
Additional configuration options, such as probability rules and zone fulfillment.
-
Testing operations, such as searching for locations and creating orders.
-
Details on importing and exporting data, including additional import and export options.
-
Changing the time zone for screens, reports, emails, and order update history.
Allow list: Retailers need to make sure that Oracle staff include all URLs, such as logos and those used for integrations, on the allow list for Order Broker Cloud Service. URLs that need to be on the allow list include:
-
The Logo URL and Shipper URL (if not ADSI) at the Drop Ship Preferences screen.
-
The Logo URL, Logo URL (packing slip), Shipper URL (if not ADSI), and Logo URL (email) at the Store Connect Preferences screen.
-
The Logo URL at the New Brand screen or the Edit Brand screen.
-
The Job Notification URL at the Event Logging screen.
-
The URL at the Inventory Service tab of the System screen.
-
The URL in the Outbound Orders Service area of the RICS Integration tab of the System screen.
-
The Store Location URL, Warehouse Location URL, Products URL, Store Inventory URL, and Warehouse Inventory URL at the OCDS Integration tab of the System screen.
-
The Tenant Logo and the Geocode Address at the Tenant (retailer information) screen or the Tenant-Admin screen.
-
The Turn-by-Turn Distance URL at the Tenant-Admin screen.
“From” email address: Set to no-reply@omni.retail.oraclecloud.com, and can also include an alias, if one is specified as the From Email Alias at the Event Logging screen.
Important:
In this document, user details / company name / address / email / telephone number represent a fictitious sample. Any similarity to actual persons, living or dead, is purely coincidental and not intended in any manner.Before You Start
Before you begin configuration of Order Broker Cloud Service you need:
-
URL: The URL to use when logging into Order Broker.
-
Default user profile: A default admin user profile for you to use when completing configuration in Order Broker, including creating additional users, configuring systems, setting preferences, and importing data.
Contact your Oracle representative for the user ID of the default admin user. This user needs to exist in both Order Broker and IDCS (Oracle Identity Cloud Service) or OCI IAM (Oracle Cloud Infrastructure Identity and Access Management).
You will need to assign the Default Shipping System to the user profile once you have completed these configuration steps below.
-
New install: You need to create all users in IDCS or OCI IAM to map to all users in Order Broker, including Order Broker users, Store Connect users, vendor users, and web service users or clients. See Creating User Profiles for more information.
-
Upgrade: You need to create all users in IDCS or OCI IAM before users can begin using Order Broker, including Order Broker users, Store Connect users, vendor users, and web service users or clients, if their records do not already exist in IDCS or OCI IAM. Users can use the Can’t sign in? link at the login page to set their passwords.
See Creating User Profiles for more information on creating users.
Creating or Configuring an Organization
About organizations: The organization is the second level in the Order Broker Cloud Service hierarchy, below the tenant. All systems are assigned to a single organization, and item searching, order creation, and drop ship fulfillment takes place within the organization. You need at least one organization.
For more information: See the Order Broker Routing Engine Overviewin the Online Help for a discussion of the organization hierarchy.
Default organization: A default organization is created in a newly provisioned Order Broker environment. The organization code and description is set to DEFAULT, and the locale is set to English United States. Optionally, you can use the Organizations screen in Modern View to change the locale.
You cannot delete the default organization if it is the only existing organization in your Order Broker environment.
Creating the Default System
About systems: Each system in Order Broker Cloud Service represents an application, such as Oracle Retail Order Management System Cloud Service or Xstore, that shares inventory information via Order Broker Cloud Service and creates cross-channel orders or purchase orders.
About the default system: The default system identifies the application that is the system of record for product creation and naming. The first system created for your organization is automatically flagged as the default. System product codes in other systems are cross references to the products in the default system.
Note:
If you integrate with Order Management System, the system code should be the same as the company number, without padding zeros: for example, 6 rather than 006. Also, the code for the system must match the setting of the OROB System (K50) system control value.Note:
The system flagged as the Vendor Default should not be the default system for the organization.-
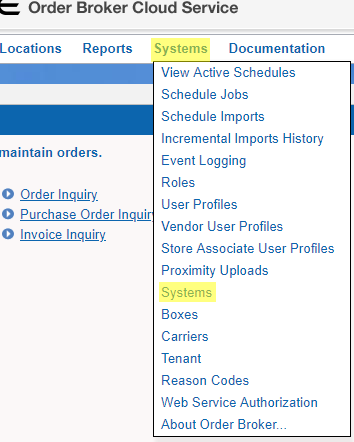
Select Systems > Systems to advance to the Systems screen.
-
At the Systems screen:
-
Select an organization from the Organization drop-down box.
-
Enter a system code in the System field. System codes can be 1 to 10 positions in length, can include spaces and special characters, and must be unique.
-
For Order Management System, the system code should be the same as the company number, without padding zeros.
-
Optionally, enter a name in the Name field. Names can be 1 to 40 positions in length and can include spaces and special characters. If you do not enter a name here, you need to enter it at the System screen when creating a system.

-
Click New.
-
If the system already exists in the organization, or if you did not select an organization or enter a System code, Order Broker displays an error message;
-
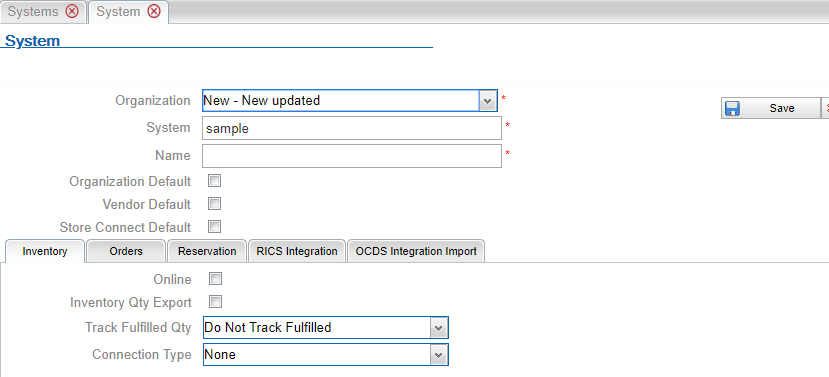
Otherwise, you advance to the System screen, where you can complete the creation of the system.
-
-
Note:
If you click Cancel at the System screen after clicking New, the system is not created.
Note:
The Organization Default flag is selected when you create the first system for an organization, and the flag cannot be unselected at this time. To designate a different system as the default, you need to create another system and flag that system as the default; this unflags the first system.
Order Management System integration: The code for the Order Management System must match the setting of the OROB System (K50) or Locate System (K50) system control value. However, names for systems do not need to be the same as the Order Management System company descriptions.
For more information: See the System screen in the Online Help for information on additional system configuration options.
Creating Each Additional System that will Integrate with Order Broker Cloud Service
Follow the steps below to create:
-
A default vendor system, if you will use the Supplier Direct Fulfillment module.
Note:
The system flagged as the Vendor Default should not be the default system for the organization.
-
The Store Connect system, if you will use the Store Connect module.
-
Each additional system, such as a POS system.
-
Select Systems > System.

-
At the Systems screen select your organization from the Organization drop-down box.

Note:
When creating the Store Connect system, you should not use a system code that begins with STC-, as these characters are used as part of the name for the user group in IDCS or OCI IAM. You can use STC_ (with an underscore rather than a hyphen) instead. -
Enter a system code in the System field. System codes can be 1 to 10 positions in length, can include spaces and special characters, and must be unique.
-
Enter a name in the Name field. Names can be 1 to 40 positions in length and can include spaces and special characters. If you do not enter a name here, you need to enter it at the System screen when creating a system.
-
Select New:
-
If the system already exists in the organization, or if you did not select an organization or enter a System code, Order Broker displays an error message;
-
Otherwise, you advance to the System screen, where you can complete the creation of the system.

-
-
Select Save.
Note:
If you select Cancel at the System screen without first selecting Save, the system is not created.
See the System screen in the Online Help for information on the fields and options available at this screen.
Creating User Profiles
This section consists of two main subjects:
-
Before You Start: Background on IDCS or OCI IAM Integration: provides an overview.
-
IDCS or OCI IAM User Synchronization: provides information on the required setup and the steps you use to create different types of users in Order Broker based on the information received from IDCS or OCI IAM.
Before You Start: Background on IDCS or OCI IAM Integration
Background on user mapping with IDCS or OCI IAM and user setup:
-
Authentication for all users takes place using the password defined for the user in IDCS (Oracle Identity Cloud Service) or OCI IAM (Oracle Cloud Infrastructure Identity and Access Management); however, if OAuth authentication is enabled, the user ID defined in Order Broker for a Web Service user maps to a client ID defined in IDCS or OCI IAM, and IDCS or OCI IAM defines a token for web service authentication, rather than a password.
About OAuth: OAuth is a standard for web service authentication through the use of access tokens rather than passwords.
-
Role assignments in Order Broker control the user’s screen and feature authority at Order Broker, Store Connect, and Vendor Portal screens. You can change the role assignments for existing users through the Role Wizard. See the Role Wizard in the online help for more information.
-
No role authority is required for web service users.
-
Since Order Broker requires a lower case user ID, you should create lower case user IDs in IDCS or OCI IAM for validation into Order Broker.
-
When the user logs into Order Broker or Store Connect, the user ID entered at the login screen must match the user ID in IDCS or OCI IAM. If the user ID in IDCS or OCI IAM is the Cloud Service User ID, then the user enters the Cloud Service User ID at the login screen.
-
User ID matching is case-sensitive, whether through the Order Broker user ID or the Cloud Service User ID.
-
Order Broker, Store Connect, and vendor users can use the Can’t sign in? link at the login page to reset their passwords.
Multiple omnichannel systems: You can use the same IDCS or OCI IAM user records for multiple omnichannel systems. You can use the Cloud Service User ID as a cross-reference to Order Broker users and Store Connect users, but this option is not available for Vendor Portal users or web service users. You can also use the same user ID for any user type, except that Order Broker requires a lowercase user ID, as noted above.
Although Order Management System uses an uppercase user ID, user validation is not case-sensitive, so a lowercase user ID from IDCS or OCI IAM passes validation.
Authentication for outbound web service requests: Use IDCS or OCI IAM to set up users for the authentication of web service requests across omnichannel systems, such as Order Management System Cloud Service or Customer Engagement Cloud Services if the omnichannel systems use the same instance of IDCS or OCI IAM.
IDCS or OCI IAM User Synchronization
About identity cloud service user synchronization: Use IDCS or OCI IAM to create users for omnichannel applications, including Order Broker Cloud Service and Oracle Retail Order Management System Cloud Service. Users that exist in IDCS or OCI IAM and are configured there for Order Broker Cloud Service access are then created in Order Broker Cloud Service:
-
Through the Identity Cloud User Synchronization job, available through the Schedule Jobs screen, or,
-
Automatically, when the user logs into Order Broker Cloud Service.
Note:
If a user exists in IDCS or OCI IAM for another application but has not been configured for Order Broker access, the user will not be able to log into Order Broker. Instead, the user advances to the Unauthorized Access screen. If the user requests and is granted access to Order Broker while still at this screen, they can use the Retry option to log into Order Broker.Users are created in Order Broker Cloud Service with the default authority defined from IDCS or OCI IAM, described below.
If you need to create Store Associate users and/or Vendor users in addition to Order Broker Cloud Service users, see Creating Vendor Users or Creating Store Associate Users, below.
The Identity Cloud User Synchronization job does not delete, deactivate, or update authority for any user records, including vendor users and store associates, in Order Broker Cloud Service. Use the related screen in Order Broker Cloud Service to update users once they have been created.
Web service authentication: The Identity Cloud User Synchronization job does not create web service users. See Setting up Web Service Authentication for information on creating web service users.
Required Setup for IDCS or OCI IAM User Synchronization
The following steps describe creating Order Broker Cloud Service (retailer) user profiles.
About the default user: The default user is created automatically, with a user name of Identity Cloud
Default User. This is not an actual user record that can log into
Order Broker Cloud Service; instead, it serves as a template for creating
actual users. You cannot delete the default user.
Configuring the default user: Before creating
additional, actual users, update the default user
with the settings to apply to actual users when they are created in
Order Broker Cloud Service:
-
Role assignments with a Role Type of Retailer, controlling the default authority to Order Broker Cloud Service screens. See the Role Wizard for more information.
-
The Default Shipping System that controls system product code to display as the Item # at the Order screen, as well as the organization to default at other screens.
Multiple groups of users: You can modify
the configuration of the default user if you will
import multiple groups of users into Order Broker Cloud Service. For
example, you could first configure the default user
with just order inquiry and maintenance authority, import a group
of users, and then reconfigure the default user with
different authority for the next group of users.
User Creation in IDCS or OCI IAM
You can use the following process in IDCS or OCI IAM to create
users and control their attributes through group assignment, using
the application record in IDCS or OCI IAM for Order Broker Cloud Service.
The application record typically has a Name such as RGBU_OBCS_<ENV>_APPID, where ENV represents
the environment.
-
Create one or more groups to use for assignment of roles to users. For example, create an ob_users group to use for creation of regular users, and an ob_admin group to use for creation of admin users. Assign the group to the appropriate application role in IDCS or OCI IAM: either OBCS_Admin or OBCS_User.
Note:
Users might not be able to see the Modern View options if they are not assigned the OBCS_User role or the OBCS_Admin role. -
Create each user in IDCS or OCI IAM, specifying the user’s first name, last name, user name, and email address.
About defining the user in IDCS or OCI IAM:
-
The user name be lower case and cannot be more than 256 positions.
-
Assign each created user to the appropriate group.
-
Assign each group to the Order Broker application in IDCS or OCI IAM.
-
Assign each user to the appropriate application role in IDCS or OCI IAM.
-
Assign or reset the password for each user in IDCS or OCI IAM. This triggers an email to the email address specified for the user, who can log in using either the user name defined in IDCS or OCI IAM if it does not exceed 10 positions, or the email address.
Note:
If the user logs in after configuration in IDCS or OCI IAM, this creates the user record in Order Broker Cloud Service; otherwise, the record is created through the import job, described below. -
-
Importing Users through the IDCS User Synchronization Job
After completing the required setup describe above, Select Systems > Schedule Jobs and run the Identity Cloud User Synchronization job to import the new users from IDCS or OCI IAM.

Each new user is created in Order Broker with the application role assignments from IDCS or OCI IAM:
-
The user ID, name, email address, and cloud service user ID are from IDCS or OCI IAM; however, if the user ID is longer than 10 positions or is a duplicate of an existing user ID of 10 positions, it is truncated as described above.
-
The admin flag is selected if the user is assigned to the OBCS_Admin application role in IDCS or OCI IAM.
-
The role-based authority is from the
defaultuser’s current settings.
After creation: Once users are created in Order Broker, you can maintain them; for example, you can change the email address, date formats, user name, authority, and default shipping system for Order Broker users, and you can flag a user as inactive so that the user cannot log in; however, this does not update the user’s record in IDCS or OCI IAM. You can also delete the users from Order Broker, although this does not delete the corresponding records in IDCS or OCI IAM, and the user would be created again in Order Broker Cloud Service the next time the synchronization job runs.
Note:
The synchronization job does not update existing users in Order Broker.Creating Vendor Users
If you also need to create vendor users in Order Broker, use the following process:
-
In Order Broker, create one or more vendors. See the Vendors screen in the online help for more information.
-
In Order Broker, create one or more role assignments with a Role Type of Vendor, controlling the default authority to Vendor Portal screens. Select the Identity Cloud User Default flag at the Specify Role Name step of the Role Wizard.
-
In Order Broker, run the Identity Cloud User Synchronization job to create the vendor user groups in IDCS or OCI IAM corresponding to each vendor created in Order Broker. The vendor user group is created as <system>|<vendor>, where <system> is the system code identifying the default vendor system, and <vendor> is the code identifying the vendor. The synchronization job performs this creation in IDCS or OCI IAM each time it runs based on the existing roles in Order Broker.The vendor user group is created as <system>|<vendor>, where <system> is the system code identifying the default vendor system, and <vendor> is the code identifying the vendor, and then the group is assigned to the role.
Note:
In the case of a failure, you may need to assign the group to the role manually.
-
In IDCS or OCI IAM, create each vendor user and assign it to the vendor user group associated with the same vendor. See User Creation in IDCS or OCI IAM for background on creating the user in IDCS or OCI IAM and notes about defining the user name.
Note:
Assign the vendor user only to the vendor user group associated with the correct vendor. Order Broker does not support assigning a vendor user to more than one vendor.
-
Run the Identity Cloud User Synchronization job again to import new vendor users from IDCS or OCI IAM. The vendor users are assigned role-based authority based on the vendor role types set up through the Role Wizard with the Identity Cloud User Default flag selected.
Note:
The synchronization job does not update existing vendor users in Order Broker.
Creating Store Associate Users
If you also need to create store associate users in Order Broker, use the following process.
-
In Order Broker, create the default Store Connect system for your organization. See the Systems screen in the online help for more information.
-
In Order Broker, run the Identity Cloud User Synchronization job to create store user groups in IDCS or OCI IAM for each system that is flagged as the Store Connect default for an organization. The user group is named STC-SYSTEM, where SYSTEM is the system code of the Store Connect default system in your organization. The synchronization job performs this creation in IDCS or OCI IAM each time it runs based on the existing roles in Order Broker.
-
In IDCS or OCI IAM, assign each store user group to the OBCS_Store_User role. Order Broker then sends a request to add each Store Connect group to the OBCS_Store_User role in IDCS or OCI IAM.
Note:
In the case of a failure, you may need to assign the group to the role manually. -
In IDCS or OCI IAM, create each store associate user and assign it to the store user group associated with the appropriate system. See User Creation in IDCS or OCI IAM for background on creating the user in IDCS or OCI IAM and notes about defining the user name.
-
In Order Broker, run the Identity Cloud User Synchronization job again to import new store associate users from IDCS or OCI IAM.
-
Use the Edit Store Associate User Profile screen to finish configuration of the store associate user, including assigning one or more locations and flagging the user as active. The Requires Location field at the Store Associate User Profiles screen indicates that the store associate user requires location assignment.
Note:
The synchronization job does not update existing store associate users in Order Broker.
Note:
When you make any changes in IDCS or OCI IAM to an existing store associate’s user role, the changes do not take effect until the user next logs in. For example, if the associate is currently logged into Store Connect and you remove the OBCS_Store_User role, the associate can continue working in the current, open session.Assigning the Default Shipping System to the Admin User Profile
Follow the steps above under Creating User Profiles to assign the Default Shipping System to the Admin user profile. The Default Shipping System assigned to a user indicates the system product code to display on Order Broker screens.
Note:
The Default Shipping System is not a required field at the User Profile screen if you have not yet created any systems in Order Broker.Uploading Proximity Data
About proximity data: Proximity data enables you to search for merchandise or assign orders based on the approximate distance from a store, warehouse, or customer address.
Note:
This step is required only if you are using proximity locator searching for locations through the Routing Engine, and only if you are not using the Oracle Maps Cloud Service. You can also perform this step at a later time.If you are using Proximity Locator searching to restrict locate
items searches or order assignment based on geographical location,
and if you are not using the Oracle Maps Cloud Service, obtain the
required .CSV file of postal code information before
you begin the upload:
-
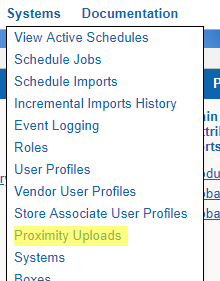
Select Systems > Proximity Uploads.
-
At the Proximity Uploads screen:
-
Select Canada, International, or United States from the Proximity Data Type drop-down list.
-
Enter the Country Code to apply to proximity records.
-
Use the Choose Files... button below the File Name field to select the .
CSVfile on your local computer. -
Select Upload.

-
-
Wait until the upload status is completed. Optionally, you can select Refresh to check the status.
For more information: See the Proximity Uploads screen in the Online Help for more information, including the file layout and troubleshooting. Also, see the Order Broker Routing Engine Overview in the Online Help or the Operations Guide for a discussion of proximity locator searching and preferences, including the use of the Oracle Maps Cloud Service.
Creating Location Types
About location types: Location types identify a group of locations based on the system to which they belong, such as your order management system or your POS system, as well as their function, such as distribution center or retail store.
At least one location type is required for you to create locations.
-
Select your organization from the top of the Modern View home screen, if necessary.
-
Select Location Types in Modern View to advance to the Location Types screen.
-
At the Location Types screen, select Add:
 The Add Location Type window opens.
-
In the Add Location Type window, enter the location type description, code, and category (
-
The description. The description can be from 1 to 40 positions long and can include spaces and special characters.
-
The code. The location type code can be 1 to 10 positions long, can include spaces and special characters, and must be unique within the organization; however, other organizations can have the same location type code.
-
Select the location category. Possible categories are Store or Warehouse.
-
-
Select OK or select Save and Create Another.
Setting up a Default Carrier and, Optionally, Additional Carriers
About carriers: A carrier is required on each order. At a minimum you need to set up a default carrier, specified at the Preferences screen.
If the Submit Order message creating a delivery or ship-for-pickup order:
-
specifies a
ship_viathat matches a carrier you have set up through the Carriers screen, Order Broker Cloud Service uses this carrier on the order and resets the carrier as active, if needed. -
specifies a
ship_viathat does not match a carrier you have set up through the Carriers screen, Order Broker Cloud Service creates the carrier and uses this carrier on the order. -
does not specify a
ship_via, Order Broker Cloud Service uses the default carrier you specify at the Preferences screen.
For a pickup order, Order Broker Cloud Service uses the default
PICKUP carrier it creates automatically, regardless of whether a ship_via is passed in the Submit Order message.
The following steps are required to set up the default carrier:
-
Select your organization from the top of the Modern View home screen, if necessary.
-
Select Carriers in Modern View to advance to the Carriers screen.
- At the Carriers screen, select Add:
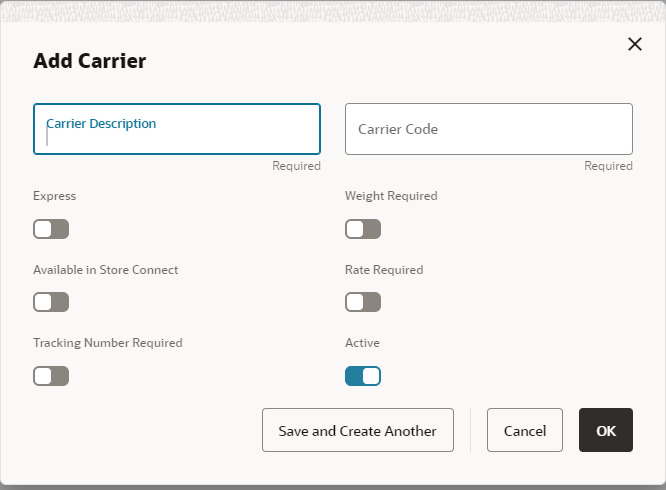
 The Add Carrier window opens.
-
Enter the description (up to 128 positions) and carrier code (up to 20 positions) and select any of the optional fields:
-
Express: Indicates an express shipper in Store Connect.
-
Weight Required: If this flag is selected, the vendor must provide the shipping weight for each manual shipment using this carrier; otherwise, the shipping weight is optional in manual shipment. Not used in Store Connect.
-
Available in Store Connect: If both this flag and the Active flag are selected, the carrier is eligible to ship orders in Store Connect.
-
Rate Required: If this flag is selected, the vendor must provide the shipping rate for each manual shipment using this carrier; otherwise, the shipping rate is optional. Not used in Store Connect.
-
Tracking Number Required: Indicates if the tracking number is required in Store Connect or the Vendor Portal.
-
Active: Indicates whether the carrier is visible in Store Connect or the Vendor Portal.
-
-
Select OK or select Save and Create Another.
For more information: See the Carriers screen in the Online Help.
Creating the Default Unfulfillable Location
About the default unfulfillable location: The Routing Engine assigns an order to the default unfulfillable location when it cannot find a location to fulfill the order. You need to specify a default unfulfillable location at the Preferences screen.
-
Select Locations > Locations.
-
At the Locations screen:
-
Select your organization if necessary.
-
In the Type field, select the location type. The default unfulfillable location is ordinarily a warehouse or distribution center type.
-
In the Location field, enter a location code. The code cannot exceed 10 positions.
-
In the Name field, enter a name for the location. The name cannot exceed 40 positions.
-
In the System field, select the default system for your organization.
-
Select New.
-
-
At the New Location screen, enter any additional information about the default unfulfillable location, and select Save to save your entries.
For more information: See Setting up Preferences for your Organization for information on identifying the default unfulfillable location for the Routing Engine.
Setting up Preferences for your Organization
About preferences: Use the Preferences screen to set rules governing locate item searching and order assignment. You can set preferences at the organization, location type, and location level.
Saving again after running imports: After you import locations, products, system products, and product locations, you will need to reopen the Preferences screen, make any desired updates, and select Save to have your preferences apply to all locations. See Scheduling Jobs for more information.
-
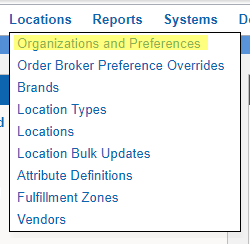
Select Locations > Organizations and Preferences.
-
At the Organizations and Preferences screen, select the Order Broker Preferences icon for your organization.

-
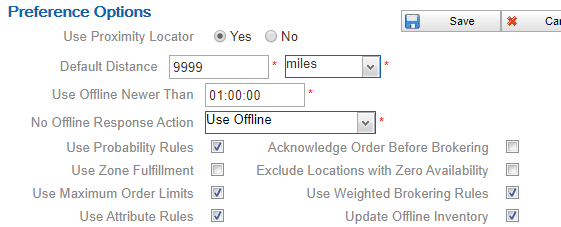
At the Preferences screen:
-
Specify basic Routing Engine options, including whether to use the Proximity Locator, the default distance to use when searching for a location, and whether to use probability rules and zone fulfillment.
-
At the Order Broker Settings tab:
-
Specify whether to group shipment locations in responses to LocateItems requests for delivery orders, simply indicating whether the requested merchandise is available for shipment rather than listing locations in the LocateItems response.
-
Indicate whether to support splitting orders or lines, or process partial status updates for order lines.
-
Specify the maximum number of locations to return in a LocateItems response.
-
Specify the default unfulfillable location (set up through Creating the Default Unfulfillable Location). This location needs to have all of the Yes/No options under Fulfillment (Backorder Available, Pickup Available, Delivery Available, or Ship For Pickup Sourcing and Ship For Pickup Receiving/Pickup) set to No.
-
Specify the default carrier (set up through Setting up a Default Carrier and, Optionally, Additional Carriers).
-
Optionally, configure turn-by-turn distance calculation rather than straight-line distance calculation for delivery orders using a specified carrier. Turn-by-turn distance calculation is available only if you use Oracle Maps Cloud Service. In order to enable turn-by-turn distance calculation, the Turn-by-Turn Distance URL also needs to be specified at the Tenant- Admin screen.
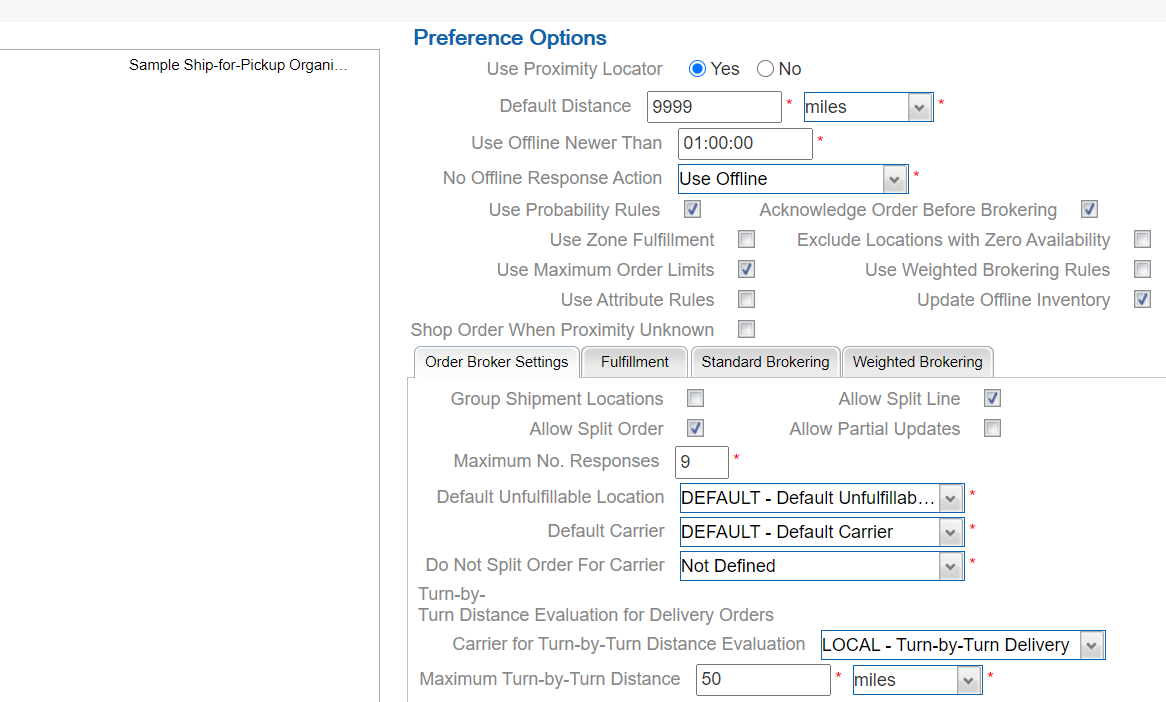
For more information: See the Preferences screen in the online help for information on the additional options available at this tab.
-
-
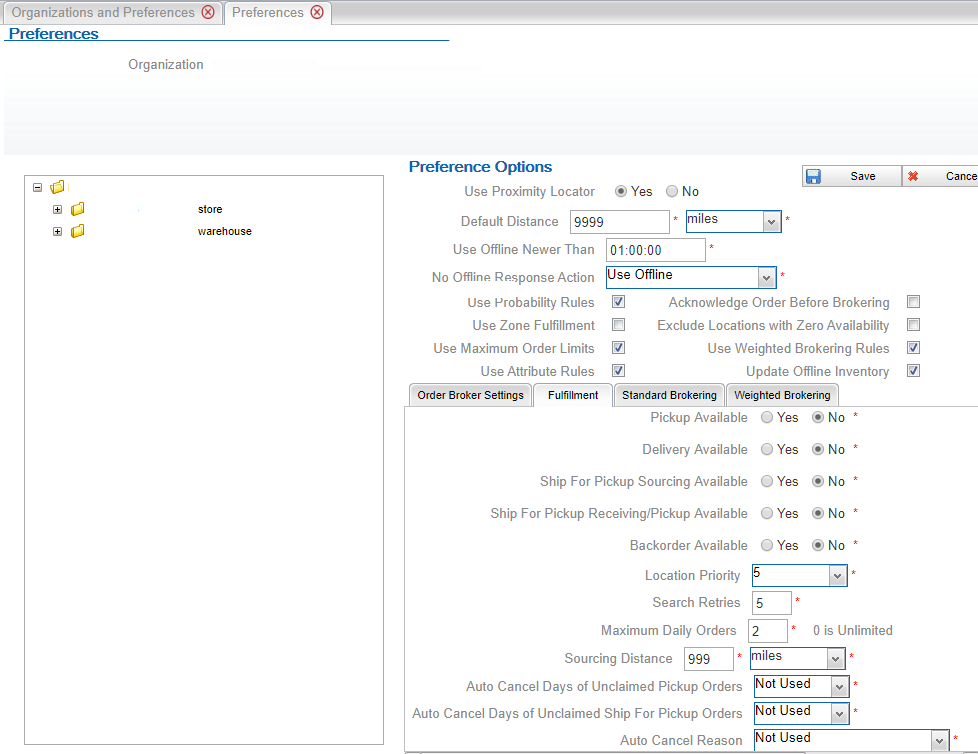
At the Fulfillment tab:
-
Specify the fulfillment types supported. Note that the options here differ based on whether ship-for-pickup orders are supported.
-
Specify the priority to use for order assignment, and the maximum number of orders to assign per day.
-
At the organization level, specify the maximum number of times to reassign (“reshop”) an order if it is rejected by the assigned fulfilling or sourcing location.
-
If your organization supports ship-for-pickup orders, specify the sourcing distance for the Routing Engine to use when shopping for sourcing locations.
-
Also at the Fulfillment tab, complete the settings related to automatically canceling unclaimed pickup or ship-for-pickup orders.
-
-
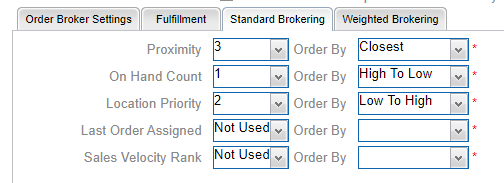
At the Standard Brokering tab, complete the fields that control brokering orders if you do not use Weighted Brokering.
-
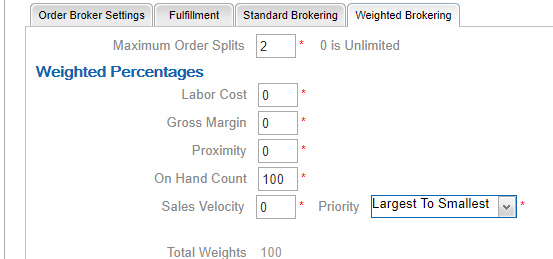
At the Weighted Brokering tab, complete the fields that control brokering orders if you do use Weighted Brokering.
-
For more information: See the Preferences screen in the Online Help for complete field descriptions and background.
Important:
You need to set all Order Broker preferences at the organization level before integrating any external systems with Order Broker Cloud Service. See the description of the Preferences screen in the online help for complete information on setting preferences.Preference overrides: Optionally, you can set up overrides at the order type and system level for the Routing Engine to use when searching for fulfilling locations. For example, you can have the Routing Engine sort locations for pickup orders by proximity, while it sorts locations for delivery orders by available quantity. Unless you set up overrides, each level “inherits” the settings from the Preferences screen. See the Order Broker Preference Overrides screen in the Online Help for more information.
Scheduling Jobs
Use the Schedule Jobs screen to create schedules for jobs:
-
Data Hygiene:
-
Completed Order Private Data Purge
-
Daily Clean Up
-
-
Exports:
-
Fulfilled Inventory Export
-
Inventory Quantity Export
-
Sales Order Data Extract
-
-
Imports:
-
Identity Cloud User Synchronization
-
Incremental Inventory Import
-
Product Import
-
-
Orders:
-
Auto Cancel Unclaimed Pickup Orders
-
Email Notifications
-
See the Schedule Jobs screen in the online help for more information.
Note:
Do not attempt to schedule jobs before creating systems.About Scheduling Imports
About imports: The automated import process enables you to import and update locations, products, system products, product locations, and product barcodes from an integrated system.
Note:
If you are using the Oracle Maps Cloud Service instead of the proximity upload to support proximity locator searching, you should complete Oracle Maps Cloud Service configuration before importing locations, so that the latitude and longitude of each location can be assigned as it is created. Contact your Oracle representative for information on implementing the Oracle Maps Cloud Service.Import from default system first: In order to create product records in the default system before you create system product records in any other systems, you need to run the import for the default system before the other systems.
Processing steps:The import checks the OROB- IMPORTS container in the FILE_STORAGE table for a pipe-delimited file containing each type of information for import (location, product, system product, product location, and product bar code). See Importing Items/Products, Inventory, Barcodes, and Locations into the Database in the online help for background on the import process.
Important:
Oracle recommends that you schedule imports daily at a time when demands on the system are limited, and when it does not interfere with the database backup, and that you do not schedule more than one import at a time against the same database.Mapping from integrating systems: Consult the integrating system’s documentation and complete the Schedule Jobs screen for systems that support the import process, including Order Management System.
For more information: See the Order Broker Routing Engine Overview in the online help for a process overview, and see Schedule Jobs in the online help for file layouts, file naming conventions, and mapping details.
Restart All
Use the Reschedule All option at the View Active Schedules screen to start all scheduled jobs and programs listed above as well as:
-
scheduled report generation,
-
polling of orders for Store Connect.

Adjust and Save Preferences
After importing locations, products, system products, and product locations, you need to return to the Preferences screen, make any necessary adjustments, and select Save again to apply the preference settings. You also need to save your preference settings after creating a new location to have the settings apply to each new location.
-
Select Locations > Organizations and Preferences.

-
At the Organizations and Preferences screen, select the Order Broker Preferences icon for your organization.

At the Preferences screen, make any necessary changes at the organization, location type, or location type level, and select Save.
Setting up Web Service Authentication
See the Retail Omnichannel Web Service Authentication
Configuration Guide on My Oracle Support for web service
configuration instructions.