D Appendix – RPASCE Configuration Manager and rpasConfigMgr
Note:
Users who want to run the RPASCE Configuration Manager on a UNIX or Linux system will need to do so over Xserver or another remote window system. Contact the administrator of the UNIX or Linux system for information about availability and setup.
Using the rpasConfigMgr
Many RPASCE users customize their configurations of RPASCE and RPASCE applications in order to be more aligned with their business needs. When those users want to upgrade to a new RPASCE or RPASCE application release, they can use the RPASCE Configuration Manager or the rpasConfigMgr utility to replicate their customizations on the new base release with as little manual configuration as possible. By using these tools to upgrade to a new release, users can take advantage of the new features of that release while maintaining their customized configuration.
rpasConfigMgr Process
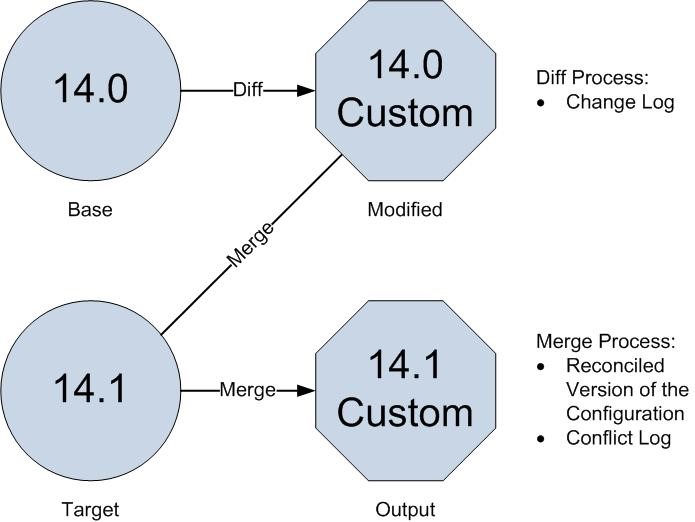
The rpasConfigMgr utility consists of two processes: diff and merge. Diffing is the identification of modifications between two versions of a configuration. Merging is the reconciliation between a base version and two modified versions of a configuration. These processes are shown at a high level in Figure D-1.
When a user has modified the base release (base) to create a customized configuration (modified), that user can use the rpasConfigMgr process to upgrade to the next base release (target) and then apply their configuration to create a customized configuration of the new release (output).
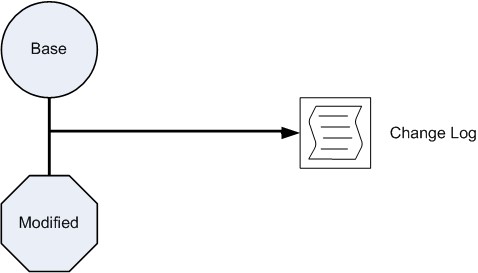
To do this, the user first runs the diff process which finds the customized aspects of the modified version by identifying the differences between the base and modified version.
The output of the diff process is a change log file which records the differences between the base and the modified versions.
Then, the user runs the merge process which automatically applies the customized configuration to the target version if possible. If an aspect of the customized configuration cannot be applied to the target version, it is recorded in the conflict log file. The output of the merge process is the reconciled version of the configuration, a change log, and a conflict log.
Alternatively, the user can run a diffAndMerge process that combines the two processes and performs them together. The result of that process is a reconciled version of the configuration, a change log, and a conflict log.
These three processes are explained in greater detail in these sections:
diff
The diff process analyzes two different versions of a configuration in order to determine the differences in the configuration between them. Examples of such differences include property changes, altered parent-child relationships, or reordered information of elements that obey strict ordering. These differences are recorded in a change log file.
The change log is an XML file that contains two distinct classes of elements: scope elements and operations elements.
Scope elements contain the structural information of the RPASCE application configured content. Scope elements by nature do not encode any information about modifications; they only provide information about the area of the configuration in which any given modification occurs.
Since the structural information can be very large and complex, the change log can contain numerous nested scope elements. These elements have an overall structure that mirrors the directory structure used within a configuration. The top level of the scope represents the entire application. This level contains sub-scopes that represent the changes that directly affect hierarchies, styles, and data interface entries. Other sub-scopes represent the solutions in the application. Solution scopes contain within them sub-scopes that represent changes that affect measures, rules, workbooks, and wizards.
To reduce the overall size and complexity of the structural information, unnecessary scope elements are removed from the change log. Unnecessary scope elements are those that contain only other scope nodes within its sub-tree. These elements usually occur when an aspect of a configuration has not changed between versions. For example, a change log that is generated for a configuration that has modifications made only to workbook measure labels would not contain any meaningful change information about hierarchies since no changes to the hierarchy information were made. Therefore, there is no need for scope elements relating to hierarchy and dimension structure to be included in the change log. For this reason, the hierarchy scope elements are removed in order to reduce the size of the change log.
Operation elements, also called change elements, are the other class of element in the change log. Within the structure created by the scope elements are the modifications made to the content of the application. The operation elements describe the nature of the change so that the corresponding modification can be made in the merging process.
There are several operations that can be performed during the configuration process. Each of these requires its own operation tag. The operations are:
-
Element removal: an operation that removes a piece of configured content from its parent container. This operation requires no additional information.
-
Element addition: An operation that inserts an additional piece of configured content to a parent container. This operation requires specification of any attributes of the new content. If the new element obeys a strict ordering (such as a position of a new rule within a rule group), then information about the position of the new element is required as well.
-
Element attribute modification: an operation that modifies one or more attributes of a piece of configured content. This operation requires information that identifies which attribute was modified and its new value.
-
Element reordering: an operation that specifies a change in the order of a piece of configured content that has a meaningful order (such as the order of a rule within a rule group). This operation requires information about the new order of the element.
Each of the operation elements previously described must provide enough information in order for the configuration merging process to recreate the modification within the target configuration. The total collection of the operation elements of a change log should provide enough information to completely capture all changes made to the input configuration.
merge
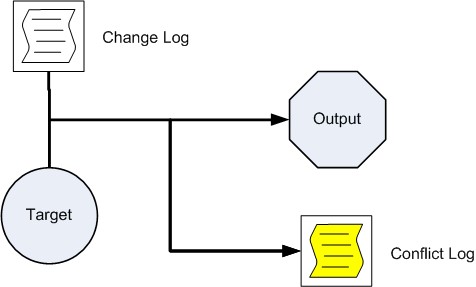
The merge process automatically applies the modifications that were identified in the change log to a target configuration. The merge process uses the change log and the target configuration to create the output configuration and a conflict log, as shown in Figure D-3.
The merge process attempts to recreate each operation represented in the change log. In cases where the modification can be correctly applied, the merge process performs the modification on the target configuration. However, if the differences between the base and target configurations make the operation impossible to perform, then the modification is not applied to the target configuration. In those cases, the operation is documented in the conflict log.
The conflict log is an XML file that contains the same scope structure as the change log. The conflict log also contains conflict nodes that describe the operations that could not be performed automatically. This information is provided so that you can manually configure them after the merge process.
diffAndMerge
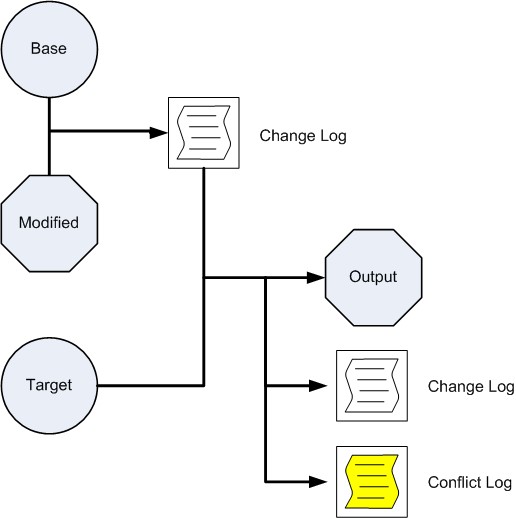
The diffAndMerge process is the combination of the diff and merge processes. Use the diffAndMerge process if you do not want to review the change log before continuing to the merge process. The diffAndMerge process loads the three versions of a configuration (the base, the modified, and the target versions), performs the diff command on the base and modified versions, and then immediately applies the detected changes to the target. The output of the diffAndMerge process is the reconciled version of the configuration, a change log, and a conflict log, as shown in Figure D-4.
For more information about the diff and merge steps of the diffAndMerge process, see the Diff Process and Merge Process pages.
rpasConfigMgr Usage
The rpasConfigMgr utility supports three commands:
-
–diff
The –diff command loads two versions of a configuration and produces a change log that describes all of the changes in the modified version of the configuration.
-
–merge
The –merge command loads and parses a change log and attempts to apply the changes described within it to a configuration that you specify. It then outputs a modified version of the configuration and a conflict log to the specified location.
-
–diffAndMerge
The –diffAndMerge command loads three versions of a configuration (the base, the modified, and the target versions), performs the diff command on the base and modified versions, and then immediately applies the detected changes to the target. The output of the diffAndMerge process is the reconciled version of the configuration, a change log, and a conflict log. These are output to the location you specify.
Examples
Here are examples of rpasConfigMgr commands. In these commands, [baseConfigPath], [modifiedConfigPath], and [targetConfigPath] are paths to the root document of the base, modified, and target versions of a configuration, respectively. [outputDirectory] is the location you specify for the outputs of the commands, and [changeReportPath] is the path to the location of the change log used in the –merge command.
rpasConfigMgr –diff –base [baseConfigPath]–mod [modifiedConfigPath]–output [outputDirectory]
rpasConfigMgr –merge –target [targetConfigPath] –change [changeReportPath] –output [outputDirectory]
rpasConfigMgr –diffAndMerge –base [baseConfigPath]–mod [modifiedConfigPath]–target [targetConfigPath] –output [outputDirectory]
RPASCE Configuration Manager
The RPASCE Configuration Manager extends the rpasConfigMgr utility to provide a more powerful and flexible tool to manage differences between different versions of a configuration. This is accomplished through two operations:
-
Creating a detailed Change Report that describes the differences between two versions of a configuration.
-
Creating different modified versions of a configuration in reference to a base version of the configuration.
RPASCE Configuration Manager uses the same diff and merge functionality that rpasConfigMgr uses but expands on that functionality in order to provide the user with more information about and control over the merge process.
-
RPASCE Configuration Manager gives users the ability to interact with the process, enabling the user to select from a subset of all of the potential changes which diffs to apply to the upgrade.
-
The rpasConfigMgr is sensitive to the changes in the base and the mod only. RPASCE Configuration Manager has two diffs:
-
Between base and modified
-
Between base and the update
A set of algorithms compares these two diffs and detects changes present in the two modified configurations that could potentially create conflicts. RPASCE Configuration Manager then allows users to resolve these conflicts before attempting the merge operation.
When the user wants to determine the set of changes present between two versions of a configuration, they select the Change Report activity from the main UI. After being prompted to supply a base configuration and a modified configuration, the user is presented with a description of the changes present between the two versions.
Field/UI Item Description
-
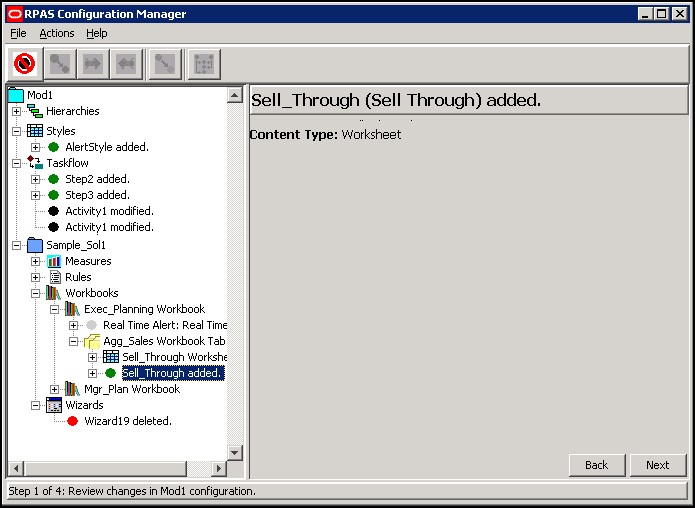
Green dot: Content that was added
-
Red dot: Content that was deleted from the configuration
-
Blue dot: Content that has been moved in the context of something where ordering matters (ordering of rules inside of a rule group matters).
-
Black dot: Piece of content that has had some property of that content modified
-
Attribute: Displays the name of the property that was changed
Note:
Selecting a node/dot will make more information about that change appear in the content area.
In addition to allowing the user to inspect the changes between two versions of a configuration, the UI provides the ability to output information about the changes in the form of a report. This report differs from the Change Log created as a part of the original rpasConfigMgr functionality in that it is intended to describe the detected changes in a readable format
The change report provides summary information about changes to the configuration as well as separate summaries for the various functional areas of the configuration (for example, Hierarchies, Measures). It also provides detailed information about individual changes.
Merge Functionality
RPASCE Configuration Manager also provides support for and expands the functionality of the merge operation of the rpasConfigMgr. As with the diff operation, the user can specify a new merge activity. The user is then prompted for a base version of the configuration, as well as two modified versions of the configuration.
RPASCE Configuration Manager performs the diff operation to compare each of the modified configurations to the base configuration. This creates two distinct change lists. These change lists are used as the inputs to the conflict reconciliation process. The reconciliation process identifies conflicts between the changes in the two change lists and the user's directives for those changes to resolve conflicts that would prevent a successful merge of changes to the configurations.
After the reconciliation process is complete, the utility merges the two distinct change lists into a single, comprehensive list of changes. This merged change list is then applied to the base configuration to generate a merged output configuration containing all changes present in both modified configurations that have not been discarded by the user as part of the reconciliation process. This merged configuration is then saved to a location specified by the user along with a Change Report which contains changes from the merged change list.
Conflict Resolution Functionality
The user specifies the base and two modified versions of the configuration. Oracle Retail Predictive Application Server Configuration Manager performs a diff between the base and each of the modified versions.
The user can examine each of the Change Log summaries. The user can discard any changes they do not wish to merge before moving forward.
The user initiates an action to detect conflicts between the two sets of changes. In its most basic form, this entails performing a series of basic merge operations from the rpasConfigMgr and recording the resulting merges.
After conflicts (whether potential or actual) have been discovered, the utility presents the conflicts in the UI. The user can examine the conflicts present between the two modified versions of the configuration and begin resolving the conflicts.
This screen shows information about the new set of algorithms, the ones that find the differences between the two diffs. Oracle Retail Predictive Application Server Configuration Manager takes the two sets of changes and runs a collision detection algorithm. This algorithm produces an enhanced node structure, which identifies every place that could potentially have a conflict during the merge step.
After all collisions are resolved, a change list opens. This change list describes all changes from the two configurations except for the ones discarded. This list is a union of both sets of changes, all the changes between the original base configuration and the output at the end. This list can be used to review the changes before the merger is committed.
Oracle Retail Predictive Application Server Configuration Manager attempts to do the merge. If there are still conflicts interfering with the merge process, the Conflict Resolution screen summarizes the conflicts. This enables the user to disable the change or modify it is that stops that change from working. The user can then attempt the merge again. This is an iterative process.
To reduce the complexity of the resolution process and to provide a greater level of assurance that the output configuration is self-consistent, conflicts are grouped into scopes by default. These scopes correspond to the entities inside an RPASCE application (for example, a measure or a workbook). Users select which of the two modified versions of the configuration they want to accept changes from. The selected version has its changes retained, while any conflicting changes in the other configuration are discarded.
For example, if both modified versions of a configuration modify properties of a measure in the base configuration, it is possible that some of the changes cannot be merged without causing a non-consistent configuration. One modified configuration might change the na value or range of the measure, whereas the other modified configuration might change the type. Although no two changes affect the same property, the combination of the changes results in an invalid measure configuration. For this reason, the user takes either one or the other of the two sets of changes to the measure to be the final change set.
This all-or-nothing approach be too limiting for the user. For example, consider a case where one modified configuration modifies data-centric properties of a measure, such as type or base intersection, and the other modified configuration modified purely cosmetic properties such as the measure label. In this case, both sets of changes can be retained without creating a non-consistent output configuration.
The conflict is presented to the user on a conflict-by-conflict basis (as opposed to an aggregate level of the entity) and users can select individual conflicts. Users can then manually select which changes result in conflicts and disable those changes. After satisfied that conflicts have been eliminated, the user can mark that collision as resolved and continue to the next collision.
For example, if both modified versions of a configuration contain instructions to modify the label of a measure, the user experiences a conflict. The merge process must accept one of the new label values or the other (or at the scope level, one set of changes to measure properties or the other). The simplest way of resolving this conflict is for the user to decide which of the two new label values is desired. After this has been determined, the instruction for the undesired label change is unavailable in the Change Logs (an unavailable change is one that is not applied as part of the merge process). At this point, the merge is successful; only the desired modification is processed.
A more complicated scenario would involve some change present in one modified configuration that can no longer be performed due to changes made in the other modified configuration that do not result in direct collisions, as previously shown, but instead result in changes to some dependent piece of content.
For example, consider the situation in which one configuration deletes a measure from the solution. The second configuration, having not deleted the measure, might attempt to add it to a measure profile. This operation cannot be performed because the operation has a dependency on some non-local content (the base measure) that can no longer exist within the merged configuration.
The utility also attempts to detect these non-local collisions. When a collision is detected, the utility reports that collision the same way that it reports local collisions. As with local collisions, users can reconcile the collision by selectively disabling changes.
RPASCE Configuration Manager Application
The RPASCE Configuration Manager application can be launched by
calling the ConfigManager.sh script located in the
bin directory of your Tools distribution. The application provides
two main functions:
Merge Operation
Table D-1 shows the buttons used for this function.
Table D-1 Merge Operations Buttons
| Button | Function |
|---|---|
|
Disable Change |
|
|
Enable Change |
|
|
Discard Mod1 Changes |
|
|
Discard Mod2 Changes |
|
|
Recompute Collisions |
|
|
Mark as Resolved |
The following steps detail the merge operation function.
-
Click New Merge Operation to begin a new operation. Click Open to resume a suspended operation.
-
You are prompted to enter locations for three configurations:
-
base
-
mod1
-
mod2
These represent the original unmodified configuration and two updated versions of that configuration. The field expects the path to the
root.xmldocument of the configuration (the file selected during the open operation in the tools).Note:
Mod1 and Mod2 are labels that can be changed using buttons, if this is desired. The new labels are used wherever Mod1 or Mod2 are referenced in the UI.
-
-
Click Next to proceed to the first step. This step is a review of the changes between the base configuration and the Mod1 configuration. In this step, there is only a single operation available. If a change node is selected, then Disable Change is available. Click Disable Change to mark the selected change so that it is ignored for the remainder of the operation and is not applied when the merged configuration is generated.
If a previously unavailable change is selected, then Enable Change is available. Click Enable Change to clear the status of the change so that it is processed in future steps.
-
When satisfied with the set of changes between base and Mod1, click Next. You are provided with the changes between the base and Mod2 configurations. The same options exist in this step as in the previous review of the changes between the base configuration and the Mod1 configuration.
-
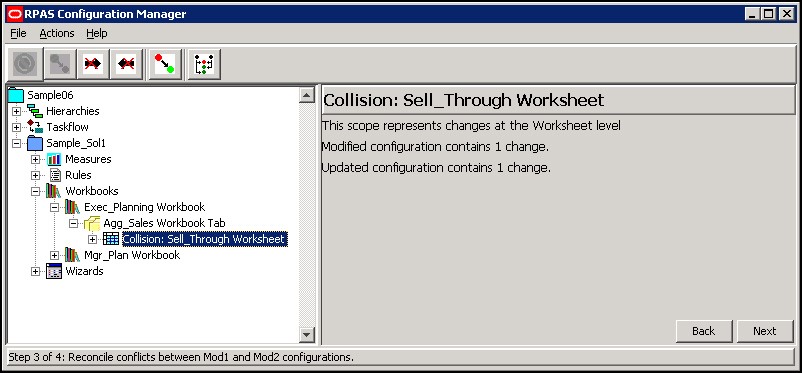
Click Next. In this step, you are presented with a list of locations where changes from the previous two steps might conflict have been identified. A conflict of this type is called a collision, and the navigation tree can be used to navigate between and view details about the conflicts.
-
You cannot progress until all collisions have been resolved. There are multiple ways to resolve collisions.
-
Select the collision node. Resolve the collision by disabling all changes related to the conflict in Mod1or Mod2.
If either of these options is selected, all changes listed in the Mod1 Changes or Mod2 Changes section of the collision are marked as unavailable, exactly as if they had been individually selected and you clicked Disable Change. Selecting either Discard Mod1 Changes or Discard Mod2 Changes marks the collision as resolved so that the merge can proceed.
-
You can manually resolve collisions. Individual changes in either the Mod1 list or the Mod2 list can be selected and unavailable using Disable Change. Unavailable changes cannot be re-enabled using Enable Change in this step; that operation can only be performed in the first two steps.
Note also that changes unavailable by using either Disable Change or Discard Mod1/Mod2 Changes are unavailable throughout the UI, even if they appear in more than one collision. It can often be the case that resolving one collision results in one or more other collisions automatically being marked as resolved because the unavailable changes were the cause of those other collisions, as well as the resolved collision.
-
Sometimes, you are satisfied that a collision does not create a problem during the merge step. This might be because the changes in the collision do not interfere with each other in any meaningful way (this is especially common if one of the sets of changes are to cosmetic attributes such as labels), or because any troublesome changes have been manually unavailable. In such cases, you can manually mark a collision as resolved using Mark as Resolved.
Click Mark as Resolved to cause the collision to be treated as resolved without disabling any additional changes in the collision (changes that were previously unavailable remain unavailable).
-
Click Recompute Collisions to cause the collision detection to be re-applied to the sets of changes that are an input to the process. However, any changes that have been unavailable are ignored for this new pass. As a result, the collisions those now-unavailable changes would cause do not appear after the re-application of the algorithm. This is useful when presented with many collisions. As collisions are resolved, the collision set can be periodically recomputed to reduce the amount of information and make remaining collisions easier to deal with.
-
-
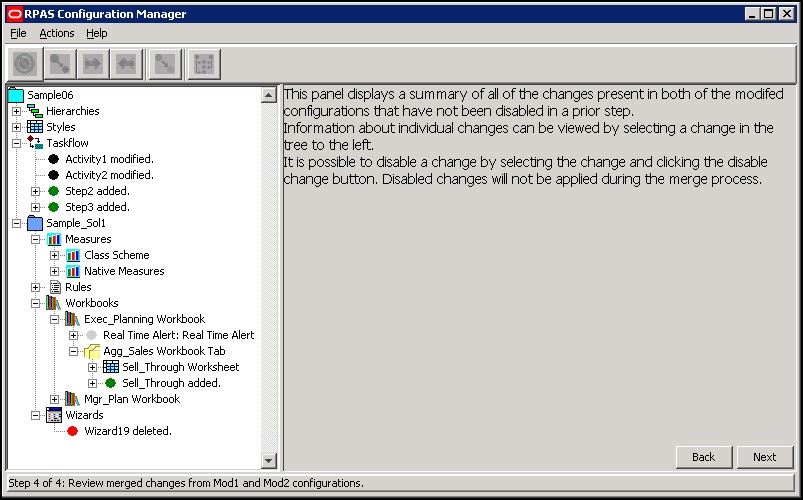
After all collisions are resolved, click Next to proceed to the final step of the process. You are presented with a set of changes, much like in the first and second steps. However, this step of changes is the combination of the changes found in both the first step (between base and Mod1) and the second step (between base and Mod2). This list contains the union of all changes from either change set that have not been unavailable at some point in the process. In this step, you can still choose to disable any changes that you do not want applied.
-
After satisfied with the list of changes, click Next. At this point, the combined set of changes is applied to the base configuration to produce a new configuration that represents the merging of the changes in Mod1 and Mod2. You are prompted for a location in which to save this new configuration, as well as a summary report. In some cases, it might be possible that changes in the separate configurations cannot be applied even though the collision detection algorithms did not detect the conflicts. In this case, the user is presented with a description of the conflicts. If this should occur, the user must go back to the merge step and manually disable changes to resolve the undetected conflict. You can then move forward to the output step.
A Note on Saving and Loading Merge Operations
Because the merge process can take a considerable amount of time for complex configurations where many changes differentiate the Mod1 and Mod2 versions, RPASCE Configuration Manager provides a mechanism to capture the current state of the merge operation and save it disk. This saved record can then be reloaded later to enable the user to pick up on the process where the user left off without starting again from scratch. This functionality is available by making use of the Save and Open menu items within the File menu.
Note:
The save operation prompts you to select a directory in which resources describing the state of the merge operation will be saved. This directory should not contain any existing files or directories to prevent conflicts with the resources created by RPASCE Configuration Manager. When loading a saved operation, you should provide the directory specified during the save operation.
Change Report Operation
The following steps detail the change report operation function.
-
Select New Change Report from the file menu. You are prompted to enter the paths to a base version of a configuration and a modified version of the configuration.
-
Click Next to move to a visual description of the changes present in the two versions of the configuration. This visual description is identical to the view presented during the merge operation when reviewing differences between a base and mod configuration. However, this view is only intended to allow a visual inspection of the detected changes; there are no meaningful operations that can be performed at this point.
-
Click Next to move to the final step. In this step you are prompted to provide a directory for output. In this directory a summary of the changes detected is generated.
