5 Customizing Batch Schedules
Overview
POM comes with a standard set of Oracle Retail Application Batch Schedules, such as Merch, AIF, RSP, and so on. These Batch Schedules support the various Oracle Retail Products and are built and maintained by the corresponding Oracle Retail product teams. However, there is a need for customers be able to tailor these Batch Schedules or build custom ones. POM provides a number of customization capabilities for use by customers to modify these Batch Schedules or create new custom ones to meet their needs.
This chapter discusses the various customization use cases and how a customer can address them within POM.
Note:
Support and maintenance for customizations, as well as any batch failures of custom jobs, are the retailer's responsibility. In addition, retailers should carefully evaluate the impact of all customizations to existing schedules, given that these could extend the batch window.Customization Use Cases
The following are some of the common customization tasks that can be performed in the POM application.
| # | Query | How To? |
|---|---|---|
|
1 |
How can I use POM to run my own ReST-enabled custom jobs that are not dependant on an existing Retail cloud schedule? |
|
|
2 |
How can I run my own ReST-enabled custom jobs in between two jobs of the nightly schedule of an Oracle Retail service from POM? |
|
|
3 |
How can I construct my own flow with the list of processes, jobs, and dependencies according to my own requirements? |
Use Custom Entities |
|
4 |
How can I change the job and its dependencies of a seeded flow or a process? |
Use Custom Entities Create a flow, add process to the flow, import existing job(s) from a seeded process to the flow and change the dependencies as per the requirement. |
|
5 |
Can I re-use a base nightly job to run on ad hoc basis? |
Use Custom Entities |
|
6 |
How can I run RDS jobs from POM? |
Refer to the Retail Data Store Integration section in the “Integration” chapter of this guide. |
Custom Batch Schedule
This section details the various steps needed to create an entirely new custom Batch Schedule within POM.
A Batch Schedule is composed of two parts:
-
Schedule Configuration – Defines the structure and environment of the Batch Schedule. It defines the name of the Schedule, the URLs of the Job Agents that will run the Jobs within the Schedule, and defines any properties for the Schedule.
-
Schedule Metadata – All the batch entities - Jobs, Processes, and Flows are defined in the Batch Schedule. The Jobs that will be running as part of the Nightly, Adhoc and Recuring Cycles and the various dependencies between them, are all defined within the schedule metadata.
Schedule Configuration
An administrator can create the configuration for the new schedule using the System Configuration screen as follows:
-
Navigate to Tasks > System Configuration.
-
Open the Schedules tab.
-
Click the Configure New Schedule button at the top right of the Schedules tab to open the “Configure New Schedule” window.
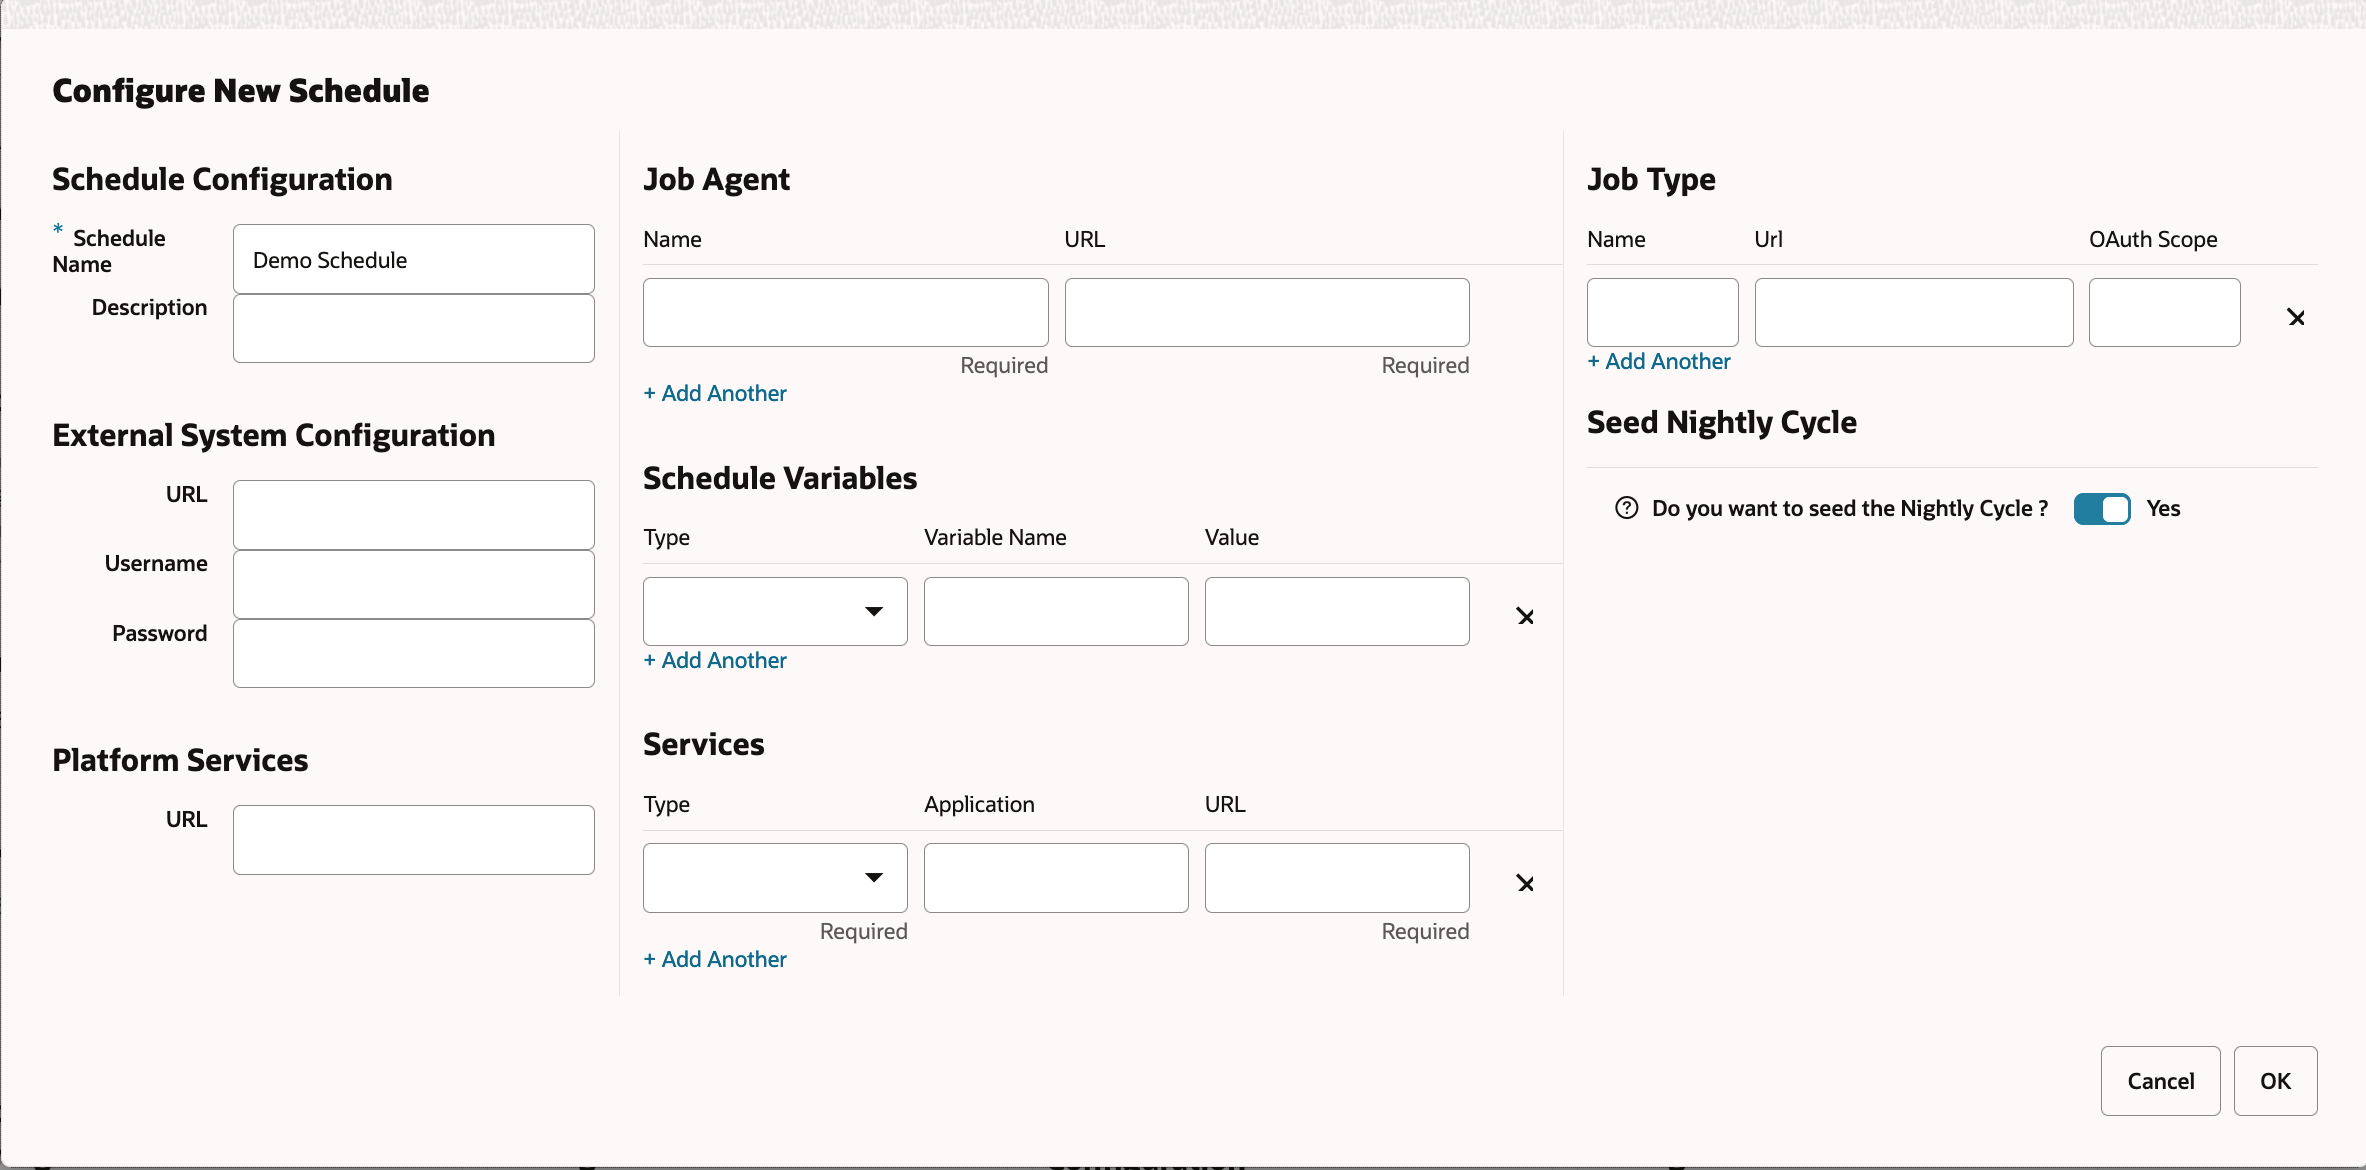
Refer the “Configure New Schedule” section in the POM User Guide for instructions on filling out the window above.
A Batch Schedule, at a minimum, must define the start and end jobs of the Nightly Cycle. An option is provided in the Configure New Schedule section to seed the Nightly cycle with some default Jobs, thereby making the Batch Schedule immediately ready to be used.
Schedule Metadata
The Batch Schedule metadata is made up of all the Jobs, Processes, Flows and all the different dependencies. This information can be specified in one of two ways or a combination of both:
-
Using the Batch Schedule Spreadsheet Template, which is then imported into POM directly using the Schedule Maintenance screen.
-
Use Custom Entities.
Fill Up the Batch Schedule Spreadsheet
Customers can fill out a new Batch Schedule spreadsheet using the template provided to set up their own custom Batch Schedule. At minimum, the Batch Schedule must define a Nightly Flow, consisting of a start and end Job, while the Recurring and Adhoc Cycles are optional. Refer to the documentation and specifications detailed in the Batch Schedule Spreadsheet Template chapter of this guide.
Import Batch Schedule Spreadsheet
The new or updated batch schedule can be set up by loading the Batch Schedule spreadsheet into the POM application using the following steps.
Remember that every time you upload an updated spreadsheet, you need to increase the Version column on the Schedule tab.
-
Log into to the POM application and navigate to the Tasks -> Schedule Maintenance screen.
-
Click the Import Latest Schedule button and upload the Batch Schedule spreadsheet.
-
The Versions table is updated with a new row item for the batch schedule upload.
Custom Job Types
As a Job Scheduler, POM provides the ability for applications to invoke and track different types of Jobs. There are pre-defined
job types (EXEC, RI, RASE, BDI, RPAS, OB, OMS, and RDS) that are supported in POM by default.
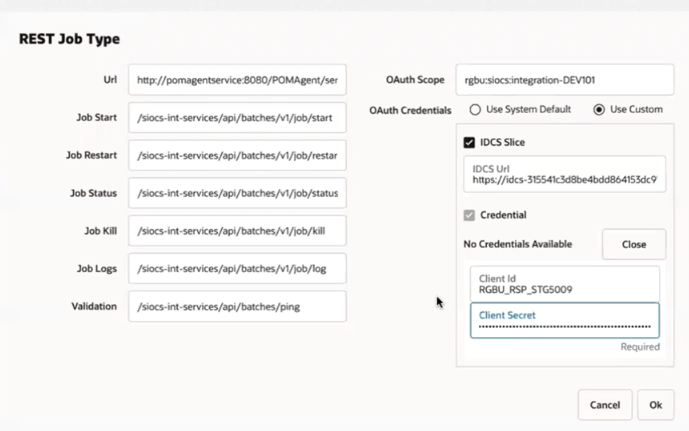
Custom job types other than the pre-defined ones can also be defined either in the JobType tab of the Batch Schedule spreadsheet or built using the Job Type feature on the System Configuration screen. This custom job type can then be associated with the base URL for endpoints at the destination system.
Custom Job Types also support the use of a separate IDCS slice. Refer to the Features of Generic ReST Jobs chapter of this guide for more information.
Custom Entities
Custom Batch Entities allow customers to customize Batch Schedules that have already been configured. These could be schedules provided by Oracle products such as Merchandising, or custom schedules created by the customer. These Custom Entities can be defined within the Batch Schedule spreadsheet or through the POM UI or by calling the related POM APIs. The best option for customers to define these Custom Entities is through the POM UI rather than the spreadsheet.
With this capability, customers have the ability to add a new Job, Process, and/or Flow to an existing Batch Schedule. These Custom Entities can only be created within the Standalone cycle by default and are distinctly separate from the Batch Entities that are seeded as part of the Batch Schedule spreadsheet.
A note about the invokable concept in POM: POM supports the execution of either a Batch Process or a Batch Flow. These entities are therefore deemed invokable. The Batch Monitoring screen for the standalone cycle provides an invokable centered view, rather than a Job-centric view seen on the Nightly and Recurring cycles. The Custom Entity APIs and the UI provide controls for the creation of custom invokables, while custom Jobs can be added as part of these custom invokeables.
The next few sections describe how to create Custom Entities through the UI. However, it is also possible to programmatically create them through ReST APIs. Refer to the Custom Batch Entities API in the “Invoking the POM Service” chapter for further details.
The Export / Import feature of POM can also perform the lift and shift of Custom Batch Entities in both the XLS and JSON formats. The following rules are followed while importing:
-
Any CBE not present in the destination environment will be created.
-
Any CBE already present in the destination environment will not be merged or modified.
Create Custom Flow
-
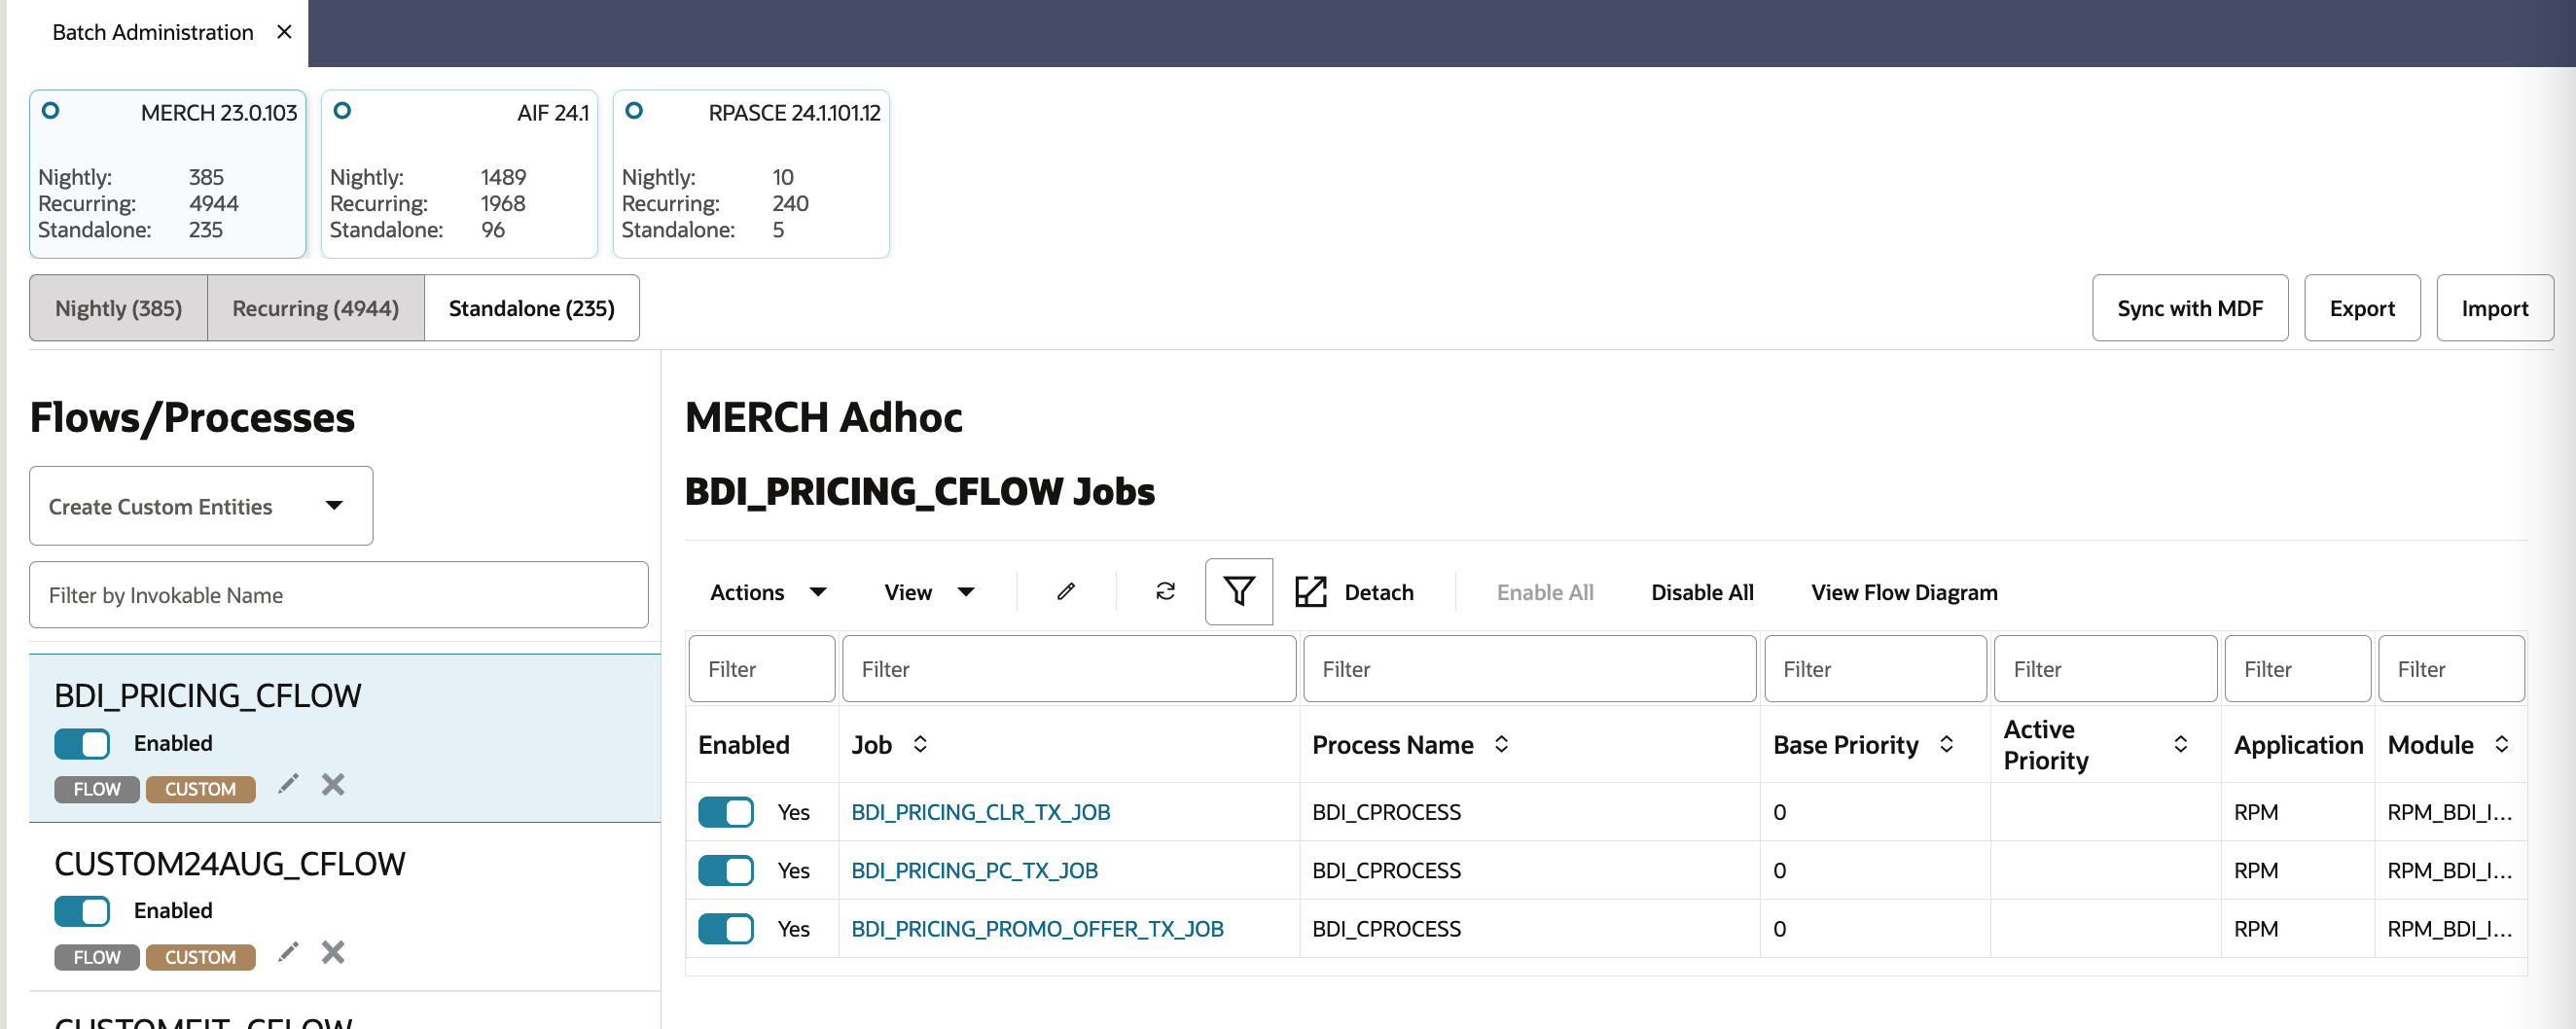
Navigate to the Tasks -> Batch Administration screen.
-
Open the Standalone tab.
-
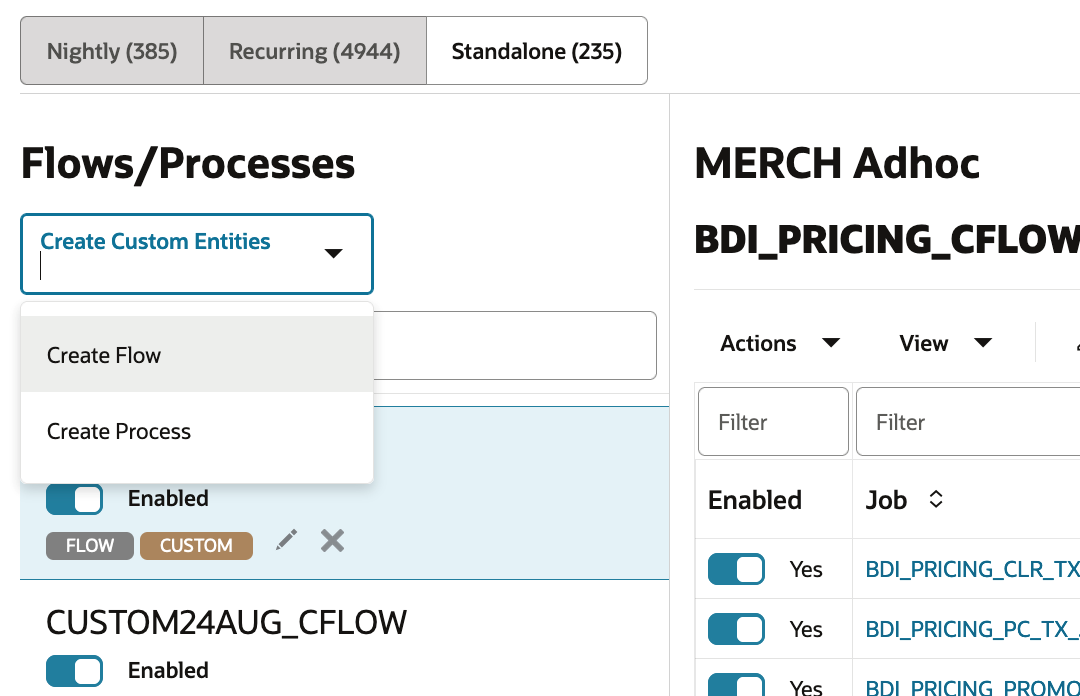
In the left panel, click Create Custom Entities -> Create Flow.
-
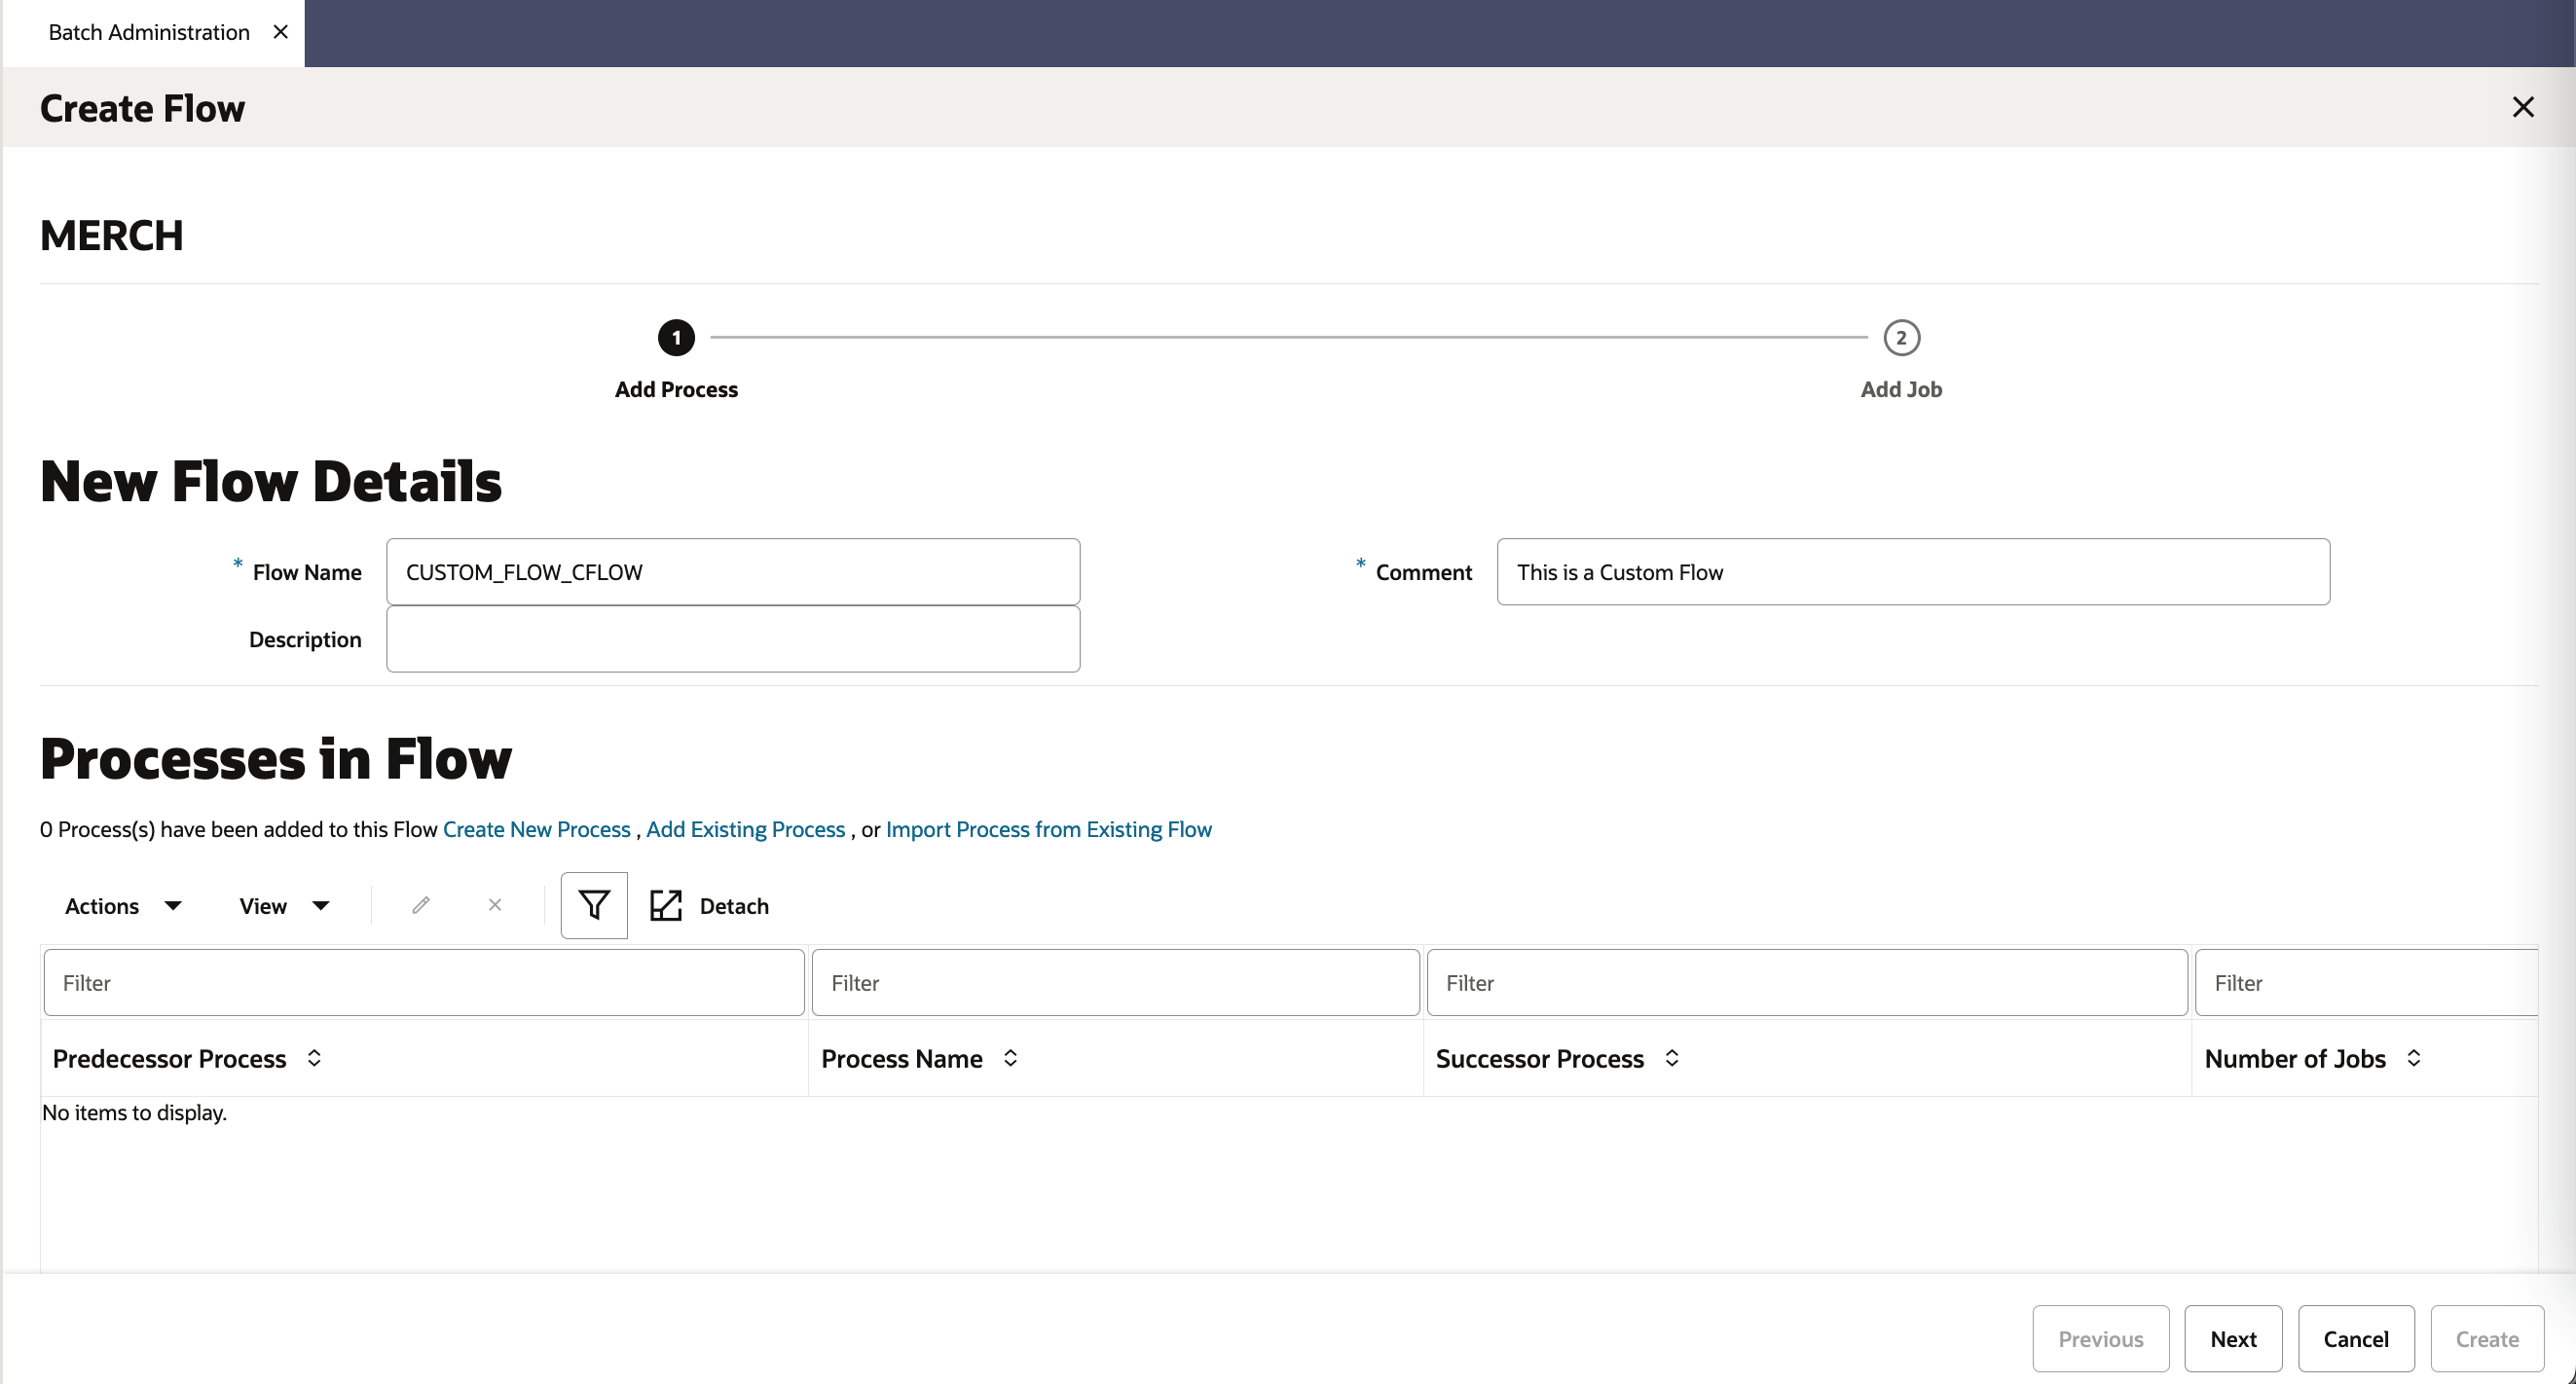
Enter the following information to create a flow:
-
Flow Name – Name of the flow ending with _CFLOW
-
Comment
-
Description (optional)
-
-
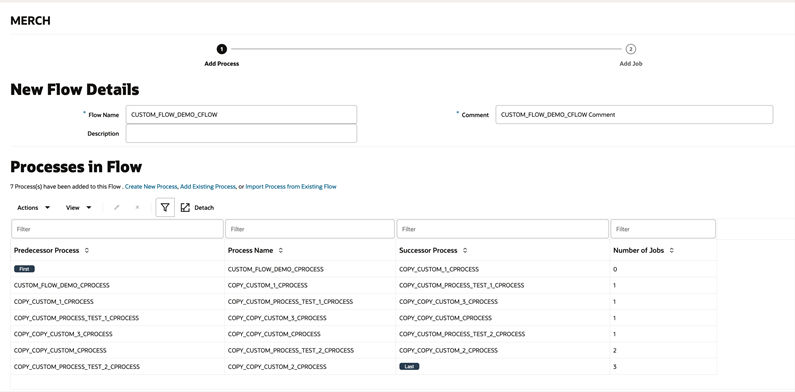
Processes in Flow
Processes can be added to the flow by either
-
Creating a new process or
-
Adding an existing process or
-
Importing processes from an existing flow.
After adding the desired processes, click the Next button to add job(s) to the processes. Every process in the custom flow should have at least one job.
-
Create New Process
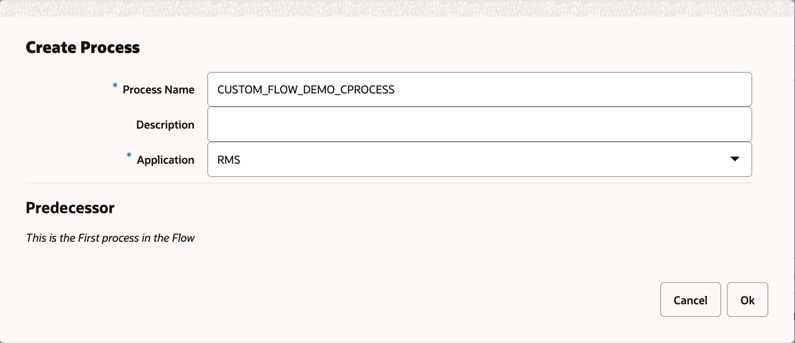
The Process Name needs to end with _CPROCESS.
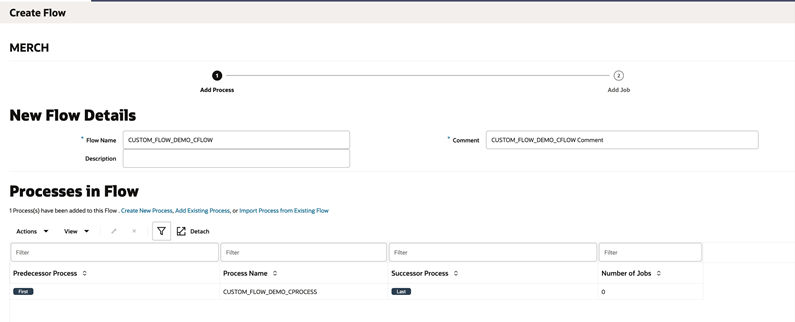
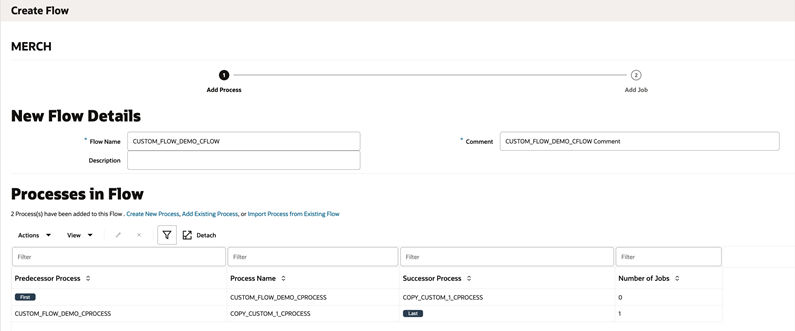
Because this is the first process in the flow, the Processes in Flow section is populated with this process as shown below, marking it as the First and Last process.
-
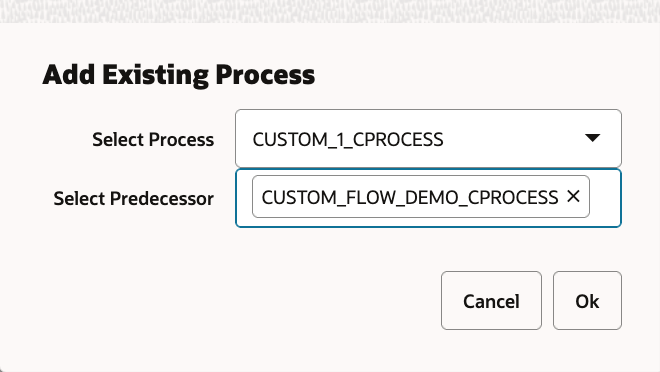
Add Existing Process
An existing process can be added to the flow using this option. Because we have already created the first process for the custom flow, the first process is the Predecessor for the next created process.
-
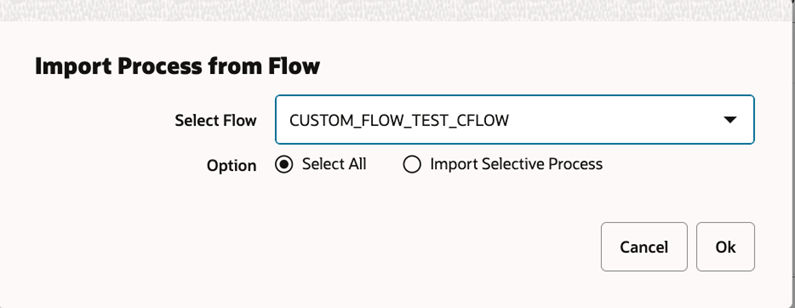
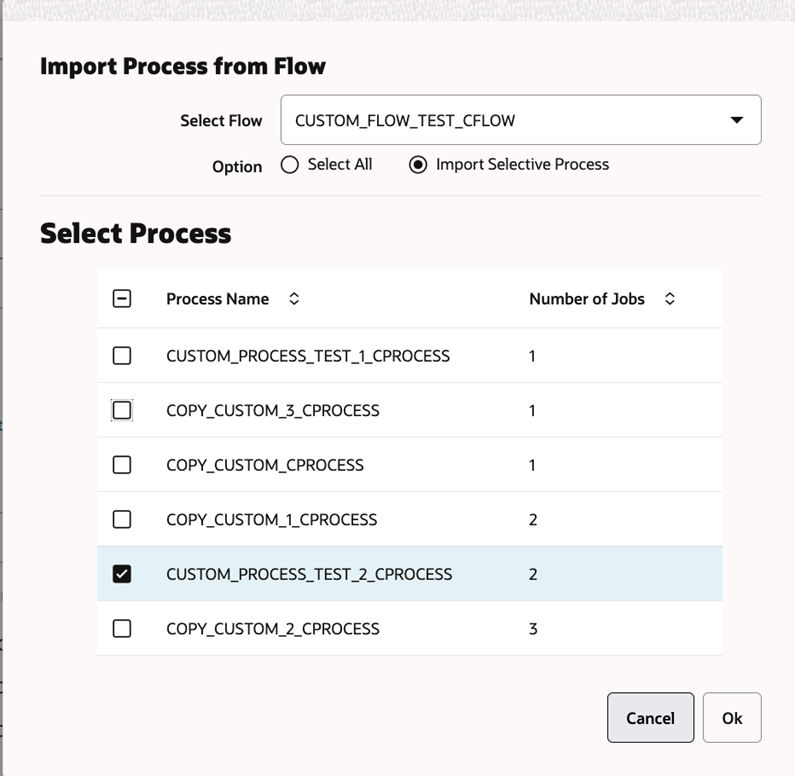
Import Process from Existing Flow
All processes from an existing flow can be imported using this option.
-
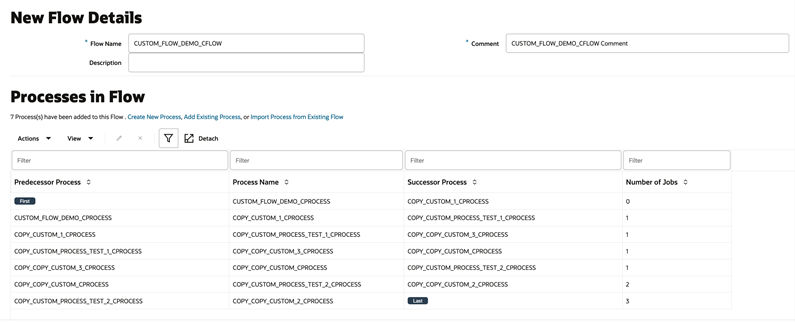
Import Process from Existing Flow – Select All
All processes from the selected flow are added.
-
Import Process from Existing Flow – Import Selective Process
Only the selected processes from the selected flow are added.
-
-
-
Jobs in Process
New or existing jobs can be added to the selected Process by either
-
Creating a new job or
-
Adding an existing job or
-
Importing jobs from an existing process.
-
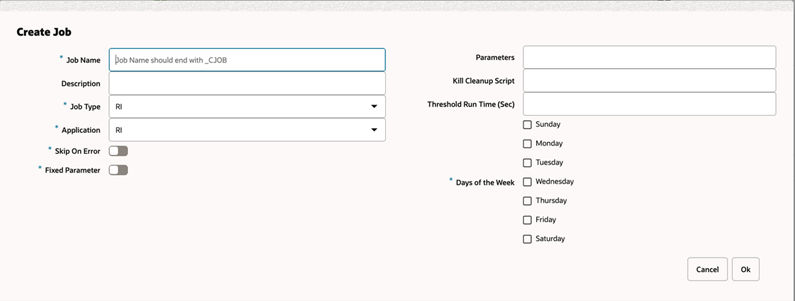
Create New Job
-
Job Name
Uniquely identifies a job and should end with _CJOB.
-
Description
Short description of the batch job. There should be no special characters.
-
Job Type
Can be one of the following values:
EXEC,RI,RASE,BDI,RPAS,OMS,OB, orRDSor a custom job type. -
Application
This holds the application that the batch job belongs to.
-
Skip On Error
If the switch is on, it indicates that the job should be skipped if it fails, and the batch schedule should continue to run. Otherwise, the batch schedule is stopped.
-
Fixed Parameter
If the switch is on, it indicates that the parameter value can be changed on the Batch Administration screen. The switch should be on if the parameter cannot have a default value, or if the parameter can have different values.
-
Parameters
This holds the entire parameter value to be passed into a shell-script type job. This field is case sensitive.
-
Kill Cleanup Script
Absolute path of the cleanup script to be run after killing a shell script (EXEC) type job from the POM UI. It can include arguments as well along with the script.
For example:
/u01/retail/app/batch/app_cleanup_script.sh -
Threshold Run Time (Sec)
Amount of time greater than which the job is deemed long running.
-
Days of the Week
Days of the week for which the job is to be run if scheduled.
-
-
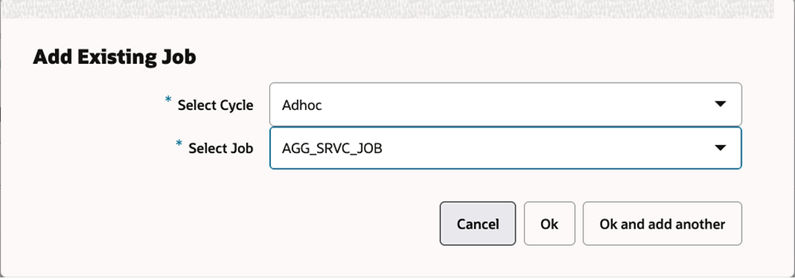
Add Existing Job
An existing job can be added to the process using this option.
-
Import Job from Existing Process
All jobs from an existing process can be imported using this option.

-
-
Create Custom Flow
After adding the desired job(s), click the Create button in the footer to create the custom flow with its associated process and jobs.
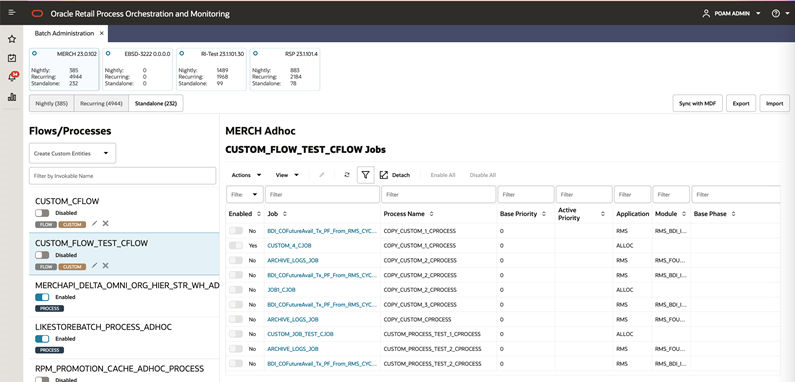
The custom flow and its jobs are created and displayed in the Standalone tab. A Custom tag is also seen along with the flow name in the left pane to indicate that it was a custom, user-created flow, as opposed to being seeded from the batch schedule spreadsheet.
-
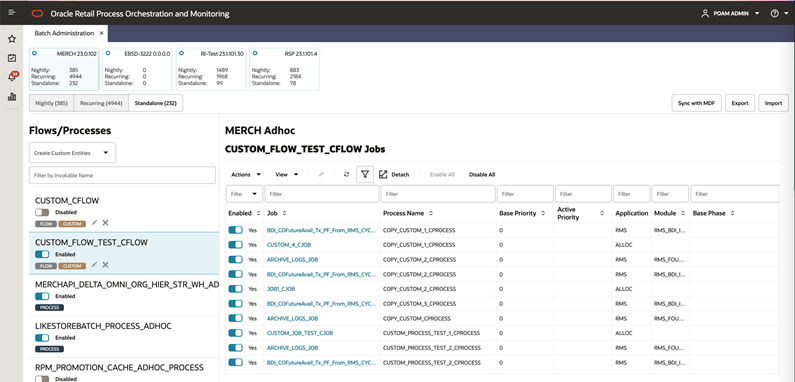
Enable Custom Flow
The custom flow is disabled by default and can be enabled by clicking the enable/disable switch. Enabling the Custom Flow also enables its batch jobs.
Create Custom Process
The user can select Create Custom Entities and click the Create Process option to create a new process and its associated job(s). The steps are same as creating custom process and associated jobs as mentioned in Create Custom Flow section above.
Custom Dependencies – Nightly Cycle
A Custom Dependency is a dependency between an Adhoc Process or Flow and a Nightly Job. This dependency ensures that the Adhoc Process or Flow executes prior to the nightly job on which it is defined. Only when the Adhoc Process or Flow completes successfully will the nightly job on which the Custom Dependency is defined be started.
Create Custom Dependencies
-
Navigate to the Tasks -> Batch Administration screen.
-
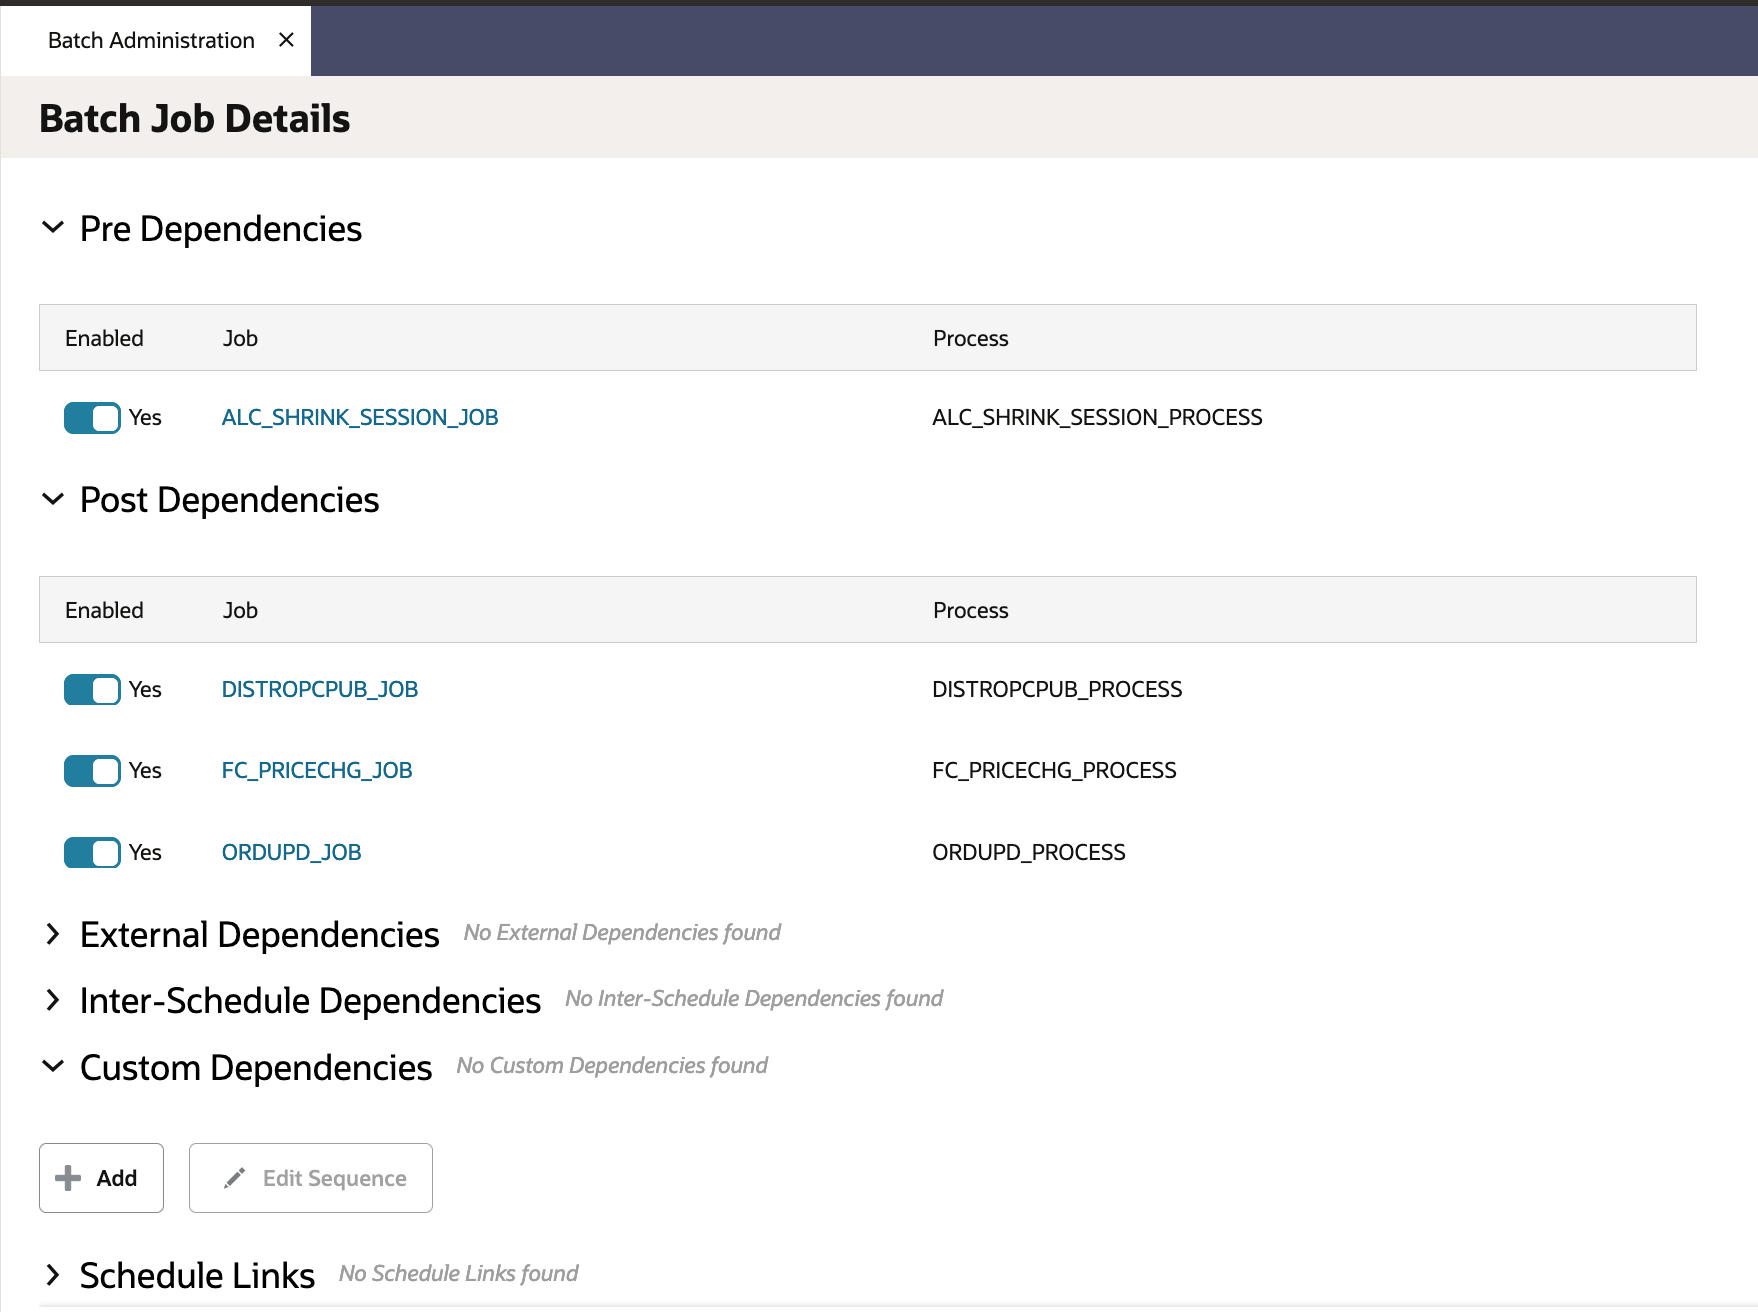
Open the Nightly tab and click on a Job Name link in the jobs table. This will open the Batch Job Details screen.
-
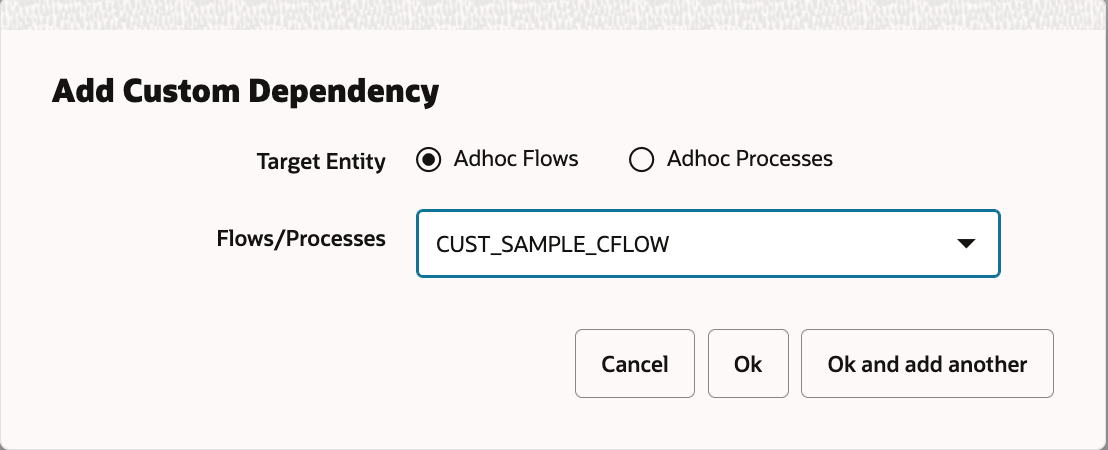
Click the Add button under the Custom Dependencies section and add an Adhoc Flow or Process as a Custom Dependency for the selected job.

-
Click Add button again to add more dependencies.

-
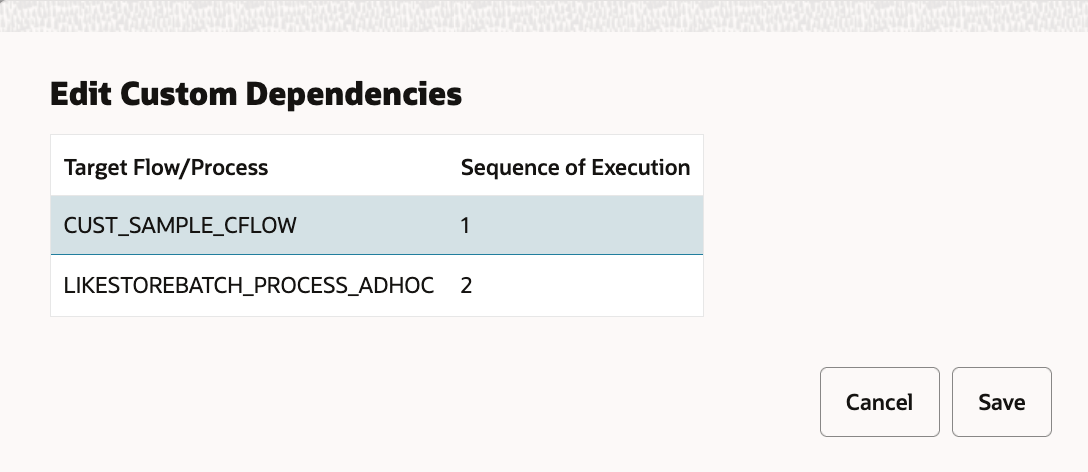
The sequence of the dependency can be set using the Edit Sequence button.
