1 Feature Summary
This chapter describes the feature enhancements in this release.
Noteworthy Enhancements
This guide outlines the information you need to know about new or improved functionality in the Oracle Retail Supplier Evaluation Cloud Service update and describes any tasks you might need to perform for the update. Each section includes a brief description of the feature, the steps you need to take to enable or begin using the feature, any tips or considerations that you should keep in mind, and the resources available to help you.
Note:
Where new fields, User Interface (UI) changes, or glossary entries are introduced as part of a change, the portal owner may need to apply their own translations of the core system text.Column Definitions
-
Feature: Provides a description of the feature being delivered.
-
Module Impacted: Identifies the module impacted associated with the feature, if any.
-
Scale: Identifies the size of the feature. Options are:
-
Small: These UI or process-based features are typically comprised of minor field, validation, or program changes. Therefore, the potential impact to users is minimal.
-
Medium: These UI or process-based features are typically comprised of field, validation, or program changes. Therefore, the potential impact to users is moderate.
-
Large: These UI or process-based features have more complex designs. Therefore, the potential impact to users is higher.
-
-
Delivered: Is the new feature available for use immediately after upgrade or must the feature be enabled or configured? If no, the feature is non-disruptive to end users and action is required (detailed steps below) to make the feature ready to use.
- Customer Action Required: You must take action before these features can be used. These features are delivered disabled and you choose if and when to enable them.
Table 1-1 Noteworthy Enhancements
| Feature | Module Impacted | Scale | Delivered | Customer Action Required? |
|---|---|---|---|---|
| JET UI Retailer User Form |
Company |
Medium |
No |
Yes |
| JET UI Library Document Form | Library | Medium |
No |
Yes |
| Site Workflow: Set to Awaiting Approval |
Supplier |
Small |
Yes |
No |
| Audit & Visit Workflow: Set to In Progress | Supplier | Small | Yes | No |
| User Terms and Conditions Acceptance | Company | Small | Yes | No |
| JET UI List View Performance Improvements | Process, Library, Reports | Small | Yes | No |
| JET UI Glossary Cache Control | All | Small | Yes | No |
| Retail Home Dashboard | Retail Home | Small | No | Yes |
JET UI Retailer User Form
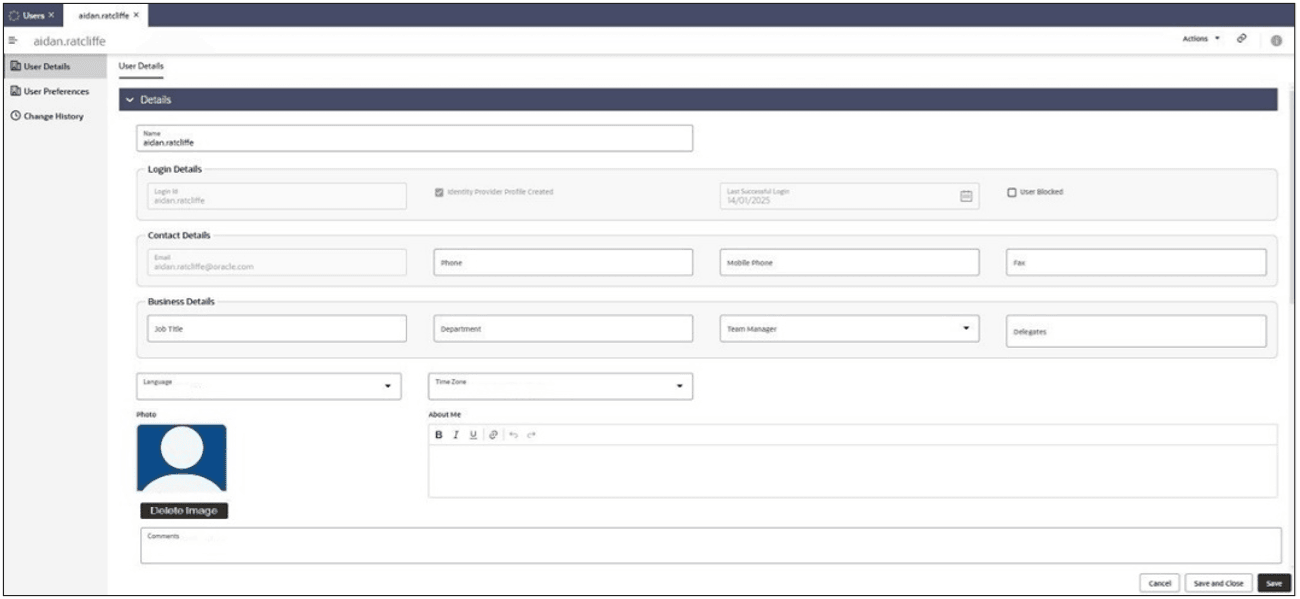
This release includes the Retailer User form as part of the transition of forms to the new JET UI design.
The Retailer User form is used for the maintenance of Retailer user accounts. The form for the maintenance of Supplier user accounts will follow in a later release.
The form includes some new features:
- An option to email new users to remind them to complete the registration of their account and set their IDCS password.
- The User Preferences page is incorporated into the User form.
- New Photo and About Me fields allow the user to enter profile details of themselves and upload a photograph.
- The User Disabled flag is renamed User Blocked, for future use in omitting such users from notifications and selectors.
The new JET UI forms are based on the Oracle Redwood design standard, giving a common look and feel with other Oracle Retail products.
Note:
This enhancement applies to environments that have the JET UI enabled.
With JET UI enabled, the new JET UI Company, Retailer User, and Library Document forms can be enabled with the JET UI Forms Enabled system parameter; or individual users can enable the forms using the new Preview JET UI Forms setting in their User Preferences.
Examples
The User Preferences page becomes a section of the form, where the user can edit their own preferences. Users can also view the preferences of other users, and if a User Administrator, may edit them.
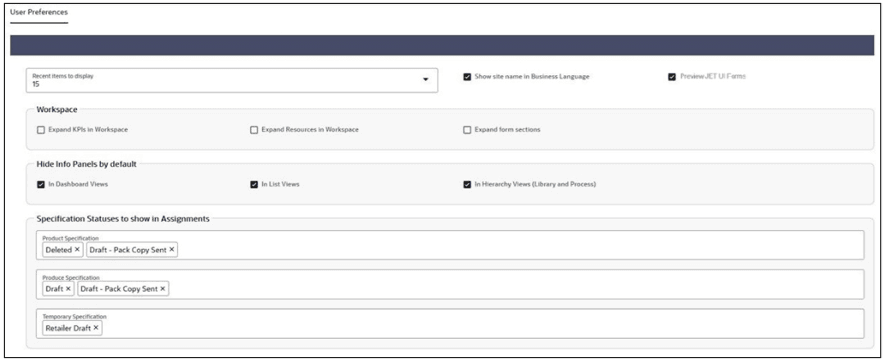
Note:
The set of Workspace preferences are not yet functional. They will be utilized in a future release.JET UI Library Document Form
This release also includes the Library Document form as part of the transition of forms to the new JET UI design.
The Document form is used to publish Library documents to the user community, with facilities for targeting and tracking readership.
The new form introduces more JET UI components and design patterns which will be utilized further in other forms, such as the Attachments Manager and Keyword Tags fields for classifying a document for searching purposes.
Note:
This enhancement applies to environments that have the JET UI enabled.
With JET UI enabled, the new JET UI Company, Retailer User, and Library Document forms can be enabled with the JET UI Forms Enabled system parameter; or individual users can enable the forms using the new Preview JET UI Forms setting in their User Preferences.
Examples
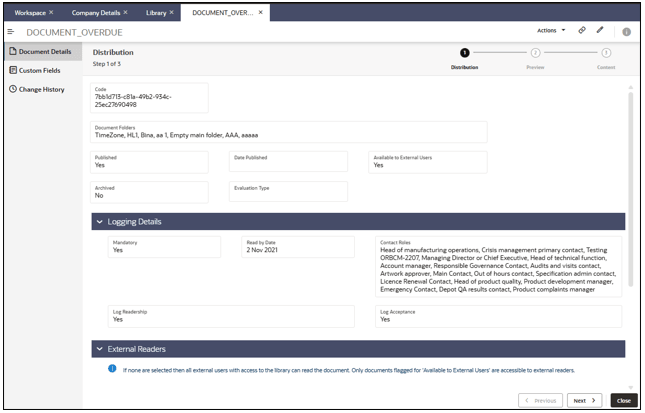
Some of the design features included in the new Document form include:
- In a similar way to the JET UI Announcements, the Retailer administrator uses a wizard to maintain and publish documents.
-
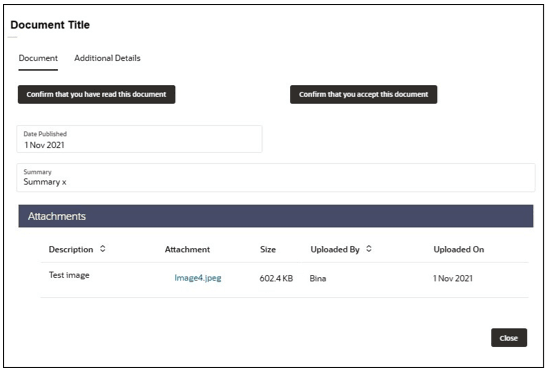
Users view the document using a read pane, which contains:
- Details of the document, including any additional details such as keyword tags and custom fields.
- A list of the document’s file attachments.
- Buttons to confirm they have read or accepted the document, where required.
- Retailer users also have access to view the readership & acceptance logs.
Site Workflow: Set to Awaiting Approval
The Sites workflow is enhanced to include the ability to manually progress a Site to Awaiting Approval status using a new Set to Awaiting Approval action. This is of use for activating Sites that have previously been set to Inactive, Unapproved, or Delisted status.
Once set back to Awaiting Approval status, a Site will behave as if it had been automatically set to that status as a result of completing the registration process, including:
- The Site will appear again in the Sites Awaiting Approval list views.
- The Site will appear again in the relevant Technologist's Assignments/Tasks list.
- If enabled, the relevant Technologists will receive an email notification.
- Audits & Visits and Assessments can be created for the Site.
- The site can be progressed to Active or Unapproved status.
There are no post release tasks required to implement this enhancement; the feature will become available automatically as part of the release.
Audit & Visit Workflow: Set to In Progress
The Audits & Visits workflow is enhanced to include the ability to progress an Audit or Visit to In Progress status while it is at Awaiting Corrective Action or Awaiting Amendment status, using the Set to In Progress action. This is of use as an interim step to allow edits to be made while non-conformance actions are still in progress. The action is available to Retailer users who have edit access to the Audit/Visit; it is not available to Supplier users.
Once set back to In Progress status, an Audit/Visit will behave as it does currently if set to that status from the Awaiting Sign-off status.
There are no post release tasks required to implement this enhancement; the feature will become available automatically as part of the release.
User Terms and Conditions Acceptance
A field has been added to the User record to indicate when the user accepted the portal’s terms and conditions. This value is set for the new user, so it will not show for existing users who have already accepted the terms and conditions.
JET UI List View Performance Improvements
The following modifications have been made to the new JET UI list views, to improve performance:
- The hierarchy list view types used in Process (Processes & Activities and All Processes & Activities) have the All Processes folder, the Expand All action, and the node count removed from the hierarchy tree pane.
- The hierarchy list view types used in Process, Library, and Reports now instead of loading the entire tree hierarchy, initially just load the top level nodes; the child nodes are then loaded on demand, when the user chooses to expand a parent node.
Note:
This enhancement applies to environments that have the JET UI enabled.JET UI Glossary Cache Control
When a screen requires data from a glossary, for example to present the options in a picklist, the data is currently retrieved each time the data is required. Once used, it is discarded and requested again if required.
Note:
This enhancement applies to environments that have the JET UI enabled.Retail Home Dashboard
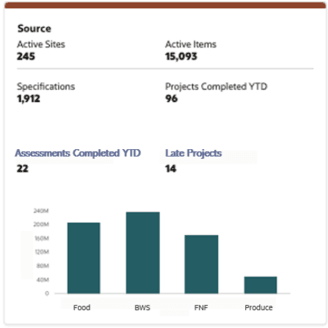
A Source tile which presents a set of metrics relating to Brand Compliance data is added to the Retail Home dashboard for use by Retailer users. The tile will contain the following metrics:
- Active Sites - the total number of Sites which are at Active status.
- Active Items/Products - the total number of Product Records which are at Active status (including both Produce and non-Produce products).
- Active/Approved Specifications - placeholders will appear for the count and graph, but the content will be empty.
- Completed Assessments YTD - the year-to-date total number of Assessments which have a Completed date from January 1st of the current year to the current date, inclusive (including both Site Assessments and Item Assessments).
- Completed Processes/Projects YTD - the year-to-date total number of the Processes/Projects which have a Completed date from January 1st of the current year to the current date, inclusive (including both Site Assessments and Item Assessments).
- Late Processes/Projects - the total number of Processes/Projects which are at Created or In Progress status, which have one or more Activities that are currently Overdue and are at Started or Not Started status.
Users will have visibility to the different metrics based on their current access rights.
The tile will auto-configure itself onto a dashboard for users with the group RGBU_BCCS_PRD1_Retailer. For stage/uat/anpe environments, additional setup is required. See Post Release Tasks.
Example
The Source tile will be presented in a similar style to this example:
Post Release Tasks & Impact on Existing Installation
The following post release tasks and impact on an existing installation must be taken into account as part of this release.
Database Update Scripts
The following feature includes a database upgrade script:
Site Workflow: Set to Awaiting Approval
Since this feature involves a modification to the allowable sequence and transition between statuses in the Site workflow, an update script will be applied to all Site records as part of the upgrade, to replace the existing workflow with the new modified workflow.
Permissions
The Audit & Visit Workflow: Set to In Progress feature requires Permissions updates. Add the entries below to the bottom of the Audit/Visit page of the Permissions spreadsheet.
| Record (A) | Authority Profile (B) | Action (E) | Data Record (F) | Status - Record(J) | User Mode (L) | Access Level (M) |
|---|---|---|---|---|---|---|
| Audit/Visit | Audit Administrator | Set to In Progress | Audit/Visit | Awaiting Amendment | NORMAL | Y |
| Audit/Visit | Audit Editor | Set to In Progress | Audit/Visit | Awaiting Amendment | NORMAL | Y |
| Audit/Visit | RESTRICTED AUDITOR | Set to In Progress | Audit/Visit | Awaiting Amendment | NORMAL | Y |
The instructions for downloading and uploading the amended Permissions spreadsheet are as follows:
-
Log in as an Oracle Authorized Administrator user and go to Company > Admin > Roles & Permissions.
-
Open the Permissions page.
-
Download the active spreadsheet by selecting the row with true in the Active Permissions column, click Download Selected, and save locally.
-
Edit the downloaded spreadsheet, make the changes described above, then save the spreadsheet.
-
Upload the edited spreadsheet by clicking Upload Permissions, select the spreadsheet, and click Ok.
-
Apply the changes by selecting the uploaded spreadsheet row, click Process Selected, and then click Ok to confirm.
System Text
The following features include new system text:
- JET UI Retailer User Form
- JET UI Library Document Form
- Site Workflow: Set to Awaiting Approval
- User Terms and Conditions Acceptance
- JET UI List View Performance Improvements
- JET UI Glossary Cache Control
System text records are added automatically during the release process, however any translation overrides must be added manually, by the retailer administrator.
Post Release Configuration
The following features have post release configuration and testing requirements:
Audit & Visit Workflow: Set to In Progress
Since this enhancement involves a change to the Audit/Visit workflow, it is advised to include a business test of Audit/Visit progression through the workflow.
Retail Home Dashboard
The new tile will automatically deploy and configure itself against the standard RGBU_BCCS_${ENV_ID}_Retailer group, where ${ENV_ID} is substituted with PRD1 or STG1 at the time of update.
For stage/uat/anpe environments, the following configuration is required:
Manually create a new group RGBU_BCCS_STG1_Retailer_PREPROD and assign any users who require visibility of the dashboard/tile to this group.
Enabling Identity Management Notifications
As an IDCS or OCI IAM Administrator, verify that Notifications are enabled in the corresponding Stage / Production tenant.
Enabling User Roles
If they do not already exist, configure the Power User, Account Administrator, Assistant Technologist, and Site Inspector user roles, and assign to the appropriate users.
The instructions for downloading and uploading the amended Permissions spreadsheet are as follows:
-
Log in as an Oracle Authorized Administrator user and go to Company > Admin > Roles & Permissions.
-
Open the Permissions page.
-
Download the active spreadsheet by selecting the row with true in the Active Permissions column, click Download Selected, and save locally.
-
Edit the downloaded spreadsheet, make the changes described above, then save the spreadsheet.
-
Upload the edited spreadsheet by clicking Upload Permissions, select the spreadsheet, and click Ok.
-
Apply the changes by selecting the uploaded spreadsheet row, click Process Selected, and then click Ok to confirm.