Schedule Processes
The multiple process update wizard provides a method of updating and scheduling processes, including the following features:
-
Add Activities
-
Remove Activities
-
Amend Activity Duration
-
Set Process Start/End Date
-
Schedule Process
To update multiple processes and/or schedule in a single process:
-
Open Processes or End Processes under the Process menu.
-
Select the Schedule Processes option under the Actions menu.
-
A Process Search window opens presenting a list of processes:
-
When selected from the Processes page, it will contain both Process and End Process types (as defined by their templates).
-
When selected from the End Processes page, it will only contain End Process types (as defined by their templates).
-
-
Select the processes to be updated and/or scheduled. To search the list of available processes, select the filters to use and then click Apply Filters, or use the search box to search the contents of the columns.
-
Click the Selected tab to view the selected processes. Unchecking in the Selected tab deselects the process.
Figure 2-5 Schedule Processes Wizard Step 1
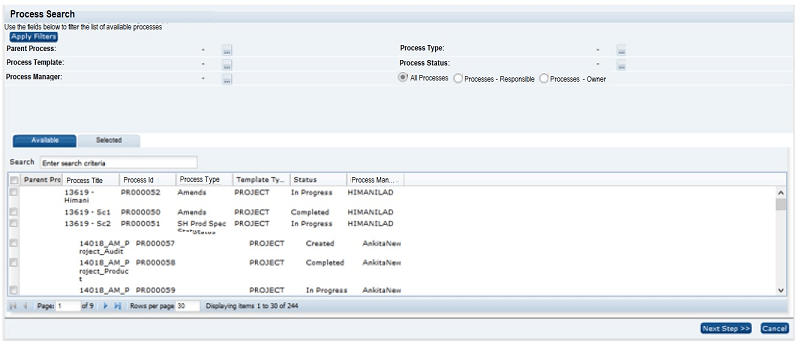
Ensure that at least one process has been selected and then select Next Step. The wizard moves to Step 2 for selecting the process update options.
-
-
A window opens, presenting a checkbox list of options for updating and/or scheduling processes:
-
Add Activities and Schedule
-
Remove Activities and Schedule
-
Amend Durations and Schedule
-
Amend Start or End Dates and Schedule
-
Schedule
Figure 2-6 Schedule Processes Wizard Step 2
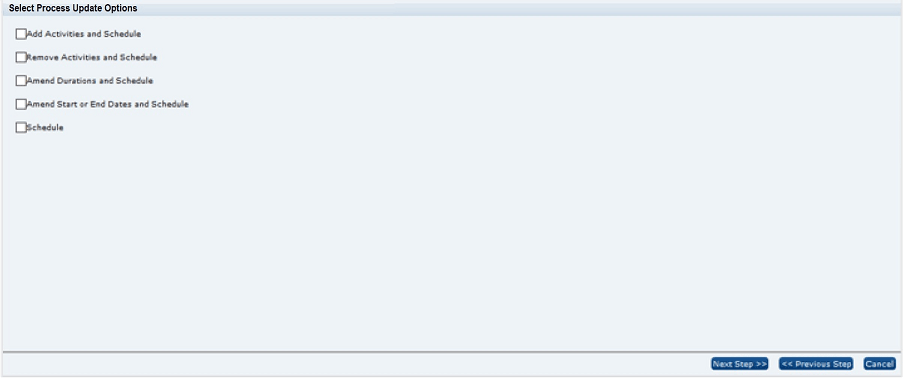
Ensure that at least one option has been selected and then select Next Step. The wizard takes you through the updates options selected.
-
-
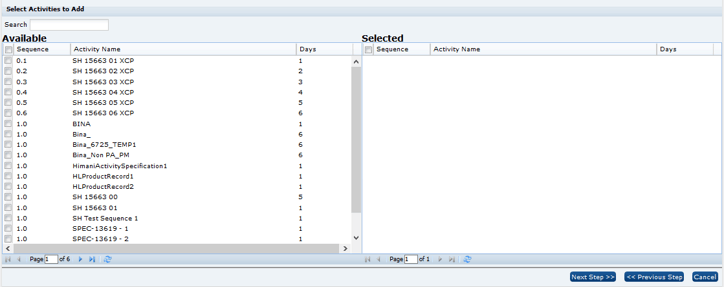
If Add Activities and Schedule was selected as an update option, a window for Step 3 of the wizard opens presenting a list of active activity templates for the user to select from to add to processes. Select at least one activity and then select Next Step. The wizard moves to the next selected update option.
Figure 2-7 Schedule Processes Wizard Step 3
-
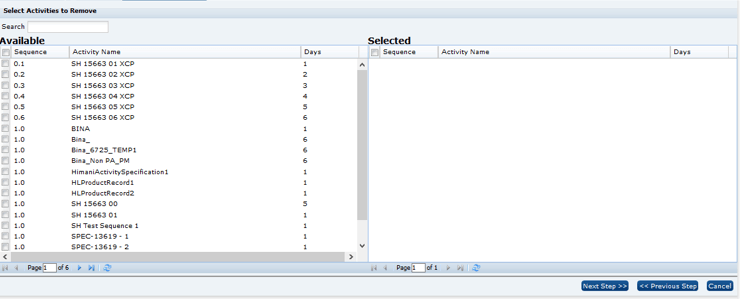
If Remove Activities and Schedule was selected as an update option, a window for Step 4 of the wizard opens, presenting a list of active activity templates for removal from processes. Select at least one activity and then select Next Step. The wizard moves to the next selected update option.
Figure 2-8 Schedule Processes Wizard Step 4
-
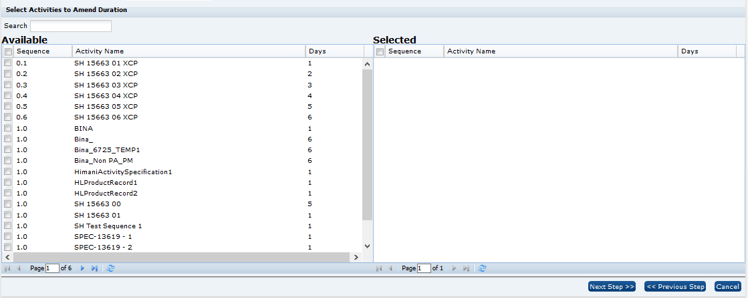
If Amend Durations and Schedule was selected as an update option, a window for Step 5 of the wizard opens presenting a list of active activity templates to select for amending the activity duration. Select at least one activity and then select Next Step. The wizard moves to part 2 of this step.
Figure 2-9 Schedule Processes Wizard Step 5 Part 1
A list of activities selected in the first part of this step is presented, to allow entry of the Days duration for each activity.
Figure 2-10 Schedule Processes Wizard Step 5 Part 2
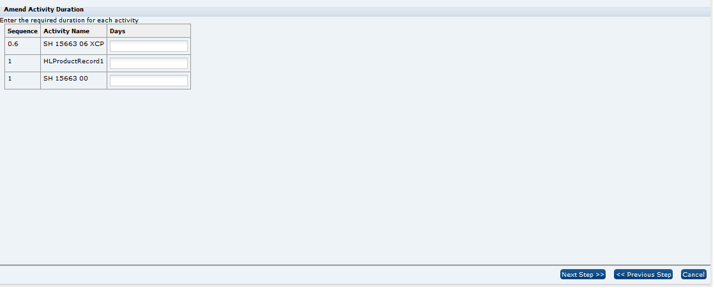
After entering a value in the Days field for each of the activities, select Next Step. The wizard moves to the next selected update option.
-
If Amend Start or End Dates and Schedule was selected as an update option, a window for Step 6 of the wizard opens presenting the date selection fields for applying to the processes.
Figure 2-11 Schedule Processes Wizard Step 6
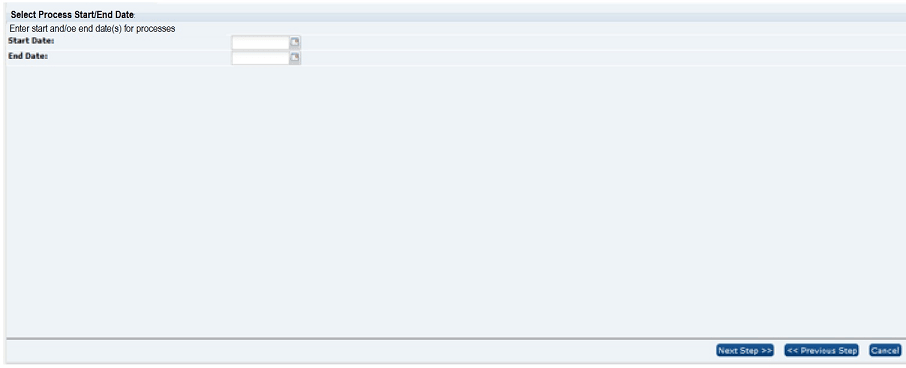
Enter a start and/or end date and select Next Step. The wizard moves to the Schedule Activities step.
-
The Schedule Activities step will always be presented, regardless of which options are selected in Step 2. The following window is presented to allow one of the scheduling methods to be selected for the Processes. The default option is the first option in the list.
Figure 2-12 Schedule Processes Wizard Step 7
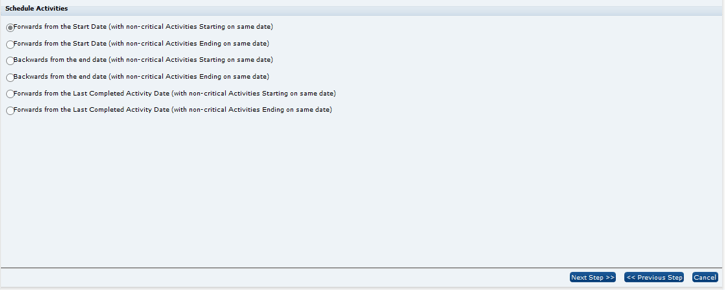
After choosing a scheduling option, select Next Step. The wizard displays a confirmation window.
-
The Confirmation window provides a summary of the updates that will be applied to the selected processes and the method of scheduling.
Figure 2-13 Schedule Processes Wizard Confirmation

Selecting Finish results in the window closing and a job being scheduled to process the updates. You will receive an email notification when the job has started and again when it has completed, including details of any exceptions.