Creating an RTF Template for a Table Report
The following instructions are for creating an RTF template for a table report using Template Builder. For details on installing the plug-in, see Installing and Launching Template Builder.
-
Create a new Word document and click Sample XML in the BI Publisher ribbon.
An alternative is to copy an existing RTF template and amend accordingly.
-
Select the data source XML file and click OK to load the data definition. The Data loaded successfully message is shown.
-
Set the page size to suit the report, typically A3 landscape with narrow margins.
If necessary, change to a custom page size, such as 55cm x 30cm under Page Layout / Page Setup / Paper changing the paper size to Custom size and setting the width and height as required (the maximum is 55).
-
Add a report title in the document header, the current date and time, and page number functions in the document footer, along with an identifier for the report.
-
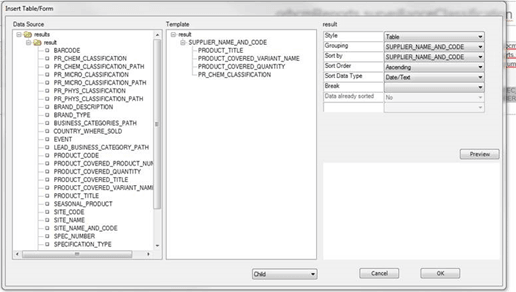
Insert the table in the body of the document by clicking Table/Form. The Insert Table/Form dialog box opens.
Figure B-11 Insert Table/Form Dialog Box

Note:
An alternative method for adding a table is to click Table Wizard and follow the steps to create the table, or use the regular Word options to manually insert an empty table, click Field Browser to insert fields in columns individually, highlight the row, and click Repeating Group.
If the template has been created by copying an existing RTF file, insert a new temporary table beneath the existing table, then copy the contents of the columns into the existing table before removing the temporary table.
-
Drag the result node from the Data Source pane to the Template pane, selecting the Drop Single Node option when prompted. Repeat for the other fields to appear as columns in the table.
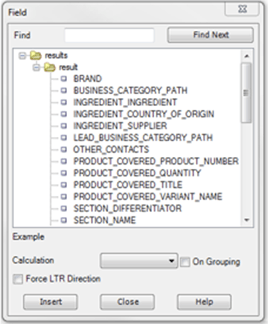
Alternatively, choose the Drop all nodes to copy all fields across and then drag back any that are not required. Fields can be individually added/removed later if necessary by clicking Field Browser.
Figure B-12 Field Browser Dialog Box

Note:
If the report is grouped by the first column, as the rows are not repeated, the repeating group should start with the second column and this is where the remainder of the sorting should be applied. If a column is grouped, any sorting in that column should be for the grouping itself. See report CR31c for an example.
-
Set any grouping and sort sequence by clicking the result node and setting the Grouping and Sort by options with the appropriate columns.
If grouping is required, select the field to group by in the right-hand properties box. Also, set its sort sequence and data type. Leave the Break option blank. If secondary sorting is required, select the grouping field, and in the right-hand properties box, select the next field to be sorted, the sort sequence and data type. Up to four levels of sorting can be set.
If sorting is required in a non-grouped table, or additional levels of sorting are required in a grouped table, you can apply the sorting after the table has been applied.
If adding grouping to a report that already contains a table (for the above method of adding a temporarily table), add the grouped column plus others then copy the first and last columns to the main table and complete the other columns.
-
Click OK to create the table.
Markers are inserted in columns, such as F and E, to indicate the first and last columns for a repeating group, and G to indicate a grouping column.
-
If a count is required at the end of the report, select Insert / Field, choose the field, then Count as the Calculation. When the count is inserted, double-click and set the Format to 0, to show as an integer. Add a field label prefix to the count. By default, only the number of data row occurrences are counted, not the distinct occurrences or number of groups.
-
If a chart is required, click Insert / Chart and then select the values and labels by dragging from the Data list. Chose the chart type and any other formatting, then add a label.
-
Click Tools / Validate Template to check for errors.
-
Apply formatting and styling, such as resizing or rearranging the table columns as required - including replacing the headings and other fixed text with links to the Supplier Evaluation system text, to allow for the dynamic translation for supported languages.
Further details on some of the options available for formatting and styling can be found in Formatting Report Contents, System Text and Language Translations, and Style Guidelines.
-
Save the document as a Rich Text Format type.
-
Preview the report by clicking Preview and then choose a format. If system text keys are used, the preview does not look up the column headings and fixed text, so the system text keys will continue to show.