Adding a Supplier
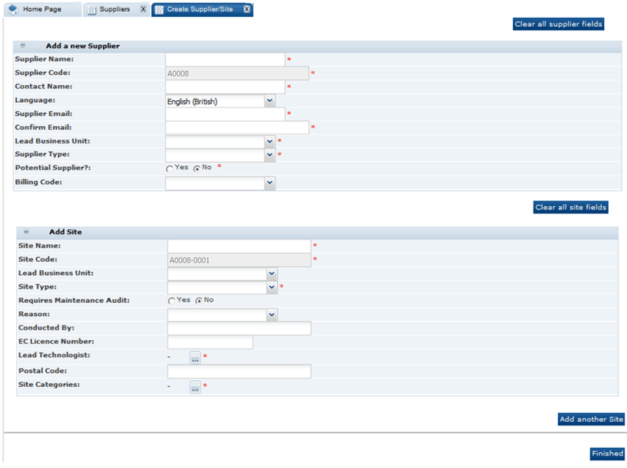
To add a supplier, select the New Supplier action. The Create Supplier/Site tab opens. From this page, a supplier can be added and sites for the supplier can be defined.
Figure 2-3 Create Supplier/Site Page

Table 2-1 describes the fields used to add a new supplier.
Table 2-1 Add a New Supplier Fields
| Field | Description |
|---|---|
|
Supplier Name |
Name of the supplier to be added. Mandatory field. |
|
Supplier Code |
Identifies the supplier account. Mandatory field. Depending on the Registration system parameter settings, the code may be automatically assigned by the system, may be automatically assigned and the user permitted to change it, or be manually entered by the user on creation of the account. The format of a supplier code is a letter followed by a 4-digit sequence number with leading zeroes. The supplier codes start from the letter A and 0001. For example, A0001, A0002, and so on. Only retailer users with edit access to Supplier records may change the code (where permitted); validation ensures the code is unique. |
|
Contact Name |
Name to be assigned to the first supplier user created. Mandatory field. |
|
Language |
Language of the initial supplier user. The language is selected from the list of languages supported for the module. This value defaults to the module's base language. Text is presented in the selected language when the user logs in to complete the registration process and in the initial registration request email. |
|
Supplier Email |
An email is sent to this address inviting the first supplier user to complete the registration process. Mandatory field. |
|
Confirm Email |
Supplier email address reentered for confirmation. Mandatory field. |
|
Lead Business Unit |
Classification of the supplier. Mandatory field. |
|
Supplier Type |
Select the type of supplier from the drop-down list. Mandatory field. |
|
Potential Supplier? |
Setting that determines if this supplier is a potential supplier. Potential suppliers are billed when their first site is approved, rather than when registration is completed. The default is No. Mandatory field. |
|
Billing Code |
An optional field to assign a billing classification to the supplier. Selection is made from the Billing Codes glossary, but has no functional use within the system. |
Table 2-2 describes the fields used to define a site for the new supplier.
Table 2-2 Add a New Site Fields
| Field | Description |
|---|---|
|
Site Name |
Name of the site to be added. Mandatory field. |
|
Site Code |
Identifies the site account. Mandatory field. Depending on the Registration system parameter settings, the code may be automatically assigned by the system, may be automatically assigned and the user permitted to change it, or be manually entered by the user on creation of the account. Other Registration system parameters control the format of the site code and whether it must be unique across the entire portal, or just within its supplier account. The default coding method generates a 4-digit sequence number with leading zeroes, starting from 0001. For example, 0001, 0002, and so on; however, an alpha alternative sequencing such as AAAA, AAAB, and so on, may be used. The site code may also be automatically prefixed with the supplier code, such as A0001-0001. Only retailer users with edit access to Site records may change the code (where permitted); validation ensures the code is suitably unique. |
|
Lead Business Unit |
Classification of the supplier. |
|
Site Type |
Select the type of site from the drop-down list. Mandatory field. |
|
Requires Maintenance Audit |
Settings that determines if a maintenance audit is required. The default is No. |
|
Reason |
Select a reason for the maintenance audit. |
|
Conducted By |
Name of the person who conducts the maintenance audit. |
|
EC License Number |
License number for the site location. |
|
Lead Technologist |
Name of the lead technologist for the site location. Mandatory field. |
|
Postal Code |
Postal code for this site location. |
|
Site Categories |
Select the business category associated with this site. Mandatory field. |
To add a new supplier:
-
Enter the information for the new supplier. For a description of the fields, see Table 2-1.
-
Enter the information for a site for the supplier. For a description of the fields, see Table 2-2.
-
If additional sites are needed, click Add another site. An additional section for information for that site appears. See Step 2.
-
When all the information is added, click Finished. The supplier and site information is validated.
If any site within the system contains the same value found within the Postal Code or EC Licence Number fields, the following mandatory field must be completed. The information entered for this field is added to the site's comment field.
Figure 2-4 Reason for This Site Request Field

-
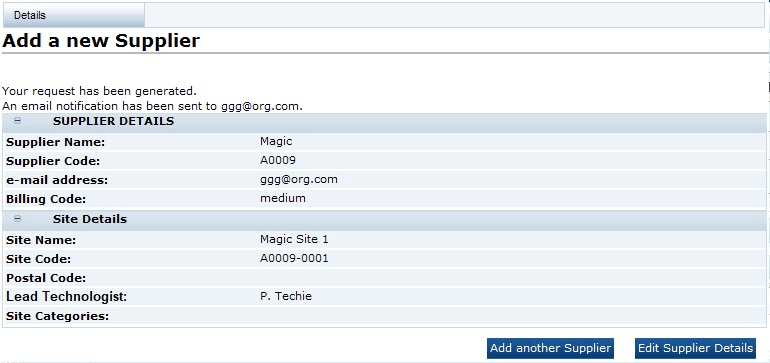
If no errors are found, the Confirmation page appears.
Figure 2-5 Add a New Supplier Confirmation Page

-
To add another supplier, click Add another Supplier. See Step 1.
-
To edit the details shown on the confirmation page, click Edit Supplier Details. A tab is opened in edit mode for this supplier.
-
Upon completion of the registration request, the following is done:
-
A Supplier record is created for the supplier with the status set to Awaiting Registration.
-
A Site record is created for each site with the status set to Awaiting Registration.
-
A User and Person record is created for the supplier contact, using the contact name and email address:
-
The User record has the job role set to Supplier Administrator.
-
The online help option is set to enabled so that any help text is available when the user initially logs in to complete the registration process.
-
The user's language is set to the language selected in the registration request or the default language if none was selected.
-
The EC Licence Number is assigned to the Certificate Number field within the References table against the Reference Type called EC Licence Number.
-
-
A Logon ID is generated from the User Name field. If a person with the same Logon ID exists, an incremental number is added to the end until the Logon ID becomes unique.
-
The corresponding IDCS or OCI IAM user profile is created; the user will receive an email, instructing them to set their password in IDCS or OCI IAM.