Advanced Search
To perform an advanced (or Query Builder) search, click the Query by Example icon or select Query by Example in the View menu, and then select the Query Builder option in the Filter Options menu. This places the list view in Query Builder mode, presenting a query bar above the column headings.
Figure 6-5 Query Builder Mode

Click the Query Builder icon on the search bar, or select Edit Query Builder in the Filter Options menu to open the Query Builder dialog box.
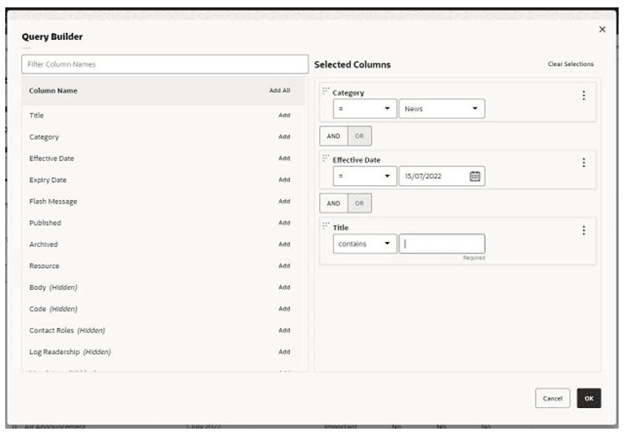
The Query Builder dialog box presents the list view columns in a left-hand pane, and the construction of the search criteria query statement in the right-hand pane.
The list of available columns can be filtered with the type-ahead text search. If the list contains multiple fields with the same name, the group name is appended to the label. Click Add to select a column, or Add All to select all columns.
The selected columns can be reordered by clicking the handle icon and dragging and dropping to the required position. Use the Remove menu option to deselect a column, or Clear Selections to deselect all.
The query statement is constructed as individual clauses for the selected columns, by specifying operators and data values. For further details, see the Building Query Statements section below.
Figure 6-6 Query Builder Dialog Box

Click OK to apply the query search. This closes the dialog box and refreshes the list view to filter the contents accordingly.
The query statement is shown in the list view query bar, and the number of records returned by the filter, and overall total number of records is shown within the toolbar.
To close the search and revert to the unfiltered list view, click the Query by Example Icon or the X on the query bar, or select the Clear Filters option in the Filter Options menu.
When Query Builder is selected, any other filters are cleared. Searches and filters cannot be applied simultaneously. Clicking a filter tile or entering Query by Example mode clears the advanced search filter.
Note:
Text input is case-insensitive.
A column that relates to a rich text field may return hits on text that is not visible, such as the HTML markup code used for text formatting.
Blank or null values will result in a match depending on the data type and operator used. The following describes per data type, which operators may result in blank/null values being returned as a match:
- For Text and Glossary fields, Blank will return rows that have no value. !=, Does Not Contain, Does Not Start With, and Does Not End With will return rows that have no value along with those that do not match the specified value.
- For Rich Text fields, Does Not Contain will return rows that have no value along with those that do not match the specified value.
- For Number, Date and Boolean fields, Blank will return rows that have no value. != will return rows that have no value along with those that do not match the specified value.
If a value contains a reserved word, such as AND/OR/&, it is not necessary to add quotation marks ' ' around the value. Quotation marks are automatically added to any entered value. For example, searching FISH AND CHIPS. Values containing a quotation mark/apostrophe are also handled in this way, for example to search for Shepherd’s Pie. This does however mean that quotation marks must NOT be entered unless they are to be literally searched for, for example, entering ‘Loose Tea’ will only match on entries which literally include the starting and ending quotation mark.
Building Query Statements
The query statement is constructed by specifying the search criteria for each selected column, and grouping clauses, as follows:
-
Select the column from the list of available columns by clicking Add.
-
Select the operator. The options vary depending on the column field’s data type.
The common options are:
-
Less than or equal to (<=) and Less than (<)
-
Equal to (=) and Not equal to (!=)
-
Greater than (>) and Greater than or equal to (>=)
-
Blank and Not Blank
Text (text, telephone number, email, hyperlink, and comment fields) include:
-
Contains and Does Not Contain for partial text matching (also for rich text fields).
-
Starts With/Does Not Start With and Ends With/Does Not End With for partial text matching.
-
-
Enter the data value.
For text, rich text, and numeric fields, enter the search value.
For fields that relate to a glossary, select from the picklist or use the type-ahead filter.
For date fields, use the date picker or enter the date. See also Date Filters below.
For Boolean fields, select or enter yes (true) or no (false).
-
If more than one column is selected, click AND or OR to set the Boolean logic for how each is compared to the next column.
As a simple example, searching for Category = ‘News’ AND Flash Message = ‘High’ would return records that have a Category of ‘News’ and a Flash Message of ‘High’; searching for Category = ‘News’ OR Flash Message = ‘High’ would return records that have a Category of ‘News’ or a Flash Message of ‘High’.
A column may be selected multiple times, for example to build a clause such as Flash Message = ‘High’ OR Flash Message = ‘Important’.
-
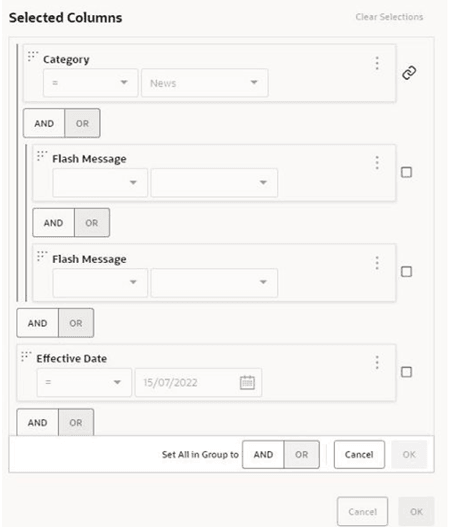
For more complex statements, use grouping. The Create Group, Edit Group, and Remove From Group menu options allow you to build a nested structure by grouping clauses together.
Groups are formed by clicking the handle icon and dragging and dropping a column onto another column within the right-hand pane. Multiple levels of group nesting is permitted; each group is indicated with a left-hand border.
Set the Boolean logic operator for the columns within the group, and for how the group is compared to the next column or group.
As a simple example, grouping would be used to search for records with a Category of ‘News’ and a Flash Message of ‘High’ or ‘Important’, where the expiry date is less than 08/04/2022, as:
Category = News AND (Flash Message = High OR Flash Message = High) AND Expiry Date < 8 Apr 2022
To make changes to the grouping structure, select the Edit Group option for the group and reset the Boolean logic operators relative to the selected group. The group icon indicates the selected group. Select the checkbox of a clause to have the logic reset, then click OK.
Figure 6-7 Edit Group

-
Use the Move Up, Move Down, and Remove menu options to adjust the selected rows and groups within the right-hand pane.
Date Filters
-
Some date fields are stored in the database as a timestamp, comprising the date and the time to the millisecond. In some cases, just a date may be visible within the application, however the time portion is also present. This must be taken into account when applying filters to such fields.
For example, for a field containing a timestamp of 11-12-2022 18:00, applying a search filter for date 11-12-2022 will look for an exact match on 11-12-2022 00:00, as it defaults the time as 00:00. The method of searching timestamp fields for a particular date, is to apply a range filter, for example where greater than 10-12-2022 and less than 12-12-2022.
In some cases, the timestamp will also be available as separate date and time columns.
-
In a set of records being filtered, dates that are null will be included in the results of less than and less than or equal to operations and excluded from the results equal to, greater than and greater than or equal to operations. This is because null dates are considered to be the lowest value in a range and therefore are always less than any filter value.