Publishing an Announcement
Announcements are created, edited, published and archived by users with News Administrator access rights, from the Announcements page.
The standard maintenance icons and actions in the list view toolbar are used to create, view, edit, and delete Announcements.
An Announcement is maintained across three pages using a wizard style form: 1 Distribution; 2 Content; 3 Preview.
1 Distribution
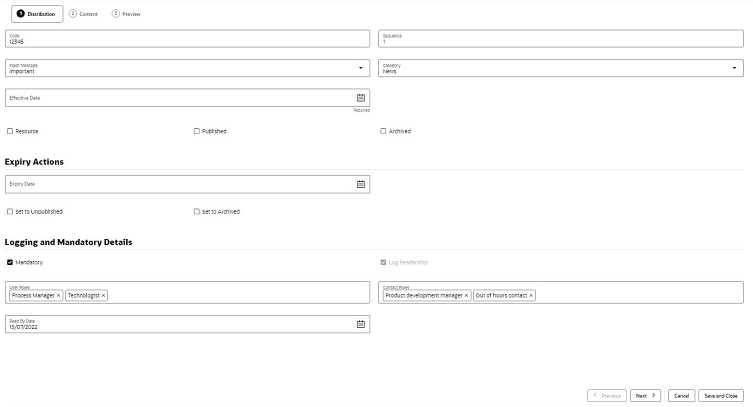
The Distribution page defines the type of announcement, and any auto-expiry, mandatory readership, or logging requirements.
Figure 4-4 Announcement Distribution Page

If the announcement is a Resource type, check the Resource checkbox, otherwise leave unchecked if it is a News Item.
On creation, enter a unique Code for the announcement. Once saved, this becomes read only.
A Sequence number can be set to control the order announcements appear within the Workspace dashboard using the by Sequence option. Enter a number between 0 and 99999. The dashboard presents the items in ascending order.
Optionally assign a Category and Flash Message by selecting an entry from the associated glossaries. These values can also be used to filter the Workspace dashboard, using the respective by Category and by Flash Message options. Category does not appear on the published item, it is for classification purposes only; Flash Message appears on the published item (News Items only) as the flash, for example to tag an item as Important.
You must set an Effective Date from when the announcement becomes effective. This cannot be in the past. The Published and Archived checkboxes control when the item is published (once the Effective Date has been reached), and/or if the item is archived.
Use the Auto Expiry options to have the announcement automatically unpublished and/or archived once the Expiry Date is reached. See also the Unpublishing and Archiving section.
Use the Logging and Mandatory Details option if it is to be mandatory for certain users to confirm they have read the item (the Mandatory checkbox), and for the readership details to be logged (the Log Readership checkbox). A mandatory item will automatically log readership; non-mandatory items may also have readership logging enabled.
If the item is mandatory, select the types of users will be required to confirm they have read the article. For internal (retailer/portal owner) users, select one or more User Roles; for external (supplier) users, select one or more Contact Roles. Once the announcement is published, when users with these roles open the full article, they will see the button to confirm they have read it. They will also have a reminder in their list of Assignments. If a Read By Date is specified, if the user has not confirmed by that date, their Assignment will become urgent. The Read By Date cannot be earlier than the Effective Date.
As a News Administrator user, you can view the logged readership details in the Review Readership page. For further details, see the Reviewing Readership section.
Click Next, or the 2 Content tab to proceed to the Content page.
2 Content
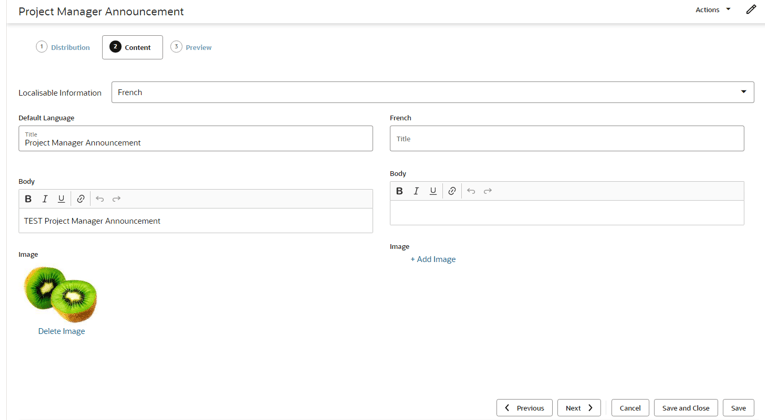
The Content page defines the contents of the announcement.
Figure 4-5 Announcement Content Page

Enter the Title of the article, any Body text, and optionally select an Image from the Photo Album.
The Body text can have rich text formatting applied for bold, italics, underline, and can have hyperlinks inserted.
Alternative content can be specified for any of the portal’s supported languages. The left-hand pane contains the default language, which is English (British). Select an alternative language from the Localisable Information picklist and enter any overrides for that language in the right-hand pane. An alternative image may also be used for each language.
When the announcement is published, any language overrides will be presented for users of that locale; in the absence of language overrides, the default language text or image is used.
Click Next, or the 3 Preview tab to proceed to the Preview page.
3 Preview
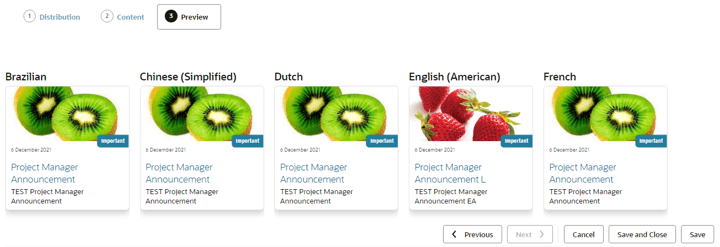
The Preview page presents the tile as it will be seen in the Workspace dashboard, for each of the portal’s supported languages.
Figure 4-6 Announcement Preview Page

Click a tile to view how the full size article will appear to the user.
Click Save and Close to save the Announcement and return to the Announcements page.