1 Feature Summary
This chapter describes the feature enhancements in this release.
Noteworthy Enhancements
This guide outlines the information you need to know about new or improved functionality in the Oracle Retail Store Inventory Operations Cloud Services update and describes any tasks you might need to perform for the update. Each section includes a brief description of the feature, the steps you need to take to enable or begin using the feature, any tips or considerations that you should keep in mind, and the resources available to help you.
Column Definitions
-
Feature: Provides a description of the feature being delivered.
-
Module Impacted: Identifies the module impacted associated with the feature, if any.
-
Scale: Identifies the size of the feature. Options are:
-
Small: These UI or process-based features are typically comprised of minor field, validation, or program changes. There fore, the potential impact to users is minimal.
-
Larger: These UI or process-based features have more complex designs. Therefore, the potential impact to users is higher.
-
-
Delivered: Is the new feature available for use immediately after upgrade or must the feature be enabled or configured? If no, the feature is non-disruptive to end users and action is required (detailed steps below) to make the feature ready to use.
- Customer Action Required: You must take action before these features can be used. These features are delivered disabled and you choose if and when to enable them.
| Feature | Module Impacted | Scale | Delivered | Customer Action Required |
|---|---|---|---|---|
|
EICS and SOCS |
Larger |
Requires related assigned permissions enabled and additional integration effort. |
Yes |
|
|
SOCS |
Larger |
Requires related assigned permissions enabled and additional integration effort. |
Yes |
|
|
EICS and SOCS |
Larger |
Requires web service integration for additional data to function. Permissions are required to access the UI dialog for maintenance. |
Yes |
|
|
EICS |
Larger |
Requires permissions to be granted. |
Yes |
|
|
SOCS |
Small |
System options must be turned on. |
Yes |
|
|
EICS |
Small |
Same permissions are executed as on mobile. |
Yes |
|
|
EICS and SOCS |
Small |
This feature will be automatically available and cannot be turned off. Impact is minimal. |
No |
|
|
SOCS |
Small |
Enabled |
No |
|
|
SOCS |
Small |
This feature will be automatically available and cannot be turned off. Impact is minimal. |
No |
|
|
EICS and SOCS |
Small |
Enabled |
No |
|
|
EICS |
Small |
This feature will be automatically available and cannot be turned off. Impact is minimal. |
No |
|
|
SOCS |
Small |
Configuration can be set to require capture. |
Yes |
|
|
EICS |
Larger |
Implementation Required. |
Yes |
|
|
EICS |
Larger |
Web service integration and configuration is required. |
Yes |
|
|
EICS |
Larger |
Enabled |
No |
|
|
SOCS |
Small |
Enabled |
No |
New Feature Descriptions
This section describes the new features.
Ticket Printing
In this release of SIOCS, ticket printing will be made available as a new feature. This feature will allow the user to print tickets or labels from either the desktop client or the MAF client. Retailers will have the option to either upload ZPL files for formatting the ticket or label, or just reference a logical label name that the printing solution can reference.
Tickets and labels can only be printed to a network-enabled printer.
On the desktop, the user will have ability to print tickets or labels in bulk. Bulk import of tickets and labels can be done through the web service. It is also possible to create a single ticket or label on the desktop to print immediately or at a later timeframe.
On the mobile device, it will only be possible to print the ticket or label immediately after it is scanned.
Every ticket or label that is printed will be tracked for audit purposes and can be reprinted.
System Parameters
Search Limit Default for Tickets
This parameter will determine the number of records to be displayed on ticket list screens.
The default value on the search criteria screen should be set to the value from the system parameter.
-
Valid values: 1 to 999
-
EICS will default to 50
-
Topic: UI
Display Item for Ticketing
-
Values: Yes/No
-
Default: No
-
Topic: UI
-
Yes - This parameter indicates if the item image will be displayed in the ticketing dialogs in EICS.
-
No - Image will not be displayed.
Note:
User Session configuration also exists in addition to this configuration.Display Item Image for Quick Item Price Print - Execution
-
Values: Yes/No
-
Default: No
-
Topic: Item Price
-
This indicates whether the item image must be displayed during the quick item price print in mobile.
Days to Hold Ticket History
-
Values: 1 to 999
-
Default: 60
-
Topic: Purge
-
This parameter will be used to purge item tickets generated in the system.
Store Parameter
Quick Item Price Events
-
Values: All, Clearance, Promotion, Regular, Event
-
Default: All
-
Topic: Ticketing
-
This parameter indicates for which price event a ticket should be printed.
Permissions
| Permission | Topic | Comments |
|---|---|---|
|
Access Ticket List |
Admin |
The user must have this permission to go to the Ticket List screen. |
|
Create Ticket |
Admin |
The user must have this permission to create new tickets. |
|
Delete Ticket |
Admin |
The user must have this permission to delete a ticket on the UI. |
|
Allow Override Ticket Price |
Admin |
The user must have this permission to enter the price in the override price field to print on the ticket/label. |
|
Print Ticket |
Admin |
The user must have this permission to print/reprint the tickets and labels from the UI. |
|
Edit Ticket |
Admin |
The user must have this permission to edit the existing ticket. |
|
Access Printer Setup |
Admin |
The user must have this permission to access printer setup (existing). |
|
Access Print Format |
Admin |
The user must have this permission to access print format screen. |
|
Access Quick Item Price Print |
Admin |
The user must have this permission in order to access the Quick Item Price Print menu under the inventory management and print the item tickets from the SIOCS application. |
|
Access Upload Ticket Templates |
Admin |
The user must have this permission to upload the ticket template files, that is, ZPL into the system via EICS for ticket printing. |
Printer Setup
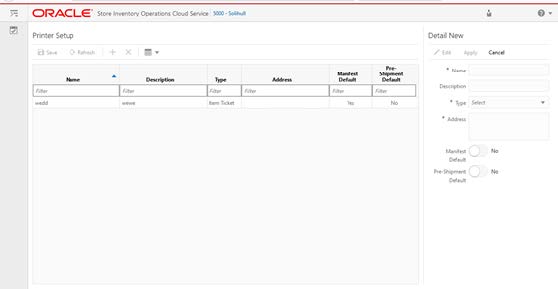
On this screen, the user can create printers to print the Item Ticket and Shelf labels.
When tickets are generated and submitted to printers for printing, the system sets the printer to which it must be printed. The printers created in this dialog for ticket and labels are used in the ticketing dialog when the user submits to print the tickets.
In addition, printer details are also sent as part of Manifesting or the pre-shipment notification. The Printer setup screen is an admin screen to create new printers and assign the address of the printers. Printers can be added, modified, and deleted using this screen. The printers that are set up in this screen are specific to the store. You will also be able to specify the default printer for manifesting and pre-shipment notifications.
The screen is accessed via the desktop menu: Admin / Technical Maintenance/ Print Setup / Printer Setup. You must have Access Printer permission in order to access this screen.
Import Ticket Template
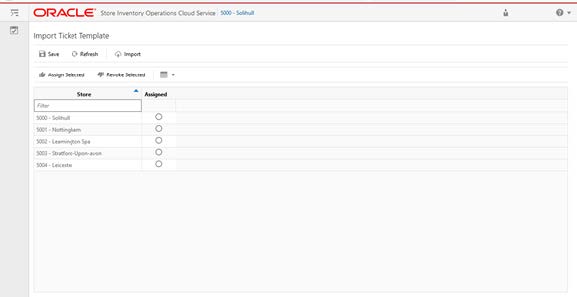
This screen is for the user to import ZPL file templates for ticket printing.
The uploaded file contains the format/layout design for the ticket. It will be used in the application when sending the print jobs to the printer after selecting a ticket format.
The ZPL files are created using the external system and uploaded for the system to understand the design layout of the ticket.
This screen can be accessed on the desktop from the Technical Maintenance > Import Ticket Template menu.
Any existing assignment will be overwritten with the new assignments done by the user.
The user will not be able to preview what file is assigned earlier.
In SOCS, these files will be used in the quick item price print to pick the right format and send it to the printer.
Print Format
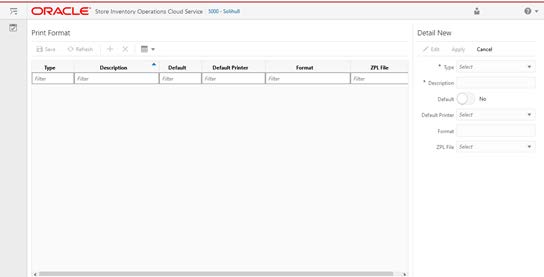
The Print Format screen is accessed from the Technical Maintenance > Print Format
The Print Format screen is an administrative screen used to set up item tickets and shelf labels to support ticket printing within EICS.
The purpose of this screen is to specify a name, type, and optionally associate a ZPL file to it. ZPL, which contains the layout of the tickets, is to support the specific third-party printer and is required to be uploaded first to be available in this screen. The screen also allows a user to select a default format and default printer for each type of format.
The system allows only one default format/printer to be set up for a specific format type. An error message will display if the user has selected more than one format as the default format. This is set up by store location. A user should select a default printer, if the default printer is not selected.
Desktop Print
Desktop printing is focused on two elements; printing bulk web service imported ticket events from an external source or printing a manual generated ticket.
Ticket Search Criteria
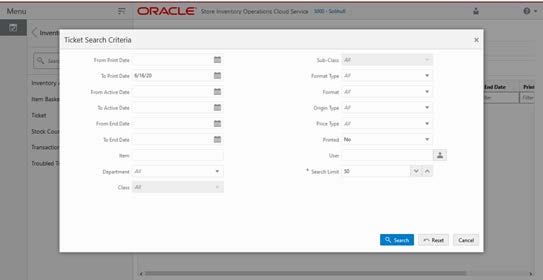
When accessing the ticket dialog, the user will first be directed to the search screen to select any tickets that have been imported.
The search criteria screen allows the user to select filter criteria for the records to be displayed before presenting the list of tickets. The default for the search is all tickets for the current store and current date.
The user can search the tickets based on several criteria such as Print Date range, Active Date range, item, merchandise hierarchy, format type, format, print status, and so on.
The system displays the tickets on the list screen based on the criteria provided by the user here.
Ticket List
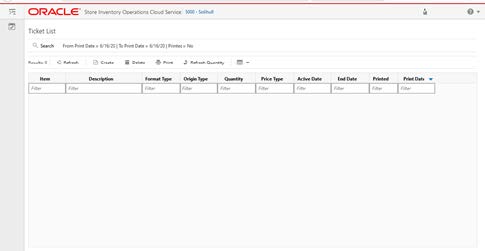
The Ticket List screen is accessed from the Inventory Management-Ticket menu after going through the ticket search.
From the Ticket List screen, the user has the potential to perform numerous tasks. The user can create, edit, delete, refresh the quantity, and print a ticket. Search Criteria will automatically display when the user enters the screen. Once the user has entered the screen, the filter option is available to further filter on the item tickets displayed.
The Refresh Quantity button can refresh the ticket quantity based on the current SOH. The status of the item ticket may be identified using the Printed field which indicates whether Printed Yes or No.
The detail fields on this screen includes, Item, Description of item, Format Type, Origin Type, Print Quantity, Price Type, Active Date, End Date, Printed Status, and Print Date.
Ticket Detail
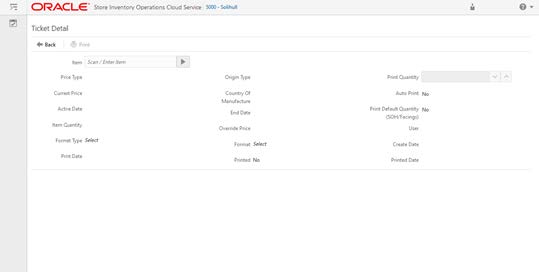
The Ticket Detail screen is accessed when the user selects Create to create a new ticket or selects an existing ticket to view and edit.
The Item Ticket Detail screen allows the user to manually create tickets/labels and edit the existing tickets if not printed. The system also allows the user to reprint the already printed tickets.
The user can select the printer and refresh the quantity when selected to print.
Mobile Print
The mobile option for ticket printing is focused on scanning an item with a mobile unit, and quickly without much user interaction, decide to print a ticket or not. The ticket will be printed to the network printer based on the configuration and setup.
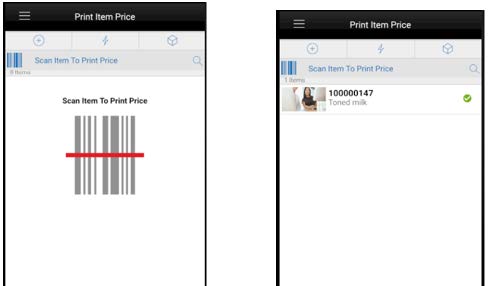
These screens allow the user to scan items and submit the tickets for printing automatically.
The system determines what tickets need to be submitted based on the Quick Item Price Events parameter.
The system assigns the printer selected by the user using the External Printer Configuration screen. The system indicates the status of submit to print.
The system applies the following rules to submit the ticket for printing.
When an item is scanned, the system checks the store parameter Quick Item Price Events setting to determine for what pricing event types it must print the item price ticket.
-
If the event type set is Clearance, the system checks whether the clearance event is active on that day for that item and if it is, then the system generates the ticket and prints to the configured printer.
-
If the event type set is All, the system prints the item price anyway with the current active price.
-
If the event type set is Event, the system checks whether any event present and will only print if there is a change for the day (clearance, promo or regular, but no same day promotions).
-
If the event type set is Regular, the system prints the regular price for the entered item.
-
If the event type set is Promotion, the system prints the price only if the item is in active promotion for the day and prints the promotion price.
RFID Item Locator
The RFID Locator functionality provides the user with the ability to locate an item quickly leveraging RFID tags in the store. This feature not only increases customer satisfaction by finding an item faster, but also reduces the user's frustration by the ability to quickly find items that might be hiding in the backroom or on the shopfloor.
Since most often the RFID tag is not known, the user will scan or lookup the item's SKU number. SOCS will provide the related RFID tags to the store and start identifying which of those tags are closest. The user can then select the closest RFID tag and be guided by the signal strength to the item.
System Parameters
Display Item Image for RFID Locator
-
Values: Yes/No
-
Default: No
-
Topic: RFID Locator
This indicates whether the item image must be displayed on the header while locating an RFID Tag.
Security Permissions
| Permission | Topic | Comments |
|---|---|---|
|
Access RFID Locator |
Admin |
With this permission, the user can access the RFID Locator dialog from the SIOCS mobile application. |
RFID Locator
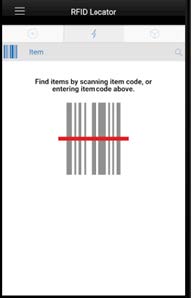
The RFID Locator dialog can be accessed from the Lookup menu.
The search field on the scan bar is item. The user can scan or enter the item barcodes.
This screen is used for locating the RFID Tag in the store. The purpose of the RFID Locator functionality is to enable the user to find the specific unit where it is placed in the store via RFID scanning.
If the user has scanned/entered an EPC and the corresponding item of the scanned EPC contains more than one EPCs/Tags in the system, the system takes the user to the Item EPCs for the user to select the appropriate tag to find it.
If the user has scanned/entered an EPC and the corresponding item of the scanned EPC contains only one EPC that is the scanned EPC, the system takes the user to the RFID Tag Finder showing the signal strength.
Item EPCs
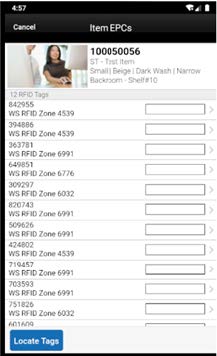
On this screen, the system displays the list of found active RFID tags based on the provided item.
From the list, the user can select a specific tag to start locating the tag or select Locate Tags option to start searching the listed tags using the radar and display the strength of the signal.
On the list, the system displays the Tag id and the description of the item along with the item information on the header.
RFID Tag Finder
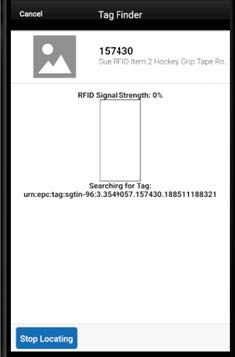
The user reaches this screen via the RFID Locator screen if the tag id was scanned or entered. Alternatively selecting the RFID Tag from the Item EPCs screen will bring the user here as well.
The system displays the signal strength to indicate how close the tag is while the user moves around the search area holding the trigger on the scanner.
When the user enters this screen, the system automatically starts the process to locate tags. The user can select to stop locating.
On the header, the system displays the item information.
Item Scan Number
The Item Scan Number Lookup dialog in EICS helps the retailers, particularly the telecom retailers, to maintain the multiple identification numbers of a single item.
Many mobile phone manufacturers produce phones that support more than one SIM slot and one unit is associated with multiple unique identification numbers. In the Retail world, this allows the users to scan any of these unique identification numbers on the unit to identify the specific instance of the product.
SIOCS will identify the item or equipment, by scanning any of the unique identification numbers associated to the product. This identification is done by a new algorithm developed in the barcode parser routine used by barcode item entry or scan fields.
Tracking the status of the individual specific unit is done by the primary identification number (UIN) that is present in the system. This means that all integration messages need to continue to use the primary UIN.
The system also has the capability to capture additional customer defined information or attributes of the unit like O/S version, Kernel, edition, unit cost, print number, and so on.
The creation and update of ISN data is done via web services or manually using the EICS UI.
ISN information is available through a web service for external systems to find the primary UIN. This allows, for example, a warehouse to scan the reference ID. If not found in its data storage, they can call the Web service with this ID which will return the correct primary UIN.
Note:
The UI dialog is only meant for maintenance. Due to the volume and specific requirements of the data, it is recommended to import it through the web service in bulk from the manufacturer data.Use Cases
-
Data Setup
-
Android phone 1234
-
Two item instances:
0888 -> Defined as Serial 1 (primary UIN), 0999 -> Defined as Serial 2
1888 -> Defined as Serial 1 (primary UIN), 1999 -> Defined as Serial 2
-
-
Receiving
-
The ASN from the supplier contains:
Item 1234 UIN 0888
Item 1234 UIN 1888
-
User scans 0999 during the receiving process, receipt is updated to 1 with Serial 0888 as the primary UIN
-
User scans 1888 during the receiving process, receipt is updated to 2 with Serial 1888 as the primary received UIN
-
User scans 1999 and receives message Serial is already added to the transaction
-
User scans 2000 during receiving process, receipt is updated to 3 with Serial 2000 as the primary unexpected UIN
-
-
Receipt is completed and receipt message is published with receipt of 3 units, including UIN 0888, 2000, and 1888
-
Stock Count
-
User is counting item 1234 (3 units on hand):
User scans 0999, stock count is updated to 1 with Serial 0888 as the primary UIN
User scans 2000, stock count is updated to 2 with Serial 2000 as the primary
User scans 0888 and receives message Serial is already added to the transaction
-
User completes count:
Inventory is reduced by 1 unit
UIN 1888 status is updated to Missing
Inventory adjustment is published that Serial 1888 was removed from inventory
-
System Parameter
Search Limit Default for Item Scan Number Lookup
-
Valid values: 1 to 999
-
EICS will default to 500
-
Topic: UI
-
This parameter will determine the number of records to display on the ISN Lookup screen.
-
The default value on the search criteria screen should be set to the value from the system parameter.
Permissions
| Permissions | Topic | Comments |
|---|---|---|
|
Access Item Scan Number Lookup |
Admin |
The user needs this permission to be able to access Item Scan Number Lookup. |
|
Create Item Scan Number |
Admin |
The user needs this permission to create a new ISN for the item in the system. |
|
Delete Item Scan Number |
Admin |
The user needs this permission to delete ISNs. |
|
Edit Item Scam number |
Admin |
This is for the web service action to edit the ISN. |
|
Edit Item Scan Number CDA . |
Admin |
This is for the web service action to edit the Item Scan Number CDAs |
Item Scan Number Lookup
ISN Lookup can be accessed from the Lookups menu in the EICS application. When accessing the ISN Lookup screen, the system displays the search criteria screen initially to provide the criteria to search.
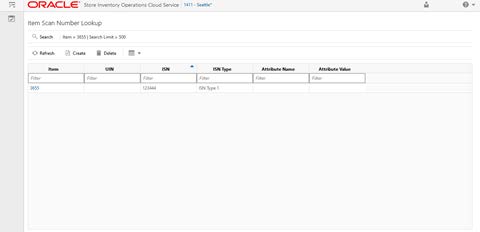
The ISN Lookup screen allows the user to search the Item Scan Number data for an item or do an inquiry for the known ISN. On this screen, the user can only view or manage ISN data for one item at a time. This screen allows the user to create new or delete the ISN data of an item.
The system displays the following fields:
-
Item
-
Item Id of the ISN data the user looking for.
-
The user can select the link on the item to go to the Item Detail screen.
-
-
UIN
-
This holds the Unique Identification number/Serial number of the item. The system maintains the UIN status of the unit based on the primary UIN only. All other unique identification numbers are in reference to the UIN.
-
-
ISN
-
This field holds the reference unique identification number, such as an ISN.
-
-
ISN Type
-
The system has four pre-defined ISN types 1 to 3 for the retailer to fit to represent the unique identifiers based on the industry. For example, the telecom retailer could use the ISN type 1 and ISN type 2 for any unique identification number of the mobile devices.
-
-
Attribute Name and Attribute Value
-
These are value pairs where the value is corresponding to the name.
-
Attribute details are captured from the external system and read only on this dialog.
-
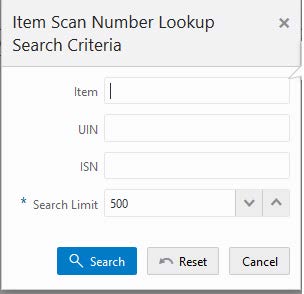
This search criteria screen is loaded automatically when the Item Scan Number Lookup is accessed. It can also be accessed by clicking the Search button on the Lookup screen. The user can filter on various search criteria. After applying the criteria, the user will be returned to the ISN Lookup screen with the ISN data.
If the system finds more than one item based on the ISN search, it prompts the user to refine the search by entering the actual item number to search for.The user must enter at least one valid search criteria to continue the search.
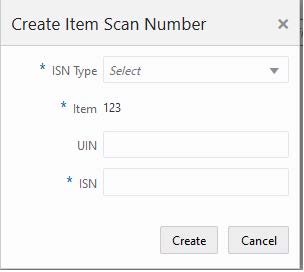
The user can create a new ISN for the inquired item by selecting the Create button on the ISN Lookup screen. If the user has provided the item in the search, the item number is defaulted, otherwise it allows the user to enter the item. On this screen, the user can select the ISN type, enter the UIN and the ISN to create a new ISN record for the item. The system saves the record upon selecting the create button.
Operational Views
Several new operational views have been added to support corporate, district manager, and store manager oversight on the desktop client. This feature is available to EICS subscribers.
System Parameters
Search Limit Default for Operational Views: Operations
-
Valid values will be 1 to 999
-
EICS will default to 50
-
Topic: UI
-
This parameter will determine the number of records to be displayed on various operational view screens.
-
The default value on various operational views screens should be set to the value from the system parameter.
Shopfloor Out of Stock Items Critical Percentage
-
Values: .01% to 100%
-
Default: .01%
-
Topic: Admin
-
If the percentage items out of stock in the shopfloor exceed this value, there will be an '!' alert with the number of items out of stock.
Permissions
| Permissions | Topic | Comments |
|---|---|---|
|
Access New Received Items |
Operational Views |
On EICS, with this permission the user will be able to access the Access New Items view in Operational Views. |
|
Access Expiring Items Lookup |
Operational Views |
On EICS, with this permission the user will be able to access the Expiring Items view in Operational Views. |
|
Access Stock Counts - Ready to Authorize |
Operational Views |
On EICS, with this permission the user will be able to access the Stock Counts - Ready to Authorize view in Operational Views. |
|
Access Shopfloor Out of Stock |
Operational Views |
On EICS, with this permission the user will be able to access the Access Shopfloor Out of Stock view in Operational Views. |
New Items
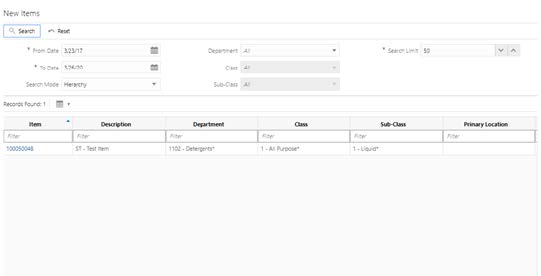
With the New Items Operational View, the user will be able to find out the list of items that are newly received on a delivery for the first time for the user's store. The user will be required to enter a date range for the search, but hierarchy is optional. The system will return the list of items that meet the criteria. An item can be selected, and the user will navigate to Item Detail for that item.
Expiring Items
Using this operational view, the user will be able to find out the list of items expiring on a particular day, in the user's store. This will allow for a single date to be passed in, which will initially default to today's date. It will return the list of items which have a Sell By or Use By date equal to the date being passed in. An item can be selected, and the user will navigate to the Item Detail for that item.

Stock Counts - Ready to Authorize
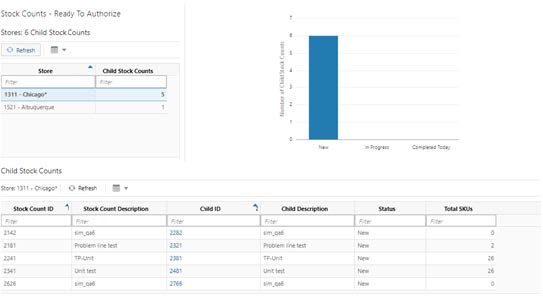
The Stock Counts - Ready to Authorize Operational View will display those stock counts that are still open. The store grid will display all stores in which the user has permissions. Once selecting a store, the grid at the bottom will display all stock counts that are New or In Progress in the authorized stage based upon the selected store. The graph displays all authorized stock counts for all stores the user has permissions for that are New, In Progress, or Completed today.
From this dialog, the user can go directly to the stock count authorization dialog to complete the stock count.
Shopfloor: Out of Stock
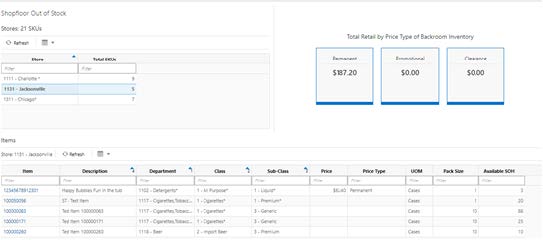
The Shopfloor Out of Stock Operational View allows a user to see what items do not have any shopfloor inventory but have available inventory. There is a list of stores that the user has permissions to with the total SKUs that do not have shopfloor inventory. The user selects a store to inquire about. The grid at the bottom populates based upon the selected store with the items that do not have shopfloor inventory but have available inventory. Fields will include: item, description, hierarchy, current price type, and price, and available inventory. Selecting an item from the grid will navigate to Item Detail for that item. The operational view also has a three-block price section. It displays the total retail of the available inventory for the selected store for each price type: permanent, clearance, and promotional.
Ad Hoc Stock Count Restriction
In the previous release of SIOCS, the ability for a user to import in bulk items from an item basket was introduced. This technique allows the retailer during the day to create an investigative item basket, or just a gap scan basket and allows a user to ad hoc count this basket by adding it to an ad hoc stock count.
However, this does not prevent a user from adding additional items by accident.
The restriction added to the product, will be based on a configuration, automatically lock an ad hoc stock count when a basket is added. A permission exists for the user to change this automatic lock.
Use Case
The user creates an ad hoc stock count.
The user adds the investigative item basket that has been created throughout the day by adding items to it from the item lookup dialog.
The user applies those items to the count.
Items are added to the stock count and the flag is set based on the system parameter.
Enable Adhoc stock count locking = Yes
The user starts scanning/counting the items, and if there is an item that was not on the basket, the item will not be added, and the user prompted.
System Parameters
Enable Adhoc Stock Count Locking
This parameter will determine whether a stock count can be locked or not from adding an additional item.
-
Yes - The user will have the ability to lock an adhoc stock count, that is, the user will not be able to add additional items after the initial import.
-
No - The user will be able to add any number of items until the adhoc stock is completed.
-
Values: Yes/No
-
Default: No
-
Topic: Stock Count
Security Permissions
| Permissions | Topic | Comments |
|---|---|---|
|
Edit Adhoc Stock Count Lock |
Stock Counts |
With this permission, the user will have the ability to enable and disable the Adhoc Stock count Lock for an adhoc stock count |
Edit Stock Counts

The Edit Stock Count screen enables the user to set the lock which decides whether additional items can be added to an adhoc stock count or not. This screen can be accessed by selecting the Edit Stock Count option from the footer menu of Stock Count Child List screen and this option will be available when the following conditions are met:
-
System parameter Enable Adhoc Stock Count Locking must be set to Yes.
-
The stock count is an adhoc stock count and the status is not Completed.
-
The user has security permission Edit Adhoc Stock Count Lock.
Stock Count Info
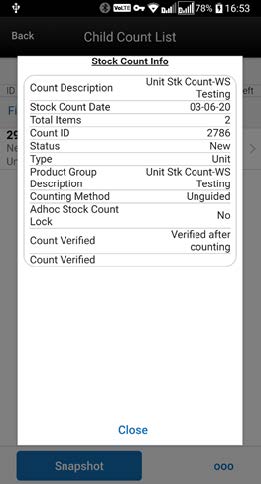
The Info screen is an informational popup that contains read-only information about the header level of the stock count. It is accessed through the Info menu option in the Footer menu on the Child Count List screen. Details include:
-
Count Description
-
Stock Count Date
-
Total Items
-
Count ID
-
Status
-
Type
-
Product Group Type
-
Product Group Description
-
Counting Method
-
Adhoc Stock Count Lock - If set to yes, the field does not allow the user to add additional items to the ad hoc count
-
CFAs and the corresponding value
Finisher Lookup
External finishers are entities that add value to an item that the retailers themselves do not want to undertake. Examples of this can be tailoring, detailing, and customizing.
This new dialog enables a retailer to see which finishers are available for a store on the desktop client.
Note:
This functionality was already available on the mobile client.System Parameters
External Finisher Enable/Disable
-
Valid Values: Enable/Disable
-
Default: Disable
-
Topic: Admin
This parameter will drive the following functionality:
-
When the external Finisher parameter is enabled, then the following dialog box displays the finisher details.
-
Return Filter
-
Return Details
-
Finisher Lookup
-
Warehouse Delivery Filter
-
Finisher Details
Also, the workflow for the handheld would additionally check for the parameter to select the workflow.
Search Limit Default for Finisher Lookup: Operations (New)
-
Values: 1 to 999
-
Default: 50
-
Topic: UI
-
This parameter indicates the default search limit for the Supplier Lookup results.
External Finisher Enabled/Disabled
-
Values: Yes/No
-
Default: No
-
Topic: Admin
-
This parameter enables the retailer to use finisher in their stores.
Permissions
| Permissions | Topic | Comments |
|---|---|---|
|
Access Finisher Lookup |
Admin |
With this permission, the user will have access to the Finisher Lookup menu option under Main Menu > Lookups. Without this permission, the user will not have access to Finisher Lookup. This does not control the access to the finisher lookup dialog within a feature. |
Finisher Lookup Screen
The user can access the Finisher Lookup screen through Main Menu > Lookups > Finisher Lookup. The user must have the proper security permission (Access Finisher Lookup) for this option to exist.
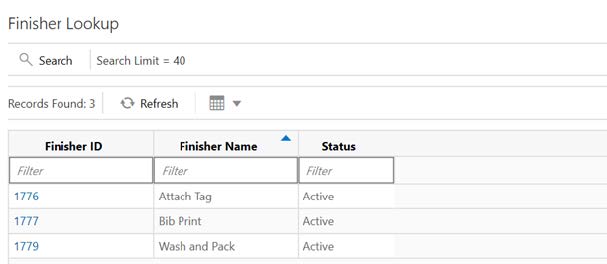
When the user first enters the screen, the active finishers will be displayed by default. After performing a search, the list of finishers per the search criteria entered will be displayed in this screen. The user can click on a finisher and it will take the user to the detail screen for the selected finisher.
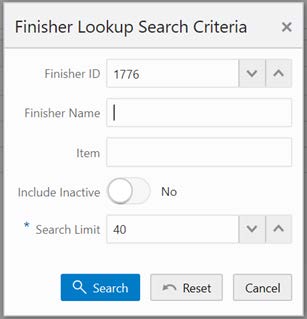
The user can access the Finisher Lookup Filter dialog by clicking the Search button from the Finisher Lookup screen. This dialog enables the user to enter various search criteria to look up the finishers that user needs. After performing the search, the list of finishers per the search criteria entered will be displayed in the Finisher Lookup screen. If only one result is found, the user is taken to the Finisher detail for that finisher. The result returned should adhere to MSOB rules.
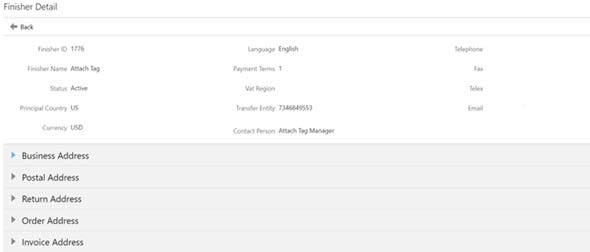
The user will be taken to the Finisher Detail Screen upon selecting a finisher from the search results on the Finisher Lookup Screen. The Finisher Detail screen consists of primary details of the finisher in the header and other details such as Addresses as sections below the header. A section will exist for every address type for the finisher being looked up. Expanding a section will display the respective details right below. Types of addresses and the number of types of addresses may vary per finisher. Everything within the screen is view only.
Translation
Two items have been added to translations.
Oracle's merchandising system now publishes item descriptions independently of the item and EICS subscribes to that message.
If this data is entered in the merchandising system, the item description message will contain translated information for the descriptions associated to an item as well as secondary descriptions.
The item description displayed in EICS and the mobile application can then be displayed in the user's preferred language independent from the store location language.
To facilitate the management of languages, EICS allows the user to download the translation bundles for a specific language to a file so a user on the desktop can download. This in turn can be uploaded and can override an existing language.
The following dialog is accessible from the previous existed translation screens, so no new permissions or configurations are needed.
Export/Import File
The user will be able to update translations in bulk using the Export / Import feature provided in this screen. This is achieved by importing a file that has the updated translations for a particular language.
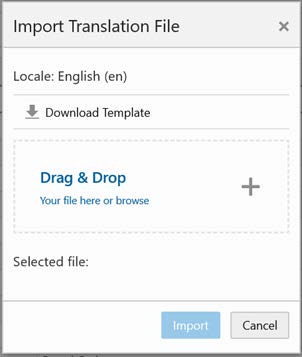
The file downloaded will be for the locale selected. The translation records downloaded in the file will be for both the Bundle Types, that is Server and Operations UI, irrespective of the Bundle Type selected.
Only the translation keys will be updated into the system. Descriptions are common for all languages and will not be updated if any changes are made.
If there are any errors encountered during the import processing of the file, an error file is generated that lists the errors along with the records that caused the error.
VPN Validation - DSD and RTV
In prior releases, the VPN entered was not validated against the VPN specific supplier sources in the DSD and RTV dialogs. The scan algorithm was only validating if a correct VPN was entered.
Sometimes however, different suppliers for a different item could use the same VPN. For example:
Item A SKU 1234 has VPN 1 for vendor 1
Item B SKU 1235 has VPN 1 for vendor 2
If no vendor transaction is used, scanning VPN 1 would require the user to select which SKU they want to work with. In the RTV and DSD dialogs, the user can now scan VPN 1 and the system will know if SKU 1234 or SKU 1235 should be used based on the vendor associated to the transaction.
Quick Receiving List
A new state was added to the quick receiving list screen to improve the decision process of the user.
Sometimes a user scans a valid container ID which is not received. In prior releases, the user would get a red icon stating the container was invalid, but no indication would be given as to why. The not received status indicator will increase when a valid barcode is scanned, but because of business process reasons such as "container from another store" or "container already defined as missing," the container cannot be received.
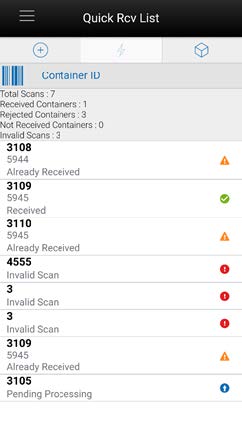
The list will display anything that is scanned or entered, including invalid scans.
-
Not Received: Total number of valid containers not received during the session. For example, when a misdirected container is scanned and not allowed to be received.
-
Blue circle with up arrow indicates that the container scanned is pending processing.
Item Basket
Item baskets on the desktop have been improved by allowing items to be added.
This change required the naming convention of hierarchy baskets to be redone. Hierarchy baskets were those created on the desktop leveraging the merchandise hierarchy. The old indicator has been replaced with the concept of dynamic baskets and static baskets.
An item basket that has only items on it is considered static meaning that the number of items does not change. An item basket that has only hierarchies or hierarchies and items is considered dynamic meaning that the items on the basket can change based upon the items associated to the hierarchy. The desktop allows for item baskets that are dynamic or static to be created, viewed, and edited. Whereas, on the mobile application, only static item baskets (ones with items) can be created, viewed, and edited.
Item Basket Search Criteria
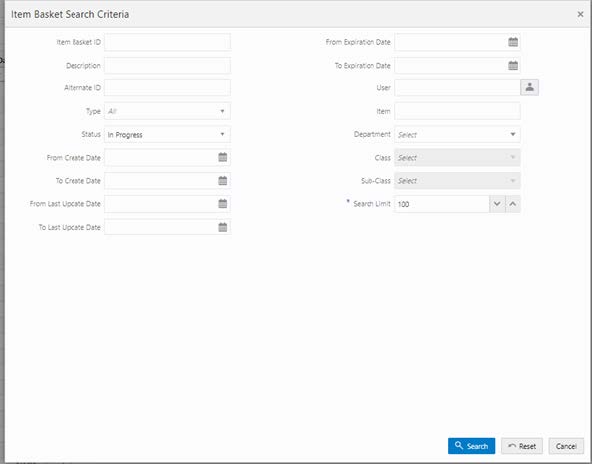
Item Basket Detail
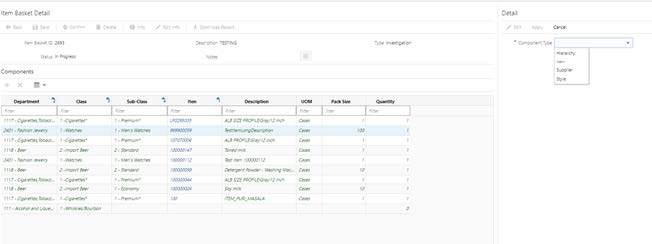
Item Baskets can now be created by Hierarchy, Item, Supplier, or Style.
If it is for Hierarchy, the detail panel will allow for hierarchies to be added. Just the hierarchy itself is added, not the items, therefore no quantity is captured. The items for the hierarchy will get added at the time the item basket is getting used (that is, in the Area dialog).
The Item selection allows individual items to be added to the item basket along with a quantity.
The Supplier option allows a user to add all the items for a specific supplier; the quantity will default to one for these items but can edited.
Style allows a user to add all the child items that belong to a style; again, the quantity will default to one for these items but can be edited.
In all cases that allow for quantity, the quantity must be greater than or equal to zero.
A combination of any of the above component types can be added to an item basket (that is, hierarchy and style). The system restricts adding duplicate or overlapping hierarchies and items. Any item basket that contains a hierarchy will be marked as dynamic, whereas if there is no hierarchy on the basket, it will be marked as static.
All other features of the desktop item basket remain the same (save, approve, copy).
Item Basket Info
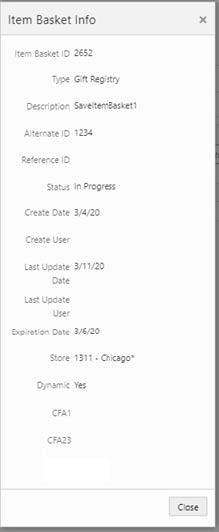
The Info popup is used for informational purposes and contains read-only information about the item basket. The hierarchy indicator was replaced with the dynamic indicator value.
Item Basket Edit Info
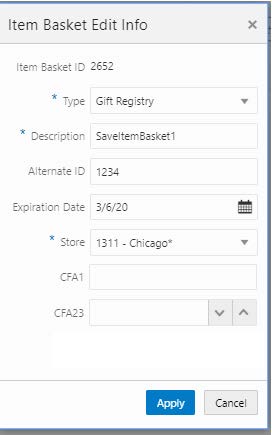
The Hierarchy type is removed from the edit item basket screen.
Assign Extended Attributes
Extended attributes, in prior releases of EICS, could only be set up as part of a single store. This means that if for example, a retailer wants to capture the expiration date for a subclass of items, and their enterprise exists out of 500 stores, they would need to log in 500 times and assign 500 times that subclass.
This improvement allows the retailer to log in to a single store and replicate the changes to other stores in a bulk fashion.
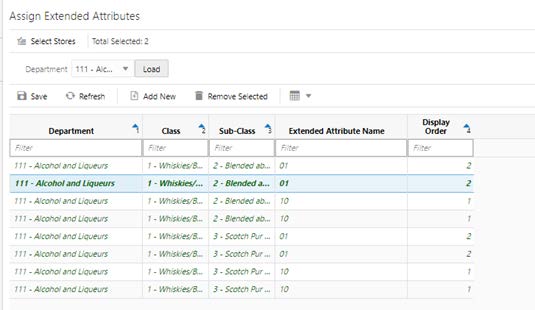
This screen lists the assignments made for the various sub-classes and their display order in the transactions. The assignment made here will be applicable to the stores selected in the select store list. All extended attributes for the current store will replace those of the selected stores. The user must have appropriate permissions to access the screen.
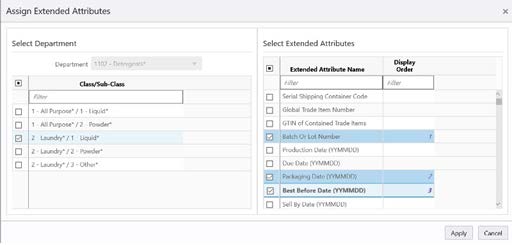
The Assign Extended Attributes popup enables the user to assign the extended attributes to a department/class/sub-class hierarchy and identify the order in which they will be displayed in the data entry screens in the transactions.
Customer Order -Tracking ID
Some retailers leverage a third-party shipper, but instead of using the build out manifest integration to automatically assign the external tracking ID a third-party shipper would provide, they want to manually key in this information.
This change allows the retailer to make the tracking ID required for customer order management deliveries.
System Parameters
Customer Order Tracking ID Required (New)
-
Values: Yes/No
-
Default: No
-
Topic: Customer Order
-
Yes - If the store parameter Manifest Customer Order Deliveries is set to No, the Tracking ID must be captured before dispatching the Customer Order Delivery. If Manifest Customer Order Deliveries is set to Yes, then it is not required.
-
No - Capturing Tracking ID becomes optional while dispatching the Customer Order Delivery to Customer Order Management.
Third-Party Transaction Import via BDI
A new BDI import is introduced to migrate transaction data from a merchandise system to EICS.
The following areas will be supported:
-
Transfers Doc
-
Allocations Doc
-
Direct Store Delivery
-
Purchase Orders
Retail Home Integration
EICS supports following integration scenarios with the Retail Home application:
-
Launch the EICS web client from Retail Home UI.
-
Add metric tiles to the Retail Home user dashboard.
EICS has added REST APIs for following two tile metrics:
-
Shopfloor Out of Stock Items:
-
URL: https://<host>:<port>/sim-mobile/internal/rhreports/outofstock/shopfloor/tile
-
Description: It returns the numbers of items that are out of stock on the shopfloor across all accessible stores where sequencing is enabled. For more details, see the Oracle Retail Home documentation.
-
-
Ready to Authorize Stock Counts:
-
URL: https://<host>:<port>/sim-mobile/internal/rhreports/readytoauthorize/tile
-
Description: It returns the number of child stock counts that are pending authorization. For more details, see the Oracle Retail Home documentation.
-
-
New Security Role and Group for Retail Home integration:
-
Added a new security role - Retail Home.
-
This role captures the permission required to access Operational Views in EICS.
-
Also added a new security group (sim_retail_home_users).
-
SFTP Push Support
EICS has added SFTP push support for the following data files:
-
Inventory extract to Order Broker
-
Stock Count export to RMFCS