1 Feature Summary
This chapter describes the feature enhancements in this release.
Noteworthy Enhancements
This guide outlines the information you need to know about new or improved functionality in the Oracle Retail Store Inventory Operations Cloud Services update and describes any tasks you might need to perform for the update. Each section includes a brief description of the feature, the steps you need to take to enable or begin using the feature, any tips or considerations that you should keep in mind, and the resources available to help you.
Column Definitions
-
Feature: Provides a description of the feature being delivered.
-
Module Impacted: Identifies themodule impacted associated with the feature, if any.
-
Scale: Identifies the size of the feature. Options are:
-
Small: These UI or process-based features are typically comprised of minor field, validation, or program changes. Therefore, the potential impact to users is minimal.
-
Large: These UI or process-based features have more complex designs. Therefore, the potential impact to users is higher.
-
-
Delivered: Is the new feature available for use immediately after upgrade or must the feature be enabled or configured? If no, the feature is non-disruptive to end users and action is required (detailed steps below) to make the feature ready to use.
- Customer Action Required: You must take action before these features can be used. These features are delivered disabled and you choose if and when to enable them.
Table 1-1 Noteworthy Enhancements
| Feature | Module Impacted | Scale | Delivered | Customer Action Required? |
|---|---|---|---|---|
| New and Updated Options | ||||
|
EICS |
Large |
No |
Grant permissions. |
|
|
EICS |
Small |
Yes |
No |
|
|
EICS |
Small |
Yes |
No |
|
|
EICS |
Medium |
No |
Grant permissions. |
|
|
EICS |
Small |
No |
Grant permissions. |
|
|
EICS |
Medium |
No |
Grant permissions. |
|
|
EICS |
Small |
Yes |
No |
|
|
EICS |
Small |
Yes |
Ensure price is integrated into SIOCS. |
|
|
SOCS |
Small |
Yes |
No |
|
|
EICS |
Small |
Yes |
No |
|
|
SOCS |
Medium |
Yes |
No |
|
|
EICS |
Small |
Yes |
No |
|
|
EICS |
Small |
Yes |
No |
|
|
SOCS |
Small |
Yes |
No |
|
|
EICS |
Small |
Yes |
No |
|
|
SOCS |
Small |
No |
Configuration |
|
|
EICS |
Small |
Yes |
Yes |
|
New Feature Descriptions
This section describes the new features.
SIOCS Managed Stores
SIOCS Managed Stores allows a retailer to indicate which stores are managed by SIOCS and which are not yet managed by SIOCS. The non-SIOCS Managed Stores will usually be maintained in a third-party system.
With this functionality, it is possible to migrate all locations to Oracle Retail Merchandise Foundation Cloud Service (RMF CS), and while the RMF CS foundation data is live, to have some stores managed in SIOCS.
Specifically, a non-SIOCS Managed Store will:
-
Not publish out any changes.
-
Subscribe to all changes, as well as allow web service calls.
-
Allow admin changes.
-
Only allow users to view transactions, but not execute them.
-
New stores will automatically be set to SIOCS Managed.
Permissions
| PERMISSION | TOPIC | DESCRIPTION |
|---|---|---|
|
Access SIOCS Managed Stores |
Admin |
With this permission, the user can access the SIOCS Managed Store dialog. |
Managed Stores Details
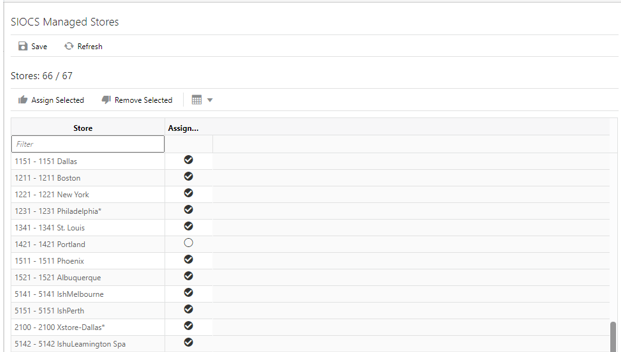
The SIOCS Managed Stores screen allows you to select those stores that are using SIOCS for inventory management. The screen is accessed by selecting Admin > Configuration > SIOCS Managed Stores.
Upon initial install, all stores will be defaulted to Assigned (selected) which means that they are SIOCS Managed. When a new store comes into SIOCS, it will default to assigned / SIOCS Managed. If a store is not using SIOCS, then it needs to be unassigned (unselected).
The following areas are impacted for non-SIOCS Managed Stores:
-
Users for non-SIOCS Managed Stores will only have access to Admin screens in EICS, lookups, and view-only access to transactions.
-
Messages will not be published out of SIOCS for non-SIOCS Managed Stores.
-
Item Lookup Stock Locator will display stock only for SIOCS Managed Stores.
-
Product Group Schedules can only be scheduled for SIOCS Managed Stores:
-
In the SIOCS Managed Stores UI of the desktop (above), if a store goes from SIOCS Managed to non-SIOCS Managed, and there are open product group schedules for this store, the user will be prompted upon saving to Delete the stores from the Product Group Schedule.
-
Transaction History
Two changes have been made to Transaction History:
-
Transaction History will now also display next to the date the time the transaction was executed.
-
On the desktop client, Item Lookup will have a punch out to see the transaction history for that item.
Transaction History Details

Transaction History will be accessible not just from the menu options, but also through Item Lookup on the desktop.
The Transaction History section can be accessed by clicking the Transaction History collapsible panel. When clicked, it will display the transaction history records for the item as it is currently displayed in the Transaction History screen. The number of transaction history records displayed will be based on the system configuration Search Date Range Default for Transaction History. The user must have the Access Transaction History permission for this collapsible panel to be visible.
UDA Print Setup
The system can automatically generate tickets and labels for items when User-Defined Attributes (UDA) values change.
Permissions
| PERMISSION | TOPIC | DESCRIPTION |
|---|---|---|
|
Access UDA Setup |
Admin |
With this permission, the user can access the UDA Print Setup dialog in the desktop application. |
|
Edit UDA Setup |
Admin |
With this permission, the user can edit the UDA Print Setup values. |
Details
The UDA Print Setup function allows you to define whether new tickets, new labels, or both, should be printed automatically when a particular UDA value is changed.
The user can access the dialog from the desktop application by selecting the menu Admin > Data Setup > UDA Print Setup.
These print settings affect all stores because User-Defined Attributes are not specific to stores. This function is only available to users with the required permissions.
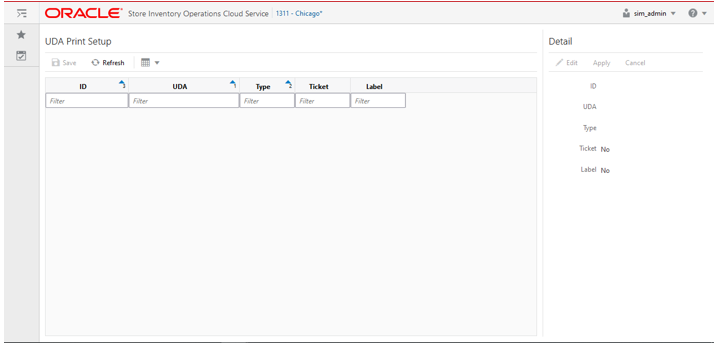
Specify whether Tickets or Labels are Printed Automatically
To control whether tickets or labels are printed automatically when a UDA changes, select the UDA and edit to switch on/off the printing of tickets and labels.
When an item has a changed UDA, the system will generate a ticket, label, or both for that item based upon the setup on this screen.
UIN Label Setup
The UIN Label Setup screen allows the user to set a customized name for the UIN. The UIN Label is used for displaying on various screens and reports in the application. This may include Serial Number, IMEI, SIN, License Number, Part Number, and so on.
Permissions
| PERMISSION | TOPIC | DESCRIPTION |
|---|---|---|
|
Access UIN Label Setup |
Admin |
With this permission, the user can access the UIN Label Setup dialog in the desktop application. |
Details
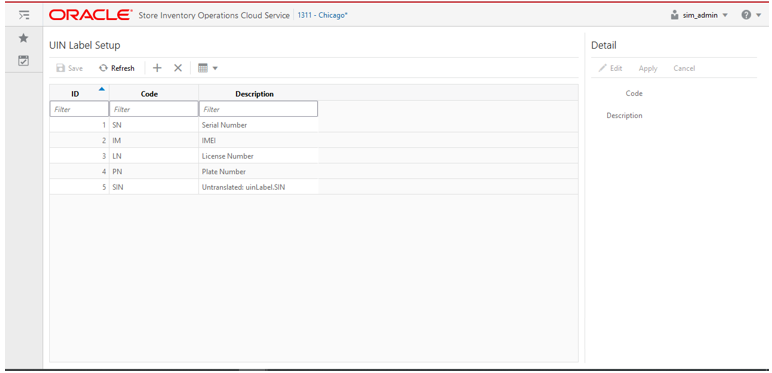
On this screen, the user can add the new labels for the UIN and provide the description.
The code entered here must match the one that is coming from the external system for correct processing.
Once the new UIN label is created and saved, the system identifies the label based on the code and uses it in the application.
Specify whether Tickets or Labels are Printed Automatically
To control whether tickets or labels are printed automatically when a UDA changes, select the UDA and edit to switch on/off the printing of tickets and labels.
When an item has a changed UDA, the system will generate a ticket, label, or both for that item based upon the setup on this screen.
Stock Count Changes
Stock Count Authorization
Several usability modifications have been made to the Stock Count authorization screen:
-
Several new fields have been added that will display the value variance. This price used for the variance calculation is taken at the time of the last snapshot taken. This allows for a consistent value during the authorization process.
The dialog will also show the user the price used as well as the type of price.
-
An additional usability feature has been made. When clicking on the item, the Item Lookup screen will open up in a new tab. This will allow the user to select and view the transaction detail information for that item or any other pertinent item information needed to make a decision around the stock position of the item.
The multiple location field can now be accessed through the multi-location indicator, while the UIN area can be accessed through the hyperlink on the UIN field.
-
A new button has been added to allow the user to apply late sales information to the stock count. This feature can be hidden or displayed to the user based on permissions.
Permissions
| PERMISSION | TOPIC | DESCRIPTION |
|---|---|---|
|
Apply Late Sales |
Stock Counts |
With this permission, the Apply Late Sales button will be available to the user in the Stock Count Authorization Detail screen. |
Stock Count Authorization Details

The user will be able to see the current Price of the item, Price Type, and Price Variance. Price Variance for an item is calculated as follows:
-
Price * (SOH - Count qty) if the stock count was not recounted.
-
Price * (SOH - Re-count qty) if the stock count was recounted.
Clicking the Apply Late Sales button refreshes the snapshot to incorporate the late sales for the items in the stock count. This button is visible only when the child count is in New or In-Progress state. The user must have the Apply Late Sales permission for this button to appear on the screen.
Authorization Detail - UIN
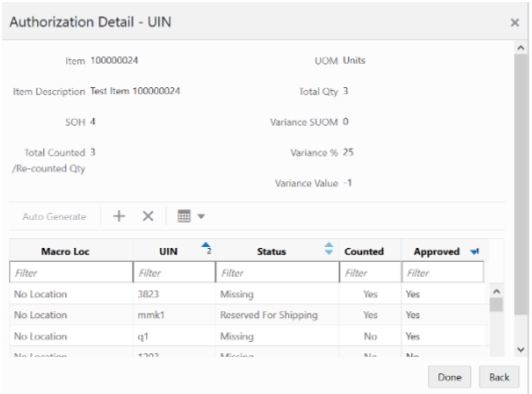
If the item is a UIN item, clicking the icon in the UIN column displays the Authorization - UIN popup.
Authorization Detail - Multi Locations
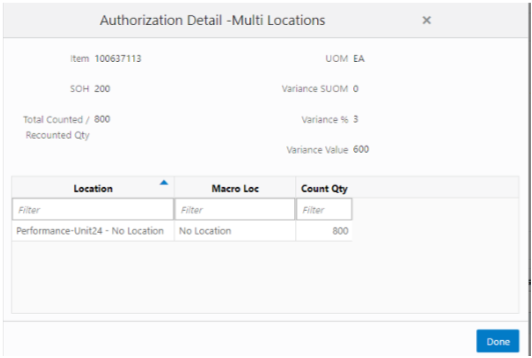
If the item has the Multi-Loc column set to Yes, it will be a hyperlink. The system displays the Authorization Detail Multi Locations popup if the user clicks the Yes hyperlink.
Adhoc Stock Counts - Delete Item
The user will now have the ability to delete items from an adhoc stock count in case something was accidently scanned.
Usability Changes
Several additional changes have been made to enhance the user experience.
Item Basket - Desktop
The Item ID has been made a hyperlink on the Item Basket dialog. Clicking the link opens the Item Detail screen for that item in a new tab in the browser.
Transaction History - Display Time
The Transaction History screen will now display the time next to the date. This enables a user to better see the sequence of when inventory changes were made in relation to each other.

Container Receiving - Discrepant Flag
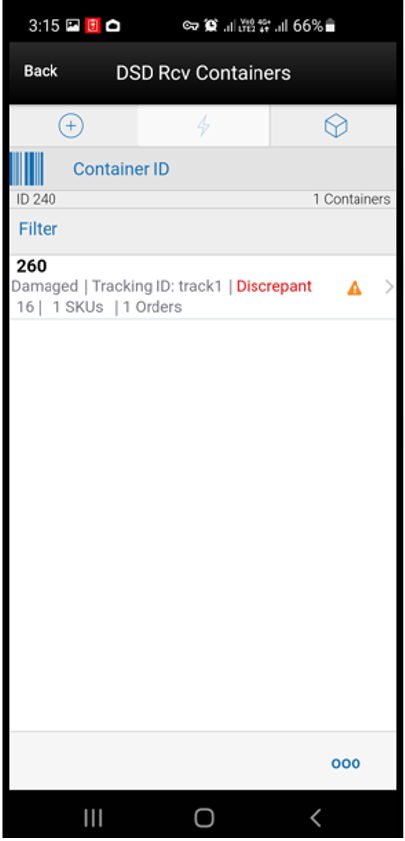
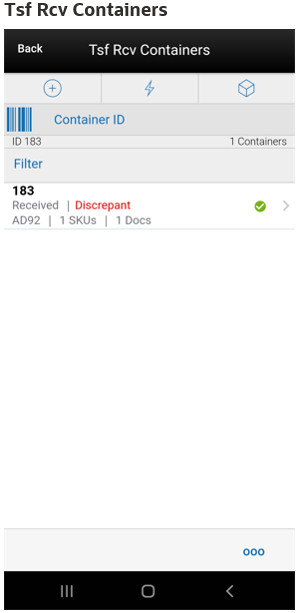
The receiving container dialogs in the transfer and Direct Store Delivery area did not display in prior releases did not display if a container had discrepancies or not. This made is difficult to revalidate the accuracy of a container receipt.
This has been rectified by adding a Discrepant label on any container on these respective container list screens.
DSD Receiving Containers
A label called Discrepant will be displayed in red color.
Tsf Rcv Containers
Purchase Order List - Display Not Before Date
The Purchase Order List screen will start displaying the Not Before date of the order. This allows users to faster spot the orders they are working on by eliminating those that have not yet arrived in the store.

Stock Count Authorize Recovery Batch - Input
When entered by the user, the existing Stock Count Authorize Recovery batch is updated to take in the following input parameters, if entered by the user:
-
Stock Count ID
-
Data Set ID (that is, Stock Count ID)
These fields already existed in the Job Admin screen however the store ID input parameters were ignored by the batch if the stock count ID was provided. From release 19.4, the batch will validate both parameters and only run for the count and/or store provided.
Both of them are optional fields. If user does not enter any input information, the job will work as before and execute for all stock counts and stores.
Delivery Bay
Delivery Bay is a feature that has been present in SIOCS since its launch. However, documentation did not cover this concept. Some additional information was added in the DSD and Transfer sections of the documentation.
A delivery bay in the store is an area where inventory is received at the time the truck arrives in the store. In a normal fast passed process, this inventory will be moved to the shopfloor or put away in the backroom and be immediately available for use. However, in some cases, the delivery load is so large, or no people are available, to manage this as part of the on-going process. For such retailers, the delivery bay allows the receiving of inventory, but does not mark this inventory as available until the next day.
A batch process runs at night that will mark this inventory as available for sale.
Direct Store Delivery Details
Receive on Shop Floor: The default will be based on the store parameter Direct Delivery Default to Shop floor Receiving. If set to Yes, the check box will default to marked.
You are required to have Receive Direct Delivery on Shop Floor permission to change the value.
This indicates whether the system delivery will default to receive inventory into the shop floor instead of automatically receiving into the backroom or delivery bay.
If this is set to receive on the shop floor, the system increments the shop floor inventory bucket instead of the backroom or delivery bay bucket. If a capacity is defined for the item and Direct Delivery Receive Item Capacity is set to Yes, the maximum shop floor quantity will equal the capacity; otherwise, the shop floor will be updated to the entire receipt amount. If the capacity is used and if the receiving quantity is excess, the balance is incremented to delivery bay or backroom depending on the Replenishment - Delivery Bay Inventory parameter.
If Receive on Shop Floor is not set on the delivery, the system increments the backroom or delivery bay bucket depending on the Replenishment - Delivery Bay Inventory parameter. If this parameter is on, the system will increment the delivery bay bucket instead of the backroom. This will increase SOH.
Transfer Receiving Details
Receive on Shop Floor: The default will be based on the store parameter Direct Delivery Default to Shop floor Receiving. If set to Yes, the check box will default to marked.
You are required to have Receive Direct Delivery on Shop Floor permission to change the value.
This indicates whether the delivery will default to receive inventory into the shop floor instead of automatically receiving into the backroom or delivery bay.
If this is set to receive on the shop floor, the system increments the shop floor inventory bucket instead of the backroom or delivery bay bucket. If a capacity is defined for the item and Direct Delivery Receive Item Capacity is set to Yes, the maximum shop floor quantity will equal the capacity; otherwise, the shop floor will be updated to the entire receipt amount. If the capacity is used and if the receiving quantity is excess, the balance is incremented to delivery bay or backroom depending on the Replenishment - Delivery Bay Inventory parameter.
If Receive on Shop Floor is not set on the delivery, the system increments the backroom or delivery bay bucket depending on the Replenishment - Delivery Bay Inventory parameter. If this parameter is on, the system will increment the delivery bay bucket instead of the backroom. Regardless, the stock on hand will be updated.
The Receive on Shopfloor check box will only display for deliveries from a store or warehouse.
Standardized SFTP File Paths
The SFTP incoming and outgoing file paths where users can upload and download batch files have been standardized. Customers need to ensure that third-party integration is updated to the following:
-
For uploading files to the SFTP server, use the from_thirdparty directory.
-
For downloading files from the SFTP server, use the to_thirdparty directory.
For information on changes and the impact to integration, see the SFTP File Directory and Filename Format appendix in the Oracle Retail Enterprise Inventory Cloud Service Administration Guide.