Transfer Receiving
The receiving dialog allows users to receive store, warehouse and external finisher deliveries with containers. It allows these containers to be received blind, without you knowing the expected quantity. The containers can also be for unavailable inventory. Lastly, the mobile application supports misdirected containers or unexpected containers originally not listed on the delivery.
Transfer Receiving features:
-
Receive by Advance Shipment Notice (ASN), container, item level, or automatically
-
Record damages during receiving
-
Blind receiving
-
Manage container deliveries for another destination or creating an additional container
-
Multiple methods to scan and identify the container delivery (GS1, Container ID, Tracking ID)
-
Inventory updated immediately as containers are scanned and confirmed
Mobile Features
-
Search for transfer receipts
-
Create a new container
-
View or edit an existing receipts or containers
-
Capture values for CFAs (Custom Flexible Attributes) for the delivery and containers
-
Delete or cancel 'In Progress' containers or receipts
-
Confirm, mark damage, mark missing, or receive a container
Figure 7-30 Transfer Receiving Mobile Screen Flow
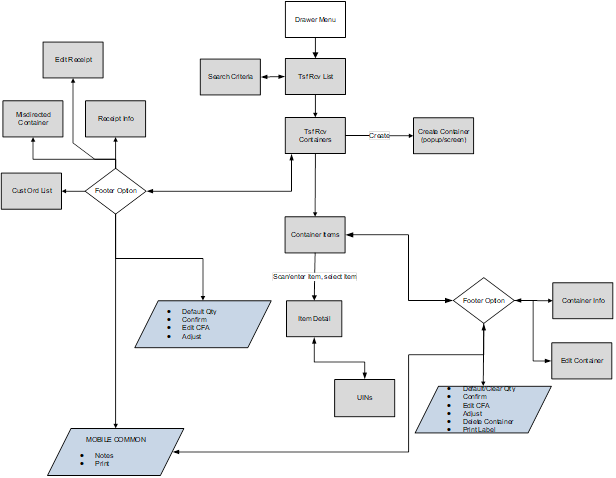
Transfer Receiving is accessed on mobile through the Shipping / Receiving menu within the drawer. Selecting the menu option will take you to the Tsf Rcv List screen. On this screen, you can search for delivery/receipt records which will be presented on the Tsf Rcv List screen. You can edit or view a delivery/receipt.
When editing or viewing a delivery/receipt, you will first be directed to the list of containers within the delivery/receipt on the Tsf Rcv Containers screen. You can create a container, edit or view a container, capture values for CFAs.
When creating, editing, or viewing a container, you are directed to the list of items in the container on the Container Items screen. You can add, view and edit the details of the items on the Item Detail screen. The Item Detail screen has tab for UINs if the system and/or item is configured. You can also capture values for CFAs that are setup for the containers.
Tsf Rcv List
Figure 7-31 Tsf Rcv List Screen
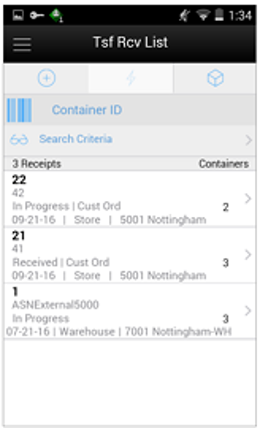
When navigating to Transfer Receiving, you go to the Tsf Rcv List screen with the default list being defined for 'Active' receipts meaning 'New' or 'In Progress' status.
These deliveries are all populated through the system from an internal or external source. The ASN corresponds to the Shipment ASN for a store to store transfer.
Use the search criteria eye glasses to navigate to the transfer receipt search criteria screen to enter search criteria for transfer receipts. When scanning/entering a container ID in the scan bar, the system adds the scanned container ID to the entered search criteria and narrows down the current list of receipts by the container ID scanned. Scan or enter the internal or external container IDs to find the matching containers in the receipt.
Selecting a receipt will direct you to the Tsf Rcv Containers screen and will display a list of containers.
An estimated expected date will be populated if one exists in the ASN. When the delivery has been received, the receive date field will be updated. You can identify any container marked as missing or holding customer orders.
This screen allows you to identify if the transfer being received is for a customer order.
If an unexpected container arrives, search for the container using the misdirected container screen. Receiving notes may also be captured at the receipt and container level.
Search Criteria (Transfer Receiving)
Figure 7-32 Search Criteria (Transfer Receiving) Screen
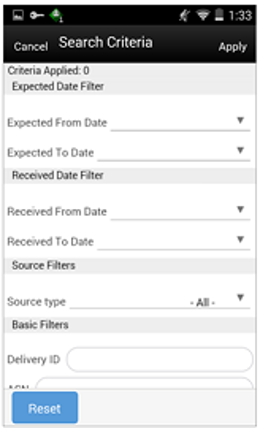
The Transfer Receiving Search Criteria screen is accessed by the eye glasses on the Tsf Rcv List screen. After applying the search criteria, the results will be listed on the Tsf Rcv List screen and the criteria applied will show. The fields available to search by include: expected date, received date, source type, source ID, source, delivery ID, asn, item, status, container ID, document ID, customer order ID, fulfillment order ID, customer orders exist, context type, and context value.
Tsf Rcv Containers
Figure 7-33 Tsf Rcv Containers Screen
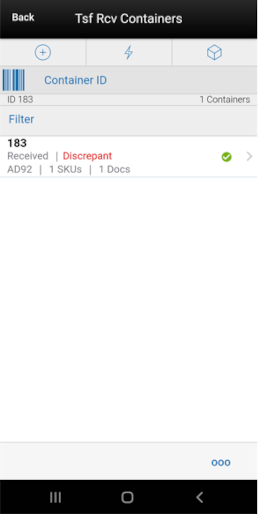
When selecting a receipt from the Tsf Rcv List screen, you go to the Tsf Rcv Containers screen with the list showing 'Active' containers above the rest. When scanning/entering a container ID in the scan bar, the system navigates you to the Container Items screen and display the items currently in the selected container.
You can scan or enter the internal or external container IDs to find the matching containers in the receipt.The filter can be used to narrow down the list of containers. Filtering can occur by internal ID, container ID, and container status.The following icons will be displayed to indicate the status of the container: green circle with check indicates the container is received, orange triangle with exclamation indicates the container is damaged, and the red circle with exclamation indicates the container is missing. If the container is in a 'New' or 'In Progress' status an icon will not display.
For containers in statuses 'Received' or 'Damaged', if they are 'discrepant', a label called 'Discrepant' will be displayed in red color.
Containers can be received individually by selecting the container. Click Default Qty and, all items received quantity for each container is set to the expected quantity. Containers can only be received at a container level if they have not been received at the item level.
If the delivery has already been received and if the receipt date is within the system configured number of days allowed to adjust a receipt, it is possible to reopen the specific container on a receipt by clicking the container. Adjust the container from within the container dialog.The receipt can be saved as 'In Progress' to complete receiving at a later time. Saving the receipt will not make any updates to the stock on hand.
Confirming the receipt will mark all containers, with received quantities, to Received. Stock on hand is updated when the status of the container changes to Received, either from within the receipt details or from within the Container. Any containers with no received quantities will be marked as Missing.
When confirming the transfer receipt, if there are containers that are in 'New' status (the items will not have any quantities):
-
If the user has the Allow Default Zero at Confirmation permission, the system will prompt the user if they would like to set the quantities to 0. If the user chooses Yes to the prompt all items that have a blank quantity value will be set to 0. If the user chooses No, the user will return to the screen and nothing is updated.
-
If the user does not have the Allow Default Zero at Confirmation permission, the user will not be able to confirm the delivery and will return to the screen. At this point the user will have to either save it for someone else with proper permission to confirm, or receive the items that are blank.
When confirming the transfer receipt, if there are containers that are in 'In Progress' status with discrepant quantities (Received is not equal to Expected), the user will be prompted that there are discrepant items:
-
If the user has the Allow Default Zero at Confirmation permission, the system will prompt the user to set the quantities to 0. (Same as above)
-
If the user does not have the Allow Default Zero at Confirmation permission, the user will not be able to confirm the delivery and will return to the screen. (same as above)
Customer Orders
The screen has a footer menu option to go to the Customer Order List screen. This enables you to identify the list of customer orders associated with this delivery, if any.
Selecting a container from the list takes you to the Container Items screen.
Footer Menu
Info: Info will access the Info (Receipt) popup.
Notes: The Notes option accesses the notes common dialog to capture notes.
Customer Orders: Accesses the Customer Order List screen.
Create: Creates a new container in the receipt.
Edit Receipt: Accesses the Edit Receipt screen.
Edit CFAs: Lets you enter values for the CFAs that are set up for transfer deliveries.
Default Qty: Copies the expected quantity to the received quantity field for all containers on the delivery/receipt.
Misdirected Container: Accesses the Misdirected Container screen.
Confirm: Confirm will set the receipt to a 'Received' status.
Back: Exits the receipt.
Print: Opens the print dialog and allows you to select formats and print various reports and container labels. The Transfer Receipt report is available on this screen.
Edit Receipt
Figure 7-34 Edit Receipt Screen
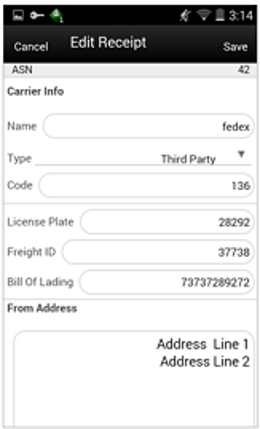
The Edit Receipt screen is used to enter details for the delivery including transportation details. Details include: ASN, Carrier Name, Carrier Type, Carrier Code, License Plate, Freight ID, Bill of Lading, and Delivery From Address.
Edit CFAs Screen
Figure 7-35 Edit CFAs
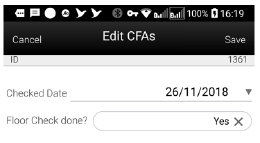
The Edit CFAs screen displays the list of CFAs (flexible attributes) that have been set up for transfer delivery containers, in the desktop application and lets you enter values for them. The CFAs that are set up as 'Required' must have a value entered for it before confirming the receipt. The value can be one of the following: Date, Text, Decimal, Long depending on the 'data type' set up for the CFAs, while creating them in the desktop application. Appropriate security permission is needed and the delivery must be in editable state for entering CFA values.
Transfer Receiving Info (Receipt)
Figure 7-36 Info (Receipt) Popup
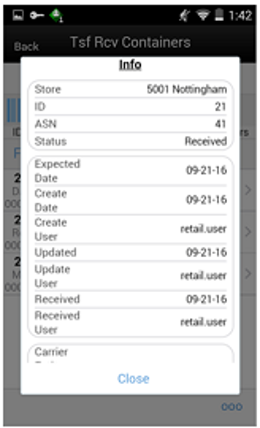
The Info (Receipt) is an informational popup that contains read-only information about the header level of the receipt. Details include: Source Type, Source, ID, ASN, Status, Expected Date, Create Date, Create User, Updated, Update User, Received, Received User, Carrier Entity, Carrier Type, Carrier Code, License Plate, From Address, Freight ID, Bill of Lading, and the CFAs. The License Plate and Freight ID fields may be used for other purposes, such as a Weigh Bill ID or BOL ID. The field names can be customized by the client.
Misdirected Container
Figure 7-37 Misdirected Container Screen
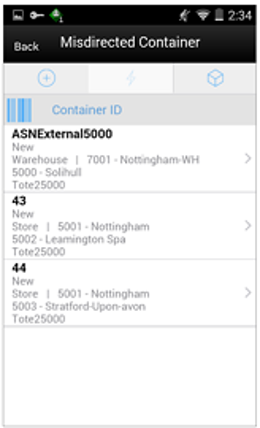
When selecting Misdirected Container from the Tsf Rcv Containers screen, you go to the Misdirected Container screen with the screen showing an empty list. When scanning/entering a container ID in the scan bar, the system will display matching containers available in the entire enterprise. Scan or enter the internal or external container IDs or Tracking ID to find the matching containers in the receipt.
When selecting a container within the list, you are taken to the Misdirected Items screen.
Misdirected Items
Figure 7-38 Misdirected Items Screen
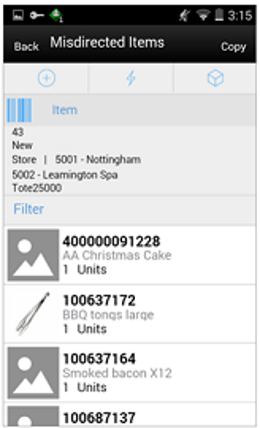
The Misdirected Items screen used when selecting a container from the Misdirected Container screen. Details about the intended destination are displayed at the top of the screen. The details include: ID, Container Status, Source Type, Source, Destination Type, Destination, and Container ID. When scanning/entering an item in the scan bar, the system will update the filter bar and display the resulting item.
The filter can be used to narrow down the list of items. Filtering can occur by item ID and description.
The Copy button will copy all items from the container to a new container. A notification is sent to the original destination store to inform them the container intended for their location has been received in another location. The old container ID will be written into the reference container field for the newly created container and the old container will be moved to a 'Missing' status.
Customer Order List
Figure 7-39 Cust Order List Screen
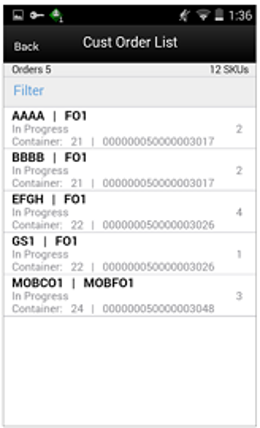
The Cust Ord List is an informational screen that contains read-only information about the customer orders within the receipt. Details include: Customer Order/Fulfillment Order, Status, Internal and External container ID.
Scrolling in the list of customer order/fulfillment orders on the left will display a filter. The filter can be used to narrow down the list of items. Filtering can occur by Customer Order ID, Fulfillment Order ID, Container ID, and Customer Order Status.
Container Items
Figure 7-40 Container Items Screen
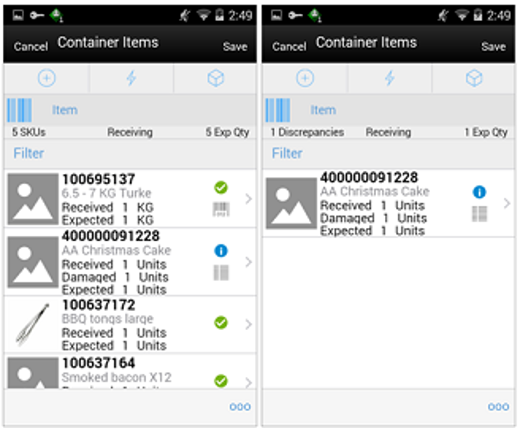
The Container Items screen is used when selecting a container to receive from the Tsf Rcv Containers screen.
This screen is used to work with the contents and details within the container. Information is populated from an Advanced Shipment Notice (ASN) and you mark the items as received or damaged. The items on the list are for the container. The item image for the line items is displayed per configuration.
If the Non-Inventory indicator of the item is No, the SOH of the item is updated at the completion of the transaction.
If the Non-Inventory indicator of the item is Yes, the item can be added to the transaction however, the SOH will not be updated on confirmation of the receipt. Item can be scanned/added to the transaction, you can enter/update quantity just like a normal (inventory enabled) item. All the processing rules and validations that apply to inventory enabled items would apply for non-inventoried items too except that the validations done on quantity against SOH will be ignored. On confirmation of the receipt, the SOH of the item will not be updated since the application doesn't preserve the inventory details of the items with Non-Inventory set as Yes.
When the screen is set to regular receiving mode, the header bar will display the number of SKUs, 'Receiving', and total expected quantity. Scanning/entering an item will update the received quantity. When the screen is set to damage receiving mode, the header bar will display the number of SKUs, 'Damages', and total expected quantity. Scanning/entering an item will update the damaged quantity. Finally, when the screen is set to display only discrepancies, the number of discrepancies is displayed on the left.
Line items appear in a list and selecting a line item will navigate to the item details of the item. If an item has been changed in the current session, it will be indicated by a bar on the left of the item. The filter can be used to narrow down the list of items. Filtering can occur by Item ID, Description, Expected Qty, Received Qty, and Damaged Qty.
Scanning or entering an item in the scan bar will navigate you to the Item Detail screen for the item. If the user scans the Item ID of a UIN item or if he scans a UIN, he will be taken to the UIN tab of the Item Detail screen.
Quantity may be updated, depending on the scan mode.
The following icons will be displayed next to the item: green circle with check indicates the item is not discrepant and the blue circle with an 'i' indicates the item is discrepant. A discrepant item is when the received quantity plus the damaged quantity does not equal the expected quantity. If configured, unexpected items may be added to the container. A new transfer will be created for the unexpected items. There will only be one transfer created for the entire receipt.
The entire container may be marked as damaged and a reason for the damage from the Container Info screen. Additionally, the container can be marked to receive on the shopfloor directly.
Receive Transfer Delivery
When the delivery is being received, the status of the delivery/receipt will move to 'In Progress' status at the receiving store. Press the Cancel button and the delivery/receipt will remain as 'New'. If configured for blind receiving, the expected inbound quantities will not display.
You may select to use Default Regular Qty option or change the quantity received and mark items as damaged if necessary.
When confirming a delivery, the status is updated to Received and inventory is updated. The merchandising system is also notified at the container level for the receipt. This provides an up to date view.
When damaged items are received the inventory for those items will be put into a Non-sellable Unavailable bucket. The total received is the sum of the received and the damaged quantities.
Receive Entire Delivery
If the system parameter Receive Entire Transfer is set equal to Yes, you cannot add or remove items from a delivery.
Managing Discrepancies
Deliveries can be received for over, short or the exact quantity dispatched. Discrepancies are easily managed with the Display Only Discrepancies footer menu option. When selected, the expected qty will be compared with the received plus damaged qty and only the items with a discrepancy will display. Unexpected items added during the session will not show up on the discrepancy list since there is no expected quantity.
Store to Store transfer receipt overages will adjust the difference out of the sending store's stock on hand. There is not an inventory adjustment created for this overage but an e-mail notification will be generated and sent to the sending store.
Adjust Container
After the delivery has been received, it is possible for a user to adjust each container on the receipt. This will depend on the Number of Days received transfers can be adjusted system parameter. Select the Adjust button and the container moves back to 'In Progress'. The entire container is reversed out and you will need to reconfirm. The full reversal will display in Transaction History.
Adjusting can only be done at the container level. The entire receipt cannot be adjusted at once. Once the original receipt has been confirmed, the inbound bucket will no longer see a change. In some cases, the container may be restricted from adjustments, such as when customer order reservations exist. If the container has been adjusted, a check box will be marked in the Container Info screen. The received quantity and damage quantity fields will be populated with the same value as when the container had been confirmed.
The ellipsis in the lower right hand corner will access the footer menu which will contain the functions that can be performed on a container.
Footer Menu
Info: Info will access the Info (Container) popup.
Notes: The Notes option accesses the notes common dialog to capture notes.
Default Regular Qty: Copies the expected quantity to the received quantity field.
Clear Qty: Clears the received quantity and damaged quantity fields for ALL items in order for you to start over.
Damage Mode: Scan/enter items and update the damage quantity field.
Regular Mode: Scan/enter items and update the received quantity field. This is the default mode.
Edit Container: Accesses the Edit Container screen.
Edit CFAs: Enter values for the CFAs that are set up for transfer deliveries - containers.
Adjust: Reopens a container in Completed status and moves it back to In Progress.
Damage Remaining Qty: Updates the remaining quantity not yet received to be applied to the damaged quantity field.
Display Only Discrepancies: Shows only the items with a received quantity plus damaged quantity that do not match the expected quantity.
Display All Items: Revert back after displaying only discrepancies. This is the default display.
Confirm: Moves the container in an 'In Progress' status to 'Received'.
Save: Saves the container in 'In Progress' status to be completed later. This option is only available when the screen is in edit mode.
When the container is saved, the UINs flagged as Received or Damaged and are not flagged to remove, the UIN status is updated to 'In Receiving'.
-
If a UIN is flagged for removal, the UIN will be deleted if the UIN has a status of 'Unconfirmed' (this identifies the UIN as manually added).
-
If a UIN is flagged for removal, the UIN receiving mode is removed if the UIN has any status other than 'Unconfirmed' (this identifies the UIN as pre-existing from an ASN).
-
If an item is flagged for removal, when you save the container and returns, the item will no longer exist in the container. Note: Only unexpected items added can be removed.
-
If a UIN was relocated from another store:
-
The UIN status is updated from In Stock to In Receiving.
-
A notification is generated and sent to the store the UIN was relocated from.
-
Delete: Marks the container to 'Canceled' or 'Missing' status. If the container is from an external system, the container will be marked as 'Missing', otherwise, it will be marked as 'Canceled'. This option will only be available for containers that are in a 'New' or 'In Progress' status.
Cancel: Exits the container and changes made in that session will not be saved. This screen is only available when the screen is in edit mode.
Back: Returns to the previous screen. This option is only available when the container is view only.
Print: Opens the print dialog and allows you to select formats and print various reports and container labels. The Transfer Receiving Container report will be available on this screen. This option will always be available regardless of the receipt or container status.
Print Tickets: Opens the Print Tickets dialog to print the tickets or labels for the current container items. This is described in common usage document with more details.
Item Detail
Figure 7-41 Item Detail (Container) Screen
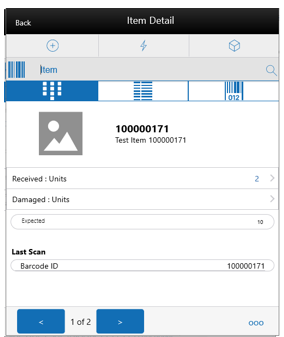
The Item Detail screen is used when selecting or scanning an item from the Container Items screen. Scanning or entering an item on this screen in the scan bar will update the quantity per the scan mode and refresh the item detail screen for the item and quantity scanned. The quantity can be edited and updated manually if permissions allow. You can enter quantity for items with Non Inventory indicator as Yes.
The item information including the image which is system configured to display in the header. The bottom portion of the screen contains information fields of inventory qty, remaining qty, document qty, and reason code (for unavailable inventory only) pertaining to the bucket stock is coming from. Lastly, the details of the last scanned barcode will be displayed.
The footer menu (ellipsis button), contains a Reset function as well as Remove and Restore functions. Page through existing item in the container view the arrows on the bottom. If the container is displaying only discrepancies, you will page through only the discrepant items.
If the user scans the Item ID of a UIN item or if he scans a UIN, he will be taken to the UIN tab within the Item Detail screen, for that item.
In the UIN tab the system displays all the UINs for the selected item, if the UINs were part of the ASN. Otherwise, the screen will remain blank until UINs are scanned/entered for the item.
When entering the screen for the first time, the status will display the following:
-
The UINs included on an incoming ASN will be displayed with a status of "Shipped to Store'.
-
The UINs manually added will be displayed with a status of "Unconfirmed", if they do not previously exist.
-
The UINs manually added may have another status, if they already exist in the system.
When re-entering this tab, the status will be updated to "In Receiving".
When the transaction is no longer editable, the screen will be in view only mode.
You will not have the ability to change the Receiving Mode for the UIN.
There is also an Extended Attributes tab that enables the user to view/capture Extended Attributes for the item. If the item is not configured to capture extended attributes or there are no extended attributes captured, the list will be empty.
Edit Container
Figure 7-42 Edit Container Screen
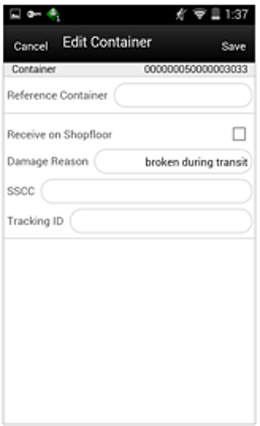
The Edit Container screen is used to enter details for the container including transportation details. You navigate to this screen from the footer menu on the Container Items screen. Details include: Reference Container, Receive on Shopfloor, Damage Reason, SSCC, and Tracking ID.
The reference container field is used to identify the original container ID and will be filled in when you have copied a container from the Misdirected Items screen. If the container was manually created, you can enter the original container ID here.
Receive on Shop Floor: The default will be based on the store parameter Direct Delivery Default to Shop floor Receiving. If set to Yes, the check box will default to marked.You are required to have Receive Direct Delivery on Shop floor permissions to change the value.This indicates whether the delivery will default to receive inventory into the shop floor instead of automatically receiving into the back room or delivery bay.If this is set to receive on shop floor, the system increments the shop floor inventory bucket instead of the backroom or delivery bay bucket. If a capacity is defined for the item and Direct Delivery Receive Item Capacity is set to Yes, the maximum shop floor quantity will equal the capacity; otherwise, the shop floor will be updated to the entire receipt amount. If the capacity is used and if the receiving quantity is excess, the balance is incremented to delivery bay or back room depending on the Replenishment - Delivery Bay Inventory parameter.If Receive on Shopfloor is not set on the delivery, the system increments the back room or delivery bay bucket depending on the Replenishment - Delivery Bay Inventory parameter. If this parameter is on, the system will increment the delivery bay bucket instead of back room. Regardless the stock on hand will be updated.The Receive on Shopfloor check box will only display for deliveries from a store or warehouse.For additional details, see In Store Replenishment.
Info (Container)
Figure 7-43 Info (Container) Popup
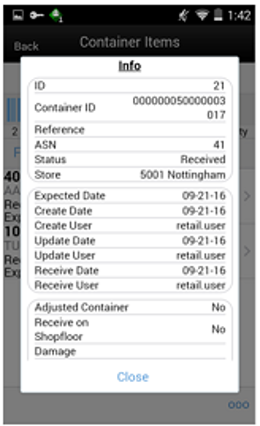
The Info (Container) is an informational popup that contains read only information about the header level of the container. Details include: ID, container ID, reference, ASN, status, source type and source, expected date, create date, create user, update date, update user, receive date, receive user, adjusted container, receive on shopfloor, damage reason, SSCC, tracking ID, and the CFAs.
Quick Receiving
The Quick Receiving dialog allows users to receive store, warehouse, and external finisher deliveries by scanning a container and marking the container as received immediately without scanning all the items within the container.
Quick Receiving features:
-
Receive entire container
-
Receive missing containers
-
Automatic confirm receipt
-
Multiple users scanning concurrently for same delivery
Mobile features:
-
Receive missing and misdirected containers
-
Update inventory immediately
-
Captures containers scanned, received, rejected, and invalid scans
Quick Rcv List
Figure 7-44 Quick Rcv List Screen
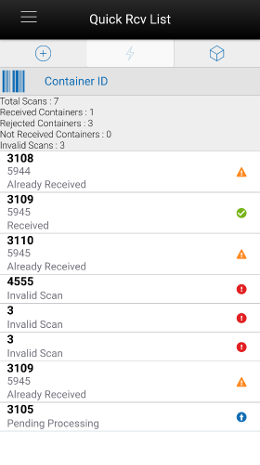
When navigating to Quick Receiving, you go to the Quick Rcv List screen. When you first go to this screen, an empty list will display. When scanning/entering a container ID in the scan bar the system searches for the container and will populate the list with the scanned value. Scan or enter the internal or external container IDs or the Tracking ID to find the matching shipments. The list will display anything that is scanned or entered including invalid scans.
The header of the screen list the number of containers that have been scanned/entered and their receiving status.
-
Total Scan: Total number of containers scanned during the session.
-
Rcvd Containers: Total number of containers that have been successfully received during the session.
-
Rejected Containers: Total number of container rejected (previously received containers) during the session.
-
Invalid Scans: Total number of container scanned which are invalid during the session.
-
Not Received: Total number of valid containers not received during the session. For example, when a misdirected container is scanned and not allowed to be received.
The following icons will be displayed to identify which scans are valid and which are in error:
-
Green circle with check indicates the container is received.
-
Orange triangle with exclamation point indicates the container was previously received.
-
Red circle with exclamation point indicates the container ID scanned or entered is invalid or not received.
-
Blue circle with up arrow indicates that the container scanned is pending processing.
Processing
Transfer Force Close Indicator
Transfer shortages will be adjusted based on the Transfer Force Close Indicator parameter settings NL, RL, or SL.
This indicator is used to determine the processing of a transfer when there is a short receipt.
-
No Loss: Sending store is incremented/decremented by the overage/shortage.
No Loss Shortage: Shortage is added back to the sending store.
Sending Store Receiving Store Beginning SOH
1000 SOH
1000 SOH, 0 In Transit
Sent qty 50
950 SOH
1000 SOH, 50 In Transit
Received qty 30 (shortage)
970 SOH
1030 SOH, 0 In Transit
-
Sending Loss: For shortages, no perpetual inventory is sent back to the sending store. Sending store is financially responsible.
Note:
This is handled on the merchandising side.
Sending Loss Shortage: Shortage is not added back.
Sending Store Receiving Store Beginning SOH
1000 SOH
1000 SOH, 0 In Transit
Sent qty 50
950 SOH
1000 SOH, 50 In Transit
Received qty 30 (shortage)
950 SOH********
1030 SOH, 0 In Transit
-
Receiving Loss: For shortages, no perpetual inventory is sent back to the sending store. Receiving store is financially responsible.
Note:
This is handled on the merchandising side.
Receiving Loss Shortage: Shortage is not added back.
Sending Store Receiving Store Beginning SOH
1000 SOH
1000 SOH, 0 In Transit
Sent qty 50
950 SOH
1000 SOH, 50 In Transit
Received qty 30 (shortage)
950 SOH********
1030 SOH, 0 In Transit
Available Versus Unavailable Inventory
When a transfer is saved, the system will move the items from either available or unavailable (non sellable) inventory, based on the inventory status, and move it to the reserved bucket within unavailable inventory. For warehouse and finisher returns, the Transfer Reserved bucket is updated. Upon dispatching of the transfer, the reserved buckets will be relieved and the stock on hand will be decremented. If sub-buckets are turned on, the appropriate sub-bucket associated with the shipment reason will be updated when transferring from unavailable inventory.
Example 1: Transfer TO Warehouse using Available Inventory
Item Lookup before:
-
Total SOH = 800
-
Available = 700
-
Unavailable = 100
-
Nonsellable = 100 Sub-bucket: Trouble 75, Admin 25
-
Reserved Qty = 0
-
Return Qty = 10 (Available), click Save.
Item Lookup:
-
Total SOH = 800
-
Available = 690
-
Unavailable = 110
-
Nonsellable = 100 Sub-bucket: Trouble 75, Admin 25
-
Reserved Qty = 10
-
-
Modify Transfer Qty to 8, click Dispatch.
Item Lookup:
-
Total SOH = 792
-
Available = 692
-
Unavailable = 100
-
Nonsellable = 100 Sub-bucket: Trouble 75, Admin 25
-
Reserved Qty = 0
-
-
Modify Return Qty to 8 and click Dispatch.
Item Lookup:
-
Total SOH = 698
-
Available = 698
-
Unavailable = 0
-
Reserved Qty = 0
-
Inventory Position Updates - Transfer Documents using Available Inventory
-
Approving a Transfer (All) :
-
Transfer Reserved (+)
-
Available SOH (-)
-
-
Confirming a Container with a Transfer Document created on the fly:
-
Transfer Reserved (+)
-
Available SOH (-)
-
-
Confirming a Container with a Transfer Document previously created:
-
No changes
-
-
Dispatching a Shipment:
-
Transfer Reserved (-)
-
Total SOH (-)
-
In bound Qty (+) for Receiving Store
-
-
Confirming a Container at Receiving Store:
-
Available SOH (+)
-
Inbound Qty (-)
-
-
Confirming a Container at Receiving Store with Damages:
-
Unavailable (+):
-
Sub-bucket (+)
-
-
Note:
Assumes Shipping Qty is less than or equal to Approved Transfer Document Qty.
Inventory Position Updates - Transfer Documents Using Unavailable Inventory
-
Approving a Requested Transfer Document:
-
Transfer Reserve (+)
-
Total SOH (no change)
-
Nonsellable (-):
-
Sub-bucket (no change)
-
-
-
Confirming a Container with a Transfer Document previously created:
-
Transfer Reserve (no change)
-
Nonsellable (no change):
-
Sub-bucket (-)
-
-
-
Dispatching a Shipment:
-
Transfer Reserve (no change)
-
Total SOH (-)
-
In bound Qty (+) at Receiving Store
-
-
Confirming a Container at Receiving Store:
-
Unavailable (+):
-
Sub-bucket (+)
-
-
In bound Qty (-) at Receiving Store
-
Note:
Assumes Shipping Qty less than or equal to Approved Transfer Document Qty; No Transfer Documents created on the fly allowed.