14 Ticketing
Ticket printing on the mobile application is accessible from Inventory Management/Print Item menu. The system supports two types of ticketing that is, Item Ticket and Shelf Label. There are two modes of printing tickets, auto print and manual print.
The user is taken to the Auto Print Mode by default when the dialog is accessed. In auto print mode, the user can print tickets quickly with the pre-defined attributes by just scanning or entering the items. The user can change the ticket attributes or switch to the Manual mode using the Default Attributes option.
In manual print item mode, the user can pre-set the type, format, override price, quantity and change the attributes if required for every ticket on the fly. The user can select the country of manufacture for the ticket.
Auto Print Item
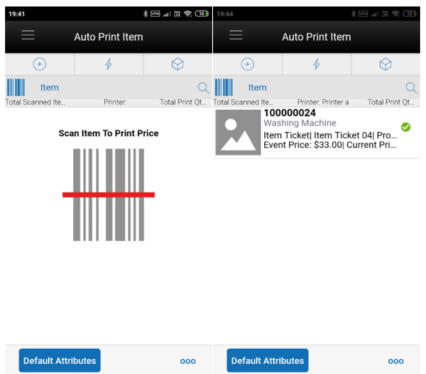
Figure 14-1 Auto Print Item

This screen is accessed from the Print Item menu under the Inventory Management in the mobile application. Auto Print Item mode is the default mode when the user enters the dialog.
This screen allows the user to scan the items and submit the tickets for printing automatically.
The system by default sets the type to Item Ticket, default format set for the type, Price type based on the Print Item Events store parameter and quantity to 1. This helps the user to start scanning the items right from the time entering the screen.
The user can select the Default Attributes option to change the attributes. The system starts using the attributes set in this screen from the time the user has changed until the dialog is closed.
Based on the event(s) configured in the Print Item Events store parameter or the values set in the default attributes, the system determines what tickets need to be submitted by looking at the item meeting the configured event as described below.
Always Print: This option will always print a ticket regardless if there is a price change.
Clearance: Only print a ticket if on the specific date any clearance event is effective. So, for Clearance say 2, that means today's date + 2 days, if the item on that day has a clearance going on, the system prints the ticket.
Promotion: Only print a ticket if on the specific date any promotion event is effective.
Regular or Clearance: Only print a ticket if on the specific date any Regular or Clearance event is getting effective.
Regular: Only print a ticket if on the specific date any Regular even of getting effective.
Any Price Event: Based on the date selected, if any price event goes into effect (clearance, promotion or regular price) a ticket is generated. If there is no price event goes into effect, the system prints nothing.
The system needs a printer to be set as default, if no printer is set as default the user is shown an error on the first scan and can select the printer using the 'Select Printer' option from the footer menu.
If there are any overlapping events, the system displays a popup with the events and allows the user to select.
On this screen, the system displays the total scanned items, what is the printer assigned and total print quantity.
The user can change the mode to Manual Print on the Default Attributes screen.
On each row, the system displays the Item Image if configured, Item Id, Description, print status, type, format assigned, price type, effective date, event price, current price, override price if any, quantity and error if any.
The system generates the ticket after a valid scan and submits to the assigned printer.
Manual Print Item
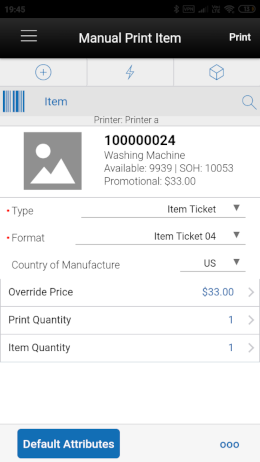
Figure 14-2 Manual Print Item

This screen appears when the user changes the mode to Manual using the Default Attributes screen.
The system displays the values based on the default setting done for the fields on this screen.
The user can scan or enter the item for which the ticket or label must be printed.
On this screen, the user can edit the type, format, country of manufacture, override price if permission allowed and enter the quantities or can use the default values and print the ticket.
The system displays the country of manufacture of the item scanned and allows to edit.
On the first scan after entering on to the manual mode, the system displays an error if the default printer is not set. The user can change the printer using the Select Printer option from the footer menu.
The user can access the Default Attributes screen anytime to change the mode and set the default attributes.
The system displays the Stock on Hand, Available, Event and price along with the item information above the editable fields.
Default Attributes
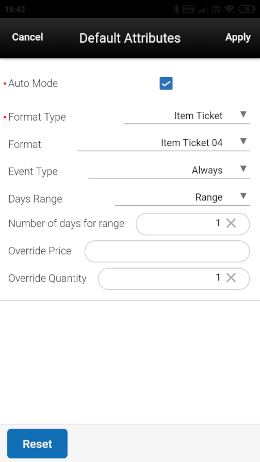
Figure 14-3 Default Attributes

This screen is used by the user to set the default attribute values for the ticket generation for the Auto and Manual mode of printing.
This screen is accessed when the user selects the Default Attributes button on the Auto Print Item or Manual Print Item screen.
For the Auto Mode, the user can set the format type, format, event type, days range, number of days for range, override price and quantity.
The Event type field consists of following options. Always, Promotion, Clearance, Permanent, Clearance or Permanent and Any Price Event. The default value shown here is set from the Print Item Events store parameter.
The Days Range option includes, Specific Date, Range, Past and Future. For all the options the range cannot be more than 3 days.
Based on the range selected, the system determines whether the scanned item falls in the selected event and if an event exists, the system generates the ticket and submits to print.
For the Manual mode, the user can set the format type, format, override price and the override quantity.
For the both the modes, the system considers the override price and quantity and sets the value when the ticket is generated.
For the manual mode the override price and quantity are populated and allowed to edit on the Manual Print Item screen.
Select Printer
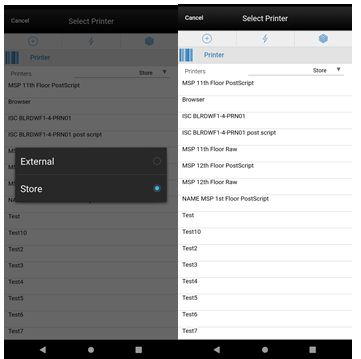
Figure 14-4 Select Printer

This screen is for the user to set the printer for the ticket printing.
On this screen, the user can filter the printers by External or Store by selecting from Printers dropdown.
The Bluetooth printers are indicated with the Bluetooth symbol and prefix 'BT' and these printers cannot be scanned.
On this screen the user can select or scan the barcode of the printer and submit the tickets for printing.
This screen is accessed from the Select Printer option on the Auto Print Item, Manual Print Item screens and Print Tickets popup that appears when printing tickets from the container items screen.
This screen lists all the printers that are available in the system for the item tickets and label type.
The selected printer is displayed on the Auto Print Item and Manual Print Item screens for the user to know to which printer the tickets/labels are submitted for printing.