15 Store Orders
This chapter is divided into the following sections:
Store Orders allows a store to request items to be ordered to the store. The items being requested may come from a supplier or a warehouse. The system allows a user to capture items and their quantities to be ordered as well as define restrictions for the store order. The inventory is sourced to the store based on the corporate replenishment setup. This can be either a delivery from a warehouse or a drop ship from the supplier. The actual sourcing, delivery timings, and final quantities remain a function of the replenishment system. Store Orders may be created manually on the mobile application. They may also come in from an external system via a web service and the user can enter quantities against the external order quantity. Features:
-
Create a new store order
-
View or edit and existing store order
-
Delete an In Progress store order
-
Copy a Completed store order
-
Print Store Order Report
Business Case
-
A retailer has milk and eggs that are setup on semi auto replenishment. Purchase Order gets generated in merchandising for the milk and eggs and it comes to SIOCS. Store manager opens the store order for the milk and eggs within the Store Orders dialog. Manager updates the quantities and approves the store order.
-
A retailer has a need to order more cornflakes due to the high demand of a current promotion. A retailer creates a store order for more boxes of cornflakes.
-
A retailer has certain items that are needed at different times of the day. Within a store order, a timeslot for the delivery can be specified, so it is possible to order doughnuts in the morning, sandwiches at lunch, and hot meals in the evening.
-
A retailer realizes that they are often out of dairy items because of very variable customer purchase habits. The store orders what is needed by scheduling a store order product group for the Dairy Department for each Monday. A system generated store order is created on Monday for the dairy items and the retailer walks through the items on the store order and enters in the needed quantity. The store order is approved and fired off to the merchandising system and three days later the items arrive at the store on a warehouse to store transfer or supplier direct delivery.
Store Orders MAF Mobile
Figure 15-1 Store Orders Mobile Screen Flow
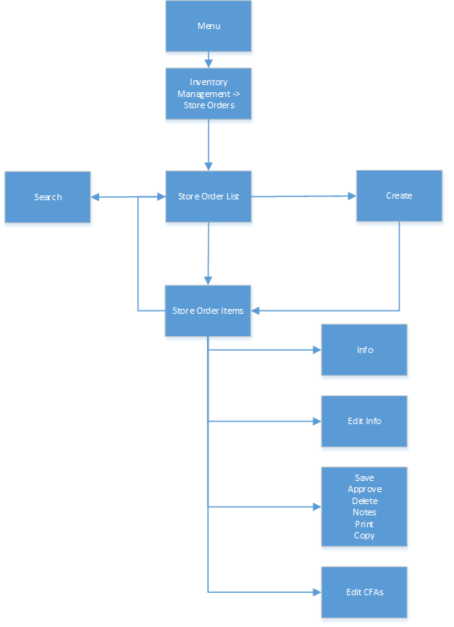
Store Orders are accessed within the Inventory Management menu by selecting Store Orders. Selecting the Store Orders menu option takes you to the Store Order List screen. On this screen, you have the option to search for existing store order records. You can create a store order, edit, or view a store order. When creating, editing, or viewing a store order, you are first directed to the list of items on the Store Order Items screen. You can add, view, and edit the details of the items on the Item Detail screen. You can specify values for CFAs (Custom Flexible Attributes) set up for store order via the Edit CFAs screen.
Store Order List
Figure 15-2 Store Order List
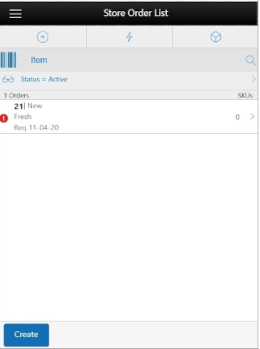
When navigating to Store Orders, the Store Order List screen displays the New and In Progress store orders as the default list and a red '!' icon will be displayed for those store orders that have a requested date before today.
The Store Order List will contain store orders for the following origins:
-
Manual: Store order was created manually in the system.
-
External: The store order was created in an external system such as a merchandising or forecasting system.
-
System: The store order was generated by the system from a scheduled store order product group
You can use the search criteria eye glasses to navigate to the Search Criteria (Store Orders) screen to enter search criteria for store orders. When scanning/entering an item in the scan bar, the system adds the item to the entered search criteria and narrows down the current list of store orders based upon the scanned/entered item.
Creating a new store order directs you to the Create Store Order popup to build a new store order. Selecting a store order from the list navigates you to the details for that existing store order.
Search Criteria (Store Orders)
Figure 15-3 Search Criteria Screen (Store Orders)
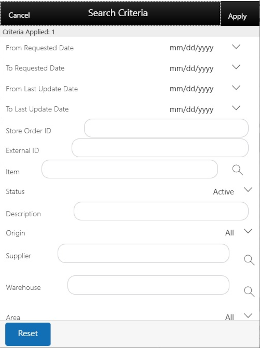
The Store Orders Search Criteria screen is accessed by the eye glasses on the Store Order List screen. After applying the search criteria, the results are listed on the Store Order List screen and the criteria applied is shown.
Search criteria include: From/To Requested Date, From/To Last Update Date, Store Order ID, External ID, Item, Status, Description, Origin, Supplier, Warehouse, Area, Context, and User.
Statuses include: ‘New’, ‘In Progress’, ‘Submitted’, ‘Approved’, ‘Canceled’ and ‘Active’. ‘Active’ status consists of ‘’New’, ‘In Progress’ and ‘Submitted’.
There is a search limit that will be used to return a set number of records, this is defaulted based upon a system admin setting.
Create Store Order
Figure 15-4 Create Store Order
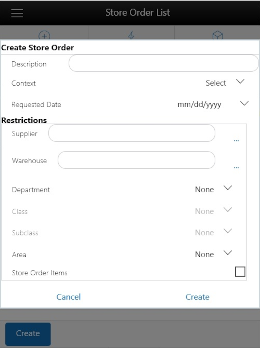
The Create Store Order screen is used when creating a new store order and it is accessed when selecting Create from the Store Order List screen. All store orders created on mobile will have an origin of 'manual'. A user must have create permissions to create a new store order.
Every newly created store order will have a system generated unique store order ID. The user may also choose to give the store order a description. The description is an optional text field to describe the store order. An optional context can be assigned to the store order, the context types are populated at setup within the Code Info dialog on the desktop. The last field in the header is the Requested Date, when the store order is wanted by. Requested Date is required and must be greater than or equal to today. The Requested Date may have additional date validations later on in the store order process (when adding items or at time of approval) depending on if the item is a 'Store Order' replenishment item.
Restrictions
The last piece of the create process is the restrictions section which is used to define what items the store order is restricted too, in other words what items are allowed to be added to the store order. Restrictions are not required, if not set up, then items will not be restricted. Restrictions can be defined by one or more of the following:
-
Supplier
-
Warehouse
-
Merchandise hierarchy
-
Area
-
Store Order replenishment items
More than one restriction can be defined for a store order.
Example: A restriction of Supplier 1212-Soda Supplier and Store Order Items of 'checked' would mean that all added to the store order must be a Store Order item for Supplier 1212-Soda Supplier.
Both Supplier and Warehouse restrictions can be configured at the store to be:
-
Enabled and optional
-
Enabled and required
-
Not displayed if not used
Supplier has one additional store configuration, DSD Delivery Supplier for Store Order, to check. If it is set to No, no additional validation is needed and the supplier can be added as a restriction. If it is set to Yes, when adding the supplier as a restriction, the DSD Allowed Indicator on the supplier must be set to Yes in order to add the supplier. If the supplier indicator is set to No then a store order cannot be created for that supplier.
An Area is setup on the desktop in the Area dialog. Areas can be used as restrictions on store orders if the store is configured to Yes for Enable Area for Store Orders.
Merchandise Hierarchy and Store Order Replenishment Items are always available to be selected for restrictions.
Note:
Restrictions will already be set for store orders that are system or externally created.
Store Order Items
Figure 15-5 Store Order Items Screen
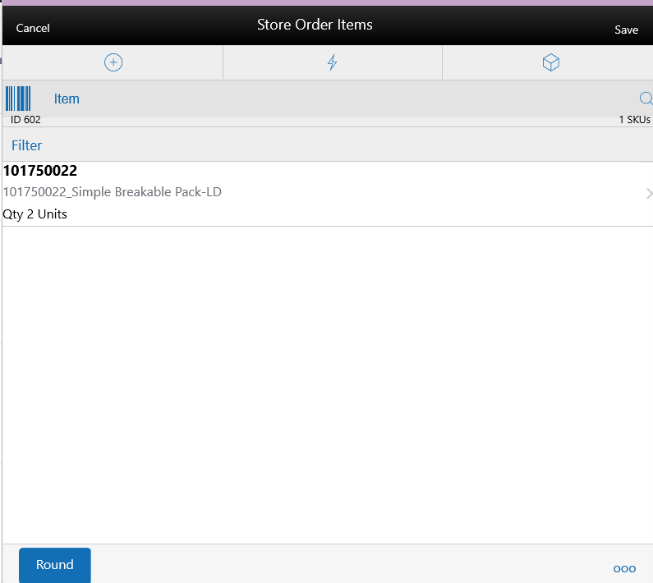
Initially, if the user is creating a new store order, this items screen will not have any items. When selecting an existing store order from the Store Order List screen, this screen will be displayed with the items for the store order. Line items appear in a list and selecting a line item navigates to the item details of that item.
Fields will include, item, item description and item image depending on the system configuration. The quantity for the item on the store order will display once a quantity has been added for the item. If the store order is from an 'External' origin there will also be an external quantity representing the suggested quantity to be ordered.
Delivery Timeslot: Will be displayed if store is configured for delivery timeslots.
-
The Delivery Timeslot at the header level will be used as a default at the item level for the 'SO' (store order) items. Changing the timeslot at the header will only apply to newly added items on the store order.
-
If not Delivery Timeslot is selected at the header, the item level will default to 'None'.
-
The Delivery Timeslots list will be populated from the Delivery Timeslot Admin screen on the desktop. The list will have those delivery timeslots that the user has data permissions for.
If an item has been changed in the current session, it is indicated by a bar on the left of the item. Scrolling in the list of items displays a filter. The filter can be used to narrow down the list of items. Filtering can occur by item ID and description.
Items can be removed by swiping. Items added by the user will be flagged for removal. Items that were on the store order from an 'External' origin will have their store order quantity set to zero.
The ellipsis in the lower right hand corner accesses the footer menu which contains all of the functions that can be performed on the store order.
Item Validations
-
Scanning or entering an item in the scan bar navigates you to the Item Detail screen for that item. The quantity may be updated depending on the scan mode.
-
Items scanned will be restricted to those restrictions defined on create.
-
Supplier: Restricts the store order to items only for that supplier.
-
Warehouse: Restricts the store order to items only for that warehouse.
-
Merchandise hierarchy: Restricts the store order to items only for that merchandise hierarchy.
-
Area: Restricts the store order to items only defined for that area.
-
Store Order replenishment items: When this restriction is checked the system restricts the store order to items that are only store order replenishment items.
-
-
Store Order Allowed: There is a store re-orderable indicator that is sent on from merchandising (ItemLocVirt). This must be Yes for the item to be put on the store order. If it is set to No, the user will get an error and the item cannot be store ordered.
-
If the item is an 'SO' (store order) replenishment item, and it has a store order reject indicator set to Yes the Request Date for the store order must be greater than or the Next Delivery Date for that item.
-
If it is not then the item cannot be added to the store order.
-
Note:
The 'SO' replenishment method, store order reject indicator and the next delivery date are defined in the merchandising system for the item and held in EICS on the item/store record.
-
-
UINS or GS1 databar data (extended attributes) are not captured in Store Orders.
Adding Items - System and External Store Orders
If the store order is a system or external store order, unexpected items (those not originally on the external store order), will only be able to be added if the store order has the Add Items indicator checked to Yes. If it is set to No the user will only be able to enter/scan items and quantities against the items that are originally on the store order.
Quantity Validations
Rounding – see Rounding menu option below
Tolerances define how much the store order quantity can deviate from the external store order quantity.
Tolerances will be validated for items on externally created store orders. Tolerances come into the system from merchandising and are defined on the item/location. They can be set as a percentage or UOM, one will be sent, not both. Tolerances will be validated if they exist. A tolerance of 0, means that the store order quantity must match the external order quantity exactly, the quantity field will be defaulted to the external order quantity and disabled.Tolerance UOM: The system will take the external order quantity and add the Tolerance UOM to it to get the upper range, and subtract the Tolerance UOM to get the lower range. Only for SUOM, not applicable to cases.
Example:
External Order qty = 100 units. Tolerance UOM = 10. Entered User Quantity must be 90-110
For Tolerance %: The system will take the % value x the External Order Quantity to get the tolerance quantity. That tolerance quantity will be added to the external order quantity for the upper range and subtracted from the external order qty to get the lower range.
Example:
External Order qty = 100 units. Tolerance % = 7. Tolerance Qty = 7% x 100 = 7 units Entered User Quantity must be 93-107 units
Footer Menu
The footer menu is accessed from the ellipsis footer menu on the Store Order Items screen. The menu functions include the following:
Info: Accesses the Info popup.
Notes: Accesses the notes dialog to capture notes.
Refresh Cost: If the user has permission for cost to display in the store order, this button will go out and grab the latest costs for the items to be used in the Total Estimated Cost on the Store Order Info screen.
Default Qty: The Default Qty will update the store order quantities for all line items on the store order that do not have a quantity.
-
For manually created store orders the quantity will be set to the last requested quantity from the most recent approved store order.
-
For externally created store orders the quantity will be set to the external quantity.
Edit Store Order: takes the user to the Edit Store Order screen to edit header level store order information.
Edit CFAs: Lets the user enter values for the CFAs that are set up for store orders.
Approve: Approves and completes the store order. The store order is set to ‘Completed’ status..
-
User must have Approve Store Order permission.
-
If the user has Submit Store Orders permission, the Approve option will be available when the store order is in ‘submitted’ status. If the user does not have this permission then Approve will be available in In Progress status.
-
If the store order has the Case Pack Round indicator set then the store order will require rounding. See Round option below.
-
Tolerances on the store order quantity will be validated.
-
The store order is published out.
Save: Saves the store order 'In Progress' status to be completed later.
-
Saving a store order does not publish anything out; it simply saves it. The Save button can be used to implement a Save and Approval process.
Round: will round the item quantities on the store order up to the next multiple of the supplier case size. Example: Pack Size is 12. User enters in a quantity of 20. Round will round up to 24 .
-
Available for store orders that are editable.
-
System, External and manually created store orders
-
Externally created store orders from RMFCS that are for a supplier (Purchase Order) will have the Case Pack Round indicator set to ‘Yes’, thus requiring the user to round the store order.
Cancel Submit: It will set the store order back to ‘In Progress’ status.
-
Will be available for store orders in ‘Submitted’ status.
-
User must have Cancel Submit Store Orders permission to have this option.
Submit: will set the store order to ‘Submitted’ status which is still an editable state. Submit will perform all functionality of the approve option with the exception of integration will not take place.
-
Available for ‘New’ and ‘In Progress’ store orders.
-
User must have Submit Store Orders permission for the option to be available.
Delete: Marks the store order to 'Canceled' status.
Cancel: Exits the store order; changes made in that session are not saved.
Print: Displays the common print dialog to print the store order report.
Copy: The copy function is only available for those store orders in a completed state which is 'Approved' or 'Canceled' status. It takes the current store order, copies the items and quantities (not external quantities), and creates a new editable store order with a new ID. It references the copied store order's ID.
Item Detail
Figure 15-6 Item Detail Screen
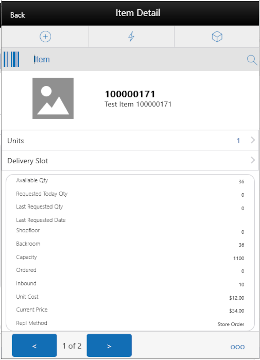
The Item Detail screen is used for selecting or scanning an item from the Store Order List screen. Scanning or entering an item on this screen in the scan bar, updates the quantity per the scan mode and refreshes the Item Detail screen for the item and quantity scanned. The item rules and validations will be the same as that on the Store Order Items screen.
The item information including the image (which is system configured) displays in the header. The bottom portion of the screen contains various read only fields about the item to assist in creating the store order.
The quantity can be edited and updated manually if permissions allow. For system generated store orders the quantity for all items will be initially blank until the user enters or scans in a quantity for the items.
Additional fields include:
Delivery Timeslot: Will be displayed if store is configured for delivery timeslots.
-
If a Delivery Timeslot was selected at the header level of the store order, it will be used as a default at the item level. User will be able to change the timeslot. Changing the timeslot at the header will only apply to newly added items on the store order.
-
The Delivery Timeslots list will be populated from the Delivery Timeslot Admin screen on the desktop.
-
The list will have those delivery timeslots that the user has data permissions for.
-
Delivery Timeslot is only available for those items that are 'SO' (store order) items.
-
Delivery Timeslot is not required.
-
When the store order is approved and published out, the Delivery Timeslot will only be sent on the message if the publish indicator is Yes.
External Order Qty: If the order was from an external origin. This is the quantity that is suggested to order by the external system.
Available: Available stock on hand for the item at the user's store.
Requested Today Qty: Sum of all requested quantities on all 'Approved' store orders for today's date for the item at the user's store.
Last Requested Qty: The store order quantity for the last/most recent 'Approved' store order for the item at the user's store.
Last Requested Date: The approved date for the store order that has the last requested quantity.
Next Delivery Date: The next delivery date for the item at the user's store.
-
This field is populated on the item location record from the merchandising system and only for 'SO' (store order) replenishment type items.
Shopfloor: Shopfloor inventory for the item at the user's store. Only displayed if store is configured to display shopfloor/backroom.
Backroom: Backroom inventory for the item at the user's store. Only displayed if store is configured to display shopfloor/backroom.
Capacity: The total summed up capacity for the item. Only displayed if store is configured to display sequence fields.
Note:
Capacity is setup / defined via a third party upload.
Ordered: The total remaining ordered quantity for the item at the store. This is for transfers, allocations and purchase orders.
Inbound: The total quantity approved to be sent to the user's store. This is for store to store transfers, warehouse and finisher deliveries and RTV shipments.
Unit Cost: The unit cost for the item. Only displayed if user has proper permission.
Note:
Unit cost will not be displayed if the currency of the store is different than that of the supplier (in the case that a supplier restriction is set up).
Price: Current price for the item.
Replenishment Method: The replenishment method for the item at the user's store, such as Store Order, Min Max, and so on.
Last Scan: Displays the details that are from the barcode.
-
GS1 - will display the barcode, GTIN, and the contents of the barcode such as price, UIN, and so on.
-
Type 2 - will display the barcode and the price.
-
All other barcodes - will display the barcode.
The footer menu, ellipsis button, contains a reset function as well as remove and restore functions. The Sales Data screen can also be accessed from this menu.
You can page through existing items on the store order using the arrows on the bottom.
Figure 15-7 Sales Data Screen
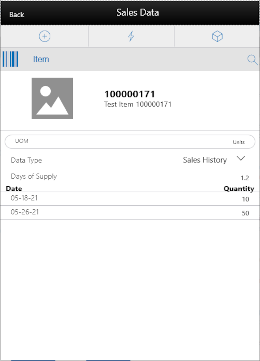
The Sales Data screen is used to display sales data for an item and store. It is accessed by selecting Sales Data from within the footer menu of the (Store Order) Item Detail screen. The screen allows a user to view two types of sales data: Sales History and Sales Forecast. A user must have permission to view Sales History as well as to view Sales Forecast. It the user does not have either permission, this screen will not be available.
Sales History: Will display the past 30 days (or less if 30 does not exist) of Sales History for the item at the user's store. Sales History is pulled from sales within the system that are found in Transaction History. This will display in a list with item and quantity.
Sales Forecast: Will display the next 30 days (or less if 30 does not exist) of future sales for the item at the user's store. Sales Forecast is retrieved via a web service from an external system such as merchandising. This will display in a list with item and quantity.
Lastly, the system will display the calculated Days of Supply.
Edit Store Order
Figure 15-8 Edit Store Order Screen
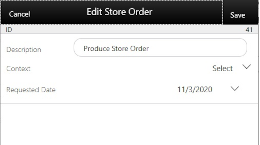
The Edit Store Order screen is used to edit header level information about the store order. Edit Store Order is accessed by selecting Edit Store Order from within the footer menu of Store Order Items, and a user must have proper permissions. The fields are the same as those on the Create Store Order screen and include: description, context, and request date.
Request Date: If there are no 'SO' (store order) items on the store order, the request date needs to be greater than or equal to today. If there are 'SO' (store order) items that have a Store Order Reject indictor of Yes, the request date needs to be greater than the latest Next Delivery Date of the 'SO' items on the store order. This gets validated also upon approval of the store order.
Edit CFAs
Figure 15-9 Edit CFAs Screen
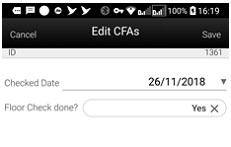
The Edit CFAs screen displays the list of CFAs (flexible attributes) that have been set up for Store Orders on the desktop, and lets you enter values for them. The CFAs that are set up as Required must have a value entered for it before approving the store order. The value can be one of the following: Date, Text, Decimal, Long depending on the 'data type' set up for the CFAs, while creating them on the desktop. Appropriate security permission is needed for entering CFA values.
Info Screen
Figure 15-10 Info Screen
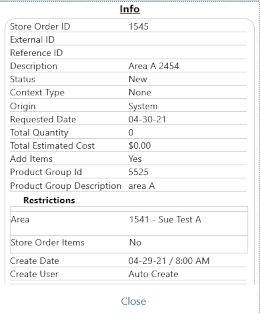
The Info screen is an informational popup that contains read-only information about the header level of the store order. Fields include:
ID: System generated ID for the store order.
External ID: The ID from the external system for externally created store orders.
Reference ID: ID associated to the store order that was copied.
Description: Description of the store order. For system generated store orders, this will be the description defined on the Product Group.
Status: Status of the store order: New, In Progress, Approved, and Canceled.
Context: The context type associated to the store order.
Origin: Where the store order originated: manual, system, or external.
Requested Date: The requested date for the store order.
Total Quantity: Total quantity of all items on the store order.
Total Estimated Cost: Total cost of all items on the store order. This field is only displayed if user has proper permission.
Add Items: Has a value of Yes or No and defines if items can be added to the store order. For manually created store orders this is defaulted to Yes. For store orders that are from an external system, or system generated, this may be set to Yes or No. Yes would mean that items can be added to the external store order, whereas No would be that items cannot be added and only the items originally on the store order can be ordered.
Product Group ID: For system generated store orders this will display the Product Group ID that the store order was generated from.
Product Group Description: For system generated store orders this will display the Product Group Description that the store order was generated from.
CFAs: Each CFA attribute and value for the store order.
Restrictions: The restrictions that were defined for the store order.
-
Supplier, warehouse, merchandise hierarchy, area, and store order items.
Create Date
Create User
Last Update Date
Last Update User
Approved Date
Approved User
Auto Approved Date: If the store order was auto approved this field will be displayed.
System Generated
System Generated store orders are created on the desktop of the EICS application. See the Product Group & Product Group Schedule section of Oracle Retail Enterprise Inventory Cloud Service User Guide - Operations chapter. Those schedules created for today will generate the store order at the time of completing the schedule for stores on the schedule. Other store orders will be generated based upon their schedule in the nightly batch. System generated store orders will have an origin of 'system' and will be created in a status of 'New' with the items that were defined per the product group component without quantities. The request delivery date will be set per the Days before Delivery.
On the mobile the store order will allow the user to modify and save or approve it. Items can be added within the defined restrictions defined on the product group if the 'Add Items' indicator was selected on the product group.
Quick Orders JET Mobile
Figure 15-11 Quick Order Flow
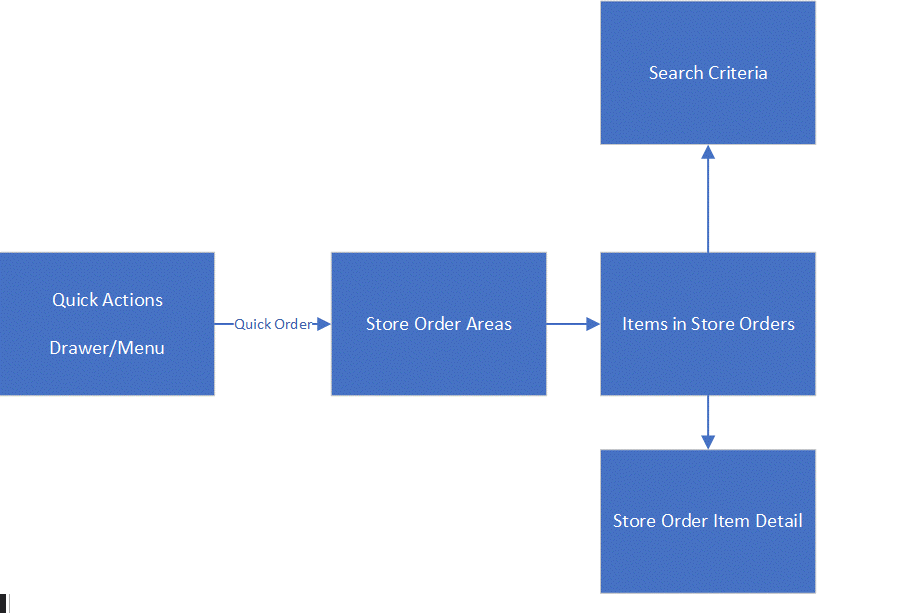
The Quick Order flow is available from the Drawer or Quick Actions menu on Jet Mobile. It will allow a user to find items in their store that are on open store orders. The items are identified by first selecting an area. The system will give a list of items that are on open external store orders for the selected Area. The user can then enter in store order quantities for the items. In this multi purpose dialog the user can also adjust the shop floor or backroom quantities
Store Order Areas
Figure 15-12 Store Order Areas
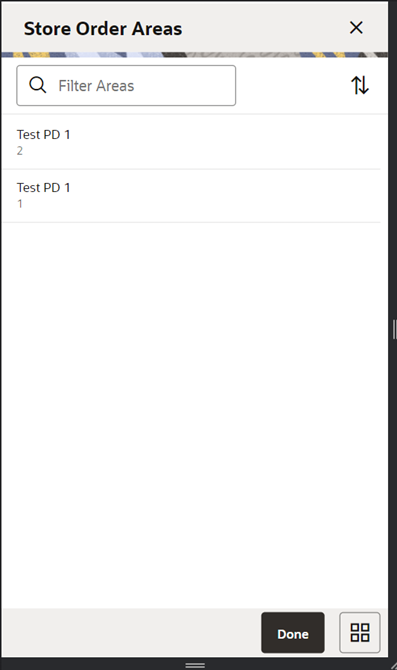
Store Order Areas is accessed by selecting Quick Order from the drawer or Quick Actions. This screen lists all Areas in the store that have ‘open’ store orders that are from external system. There is a filter to filter down the list of Areas.
Items in Store Orders
Figure 15-13 Items in Store Orders Screen
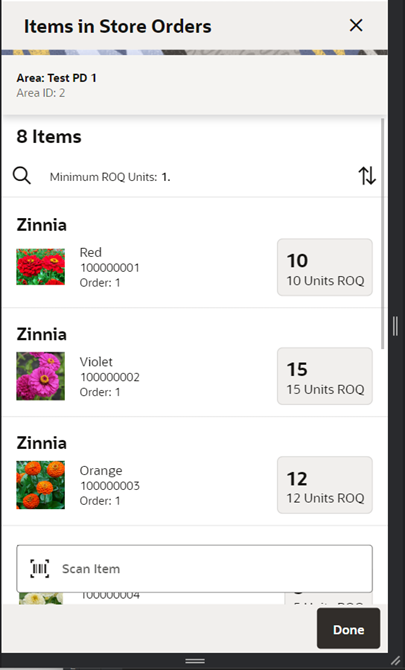
Once an Area is selected the user will navigate to the Items In Store Orders screen which will list all items that are on ‘open’ status external store orders that are for the Area selected. The area selected displays at the header. This screen displays items across multiple store orders.
Items will include ID, description, image (user preference), order ID, and the recommended order quantity. Items will be sorted by item description and the user can choose to update the sort. Selecting an item will navigate to the Item Detail for that item. Selecting the search option will navigate to the Search Criteria (for Quick Order).
The user can scan or enter in the scan bar and if the user preference for Scan Navigate is set to ‘Yes’ the user will go the Item Detail screen and the quantity will not be incremented. If the Scan Navigate is set to ‘No’ the user will stay on the Items in Store Orders and the quantity will be incremented per the scan.
Quantity Validation
Tolerances come into the system from merchandising and are defined on the item/location. They can be set as a percentage or UOM, one will be sent, not both. Tolerances will be validated if they exist. A tolerance of 0, means that the store order quantity must match the external order quantity exactly, the quantity field will be defaulted to the external order quantity and disabled. Tolerance UOM: The system will take the external order quantity and add the Tolerance UOM to it to get the upper range, and subtract the Tolerance UOM to get the lower range. Only for SUOM, not applicable to cases.
Example: External Order qty = 100 units. Tolerance UOM = 10. Entered User Quantity must be 90-110
For Tolerance %: The system will take the % value x the External Order Quantity to get the tolerance quantity. That tolerance quantity will be added to the external order quantity for the upper range and subtracted from the external order qty to get the lower range.
Example: External Order qty = 100 units. Tolerance % = 7. Tolerance Qty = 7% x 100 = 7 units Entered User Quantity must be 93-107 units.
Done – will save the Store Order as ‘In Progress’ and exit back to the Store Order Areas.
Search Criteria
Figure 15-14 Search Criteria Screen
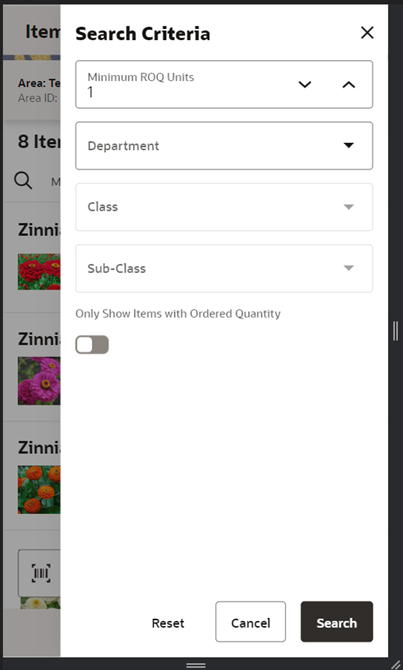
The Search Criteria Screen is accessed by selecting the search icon from Items on Store Orders. The Items on Store Orders list will be updated per this search criteria. Search fields include:
-
Minimum ROQ – default to the store configuration, ‘Default Minimum Store Order Search Quantity’. The UOM is displayed based upon store config, Store Orders Default UOM.
-
Department
-
Class
-
Sub-class
-
Only Show Items with Ordered Quantity – if this is selected only items have order quantities entered by the user will be shown. If not selected, any items.
Item Detail
Figure 15-15 Store Item Detail Screen
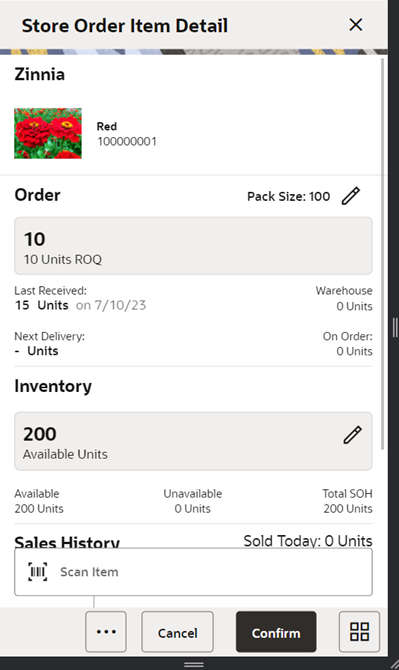
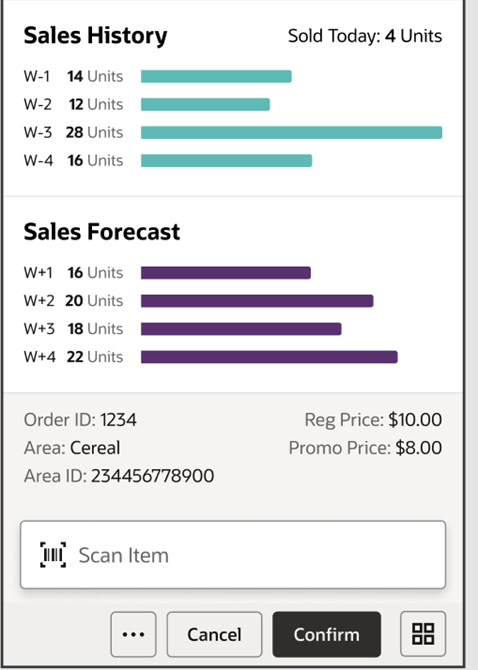
The Item Detail screen is accessed by selecting an item from Items on Store Orders or by scanning/entering an item into the scan bar on that screen. The header contains the item ID, description and image (per user preference). The order quantity can be updated. See quantity validation on Items on Store Orders.
Inventory allows for a direct update to the Shop Floor and Backroom inventory buckets if the ‘Display Shop floor / Backroom quantity’ store parameter is set to ‘Yes’. If it is set to ‘No’, then Available Inventory bucket can be adjusted.
Sales History will display if the user has ‘Display Sales History’ permission. This data is populated from Transaction History. Sales Forecast will display if the user has ‘Display Sales Forecast’ permission. The store must also be configured to call the Sales Forecast web-service. For both of these, they will be displayed in graphs with the system trying to display up to four weeks of data, if the data exists. Only full weeks will be displayed.
Additional informational fields on this screen include:
-
Last Received - how many were last received on allocation, DSD, transfer.
-
Next Delivery - the quantity on the next delivery. It is the in transit (In bound qty) for the ASN (Transfer,DSD, allocation).
-
Warehouse – sum of inventory for the item at all warehouse.
-
On Order - This field will display the total quantity remaining on the order. (same as Item Lookup)Transfers + Allocations + Purchase Orders.
-
Available
-
Unavailable
-
Total SOH
-
Order ID
-
Area Description
-
Area ID
-
Regular Price
-
Promotional Price
Footer Menu
Confirm: Store Order is updated to ‘In Progress’ status. It will get approved via the nightly batch.
-
If adjustments were made to the inventory buckets, inventory adjustment will be written with reason codes of Quick Adjustment In and Quick Adjustment Out. The adjustments are published. Transaction history is written.
Print Ticket: Allows the user to print a ticket if the user has Print Ticket security permission.
Add to Item Basket: Adds the item being looked up to an investigate type item basket. If one or more 'in progress' status 'Investigate' type item baskets exist for the user's store, the system will add the item to the newest one. If one does not exist, the system will create one. The item basket will be 'static' and available in the Item Basket dialog of both the desktop and mobile.
Remove from Item Basket: removes from the investigate item basket.
Configure Screen Layout: brings up a popup where the user can configure the Item Detail screen. See section below.
Configure Screen Layout
Figure 15-16 Configure Screen Layout Screen
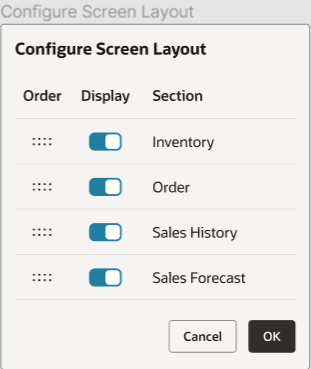
The Configure Layout screen is used to configure the data and layout on Item Detail. It will show a list of the sections to display in the screen, Inventory, Order, Sales History (Display Sales History permission), and Sales Forecast (Display Sales Forecast permission). The order of the sections can be modified by dragging the sections up and down. The switch on each section controls whether or not that section will be displayed.
-
The settings made in this screen are applicable for the user until it changes again. Whenever the user comes to this screen, these settings will be applied automatically.
-
When the user alters the settings, the changes will be effective immediately and for the future.
Integration
Manual and System Created
Those store orders that were created manually on the mobile or via a schedule in the system, will be sent out via RICS once approved. Any items with a zero quantity will not be sent. Non inventory items will be sent based upon a publish non inventory items configuration. If there are no items with quantities on the store order to send, the store order will not be sent. CFAs are also published based upon a publish attribute defined on the setup of the CFA. Delivery Timeslots will be published based upon the delivery timeslot publish attribute. Items will be sent and grouped together as being 'SO' store order items or NON store order items.
Externally Created
RMFCS
Those store orders that were generated externally from RMFCS will be published back out to RMFCS via ICL.
Third Party
Store orders can come from an external system into SIOCS via a web service. These store orders will have an external order quantity to be used as a suggested order quantity. The user will enter/scan a store order quantity for the actual order quantity. The order will also indicate if additional items can be added to the store order by the user.
Those store orders that originated from an external system will be sent out via web service. All items will be sent out those that were originally on the store order from external system as well as those added in addition by the user. Items with a zero quantity will also be sent back to the external system to indicate no quantities are required. The rules for non inventory and CFAs are the same as that above for manually created store orders.
RMFCS Processing for SIOCS Created Orders (Manual And System)
A user is able to use store order functionality to request items regardless of the replenishment type normally used by the merchandising system to replenish the item. All items are sourced from either a warehouse or through a supplier depending on the sourcing parameters for the item specified in the replenishment system. Items specified as using Store Order replenishment (or items that are not set up for auto-replenishment at all) are sourced through the creation of one-off purchase orders or warehouse transfer requests only after the store has requested inventory using the Store Order functionality. There is no correlation between the purchase order/transfer and the item request. Any quantities requested for items that have a replenishment type other than Store Order are added above and beyond the quantity that is normally sourced through the replenishment system on the item's next replenishment review date. However, if the requested delivery date falls prior to the item's next replenishment review date, the request is sourced through the creation of a one-off purchase order or warehouse delivery instead. All inventory requested is sourced to the store at the earliest possible date given the replenishment review date, the supplier or warehouse lead time, and any other factors that may influence the time it takes a delivery to reach the store.
Externally Created Store Orders
Web Services
There are web services for creating, updating and deleting of store orders. Create allows for externally created store orders to come into SIOCS and simulates the SOCS store order create functionality. In addition it also has an external order number, external order quantity, and add items indicator. The add items indicator is used to determine if additional items can be added the store order when editing it within SOCS.
ICL Integration
Store Orders can be integrated into SICOS via ICL from RMFCS.
Integration will occur for:
-
Purchase orders (POs) that are in ‘submitted’ or ‘worksheet’ status.
-
Transfers that are in ‘input’ or ‘submitted’ status.
-
Only semi-automated replenishment orders – these are flagged for review and if the ‘Store User Access’ is ‘Review’ or ‘Approved’ then they will integrate to SIOCS.
-
POs are for a single location.