1 Feature Summary
Oracle Retail Store Inventory Operations Cloud Services includes the following applications:
-
Oracle Retail Enterprise Inventory Cloud Service (EICS)
-
Oracle Retail Store Operations Cloud Service (SOCS)
This chapter describes the feature enhancements in this release.
Noteworthy Enhancements
This guide outlines the information you need to know about new or improved functionality in the Oracle Retail Store Inventory Operations Cloud Services update and describes any tasks you might need to perform for the update. Each section includes a brief description of the feature, the steps you need to take to enable or begin using the feature, any tips or considerations that you should keep in mind, and the resources available to help you.
Column Definitions
-
Feature: Provides a description of the feature being delivered.
-
Module Impacted: Identifies the module impacted associated with the feature, if any.
-
Scale: Identifies the size of the feature. Options are:
-
Small: These UI or process-based features are typically comprised of minor field, validation, or program changes. Therefore, the potential impact to users is minimal.
-
Medium: These UI or process-based features are typically comprised of field, validation, or program changes. Therefore, the potential impact to users is moderate.
-
Large: These UI or process-based features have more complex designs. Therefore, the potential impact to users is higher.
-
-
Delivered: Identifies whether the feature is Enabled or Disabled upon initial delivery.
- Customer Action Required: You must take action before these features can be used. These features are delivered disabled and you choose if and when to enable them.
Table 1-1 Noteworthy Enhancements
| Feature | Module Impacted | Scale | Delivered | Customer Action Required? |
|---|---|---|---|---|
|
SOCS |
Large |
No |
Yes Download app, configure, and deploy by third‑party MDM. In the case of using the Web Browser version, use the correct link. No need for additional permissions; they are common between MAF and Jet Mobile. |
|
|
SOCS |
Small |
Yes |
Set the indicator appropriate for your business use. | |
|
EICS |
Medium |
No |
Requires user execution. | |
|
EICS |
Medium |
No |
Job configuration may be required. | |
|
EICS |
Medium |
Yes |
Requires ad hoc execution. | |
|
EICS |
Medium |
Yes |
No |
|
|
EICS |
Small |
Yes |
Yes See section for more information. |
|
| RDS Integration Changes | Retail Data Store (RDS) | Small | Yes | No |
| GoldenGate DAS Integration Changes | Data Access Schema (DAS) | Small | Yes | No |
New Feature Descriptions
This section describes the new features.
Jet Mobile
Several new functions and features will be added to the Jet Mobile release. The first release of Jet Mobile UI in the July 2023 release 23.2.301.0 was focused on providing new functions and features that were not available in SIOCS:
- Quick container receiving for transfers and Direct Store Delivery (DSD)
- Quick orders external order quantity review
- Simplified customer order fulfilment
- Item maintenance (inventory adjustment, ticket print, and store order)
- Quick count (snapshot less counting)
In this iteration of the new UI, several additional features are added:
- Inventory adjustments. This dialog will work similar to the MAF dialog, with disposition selection by item, non-sellable inventory support, transaction save, approval permission, and multiple items.
- The Stock Count dialog will similarly support ad hoc, unit count, problem line, and unit and amount. However, the workflow here has been modified to align better with larger stock counts. Instead of displaying a full list of items, the user will have the ability to start scanning the count, and optionally go to look at statistics on the count and see the list of items. The dialog has some different features as well in comparison to the MAF workflow:
- It is possible to scan a child count.
- At the child list screen, the user will have the ability to complete all child counts. This process would be similar to a user entering each child and completing it manually.
- Completed stock counts will be able to be viewed from the mobile client.
- A new supplier lookup dialog has been added:
- Through item lookup, the user is now able to see the additional suppliers.
- It is possible to look up suppliers in their own dialog through a variety of search criteria.
- Several common workflow areas have been added or have been slightly modified:
- UIN support was added.
- Extended attributes is a new addition.
- Universal Item Lookup allows users to look up items, not just scan or enter the item ID.
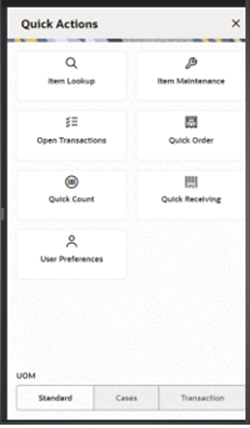
- Quick Actions allows the user to order the buttons by holding and dragging them. This allows more common buttons to be moved in easier accessible locations.
- The menu drawer has been changed to accommodate for additional workflows. It also allows for tasks and favorites similar to the desktop Jet UI.
- The open transaction screen now lists open inventory adjustment and open stock counts.
- Technically, this version has also had some additions and changes.
-
The Jet Mobile application released in 23.2.301.0 was only available as a native APK Android application. This version will have the ability to be launched as a web application. This means it supports iOS, Windows, and Android tablets.
Note: The web application does not support scanning. For an optimal user experience and efficiency, we recommend using a Zebra or Honeywell Android device with a built-in scanner.
-
For more information on browser support, check the following link for Jet Mobile information.
https://www.oracle.com/webfolder/technetwork/jet/index.html?ojr=faq
-
Inventory Adjustments
Inventory Adjustments allow a user to change the number of units in stock or mark them as non-sellable due to damage and other reasons.
The following features are available:
- Search for inventory adjustments.
- Create a new inventory adjustment.
- Copy an existing inventory adjustment.
- View or edit an existing inventory adjustment.
- Delete In Progress adjustments.
- Print inventory adjustments.
- Enter values for Custom Flexible Attributes (CFAs).
The following topics are described in this section:
- Inventory Adjustments
- Search Criteria (Inventory Adjustment)
- Inventory Adjustment Items
- Item Detail
- Information
Inventory Adjustment Mobile Screen Flow

Inventory Adjustments are accessed through the Inventory Adjustment menu within the drawer or from Quick Actions. Selecting the menu option takes the user to the Inventory Adjustments screen. On this screen, the user can search for adjustment records that will be returned in this list. The user can create an inventory adjustment by selecting the Create New option or an existing adjustment from the list. This will take the user to the Inventory Adjustment Items screen where the user can edit, copy, or view items on the adjustment. The user can add, view, and edit the details of the items on the Item Detail screen. Custom Flexible Attributes (CFAs) can be set up for inventory adjustments made using the Information screen where additional details about the adjustment can also be viewed.
Inventory Adjustments Screen
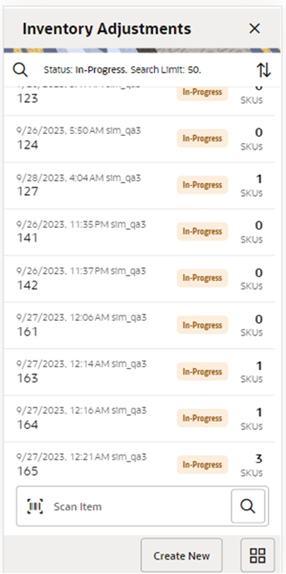
When navigating to Inventory Adjustments, the Inventory Adjustments screen displays by default the In Progress adjustments as the default list. The list can be sorted by select the sort icon.
A search can be done by selecting the search option (magnifying glass) to navigate to the Search Criteria (Inventory Adjustment) screen to enter search criteria for the inventory adjustments. The user will return to this list with the results updated.
When scanning/ entering an item in the scan bar, the system adds the item to the entered search criteria and narrows down the current list of adjustments.
Creating a new adjustment directs the user to the Inventory Adjustment Items screen with no details (items) to build a new inventory adjustment. Selecting an adjustment from the list navigates the user to the details for that adjustment.
Search Criteria Screen (Inventory Adjustments)
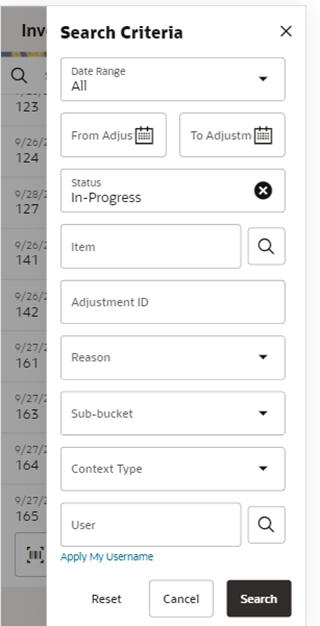
The Inventory Adjustment Search Criteria screen is accessed by the magnifying glass on the Inventory Adjustments screen. After applying the search criteria, the results are listed on the Inventory Adjustments (list) screen and the criteria applied is shown. Criteria will be retained until the user leaves the Inventory Adjustment dialog.
Criteria includes:
- Date Range - based on the create date of the adjustment.
- From / To Adjustment Date.
- Status.
- Adjustment ID.
- Item.
- Reason.
- Sub-bucket (if store is configured).
- Context.
- User - with a search and an Apply My User ID.
- Search Limit - defaulted per the system configuration and can be updated.
Inventory Adjustment Items Screen
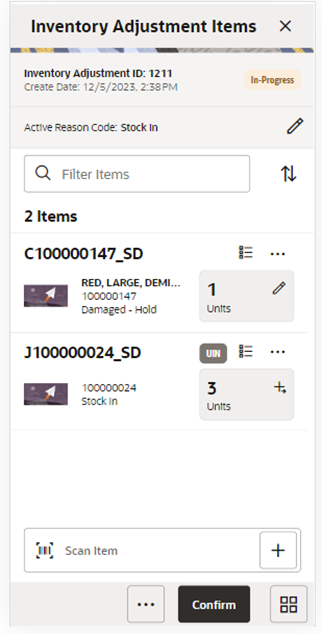
The Inventory Adjustment Items screen is where a new adjustment is created. Initially, when creating a new adjustment, this screen will not have any items. This screen is also displayed when selecting an existing adjustment from Inventory Adjustments. When viewing or editing an existing adjustment, the items are listed for the adjustment. The user must have edit permissions as well as data permissions for all reason codes in order to edit an adjustment. There is a Filter bar to filter on items by: Item ID, Item Description, Reason Code, and UOM. The user can also sort the list of items by Item ID or Item Description. The header will contain the ID, create date, and status of the adjustment.
A reason code must be selected before being able to add or edit an item on the adjustment. The Active Reason Code that is selected at the header level is applied to all newly added items until it is changed to a different reason. Once changed, the new reason is added to the items added from that point, it will not impact already added items. If an item is added/scanned and a reason code has not yet been selected, the user will be directed to select a reason code first. Reason Codes can be edited for a specific item on the Item Detail screen.
Items will appear in the list. The item image for the items is displayed per the user preference. Item description, ID, and Reason Code will also be displayed. The quantity to be adjusted will be editable if the user has Edit Quantity permission. The UOM for the quantity will be shown per UOM selected in user preferences and the quantity will be converted per the UOM. The Pack Size will be displayed if the UOM is in cases.
Quantity Validations: The system validates the inventory bucket based upon the disposition associated to the reason code. A reduction adjustment in inventory may exceed available inventory, bringing total available as a negative value. However, an unavailable inventory adjustment can never make the non-sellable unavailable bucket go negative. The same is true for sub-buckets. When sub-buckets are used, the reduction of a sub-bucket must be less than or equal to total quantity of such a sub-bucket. Increases for available or non-sellable unavailable have no restriction.
Selecting a line item navigates to the item details of that item. Scanning or entering an item in the scan bar will navigate the user per the User Preference, Scan Navigate. The user will either go to the Item Detail for the item or stay on the Inventory Adjustment Items screen. The quantity may be updated depending on the scan mode. Items can only appear once on an adjustment transaction.
If the store is configured for UINs: If the item is a UIN item, there will be a UIN icon denoted. When scanning an item that is a UIN item, the user will directly navigate to the UIN screen to capture UINs. Selecting the quantity for a UIN item will also navigate to the UIN screen to capture UINs.
Each item will have an ellipsis line item menu. The user can choose to delete an item, which will remove the item from the transaction. Also, the user can view/capture Extended Attributes for the item. Once extended attributes are captured, there will be an icon for the attributes on the item.
Footer Menu
- Confirm: Confirms and completes the adjustment. All stock on hand updates are made and the adjustment is published out. The user must have permission to confirm, as well as data permissions for all reason codes.
The footer menu is accessed from the ellipsis footer menu on the Inventory Adjustment Items screen. The menu functions include the following:
- Notes: Accesses the notes dialog to capture notes. There will be an icon for the attributes on the item.
- Print: Displays the common print dialog to print the inventory adjustment report.
- Information: Accesses the Information screen to view transaction level information, as well as enter values for the CFAs that are set up for inventory adjustments.
- Back: Only for view only adjustments. Will exit the user back to where they came from.
- Cancel: Exits the adjustment; changes made in that session are not saved.
- Delete: Marks the inventory adjustment to Canceled status. The user must have permission to Delete, as well as data permissions for all reason codes.
- Copy: The copy function is only available for those adjustments in a Completed status. It takes the current adjustment, copies the items, reasons, and quantities, and creates a new editable adjustment with a new ID. It references the copied adjustment's ID.
- Save and Exit: Saves the adjustment in the In Progress status to be completed later.
Saving an adjustment does not publish the adjustment nor does it reserve any inventory; it simply saves it. The Save button can be used to implement a Save and Approval process. After saving, the user will be taken to the Inventory Adjustments screen.
Reason Code Screen
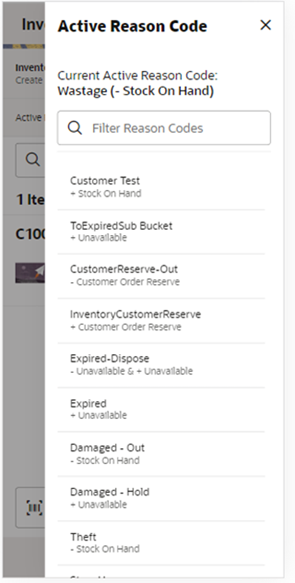
The Reason Code screen is navigated to when selecting the Active/Header level reason code on the adjustment as well as on the line item of the adjustment.
The Reason Code screen is used for selecting a Reason Code on the Inventory Adjustment. The current active reason code is displayed at the top, if there is one. Those reason codes defined on the desktop with a Use in UI flag of yes will be displayed here. The user will only see those reason codes in the list that the user has data permissions for. The reason codes will be listed along with the associated disposition. The list can be filtered down.
Item Detail Screen
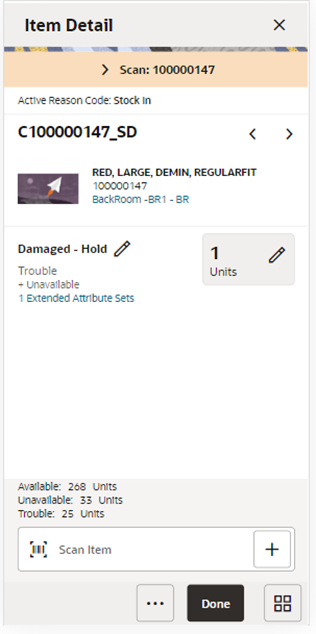
The Item Detail screen is navigated to by selecting an item from the Inventory Adjustment Items or by entering/scanning an item based upon the Scan Navigate user preferences. Scanning or entering an item on this screen, updates the quantity per the scan mode and refreshes the Item Detail screen for the item and quantity scanned.
The header includes the active reason code. This is the reason code that is applied to newly added items as a default reason code. The details of the last scan are displayed as well as paging to allow to page through the items on the adjustment. Item information includes the image (per user preference), ID, description, and the primary location. Selecting the primary location will display the Item Locations for the item.
The line level reason is defaulted per the Active/Header level reason code. It can be updated for this specific item at the line level, if needed. The corresponding disposition will be displayed as well as the sub-bucket if there is one and if the store is configured for sub-buckets.
The quantity can be edited and updated manually if permissions allow. If the UOM is in cases, the pack size will be displayed and allow for editing per the system admin setting. If the item is a UIN item, selecting the quantity will navigate to the UIN screen to capture UINs. The quantity validations are the same as on Inventory Adjustment Items.
The Extended Attributes link navigates to the Extended Attributes screen. The user can view/capture Extended Attributes for the item. If the item is not configured to capture extended attributes or there are no extended attributes captured, the list will be empty.
The bottom portion of the screen contains read-only information regarding inventory. Available Inventory is always displayed. Unavailable will display if the disposition is to/from unavailable. Customer Order Reserved will show if the disposition is to or from the customer order reserved bucket. Lastly, the sub-bucket will show if the store is configured for sub-buckets and disposition is to/from an unavailable sub-bucket.
Lastly, in the footer menu, the user has the option to delete an item. Delete will remove the item from the adjustment.
UIN Screen
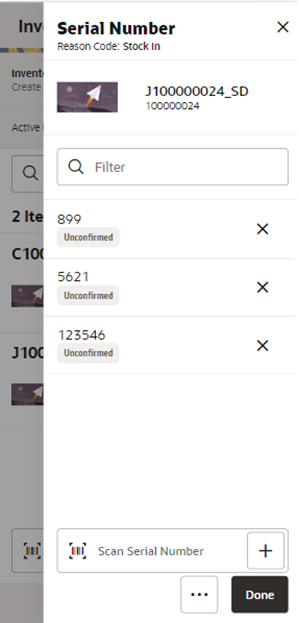
The UIN screen allows a user to add/remove UINs for UIN items (if store is configured to use UINs and if the item is a UIN item). If the user scans a UIN item, the user will directly navigate to the UIN screen for that item.
- All non-Auto Generated Serial Numbers non-AGSN) UINs require UINs to be captured, regardless of the disposition of stock movement. The quantity field cannot be entered for non-AGSN UIN items. It gets updated as the UINs get added and removed from the adjustment.
- For AGSN items, if a reason code has a disposition of anything except Out of Stock to In Stock (+Stock on Hand), a UIN is required to be captured. This is because the UIN already exists in the system and the system needs to know which AGSN UIN is being adjusted. In this case, the quantity field cannot be entered; it is updated as the AGSN is added/removed.
-
For AGSNs being adjusted from Out of Stock to In Stock (+ Stock on Hand), an Auto Generate button will be available. Selecting this button will prompt the user for a quantity and the system will auto generate the UINs per the quantity.
The user will be able to select Print from the footer menu to print tickets for those UINS that are an AGSN.
Information Screen
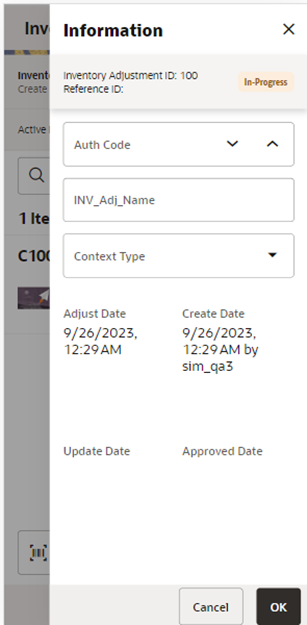
The Information screen contains header level information about the inventory adjustment.
The user can enter Custom Flexible Attributes (CFAs). Details include adjustment ID, reference adjustment ID, status, create date/user, update date/user, approve date/user.
The Adjustment Date can be entered by the user; it will default to today’s date.
Context can be selected from a drop down of context types that are defined on the desktop and may be required per a store configuration.
The CFAs (flexible attributes) that have been set up for Inventory Adjustments in the desktop application will be displayed and lets you enter values for them. The CFAs that are set up as Required must have a value entered for it before confirming the inventory adjustment. Appropriate security permission is needed for entering CFA values.
Stock Counts Jet Mobile
The stock count dialog in Jet Mobile has been redesigned from the ground up to provide a better user experience. Many customers have very large stock counts, and usually the user knows what they need to count, because the child stock count has been built based on the merchandise hierarchy or by location. The MAF dialog requires the user to first see the list of all items, before they can start recording the units they have. This causes issues since the user has to wait for that list to be generated. After that list is generated, the user can start scanning items and is brought to the Item Detail screen.
The new Jet Mobile UI reverses the order and will bring the user immediately to the scan screen where they can start scanning items. There is no need to see the full list of items selected for the child count if the user already knows. If the user does not know or would like to see if they missed any items, they can go to a summary screen where the items are listed.
Stock Count Mobile Screen Flow

After logging into the mobile application, the main menu drawer is displayed. The user can select Stock Counts from the Inventory Management menu or select an active stock count from the open transactions.
The Stock Counts module in the mobile application contains Stock Count List, Creating a new Ad hoc Stock count, Child Stock Count List, and Viewing the Item Details.
Stock Count (Stock Count List) Screen
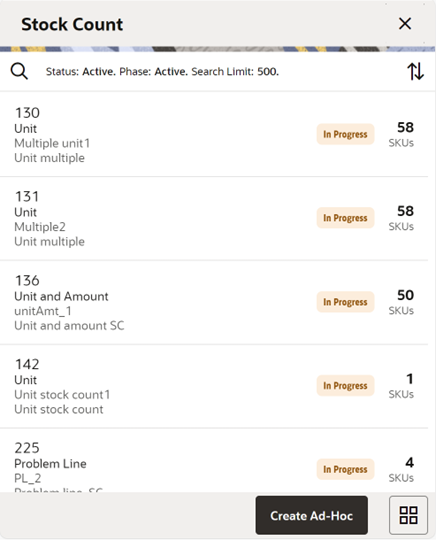
The user can select Stock Count from the Main Menu Drawer and be directed to the Stock Count screen. The user will need permissions to access this screen. This is a list screen and when the user enters the screen, the system will default to display records with a status of Active and Phase of Active.
Active Status includes New and In Progress counts. Active Phase includes Stock Count and Re-Count phases.
On this screen, you can select to Create a new Ad Hoc Stock count if the user has proper permissions. Upon selecting the option, the user is directed to the Add Stock Count popup.
The transactions may include Ad hoc stock count, Unit count, Problem Line count, and Unit and Amount count:
- The user is required to have the Edit Adhoc Stock Count permission to edit an Adhoc stock count.
- The user is required to have the Edit Unit Stock Count permission to edit a Unit stock count and Problem Line.
- The user is required to have the Edit Unit Amount Stock Count permission to edit a Unit and Amount Stock Count.
Ad Hoc Stock Count
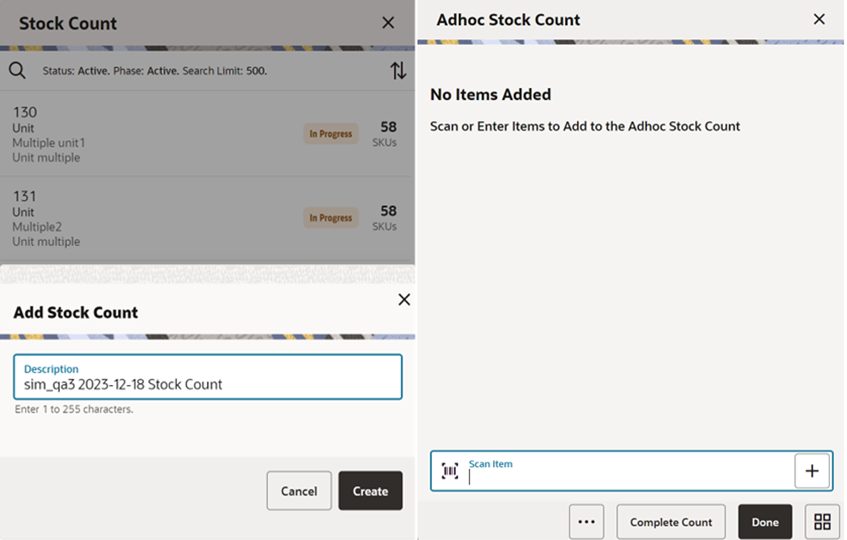
The user can select Create Ad Hoc from Stock Count and be directed to the Add Stock Count popup to add a description for an adhoc stock count. The user will need permissions to access this screen. When the user enters the screen, the text box for entering description for Ad Hoc stock count is defaulted to <user ID><date> Stock count and can be modified. After entering the description and select to create, the user can add items to the stock count and complete the count.
The system will navigate to the Item List with empty list directly when the user creates an adhoc stock count.
Stock Count Search Criteria Screen
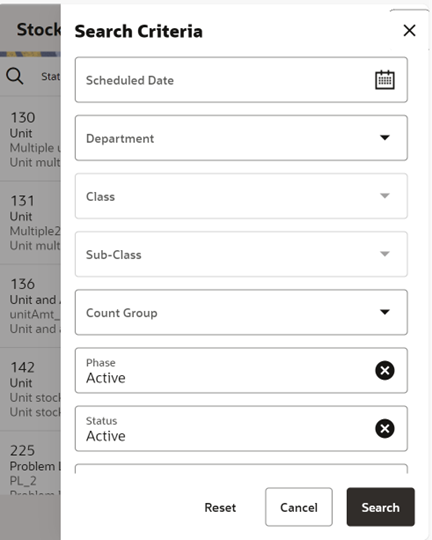
The user can select the magnifying glass from the Stock Count screen and be directed to the Search Criteria screen. On this screen, the user can set the search criteria to filter the stock count list on the Stock Count screen.
Fields
- Scheduled Date: The date for which the scheduled stock count is scheduled. Defaults to blank.
- Department: List of values containing all of the departments. The value will be defaulted to All. Since a Product Group can consist of more than one merchandise hierarchy, the filter will return all stock counts that are affiliated with the department or where the counting groups contains that hierarchy. When a department is cleared out, the class and sub-class will also be cleared out.
- Class: List of values containing all of the classes for the selected department. The user must select a department first for the class to be editable. The value will be defaulted to All. Since a Product Group can consist of more than one merchandise hierarchy, the filter will return all stock counts that are affiliated with the class and counting groups that contain that hierarchy. When a class is cleared out, the subclass will also be cleared out.
- Sub-Class: List of values containing all of the sub-classes for the selected class. The user must select a class first for the class to be editable. The value will be defaulted to All. Since a Product Group can consist of more than one merchandise hierarchy, the filter will return all stock counts affiliated with that subclass and counting groups that contain that hierarchy.
- Count Group: List of all product groups that exist in the system. Defaults to All.
- Phase: Valid values are Active, Authorize, Re-Count, and Stock Count. Active will include Stock Counts that are in Stock Count and Re-Count phases.
- Status: Valid values are All, New, In Progress, Processing, Active, Canceled, and Completed. Default value is Active. Active will include New and In Progress stock counts.
- Search Limit: Entry field. The user can define a search limit for the number of transactions being displayed. It is a Required Field. The value will default through a system admin setting, Search Limit Default for stock count list - Mobile.
Note: Confirmed is the status of a guided Unit and Amount stock count for all items that are in Authorize Phase and have not yet moved to Completed due to not having the results exported. Once exported, the stock count will move to Completed status. If the user selects a stock count in confirmed or completed status, it will be in view-only mode.
Stock Count (Child Count List) Screen
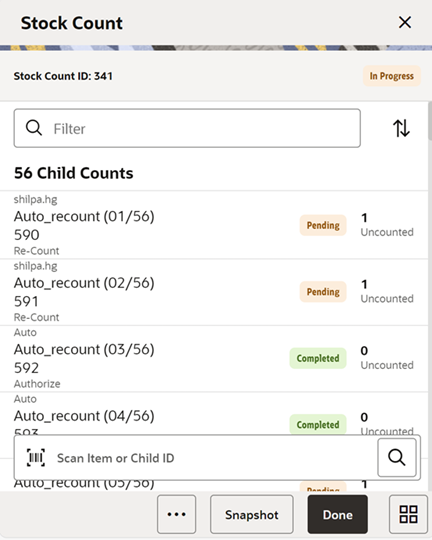
The user is directed to this screen when the user selects a Stock Count from the Stock Count (Stock Count List) or from the Open Transactions screen. When the user enters the screen, the system will sort the child count by ID. Closed child count should be at the bottom and Active child counts should be at the top and then this ID sorting should be applied.
This screen is skipped in the case of Ad-Hoc Stock Counts. The user will be directed to the Item Detail directly when they create an Ad-Hoc Stock count or select an existing ad hoc type of stock count.
Selecting a child count will take the user to the Item Detail screen and from there they can select to go to the item list.
If the user scans an item to search child count by item and if the system finds more than one result, the system prompts them to select the item from the Select Scanned Item screen.
If the system finds one or more child counts for the scanned item, the system prompts to select the child count from the Select Child Count screen.
The user can scan the child id on the scan bar and, if found, they are directed to the Item Detail (Stock Count) screen.
Snapshot: Selecting this button will take a snapshot for all the child counts on the stock count. This will take a snapshot for Problem line and Unit type of stock counts only. If any other type of stock count, this button will not be visible.
The snapshot of a stock count will happen as follows:
- Unit or Problem Line: Can be taken from Child count list screen for the whole stock count or from the Stock count item screen if not in re-count mode. For Re-Count, it will be taken automatically.
- Ad hoc: Takes snapshot as items are added.
-
Unit and Amount: Snapshot for this type can be taken using the Snapshot batch within the desktop application.
For unexpected items that get added during counting:
- If the snapshot has already been taken for the count, it will take the snapshot of the unexpected item as it gets added to the count.
- If the snapshot has not been taken for the count yet, then the snapshot for the unexpected item will not get taken as the item is added, rather when the snapshot is taken for the stock count.
Like a unit count, the user must have the Edit Unit Stock Count permission to open the screen in edit mode when displaying a Unit count; otherwise, the screen will open as view only.
The user must have the Edit Unit and Amount Stock Count permission to open the screen in edit mode mode when displaying a Unit and Amount count; otherwise, the screen will open as view only.
Footer Menu on Stock Count (Child Count List) Screen
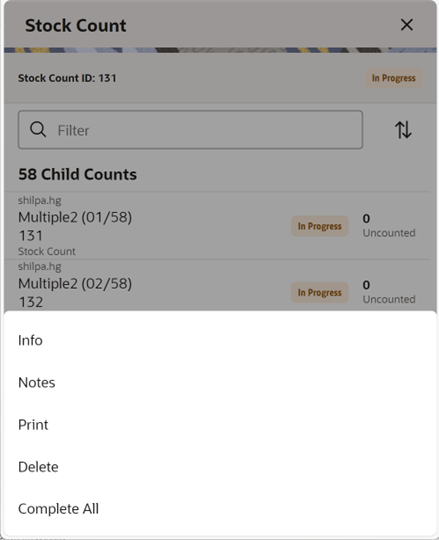
This opens up a footer menu with following options:
- Info: Information (Stock Count Information) popup will be displayed. This is a master stock count level information screen.
- Notes: Notes dialog will be displayed.
- Print: This will open the print dialog.
- Delete: This will delete the Stock Count that is under consideration and has not yet been authorized.
- Complete All: This option allows the user to complete all the child stock counts. This option is allowed if the user has permission. Upon selecting this option, the system will process all the child stock counts and will complete the count. The system will send the authorized quantities to the upstream system if there are no discrepancies found and it is set to auto processing. If the system is able to process all the child stock counts, it will mark the child counts and the master stock count as complete. The system will show the status bar to indicate the progress when the process is running. Any failed children can be resubmitted.
Item List Screens

This is an Item List screen. The user can reach this screen by selecting the view full item list icon or select from the footer menu on the Item Detail screen. This screen shows the full list of items in the child count or the Ad Hoc stock count.
The user can filter the items using the search criteria and can refine the search by Counted/Un Counted or by the hierarchy.
If the item has a UIN captured, it will have the UIN icon on the line item.
Selecting an item will go to the Item Detail for that item. If the item scanned/selected is an UIN item, the user will navigate to the Serial Number popup screen to capture the Serial Numbers (UINs).
For the stock count types other than Ad Hoc, the user can see the progress bar indicating how many are counted out of the total items.
When the user enters the screen, the system will sort the items left to count as below:
- If guided and if items are sequenced, then order by sequence order.
- If it is un-sequenced, "no location" items falling at the end by item description order.
- If unguided, items are always sorted by item description.
Variance: The user will be able to view the difference between the snapshot quantity and the Total quantity counted, provided the user has View variance security permission:
- If the snapshot quantity < Total quantity, display the + symbol before the variance value.
- If the snapshot quantity > Total quantity, display the - symbol before the variance value.
- If the snapshot quantity = Total quantity, display the 0 symbol before the variance value.
- This field will be displayed only when the user has View Variance security permission.
- This value should be calculated dynamically after each scan (count) happens.
- This value will be displayed only for counted items.
Complete Child: Complete Child is a footer button option to complete the child stock count. The user needs permission to select this button.
Complete Count: This footer button is available for the Ad Hoc type of stock counts and upon selecting this option, the system will process the stock count and mark the adhoc stock count as completed.
Additional options are available on the footer menu
Footer Menu on the Item List
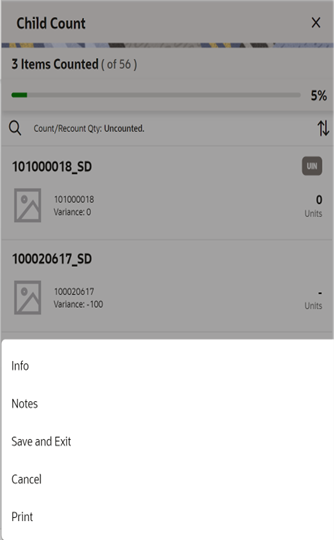
Info: Selecting Info from the Item List footer menu will take the user to the Child Count Information popup.
Notes: Notes dialog will be displayed.
Save and Exit: This will save the child count and navigate the user to the Stock Count List.
Cancel: This will discard changes to stock count / re-count and navigate the user to the Stock Count List in the case of Ad Hoc and Child Count List in the case of other types.
Print: This will open the print dialog.
Snapshot: This option is visible only for Problem Line and Unit type stock count types. Upon selecting this option, the system will take the snapshot for the child count. The option will not appear if the snapshot is already taken. This option is permission based.
Info (Stock Count Information) Screen
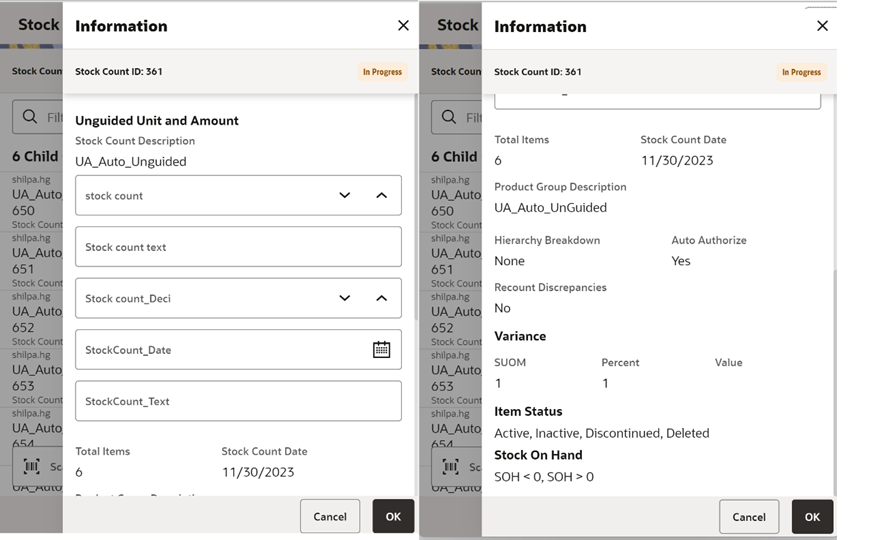
This Information popup screen is accessed from the Stock Count (Child Stock Count List) footer menu. This screen provides the header information which includes CFAs and Product Group Information at the master stock count level and allows the user to edit the CFAs. The system displays the list of CFAs (flexible attributes) that have been set up for the Stock Count and Stock Re-count in the system and that allows the user to enter values for them.
The system displays the CFA fields based on the setup. The CFAs that are set up as Required must have a value entered. The value can be one of the following: Date, Text, Decimal, Long depending on the data type set up for the CFAs, while creating them in the desktop application. Appropriate security permissions are needed, and the count must be in editable status for entering CFA values. The CFAs captured will be displayed read only when it is not in the status to edit.
Details on this screen include:
- Stock Count ID
- Status
- Counting Method and Product Group Type
- Count Description
- Stock count date
- Total Items
- CFAs and the corresponding value
- Product Group Description
- Hierarchy Breakdown
- Auto Authorize
- Re-Count Discrepancies
- Variance (SUOM, Percent, and Value)
- Item Status (Active, Inactive, Discontinued, and Deleted)
-
Stock On Hand:
SOH = 0 - Items that have stock as 0 are in product group.
SOH > 0 - Items that have stock less than 0 are in product group.
SOH < 0 - Items that have stock more than 0 are in product group.
-
Problem Line:
Actual Pick Amount less than Suggested Pick Amt - Actual pick amount is less than suggested or not is displayed. This field will only be visible if product group is a problem line product group.
Actual Shelf Repl Amount less than Suggested Shelf Repl Amount - Actual Shelf replenishment amount is less than suggested or not is displayed. This field will only be visible if product group is a problem line product group.
Available Negative Inventory - This will display if Negative inventory is available. This field will only be visible if product group is a problem line product group.
UIN Discrepancy - If any UIN discrepancy is there is displayed. This field will only be visible if product group is a problem line product group.
Child Count Information Screen
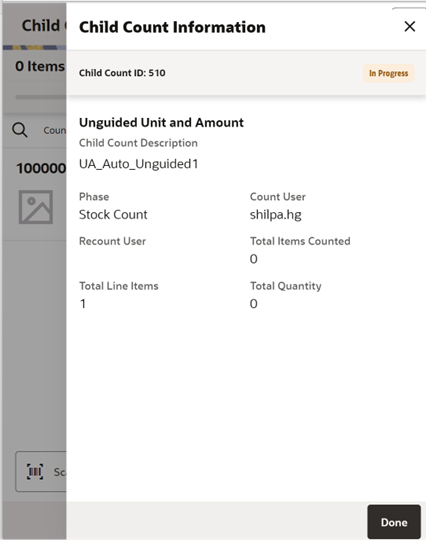
The Child Count Information screen is an informational popup that contains read-only information about the child count. It is accessed by selecting Info from the Item List screen.
Details include:
- Child Count ID
- Status
- Counting Method and Product Group Type
- Child Count Description
- Phase
- Count User
- Re-Count User
- Total Items Counted
- Total Line Items
- Total Quantity
Item List and Item Detail Search Criteria Screens

This search criteria popup screen is displayed when the user selects the magnifying glass from the Item List or Item Detail screen.
The default will be:
Stock Count: Count / Re-Count Qty = uncounted.
Re-Count: Count / Re-Count Qty = uncounted, Filter = Discrepant.
The Count / Re-Count Qty will default as the filter on the top of the Stock Count / Stock Re-Count screen.
Fields
Count / Re-Count Qty: Valid values are All, Counted, and Uncounted.
Filter: Valid values are All Items and Discrepant Items. Displays only when it is a Re-Count.
Department: List of values containing all of the departments pertaining to that stock count. The value will be defaulted to All. Since a Product Group can consist of more than one merchandise hierarchy, the filter will return all stock counts that are affiliated with the department or where the counting groups contains that hierarchy. When a department is cleared out, the class and sub-class will also be cleared out.
Class: List of values containing all of the classes for the selected Department. User must select a department first for the class to be editable. The value will be defaulted to All. Since a Product Group can consist of more than one merchandise hierarchy, the filter will return all stock counts that are affiliated with the class and counting groups that contain that hierarchy. When a class is cleared out, the subclass will also be cleared out.
Sub-Class: List of values containing all of the sub-classes for the selected Class. The user must select a Class first for the sub-class to be editable; the value will be defaulted to All. Since a Product Group can consist of more than one merchandise hierarchy, the filter will return all stock counts affiliated with that subclass and counting groups that contain that hierarchy.
Search: Upon selecting this button, the system will filter the records based on the criteria provided.
Reset: This will clear the screen of any previous search criteria that was entered by the user and set back to the default values. The screen will remain open for the user to enter in new search criteria.
Cancel: This will discard the selection and go back to the screen from where the user came.
Item Detail Screen
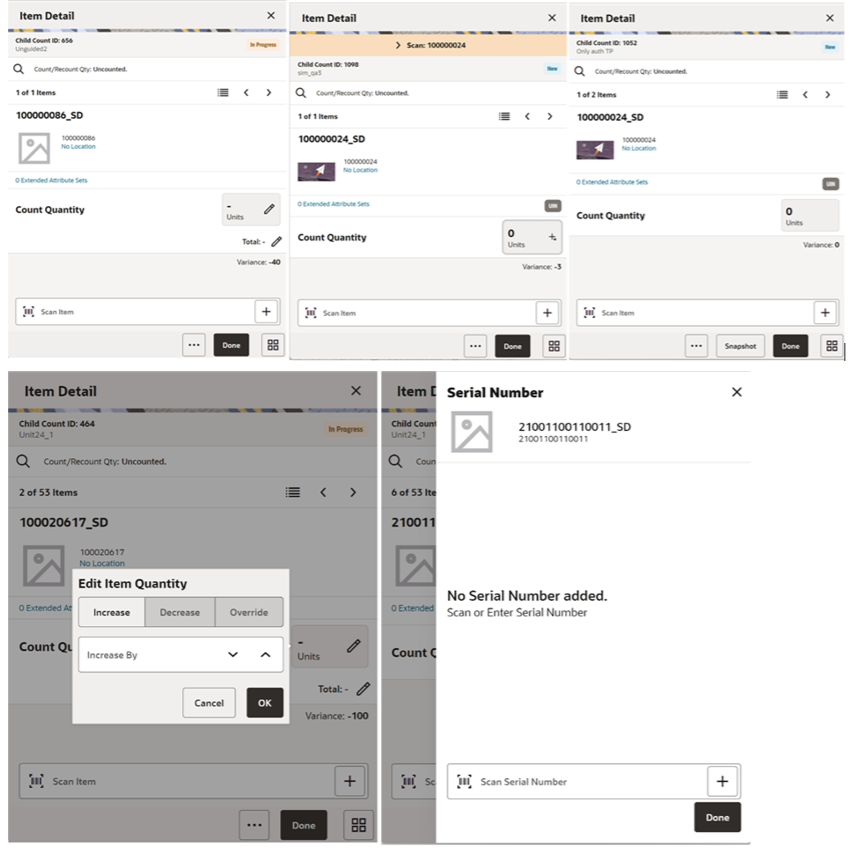
The item detail set of screens is displayed when selecting a child count or when scanning a valid child id on the Stock Count (Child Stock Count List).
This screen allows the user to go to the item list by selecting the item list icon or select the option from the footer menu.
This screen will help the user to enter count quantity or the total quantity for an item in the stock count. If stock count is not completed, the quantity fields will be editable, and the user can enter a count quantity. Upon selecting the quantity fields, the system displays the Edit Quantity popup to enter the total quantity or the counted quantity depending on what you select. On this screen, the user will be able to take the snapshot for the child count.
Below is the detailed explanation on how the Count Quantity and Total Quantity works.
Count Quantity: Displays the current scan quantity of the item until another item is scanned. The user can enter the quantity using the Edit Quantity Popup that is triggered when the user selects the field:
- It will show 1 when the item is scanned in + scan mode.
- It will bottom out to 0 when using – scan mode.
- Each time the item is saved, or the item is changed to another item, this quantity is set to 0.
- This quantity can be edited only if the user has permission.
- The entered quantity in this field is added to the total quantity.
- Value has to be 0 or positive, cannot be negative.
- For UIN Serial Numbers (AGSN and non-AGSN), the quantity field is disabled and the selecting the edit quantity will take the user to the Serial Number popup screen.
- The Edit Quantity icon will be a <pen>+, + to show that UINs are needed.
- Quantity would get updated per UINs being added / removed on the UIN panel.
- The system does not look for the Edit Quantity permission for the UIN items.
Total quantity: This value represents the total child quantity field when the item is added. The user can enter the total quantity using the Edit Quantity Popup that is triggered when the user selects the field:
- This is the user quantity increased by the current scan quantity or entered quantity.
- It will bottom out to 0 when using scan mode.
- This quantity can be edited only if the user has the correct permission granted.
- Value has to be 0 or positive, cannot be negative.
- This field will be updated real time to display the current total quantity as items are scanned in user's session.
This will be a view-only screen if the stock count is completed and no further edits can be made, or the user has no edit permissions. Items are sorted based on a few different criteria:
- If guided and items are sequenced, the order will be based on the sequence with non-sequenced (no location items) falling at the end.
- If unguided, items are always sorted by item description.
Note: Removal of an item after it has been added is not allowed in a Stock Count unless it is an Ad-hoc stock count.
Unit field: The sum of the quantity of the items scanned until a new item is scanned. It indicates the number of items a user has in front of them that they have scanned.
Variance: The user will be able to view the difference between the snapshot quantity and the Total quantity counted, provided the user has View Variance security permission.
- If the snapshot quantity < Total quantity, display the + symbol before the variance value.
- If the snapshot quantity > Total quantity, display the - symbol before the variance value.
- If the snapshot quantity = Total quantity, display the 0 symbol before the variance value. This field will be displayed only when the user has View Variance security permission.
It will be calculated dynamically after each scan (count) happens and it will only be displayed for counted items.
Last Scan: Shows the details of the last scanned barcode.
Extended Attribute Sets:
- The extended attributes option is available only if it is configured in the store parameter and the user has proper permission.
- If the proper permissions do not exist, the screen will be read only.
- It is a link that will take the user to the Extended Attributes screen.
- <x> represents the number of attribute sets assigned; initially it will be zero.
Example of how the scan quantities interact
-
Scan item A.
User quantity 1
Session quantity 1
Total quantity 1
-
Scan item A again.
User quantity 2
Session quantity 2
Total quantity 2
-
Scan item B.
User quantity 1
Session quantity 1
Total quantity 1
-
Scan item A.
User quantity 1
Session quantity 3
Total quantity 3
-
Save count and scan item A.
User quantity 1
Session quantity 1
Total quantity 4
-
Scan Item B.
User Quantity 1
Session Quantity 1
Total Quantity 2
Item Detail Footer Menu

- View Full Item List - Upon selecting this menu, the user is navigated to the Item List.
- Complete Child - This will complete the child count and go to the Stock Count (Child Stock Count List).
- Complete Count - This is applicable for Adhoc stock count. Upon selecting this, the system will complete the adhoc stock count.
- Save and Exit -This will save the child stock count and exit to the child stock count list screen.
- Cancel - This will discard changes to the stock count / re-count and navigate the user to the Stock Count (Child Stock Count List).
Supplier Lookup Jet Mobile
The Supplier Lookup functionality in Jet mobile provides the user with the ability to view information about the supplier. The following information is available, but is not limited to this list:
- ID, Name, and Status of the supplier.
- Various Addresses and Contact details of the supplier such as Business Address, Return Address, Order Address, Invoice Address, and so on.
- Return Allowed or not.
- Return Authorization Required or not.
- Additional Details such as Custom Flexible Attributes (CFAs) for the supplier.
This dialog will eventually be used in conjunction with other dialogs (Return to Vendor, Store Orders to a Vendor, and Direct Store Delivery) to look up suppliers and assign the supplier to the transaction.
Supplier Lookup Screen Flow
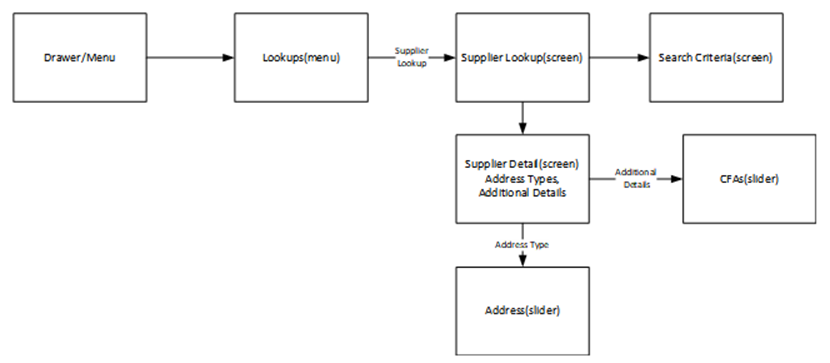
This is the screen flow for the Supplier Lookup functionality.
Select Supplier Lookup from within the Lookups menu. Navigate to Supplier Lookup that lists the suppliers. Initially, this screen will be empty with no suppliers listed. Search for suppliers by tapping the magnifying glass (search criteria) and navigate to the search criteria screen where the user enters the search criteria. The search result is displayed on the Supplier Lookup screen.
Once a supplier is selected from the list (search result), go to the Supplier Detail for that supplier and the header level supplier info will be displayed. The user can also view the details of the various addresses and additional details about the supplier in the screen.
Supplier Lookup Screen
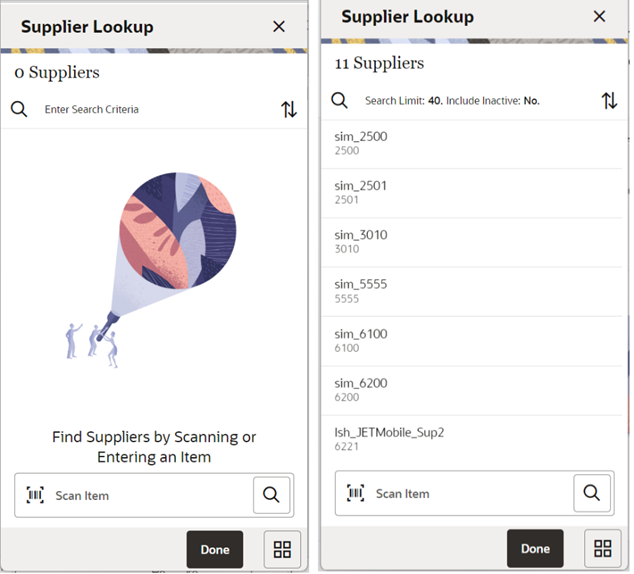
When navigating to Supplier Lookup, the user is taken to a blank list screen without any supplier results being displayed. The user can use the scan bar to scan an Item ID, UIN, VPN, GS1 barcode, and so on, to fetch the supplier associated with it. The scan result is displayed in this screen.
When scanning/entering an item in the scan bar, the system adds the scanned item to the entered search criteria and narrows down the list of suppliers by the item that was scanned. If it results in a single item, the system finds the suppliers based upon that item and presents them in the list. If there is more than one item found based upon the scan it provides an item selection to select the proper item. The item is applied to the search criteria and the suppler results are returned.
The user can also use the search criteria, magnifying glass, to navigate to the Search Criteria screen to enter search criteria to search for suppliers. After applying the search criteria, the results are listed on the Supplier Lookup screen together with the applied criteria. By clicking on the Sort icon on the screen, the user can sort the search result based on Supplier ID and Supplier Name. Selecting a supplier from the search results navigates to the Supplier Detail screen for that supplier.
Search Criteria Screen
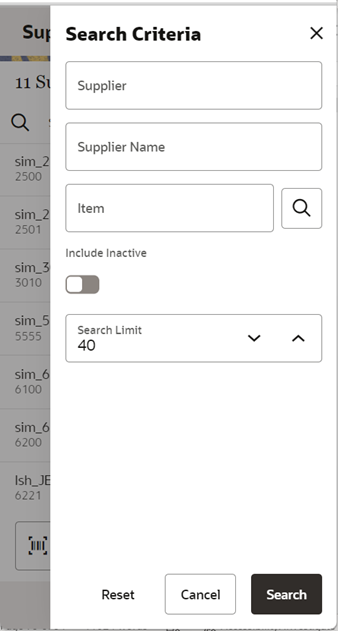
The Search Criteria screen is accessed by clicking on the magnifying glass or the search bar on the Supplier Lookup screen. Search criteria include Supplier ID, Supplier Name, and Item. The user can exclude inactive suppliers from the search if needed. The user can enter one or more search criteria to find a supplier. The results are listed on the Supplier Lookup screen.
Supplier Detail Screen
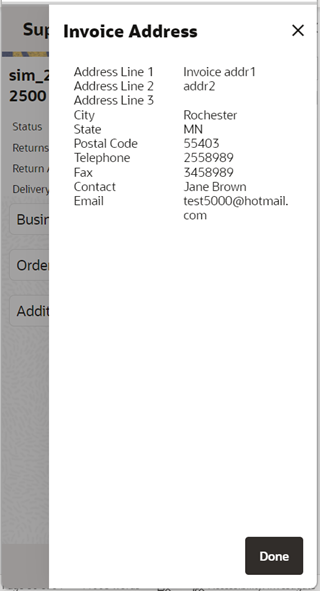
Invoice Address Screen
Additional Details Screen
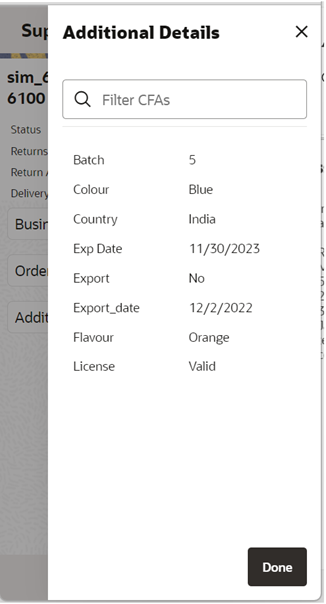
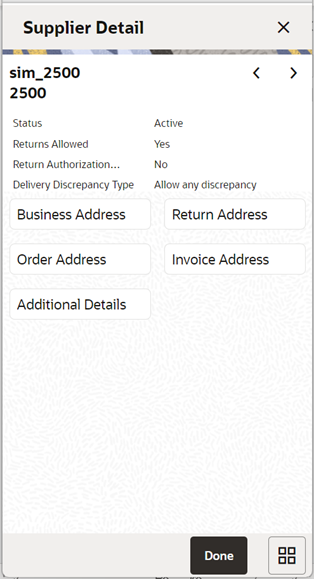
From Supplier Lookup, selecting a supplier displays the Supplier Detail screen. This is a read-only screen to display the details of the supplier being looked up.
The header shows the supplier ID, supplier name, status of the supplier, whether returns are allowed, if a return authorization number is required, and if supplier deliveries allow for discrepancies. In the bottom of the screen are options for various address types for the supplier. The types may be different per supplier, and types may be duplicated per supplier. The types are based upon the types in the system which came from the merchandising system. Clicking a type will show the details of that address. Address fields include address, phone, fax, contact name, and email if they exist for the supplier. The CFAs of the supplier can be viewed by selecting the Additional Details option. The Access Supplier CFAs security permission is needed for this option to display in the screen. The CFAs are set up at the merchandising system and the Enterprise Inventory system subscribes to this information. Each CFA and value are represented in a set. If there are no CFAs available, a message that no items are available is displayed in the screen. The list is ordered by CFA.
If the scan/search returned multiple suppliers, the user can view the Supplier Detail of other suppliers using the front and back arrows on the screen.
Common Components
Item Detail – UIN
This section covers how UINs are generically used within Jet Mobile. Each dialog will have specific rules and functionality supporting UINs:
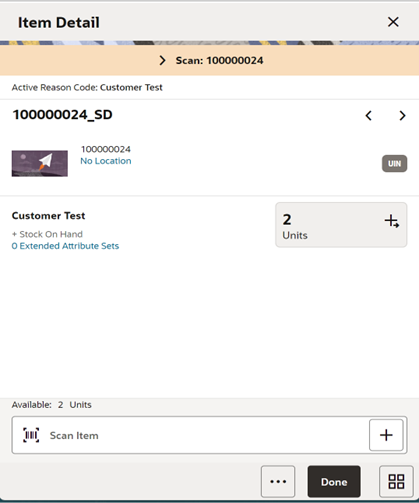
- If the store is configured to process UIN Items and if the item is an UIN item, the system will allow to capture the UINs/Serial Numbers for the transaction.
- The user can access the UIN/Serial Number popup by selecting the Quantity Field on the item detail screen within a transaction.
- On the item detail screens for the UIN items, (AGSN and non AGSN), the quantity field is disabled and the selecting the edit quantity will take the user to the UIN/Serial Number popup screen.
- The Edit Quantity icon will be a <pen>+, + to show that UINs are needed.
- Quantity would get updated per UINs being added / removed on the UIN panel.
- The system does not look for the Edit Quantity permission for the UIN items. The quantity will always be disabled.
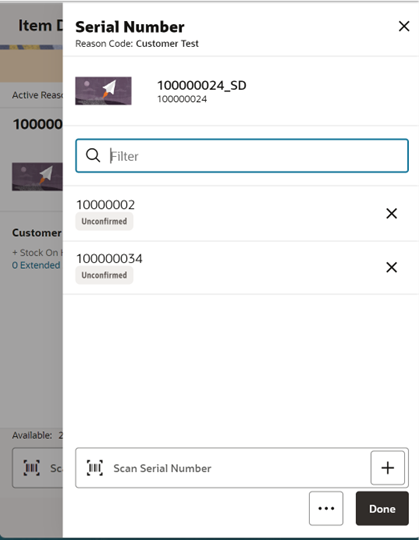
- On the Serial Number screen, the user can add or delete the serial numbers and it will be updated upon confirming the transaction.
- The user can use the Remove All option from the footer menu to remove all the Serial Numbers/UINs.
Item Detail - Extended Attributes
Extended Attributes are added at the item level on transactions. They can be accessed on the transaction item list screen by selecting the line level overflow menu (…) and then the Extended Attributes option. The Extended Attributes screen is also accessible from the Item Detail screen by selecting the <x> Extended Attribute Sets link.
The Use Extended Attributes config must be set to Yes to use extended attributes for the store and the user must have permission for that functional area, Access <functional area> Attribute. In order to add and remove attributes, a user must have Edit Attribute permission for each specific functional area.
This screen will display attributes that may have been captured automatically from a GS1 barcode, or they may have been manually captured in this screen.
Sets of attributes can be captured manually by selecting the Add Attributes button. The attributes to be captured depend on the attribute configuration for the item (setup on desktop). A popup will be displayed to enter the attributes. Sets can be removed by selecting the x icon for the set. The quantity field will increment each time the GS1 Databar is scanned.

Universal Item Lookup Jet Mobile
Universal Item Lookup is the Item Lookup dialog that is accessed from within another transaction or other area of the application. For example, when creating an inventory adjustment, if the barcode is not available and the item is not known, the user can look up the item within the universal item lookup dialog and then navigate back to the previous dialog.
Universal Item Lookup Screen Flow

Access the Universal Item Lookup using the magnifying glass. In most places, the user can enter or scan an item. The user will be directed to the Item Lookup Search Criteria screen. After entering search criteria, the list of items will be returned. From here, an item can be selected from the list by swiping left and applied to the original item field from where the universal item lookup was executed. Or the user can then choose to view the details of a specific item in Item Detail and apply from here.
Inventory Adjustments - Universal Item Lookup

The item lookup dialog will be accessed using other areas within the application when an item can be scanned or typed in. Use the magnifying glass to navigate into the Item Lookup Search Criteria screen. Search for an item and once applied, the user will exit out of Item Lookup and return to the dialog in which they started with the selected item applied.
Menu/Drawer
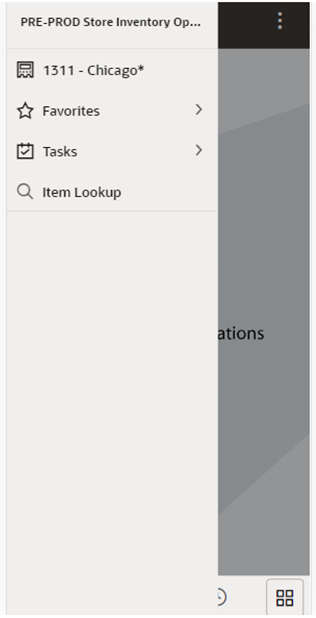
The mobile drawer is displayed as the menu panel on the left side of the screen upon tapping the drawer (hamburger stack which looks like three horizontal lines in the upper left-hand corner of the application). The menu consists of the user’s store to change stores, Favorites, Tasks, and Item Lookup.
Tasks
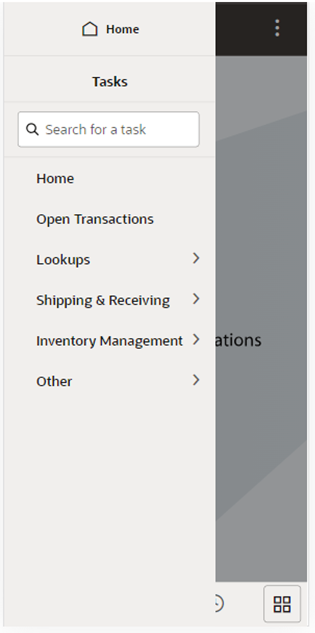
From the menu/drawer, the user can select Tasks to access various functionality of the application such as Lookups, Inventory Management, and so on. The functional areas are displayed based upon the user’s access permissions. Tasks can also be searched on.
Favorites
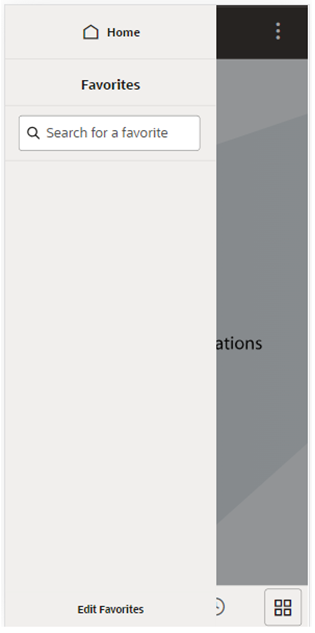
A favorite is a way of creating a shortcut for a task/menu that the user frequents often. A user's favorites are accessed by selecting the Favorites (star) option. The system will list all the favorites. Selecting a favorite will navigate into that dialog. The user can also search for a favorite, select the searched favorite, and navigate into the dialog.
Common Features
Several features across the Jet UI have been enabled and improved in this release from the MAF UI. Significant time has been spent to optimize the user experience and provide intuitive navigation:
-
Quick Actions is a dialog allowing the user to move from one functional area to another without having to go through a menu selection.
- Customer flexible attributes are enabled in the Jet Mobile dialogs where applicable.
- Sort ascending or descending lists of transaction or items.
- Recently edited allows the user to see the last 10 transactions they edited. The user can select that transaction and move into it, as long as the user has the right permissions. Only Jet Mobile changed transactions are listed in this dialog.
- Item list scan navigation allows, based on user preferences, the user to stay on the list screen when scanning items or go to a detail item screen. This flexibility allows for speedier list updates when the user just wants to record item quantities and does not need to see all the detail.
- When scanning a barcode, SIOCS will convert this barcode scan to a SKU number. In most cases, the SKU number does not match the scanned value. The new Jet Mobile client will provide a scan detail area that shows the original scan value, and in case of a type-2 or GS1 databar, it will also display the components within the barcode.
- Users will have the ability to move from one store to another without having to re-login.
- The ability to work in Cases, Standard Unit of Measure, or Transaction Unit of Measure will be available to change at a global level for the user.
- The application will be internationalized, allowing the user to select different languages.
- Several preferences are available for the user to define. These preferences can often be overridden at the local level. The preference settings are saved to the user’s profile as the default for each new session started by the user. For example, when setting the preference to Cases, the user can change this while working to SUOM, however when logging out and logging back in, the UOM type will default back to Cases. Some of the preferences that are available to be configured:
- Display images or not.
- When scanning a barcode, navigate to the Item Detail screen or stay on the Item List screen,
- Increase, decrease, or review quantities when scanning,
- SUOM, Cases, or Transaction UOM,
- Most lists screens will have a filter bar that allows the user to reduce the items in the list without having to go to a search screen.
- When leveraging plan-o-gram information, the retailer will be able to see a list of locations on most item‑specific screens.
- Users will have access to the standard reports SIOCS provides for generating a PDF that can be printed.
- A notes area will be provided in most transaction dialogs and notifications to capture additional information.
- Info screens will be enabled to allow for Custom Flexible Attributes capture. Those attributes will be available under the info screen with the regular attributes.
CFA Restrictions
To have a better user experience, a new indicator has been added that allows the Custom Flexible Attribute UI to not be displayed if they are not used by the customer.
The Disable Custom Flexible Attribute system option under admin will control this behavior.
Stock Count Extract
For large volume stock counts, SIOCS added a new report accessible through the desktop. This report is in a CSV format. The report is only accessible from the desktop, is excluded in MAF, and in general on the client running on a mobile device. This is due to the possible size limitation Mobile Units can manage.
Stock Count Cancel
The stock count cancellation job released in release 23.2.301.0 has been enhanced in several ways. Instead of deleting the stock count immediately, it now allows the stock count to move to a cancelled status. This cancelled stock count can then be purged at a specific point in time. At the time the stock count is set to cancelled, if a unit and amount count, Oracle Retail Merchandising Foundation Cloud Service (MFCS) will be notified so they can close that store on the stock count as well.
The system will consider the stock counts that are in the below states to move it to the Canceled status based on the number of days set in the Days to Hold unexecuted stock counts parameter.
| Status | Phase | Remarks |
|---|---|---|
| None | Future | New |
| New | Count | COUNT_SCHEDULED |
| In Progress | Count | COUNT_IN_PROGRESS |
| Pending | Count | COUNT_COMPLETE |
| New | Recount | RECOUNT_SCHEDULED |
| In Progress | Recount | RECOUNT_IN_PROGRESS |
| Pending | Recount | RECOUNT_COMPLETE |
The subsequent cleanup process considers the stock count records in the below statuses to purge permanently based on the Days to hold canceled/completed Stock counts.
| Status | Phase | Remarks |
|---|---|---|
| Completed | Authorize | APPROVAL_COMPLETE |
| Canceled | Count | Canceled |
Closed Container Purge
A new purge program has been added to EICS that removes containers that have been received and completed from the transaction. This allows for the reuse of container numbers in case a retailer leverages reusable container numbers.
Note:
This job can only run in an ad hoc fashion.REST Services
Similar to prior releases, SIOCS has added new REST services. In this release, the following services have been added:
- Vendor Delivery (DSD) - This service manages the inbound ASNin DSD shipment coming from the supplier.
- Transfer – This service manages the transfer request.
- Transfer shipment - This service manages the transfer shipment record; it does not generate the ASNout.
Note:
These services are not meant for initial data load. Data seeding integration jobs exist for the initial data load.Technical Changes
User-Fed Credentials Management
A technical enhancement has been added in this release to use Secure Storage Service for managing the user-fed credentials in EICS. As a one-time activity, customers are advised to review and ensure external service integration user-fed credentials are configured after the release update has completed on the non-production and production environments. The following steps will need to be taken to verify and update the user-fed credentials:
- Log on to the SIOCS web client.
- Select Task Menu > Admin > Technical Maintenance > Credential Administration.
- Verify and update any external service integration user credentials.
RDS Integration Changes
SIOCS Retail Data Store (RDS) integration remains unchanged in this release. Additional tables introduced in release 23.2.301.2 for RDS replication are incorporated as part of the cumulative updates. Details related to the new tables can be found in the 24.0.101.0 RDS data model document. Modifications to existing replication tables and views are handled by the GoldenGate replication process.
GoldenGate DAS Integration Changes
In the integration of SIOCS Data Access Schema (DAS), a minor modification has been made. The DAS data dump extract is now directed to a new object storage with the prefix goldengateexports, as opposed to the previous prefix exports. SIOCS DAS customers can access the files from the goldengateexports prefix when new dump files are extracted.
Also, for this release, the replication tables in SIOCS DAS remain unaltered. However, additional tables introduced in release 23.2.301.2 for DAS replications are integrated as part of the cumulative updates. Details related to the new tables can be found in the 24.0.101.0 DAS data model. Modifications to existing replication tables and views are handled by the GoldenGate replication process.