11 Stock Counts
This chapter covers stock counts. The following topics are covered:
-
Overview (MAF Mobile): Introduction to stock counts
-
Functionality (MAF Mobile: Description of screens)
-
Functionality (JET Mobile Description of screens)
-
Quick Count : (JET Mobile Only)
Overview
The desktop application provides the ability to schedule and authorize stock counts whereas the mobile application provides the ability to execute the stock counts.
Portions of the stock count functionality, such as the setup of product groups, schedules, and authorizations, are performed on the desktop application only. Users can configure and execute different types of stock counts such as cycle or annual counts, ad hoc counts, or counts that are based on inventory position or problems like negative stock on hand. Merchandising and individual level counting require setup and scheduling utilizing product groups, with the exception of Ad Hoc counts. The Ad Hoc count will allow you to decide which items you want to count by scanning from the shelf immediately.
Most of these counts can be scheduled to be executed repetitively on certain dates reducing the need for daily or weekly count management.
Because a variance percentage can be set, items within tolerance can, but do not have to be authorized individually.
Business Case
-
Ad Hoc Stock Count
A customer is looking for a blue tooth speaker in the color black. The customer finds the location on the shelf, but there are only bright pink speakers and asks a sales associate if there are any black speakers in the storage room. The sales associate looks up the inventory and the system shows there are three on hand. The sales associate looks in the backroom and cannot locate any in the store and informs the customer and reports to the store manager. The store manager instructs the sales associate to perform an ad hoc stock count to immediately correct the inventory.
-
Unit Stock Count
The dairy department of a grocery retailer orders milk on Tuesdays and Fridays. Before they get the order in, they are always running out of stock. The department manager decides to perform a unit count each day to determine when they are running short or if there might be some pilferage occurring.
-
Problem Line Stock Count
Due to ineffective receiving processes or supply chain issues, items regularly have negative stock on hand. Inventory control schedules a stock count that tracks this behavior automatically to correct such problems without having to generate manual stock count lists for each store.
-
Unit and Amount Stock Count
The Store Manager is informed when it is time to financially report their store's current value of inventory. The corporate user will schedule the Unit and Amount stock count to be executed by Department and the store manager will schedule additional staff to count all items in the store. Each Department manager will be required to complete and approve their section of the stock count. When complete, the financial value will be associated with each item counted in the store and sent to the merchandising system to have it in a similar way corrected.
Types of Stock Counts
Each type of stock count can be useful for a retailer and all play an important part in the management of inventory.
Ad Hoc Stock Counts
Unlike the other stock count types, Ad Hoc stock counts are not scheduled, but rather performed at random times when a user decides to correct inventory.
Since this count type is performed randomly, there are no predefined lists and you can scan any item in any order. The scanned items can also be removed from the stock count, if needed.
You can count any inventory item even if the item has been discontinued.
The inventory snapshot is taken as each item is added to the stock count. Snapshot is a process in which the system will capture the current stock on hand quantity. For Ad Hoc counts, discrepancy thresholds are set up differently from other count types by accessing the Ad Hoc Stock Count screen.
Inventory Adjustments will be created and sent to the merchandising system when an inventory change is made in the system.
Unit Stock Counts
The unit stock count must be scheduled. They can be scheduled and executed the same day if you desire. This count type can be setup on a recurring basis: daily, weekly, monthly or yearly.
The items to include in the stock count are identified by setting up a product group. The product groups are a one-time setup and can be reused for future stock counts. Product groups are used for creating the list of items as well as identifying how the stock count is processed. When setting up the stock count, you can define which items to include by selecting by All department, item, supplier, style, item basket, or merchandise hierarchy level. There are various settings used to determine how an item will be identified as being discrepant.
Unit counts are the only stock count type that allows you to select any item status to include in the count. You can also select whether to include items that do not have any stock on hand.
Inventory Adjustments are created and sent to the Merchandising System for any inventory adjustments made.
Problem Line Stock Counts
The problem line stock count is setup once and scheduled to run daily for a period of time. If there are no problem items, a stock count will not be created. Setup of the stock count can be done at the all department, item, supplier, style, item basket, or merchandise hierarchy level. Each day, the system will run the problem batch and find any problem items and populates those items on a stock count. Discrepancy Thresholds are defined the same as the Unit count, but there are additional criteria defined during Product Group Setup. The additional information you can select for the problem line counts includes, Actual Pick Amount less than Suggested Pick Amount and negative available inventory and UIN Discrepancies (Unique Identification Numbers).
Problem line stock counts follow exactly the same workflow as unit counts. The only exception is the product group setup.
Unit and Amount Stock Counts
The Unit and Amount stock counts must be scheduled for a specific date. These stock counts, need to be scheduled at least 1 day ahead of time. When the count is scheduled it is sent to the merchandising system so that it can also create a corresponding stock count.
Item lists are created by merchandise hierarchy or can include all departments. Unit and Amount counts cannot select by item, supplier, style, or item basket, because the merchandising system holds the valuation at the merchandise hierarchy level. Unexpected items can be added during the counting process so long as they are for the same merchandise hierarchy that the stock count was set up for.
The item status and SOH Quantity cannot be selected and are defined by the system. Inventory is updated in the system and a flat file is created with the new SOH quantity, rather than the delta. The file will be sent out externally for other systems such as merchandising.
Summary
The following figure shows a summary of the similarities and differences between the various types of stock counts.
Figure 11-1 Summary of Types of Stock Counts

Unit, Problem Line, Unit and Amount stock counts all use predefined items lists and must be scheduled. Ad Hoc stock counts do not use a predefined item list, are not scheduled. The snapshot for Unit, Problem Line and Unit & Amount stock counts is taken for all items on the count at the same time, while the Ad Hoc stock count takes the snapshot as each item is counted. Only the Unit and Problem Line allow the snapshot to be retaken during the recount. Ad Hoc stock counts never use guided counting and as a result files cannot be imported from a Third Party service. Only the Unit stock count can be scheduled on a recurring basis. The Problem Line can only be scheduled daily and Unit and Amount scheduled for a specific date.
Since the Ad Hoc stock count is not defined using product groups, it is the only type of count that does not have a recounting stage.
Counting Methods
The counting process is identical among Unit, Unit and Amount, and Problem Line stock count types. What differs among these three stock count types is either the setup or the items being counted.
SIOCS includes the following types of counting methods for stock counts:
-
Un-guided
The Unguided count method allows the user to scan any item in any order. When the system parameter 'Unguided Stock Count Allow Multiple Users' is set to 'Yes', an unguided stock count will allow more than one user to scan simultaneously against the same stock count.
-
Guided
In Guided count method, the items are counted based on locations
-
Third Party
Here, the stock count will be done by a third party service provider and the result file will be uploaded into the system for further processing
Serialization
Retailers who sell items such as electronics, cell phones, firearms, medications and fresh items, often have to track unique numbers or attributes for a single item or group of items. These identifiers might be serial numbers, unique identification numbers, FCC IDs, International Mobile Equipment Identity (IMEI) numbers, or other kinds of identifiers. Unique identification numbers aid the retailer in tracking expensive or controlled items, or items that may be subject to manufacturer recalls or investigations by legal authorities.
The system provides the capability to track items by unique identification numbers (UIN). If the system is not configured to use UINs, this does not apply. If the UINs are not used, fields and functions related to UINs are not available in the mobile application UI.
If UINs are required for an item, the UINs must be scanned, entered or automatically generated when stock is received. When UINs are generated for tracking items, users can print labels with the generated UINs.
If the store uses UINs, the snapshot captures the status of those items in the store as part of the store's stock on hand, as well as those UINs in missing status.
Functionality
This section covers the available screens.
Features
The following is a list of features for Stock Counts in the mobile application:
-
Search for stock count
-
Create a new AdHoc stock count
-
View or edit an existing stock count
-
Count items for stock count
-
Count items through bulk scanning
-
UIN
Figure 11-2 Stock Count Mobile Screen Flow
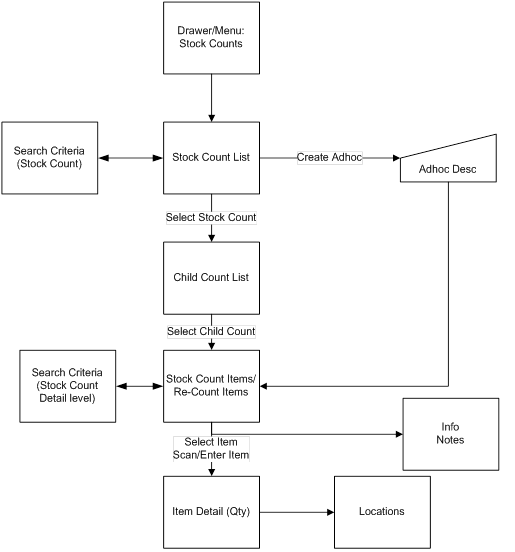
After logging into the mobile application, the main menu drawer is displayed. You can select Stock Counts from the Inventory Management menu.
The Stock Counts module in the mobile application contains Stock Count List, Creating a new Ad hoc Stock count, Child Stock Count List and viewing the item details.
Stock Count List
Figure 11-3 Stock Count List Screen
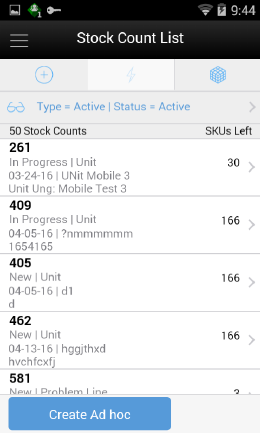
You can select Stock Count from the Main Menu Drawer and be directed to the Stock Count List screen. You will need permissions to access this screen. When you enters the screen, the system will default to display records with a status of "Active" and type of "Active."
The transactions may include Ad hoc stock count, Unit count, Problem Line count, and Unit and Amount count:
-
You are required to have the Edit Adhoc Stock Count permission to edit an Adhoc stock count.
-
You are required to have the Edit Unit Stock Count permission to edit a Unit stock count.
-
You are required to have the Edit Unit Amount Stock Count permission to edit a Unit and Amount stock count.
Ad Hoc Stock Count
Figure 11-4 Add Stock Count Popup
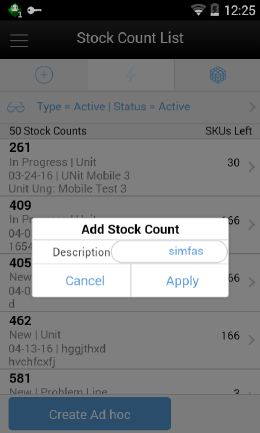
You can select Create Ad Hoc from Stock Count List and be directed to the Add Stock Count popup to add a description for an adhoc stock count. You will need permissions to access this screen. When you enter the screen, the text box for entering description for Ad Hoc stock count is filled with highlighted <user ID> which, once written with text, goes off. After entering the description, the user can add items to the stock count and complete the count.
If needed, the retailers can create an adhoc stock count and yet not give the opportunity for an associate to continue adding items, basically, the stock count will be locked after adding the first set of items. This option of locking a stock count will be enabled when the system parameter Enable Adhoc Stock Count Locking is set to Yes. If this parameter is set to Yes, there will be new flag called Adhoc Stock Count Lock which comes into picture. If the user adds items via bulk scan or through an item basket, this flag is set to Yes automatically and additional items cannot be added henceforth. It can be edited from the Edit Stock Count screen as well, provided the user has appropriate permissions.
Stock Count List Search Criteria
Figure 11-5 Search Criteria Screen
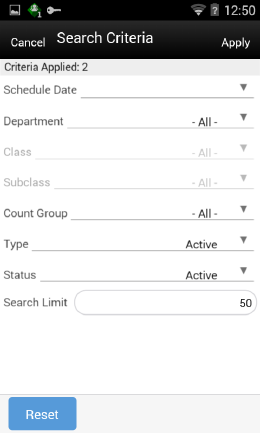
You can select the eye glasses from the stock count list screen and be directed to the Search Criteria screen. When you enter the screen, the mobile application will default to display records with a status of Active and type of Active.
Fields
Criteria Applied <x>: The number of criteria applied to the search, where X is the number.
Scheduled Date: The date for which the scheduled stock count is scheduled. Defaults to blank.
Department: List of values containing all of the departments. The value will be defaulted to All. Since a Product Group can consist of more than one merchandise hierarchy, the filter will return all stock counts that are affiliated with the department or where the counting groups contains that hierarchy. When a department is cleared out, the class and sub-class will also be cleared out.
Class: List of values containing all of the classes for the selected department. You must select a department first for the class to be editable. The value will be defaulted to All. Since a Product Group can consist of more than one merchandise hierarchy, the filter will return all stock counts that are affiliated with the class and counting groups that contain that hierarchy. When a class is cleared out, the subclass will also be cleared out.
Sub-Class: List of values containing all of the sub-classes for the selected class. You must select a class first for the class to be editable. The value will be defaulted to All. Since a Product Group can consist of more than one merchandise hierarchy, the filter will return all stock counts affiliated with that subclass and counting groups that contain that hierarchy.
Count Group: List of all product groups that exists in the system. Defaults to All.
Type: List of values. Valid values are Stock Count, Re-Count, Authorize, Active, and All. Default value is Active. Active is a type represents Stock Count and Recount (not Authorize).
Status: valid values are New, In Progress, Processing, Completed, All, and Active. Default value is Active. Active will include New and In Progress stock counts.
Note:
Confirmed is the status of a guided Unit and Amount stock count for all items that are in Authorize Type and have not yet moved to Completed due to not having the results exported. Once exported, the stock count will move to Completed status. If user selects a stock count in confirmed or completed status it will be in view only mode.
Search Limit: Entry field. You can define a search limit for the number of transactions being displayed. It is a Required Field. The value will default through a system admin setting, Search Limit Default for stock count list - Mobile.
Child Count List
Figure 11-6 Child Count List Screen
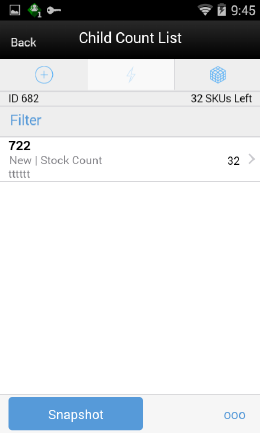
You can select Stock Count from the Stock Count List and be directed to the Child Count List screen. When you enter the screen, the system will sort the child count by ID. Closed child count should be at the bottom and Active child counts should be at the top and then this ID sorting should be applied.
Selecting a child count will take you to the Stock Count Items and Stock Re-Count Items screen. Ad hoc Stock Counts will automatically have a single child count created. (Ad hoc stock counts will have one stock count to one child). The child count will be automatically named the same as the stock count (assigned description by user) with the words (child) after it.
Snapshot: This will take snapshot for all the child counts on the stock count. This will take a snapshot for Problem line and Unit type of stock counts only. If any other type of stock count, this button will not be visible.
The snapshot of a stock count will happen as follows:
-
Unit or Problem Line: Can be taken from Child count list screen for the whole stock count or from the Stock count item screen if not in re-count mode. For Re-Count, it will be taken automatically.
-
Adhoc: Takes snapshot as items are added.
-
Unit and Amount: Snapshot for this type can be taken via the Snapshot batch within the desktop application.
-
For unexpected items that get added during counting:
-
If the snapshot has already been taken for the count, it will take the snapshot of the unexpected item as it gets added to the count.
-
If the snapshot has not been taken for the count yet, then the snapshot for the unexpected item will not get taken as the item is added, rather when the snapshot is taken for the stock count.
-
-
You can access the Child Count List screen by creating an Adhoc stock count or selecting a stock count from the Stock Count List screen.
You must have the Edit Adhoc Stock Count permission to open the screen in edit mode when displaying an Adhoc count; otherwise the screen will open as view only.
Similar to a unit count, you must have the Edit Unit Stock Count permission to open the screen in edit mode when displaying a Unit count; otherwise, the screen will open as view only.
You must have the Edit Unit and Amount Stock Count permission to open the screen in edit mode when displaying a Unit and Amount count; otherwise the screen will open as view only.
Footer Menu
Figure 11-7 Child Count List Footer Menu
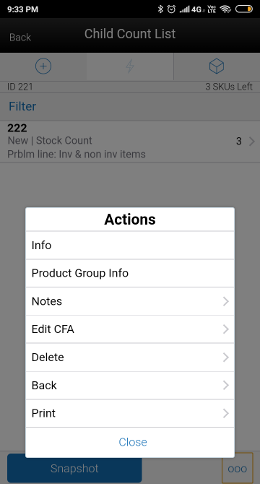
This opens up a footer menu with following options:
Info: Info popup will be displayed.
Product Group Info: Product Group Info popup will be displayed.
Notes: Notes dialog will be displayed.
Edit CFAs: This will navigate you to the Edit CFAs screen to capture the Custom Flexible attributes for the stock count/recount.
Print: This will open the print dialogue.
Back: This will navigate you back to the Stock Count List screen.
Delete: This will delete the Stock Count that is under consideration and have not yet been authorized.
Close: This will navigate you to stock count list screen.
Edit Stock Count
Figure 11-8 Edit Stock Count
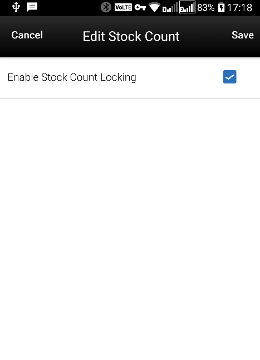
The Edit Stock Count screen enables the user to set the lock which decides whether additional items can be added to an adhoc stock count or not. This screen can be accessed by selecting Edit Stock Count option from the footer menu of Stock Count Child List screen and this option will be available when the following conditions are met
-
System parameter Enable Adhoc Stock Count Locking must be set to Yes.
-
The stock count is an adhoc stock count and the status is not Completed.
-
The user has security permission Edit Adhoc Stock Count Lock.
Edit CFAs
Figure 11-9 Edit CFAs
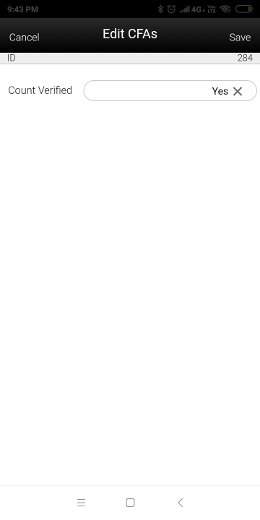
The Edit CFAs screen displays the list of CFAs (flexible attributes) that have been set up for the Stock Count and Stock Recount in the system and that allows you to enter values for them.
The system displays the fields based on the setup for the type of delivery. The CFAs that are set up as Required must have a value entered. The value can be one of the following: Date, Text, Decimal, Long depending on the 'data type' set up for the CFAs, while creating them in the desktop application. Appropriate security permissions are needed and the count must be in editable status for entering CFA values. The CFA's captured will be displayed in the info screen.
Stock Count Items and Stock Re-Count Items
Figure 11-10 Count Items and Re-Count Items Screens
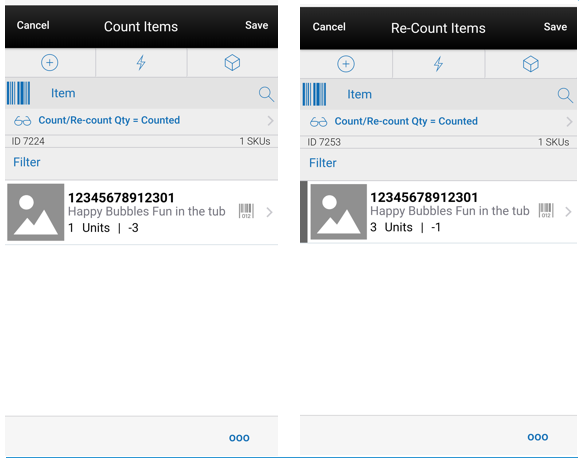
You can select a child count from the Child Count List screen and be directed to the Stock Count Items or Stock Re-Count items screen depending upon the status of the stock count. This screen appears when a child stock count is selected and the Child stock count type is Stock Count New or Stock Count In Progress. Item Images will be displayed per a system admin setting for stock counts. The system will default to show the "uncounted" records.
If the item has a UIN captured, it will have the UIN icon on the line item.
Selecting an item will go to the Item Detail for that item. If the item scanned/selected is a UIN item, the user will navigate to the UIN tab within the Item Detail screen.
All newly added items and modified items will have a bar on left to denote those have been modified.
When you enter the screen, the system will sort the items left to count as below:
-
If guided and if items are sequenced, then order by sequence order.
-
If it is un-sequenced, "no location" items falling at the end by item description order.
-
If unguided, items are always sorted by item description.
Variance: User will be able to view the difference between the 'snapshot' quantity and the 'Total quantity' counted, provided the user has 'View variance' security permission.
-
If the snapshot quantity < Total quantity, display '+' symbol before the variance value.
-
If the snapshot quantity > Total quantity, display '-' symbol before the variance value.
-
If the snapshot quantity = Total quantity, display '0' symbol before the variance value.
-
This field will be displayed only when the user has 'View Variance' security permission.
-
This value should be calculated dynamically after each scan (count) happens.
-
This value will be displayed only for 'counted' items.
Footer Menu
Figure 11-11 Count Items and Re-Count Items Footer Menu
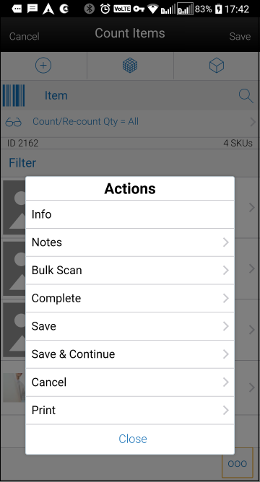
Info: Info popup will be displayed.
Notes: Notes dialog will be displayed.
Bulk Scan: This will take the user to the Bulk Scan screen
Complete: This will complete the child count and navigate you to the Child Count List screen. You are required to have the Complete Stock Count permission for this menu option to display.
Save: This will save the child count and navigate you to Child count list screen.
Save & Continue: This will save the child count and user will be in the same dialog.
Cancel: This will discard changes to stock count / re-count and navigate you to Child count list screen. This will be "Back" when in view only mode.
Print: This will open the print dialogue.
Close: This will navigate you to Stock Count Items screen.
Info
Figure 11-12 Info Screen
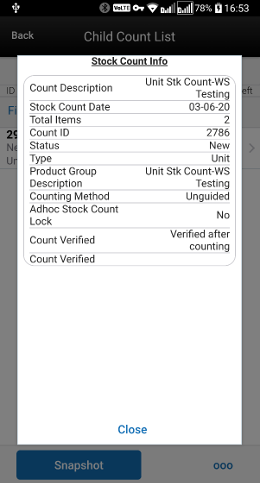
The info screen is an informational popup that contains read-only information about the header level of the stock count. It is accessed through the Info menu option in the Footer menu on the Child Count List screen. Details include:
-
Count Description
-
Stock count date
-
Total Items
-
Count ID
-
Status
-
Type
-
Product Group Type
-
Product Group Description
-
Counting Method
-
Adhoc Stock Count Lock - If set to yes, the field does not allow the user to add additional items to the ad hoc count
-
CFAs and the corresponding value
Product Group Info
Figure 11-13 Product Group Info Screen
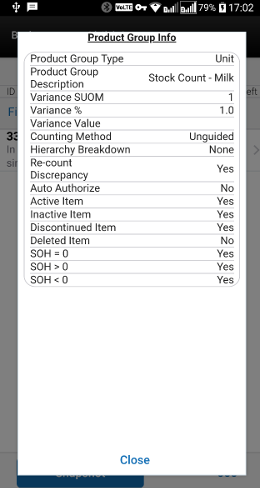
The Product Group Info screen is an informational popup that contains read-only information about the product group associated with the stock count. It is accessed through the Product Group Info menu option in the Footer menu on the Child Count List screen. Details include:
-
Product Group Type
-
Product Group Description
-
Variance SUOM
-
Variance %
-
Variance Value
-
Counting Method
-
Hierarchy Breakdown
-
Re-count Discrepancies
-
Auto Authorize
-
Active Item
-
Inactive Item
-
Discontinued Item
-
Deleted Item
-
SOH = 0
-
SOH > 0
-
SOH < 0
-
Prob Line-Actual Pick Amt less than Suggested Pick Amt
-
Prob Line-Actual Shelf Repl Amt less than Suggested Shelf Repl Amt
Child Count Info
Figure 11-14 Child Count Info Screen
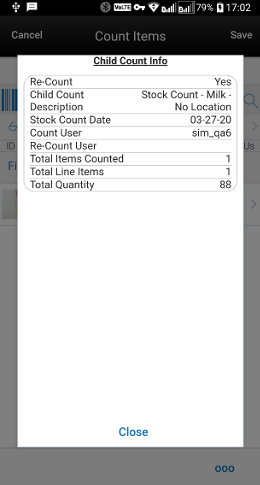
The Child Count Info screen is an informational popup that contains read-only information about the child count. It is accessed by selecting Info from the Count Items screen. Details include:
-
Recount
-
Child Count Description
-
Stock Count Date
-
Count User
-
Re-Count User Total Items Counted
-
Total Line Items
-
Total Quantity
Bulk Scan
Figure 11-15 Bulk Scan Screen
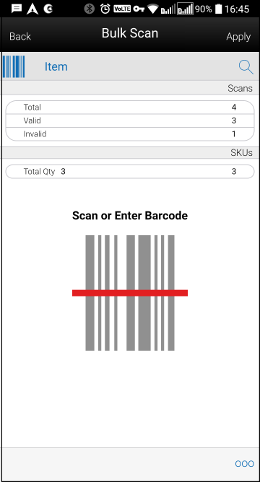
The Bulk Scan screen is used to scan (or enter) one or more items to apply to a transaction in Bulk.
As Items are scanned/entered, they are accumulated on this screen with just item existence validation. It acts as a "counter" and "storage" of the valid scans until they are applied to the transaction. The screen is read-only.
The user can access the Bulk Scan screen by:
-
Selecting the Bulk Scan menu option from the footer menu of the Stock Count Items and Stock Re-Count Items screen. The user must have proper security permissions, Allow Bulk Scan, for the Bulk Scan menu option to be available.
-
Scanning/entering items on the Stock Count Items and Stock Re-Count Items screen, when the scan type is set to Bulk and one or more items are scanned. The user must have proper security permissions, Allow Bulk Scan, for the Bulk Scan type option to be available.
Footer Menu
Items: The user will be taken to the Bulk Items screen to view the items from the scan(s)
Import Basket: You will be taken to the Select Item Basket screen to select an item basket to import. User must have Import Item Basket permission for the respective functional area for this menu option to be available within a functional area. Only 'static' item baskets can be imported.
Apply: This will take all of the items found (valid scans) from the scan(s)/entries on the screen and validate them against the transaction. Any issues will be gathered to display on the Issues screen.
Clear: This will clear out anything that has been scanned/entered. All counters will reset back to 0.
Back: The user will navigate back to Stock Count Items and Stock Re-Count Items screen and the system will auto save the items scanned/entered.
Bulk Items
Figure 11-16 Bulk Items Screen
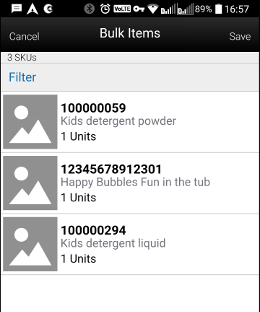
The Bulk Items screen displays all of the items that are affiliated with the items collected on the Bulk Scan screen. All scans that were valid/successful, meaning that they found an item in the system, will be displayed on this screen.
Issues
Figure 11-17 Issues Screen
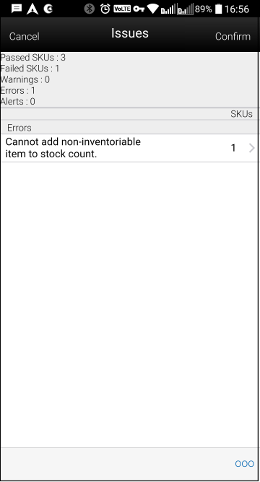
This screen displays all of the Issues (alerts, warnings and errors) associated to the items that were scanned/entered on the Bulk Scan screen from Item Detail and Stock Count Items and Stock Re-Count Items screen.
Footer Menu
Yes to All: All warnings will be set to 'checked'/'yes'.
No to All: All warnings will be set to 'unchecked'/'no'.
Confirm: The system will apply the item(s) to the transaction that had no and those with issues based on the decisions taken by the user. If the item does not exist on the transaction yet, the item and quantities will be added to the transaction. If the item does exist on the transaction, the quantity will be added. All items that have only Alerts and all items that have only Warnings that were selected as 'Yes' will be applied to the stock count.
Cancel: Exits the screen and nothing is saved.
Issue Detail
Figure 11-18 Issue Detail Screen
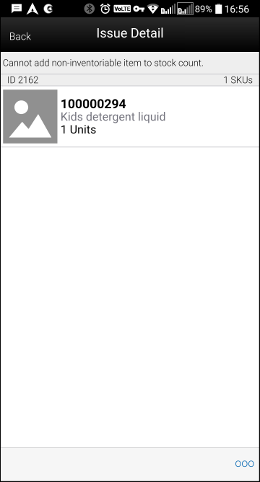
This screen displays all of the items that are associated with a specific issue (Alert, Warning, or Error). The user can access the Issue Detail Screen by selecting an issue (Alert, Warning, or Error) from the Issues screen.
Footer Menu
Yes to All: All warnings will be set to 'checked'/'yes'.
No to All: All warnings will be set to 'unchecked'/'no'.
Cancel: This will take the user back to the Issues screen.
Issue Detail - UIN
Figure 11-19 Issue Detail UIN Screen
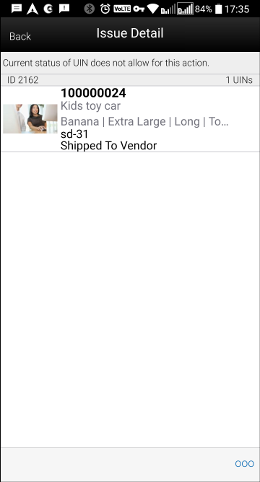
This is the Issues Detail screen for UINs. The screen displays all of the UINs that are associated with a specific issue (Alert, Warning, or Error), along with the item it belongs to. The user can access the Issue Detail screen by selecting an issue (Alert, Warning, or Error), from the Issues screen, which is of UINs.
Issues - Single Item
Figure 11-20 Issues - Single Item Screen
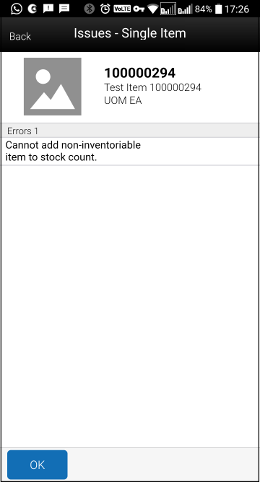
This is the Issues - Single Item screen which displays all of the issues (Alert, Warning, or Error) for an item scanned via regular scan. The screen is displayed when the user scans a single item in Auto/UIN scan type mode and if the item failed any validations.
Footer Menu
Apply: This button is displayed if there are warnings and alerts only. This lets the user to go ahead with the warning displayed and add the item to the transaction. After selecting 'Apply', the required action will take place depending on the requirements of the warning displayed.
Cancel: This button is displayed if there are warnings and alerts only. This allows the user to stop adding the item to the transaction. After selecting this button, the required action will take place depending on the requirements of the warning displayed.
OK: This button is displayed if there are errors and/or alerts only. By clicking 'OK', the user can acknowledge the error/alert.
Search Criteria - Stock Count Items and Stock Re-Count Items
Figure 11-21 Search Criteria Screen
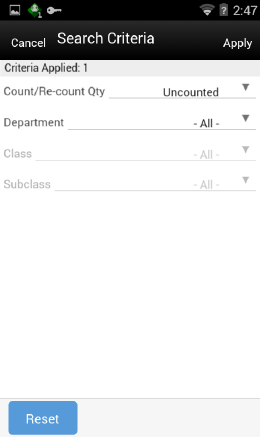
You can select the eye glasses from the Stock Count Items and Stock Re-Count Items screen and be directed to the Search criteria screen.
The default will be:
Stock Count: Count / Re-Count Qty = 'uncounted'
Re-Count: Count / Re-Count Qty = 'uncounted', Filter = 'Discrepant'
The Count / Re-Count Qty will default as the filter on the top of the Stock Count / Stock Re-Count screen.
Fields
Criteria Applied <x>: - the number of criteria applied to the search, where X is the number.
Count / Re-Count Qty: Valid values are All, Counted and Uncounted.
Filter: Valid values are All Items and Discrepant Items. Displays only when it is a Re-Count.
Department: List of values containing all of the departments pertaining to that stock count. The value will be defaulted to All. Since a Product Group can consist of more than one merchandise hierarchy, the filter will return all stock counts that are affiliated with the dept or where the counting groups contains that hierarchy. When a department is cleared out, the class and sub-class will also be cleared out.
Class: List of values containing all of the classes for the selected Department. User must select a department first for the class to be editable. The value will be defaulted to All. Since a Product Group can consist of more than one merchandise hierarchy, the filter will return all stock counts that are affiliated with the class and counting groups that contain that hierarchy. When a class is cleared out, the subclass will also be cleared out.
Sub-Class: List of values containing all of the sub-classes for the selected Class. You must select a Class first for the sub-class to be editable; the value will be defaulted to All. Since a Product Group can consist of more than one merchandise hierarchy, the filter will return all stock counts affiliated with that subclass and counting groups that contain that hierarchy.
Reset: Button will clear the screen of any previous search criteria that was entered by you and set back to the default values. The screen will remain open for you to enter in new search criteria.
Item Detail
Figure 11-22 Item Detail Screen
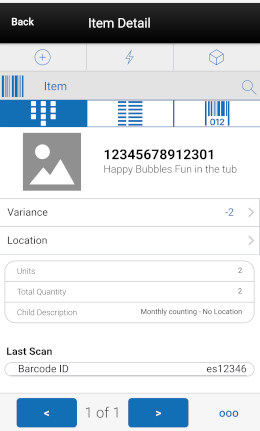
The Item Detail screen is displayed when selecting an item from the Stock Count Items and Stock Re-Count Items screen or an item is scanned. The image display will be controlled by the system parameter. This screen will help you to enter quantity for an item in the stock count. If stock count is not completed then the quantity fields will be editable and user can enter value for counting item. The quantity fields will be disabled for UIN items and RFID enabled items. The value for these fields will be based on the number of UINs/RFID tags scanned.
There is a UIN tab that enables the user to view/add/remove the UINs for the item, if the item is a serial number item. If the user scans a serial number item, they will be taken directly to the UIN tab within the Item Detail screen, for that item.
There is an Extended Attributes tab that enables the user to view/capture extended attributes for the item. If the item is not configured to capture extended attributes or there are no extended attributes captured, the list will be empty.
This will be a view-only screen if the stock count is completed and no further edits can be made, or the user has no edit permissions. Items are sorted based on a few different criteria:
-
If guided and items are sequenced, the order will be based on the sequence with non-sequenced (no location items) falling at the end.
-
If unguided, items are always sorted by item description.
Note:
Removal of an item after it has been added is not allowed in Stock Count unless it is an Ad-hoc stock count.Units/case field: The sum of the quantity of the items scanned until a new item is scanned. This field indicates the number of items a user has in front of them that they have scanned.
Variance: User will be able to view the difference between the 'snapshot' quantity and the 'Total quantity' counted, provided the user has 'View variance' security permission.
-
If the snapshot quantity < Total quantity, display '+' symbol before the variance value.
-
If the snapshot quantity > Total quantity, display '-' symbol before the variance value.
-
If the snapshot quantity = Total quantity, display '0' symbol before the variance value. This field will be displayed only when the user has 'View Variance' security permission.
It will be calculated dynamically after each scan (count) happens and it will only be displayed for 'counted' items.
Note:
If the system is configured to auto save the items for the unguided stock counts depending on the system parameter ‘ Unguided stock counts Automatic Save’, the system will look for the threshold value set in the Auto Save number of items threshold and save the items automatically when it reaches the threshold. The system resets the count and automatically saves the items every time it reaches the threshold. If the user exits before the threshold is met, the system still automatically saves the items and exits.Last Scan shows the details of the last scanned barcode.
User Quantity is the sum of all quantities for an item since the last time it was saved.
Total Quantity includes the quantities from the database when it was last read, increase with the user quantity.
Example of how the scan quantities work:
-
Scan item A.
User quantity 1
Session quantity 1
Total quantity 1
-
Scan item A again.
User quantity 2
Session quantity 2
Total quantity 2
-
Scan item B.
User quantity 1
Session quantity 1
Total quantity 1
-
Scan item A.
User quantity 1
Session quantity 3
Total quantity 3
-
Save count and scan item A.
User quantity 1
Session quantity 1
Total quantity 4
-
Scan item B.
User quantity 1
Session quantity 1
Total quantity 2
Footer Menu
Figure 11-23 Item Detail Footer Menu
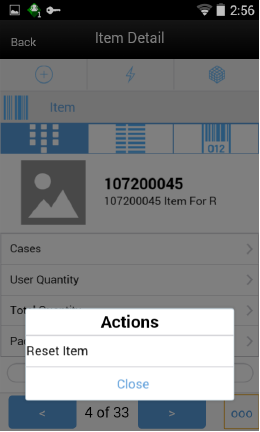
If you want to reset the changes done in the same session, you can reset it through the footer menu on the Item Detail screen.
Functionality - JET Mobile
This section explains the functionality of the stock count module screens available in the SOCS Jet Mobile application. While the major functionality of the stock count module in the SOCS Jet Mobile matches with the SOCS MAF, there are some flow changes and modified screens that you need to take note of. Additionally, there could be some missing functionalities like Bulk Scan, Item Basket, etc.
Features
The following is a list of features for Stock Counts in the JET mobile application:
-
Search for stock count
-
Create a new Ad Hoc stock count
-
View or edit an existing stock count
-
Count items for stock count
-
UIN
Figure 11-24 Stock Count Mobile Screen Flow
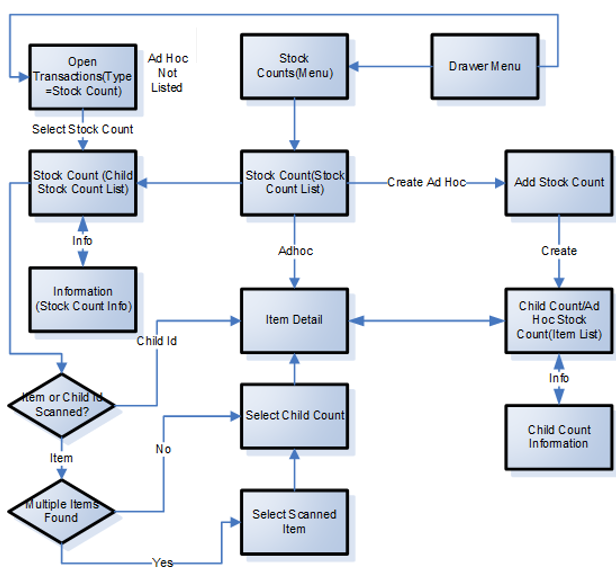
After logging into the mobile application, the main menu drawer is displayed. You can select Stock Counts from the Inventory Management menu or select an active stock count from the open transactions.
The Stock Counts module in the mobile application contains Stock Count List, Creating a new Ad hoc Stock count, Child Stock Count List and viewing the item details.
Stock Count (Stock Count List)
Figure 11-25 Stock Count List Screen
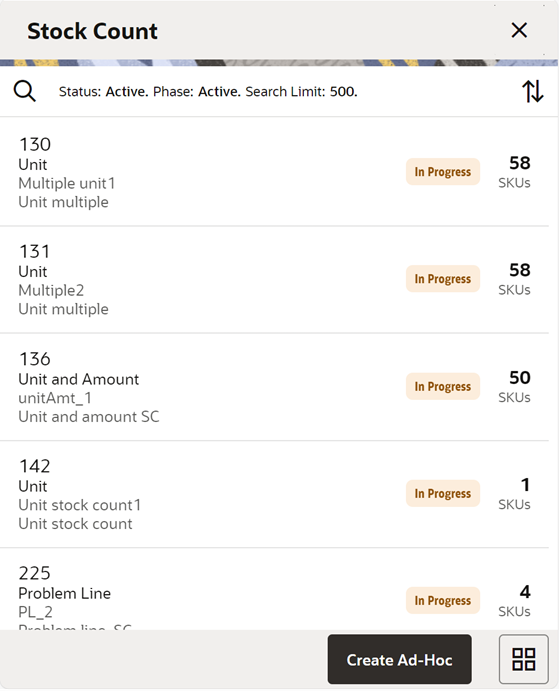
You can select Stock Count from the Main Menu Drawer and be directed to the Stock Count screen. You will need permissions to access this screen. This is a list screen, and when you enter the screen the system will default to display records with a status of "Active" and Phase of "Active."
Active Status includes ‘New’ and ‘In Progress’ counts. Active Phase includes Stock Count and Re-Count phases.
On this screen, you can select to Create a new Ad Hoc Stock count if you have proper permissions. Upon selecting the option, you are directed to the Add Stock Count popup.
The transactions may include Ad hoc stock count, Unit count, Problem Line count, and Unit and Amount count:
-
You are required to have the Edit Adhoc Stock Count permission to edit an Adhoc stock count.
-
You are required to have the Edit Unit Stock Count permission to edit a Unit stock count and Problem Line.
-
You are required to have the Edit Unit Amount Stock Count permission to edit a Unit and Amount stock count.
Ad Hoc Stock Count
Figure 11-26 Add Stock Count Popup
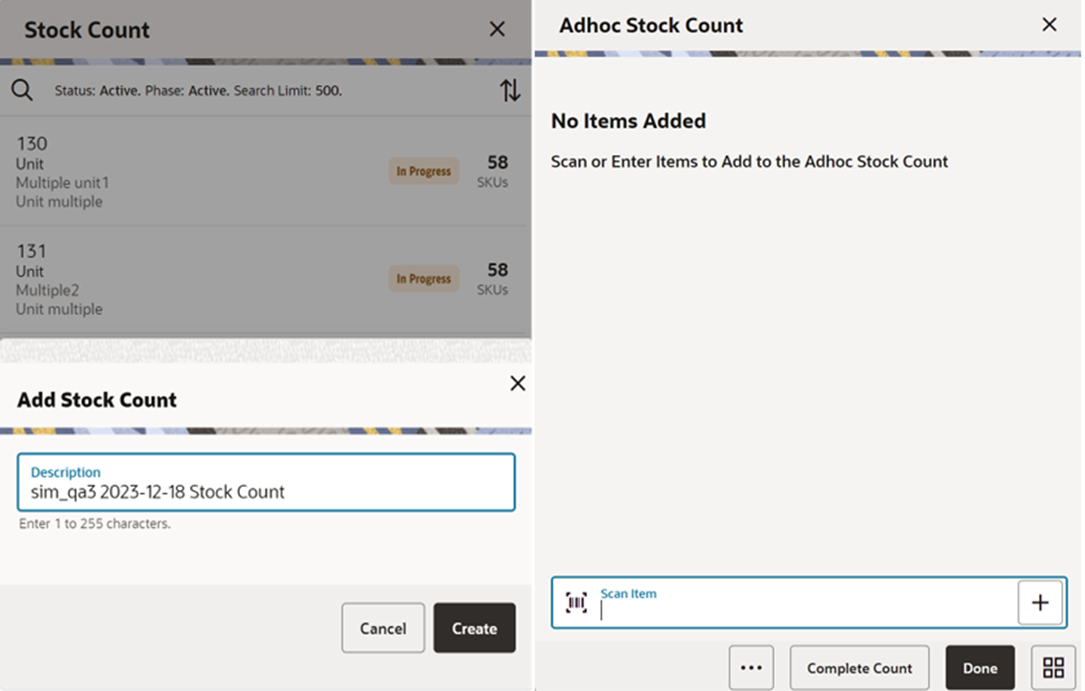
You can select Create Ad Hoc from Stock Count and be directed to the Add Stock Count popup to add a description for an adhoc stock count. You will need permissions to access this screen. When you enter the screen, the text box for entering description for Ad Hoc stock count is defaulted to <user ID> <date> Stock count and can be modified. After entering the description and select to create, the user can add items to the stock count and complete the count.
The system will navigate to Item List with empty list directly when the user creates ad hoc stock count.
Stock Count - Search Criteria
Figure 11-27 Search Criteria Screen
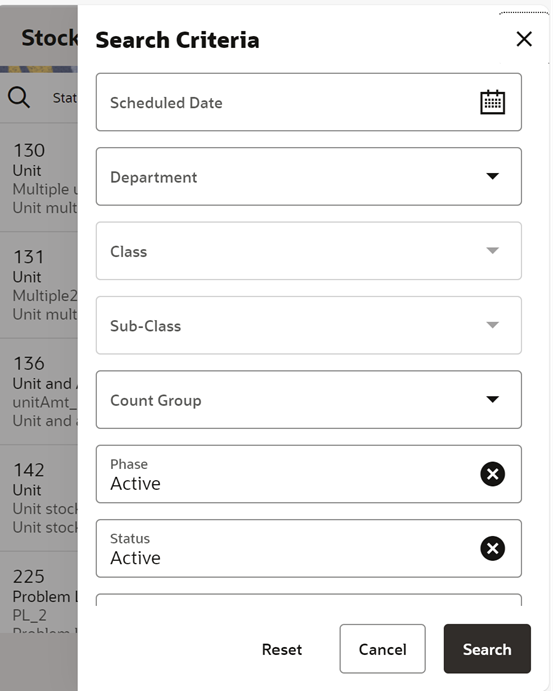
You can select the magnifying glass from the Stock Count screen and be directed to the Search Criteria screen. On this screen, you can set the search criteria to filter the stock count list on the Stock Count screen.
Fields
Scheduled Date: The date for which the scheduled stock count is scheduled. Defaults to blank.
Department: List of values containing all of the departments. The value will be defaulted to All. Since a Product Group can consist of more than one merchandise hierarchy, the filter will return all stock counts that are affiliated with the department or where the counting groups contains that hierarchy. When a department is cleared out, the class and sub-class will also be cleared out.
Class: List of values containing all of the classes for the selected department. You must select a department first for the class to be editable. The value will be defaulted to All. Since a Product Group can consist of more than one merchandise hierarchy, the filter will return all stock counts that are affiliated with the class and counting groups that contain that hierarchy. When a class is cleared out, the subclass will also be cleared out.
Sub-Class: List of values containing all of the sub-classes for the selected class. You must select a class first for the class to be editable. The value will be defaulted to All. Since a Product Group can consist of more than one merchandise hierarchy, the filter will return all stock counts affiliated with that subclass and counting groups that contain that hierarchy.
Count Group: List of all product groups that exists in the system. Defaults to All.
Phase: Valid values are Active, Authorize, Re-Count and Stock Count. Active will include Stock Counts that are in Stock Count and Re-Count phase.
Status: Valid values are All, New, In Progress, Processing, Active, Canceled and Completed. Default value is Active. Active will include New and In Progress stock counts.
Note:
Confirmed is the status of a guided Unit and Amount stock count for all items that are in Authorise Phase and have not yet moved to completed due to not having the results exported. Once exported, the stock count will move to Completed status. If the user selects a stock count in Confirmed or Completed status, it will be in view only mode.Search Limit: This is an entry field. You can define a search limit for the number of transactions being displayed. It is a Required Field. The value will default through a system admin setting, Search Limit Default for stock count list - Mobile.
Stock Count - Child Count List
Stock Count (Child Count List) Screen
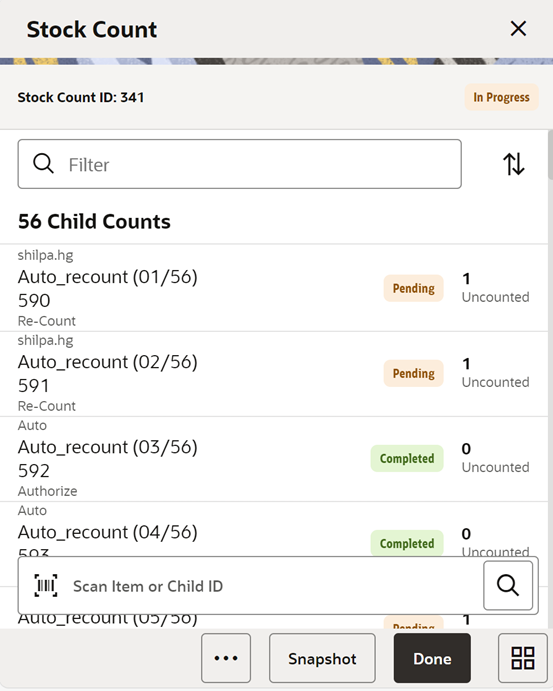
You are directed to this screen when you select a Stock Count from the Stock Count (Stock Count List) or from the Open Transactions screen. When you enter the screen, the system will sort the child count by ID. Closed child count should be at the bottom and Active child counts should be at the top and then this ID sorting should be applied.
This screen is skipped in case of Ad-Hoc Stock Counts. You will be directed to the Item Detail directly when you create an Ad-Hoc Stock count or select an existing ad hoc type of stock count.
Selecting a child count will take you to the Item Detail screen and from there you can select to go to the item list.
If you scan an item to search child count by item and if the system finds more than one result, the system prompts you to select the item from the Select Scanned Item screen.
If the system finds one or more child counts for the scanned item, the system prompts to select the child count from the Select Child Count screen.
You can scan the child ID on the scan bar and if found you are directed to the Item Detail (Stock Count) screen.
Snapshot: Selecting this button will take snapshot for all the child counts on the stock count. This will take a snapshot for Problem line and Unit type of stock counts only. If any other type of stock count, this button will not be visible.
The snapshot of a stock count will happen as follows:
-
Unit or Problem Line: Can be taken from Child count list screen for the whole stock count or from the Stock count item screen if not in re-count mode. For Re-Count, it will be taken automatically.
-
Ad hoc: Takes snapshot as items are added.
-
Unit and Amount: Snapshot for this type can be taken via the Snapshot batch within the desktop application. For unexpected items that get added during counting:
-
If the snapshot has already been taken for the count, it will take the snapshot of the unexpected item as it gets added to the count.
-
If the snapshot has not been taken for the count yet, then the snapshot for the unexpected item will not get taken as the item is added, rather when the snapshot is taken for the stock count.
-
Like a unit count, you must have the Edit Unit Stock Count permission to open the screen in edit mode when displaying a Unit count; otherwise, the screen will open as view only.
You must have the Edit Unit and Amount Stock Count permission to open the screen in edit mode when displaying a Unit and Amount count; otherwise, the screen will open as view only.
Footer Menu on Stock Count (Child Count List) Screen
Figure 11-28 Child Count List Footer Menu
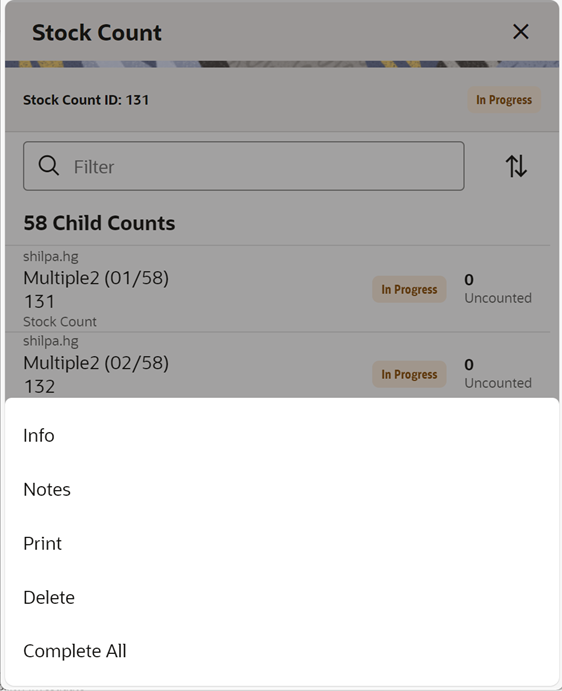
This opens up a footer menu with following options:
Info: Information (Stock Count Information) popup will be displayed. This is a master stock count level information screen.
Notes: Notes dialog will be displayed.
Print: This will open the print dialogue.
Delete: This will delete the Stock Count that is under consideration and have not yet been authorized.
Complete All: This option allows the user to complete all the child stock counts. This option is allowed if the user is having permission. Upon selecting this option, the system will process all the child stock counts and will complete the count. The system will send the authorized quantities to the upstream system if there are no discrepancies found and it is set to auto processing. If the system is able to process all the child stock counts, it will mark the child counts and the master stock count as complete. The system will show the status bar to indicate the progress when the process is running. Any failed children can be resubmitted.
Item List
Figure 11-29 Item List Screens
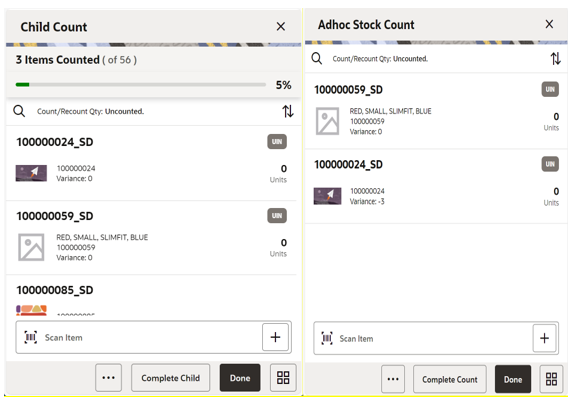
This is an Item List screen, and you can reach this screen by selecting the view full item list icon or select from the footer menu on the Item Detail screen.
This screen shows the full list of items in the child count or the Ad Hoc stock count.
You can filter the items using the search criteria. You can refine the search by Counted/Un Counted or by the hierarchy.
If the item has a UIN captured, it will have the UIN icon on the line item.
Selecting an item will go to the Item Detail for that item. If the item scanned/selected is an UIN item, the user will navigate to the Serial Number popup screen to capture the Serial Numbers (UINs).
For the stock count types other than Ad Hoc, you can see the progress bar indicating how many are counted out of the total items.
When you enter the screen, the system will sort the items left to count as below:
-
If guided and if items are sequenced, then order by sequence order.
-
If it is un-sequenced, "no location" items falling at the end by item description order.
-
If unguided, items are always sorted by item description.
Variance: User will be able to view the difference between the 'snapshot' quantity and the 'Total quantity' counted, provided the user has 'View variance' security permission.
-
If the snapshot quantity < Total quantity, display '+' symbol before the variance value.
-
If the snapshot quantity > Total quantity, display '-' symbol before the variance value.
-
If the snapshot quantity = Total quantity, display '0' symbol before the variance value.
-
This field will be displayed only when the user has 'View Variance' security permission.
-
This value should be calculated dynamically after each scan (count) happens.
-
This value will be displayed only for 'counted' items.
Complete Child : Complete Child is a footer button option to complete the child stock count. You need permission to select this button.
Complete Count : This footer button is available for the Ad Hoc type of stock counts and upon selecting this option, the system will process the stock count and mark the adhoc stock count as completed.
Additional options are available on the footer menu.
Footer Menu on the Item List
Figure 11-30 Footer Menu
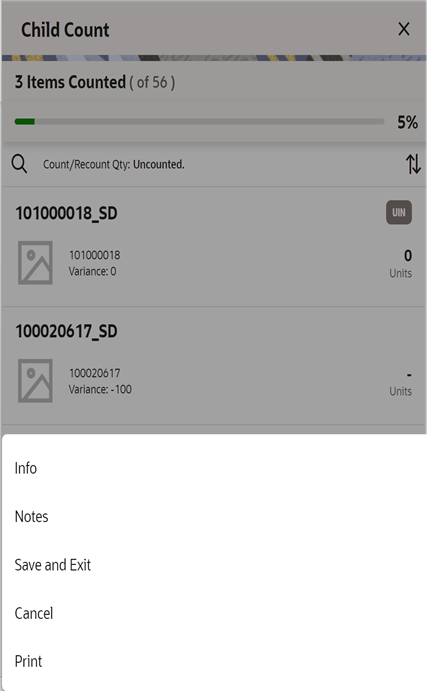
Info: Selecting Info from the Item List footer menu will take you to the Child Count Information popup. Notes: Notes dialog will be displayed.
Notes: Notes dialog will be displayed.
Save and Exit: This will save the child count and navigate you to Stock Count List.
Cancel: This will discard changes to stock count / re-count and navigate you to Stock Count List in case of Ad Hoc and Child Count List in case of other types.
Print: This will open the print dialogue.
Snapshot: This option is visible only for Problem Line and Unit type stock count types. Upon selecting this option, the system will take the snapshot for the child count. The option will not appear if the snapshot is already taken. This option is permission based.
Info (Stock Count Information)
Figure 11-31 Stock Count Information Screen
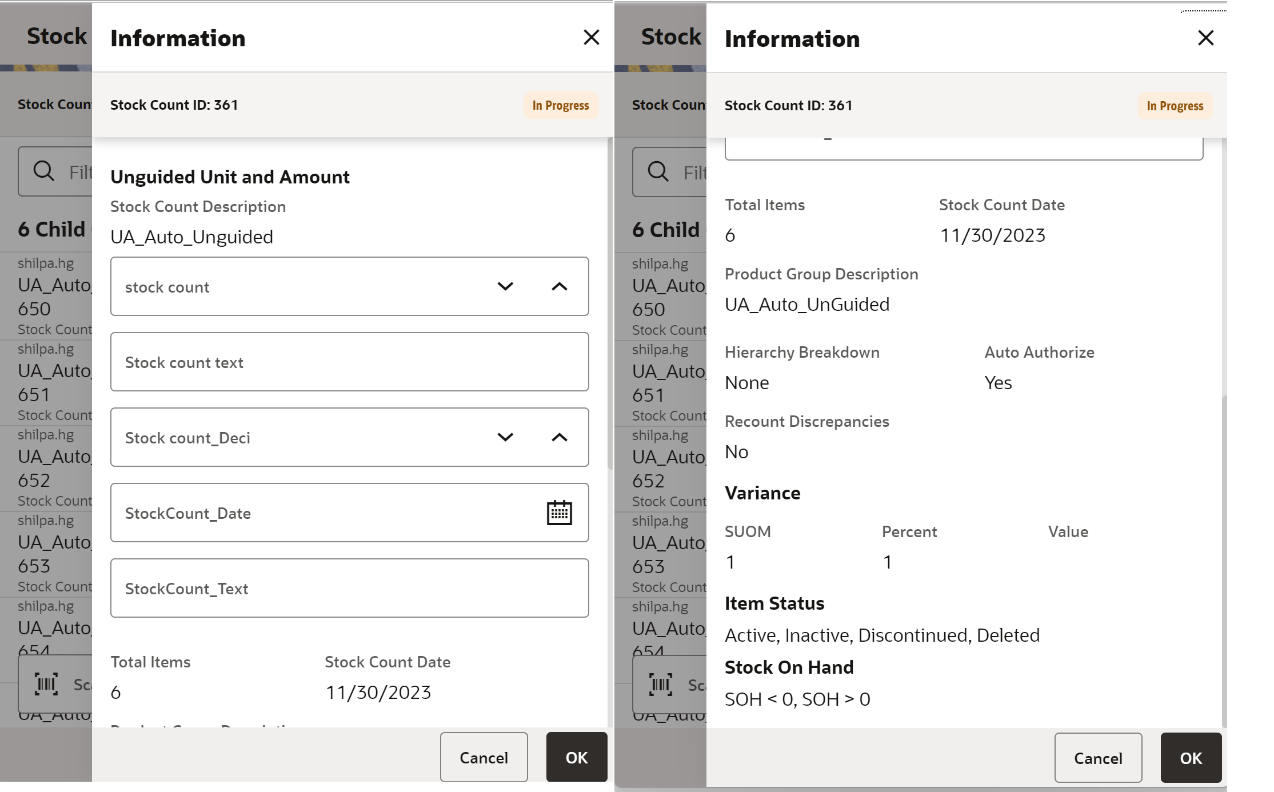
This Information popup screen is accessed from the Stock Count (Child Stock Count List) footer menu. This screen provides the header information which includes CFAs and Product Group Information at the master stock count level and allows the user to edit the CFAs. The system displays the list of CFAs (flexible attributes) that have been set up for the Stock Count and Stock Recount in the system and that allows you to enter values for them.
The system displays the CFA fields based on the setup. The CFAs that are set up as Required must have a value entered. The value can be one of the following: Date, Text, Decimal, Long depending on the 'data type' set up for the CFAs, while creating them in the desktop application. Appropriate security permissions are needed, and the count must be in editable status for entering CFA values. The CFA's captured will be displayed read only when it is not in the status to edit.
Details on this screen include:
-
Stock Count ID
-
Status
-
Counting Method and Product Group Type
-
Count Description
-
Stock count date
-
Total Items
-
CFAs and the corresponding value
-
Product Group Description
-
Hierarchy Breakdown
-
Auto Authorize
-
Re-Count Discrepancies
-
Variance (SUOM, Percent, and Value)
-
Item Status (Active, Inactive, Discontinued, and Deleted)
-
Stock On Hand
SOH = 0 - Items that have stock as 0 are in product group.
SOH > 0 - Items that have stock less than 0 are in product group.
SOH < 0 - Items that have stock more than 0 are in product group.
-
Problem Line
Actual Pick Amount less than Suggested Pick Amt - Actual pick amount is less than suggested or not is displayed. This field will only be visible if product group is a problem line product group.
Actual Shelf Repl Amount less than Suggested Shelf Repl Amount - Actual Shelf replenishment amount is less than suggested or not is displayed. This field will only be visible if product group is a problem line product group.
Available Negative Inventory - This will display if Negative inventory is available. This field will only be visible if product group is a problem line product group.
UIN Discrepancy - If any UIN discrepancy is there is displayed. This field will only be visible if product group is a problem line product group.
Child Count Information
Figure 11-32 Child Count Information Screen
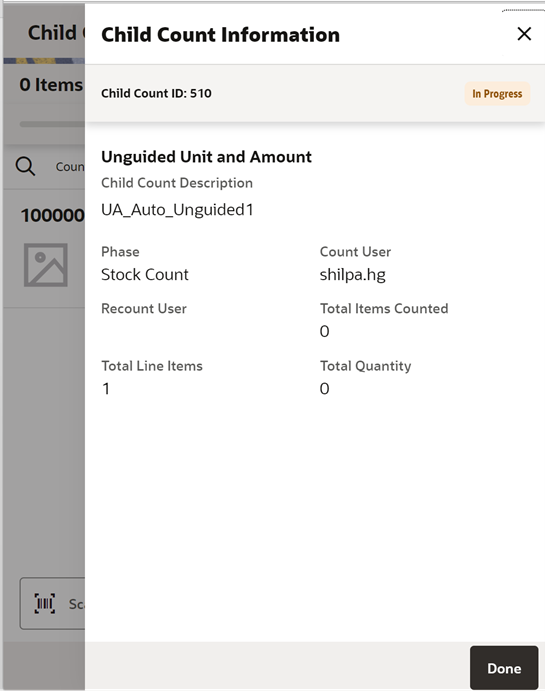
The Child Count Information screen is an informational popup that contains read-only information about the child count. It is accessed by selecting Info from the Item List screen.
Details include:
-
Child Count ID
-
Status
-
Counting Method and Product Group Type
-
Child Count Description
-
Phase
-
Count User
-
Re-Count User
-
Total Items Counted
-
Total Line Items
-
Total Quantity
Search Criteria - Item List and Item Detail
Figure 11-33 Search Criteria Screens
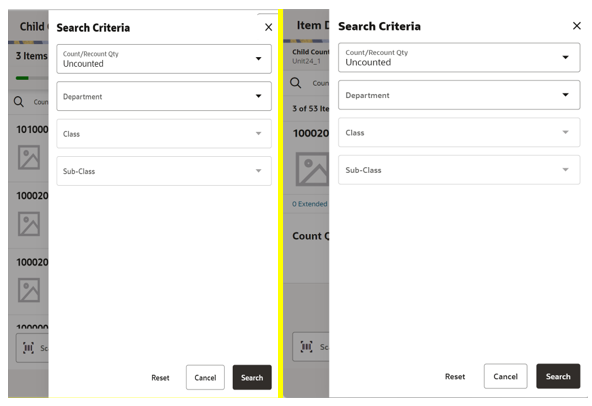
This search criteria popup screen is displayed when you select the magnifying glass from the Item List or Item Detail screen.
On the item list screen, this helps you to filter the items based on the search criteria applied and on the item detail this will help you to navigate through the items based on the search.
The defaults will be:
-
Stock Count: Count / Re-Count Qty = 'uncounted'
-
Re-Count: Count / Re-Count Qty = 'uncounted', Filter = 'Discrepant'
-
The Count / Re-Count Qty will default as the filter on the top of the Stock Count / Stock Re-Count screen.
Fields
Count / Re-Count Qty: Valid values are All, Counted and Uncounted. Filter: Valid values are All Items and Discrepant Items. Displays only when it is a Re-Count.
Filter: Valid values are All Items and Discrepant Items. Displays only when it is a Re-Count.
Department: List of values containing all of the departments pertaining to that stock count. The value will be defaulted to All. Since a Product Group can consist of more than one merchandise hierarchy, the filter will return all stock counts that are affiliated with the dept or where the counting groups contains that hierarchy. When a department is cleared out, the class and sub-class will also be cleared out.
Class: List of values containing all of the classes for the selected Department. User must select a department first for the class to be editable. The value will be defaulted to All.
Since a Product Group can consist of more than one merchandise hierarchy, the filter will return all stock counts that are affiliated with the class and counting groups that contain that hierarchy. When a class is cleared out, the subclass will also be cleared out.
Sub-Class: List of values containing all of the sub-classes for the selected Class. You must select a Class first for the sub-class to be editable; the value will be defaulted to All. Since a Product Group can consist of more than one merchandise hierarchy, the filter will return all stock counts affiliated with that subclass and counting groups that contain that hierarchy.
Search: Upon selecting this button, the system will filter the records based on the criteria provided.
Reset: Button will clear the screen of any previous search criteria that was entered by you and set back to the default values. The screen will remain open for you to enter in new search criteria.
Cancel- This will discard the selection and go back to the previous screen.
Item Detail
Figure 11-34 Item Detail Screen 1
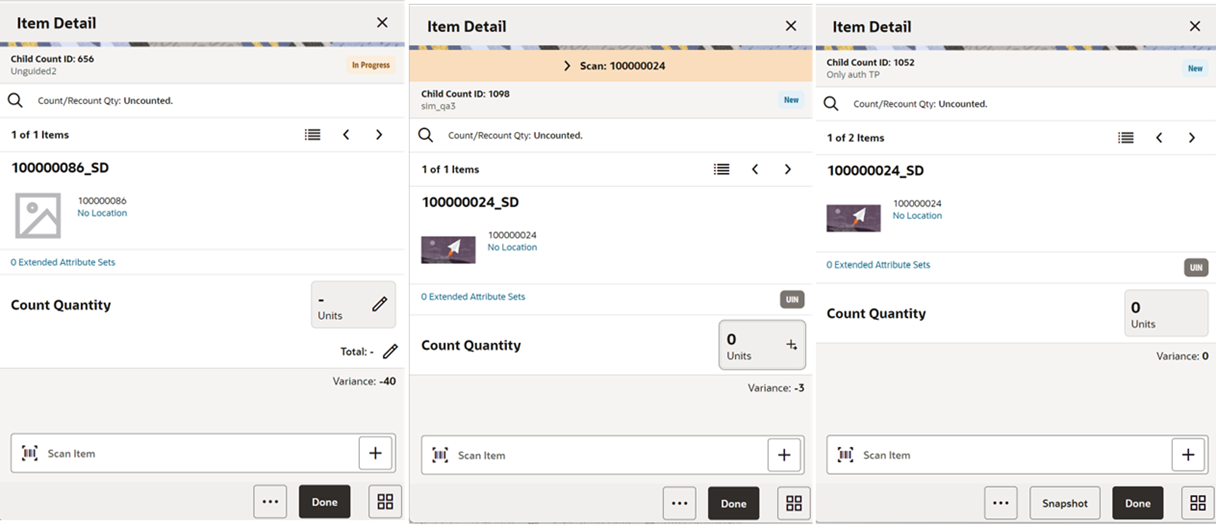
Figure 11-35 Item detail Screen 2
You are directed to the Item Detail screen in multiple ways:
-
When selecting a child count or when scanning a valid child id on the Stock Count (Child Stock Count List).
-
After selecting the child stock count from the Select Child Count screen when there are more child count results for the search.
-
After selecting or scanning a valid item on the Count Items(Item List).
You can go to the item list by selecting the Item List icon or selecting the option from the footer menu.
This screen will help you to enter count quantity or the total quantity for an item in the stock count. If stock count is not completed, the quantity fields will be editable, and you can enter value for the item counted. Upon selecting the quantity fields, the system displays the Edit Quantity popup to enter the total quantity or the counted quantity depending on what you select. On this screen you will be able to take the snapshot for the child count.
Below is a detailed explanation on how Count Quantity and Total Quantity work:
Count Quantity – Displays the current scan quantity of the item until another item is scanned. Enter the quantity using the Edit Quantity Popup that is triggered when you select the field.
-
It will show 1 when the item is scanned in + scan mode
-
It will bottom out to 0 when using – scan mode
-
Each time the item is saved, or the item is changed to another item, this quantity is set to 0
-
This quantity can be edited only if you have permission.
-
The entered quantity in this field is added to the total quantity.
-
Value has to be 0 or positive, it cannot be negative.
-
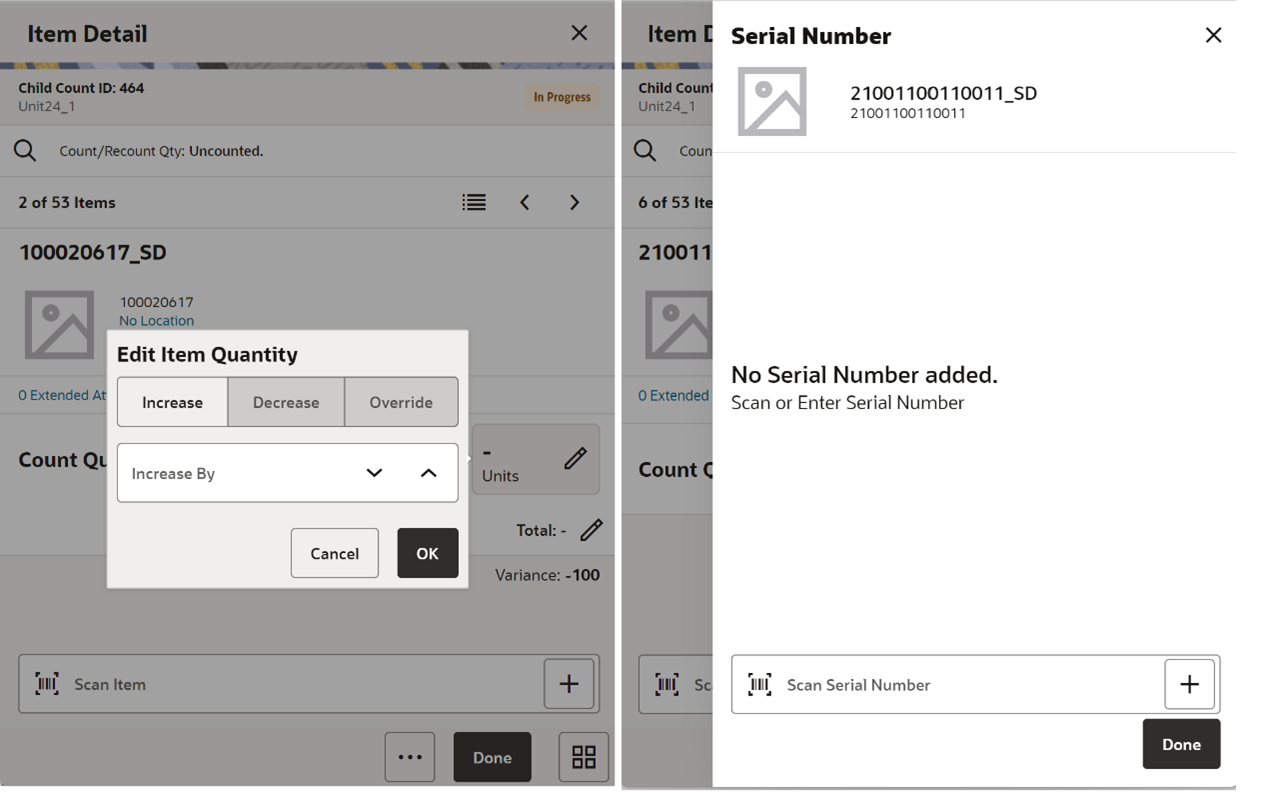
For UIN Serial Numbers (AGSN and non AGSN), the quantity field is disabled and the selecting the edit quantity will take the user to the Serial Number popup screen
-
The Edit Quantity icon will be a <pen>+, + to show that UINs are needed.
-
Quantity would get updated per UINs being added / removed on the UIN panel
-
The system does not look for the Edit Quantity permission for the UIN items.
-
Total Quantity - This value represents the total child quantity field when the item is added. Can enter the total quantity using the Edit Quantity Popup that is triggered when you select the field.
-
This is the user quantity increased by the current scan quantity or entered quantity
-
It will bottom out to 0 when using – scan mode
-
This quantity can be edited only if you have permission to do so
-
Value must be 0 or positive, it cannot be negative.
-
This field will be updated real time to display the current total quantity as items are scanned in user's session
This will be a view only screen if the stock count is completed and no further edits can be made, or the user has no edit permissions. Items are sorted based on different criteria:
-
If guided and items are sequenced, the order will be based on the sequence with non-sequenced (no location items) falling at the end
-
If unguided, items are always sorted by item description
Note:
Removal of an item after it has been added is not allowed in Stock Count unless it is an Ad-hoc stock count.Unit Field: The sum of the quantity of the items scanned until a new item is scanned. It indicates the number of items a user has in front of them they have scanned.
Variance: The user will be able to view the difference between the 'snapshot' quantity and the 'Total quantity' counted, provided the user has 'View variance' security permission.
-
If the snapshot quantity < Total quantity, display '+' symbol before the variance value.
-
If the snapshot quantity > Total quantity, display '-' symbol before the variance value.
-
If the snapshot quantity = Total quantity, display '0' symbol before the variance value. This field will be displayed only when the user has 'View Variance' security permission.
It will be calculated dynamically after each scan (count) happens and it will only be displayed for 'counted' items.
Note:
If the system is configured to auto save the items for the unguided stock counts depending on the system parameter ‘ Unguided stock counts Automatic Save’, the system will look for the threshold value set in the Auto Save number of items threshold and save the items automatically when it reaches the threshold. The system resets the count and automatically saves the items every time it reaches the threshold. If the user exits before the threshold is met, the system still automatically saves the items and exits.Last Scan: Shows the details of the last scanned barcode.
Extended Attributes Sets: The extended attributes option is available only if it is configured in the store parameter and the user has proper permission.
-
If the proper permissions do not exist, the screen will be read only.
-
It is a link that will take the user to the Extended Attributes screen.
-
<x >represents the number of attribute sets assigned; initially it will be zero.
Examples of how the scan quantities interact
Scan item A
User quantity 1
Session quantity 1
Total quantity 1
Scan item A again
User quantity 2
Session quantity 2
Total quantity 2
Scan item B
User quantity 1
Session quantity 1
Total quantity 1
Scan item A
User quantity 1
Session quantity 3
Total quantity 3
Save count and scan item A
User quantity 1
Session quantity 1
Total quantity 4
Scan Item B
User quantity 1
Session quantity 1
Total quantity 2
Footer Menu
Figure 11-36 Item Detail Footer Menu
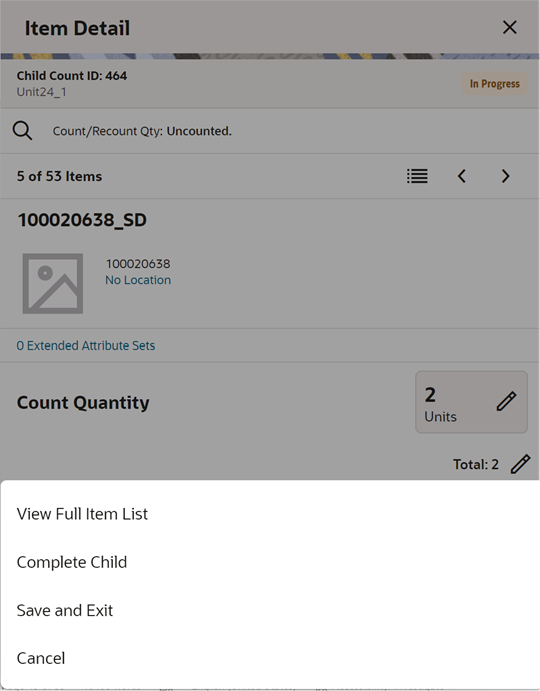
View Full Item List - Upon selecting this menu, you are navigated to the Item List.
Complete Child - This will complete the child count and go to the Stock Count (Child Stock Count List).
Complete Count - This is applicable for Adhoc stock count. Upon selecting this the system will complete the adhoc stock count.
Save and Exit -This will save the child stock count and exit to the child stock count list screen.
Cancel - This will discard changes to stock count / re-count and navigate you to Stock Count (Child Stock Count List).
Quick Count
The Quick Count dialog can be accessed from the drawer/menu on the Jet Mobile application. This dialog enables the store users to do a quick count of inventory in the store across multiple locations on the fly without scheduling a stock count, taking a snapshot or authorizing the count results.
This feature helps the retailer to keep an eye on the inventory and do a quick stock count of any random item(s) like high priced, fast moving, etc and match the inventory with the physical count in the store.
Features:
-
Update inventory of Shop Floor, Backroom and Delivery Bay of an item or just the available inventory based on configuration.
-
Adjust the quantity of all inventory buckets of an item to zero.
-
Add the selected item to the item basket.
-
Print Ticket.
Figure 11-37 Quick Count Screen
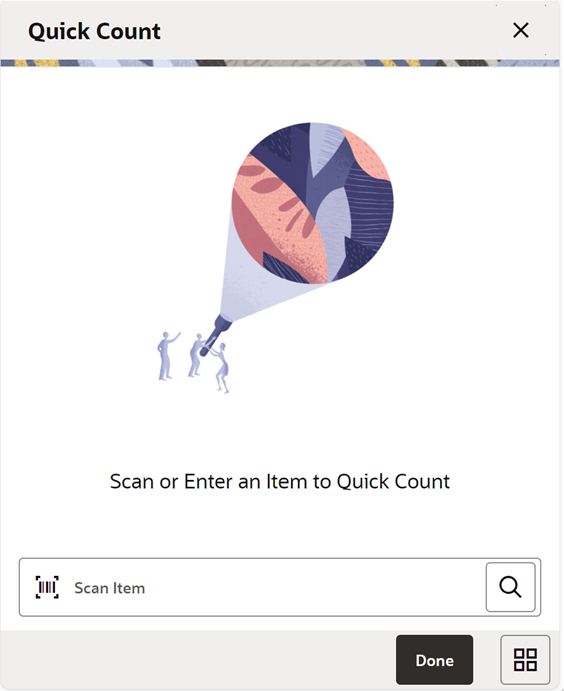
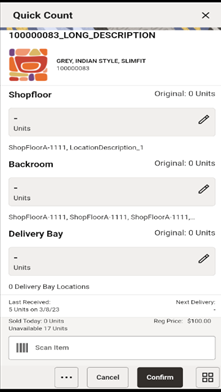
Figure 11-38 Quick Count Screen: Item
The Quick Count screen can be accessed from the menu drawer and Quick Actions. On this screen, the user can enter or scan an item to update the inventory.
The user can access this only when the proper permission is assigned.
User can scan or enter an item on the scan bar and the system will display the item if it is valid. On this screen, the user can see the current values of the inventory buckets and enter the actual quantity to be updated on the individual buckets. Scanning the next item is not a confirmation on this screen. User must enter the values using the Edit quantity widget and confirm for the system to update.
Non inventory items are not allowed on this screen.
The shopfloor, backroom and delivery bay are only displayed when they are leveraged in the system. If they are turned off, then only available inventory will be shown to the user.
Confirm Quick Count
Upon selecting the Confirm button, the system updates the inventory based on the values entered in Shop floor, Back room and Delivery bay quantities or available bucket if shopfloor/backroom are not managed in SIOCS.
Depending on the inventory buckets tracked in SIOCS, the following rules will apply when the system updates available inventory. Note that this type of stock count does not set SOH to 0 when nothing is counted, so there is no impact on driving the inventory negative when unavailable inventory exists.
-
The available bucket = Shop Floor+Backroom+Delivery bay. If not configured for these buckets, available will be update with the counted quantities.
-
In case a bucket is not counted, the original value will be applied. With other words a blank value does not equate to a 0 count.
-
Update process will create an inventory adjustment in the system using the inventory adjustment reason with appropriate disposition.
Use Cases
-
Assume current inventory bucket values in the system are SOH =100, Available=80, Unavailable=20, Shop floor=20, Backroom=40 and Delivery bay=20.
-
User starts counting an item and scans the item, e.g. 1234.
-
Assume counted quantity in Shop floor=30, Backroom=20 and Delivery bay=10 and user enters the quantity on the respective buckets on this dialog.
-
The system will update the SOH=80, Unavailable=20(not altered), Shop floor=30, Backroom=20 and Delivery bay=10.
The system displays the Shop Floor and Backroom fields only when ‘Display Shop floor/Backroom quantity’ system setting is enabled.
The delivery bay is only displayed when the Replenishment - Delivery Bay Inventory parameter is turned on.
Additional informational fields on this screen include:
-
Last Received - how many were last received on allocation, DSD, transfer.
-
Next Delivery - the quantity on the next delivery. It is the in transit (In bound qty) for the ASN (Transfer,DSD, allocation)
-
Sold Today - number of units sold today for item and store in the SUOM.
-
Unavailable - This field holds the total unavailable stock on hand. Unavailable = Total Stock on Hand – Available SOH
-
Regular Price - shown if the item is on regular price. Also shown if the item is on Promo. Will not display if item is on clearance.
-
Promo Price - will display if there is a promo for the item. May also display if the item is on clearance.
-
Clearance Price - will display if the item is on clearance.
Footer Menu
From the footer menu, the user can access the Adjust to Zero, Add to Item Basket and Print Ticket functions.
Add to Item Basket — User can select this option to add the item to the Investigate Item Basket. Item is added to the latest active investigate type item basket.
Remove from Item Basket — Selecting this option will remove the item from the item basket.
Print Ticket — If the user is having permission to print the tickets, this option can be used to print the tickets.
Printer — This will show the list of printers configured including the blue tooth printers. During the session, the ‘default’ printer is the one the user selected first.