1 Feature Summary
Oracle Retail Store Inventory Operations Cloud Services includes the following applications:
-
Oracle Retail Enterprise Inventory Cloud Service (EICS)
-
Oracle Retail Store Operations Cloud Service (SOCS)
This chapter describes the feature enhancements in this release.
Noteworthy Enhancements
This guide outlines the information you need to know about new or improved functionality in the Oracle Retail Store Inventory Operations Cloud Services update and describes any tasks you might need to perform for the update. Each section includes a brief description of the feature, the steps you need to take to enable or begin using the feature, any tips or considerations that you should keep in mind, and the resources available to help you.
Column Definitions
-
Feature: Provides a description of the feature being delivered.
-
Module Impacted: Identifies the module impacted associated with the feature, if any.
-
Scale: Identifies the size of the feature. Options are:
-
Small: These UI or process-based features are typically comprised of minor field, validation, or program changes. Therefore, the potential impact to users is minimal.
-
Medium: These UI or process-based features are typically comprised of field, validation, or program changes. Therefore, the potential impact to users is moderate.
-
Large: These UI or process-based features have more complex designs. Therefore, the potential impact to users is higher.
-
-
Delivered: Identifies whether the feature is Enabled or Disabled upon initial delivery.
- Customer Action Required: You must take action before these features can be used. These features are delivered disabled and you choose if and when to enable them.
Table 1-1 Noteworthy Enhancements
| Feature | Module Impacted | Scale | Delivered | Customer Action Required? |
|---|---|---|---|---|
|
SOCS |
Large |
No |
Yes Download app, configure, and deploy by third‑party MDM. In the case of using the Web Browser version, use the correct link. |
|
|
SOCS |
Small |
Yes |
Updates to include the new role permissions will happen automatically. Jet features that exist will be auto‑enabled if the user had MAF access prior to the change. | |
|
EICS |
Small |
Yes |
If applicable to your region, requires the configuration of a store parameter. | |
|
EICS |
Large |
Yes |
Log SR to enable. | |
|
EICS |
Medium |
Yes |
No |
New Feature Descriptions
This section describes the new features.
Jet Mobile
Similar to the last few releases, new features have been added to the latest release of SIOCS on Jet Mobile. This release is focused on the process of managing the transfer document through its different stages of requesting and approving as well as the shipment of this document.
Several additional features are added that are in addition to the Mobile Application Framework (MAF):
-
Users will have the ability to ship transfers with or without containers. When selecting the option without container, in the backend a container is still created, so a container can be received in quick warehouse receiving as well as be tracked with a tracking ID if needed.
The main difference between with or without container is that without container, the user does not have the feeling they are in a shipment / container structure; they will not be able to create a container or add additional containers, and the dialog menu structure is different. Without container, the user will be able to ship without having to go to the shipment level. They will also be able to manage the Bill of Lading (BOL) and other shipping information.
A variety of permissions exist for those retailers who want to leverage the no container concept with their employees. They can default it as an option, or they can turn off regular container shipping so the user never has to learn the extra step of creating a container.
Note:
When using to ship without container, MAF transfer shipping should be turned off for those stores using the Jet Mobile application. - Jet Mobile will have the ability to create a transfer document directly, unlike MAF. This document can be either for unavailable or available quantity.
- The user will have the ability to create a shipment directly from the transfer document.
Transfer Document (Jet Mobile)
The transfer document dialog allows you to create transfer requests requesting items from a store, accept and reject transfer requests from a store, as well as create and approve transfer documents to ship items to a warehouse, store, and external finisher in a single dialog.
Transfer Document features:
- Creation of transfer documents to allow the movement of goods between stores or from a store to a warehouse or external finisher.
- Creation of transfer requests from a store to another store requesting for the movement of goods. The sending store will have the ability to either accept the request or reject it.
- Transfer requests created externally can be accepted or rejected.
- A flow exists to pick items for the transfer document.
- Transfers can be done from both available and unavailable inventory.
- Visibility of shipment and receipt values after transfer approval.
- View Transfer Documents and Requests for Transfer.
- Look up Shipping and Receiving Details.
- Close a Transfer.
- Capture values for Custom Flexible Attributes (CFAs).
- Print Reports.
- This will also be a placeholder for Stock Order messages from the external system for Store, Warehouse, and Finisher deliveries.
Transfers Mobile Screen Flow
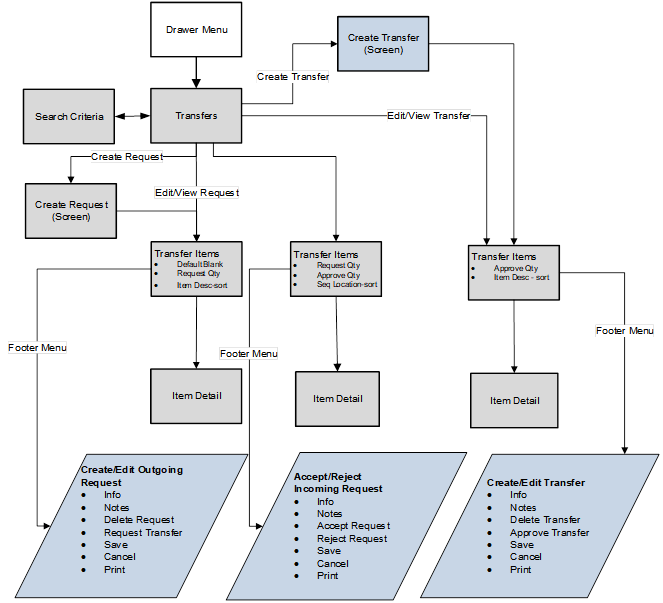
Destination Types
-
Transfer Shipment to Store (Store to Store).
To create a Store Transfer Shipment, the destination type of Store must first be identified for the shipment. The system provides a list of valid store locations. The user can do a lookup as well.
-
Transfer Shipment to Warehouse and to Finisher.
To transfer items to a warehouse, the destination type of Warehouse must first be chosen for the shipment. The system provides a list of valid warehouses. For a transfer to Finisher, select a destination type of Finisher and select the destination for the shipment, or search for it using the lookup widget. Finishers are restricted to those which are for the same organization unit as the store.
Customer Orders
Transfer requests can come from the merchandising system to request goods from one store to another store that are for a customer order. These transfer requests will appear in the Transfer dialog.
There will be a customer order indicator on the transfer to denote that the transfer has a customer order affiliated with it. When searching for a transfer using the filter, you can search for those transfers that are for customer orders, or search for a transfer that contains a specific customer order ID and fulfillment order ID.
The Info screen will display the specific customer order and fulfillment order ID for that transfer if there is one. Allow Partial Delivery is populated based upon the customer order or the system can be configured to not allow partial customer order transfer shipments. If Allow Partial Delivery is not on, then when accepting a transfer request, you must accept the full amount being requested. If the system parameter Customer Order Fulfillment Restriction is set to Line Controlled, for transfer requests associated with a customer order, any item getting approved should get approved completely.
Transfers List Screen
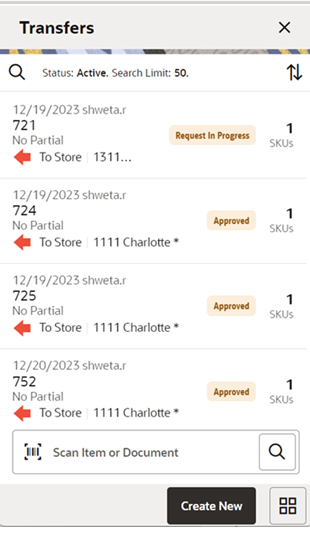
When navigating to Transfers from drawer menu->Shipping & Receiving or from Quick Actions, you go to the Transfers screen which lists the inbound and outbound transfer requests and documents for your store. The user must have the Access Transfer security permission to access this screen. This screen displays Active transfers by default. The user can click a Transfer record and the system will take the user to the Transfer Items screen. The records in the Transfer List screen will be sorted in the following manner by default when the user enters the screen. The Outbound records will be listed first and within the outbound records, the records are sorted by Not After Date, lowest Not After Date to highest. The Inbound records will be listed after the Outbound records and within the inbound records, the records are sorted by Not After Date, lowest Not After Date to highest. Apart from this, the user has been provided with different options to sort by: Transfer ID, Newest, or Oldest based on Create Date of transfer.
Search Criteria Screen
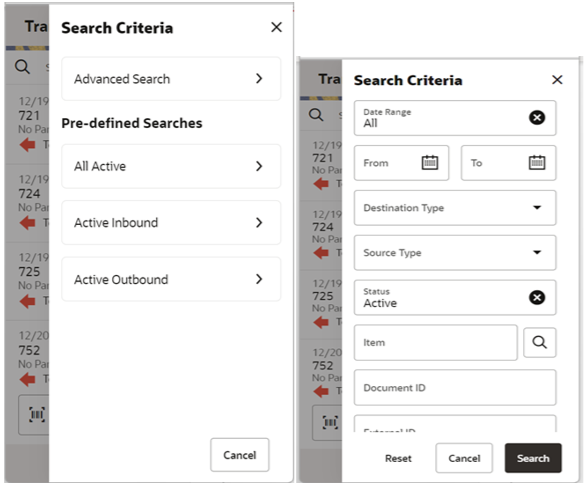
The Transfer Search Criteria Screen is accessed by clicking the magnifying glasses on the Transfers screen. After applying the search criteria, the results are listed on the Transfers screen and the criteria applied is also shown. The search results must have the current store as either the Source or Destination location. To enable users to search for transfers, there are two ways available:
- Pre-defined searches – These are search criteria pre-defined within the system which can be used to quickly narrow down the list of records without having to go to the Search Criteria screen and use various search criteria. The options include: 1. All Active, 2. Active Inbound, and 3. Active Outbound.
- Advanced Search – Clicking this option will present the user with various search criteria in the Search Criteria screen. Some of the search criteria include Source and Destination types, Item ID, Document ID, Status, Customer Order/Fulfilment Order ID, Last Update Date range (pre-defined and user entered), and so on. Users can also search for only the transfers that are associated with a customer order.
Create Transfer (Request) Drawer
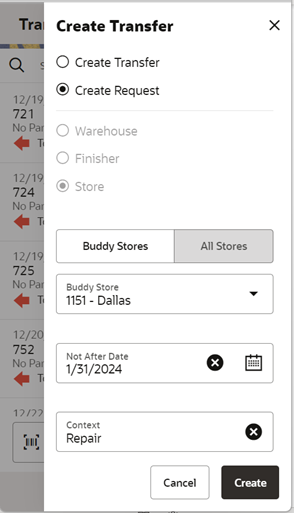
A request is created from the Transfers screen by clicking the Create New button and selecting the Create Request option, when a store wants to receive items from another store. The user must have the Create Request security permission to create a new request. A request can be generated from an external system or be created in the mobile application. If the request has been created in the mobile application, then the Source Type can only be a Store. A store cannot create a transfer requesting for items from a warehouse or a finisher.
The request can only be created if the store creating the request is in the same transfer zone as the source store or from a null transfer zone. Also, the requesting store should not be an excluded store for the Source store, that is, the requesting store must be in the shipping network of the source store in order to request items from a store. However, if the user has the Override Exclude Shipping Network security permission, the user can proceed with creating the request. A store's shipping network is set up through the Store Shipping Network screen in the desktop application.
The user can select the source store either through the Buddy Stores tab or All Stores tab. In the Buddy Stores tab, the system will automatically list only the buddy stores set up for the store you are logged in to. However, any other store can also be searched and selected from the All Stores tab.
If the store requesting the items wants the items before a certain date, a date can be selected or entered into the Not After Date field. The request will automatically cancel if not accepted by this date. There are notifications in place to ensure the transaction is fulfilled in time, if configured.
The request needs to be accepted by the other store before a transfer can be shipped. Once accepted, the transfer document can be used to restrict or default items in a shipment/ container.
Create Transfer Popup
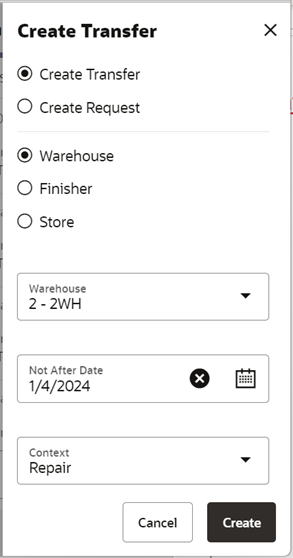
A transfer document is created from the Transfers screen by clicking the Create New button and selecting the Create Transfer option, when a store wants to send items to another store. The user must have Create Transfer security permission to create a new transfer. A store can create a transfer to another store, a warehouse, or to a finisher.
The transfer can only be created if the destination store is in the same transfer zone as the source store or from a null transfer zone. Also, the destination store should not be an excluded store for the Source store. However, if the user has the Override Exclude Shipping Network security permission, the user can proceed with creating the transfer. A store's shipping network is set up through the Store Shipping Network screen in the desktop application.
The user can select the destination store either through the Buddy Stores tab or All Stores tab. In the Buddy Stores tab, the system will automatically list only the buddy stores set up for the store you are logged in to. However, any other store can also be searched and selected from the All Stores tab.
The Not After Date field will need to be set if the source store wants the items to be shipped by a specific date.
The transfer needs to be approved at the source store for it to be shipped
Transfer Items (Request) Screen
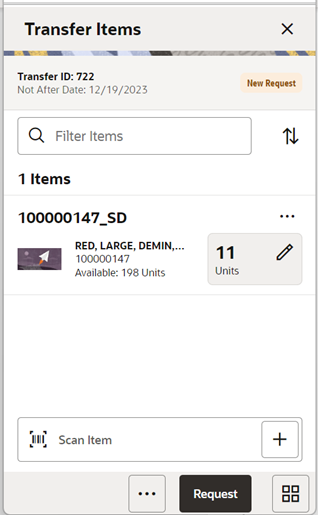
The Transfer Items screen is used when creating a new request which allows the requesting store to ask for items from another store. Initially, this screen will not have any items. The user can add items to the request by scanning/entering the Item ID in the scan bar. This screen is also displayed when selecting a saved request from the Transfers screen. The items that have been added to the transfer request are listed in this screen. The item image for the line items is displayed per the configuration done in the User Preferences.
Line items appear in a list and the user can update the request quantity for the items in the list or navigate to the item detail of that item by selecting the item. The user can also add new items to the list. This screen also displays a filter. The filter can be used to narrow down the list of items. Filtering can occur by item ID and description. The filter disappears when you scroll down through the list of items.
Items with Non-Inventory set to Yes are also allowed to be added to the request.
On scanning or entering an item in the scan bar, the user will either stay on the screen or go to the Item Detail based upon the Scan Navigation user preference. Quantity may be updated depending on the scan mode. The item must be unique on the transfer.
The ellipsis in the lower right-hand corner accesses the footer menu which contains all of the functions that can be performed on a transfer request.
Footer Menu
The footer menu is accessed from the ellipsis footer menu on the Request Items screen. The menu functions include the following:
-
Info: Accesses the Info popup.
Allows you to enter values for the CFAs that are set up for the Transfer documents.
Also, the screen will allow you to enter Context Type, Context Value, Not After Date, and so on.
- Notes: The Notes option accesses the notes common dialog to capture notes.
- Save: Saves changes without requesting the transfer.
- Delete: Deletes the transfer before it is requested.
- Cancel: Leaves the screen without saving any changes.
- Back: Return to the previous screen. Available only in view mode.
- Print: Opens the print dialog and allows you to print reports. This option will always be available regardless of the transfer status.
Footer Button
Request: Allows you to request the transfer. The Transfer status is updated to Requested and it will appear in the source store. A notification is sent to the source store if configured. If the store parameter Context Type/Value required for Transfer is set to Yes, a validation is done at this point to check if the Context Type/Value has been entered for the transfer.
Transfer Items Accepting/Picking Request
Once the requested transfer is created by the receiving store or in the merchandising system, the user on the shipping side of the transfer can enter approved quantities or pick items and set them aside for eventual shipment. Once the quantities are entered or picking is completed, the transfer moves to an Approved status.
Transfer Items Screen
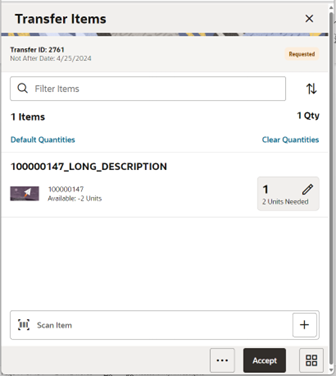
The Transfer Items screen is displayed when opening a transfer request from the Transfers screen in the requested store (source store). This screen enables you to pick and approve the quantities to ship, for the requested items. This screen will display the items that have been requested. The item image for the line items is displayed per configuration.
Line items appear in a list and selecting a line item navigates to the item details of that item. This screen also displays a filter. The filter can be used to narrow down the list of items. Filtering can occur by item ID and description. The filter disappears when you scroll down through the list of items.
Default Quantities: Allows you to default the requested quantity to the Approved quantity field for all the items in the transfer.
Clear Quantities: Clicking this option sets the Approved quantity to NULL for all items on the transfer.
On scanning or entering an item in the scan bar, the user will either stay on the screen or go to the Item Detail based upon the Scan Navigation user preference. Quantity may be updated depending on the scan mode.
Items with Non-Inventory set to Yes are also allowed to be in the transaction and you can enter the approved quantity for these items.
You can add (unexpected items) to ship along with the requested items if you have the necessary security permission.
The ellipsis in the lower right hand corner accesses the footer menu which contains all of the functions that can be performed in this screen.
Footer Menu
The footer menu is accessed from the ellipsis footer menu on the Transfer Items screen. The menu functions include the following:
-
Info: Accesses the Info popup.
Allows you to enter values for the CFAs that are set up for Transfer documents.
Also, the screen will allow you to enter Context Type, Context Value, Not After Date, Allow Partial Delivery indicator, and so on.
- Notes: The Notes option accesses the notes common dialog to capture notes.
- Create Shipment: This option enables the user to create a shipment for the transfer. Security permission is needed for this option to be displayed.
- Reject: Rejects the transfer request.
- Save and Exit: Saves the changes made to the transfer, exits the screen, and takes the user to the Transfers screen.
- Close Transfer: Closes the transfer when certain conditions are met. Reverses the reserved inventory if any. Security permission is needed for this option to be displayed.
- Cancel: Leaves the screen without saving any changes. This option is available when the transfer is in edit mode.
- Back: Returns to the previous screen. This option is available when the transfer is in view mode.
- Print: Opens the print dialog and allows you to print reports. This option will always be available regardless of the transfer status.
Footer Button
Accept: Accept to ship the items requested by the requesting store. Before accepting the transfer, the system will validate to ensure that the destination store is not an excluded store for the source store however if the user has Override Exclude Closed Stores, the system allows the user to proceed if the user wants to. If the system parameter Customer Order Fulfillment Restriction is set to Line Controlled for transfer requests associated with a customer order, any item that is getting approved should get approved in its entirety. The validation on mandatory CFAs is also done here. The user can also choose to create a shipment immediately on accept if the user wants to, provided if the user has security permission to do so.
Item Detail Screen (Requested Quantity)
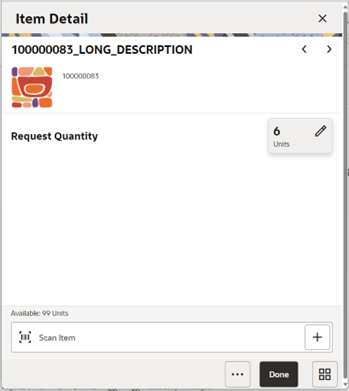
The Item Detail screen is used when selecting or scanning (when set by User preference) an item from the Transfer Items screen of a request in the requesting store. Scanning or entering an item on this screen in the scan bar, updates the quantity per the scan mode and refreshes the Item Detail screen for the item and quantity scanned. You can enter the quantity to be requested for the items.
The quantity can be edited and updated manually if permissions allow. The system validates whether the item that is getting requested has enough inventory at the sending store. If the sending store does not have enough available inventory for the item, a soft warning is displayed. If the sending store does not have enough unavailable inventory for the item, an error is displayed. A transfer request created in the mobile application can request the item from both the available and unavailable inventory similar to a transfer request created in an external system.
Items with Non-Inventory set to Yes are also allowed to be added to the request.
The item information including the image (which is system configured) display in the header. The screen contains fields for entering the quantity being requested, pack size of the item if the UOM mode is Cases, and a field that displays the SOH of the item in the sending store. The details of the last scanned barcode will be displayed at the top. You can page through existing items on the request using the arrows on the header.
The footer menu, ellipsis button, contains a Delete option to remove the item from the transaction.
Item Detail Screen (Approved Quantity)
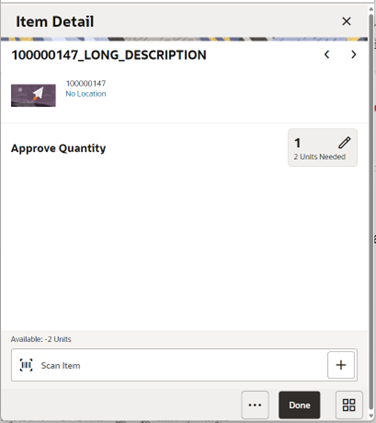
The Item Detail screen is displayed when selecting or scanning an item from the Transfer Items screen of a transfer request in the sending store. Scanning or entering an item on this screen in the scan bar updates the quantity per the scan mode and refreshes the Item Detail screen for the item and quantity scanned. You can enter the approved quantity for the items that have been requested by another store.
The quantity can be edited and updated manually if permissions allow. Items with Non-Inventory set to Yes are also allowed to be in the transaction and you can enter the approved quantity for these items.
The item information including the image (which is system configured) display in the header. The screen contains fields for entering the quantity being approved, pack size of the item if the UOM mode is Cases, Primary Location where the item is present if sequencing has been done for the item, field that displays the requested quantity of the item, and a field that displays the available/unavailable quantity depending on the inventory bucket from where the item has to be picked. This screen also displays certain fields depending on the status of the transfer. For example, the In Shipping field is displayed if the transfer is in the In Shipping status.
Received and Damaged quantity fields are displayed if the transfer is getting received at the requesting store. You can view the list of locations where the item is available (if sequenced) to help you to pick the items faster. The details of the last scanned barcode will be displayed at the top.
The footer menu, ellipsis button, contains a Delete function to enable the user to remove an item. You can also page through existing items on the transfer using the arrows on the header.
Transfer Items Screen (Creating/Approving a Transfer)
The user will go to the Transfer Items Screen after the user has created the transfer, by selecting the Create New button from the Transfers screen and selecting to create a transfer or selecting a transfer from the Transfers screen that is in Transfer In Progress status. The user can add items and the corresponding ship quantity that the user wants to ship to another store, and approve the transfer which will be eventually shipped.
Transfer Items Screen
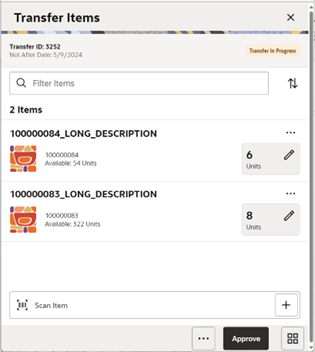
This screen will display the items that have been added to the transfer. The item image for the line items is displayed per the configuration.
Line items appear in a list and selecting a line item navigates to the item details of that item. This screen also displays a filter. The filter can be used to narrow down the list of items. Filtering can occur by item ID and description. The filter disappears when you scroll down through the list of items. The user can view the current inventory available for the item which helps the user to understand how much can be sent to another store. Pack size can be edited as well.
On scanning or entering an item in the scan bar, the user will either stay on the screen or go to the Item Detail screen based on the Scan Navigation user preference. Quantity may be updated depending on the scan mode.
Items with Non-Inventory set to Yes are also allowed in the transaction and you can enter the approved quantity for these items.
The ellipsis in the lower right hand corner accesses the footer menu which contains all of the functions that can be performed in this screen.
Footer Menu
The footer menu is accessed from the ellipsis footer menu on the Transfer Items screen. The menu functions include the following:
-
Info: Accesses the Info popup.
Allows you to enter values for the CFAs that are set up for Transfer documents.
Also, the screen will allow you to enter Context Type, Context Value, Not After Date, Allow Partial Delivery indicator and so on.
- Notes: The Notes option accesses the notes common dialog to capture notes.
- Create Shipment: This option enables the user to create a shipment for the transfer. Security permission is needed for this option to be displayed.
- Save and Exit: Saves the changes made to the transfer, exits the screen, and takes the user to the Transfers screen.
- Close Transfer: Closes the transfer when certain conditions are met. Reverses the reserved inventory if any. Security permission is needed for this option to be displayed.
- Cancel: Leaves the screen without saving any changes. This option is available when the transfer is in edit mode.
- Back: Returns to the previous screen. This option is available when the transfer is in view mode.
- Print: Opens the print dialog and allows you to print reports. This option will always be available regardless of the transfer status.
Footer Button
Approve: Enables the user to approve to ship the items to another store. Before approving the transfer, the system will validate to ensure that the destination store is not an excluded store for the source store however if the user has Override Exclude Closed Stores, the system allows the user to proceed if the user wants to. The validation on mandatory CFAs and Context type are also done here. The user can also choose to create a shipment immediately on approval if the user wants to, provided if the user has security permission to do so.
Item Detail Screen (Approved Transfer Quantity)
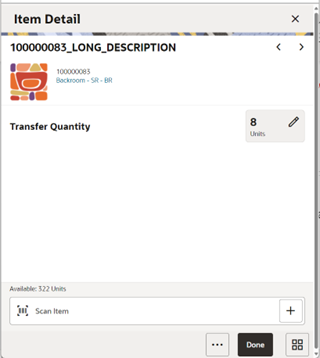
The Item Detail screen is used when selecting or scanning (when set by User preference) an item from the Transfer Items screen of a transfer in the sending store. This is a transfer that the sending store has directly created in order to ship items to another store. Scanning or entering an item on this screen in the scan bar updates the quantity per the scan mode and refreshes the Item Detail screen for the item and quantity scanned. You can enter the quantity that is approved to be shipped for the items.
The quantity can be edited and updated manually if permissions allow. The system validates whether the item has enough inventory at the sending store. If the sending store does not have enough available inventory for the item, a soft warning is displayed. If the sending store does not have enough unavailable inventory for the item, an error is displayed.
Items with Non-Inventory set to Yes are also allowed to be added to the transfer.
The item information including the image (which is system configured) display in the header. The screen contains fields for entering the quantity being approved, pack size of the item if the UOM mode is Cases, and a field that displays the SOH of the item in the sending store. The details of the last scanned barcode will be displayed at the top. You can page through existing items on the request using the arrows on the header.
The footer menu, ellipsis button, contains a Delete option to remove the item from the transaction.
Info Screen
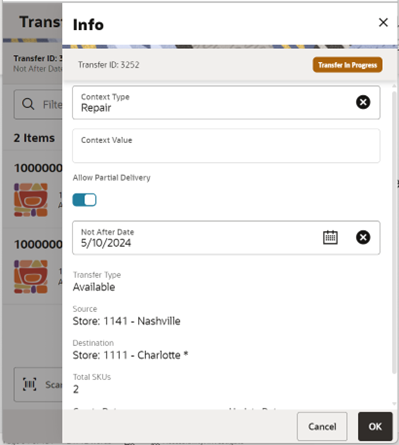
The Info screen is an informational popup that contains a few read-only and editable information about the header level of the transfer. The screen is accessed by clicking the Info footer menu option from the Transfer Items screen. The list of fields is dependent on the status of the transfer. Details include Transfer Document ID, External Transfer Document ID, Source/Destination Type, Source/Destination ID, Status, Context Type and value, Inventory bucket information (Available or Unavailable), Allow Partial Delivery indicator, Customer Order/Fulfilment Order info, Request Date/User, Create Date/User, Approve Date and Approval User, Close/Reject Date/User, and the CFAs.
Note:
A transfer document can only contain available or unavailable inventory. The selection of this has to be completed before adding the first item. After the first item is added, the available/unavailable option will be locked down.The Info screen displays the list of CFAs (flexible attributes) that have been set up for Transfer Documents in the desktop application and lets you enter values for them. The CFAs that are set up as Required must have a value entered for it before creating/accepting the transfer. Appropriate security permission is needed and the transaction must be in editable status for entering CFA values. For Transfers, the CFAs can be captured for the same transfer in both destination and source stores while creating and approving the request respectively. In this case, the same set of CFAs will be available at both the stores. The CFAs captured during the request create will be available on the screen of the request approve along with the values captured; the values can be overridden.
This screen allows you to edit certain information for the transfer request such as Context Type/ Value, Not After Date, and Allow Partial Delivery (Y/N). You need the appropriate permission to edit these fields. This screen is available only when the transfer request is in New request status.
A context type and value can be entered if necessary. The context type is used to give a reason or purpose for the request. For context types of PROM (Promotion), the Context Value field will be displayed and a promo ID will need to be entered. If the promo ID exists, the description for the promotion will be displayed. If the promotion ID does not exist in the system, the description displays as Unknown.
Transfer Shipping (Jet Mobile)
The Transfer Shipping dialog is focused on shipping out items using a container or not using a container depending on the retailer’s business process. Each shipment can be associated to one or more complete or partial transfer documents. The shipment/Containers (if applicable) can also be restricted to specific merchandise hierarchies to prevent the mixing of items.
Transfer Shipment features:
- Supports shipping to the store, warehouse, or external finisher.
- Creating shipments without containers, with/without referencing transfer documents (on the fly).
- Multiple transfer documents allowed in a single shipment (in the case of without container).
- Multiple transfer documents allowed in a single container.
- Create container without referencing a transfer document (on the fly).
- Limit store selection by buddy store and transfer zone.
- Multiple containers allowed in a single shipment.
- Manifest system integration and package tracking ID processing.
- Two step approval process to warn of pending shipments.
- Restrict merchandise packaged together by merchandise hierarchy.
Features
- Search for transfer shipments.
- Create a new shipment (with/without container).
- Create a new container, in the case of shipments with container.
- View or edit an existing shipment or containers.
- Delete or cancel In Progress containers or shipments.
- Submit, cancel submit, or dispatch a shipment.
- Capture values for Custom Flexible Attributes (CFAs).
- Print pre-shipment and manifest.
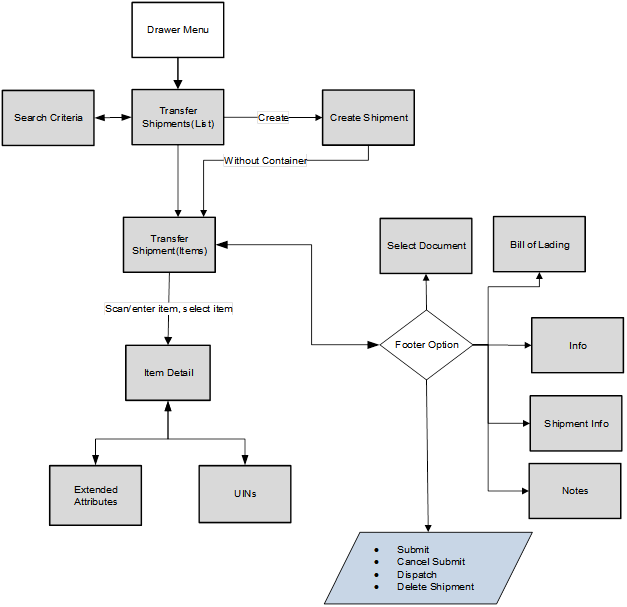
Transfer Shipment without Container Screen Flow
Transfer Shipment with Container Screen Flow
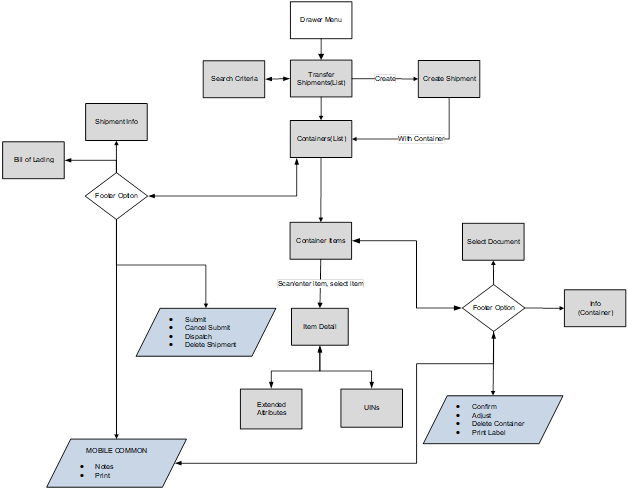
Transfer Shipments are accessed on mobile through the Shipping / Receiving menu within the drawer. Selecting the menu option will take you to the Transfer Shipments screen. On this screen, you can search for shipment records. You can create a shipment, edit, or view a shipment.
When creating, editing, or viewing a shipment with containers, you are directed to the list of containers within the shipment on the Containers screen. Here, you can create a container, edit, or view a container. When creating, editing, or viewing a container, you are directed to the list of items in the container on the Container Items screen. You can add, view, and edit the details of the items on this screen as well as on the Item Detail screen.
When creating, editing, or viewing a shipment without containers, you are directed to the Transfer Shipment screen where the items to be shipped and their details can be added.
On the Item Detail screen, there will be tabs for Unique Identification Numbers (UINs) if the item is a UIN-required item and the store is configured for the UIN processing.
You can specify values for Custom Flexible Attributes (CFAs) set up for shipments and containers by using the respective Info screens.
Transfer Shipments Screen
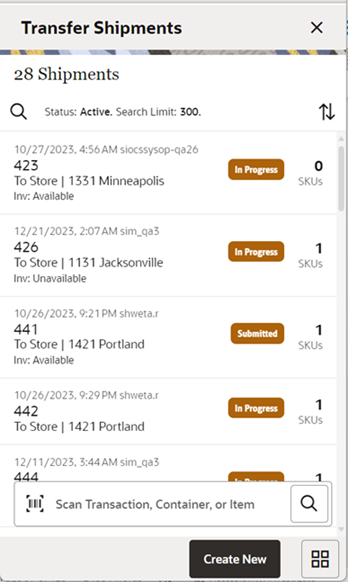
When navigating to Transfer Shipping, you go to the Transfer Shipments screen with the default list being defined for Active shipments. This screen gives a quick view of the list of shipments along with the details such as shipment’s status, destination type/name, status of the Fiscal Doc/E-way bill request (if the system is configured to use Fiscal Doc ID/E-way Bill ID), and so on.
You can use the search criteria magnifying glasses to navigate to the Transfer Shipment Search Criteria screen to enter the criteria to search for transfer shipments. The user can scan/enter the Shipment ID/Container ID (internal/external ID)/Tracking ID/Fiscal Doc ID to fetch the shipment needed. When scanning/ entering these IDs in the scan bar, the system adds the ID scanned to the respective search criteria field and narrows down the current list of shipments by the ID scanned. If there are multiple containers found with the same scanned or entered number, you are prompted to select the shipment/container to return.
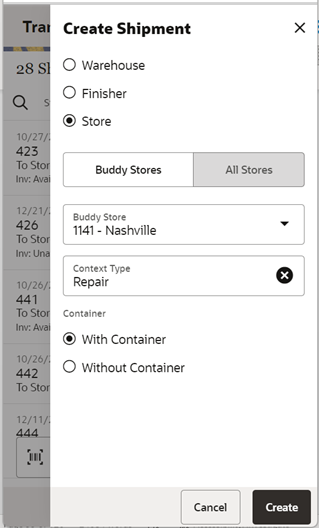
Create Shipment to a Store
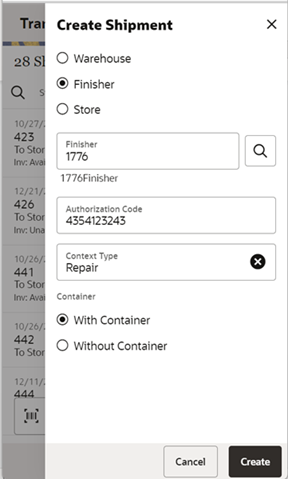
Create Shipment to a Finisher
Create Shipment to a Warehouse
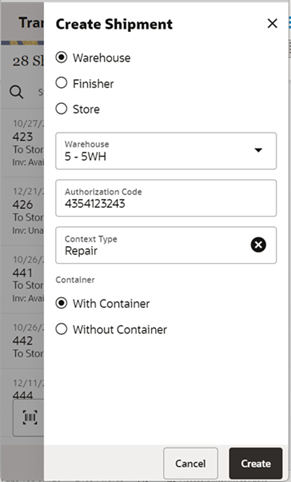
The Create New button prompts you to create a new shipment. You can create a shipment for a store, warehouse, or finisher. The destination types for which a user can create a shipment is controlled by the data permission Transfer Destination Type.
In the case of a shipment to a store, the shipment is allowed to be created only if the destination store is not an excluded store for the source store. That is, the destination store has to be in the shipping network of the source store in order to ship items. However, if the user has the Override Exclude Closed Stores permission, the system allows the user to proceed with creating the shipment if needed. The user can set up the shipping network for a store using the Store Shipping Network screen in the desktop application.
The user can select the destination store either through the Buddy Stores tab or All Stores tab. In the Buddy Stores tab, the system will automatically list only the buddy stores set up for the store you are logged in to. However, any other store can also be searched and selected from the All Stores tab.
If the destination is a warehouse, the user can choose the warehouse using the dropdown which lists all the warehouses available. If the destination is a finisher, the user can enter the finisher ID if known or can use the lookup available to search for the finisher.
The user can specify the Authorization code for transfers to a warehouse and finisher. If the user has permission to enter Context type, it can be entered as well. Context Type can be made mandatory using a Store configuration.
The user can choose to create the shipment with or without containers. Creating a new shipment with containers will direct you to the Containers screen with no containers listed initially. If you select an existing shipment, the same screen displays a list of created containers.
Creating a new shipment without containers or opening a shipment without containers will direct you to the Transfer Shipment screen.
Search Criteria Screen (Transfer Shipment)
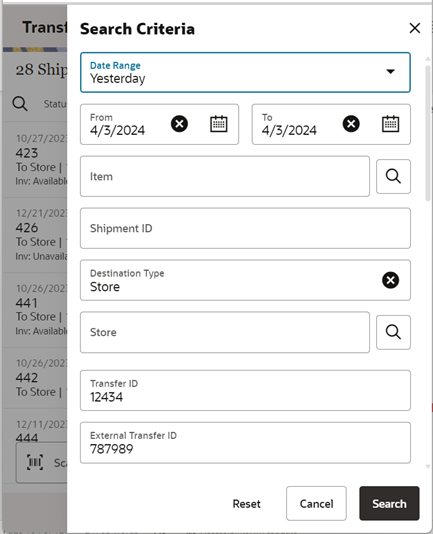
The Search Criteria screen is accessed by the magnifying glasses on the Transfer Shipments screen. After applying the search criteria, the results will be listed on the Transfer Shipments screen and the criteria applied will show. The following fields can be searched on from this screen: Last Updated, Destination Type, Destination ID, Destination, Document ID, ASN, Item, Container ID, Customer Order ID, Fulfillment Order ID, Customer Orders Exist, Shipment Status, Context Type, and Context Value. If the retailer has set up the system to use Fiscal Document/E-way bill for the shipments, there will be additional criteria provided such as Fiscal Request ID, Fiscal Doc ID, and Fiscal Request Status.
Containers
The containers within a single shipment will display on this screen if the shipment has been created with containers. If the shipment has just been created, the list will be blank. Several functions may be performed on this screen to include the following:
- One or multiple containers can be created which is controlled by security permission.
- Add items from transfer documents and ship them.
- Add additional items to the shipment.
- Viewing additional details.
- Updating authorization number and Context Type.
- Viewing customer orders associated with transfer documents added to the shipment.
- Set up the carrier shipment details.
Submit
The shipment can be saved in the In Progress status to continue edits later or it may be submitted or dispatched. Submitting is possible when the store setting Dispatch Validate is configured for Ship Submit. Submitting will set the shipment to a Submitted status and not allow for edits; there are no updates to inventory at this point. The only step possible will be to Cancel, Submit, or Dispatch. If the system is enabled to obtain the Fiscal Doc ID/E-way bill ID for the shipment, the process to request for the same starts once the shipment is submitted.
Dispatch
When the shipment is dispatched, the transfer reserved quantity for the outbound location will decrease in addition to the stock on hand. If no shipping quantities are identified, the transaction should be cancelled. Inbound is increased at the receiving store for what has been shipped. If the system is enabled to incorporate Fiscal Doc ID/E-way bill ID as part of the shipping process, the shipment cannot be dispatched until the Fiscal Doc ID/E-way bill ID is available. The exception is when the user has the Allow dispatch without Fiscal Document ID security permission.
Customer Orders
The Shipment Info screen has a field called Customer Orders, which is set to Yes when there are customer orders associated with transfer documents and a link has been provided to view the details of customer orders associated. It will display the Customer Order and Fulfillment Order IDs, along with the Container ID where the items are in, Status, and Total SKUs in the customer order.
When dispatching a transfer shipment, if the transfer associated to the shipment has Allow Partial set to No, then you must ship the full amount which is requested.
If any of the containers on the shipment references a transfer with a customer order with the Allow Partial Delivery indicator is set to Yes and the system parameter Customer Order Restriction is set to Line Controlled, the items getting delivered have to be delivered in its entirety. Partial delivery of an item is not allowed. This validation is done on both the Submit and Dispatch of a customer order.
Upon selecting a container on the Containers screen, you go to the details of that container on the Container Items screen.
Containers Screen

When creating or selecting an existing shipment with containers from the Transfer Shipments screen, you go to the Containers screen with the list being defaulted to Active containers. When scanning/ entering a container ID (internal or SSCC)/Tracking ID/Item ID in the scan bar, the system will navigate you to the Container Items screen and display the items currently in the selected container.
The Create button will create a new container for the shipment. Creating a new container will direct you to the Container Items screen with no details (items) in order to build a new container. Lastly, selecting a container from the list will navigate to the details for that container. The button will not be available after the first container is created if the user does not have the Allow Create Multiple Container security permission. This is to restrict users to ship with only one container.
Footer Menu
Shipment Info: Enables the user to access the Shipment Info screen.
Bill of Lading: Enables the user to access the Bill of Lading screen.
Note: The Notes option accesses the notes common dialog to capture notes.
Cancel Submit: Cancel Submit will reverse the Submit and move the shipment back to In Progress.
Delete: Delete will mark the shipment to Canceled status.
Back: Back will exit the shipment. Available in view only mode.
Cancel: This option is used to exit the shipment without saving any changes. This is available only when the shipment is in edit mode.
External Printing: External Printing will display the External Printing popup to select a printer for the pre-shipment notice and manifest documents.
Print: Opens the print dialog and allows you to print various reports and container labels. The Transfer Shipment Container report and the BOL Detail report will be available on this screen.
Footer Buttons
Create: Create will create a new container in the shipment.
Submit: Submit will perform validations for In Progress shipments including excluded store validation and lock the shipment for additional edits. The shipment will be ready for dispatch. This menu option will only be available when the store parameter Transfer Shipment Dispatch Validate is set equal to Ship Submit. Validations to check if the destination is a closed store for the sending store, mandatory check on CFAs, Context Type, and so on, will happen here. The process to start obtaining the Fiscal Document ID also happens at this point, if configured.
Dispatch: Dispatch will perform validations including excluded store validation and post transactions to finalize the shipment; no further changes are allowed. Validations to check if the destination is a closed store for the sending store, mandatory check on CFAs, Context Type, Fiscal Document ID, and so on, will happen here.
Bill of Lading Screen
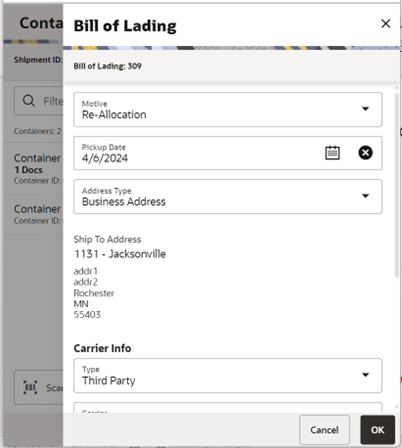
The Bill of Lading screen is used to enter details for the shipment including transportation details. It is editable when the user has the Edit Shipment BOL permission.
Details will include: Motive, pickup date, ship to address, carrier type, carrier, carrier service, and carrier address.
The Carrier Type will be defaulted based on the transfer carrier table; however, you can modify this if necessary. For carrier types of Third Party, the Service will need to be selected.
The Carrier information will be locked down once the container has been confirmed. At that time, the Adjust Carrier button will be available to move the containers back to In Progress which will allow you to make changes to the carrier and other shipment details.
Shipment Info Popup
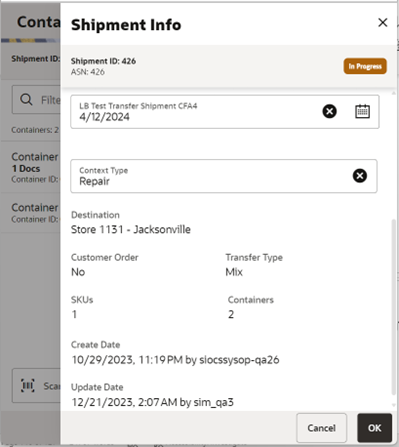
The Shipment Info screen contains read-only information about the header level of the shipment as well fields to specify. Details include: Destination Type, Destination, Shipment ID, ASN, Status, Total Container SKUs, Containers, Documents, Customer Order, Total Shipment Qty, Create Date, Create User, Last Update, Last Update User, Submit Date, Submit User, Dispatch Date, and Dispatch User. The screen also displays details such as Fiscal Request ID, Fiscal Request Status, Reject Reason, Fiscal Doc ID, and Fiscal Doc Link, if the retailer has been using Fiscal Document ID/E‑way bill ID in the shipment process.
The screen also enables you to specify information regarding the shipment such as Authorization number, CFAs, Driver, and Vehicle details to get Fiscal Doc ID.
If the shipment is to a warehouse or finisher, you can enter an authorization number.
The screen displays the list of CFAs (flexible attributes) that have been set up for Transfer shipments, in the desktop application and lets you enter values for them. The CFAs that are set up as Required must have a value entered for it before completing the shipment. The value can be one of the following: Date, Text, Decimal, or Long depending on the data type set up for the CFAs, while creating them in the desktop application. Appropriate security permission is needed and the shipment must be in editable state for entering CFA values.
The screen also enables the user to specify details such as vehicle number and country, driver name, and License number, if the retailer has been using Fiscal Document ID/E-way bill ID in the shipment process.
Customer Orders Screen
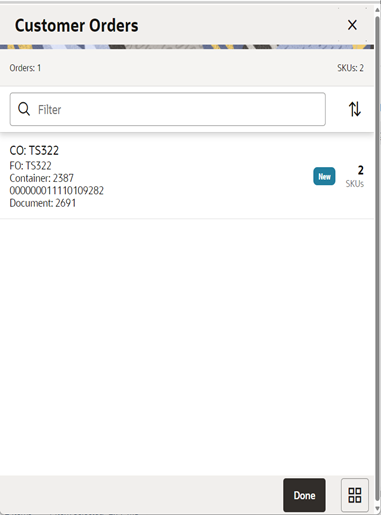
The Customer Orders screen is an informational screen that contains read-only information about the customer orders within the shipment.
The user will go to the Customer Orders screen using two ways, upon clicking the View Details link in the Shipment Info screen and upon clicking the View Details link in the Info (Container) screen. The screen lists the customer orders present in the selected shipment if the user opened the screen from the Shipment Info screen. The screen lists the customer orders present in the selected container if the user opened the screen from Info (Containers) screen.
The customer order information displayed on the screen will include: Customer Order/ Fulfillment Order ID, Status, the internal/external Container ID where the items on the customer order have been kept, and the Transfer Document ID associated with the Customer Order.
The filter can be used to narrow down the list of items. Filtering can occur by Customer Order ID, Fulfillment Order ID, Container ID, and Customer Order Status.
Container Items Screen
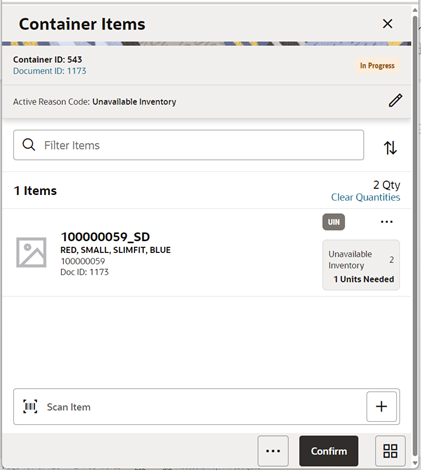
The Container Items screen is used when creating a container within a shipment.
There are several functions you can perform on this screen. Some of the features include:
- Create, edit, delete, or confirm a container.
- Add items from transfer documents or add loose items.
- Adjust (re-open) a container after it has been confirmed.
The container can be created with or without referencing a transfer document. The items within a container have to be shipped either from available inventory or from unavailable inventory.
When a container is created but not yet completed, the container will display a status of In Progress. The transfer reserved bucket will update the moment the container is saved for on the fly shipments. If the item is from a request, reservation must have happened at the time of approval of the request. Any new additions or deletions of items and quantities will be updated to the approved document. It will also update the In Shipping quantity in the document. When the shipment is dispatched, the saved quantity in the transfer reserved bucket will be removed. This will keep the inventory accurate.
The items on the list are for the container.
The item image for the line items is displayed per the configuration. Line items appear in a list and selecting a line item will navigate to the item details of the item. Scrolling in the list of items on the left will display a filter. The filter can be used to narrow down the list of items. Filtering can occur by Item ID, Description, Document ID, and Reason Code.
If the Non-Inventory indicator of the item is set to No, the SOH of the item is updated at the completion of the transaction.
If the Non-Inventory indicator of the item is set to Yes, the item can be added to the transaction however the SOH will not be updated on confirmation/completion of the transaction. That is, the item can be scanned/added to the transaction, and you will be able to enter/update quantity just like a normal (inventory enabled) item. All the processing rules and validations that apply to inventory-enabled items will apply for non-inventoried items too except that the validations done on quantity against SOH will be ignored. On dispatch, the SOH of the item will not be updated since the application does not preserve the inventory details of the items with the Non-Inventory indicator set to Yes. Publishing of non-inventory items can be restricted depending on the administration integration settings.
Inventory Type of items (Available or Unavailable) in the container is held at a container header level. This means that all items in the container must be for the same inventory type, there cannot be a mixture. Once items from a transfer have been added to the container, the inventory type is set for the container and can no longer be changed. However, a shipment may have both unavailable and available containers.
If inventory is from unavailable inventory, the shipped quantity cannot exceed the unavailable stock. If the system is configured to use sub-buckets, then the sub-bucket associated to the reason codes which are for unavailable inventory will be displayed. The sub-bucket will be updated as the unavailable inventory is updated.
When a container is set up to use unavailable inventory, a reason code must first be selected before being able to add or edit an item in the container. The reason code is selected on the header part of the screen. Containers that are set up to use available inventory will not use reason codes. The reason code selected will be applied to all newly added items until it is changed to a different reason, in which case the newly changed reason will be added to the subsequent newly added items.
For containers with available inventory type, scanning or entering an item in the scan bar will navigate you to the Item Detail screen for the item or remain in the same screen (depending on the User preference set). Quantity may be updated, depending on the scan mode. If the user scans the Item ID of a UIN item or if the user scans a UIN, the user will be taken to the UIN tab of the Item Detail screen. You can also edit/update the ship quantity from this screen.
For containers with unavailable inventory type, scanning or entering an item in the scan bar will always navigate you to the Item Detail screen for the item irrespective of the User preference set. The quantity can be updated from the Item Detail screen unlike containers with available inventory type.
In the header of the screen, the currently selected transfer document will display. When first entering the container, No Document will be displayed. You will need special permissions to add items without selecting a document. Access the active documents by tapping this link which to take you to the Select Document screen.
Next to each item, the UIN icon will display if the UINs have been associated to the item.
The ellipsis in the lower right hand corner will access the footer menu which will contain all the functions that can be performed on a container.
Save: Saves the container in In Progress status to be completed later. This option is only available when the screen is in edit mode.
Print: Opens the print dialog and allows you to select formats and print various reports and container labels. The Transfer Shipment Container report will be available on this screen.
Print Tickets: Opens the Print Tickets dialog to print the tickets or labels for the current container items. This is described in common usage chapter with more details.
Delete: Marks the container to Canceled status. This option will only be available for containers that are in a New or In Progress status.
Cancel: Exits the container and changes made in that session will not be saved. This screen is only available when the screen is in edit mode.
Back: Returns to the previous screen. This option is only available when the container is view only.
Footer Buttons
Adjust: Reopens a container in Completed status and moves it back to In Progress.
Confirm: Moves the container in an In Progress status to Completed.
Transfer Shipment Items Screen (without Container)
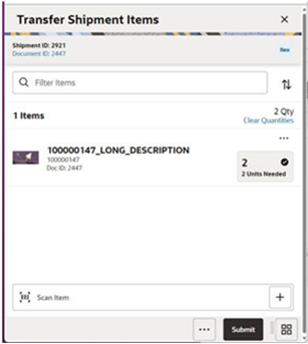
The Transfer Shipment Items screen is used to add items within a shipment without container.
There are several functions you can perform on this screen. Some of the features include:
- Add items from transfer documents or add loose items.
- Submit/Dispatch the shipment.
The shipment can be created with or without referencing a transfer document. The items within a container have to be shipped either from available inventory or from unavailable inventory.
When a shipment is created but not yet completed, the shipment will display a status of In Progress. The transfer reserved bucket will update the moment the shipment is saved for on the fly shipments. If the item is from a request, reservation must have happened at the time of approval of the request. Any new additions or deletions of items and quantities will be updated to the approved document. It will also update the In Shipping quantity in the document. When the shipment is dispatched, the saved quantity in the transfer reserved bucket will be removed. This will keep the inventory accurate.
The item image for the line items is displayed per the configuration. Line items appear in a list and selecting a line item will navigate to the item details of the item. Scrolling in the list of items on the left will display a filter. The filter can be used to narrow down the list of items. Filtering can occur by Item ID, Description, Document ID, and Reason Code.
If the Non-Inventory indicator of the item is set to No, the SOH of the item is updated at the completion of the transaction.
If the Non-Inventory indicator of the item is set to Yes, the item can be added to the transaction however the SOH will not be updated on the confirmation/completion of the transaction. That is, the item can be scanned/added to the transaction, and you will be able to enter/update quantity just like a normal (inventory enabled) item. All the processing rules and validations that apply to inventory-enabled items will apply for non-inventoried items too except that the validations done on quantity against SOH will be ignored. On dispatch, the SOH of the item will not be updated since the application does not preserve the inventory details of the items with the Non-Inventory indicator set to Yes. Publishing of non-inventory items can be restricted depending on the administration integration settings.
Inventory Type of items (Available or Unavailable) in the shipment is held at a header level. This means that all items must be for the same inventory type, there cannot be a mixture. Once items from a transfer have been added to the shipment, the inventory type is set and can no longer be changed.
If inventory is from unavailable inventory, the shipped quantity cannot exceed the unavailable stock. If the system is configured to use sub-buckets, then the sub-bucket associated to the reason codes which are for unavailable inventory will be displayed. The sub-bucket will be updated as the unavailable inventory is updated.
When a shipment is set up to use unavailable inventory, a reason code must first be selected before being able to add or edit an item in the shipment. The reason code is selected on the header part of the screen. Shipments that are set up to use available inventory will not use reason codes. The reason code selected will be applied to all newly added items until it is changed to a different reason, in which the newly changed reason will be added to the subsequent newly added items.
For shipments with available inventory type, scanning or entering an item in the scan bar will navigate you to the Item Detail screen for the item or remain in the same screen (depending on the User preference set). Quantity may be updated, depending on the scan mode. If the user scans the Item ID of a UIN item or if the user scans a UIN, the user will be taken to the UIN tab of the Item Detail screen. You can also edit/update the ship quantity from this screen.
For shipments with unavailable inventory type, scanning or entering an item in the scan bar will always navigate you to the Item Detail screen for the item irrespective of the User preference set. The quantity can be updated from the Item Detail screen unlike containers with available inventory type.
In the header of the screen, the currently selected transfer document will display. When first entering the shipment, No Document will be displayed. You will need special permissions to add items without selecting a document. Access the active documents by tapping this link which to take you to the Select Document screen.
Next to each item, the UIN icon will display if the UINs have been associated to the item.
The ellipsis in the lower right hand corner will access the footer menu which will contain all the functions that can be performed on a container.
Footer Menu
Info: Info will access the Info screen.
Shipment Info: Accesses the Shipment Info screen.
Notes: Accesses the notes common dialog to capture notes.
Save and Exit: Saves the shipment in In Progress status to be completed later and exit the screen. This option is only available when the screen is in edit mode.
Bill of Lading: This menu option will allow the user to view/enter the shipment information for the carrier and other details.
Cancel Submit: This menu option will move the shipment back to a state that allows edits.
External Printing: This menu option will allow the user to set the printer to use for the user session when automatically generating specific manifesting documents.
Print: Opens the print dialog and allows you to select formats and print various reports and container labels. The Transfer Shipment and BOL report will be available on this screen.
Delete: Marks the shipment to Canceled status. This option will only be available for shipments that are in a New or In Progress status.
Cancel: Exits the shipment and changes made in that session will not be saved. This screen is only available when the screen is in edit mode.
Back: Returns to the previous screen. This option is only available when the shipment is view only.
Footer Buttons
Submit: Submit will perform validations for In Progress shipments including excluded store validation and lock the shipment for additional edits. The shipment will be ready for dispatch. This menu option will only be available when the store parameter Transfer Shipment Dispatch Validate is set equal to Ship Submit. Validations to check if the destination is a closed store for the sending store, mandatory check on CFAs, Context Type, and so on, will happen here. The process to start obtaining Fiscal Document ID also happens at this point, if configured.
Dispatch: Dispatch will perform validations including excluded store validation and post transactions to finalize the shipment and no further changes are allowed. Validations to check if the destination is a closed store for the sending store, mandatory check on CFAs, Context Type, Fiscal Document ID, and so on, will happen here.
Item Detail (Quantity) Screen
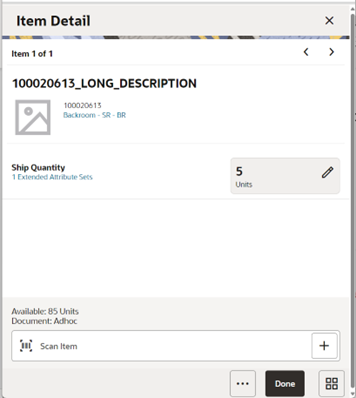
The Item Detail screen is the screen used when selecting or scanning an item from the Container Items screen or from the Transfer Shipment screen when not using a container. This screen allows the user to add ship quantity for an item. Scanning or entering an item on this screen in the scan bar will update the ship quantity per the scan mode and refresh the Item Detail screen for the item and quantity scanned. The quantity can be edited and updated manually if permissions allow.
Items with Non-Inventory Indicator set to Yes are also allowed to be in the transaction and you can enter ship quantity for these items.
If the user scans the Item ID of a UIN item or if the user scans a UIN, the user will be taken to the UIN tab of the Item Detail screen.
The item information including the image which is system configured to display in the header. The screen contains information fields of inventory qty, remaining qty, document qty, and reason code (for unavailable inventory only) pertaining to the bucket that the stock is coming from. Lastly, the details of the last scanned barcode will be displayed at the top.
For containers with inventory type of Unavailable, if the same item has to be shipped using multiple reason codes/sub-buckets, you can do it all from the same Item Detail screen.
Pack size can be edited from this screen.
The footer menu (ellipsis button) contains options to Edit pack size, View Locations, and Delete. Page through the existing items in the container view using the arrows on the top.
There is also a UIN tab to take you to the UIN screen to add and remove UINs for UIN items.
For UIN items, in order to add UIN details, the UIN screen is accessed by selecting the Ship Quantity field for the item from the Item Detail screen.
There is also an Extended Attributes link that enables the user to view/capture Extended Attributes for the item if the item is not configured to capture extended attributes.
Select Document Screen
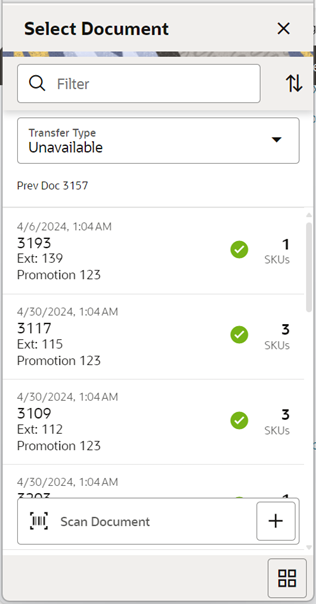
The Select Document screen is used for adding items to ship into the container or shipment without containers. Access this screen by tapping the Document ID in the header bar of the Container Items screen for shipments with containers or from the Transfer Shipment screen for shipments without containers. If there are no approved documents to display, the list will be empty.
The documents displayed on the screen is based on the Transfer Type (Available or Unavailable) selected in this screen (header) or in the Info screen. The default will be to display documents with the inventory type set to available.
Additionally, if you have placed a hierarchy restriction using the Limit Item To drop-downs on the Info screen, only those documents with items matching the criteria will display. This will happen once the restriction is set by adding the first item. If the no items have been added yet, all documents will be displayed for the appropriate transfer type.
Scanning or entering a document ID on this screen in the scan bar will display the Document Options popup if any are found. The filter can be used to narrow down the list of documents. Filtering can occur by Document ID, External ID, Customer Order ID, Fulfillment Order ID, Context type, and Context value.
The documents are grouped by documents with remaining quantity and documents with no remaining quantity. The documents are sorted by Not After Date and then Doc ID based on the group they fall into (remaining versus no remaining). If the Not After Date is blank, the document should display on the bottom of each of the groups they fall into.
The following icons will be displayed to indicate the status:
- Green circle with check indicates the document has remaining quantities.
- Orange triangle with exclamation point indicates the document has no remaining quantities.
Options to Add to Container
You can select an approved transfer document and have different options to apply the items. In the Container Items screen or Transfer Shipment screen, any items added manually will be added to the adhoc transfer document. If you do not want to add the items from a transfer, select No Document from this screen to clear out the document selection. Items added manually will be added to the Ad Hoc transfer if no document is selected. Adding loose items to a container is only allowed for Containers set up for Available inventory.
- Apply Item(s): The items are pre-filled in the container/shipment without quantities.
- Apply Item(s) & Quantity: The items with their remaining quantity are added into the container/shipment.
- Use Document: Manually add the items to the container/shipment validating against the selected document. You are prompted when an item does not exist on the document. If not, you may or may not have the ability to add to the container or to the selected document.
Once the document and items are selected, the document ID is populated in the header of the Container Items screen or Transfer Shipment screen as well as next to each item added to the container/shipment. There are various permissions that will control which options you can perform.
The No Document button is used to clear the selected document. You need special permissions to use this button. Any items added when No Document is selected, will be added to an ad hoc transfer created for the entire shipment for any unexpected items not associated with an existing transfer. The button will not be available when the container has been set up to pull items from unavailable inventory buckets since a pre-created transfer document is required.
Info (Container) Screen
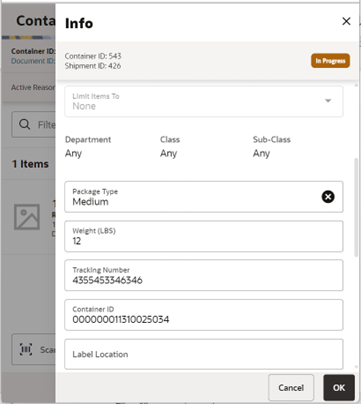
The Info screen is used to enter details for the container including transportation details. You navigate to this screen from the footer menu on the Container items screen or from the Transfer Shipment screen. Details will include: ID, Transfer Type, Container ID, Package Type, Weight, Tracking ID, and Container Restriction by Hierarchy.
The inventory status and the container restriction by hierarchy will be locked down once the first item has been added to the container.
Limit Items to (Hierarchy Restriction)
If you want to set up the container/shipment (without container) to restrict to hold the same type of items, you can restrict by department, class, and subclass. You do not select the actual department, but set the hierarchy level to restrict by. When the first item is added to the container/shipment (without container), the department, class, and/or subclass is set for the container/shipment (without container) based on the hierarchy the item is part of. Any items added subsequently must match the hierarchy of the first item. For example, if the restriction was set up to limit items to the same department and the first item added was for the Women's Department, only items that match the Women's Department can be added to the container, but it will not matter which class and subclass the item is in since the hierarchy level is set at Department.
The hierarchy level is auto defaulted depending on the permission you have been given.
If manifesting has been configured, the package type and weight may be required by the carrier selected for the shipment before you can confirm the container/dispatching the shipment (without container).
The screen also displays the list of CFAs (flexible attributes) that have been set up for Transfer shipment containers, in the desktop application and lets you enter values for them. The CFAs that are set up as Required must have a value entered for it before confirming the container. The value can be one of the following: Date, Text, Decimal, or Long depending on the data type set up for the CFAs, while creating them in the desktop application. Appropriate security permission is needed and the container/shipment must be in editable state for entering CFA values.
The Info screen also displays read-only information such as ID, Container ID, Shipment ID, Status, Destination Type and Destination, list of transfer documents that have been added, Create Date, Create User, Update, Update User, Approve Date, and Approve User.
For transfer shipments without container, the ID, Status, Container ID, Create Date, Create User, Update, Update User, Approve Date, and Approve User fields are not displayed.
MAF Access Permissions
Currently, permissions in the system are used generically to control both MAF and Jet Mobile. This prevents a retailer from giving access to some users to use only MAF in some stores, while other users will only run a Jet feature in other stores.
This update will be adding permissions to separate the Access of Functional areas for MAF and Jet Mobile. The following rules will be going into effect:
-
All of the existing Access <functional area> permissions will pertain only to Jet mobile and Jet desktop, that is, Access Inventory Adjustments will allow a user to access inventory adjustments on Jet Mobile and Jet Desktop. The user will have Inventory Adjustments on the Quick Actions and the drawer menu.
Those permissions for dialogs that do not exist in Jet desktop or Jet Mobile will be removed until those dialogs have been added.
- The new Access <functional area> MAF permission will exist to restrict each functional area on MAF:
- The user must have this Access <functional area> MAF permission to access the functional area on MAF. It will not look at the old permission, Access <functional area>; that will be used now for Jet Mobile and Jet desktop.
- This will apply to displaying the functional area menu option in the drawer on MAF.
- It also applies to displaying the transaction on Open Transactions on MAF.
Note:
Those roles that have been configured with Access to <functional area> will automatically be updated to Access to <functional area> MAF so no need for the retailer to reconfigure MAF permissions.
| Permission | Topic | Usage |
|---|---|---|
| Access Item Lookup MAF | Admin | With this permission, the user will have access to the Item Lookup functionality on MAF mobile. |
| Access Supplier Lookup MAF | With this permission, the user will have access to Supplier Lookup supplier lookup functionality on MAF mobile. | |
| Access Container Lookup MAF | Admin | With this permission, the user will have access to the Container Lookup functionality on MAF mobile. |
| Access Inventory Adjustment MAF | Admin | With this permission, the user will have access to Inventory Adjustments on MAF mobile. |
| Access Item Basket MAF | Admin | With this permission, the user will have access to Item Baskets on MAF mobile. |
| Access Store Orders MAF | Admin | With this permission, the user will have access to Store Orders on MAF mobile. |
| Access Stock Counts MAF | Admin | With this permission, the user will have access to Stock Counts on MAF mobile. |
| Access Shelf Replenishment MAF | Admin | With this permission, the user will have access to Shelf Replenishment on MAF mobile. |
| Access Shelf Adjustment MAF | Admin | With this permission, the user will have access to Shelf Adjustments on MAF mobile. |
| Access Scan List MAF | Admin | With this permission, the user will have access to Scan Lists on MAF mobile. |
| Access Quick Receiving MAF | Admin | With this permission, the user will have access to Quick Receiving on MAF mobile. |
| Access Transfer Receiving MAF | Admin | With this permission, the user will have access to Transfer Receiving on MAF mobile. |
| Access Shipment MAF | Admin | With this permission, the user will have access to Transfer Shipments on MAF mobile. |
| Access Transfer MAF | Admin | With this permission, the user will have access to Transfers on MAF mobile. |
| Access Transfer Request MAF | Admin | With this permission, the user will have access to Transfer Requests on MAF mobile. |
| Access RTV MAF | Admin | With this permission, the user will have access to RTVs on MAF mobile. |
| Access RTV Shipment MAF | Admin | With this permission, the user will have access to RTV Shipments on MAF mobile. |
| Access DSD Receiving MAF | Admin | With this permission, the user will have access to DSD Receiving on MAF mobile. |
| Access Purchase Order MAF | Admin | With this permission, the user will have access to Purchase Orders on MAF mobile. |
| Access Customer Order MAF | Admin | With this permission, the user will have access to Customer Orders on MAF mobile. |
| Access Customer Order Delivery MAF | Admin | With this permission, the user will have access to Customer Order Deliveries on MAF mobile. |
| Access Customer Order Pick MAF | Admin | With this permission, the user will have access to Customer Order Picks on MAF mobile. |
| Access Customer Order Reverse Pick MAF | Admin | With this permission, the user will have access to Customer Order Reverse Picks on MAF mobile. |
| Access Print Item MAF | Admin | With this permission, the user will have access to the ticket printing dialog on MAF mobile. |
E*Waybill
To enable different documents to be created in the Fiscal Document Generator (FDG) by country, this release of SIOCS will be enhanced with a store-level parameter where the retailer can configure the document type. This is an open description field, so in the future, it will be easy to add document types that FDG will support.
Store Parameter
Fiscal Document Doc Type
- Free text
- There are two codes that are currently integrated that will trigger special workflow in downstream systems:
- WBL - waybill
- NFE - Brazil fiscal document
- The value is case sensitive.
- This parameter will be included in the Store Admin Default as well.
POM Integration
Process Orchestration and Monitoring (POM) is a user interface which allows the user to schedule, track, and manage batch jobs. It uses REST APIs to trigger and get status of the batch jobs.
From this release of SIOCS, POM can be enabled for new customer environments. Existing customers should submit a Service Request on My Oracle Support (MOS) to enable POM. With this additional feature, existing customers could choose to migrate to POM or use EICS job-admin to manage batch jobs. After migrating to POM, it is not possible to move back to EICS job admin to manage batch jobs.
REST Services
Similar to prior releases, SIOCS has added new REST services. In this release, the following services have been added:
- Product Group - This service allows retailers to execute the same business functionality as the UI.
- Shipping - This service allows access to supporting data (such as reason codes) in order to do shipping functionality (such as vendor shipments).
- Vendor Shipments - This service allows retailers to execute the same business functionality the UI provides.
- Notifications - This service allows the retailer to send notifications into SIOCS.
Note:
These services are not meant for initial data load. Data seeding integration jobs exist for the initial data load.